

Page 1

Front CoverBack Cover
Page 2
A. Introduction A-01
GP S wa tch combi nes perso nal train ing and
na vigat ion fun cti on s into one co mp act wri st
com puter. It is amo ng the wor ld’s smalles t of its
ki nd a nd y et f ul ly w ater resi stanc e. I t ca n
wit hstand immersion in 30 meters of water. The
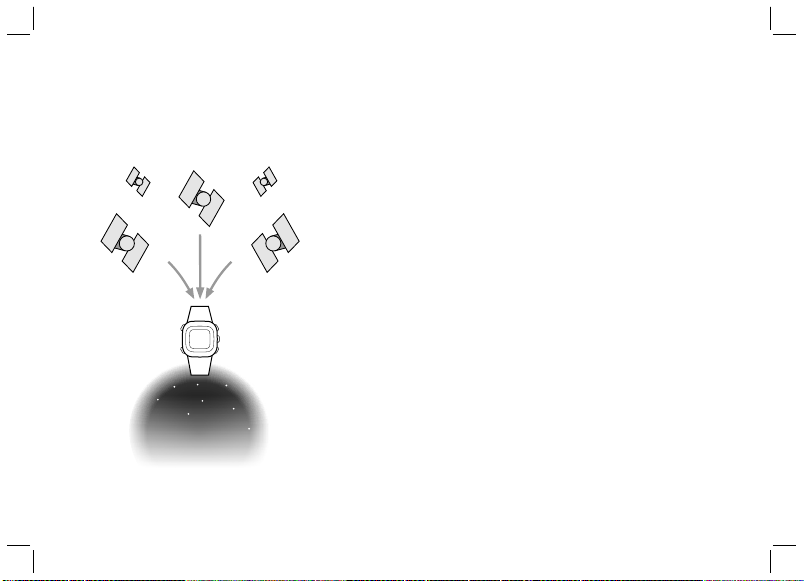
GPS naviga tion fu nction loca tes and tracks y our
pos ition w herever you go. GPS watch is power ed
by a hig hly sensi tiv e ch ip t hat tra cks you r
pos ition even at wea k signal condition . It can be
ado pted for various kind s of out door activiti es
suc h as Jogg ing, Running, Bik ing, Hiki ng, Skiing,
Sai ling, hu nting, etc.
Thi s pack age comes with a digitall y coded Heart
Rat e Monitor (HRM) chest strap and a USB
de di ca te d ca ble . The H RM l is te ns to yo ur
phy sical condition and giv es you warni ng relia bly
as you do your workout. The USB clip cable
all ows fas t batte ry char ging an d data transfe r to
and from PC in a snap. Data transfer is done by
GPS Mas ter. It is a PC soft ware that assists you
wit h your workout analysis, route planning and
tra ining summary repo rting. It is a helpful partner
tha t accomp anies yo u to ex plore yo ur physica l
lim its and beyon d.
Sat ellit e
Sig nal
Sat ellit e
Sig nal
NAV
Master
Sat ellit e
Sig nal
Page 3

A. Introduction: Warnings and Cautions
A-02
WARNING !
Make sur e tha t yo u ful ly u nderstan d th e fun ctions and limi tations of this
prod uct be fore u sing it.
The perfo rmanc e of thi s produ ct, li ke most Globa l Posi tionin g Syst em
equi pment, depen ds on the sate llites which are oper ated by t he U nited States
gove rnment. The above satelli te sys tem m ay be subjec t to change which could
affec t the accur acy an d perf ormance of t his p roduct and a ll GPS equip ment.
This pr oduct is an assis tant device fo r n avigati on, and it is NOT a substit ute
for gettin g the navig ating informa tion f rom ch arts, maps, observ ations and
expe rienced navig ators. DO NOT use this p roduct for t he navi gation that
requ ires p recise naviga tion o r is devoted to vital matters .
This Wa tch and Ch est Strap i s a supple mentary d evice for m easurin g heart
rate ; it is NO T a subs titute for med ical device s. You sho uld periodi cally
comp are the heart rate read ings acquire d by thi s w atch and Chest Strap wi th
the readin gs fro m a doctor.
Cons ult a doc tor or tr ainer be fore set ting your Upper a nd Lower heart ra te
limi ts.
This pr oduct set, l ike most ele ctronic or ma gnetic dev ices that ma y interfer e
with p acemaker. W hile it is sa fe for pati ents with p acemaker s to check w ith
thei r doct ors be fore using this p roduct set.
In cas e, there is d oubt about the direc tions and po sitions o f the way of th e
na viga tion , con sult the p ark a dmin ist rati on of fice bef ore s tart ing t he
navi gation.
DO NOT ex pose y our w atch t o extr eme ho t or extrem e cold situa tion.
DO NOT use this Watch and Chest Strap for comme rcial or p rofessio nal
purp oses.
DO NOT c harge or co nnect the u nit wi th th e USB clip when it i s wet. Wipe dry
and air dry be fore u sing.
Alth ough this uni t is water resi stance, yo u c annot wear i t for swimmi ng. The
GPS and chest strap heart rate function do not wo rk un der wa ter.
CAUTION
This produc t can only locate positi ons in
an outdoo r env ironmen t or open area. The
more ope n th e a rea is, the more accur ate
and fa ster info rmation i t c an collec t t o
loca te th e pos ition.
The fi rst posit ion can be loc ated with in 1
minu te at co ld start , and 10 s econds for
hot start .
To use workou t and n avigati on fun ctions
with GPS, tu rn on the G PS recei ver and
ge t the pos itio n upd ate d bef ore hand .
Othe rwise, the G PS rela ted fe atures are
no t wor king acco rdi ng to the curr ent
situ ation as the rec eiver co llects s atelli te
data con stantly as long as the GPS o f th e
watc h is on.
The Alt itude is taken at Mean Sea Level
in meter/ feet.
Rins e and wash the C hest stra p with tap
wate r and wipe your it d ry af ter e ach us e.
DO NO T t ake hear t rate me asureme nt
when divi ng or under wate r.
DO NOT use hand cream on the skin that
is i n con tact with the s enso r; it will
insu late the re ceptio n of the sign als from
the skin to t he se nsor.
Page 4

A. Introduction: FCC Compliance Statement
Thi s devi ce complies with Par t 15 of the FCC Rules. Operation is
sub ject to the f ollowing t wo conditi ons: (1) This de vice may n ot
cau se h armful interf erence, and ( 2) T his device mu st a ccept any
FCC
Compliance
Statement
(For US)
in te rfere nce re ceive d, i nc ludin g in te rfere nce th at m ay c au se
und esired o peration.
WARNING: Changes or modificati ons to this unit not expressl y
app roved by th e party res ponsible fo r complia nce cou ld v oid
the user ’s autho rity to o perate the equipment .
NOT E: This equipment ha s been tested a nd foun d to comply
wit h the limits for a class B digital de vice, purs uant to Pa rt 15
of t he F CC R ules. T hese limi ts a re desi gned to pro vide
re asona ble pr ot ec ti on a ga in st ha rm fu l in te rf er en ce in a
res idential instal lation. This equi pment generates , uses a nd
rad iates radio frequency energ y. If it is not insta lled and used in
ac co rd an ce w it h the i ns tr uctio ns , it ma y caus e h armful
int erference to radio co mmunicati ons.
How ever, there is no guara ntee that inter ference will not occu r in a
pa rt icu la r in stall ation . If this equi pment doe s caus e ha rm ful
in te rf er ence t o ra di o or te le vision r ec eptio n, which ca n be
determined b y tur ning the equi pment off a nd on, the user is
enc ouraged to try to correct the interfe rence by one or more of the
fol lowing m easures:
Reo rient or relo cate the rece iving an tenna.
Inc rease th e s eparation between the equipmen t a nd recei ver.
Con sult the deal er or an e xperience d r adio/TV technicia n f or help.
A-03
Page 5

A. Introduction: Care and Maintenance
The wa tch is care fully de signe d and pro duced . In orde r to
CARE
MAINTENANCE
uti lize t he fea tures, it is a dvisa ble to use the watch i n
con formi ty with belo w notes:
Avoid exp osing the w atch to ex treme cond ition s for an
unr eason able time, and avoid rough us es or s evere impa cts
on the watch .
Cle an t he watch occasionally with a so ft and moist clot h.
Br ush the cli p con tac ts at t he bottom o f the watch
reg ularl y. Dirt b uildi ng up on th e s urfac e o f the c ontac t
poi nts may affect n ormal charging and data transfer.
DO NOT exp ose the wat ch to strong c hemic als s uch a s
gas oline and alco hol as they will damage th e wa tch.
Sto re t he watch in a dr y p lace when it is not in use.
Rem ove the battery from the C hest St rap whe n it will no t
be used for a lo ng time.
Rin se and wash your Ches t Strap with tap water and wipe
it dry after each use.
Do no t be nd or stretch the c ontac t st rips on t he Chest
Str ap, especially wh ile transmitting.
Und er t he envi ronment with hi gh e lectr ostat ic discharge,
the PC co nnect oper ation may n ot be maint ained . It i s
adv isabl e for users to reconnect the watc h to the PC again
unt il n ormal op erati on.
A-04
Page 6

A. Introduction
Water resistance up to 30 me ters
Heavy duty m ineral glass lens
Compact size: measurement 46x71x16 mm
and Weight 55g only.
Dual-proces sor desi gn optimizes the battery
life. The Bat tery of a fully single charge
keeps the watch running for a year without
using GPS function. Heavy usage of GPS
can last for around 8.5 hours.
Worko ut functions
5 fully customized profiles for fast workout
setup. Profiles can be configured from the
watch or throug h PC software.
3 co nfi gurable V iews (sc reens) for ea ch
profile
3 programmable fields for each view
A single workout log can have a maximum of
48,170 waypoints. If the number of workout
lo g files i ncr eas es, t he t otal num ber of
waypoints is slightly reduced. The memory of
this watch is able to k eep 120 workout logs.
Smart Lap
B-01
Heart Rate M onitor
Digitally coded 2.4GHz wireless chest strap
4 target heart rate zones
Above/In/Be low Zone timer
Audio above/In/ Below zone alert
Navigation functio ns
Total 10 paths (routes) with a maximum of
99 waypoints for each path
3 Navigation Modes: Waypoint , Forward,
Backward
Heading pointer
Current speed, distance to waypoint and
destination , es timated time of arrival
Manual and autom atic waypoint marking
(Smart Lap)
Electronic Compass
North Pole p ointer
1 degree resolu tion with 16 cardinals
Page 7
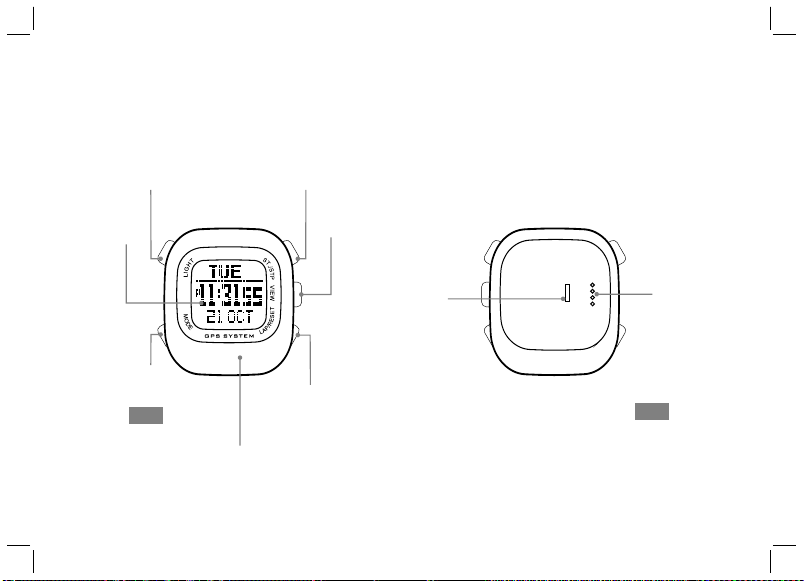
B. Unit Overview: Name of the Parts (Watch)
B-02
[E L]
Lig ht
But ton
LCD
Dis play
[M ode]
But ton
Fro nt
GPS a ntenn a locat ion – alw ays
dir ect ant enna to wards s ky for
bes t GPS rec eptio n
[ tar t/ top] S S [S/ S]
But ton
[ ]Vie w
But ton
[La p/Res et]
[L/ R]
But ton
Cli p Guidi ng
Not ch
USB C able
Con tact po ints
Bac k
Page 8
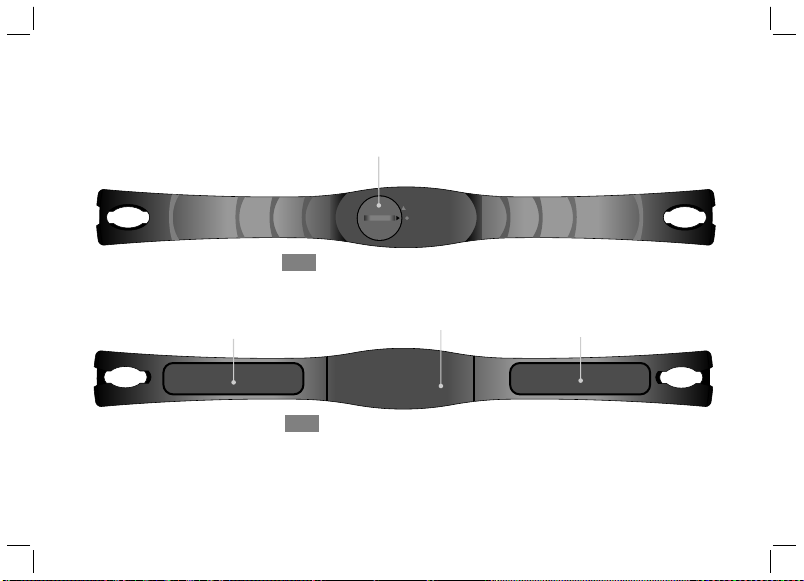
B. Unit Overview: Name of the Parts (Chest Strap)
Bat tery
Hat ch
Fro nt
Bui lt-in
Ant enna
(un derne ath
Con ducti ve Cont act Pad
Bac k
the c ase)
B-03
Con ducti ve Cont act Pad
Page 9

B. Unit Overview: Major Functions Part 4
CD RO M
GPS Wa tch
GLOBAL PO SITIO NING SY STEM
with Hear t Rate Mo nitor
OWNER'S MANUAL
Man ual
USB C able
Elas tic Be nd
B-04
CD ROM
PC applicatio n so ftwar e GPS M aster
The detail i nstru ction on how to use the watc h
Man ual
Ins truct ion on how to use the watch
Ela stic Bend
Mou nt t he Chest Strap on users chest
USB cable
To charge the batt ery of the watch
To communicate with PC
Page 10
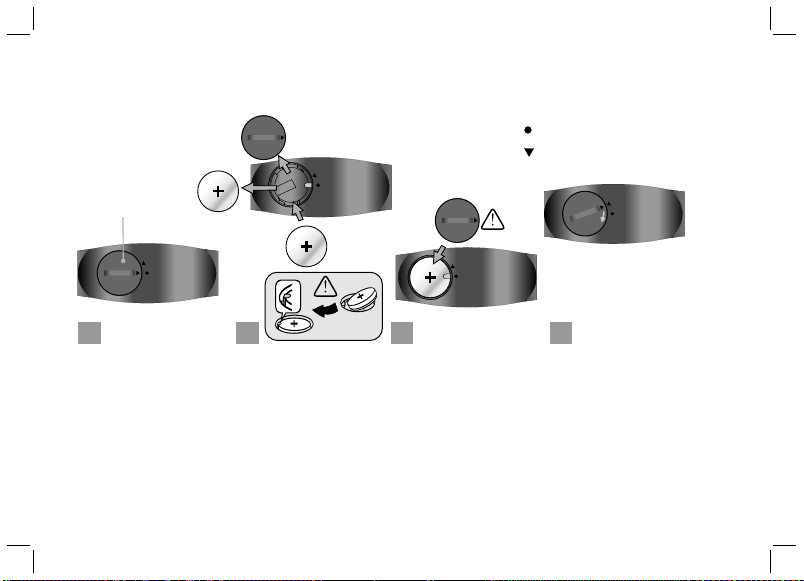
C. Setting Up: Replace Battery for the Chest Strap
Old
battery hatch
CR2032
New
CR2032
CR2032
C-01
Close position maker
Ope n position maker
1 42
Turn the ba ttery hatch
ant iclo ckwi se unti l the
ar row al igns wi th the
op en pos iti on ma rke r
(arr ow). The n tu rn one
step fur ther slightly until
the b attery h atch pop s
up.
Pu t as ide the ba tter y
hatc h. Repla ce t he old
b at t er y w it h a n ew
CR20 32 batter y wi th the
“+” si de facin g upward .
IM POR TANT: Be su re
th at t he ba tt er y s it s
b e ne a t h t he m e t al
batt ery hook .
3
Re -in sta ll the b att ery
hatc h.
IM POR TANT: Be su re
that the O- Ring i s place d
on its original posi tion
(bat tery h atch) and a ll
the su rfaces a re clean .
Turn the ba ttery hatch
cloc kwise until the a rrow
al ign s w ith th e c los e
posi tion mar ker (dot ).
Page 11
C. Setting Up: Fasten the Chest Strap on one’s chest
C-02
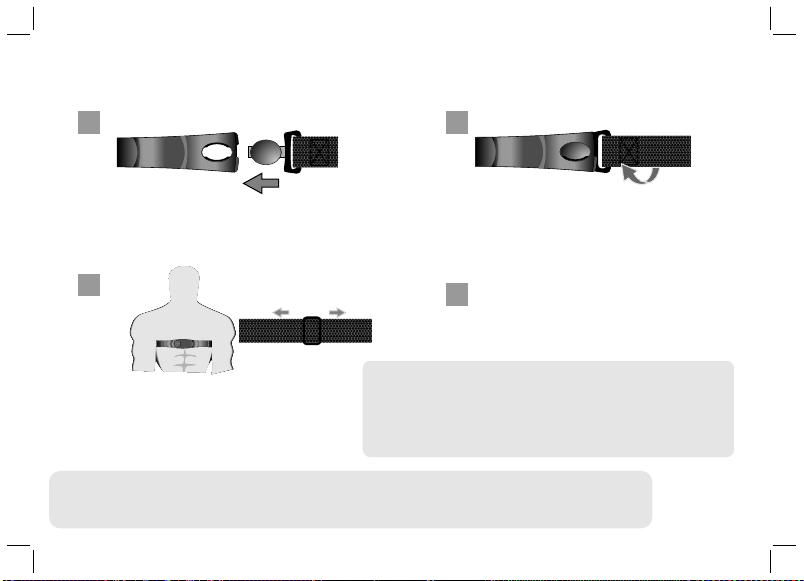
1
Inse rt th e con necter of the elas tic b and
into the ho le at the end of the chest strap.
3
Note:
Cent er t he C hest Strap again st y our chest
as h igh un der yo ur brea sts as comfort able.
Adju st the Ches t S trap wit h t he elasti c
band comfo rtably and a llow fo r norm al
brea thing.
WARNI NG:
– DO NOT ad just th e Ches t Stra p too t ight, it may hinder the blo od cir culatio n and breathi ng.
- Avoi d doin g any awkward motion during measure ment, i t may create an ina ccurate heart rate re ading.
- Wet ting the contac ts with water o r saliv a can i ncrease the con ductivit y.
- Mak e sure that th e contac ts are
measu rement
- C lean t he co ntacts occasi onally by m oist p aper t owel, and w ipe i t dry with dry paper to
remov e grease .
- Use the Chest Str ap i n a pla ce w ithin 3 meters fro m th e Wa tch, otherw ise the Watch
CANNO T receiv e the d ata from the Ch est Str ap.
2
Twist the el astic b and so that t he whol e
conn ecter is co mpletel y l odged int o t he
ches t stra p.
Lodg e t he free con nector in to the
4
othe r end of t he Ch est St rap a s Ste p
1 an d 2.
.
made firm co ntact wi th the user's skin dur ing
Page 12
C. Heart rate Monitor Function: Strap Pairing
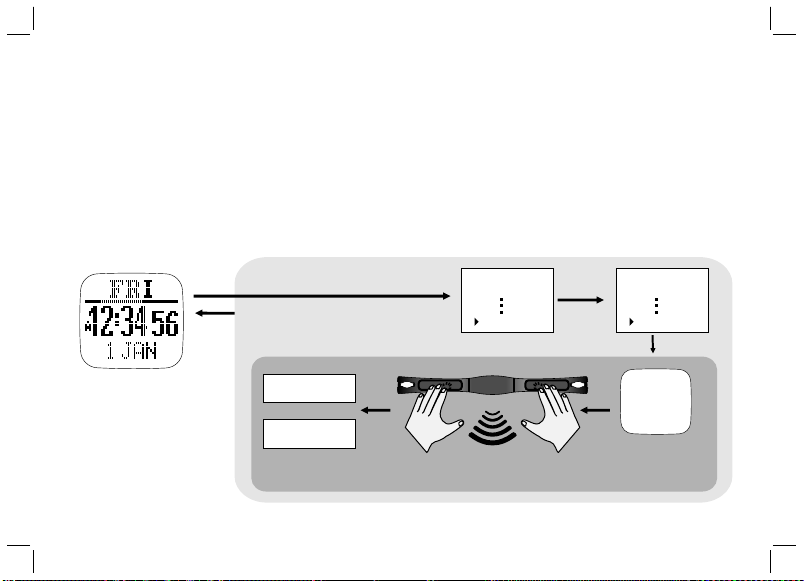
Str ap Pair ing
Eve ry Chest Strap (HRM) is assigned a uni que ID w hen it w as man ufac ture d in the f acto ry. The wa tch
has to be paired up with it before use . Thi s is to av oid in terf eren ce wit h othe r users who are using the same
equipment. Pairing has been do ne in th e fact ory. Sho uld yo u repl ace th e HRM wi th a new o ne, yo u have t o pair
the n ew strap again.
To do the p airi ng, Ho ld [M] t o go to Me nu --> H RM-- > Pair ing. T hen to uch an d hold t he 2 con duct ive pa ds on
the C hest St rap fo r a few seconds. If the pairing is succe ssful, the m essa ge “DO NE!” w ill be d ispl ayed o n the
watch.
C-03
Home time mode
Hold
[M]
[M]
DONE!
or
FAIL
Menu:
Workout
HRM
Touch t he cont acts
wit h both ha nd
[V]
HRM:
On/Off
Pairing
Paring
Chest
Strap
.....
Str ap Pair ing
Page 13
C. Charge the Battery
The w atch has bui lt-i n a rech arge able l ithi um pol ymer b atte ry. Cha rge it f or at le ast 3 ho urs if i t is goi ng to be u sed
for the f irst t ime. If th e batt ery i s emp ty, the char ging c ycle will be com pleted in l ess th an 2 h ours . If th e bat tery i s
not emp ty, t he c harg ing time will be s hort er. A q uick 15-m inut e ch argi ng m ay k eep GPS runn ing for arou nd 1 .5
hours. T he Ba tter y of a s ingl e cha rge d epen ds upon its usag e. If the GP S is n ot ac tiva ted, it can run f or ar ound a
yea r. If the GPS is ON , th e ba tter y is expe cted to r un f or a ppro xima tely 8.5 hours. Th is r echa rgea ble batt ery is
good fo r at leas t 50 0 ch argi ng cy cles . Ba tter y ga uge f unct ion is provided. The approxim ate r emai ning time left,
when working with GPS, is ca lcul ated by pu shin g the [V] b utto n onc e in T IME m ode. This only serves as a rough
est imation. The a ctua l life may v ary a s the o pera ting cond itio ns ch ange . If th e bat tery leve l is ne arly empt y, GPS
and Hear t Rate M onit or fu ncti ons wi ll be di sabl ed au toma tica lly. At th is sta ge, the wat ch can s till r un for a noth er 2
weeks with normal time keeping funct ions .
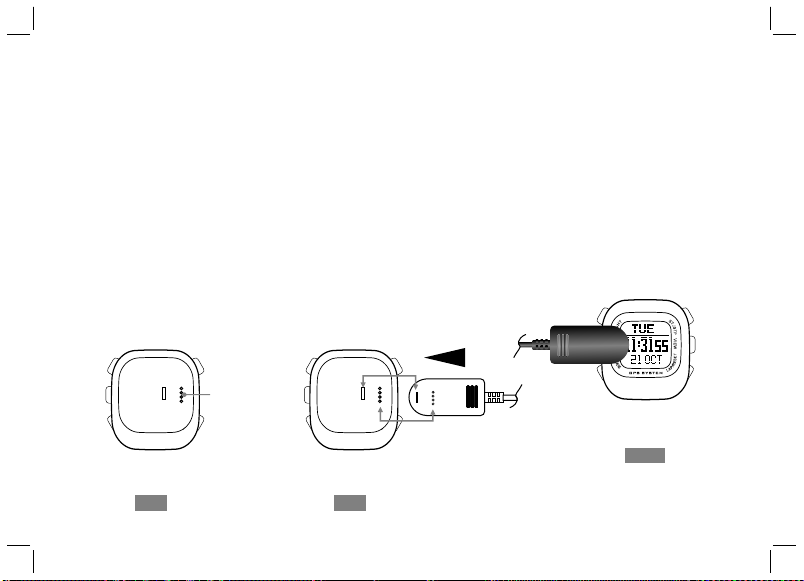
To charge the battery:
1) Align the clip guide and pin s with t he not ch and c onta cts at t he bot tom of t he wat ch
2) Ma ke sure t he clip is secured
3) Pl ug USB ca ble into any of the PC’s USB co nnec tors
USB C able
Con tacts p oint
C-04
Fro nt
Bac k
Bac k
Page 14

D. Getting Start: Glossary
Way poin t
Way poin ts ar e a set of c oord inat es that ide ntif y poi nts i n physica l spac e. Fo r the pur pose of te rres tria l
navigation, t hese coo rdin ates us uall y i nclu de longitude a nd lati tude , and some time s a ltit ude. The Waypo int
name is li mite d to 10 c hara cter s long . It ca n be nam ed or r enam ed in GP S Mas ter. Re nami ng can b e done e asil y
by just kicking and dragging on th e wayp oint n ames .
Path
Path is a c olle ctio n of way poin ts. I t can be trea ted in depe nden tly a s scat tere d waypoin ts; or l inke d in se quen tial
order ( eith er f orwa rd o r ba ckwa rd). Link ed w aypo ints form a PATH ( or ro ute) . GP S Wat ch h as 1 0 Pat hs. Each
path has a maxi mum of 99 way poin ts. Pat hs can be cre ated by La p-To-Wa ypoi nt func tion . Or they ca n be
created b y GE (Goo gle Eart h) or GMap s (Goo gle Maps ) then th ey are impo rted to th e watch t hrou gh GPS
Master. Th e Path n ame ca n be 32 ch arac ters l ong.
Wor kout l og
Aft er wo rkou t/na viga tion has started, GP S Watc h col lect s all t he in form atio n into a log . The s ampl ing interval is
controlled b y the val ues i n the Trac kLog set ting . Wor kout log s con tain : starting time and d ate, wor kout
summary, lap d etai ls, sp eed, d ista nce, H R and tr ack da ta.
Pace
PACE is comm only used by run ners to esti mate the time req uire d t o g o to a dest inat ion. It is defined as the
elapsed time need ed pe r Km / Mile . It i s ano ther inte rpre tati on of spee d but in re vers e uni t. Th e uni t of PAC E is
specified in Menu-->Settings-->S yste m-->U nits- ->Ge nera l.
E.g . if the u nit is K m and PACE is 6 th en it means t hat yo u are ru nnin g at 6 mi nute s per Ki lome ter. I t is equ ival ent
to 60 /6 => 10 KmH. If PAC E is sma ller, i t mean s that y ou are r unni ng fas ter.
Com pass be aring
Compass bea ring is eq uiva lent to a zimu th be arin g. An azimuth b eari ng u ses a ll 3 60° of a comp ass t o in dica te
direction. The com pass is numb ered clo ckwi se with nor th as 0°, east 9 0°, sout h 1 80°, and we st 270° . S o a
bearing of 42° would be northeas t and a be arin g of 200 ° woul d be sou thwe st, an d so on.
D-01
Page 15

D. Getting Start: Glossary
Lap -By-Distance (LBD)
Create a lap after the preset lap distance has reach ed
Lap -To-Wa ypoi nt (L2 WP)
Create a waypoint at the end of a selected path wh enev er a lap i s mark ed.
Col d Star t
If G PS has been susp ende d for a l ong t ime, S atel lite data collecte d earl ier a re not vali d anym ore. It takes ab out
30 seconds to collect suffi cien t sate llit e data t o loca te you r posi tion . This i s know n as the c old st art.
Hot S tart
If GPS h as bee n ter mina ted f or on ly a sh ort p erio d of ti me be fore re-s tart ing, sate llit e data is st ill v alid . It ta kes
only a few seconds to locate your po siti on. Thi s is kno wn as th e Hot st art.
GPS M aste r
GPS Master is a PC a ppli cati on sof twar e whic h is wri tten t o work w ith GP S watc h. Wor kout l og and p aths c an be
downloaded / upl oade d easi ly via the U SB cabl e. GPS Ma ster pr ovid es a much be tter me ans fo r work out
analysis, path creation and manipu lati on.
%EMHR
%EMHR = percentage of HR with resp ect to t he Est imat ed Max imum H eart R ate.
Est imated maximum HR is calcul ated a s 220 – yo ur age
Targ et HR Zo ne (Tar get Zo ne)
The r egio n of HR is w hat yo u woul d like y our ex pect ed hig hest a nd low est HR t o be dur ing ex erci se.
D-02
Page 16

D. Getting Start: Buttons Functions Summary
But tons Na mes Major Fun ctio ns
Lig ht
Mod e
ST. /STP
Pre ss to turn ON t he E L back light for about 3 s econd s
Hol d to ent er Nigh t Mode ( Pres s once t o exit)
Press to select among the functional d ispl ays
Hold to enter the setting mode
Hold to fast exit to function modes when you are s ever al lev els do wn the m enu
Press to exit setting or go back one l evel u p the me nu
Press to move forward
Press to increase watch da ta
Press to Start/Sto p work out / Ch rono grap h
D-03
VIE W
LAP /RESE T
Press to enter sub-m odes o r work out vi ews
Press to make selection/confirma tion
Hold to turn on GPS at Work out / Na viga tion M ode
Press to move backward
Press to decrease watch da ta
Press to Start/Sto p Work out / Ch rono grap h
Press to take laps in Wor kout M ode
Hold to save Wayp oint a t Navi gati on Mod e
Hold to clear workout data
Page 17

D. Getting Start: Main Function Modes
D-04
[M]
Compass
[M]
Navigation
Time mode
[M]
[M]
Workout mode
Main Function Modes
Page 18

E. Workout Mode
Workout mode records and displays your current performance. You can keep reco rds of and
rev iew you r performance as you are running or navigating in the wilderness . The workout
mod e sho ws speed, dis tance traveled, workout tim e from the start, hea rt rate and other
use fut data regardi ng your cur rent wor kout. It keeps records of your spe ed, hear t rate and
alt itude th at you can view them on a PC g raphicall y.
Workout mo de works to gether wi th t he Naviga tion mode. Start, st op, lap, GP S sh ortcut
ope rations are com mon to bot h modes. Perf orming these ac tions in either of thes e modes
has the same effect.
Abo ut the Workout Mode
The watch offers 5 a ctivity prof iles (defa ults are Running, Cycling, Hikin g, Sailing and User).
Nam e editi ng of thes e profi les can only b e done in the PC application software. Text edit ing
is quite a p ainful task if it is done by a watch which only has 4 buttons. Each profi le has 3
vie ws (or screens). Each vi ew has 3 data fie lds. Data field s can be sel ected free ly from a
lis t of fiel ds. This a llows u sers to r eview s elected f ields i n the ir own interes t. Profile
con figuratio n can a lso be done through the PC softwa re quickly. You c an sto re as m any
pro files as you want i n the PC. It s massive storag e cap acity is virtual ly no limit to th e
num ber of poss ible profi le combinati ons that you can think of.
E- 01
Page 19

E. Workout Mode
Workout mode
E- 01
How to start the Worko ut M ode
Press [M] in Tim e mode to e nter the Workou t mode
Press [S/S ] t o Start/ Stop the Worko ut. GPS and HRM funct ions are
tur ned ON a utoma tical ly a t st art if it h as n ot b een done manua lly.
Mar k La ps
P ress [L /R] to t ake Laps . Th e ma ximu m nu mber of l aps for a si ngle
workou t sess ion is 9 9.
Reset Wor kout / Navigati on
Wh en wo rkou t has been stop ped, hold [L/R ] unt il you see t he RE SET
popup mess age to reset work out/navigat ion. Thi s clea rs the curr ent
sessio n of w orko ut dat a a nd pre pare s you t o s tart a noth er new
workou t. Work out data a re rec orde d a nd stor ed automatical ly in the
memory at re set. If yo u don’ t wan t to keep it , you have to eras e it
manual ly. H ere is the key sequ ence : M enu> Wor kout > Dele te >
Del Last .
Summar y of wor kout h isto ry can b e view ed from:
Menu > Work out > Hi story.
How to change th e Workout vi ew
Pr ess [ V] to s elec t amo ng the 3 preset di spla ys. T hese 3 disp lays will
be sh own on e by one cy clicall y if the Vi ewSc an fun ctio n has bee n
select ed. Each disp lay st ays fo r abo ut 3 seco nds. To set /res et the
Vie wSca n: Menu > Work out > Vi ewSc an > On/ Off
Note: S ee n ext c hapter t o se lect the Work out prof iles , customize t he
displa y data a nd rev iew th e work out hi story.
Page 20

E. Workout Mode - GPS
Fixing with
GPS
Hold
[H]
GPS Fixed
Workout mode
E- 02
How to turn O N the GPS ma nuall y:
If GPS rece iver has been stop ped for a long time, say m ore than 2
hou rs, it is recommended to start the GP S manually, e speci ally
whe n yo u want to hav e tr ack log ging done at the beg inning of
wor kout. I t is beca use the G PS cold s tart ti me is lon g. Usually it
tak es appro ximat e h alf a minute. During the cold start period, track
inf ormat ion is n ot a vailable. y ou shou ld hav e th e G PS posi tion
upd ated beforehand . To do t his you can do e ither of the followings:
a) Menu> G PS> GP S ON or OFF (tu rn GPS O N); or S imp ly hol d
[V] for 2 se cond s at Wor kout / Navi gati on modes to t oggl e GPS
either O N or OFF .
b) Menu> G PS> Ti meou t
It can be ch osen e ither 5 or 30 m inut es. If GPS is l ost an d 30
minute s time out is sele cted , the watch w ill tr y re-loca te it po sition
via sate llit es in 30 minu tes.
GPS stat us ind icator
- When GPS i s coll ecting sa tell ite infor mati on, an “ANT ENNA ”
icon is fl ashi ng at the top r ight f or most of th e work out views .
- If GPS has a 2 D loca tion loca ted, “ GPS fixed ” mess age will po pup and it wi ll las t for a few sec onds . Icon at the t op lef t is as
shown he re.
- If more sa tell ites are ca ptur ed, GPS has a 3 D loca tion loca ted.
Icon wil l be lik e this.
- If GPS los es con tact with s atel lites and c anno t fix its pos itio n,
GPS “GPS L ost” p op- up mess age wi ll appear. I t stay s on the
LCD unti l any of t he button i s pres sed.
Page 21

E. Workout Mode - Workout Profile
Line 1
Line 2
Line 3
Workout mode
[V]
[V]
Lin e 1 and 3
- Altitude
- Calories
- Distance
- Heading
- Ave rage H eart R ate
- Max Heart Rate
- Min Heart Rate
- Current Heart Rate
- Above target zone time
- Below target zone time
- Wit hin ta rget zone time
- Lap distance
- Lap number
- Lap Tim e
- Ave rage P ace
- Maximum Pace
- Current Pace
- Ave rage S peed
- Maximum Speed
- Current Speed
- Tim e of Day
- Wor kout Ti me
E- 03
How t o sele ct Wor kout P rofi le
h Hold [M] und er a ny m ode to ente r Se ttin g M enu > Work out >
Profile s > Selec t
h Pre ss [V] to c onfi rm
How t o cust omiz e the Wo rkou t view d ata
hHold [M] und er any mod e to ente r Setting Me nu > Workout >
Profile s > C usto mize > Sel ect the desi re p rofi le > Sele ct Vi ew 1
to 3; L ine 1-3 data according to the table below.
How t o rese t to defa ult set ting
h Hold [M] und er a ny m ode to ente r Se ttin g M enu > Work out >
Profile s > Reset
Lin e 2
- Distance
- Current heart rate
- Lap distance
- Latitude & Longitude
- Ave rage P ace
- Ave rage S peed
- Current Speed
- Tim e of Day
- Wor kout Ti me
Page 22

E. Workout Mode - Workout History
How to rev iew Workou t Hist ory fr om the w atch
Hold [M] under any mode to enter Setting Menu > Wor kout > Hi story
Then the summary o f th e latest recor d will be s hown.
Vie w Work out su mmary:
Workou t d ata summa ry occup ies 3 pages. At the Top right cor ner of first page is the recor d n umber.
Cha nge the recor d number by press ing [S/S] or [L/R] butt on. The 2nd and 3rd lines are time and date
of the record . T he last line is the tota l number of laps for this workout. This page stay s f or 5 s econd s.
The n it is rep laced by t he nex t one. Pag es 1, 2 , and 3 are sho wn onc e at a time for 5 se conds
seq uenti ally. The 2nd p age sh ows wor kout t ime, distance, and aver age pa ce. The 3rd p age sh ows
cal orie cons umpti on, aver age heart ra te and aver age spee d. After sev eral cycles of display, it will go
bac k t o t he Time mode auto matic ally. If you want to take a l ook at the deta ils of indi vidua l l aps, press
[V] to go into Lap Summa ry view. When you finis h, press [M] to go back to previous menu or hold [M]
2 secon ds to g o ba ck t o the Time m ode direc tly.
Vie w Lap su mmary:
Lap sum mary con sists of 2 pag es. Reco rd number is at the top lef t whil e curre nt lap numb er is at
the top righ t c orner .Cha nge the lap numbe r b y p ressi ng [S/S] or [L/R] butt on. Like the data summ ary,
the se pag es are shown alt ernatively. P age 1 s hows l ap tim e, lap dis tance , and l ap ave rage p ace.
Pag e 2 sho ws the split time ( elaps e t ime from starting to this lap) , average heart rate for thi s l ap and
the lap spee d.
Pres s [v] t o s witc h b ack to W orko ut Summ ary view. If you fini sh, pres s [M] t o g o b ack to t he Work out
menu or ho ld [M] 2 s econ ds to go b ack to the Tim e mode d irec tly.
How to Delet e the last or A ll rec ords
Ho ld [ M] u nder any mode to e nter Setti ng M enu > Wo rkout > D elete last o ne/Delete a ll.
Press [V] to c onfir m
Not e: Num ber of Records depe nds on the size of t he Memory.
E- 04
Page 23

E. Workout Mode - Smart Lap
Smart La p is a con cept o f mar king l aps or w aypo ints a utom atic ally. You c an ma ke use o f Smar t Lap to achi eve th e
fol lowing functions:
Lap -By-Distance (LBD): Menu>Wo rkou t>S mart Lap> ByD ist
When th is func tion is turned ON, you can specify a fixed distance su ch that a new la p is mark ed
automatically wh enev er the lap di stan ce is r each ed wi th the preset tar get. You just f ocus on you r workout. It is n o
need for you to push t he la p button an ymor e. You ar e fre e to ma rk an y new l aps manually in betw een th e Lap -ByDistance period.
* If Ale rt is swi tched ON, a single beep will sou nd onc e when a n ew lap i s mark ed.
Lap -To-Wa ypoi nt (L2 WP) : Me nu> Work out> Sma rtLa p>”Lap->WP”
This is a v ery usefu l fe atur e f or creating a PATH by the watc h a lone . One o f t he 10 PATHs h as to be
dedicated for this purp ose. Thi s path is sp ecif ied in the La p->WP sett ing scr een. If th is func tion is ON , the
selected path is cl eare d at the beg inni ng of Work out/ Navi gati on. Afte r that , when ever a new la p is crea ted,
disregarding if i t is ad ded by Lap- By-D ista nce or by pus hing lap button manu ally, t he cu rren t loca tion is added as
the lat est wayp oint of t he dedi cate d pa th. The numb er o f w aypo ints allo wed is t he same as t hat defi ned in t he
regular paths.
05E-
Page 24

E. Workout Mode - Application example - Backward tracking
A typ ical application fo r this is ba ckwa rd tra ckin g. If y ou ar e goin g to ex plor e the w ilde rnes s wit hout p lanning a nd
want to return on the same path, you may:
- Set L BD to, s ay 200 m eter s, and t urn it ON: Menu>W orko ut> Smar tLap >ByDist>[ON , 200] .
Rem embe r tha t the maximum n umbe r of w aypo ints for a path is li mite d to 9 9. Se t minimu m LBD dist ance
accordingly and yet it will not exceed the limit. Way poin ts bey ond th e path l imit a re ign ored .
- Set L 2WP pa th to Pa th9, a nd tur n it ON: M enu> Wor kout >Sma rtLa p>" Lap ->WP "> [ON, P ath9 ]
- Sta rt Wor kout /Nav igat ion tr ip: Na viga tion [ S/S]
- If you want t o sto p and r etur n, th en pre ss [S /S] to stop a nd hol d [L/ R] to r eset a nd th en you are r eady t o ret urn
on th e same path.
- Turn O FF L2W P: Men u>W orko ut> Smar tLap >"Lap->WP”> [OFF ]
- Sel ect Pat h9 as th e current path for navigation. Menu>Na viga tion >Se lPat h>P ath9
- Set n avig ation mode to backward. Menu>Nav igat ion> Nav Mode >Ba ckwa rd
- On th e Navi gation-Goto screen, select the last waypoi nt of Pa th9 as t he cur rent w aypo int
- S tart Navi gati on, f ollo w th e He adin g Poi nter. The w atch will guid e you from the l ast wayp oint to th e st arti ng
point precisely.
06E-
Page 25

E. Workout Mode - TrackLog interval
5
10M in
10M in
4
Pat h
Trac k Log
Exa mple: Tr ackLo g has bee n set for 1 0Min
2
3
10M in
10M in
08
1
07E-
GPS wa tch reco rds your track c ontinuo usly. The samplin g
interv al is specifi ed by the val ue in the Trac kLog settin g.
Defaul t is 4 sec onds . It can b e set fr om 1 second to 10
minute s per po int.
How to set t he Trac kLog t ime
Under an y mode , Hold [ M]
Menu > Work out > Tr ackl og
Press [S/S] or [ L/R] t o set th e time
Note:
1% of the memory can store appr oxim atel y 4 80 poin ts.
Percen tage of me mory us ed for a work out per iod can be
estima ted a s Exp ecte d Workout T ime p er Tra ckLo g Int erva l
divide d by 480 00 tim es 100 %.
% of memo ry used = (Exp ected work out Time/Trac kLog
interv al)/ 4800 0 x 100%
Page 26

F. Navigation Function
Naviga tion m ode h as 2 sc reen s: Na viga tion and Go to sc reen . Nav igat ion s cree n gives you all th e inf orma tion
you nee d whe n you are navi gati ng to a way point. G oto s cree n all ows you t o pic k a wa ypoint f rom t he cu rren t
path.
Introducti on
GPS watc h is able to ke ep 10 p aths s imul tane ously. But y ou can w ork o n a sing le pa th at a time. T his is k nown
as the c urre nt p ath. To se lect the c urre nt pa th: Menu > Navigation > Sel Path. Ea ch pa th h as a m aximum o f
99 wa ypoi nts. Wa ypoi nts, i n a path , may or ma y not hav e rela tion ship wi th eac h other. If they have no
relati onsh ip, th is pa th is ju st a co llec tion o f sca tter ed waypoi nts. Wa ypoints c an be linke d sequ enti ally to for m
a route. You c an nav igat e up or down a li nked p ath un til the fir st or la st way poin t has been re ache d. Sel ect yo u
naviga tion m ode be fore n avig atio n
Naviga tion m odes
Ther e ar e 3 navi gati on modes: Wa ypoi nt, Forw ard, and Ba ckwa rd m odes . To p ick your desi red mode with
this key s eque nce – Me nu > Nav igat ion > Na v Mode .
Way poin t mode
The active wayp oint is t he d esti nati on. Select this mode if y ou w ant to g o to the indi vidu al w aypoint s in the
curren t path. The n, pi ck th e active wa ypoint on the Got o scr een. Thi s act ive w aypo int i s actuall y the
destin atio n.
Forwar d mode
The last way poin t is the dest inat ion. Sele ct th is m ode if yo u wa nt to nav igat e fr om t he fi rst wayp oint to th e
last one i n current p ath. P ick the nea rest w aypoint a s the activ e wayp oint o n the G oto sc reen befo re you s tar t.
If the ac tive wa ypoi nt is reac hed, it will nav igat e to the next wa ypoi nt in the pat h. This repe ats until the
destin atio n (las t wayp oint ) is rea ched.
- 01F
Page 27

F. Navigation Function
Backwa rd mod e
Th e firs t wayp oint is the d estinat ion. S elec t this mode i f you w ant to n avigate a long t he pa th in re vers e ord er.
For exa mple: from the last wayp oint to the first one on t he c urre nt p ath. Pick the near est wayp oint on the
Goto scr een be fore y ou sta rt. If the ac tive w aypo int is reac hed, i t will n avig ate you to th e prev ious w aypoint o n
the path . This rep eats u ntil t he des tina tion ( firs t waypoin t) is re ache d.
Set Waypo int ra dius
You ar e tre ated as arr ival at the acti ve waypoint whe n you f all i nto the reg ion o f the w aypo int withi n the r adiu s
set in WP R adiu s se ttin g. I t ca n be adju sted in M enu > Naviga tion > WP Radi us. The Defa ult is 3 0 me ters
(100 ft) . The range is 10m ~250 m.
02F-
Page 28

F. Navigation Function - How to navigate
Set up the p ath and navigation mode as de scrib ed before. Turn
ON GPS by Holding [V]. Or if you want to have worko ut logge d,
jus t p ress [S/S ] t o start work out. Then wait for GPS to be fixed.
Fixing with GPS
Direction
Navigation
Path
Name
Wayp oint Data View
Hold
[V]
[V]
GPS Fixed
Current
Speed
Waypoint
Destination
Workout
Data View
Waypoint
No.
Navigation
data
At the same time, you can pick the acti ve waypoint by pres sing
[V] to switc h to th e Go to scree n.
Set Activ e Way point
On the Go to scree n, brows e the waypoint s up and down on the
cur rent path with [S/S] and [ L/R] buttons. The seque nce number
of the wa ypoin t is shown at the top rig ht. The Pat h name is in
th e 2n d lin e. Ot he r det ai ls of t he w ayp oin t ar e sho wn
con secut ively in lines 3 a nd 4 ac ross 3 pa ges.
- Pa ge 1 s hows the time, dat e, and name of a waypoint. The
nam e o f the waypoint is limited to 10 chara cters lo ng. Editing o f
the wayp oint name can only be done in the PC Maste r. A
D ef au lt n am e “ Wa yp tX X” i s ass ig ne d t o a w ay po in t
aut omati cally by the watch w hen it is m arked manually or
cre ated by Smart Lap. Wh ere XX is a sequence nu mber goi ng
fro m 00 to 99.
- Page 2 sho ws the distance b etwee n the curren t position an d
the heading to this wayp oint if G PS has been fixed .
- Page 3 sh ows the latitude and longitude of this wayp oint
Pre ss [V] o nce ag ain to g o back to Na vigat ion af ter th e active
way point has been sele cted.
03F-
Page 29

F. Navigation Function
F-
04
Heading pointer
Navigation
Current
Speed
Waypoint
Destination
Workout
Data View
Fol low the head ing point er
Onc e G PS has b een fi xed, the head ing po inter starts t o
wor k. M ake sure tha t th e el ectronic comp ass has been
cal ibrat ed pr operl y (See compass c alibr ation deta ils i n the
Sys tem S ettin g cha pter) and the watch is m aintained at
hor izont al position. Til ting away from th e hori zonta l posit ion
wil l affect the accuracy of the he ading po inter. If every thing
is pro perly se t, t he point er alway s points to the ac tive
way point .
Your curr ent speed and dis tance to the acti ve w aypoi nt
fig ures are show n at the t op right of Navi gatio n s creen . Time
of Da y, Work out Time , Di stanc e to D estin ation , Es timat ed
Time to Dest inati on, and Current HR are sc rolli ng out once
at a time at the bottom line. Wh en ther e is no HR datu m, it
wil l no t b e sh own at all and this part will be skipped.
Whe n you are a pproa ching t he WP regio n of the active
way point w ithin t he preset radius, 3 beep t ones wi ll soun d.
Bee p tones w ill b e su ppres sed if the Ke y Tone setting is
tur ned OFF. If you are navigat ing wit h Forwa rd / Back ward
mod e, it direc ts you to the next way point automatically. This
pro cess repea ts u ntil you arrive a t th e final destination.
Page 30

F. Navigation Function
Navigation
05F-
How to create Waypoints or a pat h in the PC
Note: You should have G PS Master insta lled in the PC first. See the
GPS Master installation and user’s manual for d etails.
Ru n GPS Master
Ac tivate the P ath M anager ( Pat h-->Path Manage r)
Cl ick N EW on the Current Path
Locate the des ired posi tion in the em bedded Go ogle Maps
(GMAP) and le ft click the m ouse but ton. A new w aypoint is jus t
created. It is assigne d with a default name . If you want to change
this n ame, doub le click t he waypoi nt place ma rk. A dial ogue box
will app ear. You can input a meanin gful name there . The name of
waypoints is limited to 10 characters long.
Add as many poi nts as you want. Waypoints are linked
sequentially.
Click Save Path as you finish addin g waypoint s. They will save
into the Current Path table.
Clip the watch and plug in the USB cable. Then Click the “PC-
>Watch ” button in G PS Master. Path(s) in the C urrent Pa th table
will be transferred to the watch in seconds.
Ho w to St art /Sto p W orko ut ses sion an d Tak e La ps whi le
navigating
Pr ess [ S/S] to St art Wo rkout. Push [S/S] again to Stop Wo rkout
Pr ess [ L/R] to ta ke La p
Page 31

G. Compass Mode Function
01G-
obje ct D
NE
poin t A
Com pass Di recti ons
Direction
Compass Mode
N
N
W
obje ct B
SW
obje ct C
obje ct D
3158
Bea ring Di recti ons
poin t
A
Cardinal
directions
Azimuth
hori zonta l
angl es
08
1358
obje ct C
908
The Direction of a n Object
The di rect ion of an object fr om a point ca n be
spe cifie d in eith er card inal di recti on or azimuth. This
wat ch i nclud es b oth cardi nal direc tion and azimu th.
The 16 cardi nal direc tions
Cardin al d irectio ns a re the mo st comm only us ed
for ms of d irect ions. They inc lude N orth, South, East
and We st. This e lectr onic compass ha s Prima ry (NE,
NW, SE, SW) and Se condary (NNE, ENE, ESE, SSE,
SSW, WSW, WNW, NNW) Inte rCard inal direc tions as
wel l. C ardin al d irect ion is s hown at t he top left corn er.
The Azimuth
08
Azi muth is defi ned as the hor izontal an gle b etwee n
the No rth a nd t he ob ject mea sured cl ockwi se. ( The
Nor th is 0 de gree) . Azimuth is sho wn in the mid dle
rig ht.
obje ct B
Page 32

G. Compass Function - Setting
How to calib rate the comp ass
Ho ld [M ] u nder any m ode to enter setti ng mode: Menu > Settings > System >
Com pass > Calibrat e Whil e cali brati ng, tu rn the watch 360 d egree horizontally. You wil l
see th e trace of do ts forming the out line of a rec tangu lar box wh en the watch is rotat ing.
Cal ibration is done when the outl ine is filled c ompletely.
Not e: Press any key to e xit the calib ratio n w ithou t a ny chang es
How to set the magnetic declinati on of t he compa ss
Ho ld [M ] u nder any m ode to enter setti ng mode: Me nu > Settings > Syst em >
Com pass > De clinate
Press [S /S] or [L/R ] to ch ange the value
Press [V ] t o confir m
Not e: Consu lt these websites for deter mining t he decli nation a t y our loca tion.
htt p://w ww.mag netic-dec linat ion.com/
htt p://w ww.ngd c.noaa.go v/geo magmodels /Decl ination.j sp
htt p://g eomag.nrc an.gc .ca/apps/ mdcal -eng.php
02G-
Page 33

H. Heart rate Monitor Function
How t o Use He art rate Monitor (HRM)
Wor king w ith th e HRM is s impl e. Wea r the ch est st rap as m enti oned e arli er. The s trap s houl d be tur ned ON b y
its elf. At t he wat ch, pr ess [S /S] in W orko ut mod e. The w atch w ill di spla y an ico n “HR” w ith th e ches t stra p in a
cou ple of seconds. During your workou t, the H R is sto red at t he rat e as def ined i n the Tra ckLo g. Pre ss [S/ S] aga in
to st op whe n you finish workout.
How t o star t the Hea rt Rate Monitor
The re are 2 w ays to a ctiv ate th e Hear t Rate M onit or fun ctio n:
1) Under Wo rkou t mode , the He art Ra te Mon itor w ill st art au toma tica lly wh en Wor kout s tart s.
2) Hold [M] under any mode to enter the Setting mo de: Me nu > HRM > O n/Off
Heart Rate Data
Heart Rate Data
01H-
Page 34

H. Heart rate (HR) Zone
%
EMHR
Fat
Upper
Limit
Lower
Limit
Healt h
65% 75% 80%
50% 55% 65%
Aerobi cs
Burn
Abov e Zone
In Zone
Belo w Zone
Heart Rate Zone
User
User
defi ned
02H-
How to Use Tar get Heart R ate Zo ne
Settin g tar get H R zon e is v ery imp orta nt fo r your pe rson al
traini ng plan . If you are no t work ing in the ta rget zo ne, ale rt
beeps w ill s ound . You ca n adjust you r pac e of e xercise to
mainta in your HR in the targ et zone lim its. The re are 4 t arget
zone le vels: He alth, Fa t Bu rn, A erob ics and User. The limi ts o f
these zone s are s hown on the left tabl e. If t hey do not fit your
traini ng sc heme , you are f ree t o set your own t arget zone li mits
in any of th ese se ttin gs.
How to sel ect He art Ra te Zon e
Hold [M ] un der any mode to enter Setting Men u > HRM > HR
Zone > Sel ect
Select a mong H ealt h / Fat bu rn / Aerobic s / User
Press [V ] to con firm > “ Done ” will be sho wn
How to set t he HR Zo ne Lim its
H old [ M] under any m ode to en ter Sett ing M enu > HR M > HR
Zone > Cus tomi ze
Select a mong H ealt h / Fat bu rn / Aerobic s / User
Set the va lue by p ress ing [S /S] or [L/R ]
Press [V ] to con firm
How to res et all H eart R ate Zo nes
Hold [M ] un der any mode to enter Setting Men u > HRM > HR
Zone > Res etAL L
Page 35

I. PC Connection Function
Per sonal C omput er
the W atch c onnec ted
wit h the PC
01I-
Ins tall the bundl ed P C so ftwar e into your PC i n
ord er t o connect your watc h fo r da ta transfer and
mak ing use of some specia l features.
The system r equir ement s fo r th e PC ar e as
fol lows:
Penti um II 300MHz or higher
64MB Main memory or higher
20MB hard disk spac e or more
256 color mo nitor or higher
Windo w XP/VIS TA/ 7 op erati ng s ystem
CD-RO M drive
USB port
Fol low the instr uctio ns in t he G PS m aster setu p
wiz ard to instal l the p rogra m. Af ter insta llati on,
res tart your PC.
Clip the U SB cab le to th e watc h and plug th e cabl e
into the P C’s USB conn ecto r. Once c onnecte d,
"C onnecte d icon " w ill be s hown on the watch ’s
screen .
Page 36

I. PC Connection Function
How to se tup a new u ser
- Enter U ser n ame i n the
New user dialogue box
- Press ' Add'
How to sy nchronize data
bet ween the watch a nd the
PC
-O n PC s creen > Data
tra nsfer > Receive the
Watc h Data
- Wo rkout data will be
sho wn on screen
02I-
PC Sc reen
Page 37

J. Home Time Function
01J -
Dat e
Day o f week
Home time mode
Cur rent ti me
Mon th
How to set Time Of Day
GPS watc h i s able to synch ronize i ts clock with the
sat ellite's atom ic clock auto matic ally. This is done
whe never th e GPS h as fixed its position . Aut o t ime zone is
ano ther cool feature. It tries to set your curr ent time zone
acc ording t o the l ongitude. In other word s, when there i s a
sat ellite a nd the GPS is turn ed on o ccasional ly. Th e t ime is
syn chronized with the satellite ’s c lock. You don’ t n eed to
bot her adju sting the watch. The time is alway s accura te. If
the re is n o s atell ite cove rage, ma nual time setti ng is a lso
ava ilable.
Hold [M] unde r any mode to ente r Settin g Menu >
Set tings > T ime Date
Select Home Time/ Dual Tim e or Fo rmat
Time of Day Setting
GPS Update - Menu > Set tings > TimeDate >
Hom eTime > GPS Upd
GPS watch sy nchronize d the t ime with the satellit e atomic
clo ck whene ver a G PS is first fixed wh en this optio n has
bee n turned ON.
Page 38

J. Home Time Function
Time Zo ne
Men u>Se ttings>TimeDat e>Ho meTime>Tim eZone
Set time zone accor ding to your current location. It can be a djusted from +12:0 0 to -1 2:00 hours
fro m GMT i n 0.5 h our step . Or it can be s et to b e u pdate d a utoma tically by GPS. When this
opt ion is activated , GPS s ets your time zone accor ding to the longitude . It sh ould work most of
the time, bu t t here are exception s. If t he time zone set by GPS does not reflect your local ti me
cor rectly, ad just the time manually.
Man ual time setting
Men u > Settings > TimeDate > HomeTime > Man ual
Set time and date in the foll owing sequ ence:
Sec ond > M inute > Hour > Year > Month > Date
Pre ss [S/S] or [L/R] to change t he value
Dua l Ti me Setti ng
Men u > Settings > TimeDate > DualTime
Pre ss [S/S] or [L/R] to change t he value per 30 min
For mat
Men u > Settings > TimeDate > Forma t
Pre ss [S/S] or [L/R] to choose 1 2 / 24 Hour Forma t
01J -
Page 39

K. Battery life - remaining power
Rem ain
hou r
Battery Life Time
01K -
Che ck Battery life - remain ing powe r
Press [V] in Home ti me mo de > B attery
Battery life re maining ho urs w ill b e shown
Page 40

L. Timer Function
Timer mode
Time r time
Cur rent ti me
01L -
How to use Ti mer
i Press [V] in Hom e tim e mod e > Battery >
Timer
i Press [S/ S] t o start or stop
i Press [ L/R ] to reset to the preset time
i Beep sound wi ll be heard in the las t 1 0
sec onds
i Lon g b eep will be hea rd once r eaching
0:00:0 0
How to se t Timer
Hold [M] under any mode to enter Se tting Menu >
Set tings > T imer
Pre ss [S/ S] or [L/R] to change the value:
Hou r > Minute > Second
Page 41

M. Alarm Function
Ala rm
tim e
Alarm mode
Ala rm No.
Ala rm
Da y
M -
01
How to use the Alarm
Press [V] in Home time mode > Battery >
Timer > Al arm
Press [S/ S] t o select 1 - 5 Al arms
Press [ L/R ] to turn the alarm On/ O ff
How to se t t he Alarm
Hold [M] under any mode to enter Se tting Menu >
Set tings > Alarms
Alarm n o. > Hou r-> mi nute s-> On /Of f->
Dai ly/S un-S at/Mon-Fri
Press [ S/S ] or [L/R] to chang e the value
Page 42

N. Dual Time Mode
Dual Time mode
Dua l
Time
Hom e
Time
01N -
How to use Dual Ti me
P ress [V ] in Hom e time mode > Bat tery >
Timer > Ala rm > Dua l Time
How to se t Dua l Time
Ho ld [M] und er any mod e to en ter Setting Menu >
Set tings > T ime Date > D ual Time
Select Dual Time
Press [S/S] or [L/R] to change the valu e per
30 min
Page 43

O. User settings
01O -
To g et the ac curate workout data, the
use r’s data se tup is important .
Ho ld [ M] u nde r an y mo de t o enter
Set ting Menu > Setti ngs > User
Gender o r B irthD ate or Weigh t
Gen der
Press [S /S] or [L/R] to sele ct Mal e o r
fem ale
Press [M ] t o confir m
Dat e of Bi rth
Press [S /S] or [L/R ] to ch ange the value
Pres s [ V] to confirm and set the following
dat a
Year > M onth > Day
Press [M ] t o confir m
Weight
Press [S/S] or [ L/R ] to change the
val ue. Hold the bu tton to c hange the
val ue faster
Press [M] to confir m
Not e: To change t he Un it, see the
sub sequent chapter
Page 44

P. System settings
01P-
For system s etting
Ho ld [M] un der any m ode to en te r
Set ting Menu > Setti ngs > Syste m
S ou nd o r C on tra st o r U ni ts o r
Com pass or S ystem Re set
Sou nd
Select K ey Tone / C hime
Turn On/ Off
Press [M ] t o confir m
Con trast
Select f rom leve l 3 Lighter to 16 Darker
Press [M ] t o confir m
Uni ts
Select General / Latlon g
General > kg/M /km or lb/ft/ mi
Bearin g > Mi n'se c" or Decimal
Com pass
R efer to the chapt er - Compa ss
fun ction mode sett ings
Lan guage
Select l anguages
Press [V ] t o confir m
Sys tem Reset
Select N o/Yes
Press [V ] t o confir m
NOT E: Th is wi ll reset the watch to the
fac tory defau lt setting s.
All data will be cl eared .
Page 45

Q. Memory Usage
Memory Usage
04Q -
How to ch eck t he Me mory Usage
Ho ld [ M] u nd er a ny m ode to e nter
Set ting Menu > Memor y
Display
Page 46

R. Power Saving Mode
Home time mode
Hol d [L/R]
5 sec ond
Pow er Saving Mode
(LC D display turned off)
Hol d [L/R]
5 sec ond
Power Saving Mode
This Watch has a Power Saving Function which
can turn off the LCD display so that the b attery
can last longer.
While in the Power Saving Mode, the watch
function is still working normally. ( i.e. The
timekeeping function i s st ill running during the
Power Saving Mode.)
How to enter/exit the Power Saving Mode
To enter the Power Saving Mode, hold down
the [L/R] butt on in Home Time Mode f or about 5
seconds and the LCD display will be turned off.
Press [L/R] button during Po wer Saving Mode
will exit the mode and the LCD display wi ll b e
resumed.
01R -
 Loading...