

PYLE Audio PPTCM80BT User Manual
Vintage Bluetooth
Turntable Speaker System
User Manual
PPTCM80BT
1
CAUTION
RISK OF ELECTRIC SHOCK
DO NOT OPEN
CAUTION: TO REDUCE THE RISK OF ELECTRIC SHOCK, DO NOT REMOVE THE COVER (OR BACK). NO
USER-SERVICEABLE PARTS INSIDE. REFER ALL SERVICING TO QUALIFIED SERVICE PERSONNEL.
WARNING:
1. TO REDUCE THE RISK OF FIRE OR ELECTRIC SHOCK, DO NOT EXPOSE THIS UNIT TO RAIN OR MOISTURE.
2. To avoid any damage, do not force the cover into position.
CAUTION!
Visible and invisible laser radiation when open and with interlocks disabled. Avoid direct exposure to beam.
The lightning bolt with an arrowhead within a triangle indicates the presence of non-insulated
dangerous voltage within the product enclosure that may be of sufficient magnitude to constitute a risk of
electric shock to persons.
The exclamation point within a triangle indicates the presence of important operating and maintenance
(servicing) instructions in the literature accompanying the unit.
ACCESSORIES INCLUDED
1. Remote control
2. User manual
2
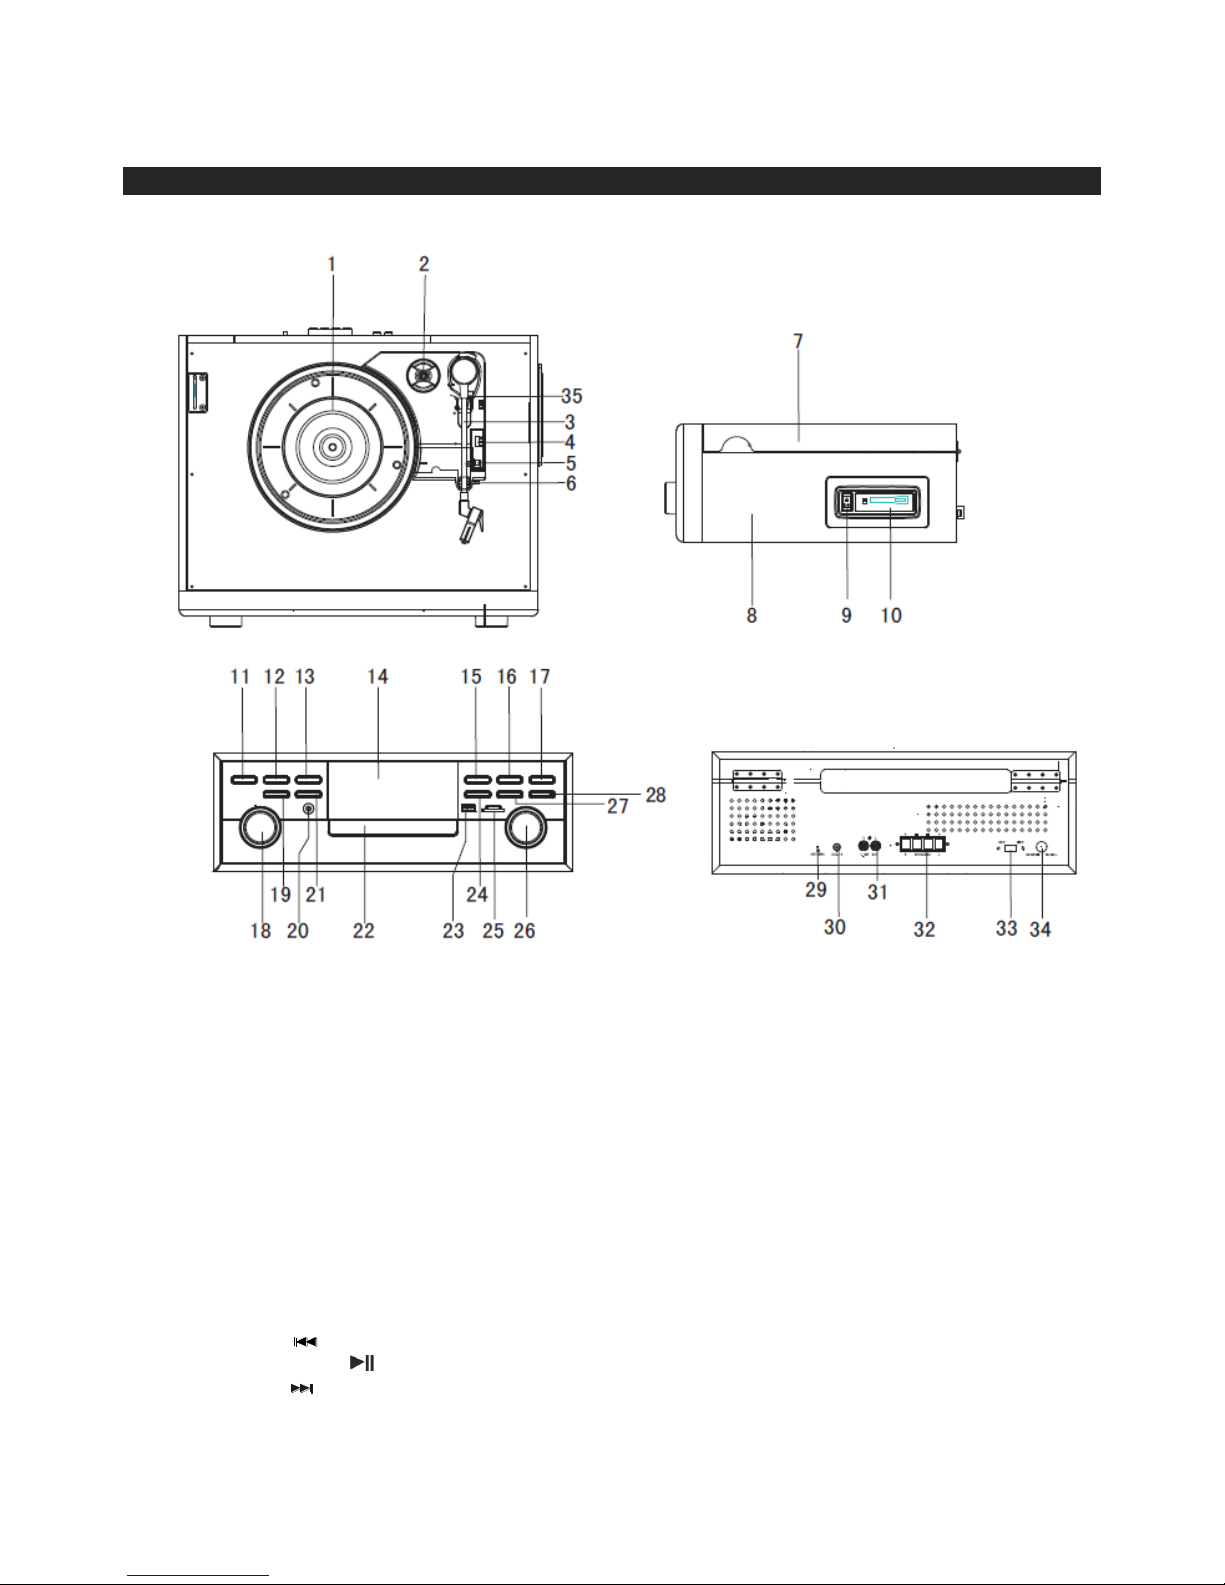
MAIN UNIT
PARTS / BUTTONS
1. Turntable platter
2. 45 rpm adapter
3. Tone arm
4. Speed selector
5. Auto-stop (ON/OFF) switch
6. Tone arm rest
7. Dust cover
8. Side panel
9. Cassette eject / Fast-forward (FF)
button
10. Cassette door
11. Power button
12. Function button
13. Bass button
14. LCD display
15. Back [ ] button
16. Play/Pause[ ] /Pair button
17. Next [ ] button
18. Tuning control knob
19. Programme/Clock set button
20. Headphone jack
21. CD door Open/Close button
22. CD door
23. USB port
24. Record button
25. SD/MMC card slot
26. Volume control
27. Stop/Band selector
28. Delete button
29. FM antenna
30. AUX-IN jack
31. RCA line-out R /L
32. External speaker terminals
33. Dual voltage switch
34. AC power cord
35. Lift lever

2
REMOTE CONTROL
Before use remote control, you have to install two “AAA” battery (not included)
1. POWER button
2. MUTE button
3. FUNCTION button
4. PLAY/PAUSE/PAIR button
5. BACK- button
6. STOP/BAND button
7. NUMBER button s
8. PROGRAM/CLOCK SET button
9. CD door OPEN/CLOSE button
10. MODE button
11. FOLDER+/MEM+ button
12. NEXT+ button
13 FOLDER-/MEM- button
14. BASS button
15. RECORD button
16. DELETE button
Remark: When the battery runs low, the distance at which the remote control will operate is greatly reduced
and you will need to replace the battery.
USING THE REMOTE CONTROL
1. To use the remote control, point it at the remote sensor and press the button gently, but firmly. Since
the remote control range is reduced when the unit is used at an angle, try to aim it directly at the
remote sensor.
2. Do not expose the remote sensor to strong light (direct sunshine or artificial light) and make sure that
there are no obstacles between the remote sensor and the remote control.
GETTING STARTED
CONNECTING THE AC POWER CORD
Remark: As this product is dual voltage 110/220V, before connecting the AC power cord, please check the
voltage at back of the unit which voltage it was set.
1. Unwind the AC power cord and connect it to a household 110V~ 60HZ or 220V~ 60HZ AC outlet.
SETTING THE TIME
1. In Standby mode, press and hold the Programme/Clock set button (19) for 3 seconds. “24 Hr” will be
displayed blinking.
2. Press the BACK/NEXT buttons (15, 17) to select the clock display format (12 hrs or 24 hrs).
Press the Programme/Clock set button (19) to confirm; the hour digits will blink. Press the
BACK/NEXT buttons (15/17) to set the hour. Press the Program/Clock set button (19) to confirm; the
minute digits will blink. Press the BACK/NEXT buttons (15/17) to set the minutes, then press the
Program/Clock set button (19) again to confirm and finish setting the time.
Note: The LCD illumination will automatically brighten for 5 seconds when you press any button in Standby
mode.
 Loading...