

Instruction Manual
10.2 TFT LCD COLOR MONITOR/DVD
PLRD102
WARNING:
HAZARD DO NOT OPERATE THIS
UNIT UNLESS VEHICLE IS PARKED
IN SAFE AND LEGAL AREA
WWW.PYLEAUDIO.COM

1
1. SPECIFICATIONS
TFT-LCD MONITOR
Screen size: 10.2 inch 16:9 TFT
Resolution: 800 (H)x600(V)
Power source : DC12V 20%
Electric current: 1.35A 20%
System: PAL/NTSC
Operation temperature: -10 -55
Storage temperature: -10 -80
Disc zone: multizone
Disc format compatible: MP3, SVCD, VCD, DVD, CD, CD-R, CD-RW,
DVD-RW, DVD-R
2 NOTICE
A.Please do not try to repair. The display screen is composed of lots
of precise electronic components. They will be broken or cracked if
disassembled or refitted. If the failure happened, please turn off the
monitor and notify distributors or us.
B. Don t let the display screen incur the pollution like dampness,
dust, steam, lampblack, etc.
C. Please don t use thinner or other chemical cleaner to wipe the
surface of the display screen. The dirt should be wiped off by using
soft cloth.
D. Keep the monitor away from extreme hot and cold locations.
E. Avoid dropping and strong impact.
3.REMINDING:
DO NOT HIT THE SCREEN, PLEASE CONNECT THE ANODE AND
CATHODE OF POWER CORRECTLY.
DANGEROUS HIGH VOLTAGE ARE PRESENT INSIDE
THE ENCLOSURE. DO NOT OPEN THE CABINET. REFER
SERVICING TO QUALIFIED PERSONNEL ONLY.
No inform available if there is any change of specification
14
ATT ACHMENT
1.MAINTAIN OF LCD
A: Do not press or touch LCD, which may cause distortion or fault.
B: Use soft cloth with a little water clean LCD.
C: Do not use oil, thinner, cleanser or anlistatig.
D: In cold or hot condition, picture may not clear, any new LCD may
has red or blue light point, 99.99% on the LCD should be without
any point but 0.01% point appeared is allowed.
Spare parts list
Item no description Q ty
1 power, A/V cable 1
2 remote control 1
3 manual 1
4 screws 1 bag
5 5M RCA cable 1
2
•
‚
ƒ
„
…
†
‡
ˆ
‰
Š
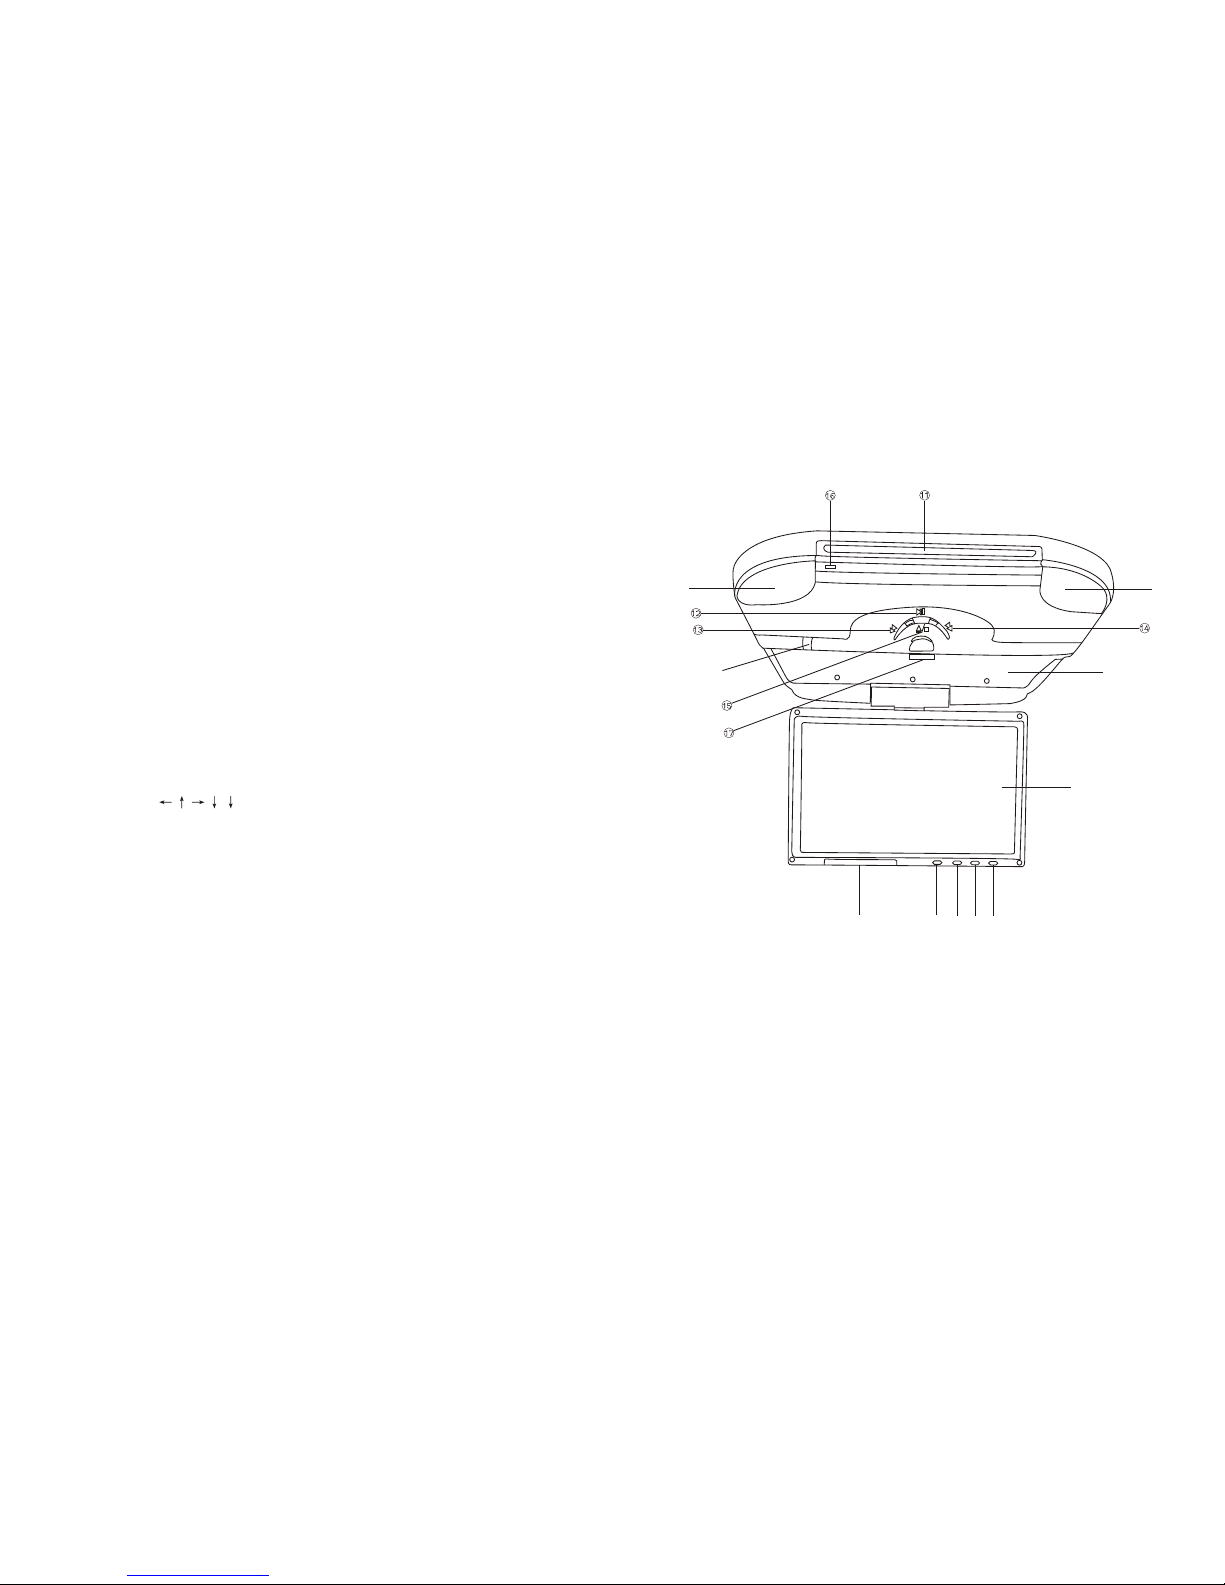
1)Power ( control display) 3) MENU
2) - 4) +
5) IR TRANSMIT 6) LCD MONITOR
7) FIX PEDESTAL 8) LAMP BUTTON
9) LEFT LAMP 10) RIGHT LAMP
11) EJECT 12) PLAY/PAUSE
13) BACKWARD 14) FAST FORWARD
15) STOP 16) DVD INDICATOR
17) OPEN
13
Attachment
1.maintain of DVD MONITOR
please use normally rotund disc. If you put in an abnormity, not rotund
disc, they will be locked by the player or can not play well.
Make sure the disc before play has no split, scratch or warp.
Do not touch the record surface ( not printed side)
Keep disc in the disc pack after playing;
Do not expose disc under direct sunlight or high temperature;
Do not stick label, write or use chemical on the surface of disc;
If you use central heating in cold weather, you may find dews on the DVD
player, which may make the unit can not work well. Then please cut off
the unit for 1 hour to make it dry and wipe the disc by dry cloth.
Shock may cause the play stop.
2.MAINTAIN OF DISC
A: some functions may not available for certain kinds of DISCS.
B: some discs may not compatible with this unit.
C: this unit can only play DVD-R/DVD-RW disc in video mode, and some
files download from computer can not be read.
D: broken, dirty or wet disc can not be read.
E: some disc recorded by personal may can not be read for the format
of recording.
F: when play MP3 format , adopt special method to playing, because of
the special MP3 format of document storage.
G: should use to choose the file when play MP3 disc,
closed by ENTER.
3.MAINTAIN OF REMOTE CONTROL
A: Do not expose it in direct sunlight or put in on the instrument board
B: Especially in summer, the high temperature there will make it distorted
C: the unit may can not receive the signal from the remote control
under direct sunlight, move it near to the unit

3
3.INSTALLATION
Use the 6 pieces of machine screws(4x20BA) , and fix the setting plate to
the place, then assembly the unit of monitor to the setting plate.
12
Fault reason resolvent
No power
red wire goes to 12v +;
black one goes to ground
connect power
correctly
Fuse Blowout
change fuse
Power line unconnected
connect correctly
to the power
No picture
no VD input
input video
No dvd signals output
reset dvd
Video lines unconnected
connect video line again
Remote
useless
battery protection
paper unload
take out the paper
Aim at wrong direction
aim at the receiver
window
No power
change battery
Distortion
Can not play
bad disc
change better disc
disc load in mistake way
re-put disc
Disc dirty
clean disc
Fast forward/ backward
Normally
BASIC TROUBLE SHOOTING
Installation

Video1 input (yellow)
BATTERY
CAR AUDIO(DVD OR VCD)
Video2 out ( yellow)
Audio L out (white)
Audio R in (red)
4
Audio R out (red)
Audio L in (white)
Wiring diagram
Step 1 : please take out power signal cable from attached bag, long
cable connect the thrum ,as per arrow direction, with screen
signal thrum insert it correctly
Step 2: connect the power correctly, red cable is anode , black cable
is cathode
Setp 3: signal cable ( 1 way) is video input,one of red cable and white cable
are left and right audio input, others are left and right output.
( please see the tag )
WIRING DIAGRAM
U/LU/L
AUDIO
STEP
MUNE
RETURN
POWER
L/R
11
1.PDVD: DVD power
2.DISPLAY: show information about disc
3.PBC: when it plays super VCD, VCD2.0, it can
show menu of the song: song 1, song 2,--- choose
number directly.
4.RESUME: memorial play
5. Inhale / eject disc
6.GOTO: set time
7.L/R: right / left channel
8.PRO-GRAM: edit
9.PLAY/PAUSE: press once, it plays or stops play;
press again , it returns.
10.STOP: stop play if press this button
11.1~10: number
12.AUDIO: mode of audio
13.STEP: press this button, it will play next picture;
press PLAY, it comes to normally mode.
14.TITLE: back to main page
15.MENU:menu
16. Next song
REMOTE CONTROL FUNCTIONS
17. Last song
18. fast forward
19. Fast backward
20.A-B: repeat play start part A to part B by press this button two times
( first press is A and the second is B), press third time, it stops repeat play.
21.RETURN: back to main menu
22.ENTER: confirm
23. : direction
24.SLOW: play slowly
25.ZOOM: zoom the picture with 4 class
26.SETUP: set
27.REPEAT: repeat play
28.VOL-: lower
29.VOL+: louder
30.ANGLE: video angle
31.SUBTITLE
32.MUTE
33.A V
34.U/L: display start up or down way
35.-: reduce
36.SEL: menu
37.+: increase
38.POWER: power of this monitor
FILTER

NTSC N720x240
Brightness
Contrast
Hue
Saturation
Language
Volume
Exit
Select
NTSC N720x240
Brightness
Contrast
Hue
Saturation
Language
Volume
Exit
Select
NTSC N720x240
Brightness
Contrast
Hue
Saturation
Language
Volume
Exit
Select
5
3) Hue
Enter into MENU, use + - buttons to adjust the picture s h ue.
can adjust the range in 0~100. this function apply to the NTSC system
only . normally, adjust the range of hug in 50.attached is the main menu.
FUNCTIONS
1)Brightness
Enter into MENU, use + - buttons to adjust the picture s b rightness,
can adjust the range in 0~100. attached is the main menu.
2) Contrast
Enter into MENU, use + - buttons to adjust the picture s
contrast . Can adjust the range in 0~100.attached is the main menu.
AUDIO OUT LT/RT
STEREO
DYNAMIC RANGE VSS
DOWN SAMPLE OFF
EXIT SETUP
AUDIO SETUP
DOWN MIX
AUDIO SETUP
DOWN MIX
AUDIO OUT
STEREO
AUDIO OUT FULL
DOWN MIX 6/8
4/8
DOWN SAMPLE 2/8
OFF
EXIT SETUP
AUDIO SETUP
DYNAMIC RANGE
AUDIO SETUP
DYNAMIC RANGE
AUDIO OUT
DOWN MIX 6/8
AUDIO OUT
DOWN MIX
DYNAMIC RANGE
48K
96K
EXIT SETUP 192K
AUDIO SETUP
DOWN SAMPLE
AUDIO SETUP
AUDIO OUT
DOWN MIX
DYNAMIC RANGE
AUDIO OUT
DOWN MIX
DYNAMIC RANGE
DOWN SAMPLE
AUDIO SETUP
EXIT SETUP
AUDIO SETUP
AUDIO OUT
DOWN MIX
DYNAMIC RANGE
DOWN SAMPLE
10
NOTICE:
A: Should use to set and ENTER to confirm your set.
B: do not change preset if unnecessary
C: if this set compatible with PAL and NTSC, it would be better
choose NTSC
D: Original password is 0000
E: part of the functions are available only under certain condition,
while some are not available right now.
Playing edit
if there are two tiles or songs above in the disc, use PRO-GRAM
button to set the order, it will show 1[--],2[--]---on the picture, so
press the number to edit the order, then you can use and
ENTER to play.

-
+ 50
Exit
Saturation
NTSC N720x240
Brightness
Contrast
Hue
Saturation
Language
Volume
Exit
Select
NTSC N720x240
Brightness
Contrast
Hue
Saturation
Language
Volume
Exit
Select
English
Deutsch
Franis
Espanol
I tal iano
Slimplified Chinese
Traditional Chinese
NTSC N720x240
Brightness
Contrast
Hue
Saturation
Language
Volume
Exit
Select
+ 50
Exit
Volume
6
4)saturation
Enter into MENU, use + - buttons to adjust the picture s saturation.
can adjust the range in 0~100.attached is the main menu.
5)Language
Enter into MENU, use + - buttons to adjust the picture s language.
Can adjust the range in 0---100.attached is the main menu.
6)V olume
N/A
LANGUAGE SETUP
OSD LANGUAGE
AUDIO LANG
SUBTITLE LANG
MENU LANG
EXIT SETUP
LANGUAGE SETUP
AUDIO LANG
OSD LANGUAGE CHINESE
ENGLISH
SUBTITLE LANG JAPAN
MENU LANG FRENCH
SPANISH
EXIT SETUP PORTUGUESE
LATIN
GERMAN
LANGUAGE SETUP
OSD LANGUAGE ENGLISH
AUDIO LANG CHINESE
SUBTITLE LANG GERMAN
MENU LANG SPANISH
FRENCH
EXIT SETUP PORTUGUESE
ITALIAN
JAPAN
LANGUAGE SETUP
LANGUAGE SETUP
SUBTITLE LANG
OSD LANGUAGE CHINESE
AUDIO LANG ENGLISH
JAPAN
MENU LANG FRENCH
SPANISH
EXIT SETUP PORTUGUESE
GERMAN
OFF
LANGUAGE SETUP
SUBTITLE LANG
LANGUAGE SETUP
MENU LANG
OSD LANGUAGE CHINESE
AUDIO LANG ENGLISH
SUBTITLE LANG JAPAN
FRENCH
SPANISH
EXIT SETUP PORTUGUESE
GERMAN
LATIN
LANGUAGE SETUP
SUBTITLE LANG
LANGUAGE SETUP
EXIT SETUP
OSD LANGUAGE
AUDIO LANG
SUBTITLE LANG
MENU LANG
LANGUAGE SETUP
EXIT SETUP
SUBTITLE LANG
AUDIO OUT
DOWN MIX
DYNAMIC RANGE
DOWN SAMPLE
EXIT
AUDIO SETUPAUDIO SETUP
SPDIF/OFF
DOWN MIX SPDIF/RAW
DYNAMIC RANGE SPDIF/PCM
DOWN SAMPLE
EXIT
AUDIO OUTAUDIO OUT
9
B: language setting
Press SETUP to set up the language , attached is the main menu and sub menu:
C: audio setting
Press SETUP to set up the audio, attached is the main menu and sub menu:
Language

NTSC N720*240
Brightness
Contrast
Hue
Saturation
Language
Volume
Exit
Select
SYSTEM SETUP
TV SYSTEM
SCREEN SAVER
TV TYPE
PASSWORD
RATING
DEF AUL T
EXIT SETUP
SYSTEM SETUP
NTSC TV SYSTE
SCREEN SAVER PAL 60
TV TYPE PAL
PASSWORD AUTO
RATING
DEF AUL T
EXIT SETUP
NTSC
SYSTEM SETUP
1MIN
TV SYSTE
SCREEN SAVER
TV TYPE 5MIN
PASSWORD 10MIN
RATING 30MIN
DEF AUL T OFF
EXIT SETUP
1MIN
SYSTEM SETUP
TV SYSTE
SCREEN SAVER
TV TYPE 4:3PS
PASSWORD 4:3LB
RATING 16:9
DEF AUL T
EXIT SETUP
SYSTEM SETUP
TV SYSTE
SCREEN SAVER
TV TYPE
PASSWORD - - - -
RATING
DEF AUL T
EXIT SETUP
SYSTEM SETUP
NO ADUL T
TV SYSTE
SCREEN SAVER
TV TYPE
PASSWORD
RATING
DEF AUL T KID SAFE
VIEW ALL
EXIT SETUP
SYSTEM SETUP
RESTORE
TV SYSTE
SCREEN SAVER
TV TYPE
PASSWORD
RATING
DEF AUL T
EXIT SETUP
RESTORE
SYSTEM SETUP
TV SYSTE
SCREEN SAVER
TV TYPE
PASSWORD
RATING
DEF AUL T
EXIT SETUP
7
8
7)Exit
Enter into MENU, use + - buttons to adjust the exit
DVD FUNCTIONS
1). DVD PLAYER
DVD reading indication light will gleam when loading DVD DISC; and
then when disc is reading the light turns to be shining.
2) PAUSE
press when playing , it will pause playing for you to see inactive
picture.
Press it again, it will go on playing.
3)STOP
Press it will stop playing
4)FAST FORWARD / BACKWARD
press to fast forward and backward when playing DVD, while
press to go on playing.
5)LAST/NEXT
press to chose last or next song by remote control.
6)TURN TO APPOINTED MENU OR TIME
press GOTO one time, will show following picture:
press on the remote control to present song, then input the number
of the song or the time you want closed by ENTER, If the number is 10
above, press 10 and then the number.
7)DVD INFO
Press DISPLAY on the remote control to display DVD information .
8)DVD player menu
Press MENU on the remote control to turn into DVD menu, as per
play menu, enter into number to choice the program.
9) DVD TITLE
Turn to DVD title by press TITLE on the remote control.
10) DVD SETTING
A: normally setting
press SETUP to preset DVD , Attached is the main menu and sub menu.
01/02 /001 001 00:00:00
present title total title present song total songs
Title Time
 Loading...