

Page 1
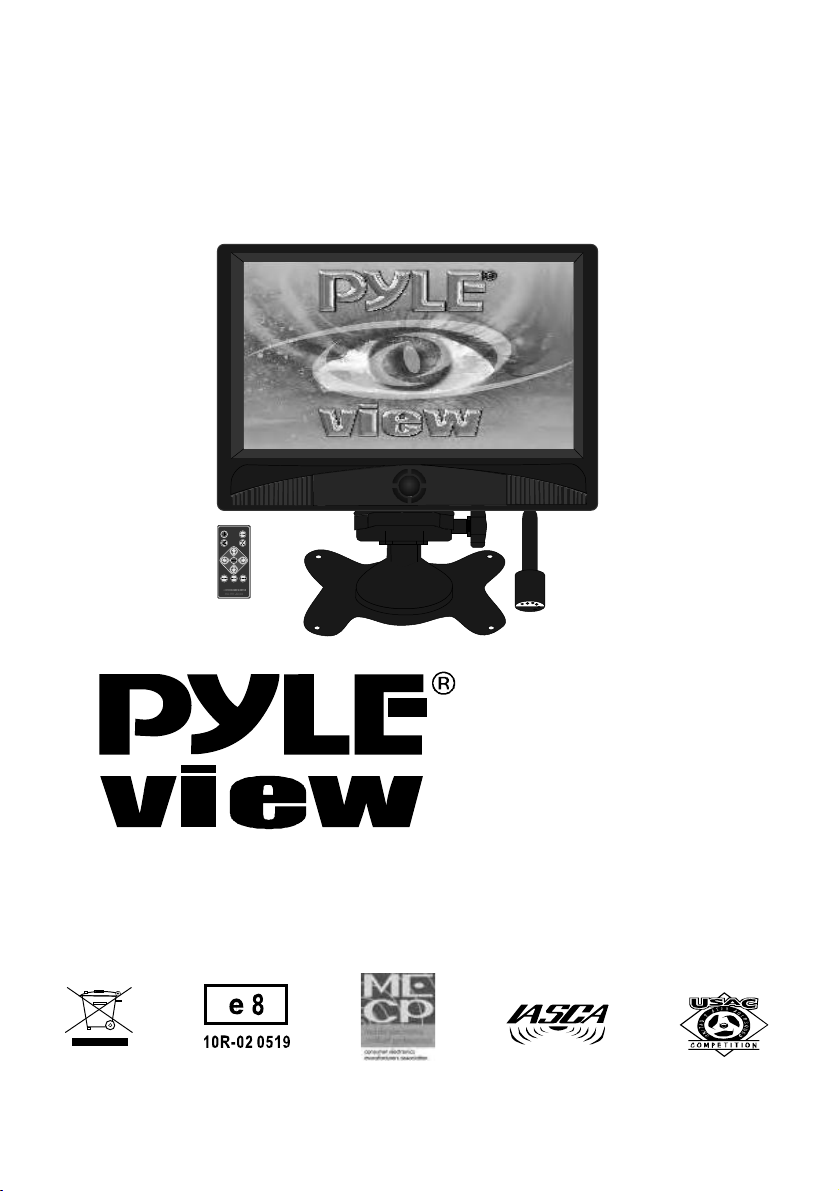
7"WideLCDMonitor
With4MountingOptions
POWER
MENUINVERT
2.
PLHR7SP
www.pyleaduio.com
INSTRUCTION MANUAL
Page 2

Table of Contents
About the liquid crystal display (LCD) panel
Precautions
Control & Layout for monitor / wireless remote
Accessories
Connection diagram
Replacing the remote control battery
Installing headrest with shroud
Installing sun-visor with shroud
Installing of headrest case
Function Setting
Troubleshooting guide
Specifications
2
3
4
5
6
6
7-8
9-10
11
12-18
18
19
1
Page 3
About the liquid crystal display (LCD) panel
1. Do not press on the LCD panel on the monitor unit as doing so can distort the picture orcause a
malfunction, the picture may become unclear, or the LCD panel may be damaged.
2. Notes on cleaning
-clean the LCD panel with a slightly damp soft cloth.
- do not use solvents such benzine, thinner, commerciallyavailable cleaners or antistaticspray.
3. Do not use this unit temperatures under 5C (41F) or over 45C (113F).
o o o o
4. If your car was parked in a clod or hot place, the picture may not be clear.The monitor isnotdamaged.
The picture will become clear after temperature in your car becomes normal.
5.Some stationary blue or red dots may appear on the monitor.These are called brightspots,and happen
with anyLCD.The LCD panel is highly sophisticated, and more then99.99% ofthe segments used in
the panel are flawless.However, there is a possibility that less than 0.01% of the segments are defective
and maynot light up properly.However, these segments will not interfere with your viewing.
Safety
To avoid the risk of accident and the potential violation of applicable laws, the fronts tv should
Never used while the vehicle is being driven.Also, rear displays should not be location where
It is a visible distraction to the driver.
In some countries the viewing of image on a display inside a vehicle even by persons other than
The driver may be illegal. Where such regulations, they must be obeyed and this unit’s features
Should not be used.
Warning
To Prevent fire or shock hazard,do not expose the unit to
rain or moisture.
CAUTION!!
RISK OF ELECTRIC SHOCK
DO NOT OPEN
Caution:To reduce the risk of electric shock
Do not remove cover (or Back)
No user-serviceable parts inside
Refer servicing to qualified service personnel
!
This symbol is intended to alert the user to
the presence of uninsulated “DANGEROUS
VOLTAGE” within the product’s enclosure
that may be of sufficient magnitude to
constitute a risk of electric shock to persons.
!
This symbol is intended to alert the user to
the presence of important operating and
maintenance(servicing) instructions in the
literature accompanying the appliance.
Disposal of old electrical & electronic equipment
( applicable in the European Union & other European
countries with separate collection systems)
This symbol on the product or on its packaging indicates that this product shall not be treated
as household waste. In stead it shall be handed over to the applicable collection point for the
recycling of electrical and electronic equipment. By ensuring this product is disposed of
correctly, you will help prevent potential negative consequences for the environment and
human health, which could otherwise be caused by inappropriate waste handling of this
product.The recycling of materials will help to conserve natural resources. For more detailed
information about recycling of this product, please contact your local Civic Office, your
household waste disposal service or the shop where you purchased the product
2
Page 4

Precautions
Please read this manual completely and carefully prior to attempt to install your new car video
equipment. Install correctly, your new equipment will provide you with years of enjoyable and safe usage.
Installing this unit requires technical expertise.This unit should be installed by a qualified
technician or service personnel. If you try to install this unit by yourself, do it properly, referring to the
installation and wiring diagrams in this operating manual. Improper installation may result in fire or
electric shock.
1.Do not operate this equipment while driving-safe driving should always be your highest priority.
2.Do not install components in areas which are susceptible to rain, moisture direct sunlight,extremely
heat or cold, excessive dust, dirt or humidity.
3. Immediately unplug the power cord and send the monitor to your local dealer or service center as
soon as possible:
a) If there is smoke or any peculiar odor present during used
b) If there is damage to any of the internal components
4.To avoid damage to the monitor and risk of electronic shock, do not permit any of thisequipment to
become damp or wet from water or liquid. If this does occur, immediately unplug the power cord and
send the monitor to your local dealer or service center as soon aspossible.
5. Do not attempt to repair, open or disassemble any of the components. Dangerous highvoltages are
present which may result in electric shock.
6. Use only a power source with DC12 volts car battery (negative ground).
7. Do not place or suspend objects on the power cord, as this may damage the cord.
8. Do not twist or place the power cord near any source of heat in the vehicle.
9. Do not attempt to repair a damaged, broken or faulty power cord. Replace it with a new one immediately.
10.Avoid dropping any metal objects or inflammable items into the monitor ventilation slots.
11.After the monitor is installed, do not arbitrarily pull it down or strike it.This may loose the mounting
screws and cause it fall down.
12. Do not install this unit where:
a) it will obstruct the driver’s view.
b) it will obstruct the operation of the airbag system.
c) it will obstruct the operation of the vehicle, especially the steering wheel, shift lever, or brake pedal.
d) a diver or passengers may injure themselves when getting into or out of the car.
13. Do not damage any pipes, tubes, the fuel tank or electric wiring when installing this unit. this can
cause a fire. if you drill a hole in car panels, make sure that any hidden car parts will not be damaged.
14. do not use any nuts or bolts for safety devices such as steering linkage, fuel supply or braking
systems. this can cause a fire or an accident .take care to prevent cords and wires from getting
tangled or crimped in the moving portion of a seat rail.
3
Page 5
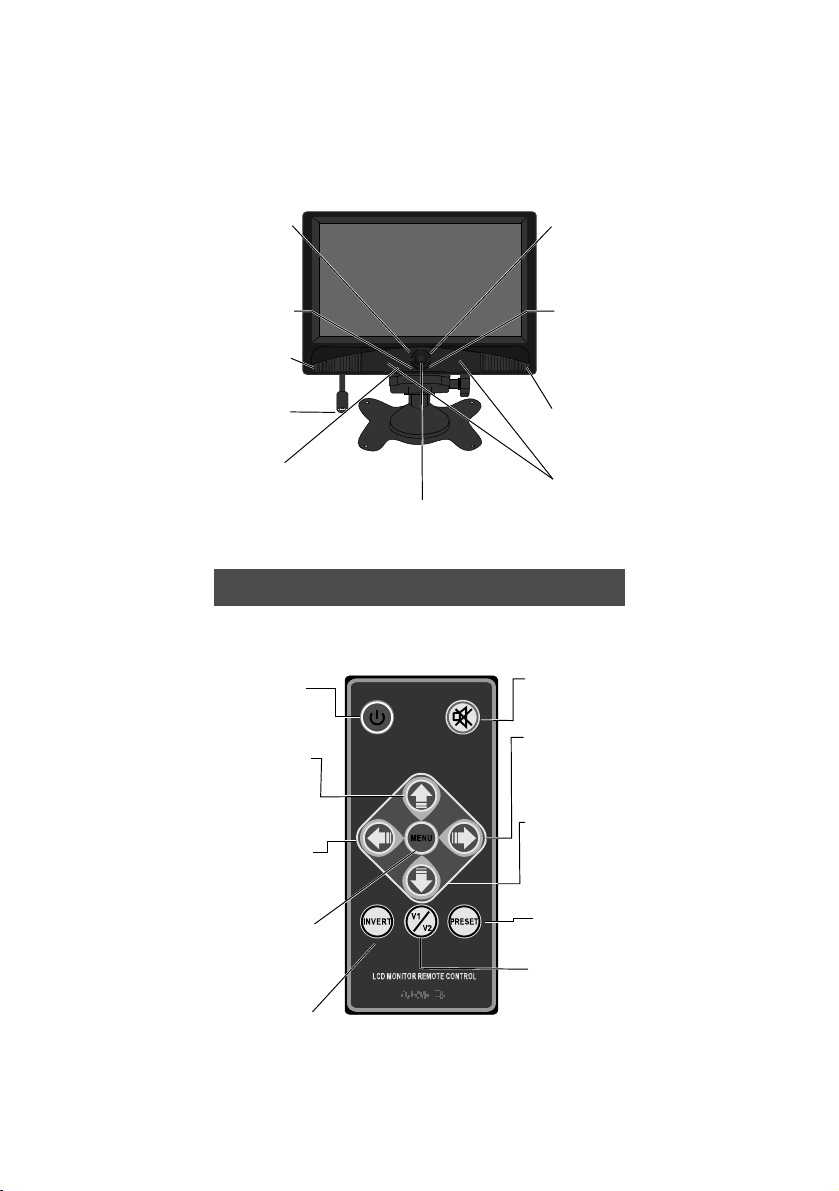
Controlandlayoutforthemonitor
This multipurpose button serves
Adjust Decrease
to decrease the selected
parameter, such as volume,
Front L & R audio input
Remote control sensor IR
contrast, etc.
V1/V2
to select Video input
FrontAudio Input
(open the speaker cover)
Power Cord
(Male)
Remote Sensor
Notice:somefunctionsworkbyremotecontrol.
Turn On / Off the monitor
This multipurpose button serves to
adjustdownto selectmenu function
and increase the selected parameters
such as contrast,color,brightness etc
Adjust reduce headphone output
This button brings up the on-screen
menu for adjustment of a range of
monitor parameters such as,
vol, con, col, bri, tint. Etc
Power On/Off
Adjust Increase
Volume
Reduce
volume
Menu
To adjust the picture
up/down/left/right
Invert
Blue screen when
no video signal
Power On / Off
Turn on/off the monitor
4
Adjust Increase
This multipurpose button
serves to increase the selected
parameters, such as volume,
contrast etc.
Menu
This button brings up the on-screen
menu for adjustment of range of
monitor parameters such as, volume,
brightness, color, contrast, tint
Front Video Input
Front video input
(open the speaker cover)
IR Sensor
Infra RedAudio Output
Mute
Press to Mute the sound, press again
to restore the previous volume level
VolumeIncrease
Adjust increase headphone output
volume
Adjust Decrease
This multipurpose button serves to
adjust up to select menu function
and decrease the selected parameters
such as contrast, color, brightness etc.
Preset
Picture preset by factory
V1/V2
Select Video 1 or Video 2 Input
When you use a wireless radio or portable telephone near
this unit, picture or sound interference may occur. Do not
use such devices near this unit.
Page 6
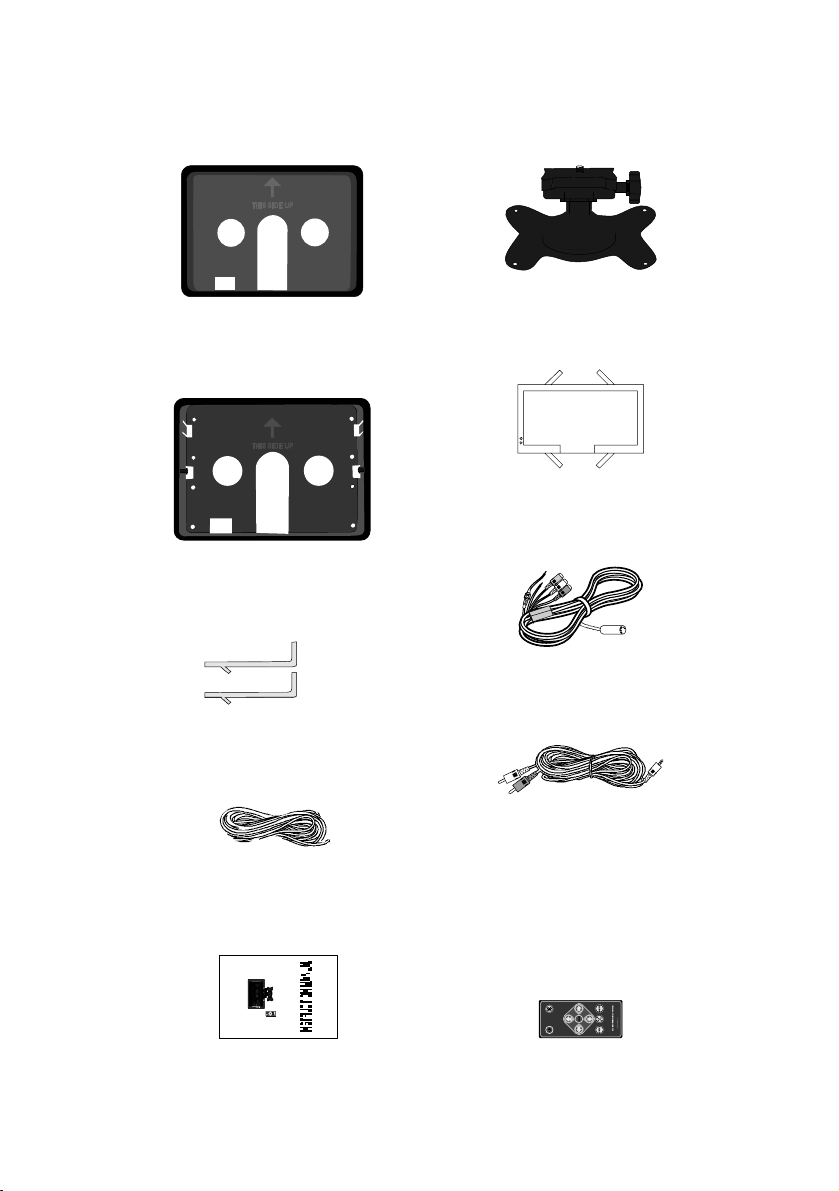
Accessories
SunVisorHousing
HeadrestHousing
Key-for removing the monitor
from headrest or visor shroud
UniversalStand
Headrest Bag
Extension Min Din Cable
With DCAdapter (12-28 Volts)
Audio Cable
Instruction Manual
Remote Control
5
Page 7

ConnectionDiagram
Fuse replacement
Never use fuse with an amperage rating
exceeding the one supplied with the unit as
this could damage the unit.
When replacing the fuse, be sure to use one
that matches the amperage described on the
original fuse. If the fuse blows, check the
power connection and replace the fuse. If the
fuse blows again after replacement, there may
be an internal malfunction. In such a case,
consult your nearest your’s dealer.
1
2
Fuse
(2A)
ReplacingtheRemoteControlBattery
1)Alwaysusenewbatterywhenreplacetheoldset.
2)Donotattempttocharge,short-circuit,disassemble,
heatorburnusedbatteries,batterymaybeexplode
ifmistreated.
3)Batteryreplacementisnecessarywhenremote
controlactssporadicallyorstopsoperating.
4)Donotdrop,applyshockorstepontheremotecontrol.
5)Donotspillwaterontheremotecontrol.
6)Donotplaceobjectsbetweentheremotecontrolandremotesensor.
7)Donotuseremotecontrolfortheotherequipmentsatthesametime.
8)Donotleavetheremotenearanyheatsources,orinaplacesubjecttodirectsunlight
(especiallyonthedashboard).
9)Keepthelithiumbatteryoutofthereachofchildren.Shouldthebatterybeswallowed,immediately
consultadoctor.
10)IftheMONITORdoesnotoperateevenwhenyouoperatetheremotecontrolfromacloserange,
itistimetoreplacethebattery(useCR-2025lithiumbattery),referringtothelabelonthebackof
thebasiccontrol.
11)Donotholdthebatterywithmetallictweezers,otherwiseashort-circuitmayoccur.
PULLOUT
PUSHIN
6
Page 8

Page 9

Insert the monitor
Push to insert the monitor
to the headrest housing.
Swviel
Press here to
adjust your
favour angle
Page 10

Steps For Installing Sun-visor with Shroud
Setup work
Remove the visor and set it in an uncluttered
work area. Pay appropriate precautions to
ensure that it is not damaged during the installation.
CAUTION:makesurethescrewsarenotlongenoughtogothrough
thevisor!
Ifyouhaveanydoubtsaboutthistypeofinstallation,pleaseconsult
yourlocalmobileelectronicsretailer.Cuttingandmakingholesin
thevisorwillcauseelectronicdamagewhichisexpensivetorepair.
Measurements
Press push on the headliner with your fingers to make
sure there are no obstructions that would hinder
the installation. Use paper template to mark the
area to be cut.
Cut the visor
Use an adjustable-depth blade, start
your cut 1/4 inch inside one corner and
cut diagonally across, stopping 1/4 inch in
from the other corner. Repeat this procedure
for the other two corners.
Removefoam&obstructions
Carefullypeeloffthematerial.Setthe
adjustablebladetooneinchdepthandcut
aroundtheedgesofthehole,staying1/4inch
insidetheedge.Pulluponecornerofthefoam
andusethebladetocutunderneath.Remove
smallsectionatatime,ensuretobethe
uniformdepth.Useadremelorotherappropriate
toolstoremoveotherobstructions.Insertthe
monitortomeasurethefitandmake
adjustmentifnecessary.
9
Page 11

Page 12

Steps For Installing Headrest Bag
Rear side of headrest
Insert the monitor to the headrest bag
Put the monitor with headrest bag at the
rear side center of pillow.
Front side of headrest
Cut the magic tape to the fit your pillow size,
then fasten it as X as diagram show.
11
Page 13

Function setting
Press MENU button (1)from the remote or press
manu button (1) from the monitor to call out the
function menu, press button (2 or 3) to the
desired setting.
2
1
Remote
3
Monitor
SOURCE
AV1
AV2
RETURN
AV1
AV2
RETURN
When screen appears “SOURCE” Press Menu
button (1) to enter video signal input selection.
[The symbol show current video input.]
2
1
Remote
3
Press the button( 2or3) to move the symbol
and choose video signal input.
Press menu button (1) to confirm your selection.
Move the symbol to RETURN and press
menu button (1) to exit input setting.
2
1
3
Remote
12
Monitor
Monitor
Page 14

Page 15

PICTURE
BRIGHT
CONTRAST
COLOR
RETURN
Press the button( 2or3) to adjust the symbol
to choose “CONTRAST”.
Press menu button (1) to enter CONTRAST setting.
[
Contrast: Narrows or widens the gap between black & white
(darken & brighten)]
2
1
PICTURE
PICTURE
CONTRAST 50
BRIGHT
CONTRAST
COLOR
RETURN
Remote
3
Monitor
Press button 2: adjust contrast to brighter level.
Press button 3: adjust contrast to darker level.
Press button 1 to confirm setting.
[Contrast adjustable level: 0~100 . Preset: 50]
2
1
Remote
3
Monitor
Press the button( 2or3) to adjust the symbol
to choose “COLOR”.
Press menu button (1) to enter hue setting.
[COLOR: adjusts more or less color intensity]
2
1
Remote
3
Monitor
14
Page 16

PICTURE
COLOR 50
Press button 2: adjust more color intensity level.
Press button 3: adjust less color intensity level.
Press button 1 to confirm setting and exit.
[Color adjustable level: 0~100 . Preset: 50]
2
1
PICTURE
AUDIO
BRIGHT
CONTRAST
COLOR
RETURN
VOLUME
RETURN
Remote
3
Monitor
Exit Picture setting, Press the button( 2or3) to
adjust the symbol to “RETURN”.
Press menu button (1) to exit.
2
1
Remote
3
Monitor
When screen appears “PICTURE” press the menu
button (1)to enter picture parameters setting.
Press the button( 2or3) to adjust the symbol
to choose “VOLUME”.
Press menu button (1) to enter volume setting.
[VOLUME: adjust sound soft or loud ]
2
1
Remote
3
Monitor
15
Page 17

AUDIO
VOLUME 50
Press button 2: adjust sound to more loud level.
Press button 3: adjust sound to more soft level.
Press button 1 to confirm setting and exit.
[Volume adjustable level: 0~100 . Preset: 50]
2
1
FUNCTION
INVERT 1
SIZE:
Full 16:9
Language Select:
RETURN
FUNCTION
INVERT 1
SIZE:
Full 16:9
Language Select:
RETURN
Remote
3
Monitor
When screen appears “FUNCTION” press the menu
button (1)to enter function parameters setting.
Press the button( 2or3) to adjust the symbol
to choose desired setting
2
1
Remote
3
Monitor
When the symbol at “INVERT1” and Press the
MENU (1) button repeatedly to invert the picture,
each time the button press the picture rotate as
clockwise as the diagram show.
Remote
Invert 1
LCD
MONITOR
2
1
3
Monitor
MONITOR
LCD
Invert3
16
Page 18

FUNCTION
Normal 4:3
Diagram
Full 16:9
Diagram
INVERT 1
SIZE:
Full 16:9
Language Select:
RETURN
FUNCTION
INVERT 1
SIZE:
Full 16:9
Language Select:
RETURN
FUNCTION
When the symbol at “SIZE” Press the MENU (1)
button repeatedly to change the picture display
size to Full 16:9 or Normal 4:3 as the diagram show.
2
1
Remote
3
When the symbol at “Language Select:” Press
the MENU (1) button to enter the OSD languages
display.
2
1
3
Remote
Press the buttons 2 or 3 to the desired language,
and press “MENU” to confirm.
Monitor
Monitor
English
German
French
Spanish
Portugal
Italian
Chinese C
RETURN
2
1
Remote
3
17
Monitor
Page 19

FUNCTION
When the symbol at “Exit” Press the MENU (1)
button to exit the setup.
Exit
Remote
Troubleshooting guide
The following checklist will help you solve problems you may encounter with your unit.
Before going through the checklist below, check the connection and operating.
if you can not solve the problem with follows guide, please contact your nearest dealer.
Problem
No picture, no sound
Good picture, but no sound
Dolled lines or stripes
No picture, or no sound when you
connect the optional equipment
No response when pressing the buttons on
the wireless remote
Cause/solution
The power cord or battery has been disconnected.
The fuse has blown.
Press power on.
Press the volume increase button on the wireless
remote, or on the monitor.
Press the mute button from the wireless remote.
(TIP: refer to page 4 for the “control & layout”)
This maybe caused by local interference such as car
engine or motorcycle.
The cord has been disconnected. Connect the cord
securely.
Press power on.
The wireless remote batteries may be exhausted.
2
1
3
Monitor
18
Page 20

LCD Drive Method: TFTActive Matrix
Visible Screen Size: 7 Inch Wide Screen (Diagonal)
Aspect Ratio: 16:9
Display Format: 480 x RGB x 234
Number of Pixels: 336,960
Response Time: ≤15ms
Backlight : High Brightness CCFT
Luminance: 380 cd/m
Backlight Life: 15,000 Hrs
Contrast Ratio: 300:1
ViewingAngle: (H/V): 120 / 100
Operation Temperature: -20C ~ 70C / -2F ~ 158F
2 #3
#1
o o
o o o o
Video Color System Input: NTSC & PAL Compatible
#1
A measure of the time unit screen brightness declines by half under continuous viewing
in a car/room at 25C with screen brightness in standard mode. (50% original brightness)
#2 o
A measure of the unit temperature declines in a car/room at 25C
with screen brightness in standard mode. (50% original brightness)
#3 2
A measure of the backlight 350cd/m brightness will in standard
lamp voltage at 560 Vrms.
o
 Loading...