

Page 1

PLDVD198
Mobile Video System
Digital Audio Out-Coaxial
PLL Synthesizer Stereo Radio
DVD Player
Automatic Memory Storing
Full Detachable Panel
Preset Equalization
Multi-subtitle Languages Function
Multi-audio Languages Function
Multi-angle Function
Parental Control
Remote Control
www.pyleaudio.com
Page 2

FEATURES
Compatible with NTSC DVD
(Video CD)
This player can play discs recorded in
either PAL or NTSC format.
A single LSI chip now integrates all
major DVD playback circuit functions
including MPEG2 decoder, video D/A
converter, and audio decoders.
L/R stereo analog audio outputs for
connection to existing head unit aux
inputs. Video output is composite
video.
Supplied remote handles multi-function
software (multi-language audiotrack/subtitle, multi-angle, multistory, etc.), plus all basic functions.
USE THIS PRODUCT SAFELY
When Driving
Keep the volume level low enough to be
aware of road and traffic conditions.
Protect the Disc Mechanism
Avoid inserting any foreign objects into
the slot of this player.
Failure to observe this may cause
malfunction due to the precise
mechanism of this unit.
Use Authorized Service Centres
Do not attempt to disassemble or adjust
this precision product. Please refer to
the Service Centre list included with this
product for service assistance.
For Installation
The unit should be installed in a
horizontal position with the front end up
at a convenient angle, but not more than
30 .
When Car Washing
Do not expose the product to water or
excessive moisture. This could cause
electrical shorts, fire or other damage.
When Parked
Parking in direct sunlight can produce
very high temperatures inside your
vehicle. Give the interior a chance to
cool down before starting playback.
Use the Proper Power Supply
This product is designed to operate with
a 12 volt DC, negative ground battery
system (the regular system in a North
American car).
2
Page 3

CONTENTS
Safety Information ....................................................................................... 4
Disc Notes .................................................................................................... 5
Installation ....................................................................................................6
Using the Detachable Front Panel ..............................................................9
Wiring Connection ......................................................................................10
20 Pin Socket Connection ..................................................................................10
Location and Function of Keys
The Player
Remote Control ..........................................................................................12
................................................................................................
Remote Control .................................................................................................... 14
Preparing the Remote Control ..............................................................................14
Loading/ Ejecting a disc ............................................................................15
Loading a disc ......................................................................................................15
Ejecting a Disc
......................................................................................................
Operation ....................................................................................................16
Basic Operation ...................................................................................................16
Radio Operation
Disc (DVD, VCD, CD, MP3) Operation
AV IN Operation
...................................................................................................................... 23
Setup
Initial Setup
General Setup
Audio Setup..........................................................................................................25
Preferences Setup ...............................................................................................26
Defaults Table ......................................................................................................28
......................................................................................... 22
......................................................................................................... 23
.....................................................................................................23
.........................................................................11
11
15
............................................................... 17
................................................................ 18
Trouble Shooting ........................................................................................29
Specifications..............................................................................................30
3
Page 4

SAFETY INFORMATION
CAUTION:
MOBILE DVD PLAYER IS A CLASS I
LASER PRODUCT. HOWEVER THIS
MOBILE DVD PLAYER USES A
VISIBLE/INVISIBLE LASER BEAM
WHICH COULD CAUSE HAZARDOUS
RADIATION EXPOSURE IF DIRECTED.
BE SURE TO OPERATE THE MOBILE
DVD PLAYER CORRECTLY AS
INSTRUCTED.
USE OF CONTROLS OR
ADJUSTMENTS OR PERFORMANCE OF
PROCEDURES OTHER THAN THOSE
SPECIFIED HEREIN MAY RESULT IN
HAZARDOUS RADIATION EXPOSURE.
DO NOT OPEN COVERS AND - DO NOT
REPAIR YOURSELF. REFER SERVICING .
TO QUALIFIED PERSONNEL.
WARNING:
TO REDUCE THE RISK OF FIRE OR
ELECTRIC SHOCK, DO NOT EXPOSE
THIS EQUIPMENT TO RAIN OR
MOISTURE.
TO REDUCE THE RISK OF FIRE OR
ELECTRIC SHOCK, AND ANNOYING
INTERFERENCE, USE ONLY THE
RECOMMENDED ACCESSORIES.
REGION MANAGEMENT
INFORMATION
Region Management Information:
This Mobile DVD Player is designed and
manufactured to respond to the Region
Management Information that is recorded
on a DVD disc. If the Region number
described on the DVD disc does not
correspond to the Region number of this
Mobile DVD Player, this Mobile DVD
Player cannot play this disc.
THIS DEVICE IS INTENDED FOR
CONTINUOUS OPERATION.
This product incorporates copyright
protection technology that is protected
by method claims of certain U.S. patents
and other intellectual property rights
owned by Macrovision Corporation and
other rights owners. Use of this copyright
protection technology must be authorized
by Macrovision Corporation, and is
intended for home and other limited
viewing uses only unless otherwise
authorized by Macrovision Corporation.
Reverse engineering or disassembly is
prohibited.
4
Page 5

DISC NOTES
Disc formats supported by this player
DVD
12 cm disc
(Single-sided disc only)
VIDEO CD
12 cm disc
CD
12 cm disc
MP3
12 cm disc
Discs which cannot be played with this
player
DVD-ROM
DVD-R/DVD-RAM
CDV
CD-G
Handling and Cleaning
Dirt, dust, scratches and warping disc
will cause misoperation.
Do not place stickers or make
scratches on discs.
Do not warp discs.
A disc should always be kept in its
case when not in use to prevent from
damaging.
Do not place discs in the following
places:
1. Direct sunlight
2. Dirty, dusty and damp areas
3. Near car heaters
4. On the seats or dashboard
Disc Cleaning
Use a dry soft cloth to wipe the surface.
If the disc is quite dirty , use a soft cloth
slightly moistured with isopropyl (rubbing)
alcohol. Never use solvents such as
benzine, thinner or conventional record
cleaners as they may mar the surface of
the disc.
unusable) depending on your handle it
and conditions in the usage environment.
Note these scratches are not an
indication of any problem with the player.
Label side up
Do not touch
the underside
of the disc
Do not bend
Wipe the disc from center
toward the outside edge
Preparing New Discs with Rough Spots
A new disc may have rough edges on its
inside and outside edges. If a disc with
rough edges is used, the proper setting
will not be performed and the player will
not play the disc. Therefore, remove the
rough edges in advance by using a ball
point pen or pencil as shown on the right.
To remove the rough edges, press the
side of the pen or pencil against the
inside and outside edges of the disc.
Rough spots on
outside edge
Ball point pen
or pencil
Note:
A disc may become somewhat scratched
(although not enough to make it
Rough spots
5
on inside edge
Page 6

INSTALLATION
Notes:
Choose the mounting location where
the unit will not interfere with the
normal driving function of the driver.
Before finally installing the unit,
connect the wiring temporarily and
make sure it is all connected up
properly and the unit and the system
work properly.
Use only the parts included with the
unit to ensure proper installation. The
use of unauthorized parts can cause
Malfunctions.
Consult with your nearest dealer if
installation requires the drilling of
holes or other modifications of the
Vehicle.
Install the unit where it does not get
in the driver's way and cannot injure
the passenger if there is a sudden
stop, like an emergency stop.
If installation angle exceeds 30 from
horizontal, the unit might not give its
optimum performance.
30
Avoid installing the unit where it would
be subject to high temperature, such
as from direct sunlight, or from hot air,
from the heater, or where it would be
subject to dust, dirt or excessive
vibration.
DIN FRONT/REAR-MOUNT
This unit be can properly installed either
from "Front"(conventional DIN
Front-mount) or "Rear"(DIN Rear-mount
installation, utilizing threaded screw holes
at the sides of the unit chassis). For
details, refer to the following illustrated
installation methods.
O
DIN FRONT-MOUNT (Method A)
Installation Opening
This unit can be installed in any
dashboard having an opening as show
below:
53mm
182mm
Installing the unit
Be sure you test all connections first, and
then follow these steps to install the unit.
1.
Make sure the ignition is turned off,
and then disconnect the cable from the
vehicle battery's negative (-) terminal.
Disconnect the wire harness and the
2.
Antenna.
3.
Press the release button on the front
panel and remove the control panel
4.
(see the steps of “removing the front
panel”).
5.
Lift the top of the outer trim ring then
pull it out to remove it.
The two supplied keys release tabs
inside the unit's sleeve so you can
remove it. One key is for the right side
and the other is for the left side. Insert
the keys as far as they will go (with the
notches facing up) into the appropriate
slots at the middle left and right sides
of the unit. Then slide the sleeve off
the back of the unit.
Sleeve
L Key
Outer Trim Ring
Front Panel
R Key
6
Page 7

INSTALLATION
Mount the sleeve by inserting the
6.
sleeve into the opening of the
dashboard and bend open the tabs
located around the sleeve with a
screwdriver. Not all tabs will be able to
make contact, so examine which ones
will be most effective. Bending open
the appropriate tabs behind the
dashboard to secure the sleeve in
place.
Dashboard
Tabs
Screwdriver
any wires or cables.
7.
Reconnect the wire harness and the
antenna and be careful not to pinch
any wires or cables.
Slide the unit into the sleeve until it
8.
locks into place.
9.
To further secure the unit, use the
supplied metal strap to secure the back
of the unit in place. Use the supplied
hardware (Hex Nut (M5mm) and Spring
Washer) to attach one end of the strap
to the mounting bolt on the back of
the unit. If necessary, bend the metal
strap to fit your vehicle's mounting area.
Then use the supplied hardware
(Tapping Screw (5x25mm) and Plain
Washer) to attach the other end of
metal strap to a solid metal part of the
vehicle under the dashboard. This
strap also helps ensure proper electrical
grounding of the unit.
Sleeve
Spring Washer
Metal Strap
Mounting Bolt
Hex Nut
Plain Washer
Tapping Screw
10. Reconnect the cable to the vehicle
battery's negative (-) terminal. Then
replace the outer trim ring and install
the unit's front panel (see the steps of
“installing the front panel”)
Removing the unit
1.
Make sure the ignition is turned off,
then disconnect the cable from the
vehicle battery's negative (-) terminal.
2.
Remove the metal strap attached the
back of the unit (if attached).
3.
Press the release button to remove
the front panel.
4.
Lift the top of the outer trim ring then
pull it out to remove it.
5.
Insert both of the supplied keys into the
slots at the middle left and right sides of
the unit, then pull the unit out of the
dashboard.
7
Page 8

INSTALLATION
DIN REAR-MOUNT (Method B)
If your vehicle is a Nissan, Toyota, follow
these mounting instructions.
Use the screw holes marked T (Toyota),
N (Nissan) located on both sides of the
unit to fasten the unit to the factory radio
mounting brackets supplied with your
vehicle.
Side View showing
Screw Holes marked
T, N
Screw
Factory Radio
Mounting Bracket
Screw
Dashboard or Console
Hook
To fasten the unit to the factory radio
mounting brackets.
1. Use a screwdriver to loose the hook's
screws on the front left and right sides
of the unit and remove the hooks.
2. Align the screw holes on the bracket
with the screw holes on the unit, and
then tighten the screws (5x5mm)on
each side.
Note: the outer trim ring, sleeve
and the metal strap are not used
for method B installation.
8
Page 9

USING THE DETACHABLE FRONT PANEL
REMOVING THE FRONT PANEL
1. Press the release button on the front
panel and pull off the front panel.
Release Button
Front Panel
2. Keep front panel into the case.
Precautions when handling
1. Do not drop the front panel.
2. Do not put pressure on the display
or control buttons when removing
or installing the front panel.
3. Do not touch the contacts on the
front panel or on the main unit body.
It may result in poor electrical contact.
4. If any dirt or foreign substances
adhered on the contacts, they can be
removed with a clean and dry cloth.
5. Do not expose the front panel to high
temperatures or direct sunlight in
anywhere.
6. Keep away any volatile agents (e.g.
benzene, thinner, or insecticides)
from touching the surface of the front
panel
7. Do not attempt to disassemble the
front panel.
INSTALLING THE FRONT PANEL
To install the front panel, insert the panel
into the housing and make sure the panel
is properly installed. Otherwise,
abnormality occurs on the display or
some keys will not function properly.
9
Page 10

WIRING CONNECTION
20 PIN SOCKET CONNECTION
ANTENNA
CONNECTOR
ANTENNA SOCKET(OPTIONAL)
R
E
V
I
E
C
E
R
L
O
R
T
N
O
C
E
T
O
M
E
R
FRONT Lch
SPEAKER
REAR Lch
SPEAKER
+
-
+
-
WHITE
WHITE/BLACK
GREEN
GREEN/BLACK
AUDIO R IN (RED)
AUDIO L IN (WHITE)
AV IN CABLE(BLACK)
VIDEO IN ((YELLOW))
AV OUT CABLE(GREY)
FUSE
FRONT RCA CABLE(BROWN)
REAR RCA CABLE(GREY)
(FOR RCA LINE OUT VERSION ONLY)
BLUE
RED
YELLOW
BLACK
GREY
GREY/BLACK
VIOLET
VIOLET/BLACK
+
-
+
-
VIDEO OUT 1(YELLOW)
VIDEO OUT 2 (YELLOW)
DIGITAL AUDIO (ORANGE)
RED
Rch
WHITE
Lch
RED
Rch
WHITE
Lch
POWER
ANTENNA
IGNITION
SWITCH (ACC+)
MEMORY BACK UP (B+)
GROUND (B-)
FRONT Rch
SPEAKER
REAR Rch
SPEAKER
10
Page 11
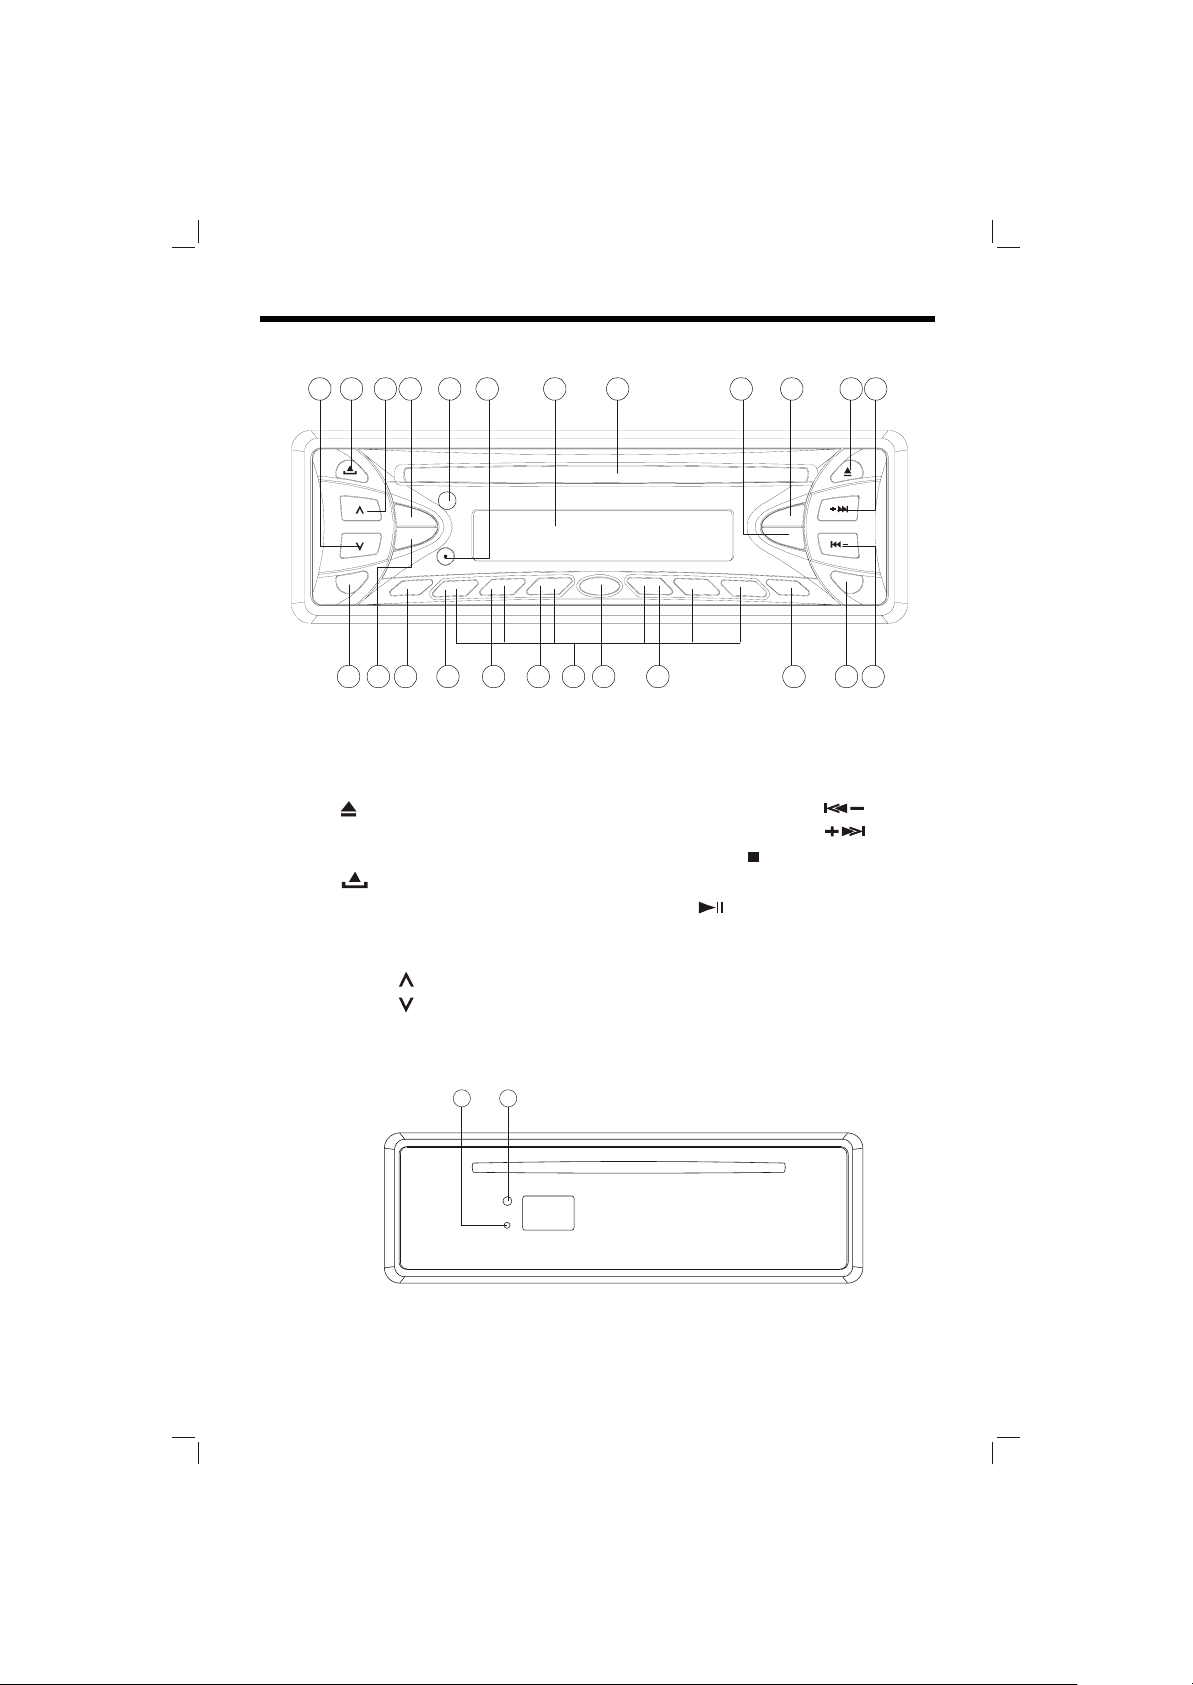
LOCATION AND FUNCTION OF KEYS
THE PLAYER
7
10
11 2412
9
1. PWR (power button)
2. LOC
3. MUT
4.
5. Disc Slot
6. MODE
7.
8. Liquid Crystal Display
9. L/R (ST)
10. SEL
11. VOL
12. VOL
2
15
8
5 6
232221 14203
18
13. BND/LOU
14. 1~6 preset buttons
15. DSP
16. MANU/SKIP
17. MANU/SKIP
18. AMS
19. EQ
20.
21. RPT
22. INT
23. RDM
24. RX
13 4 17
19
1
16
When remove the front panel:
26
25
25. LED 26. RESET button
11
Page 12
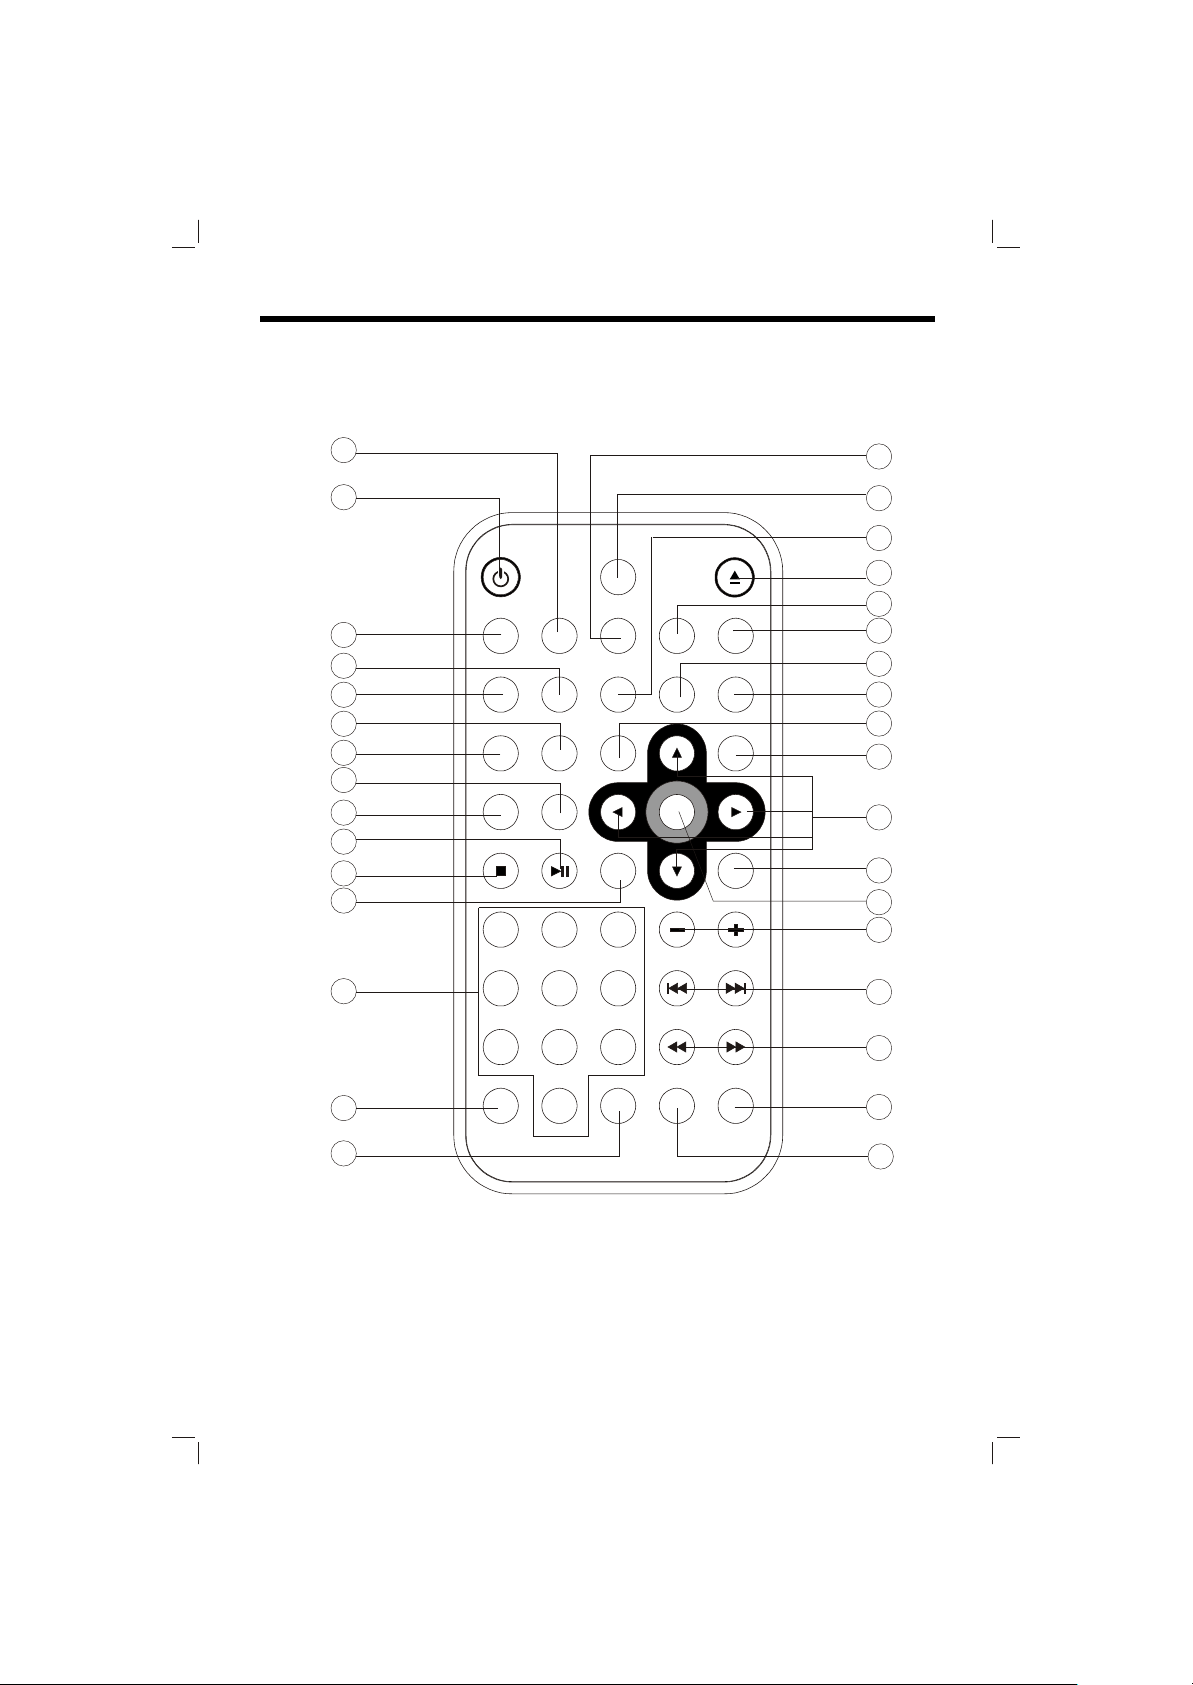
LOCATION AND FUNCTION OF KEYS
REMOTE CONTROL
24
1
2
25
28
31
30
26
29
15
18
19
20
27
5
3
32
8
6
9
4
10
7
12
11
13
23
17
22
21
16
14
33
12
Page 13
LOCATION AND FUNCTION OF KEYS
1. POWER Press POWER to turn the unit ON or OFF.
2. MUTE Press to mute the sound.
3. SUB-T Changing of the SUBTITLE language on multi-subtitle language DVD
disc.
4. ANGLE Changing of the view angle on multi-angle DVD disc.
5. MODE Changing between radio mode, disc (DVD/VCD/CD/MP3) play mode
and AV IN mode.
6. DISPLAY Display statistical disc information during playback.
7. SETUP Display the SETUP menu.
8. TITLE Display the TITLE menu that is stored in DVD disc.
9. PROGRAM Allows the track played in the order you programmed (For MP3/CD).
10. PBC (LOC) Changing between PBC ON and PBC OFF on the VCD disc.
In radio mode, press it to select between local and distant stations.
11. SEL Press to select the desired adjustment mode. Then press VOLUME+/ to change settings.
12. / , / In case of menu mode, / , / buttons served as cursor buttons to select
item left/right, ahead/back.
13. OK Confirm the Track/Chapter selected with the numeric buttons or selected
with the cursor buttons on screen display.
14. GOTO Disc search button, cooperatively used with numeric buttons.
15. Press to play/pause the disc.
16. / Press to search forward rapidly & to search reverse rapidly.
17. (SEEK+) Press to skip to the next track & press to skip back one track.
/ (SEEK-) In radio mode, press (SEEK+) shortly to increase frequency or press
(SEEK-) shortly to decrease frequency by one step of channel spacing.
Hold (SEEK+)/ (SEEK-) longer for fast tuning.
18. Press it to stop playback.
19. EQ Press it to select the equalization mode, such as CLAS, POP, ROCK.
20. 0-9 Numeric buttons
21. 10+ Digital selecting button cooperatively used with numeric buttons.
22. MENU Display the root menu that is stored on the DVD disc.
23. VOLUME+/- Press VOLUME+/- button to increase or decrease the volume level.
24. ZOOM Allows the picture to be increased in size.
25. RESUME When in stop mode, press the button, the play can be resumed from
the stop point.
26. LOUD Press to reinforce the bass output. Press it again to release this function.
27. P/N Switch between PAL mode and NTSC mode.
28. RANDOM Allows the track played in random order (NOT for DVD).
29. ST(AUDIO) In radio mode, press it to select mono or stereo mode.
Changing of the AUDIO soundtrack on multi-audio soundtrack DVD disc.
Changing of the sound mode of the VCD/CD discs.
30. RPT(AMS) Switch the Repeat mode of discs.
In radio mode, press for several seconds to enter into automatic
memory storing function; press shortly to scan preset station.
31. A-B (BAND) A-B repeat allows a passage to be repeated continuously.
In radio mode, press it to select desired band.
32. EJECT Press to eject the disc.
33. SLOW Changing for slow forward playback motion (For VCD/DVD).
13 14
Page 14

REMOTE CONTROL
Preparing the Remote Control
Inserting the Batteries
1. Open the battery compartment cover.
2. Insert the new battery. Make sure
that the positive and negative terminals
of the battery are oriented as indicated.
3. Close the cover.
Battery: a button cell lithium battery
(CR2025 3V)
Using the Remote Control
Point the remote control towards the
player front face remote sensor RX
(remote control signal receiver).Operation
angle: About 30 degree in each the
direction of the front of the remote sensor.
Page 15
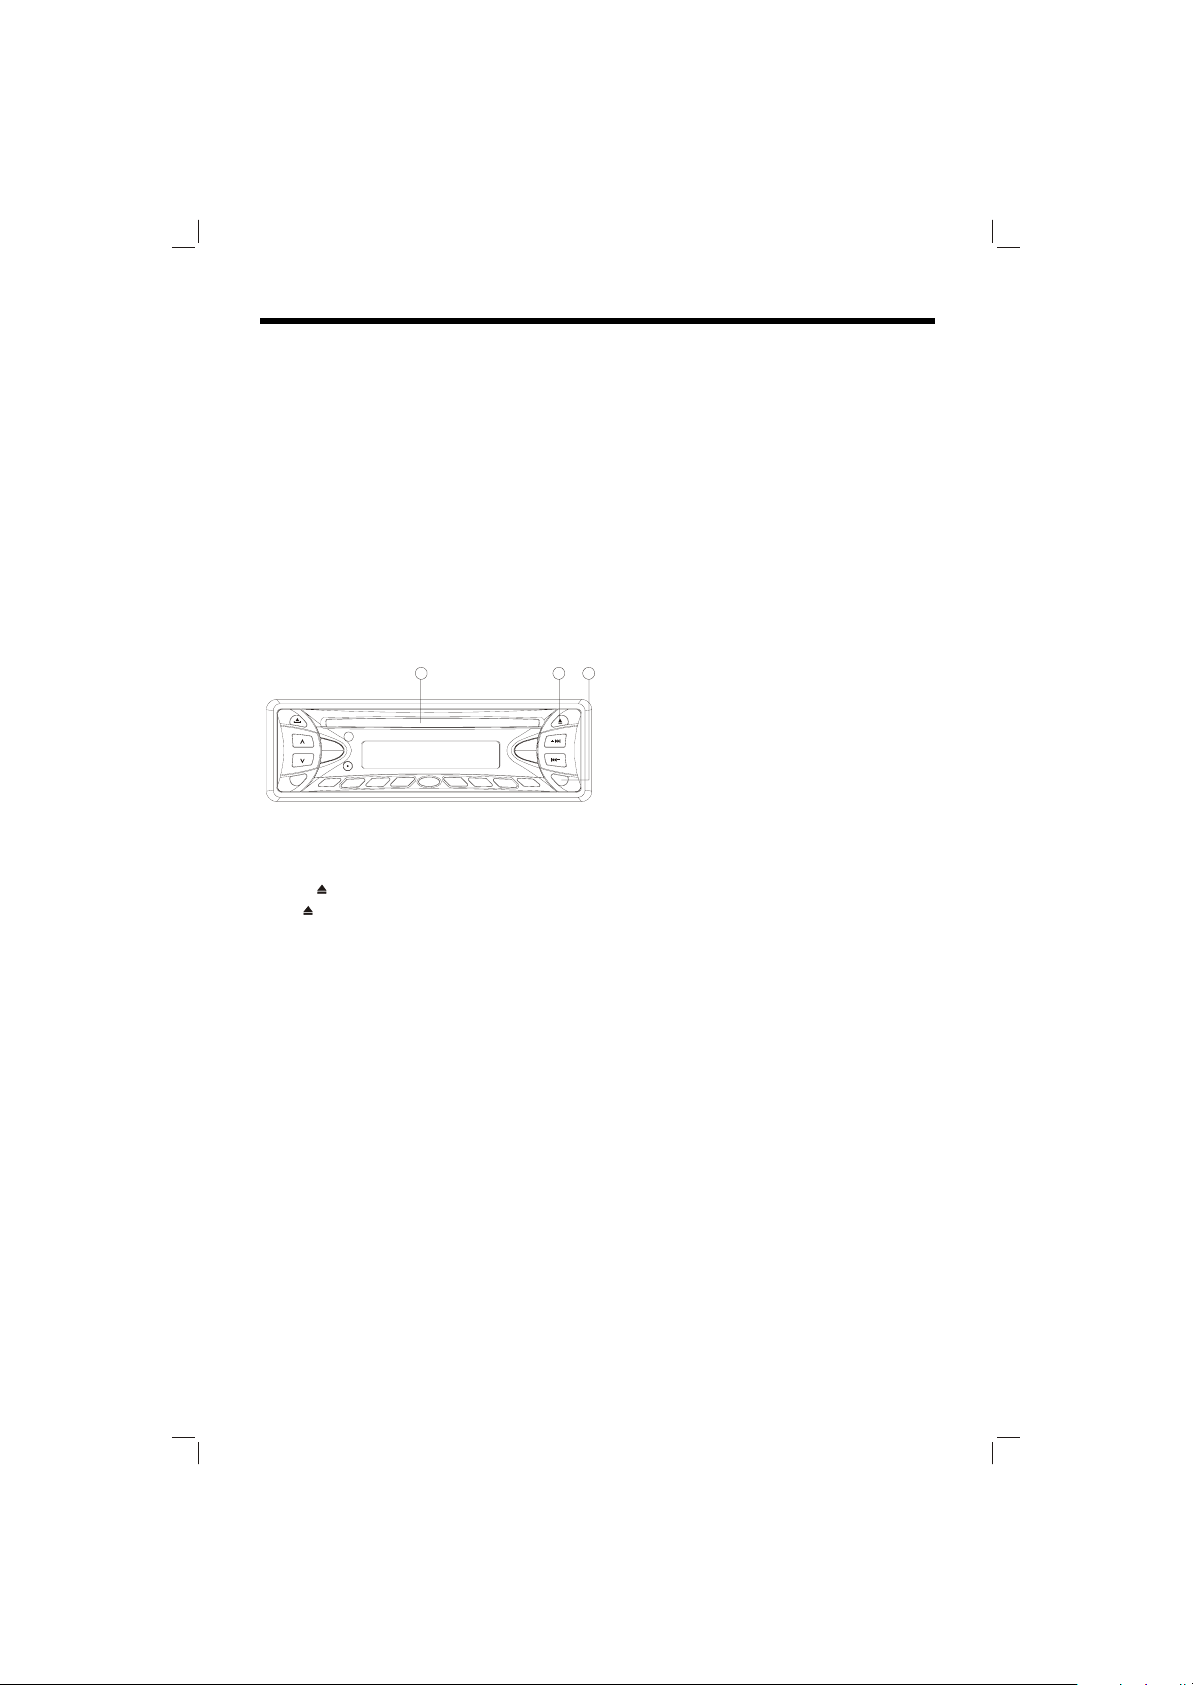
LOADING/EJECTING A DISC
Loading a Disc
When all connections have completed,
you can load a disc as follows:
1. Turn the ignition on to the accessory
position.
2. Press the PWR button (1) on the
front panel or POWER button on the
remote controlto turn on the unit.
3. Insert the disc with printed side
facing up into the disc slot (2).
4. The player will start playback
automatically.
2
3
1
Ejecting a Disc
Press button (3) on the front panel
or to (EJECT) button on remote
controlto eject the disc.
15
Page 16
OPERATION
BASIC OPERATION
SWITCHING ON/OFF THE UNIT
Press PWR button on the front panel or
POWER button on the remote control
to turn on the unit.
FACEPLATE RELEASE
Press button on the front panel to
detach the removable faceplate.
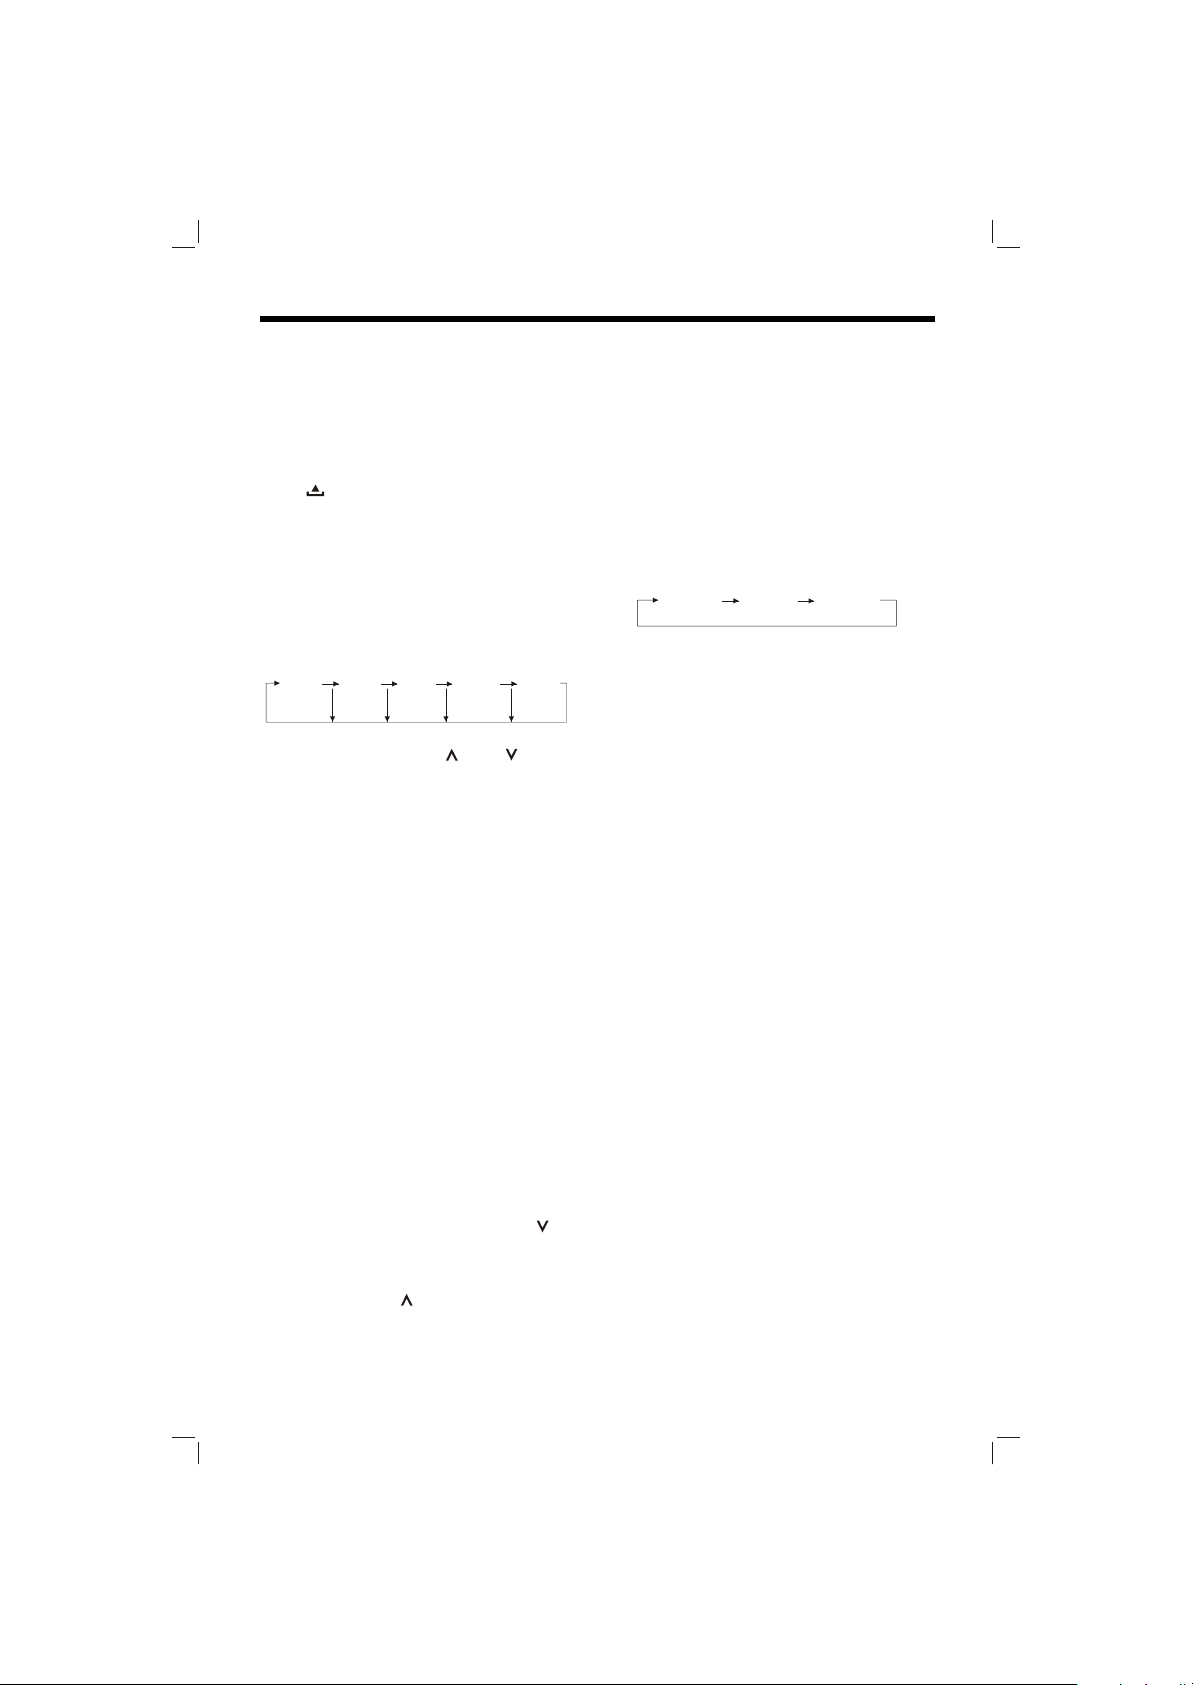
SOUND ADJUSTMENT
Press SEL button on the front panel of
the unit or on the remote control to
select the desired adjustment mode.
The adjustment mode will change in the
following order:
VOL BAS TRE BAL FAD
(Volume) (Bass)
By pressing the VOL /VOL buttons
on the front panel or VOLUME +/-
buttons on the remote control, it is
possible to adjust the desired sound
quality.
LOUDNESS
Press and hold BND/LOU button on the
font panel for several seconds or press
LOUD button on the remote control to
reinforce the bass output. Press
BND/LOU button on the font panel for
several seconds again or press LOUD
button on the remote control again to
release this function.
SET THE CLOCK
Press the DSP button on the front panel,
the clock is shown on the LCD display.
Then hold down the button until the
clock flashes. Then press the VOL
button on the front panel or VOLUME +
button on the remote control to change
hours; press VOL button on the front
panel or VOLUME button on the remote
control to change minutes.
(Treble)
(Balance) (Fader)
MUTE
Press MUT button on the front panel or
MUTE button on the remote control to
mute down the sound instantly. Pres it
again to resume sound output.
EQUALIZATION
Press EQ button shortly to turn on
equalization function and to select
desired audio mode. There are three
kinds of mode as below:
CLAS POP ROCK
MODE SELECTION
Press MOD button on the front panel of
the unit or MODE button on the remote
control to select among radio, disc
(DVD/VCD/CD/MP3) play mode and
AV IN mode.
LIQUID CRYSTAL DISPLAY
Exhibit current frequency and activated
functions on the display of the front
panel.
FLASHING LED
If the front panel does not install in the
main unit, the LED will be flashing.
REMOTE SENSOR
Point the remote control handset to the
remote sensor RX. Press the function
keys on the handset to control the
system.
RESET FUNCTION
RESET button on the housing must be
activated with either a ballpoint pen or
thin metal object. The RESET button is
to be activated for the following reasons:
16
Page 17
OPERATION
- Initial installation of the unit when all
wiring is completed.
- All the function buttons do not operate.
- Error symbol on the display.
Note: if press RESET button, the unit
can't work yet, please use a cotton swab
soaked in isopropyl alcohol to clean the
socket on the front panel.
RADIO OPERATION
SWITCHING TO RADIO MODE
Press MOD on the front panel or
MODE on the remote control to
select radio mode, the radio mode
appears in the display together with
the memory band and frequency.
SELECTING THE FREQUENCY
BAND
During radio mode, shortly press
BND/LOU button on the front panel
or A-B (BAND) button on the remote
control to select the desired band.
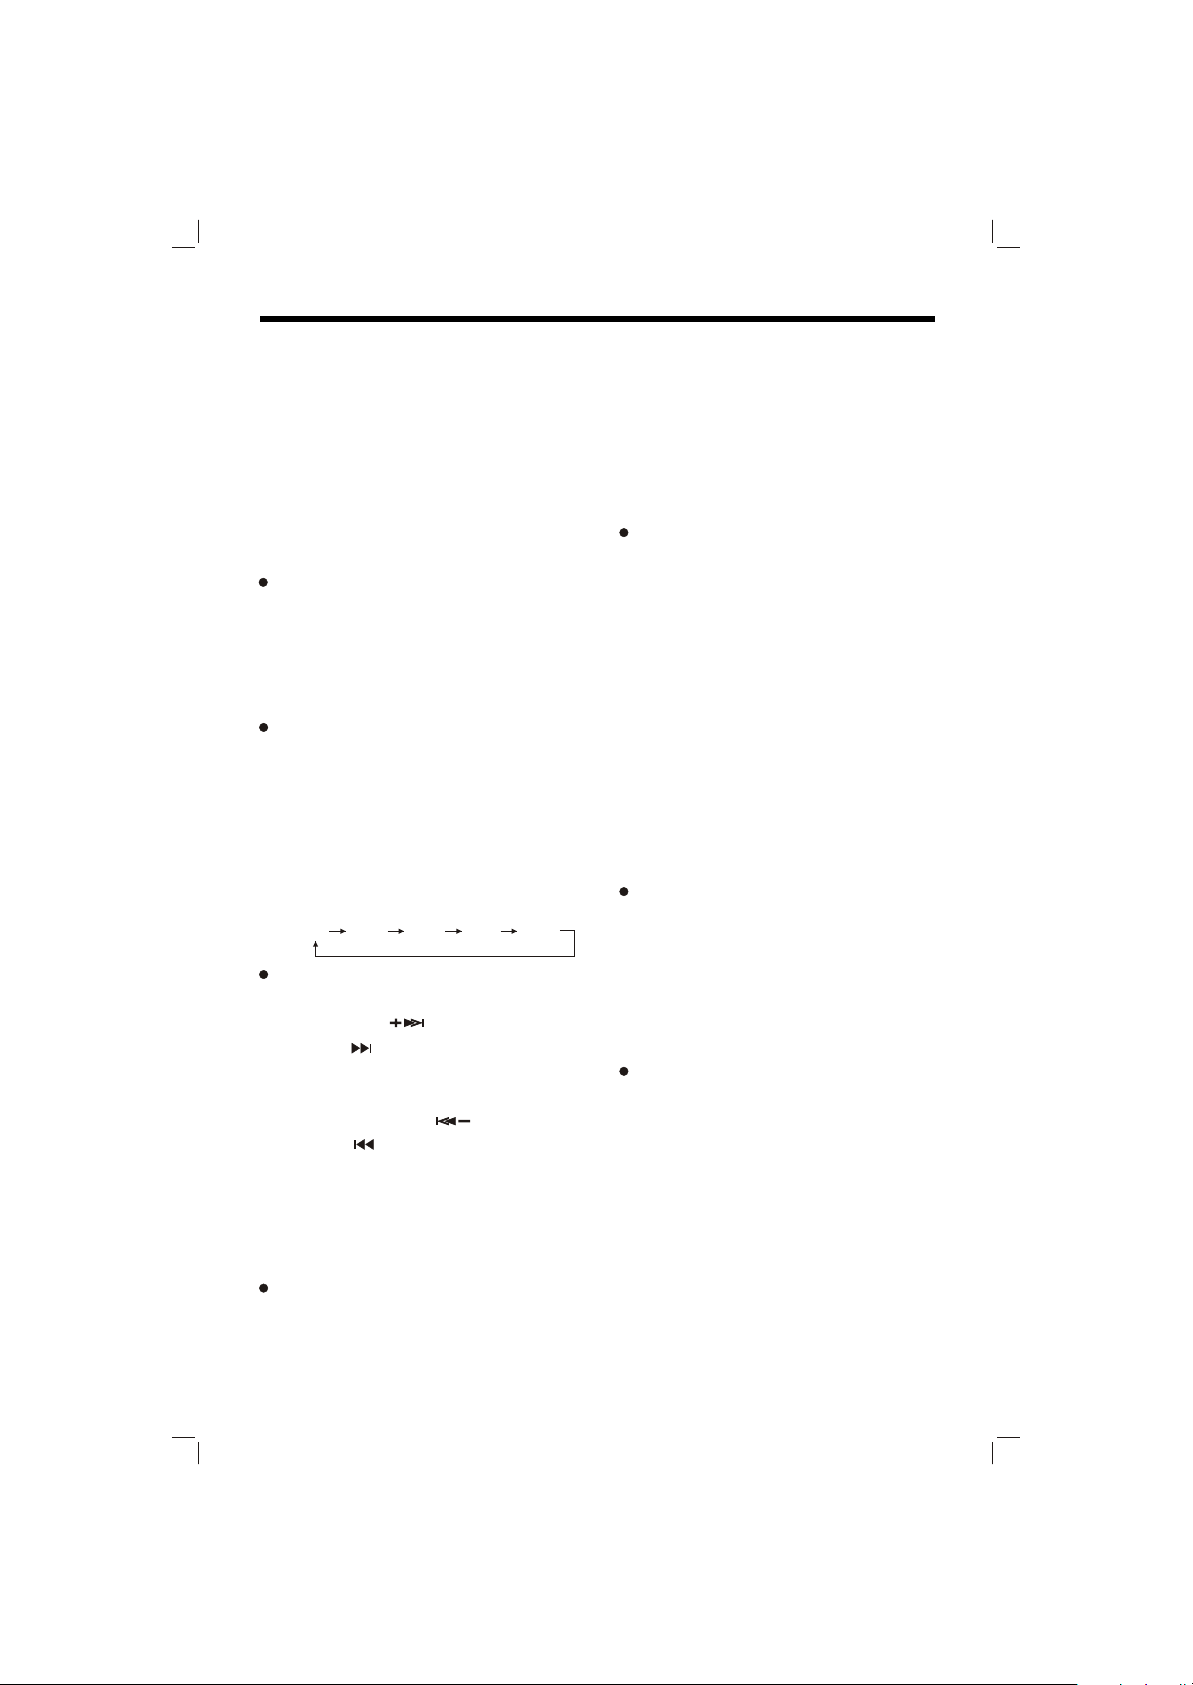
The reception band will change in
the following order:
FM1 FM2 FM3 AM1 AM2
SELECTING STATION
During radio mode, shortly press
MANU/SKIP button on the front
panel or (SEEK+) button on remote
control to increase frequency by one
step of channel spacing, and shortly
press MANU/SKIP on the front
panel or (SEEK-) button on remote
control to decrease frequency by one
step of channel spacing. Hold the
button longer for fast tuning. The
frequency is updated correspondingly
on display.
LOCAL/DISTANT
Press LOC button on the front panel
or PBC (LOC) button on the remote
control to select between local and
distant stations.
Local setting for reception of strong
station, and a distant setting for
reception of weaker stations. This
function is effect during AUTO SEEK
operation.
AUTOMATIC MEMORY STORING
& PROGRAM SCANNING
Automatic memory storing
Press AMS button on the front
panel or RPT (AMS) button on the
remote control for several seconds,
the radio searches from the current
frequency and checks the signal
strength until one cycle search is
finished. And then 6 strongest
stations are stored into the
corresponding preset number
button.
Program scanning
Press AMS or RPT (AMS)
button shortly to scan preset
station.
STATION STORING
Press any one of the preset buttons
(1 to 6) on the front panel to select a
station, which had been stored in the
memory. Press this button for several
seconds, current station is stored into
the number button.
MONO/STEREO
Press L/R (ST) button on the front
panel or ST (AUDIO) button on the
remote control to select mono or
stereo mode. You can sometimes
improve reception of distant stations
by selection mono operation.
17
Page 18
OPERATION
DISC (DVD/VCD/CD/MP3)
OPERATION
STOPPING PLAY
Briefly press the (Stop) button to
stop the unit playback, when
button on the front panel or button
on the remote control is pressed,
normal playback will continue.
Press (Stop) button twice to stop
the playback and go back to initial
Track/Chapter.
RAPID FORWARD/RAPID REVERSE
Press & during play.
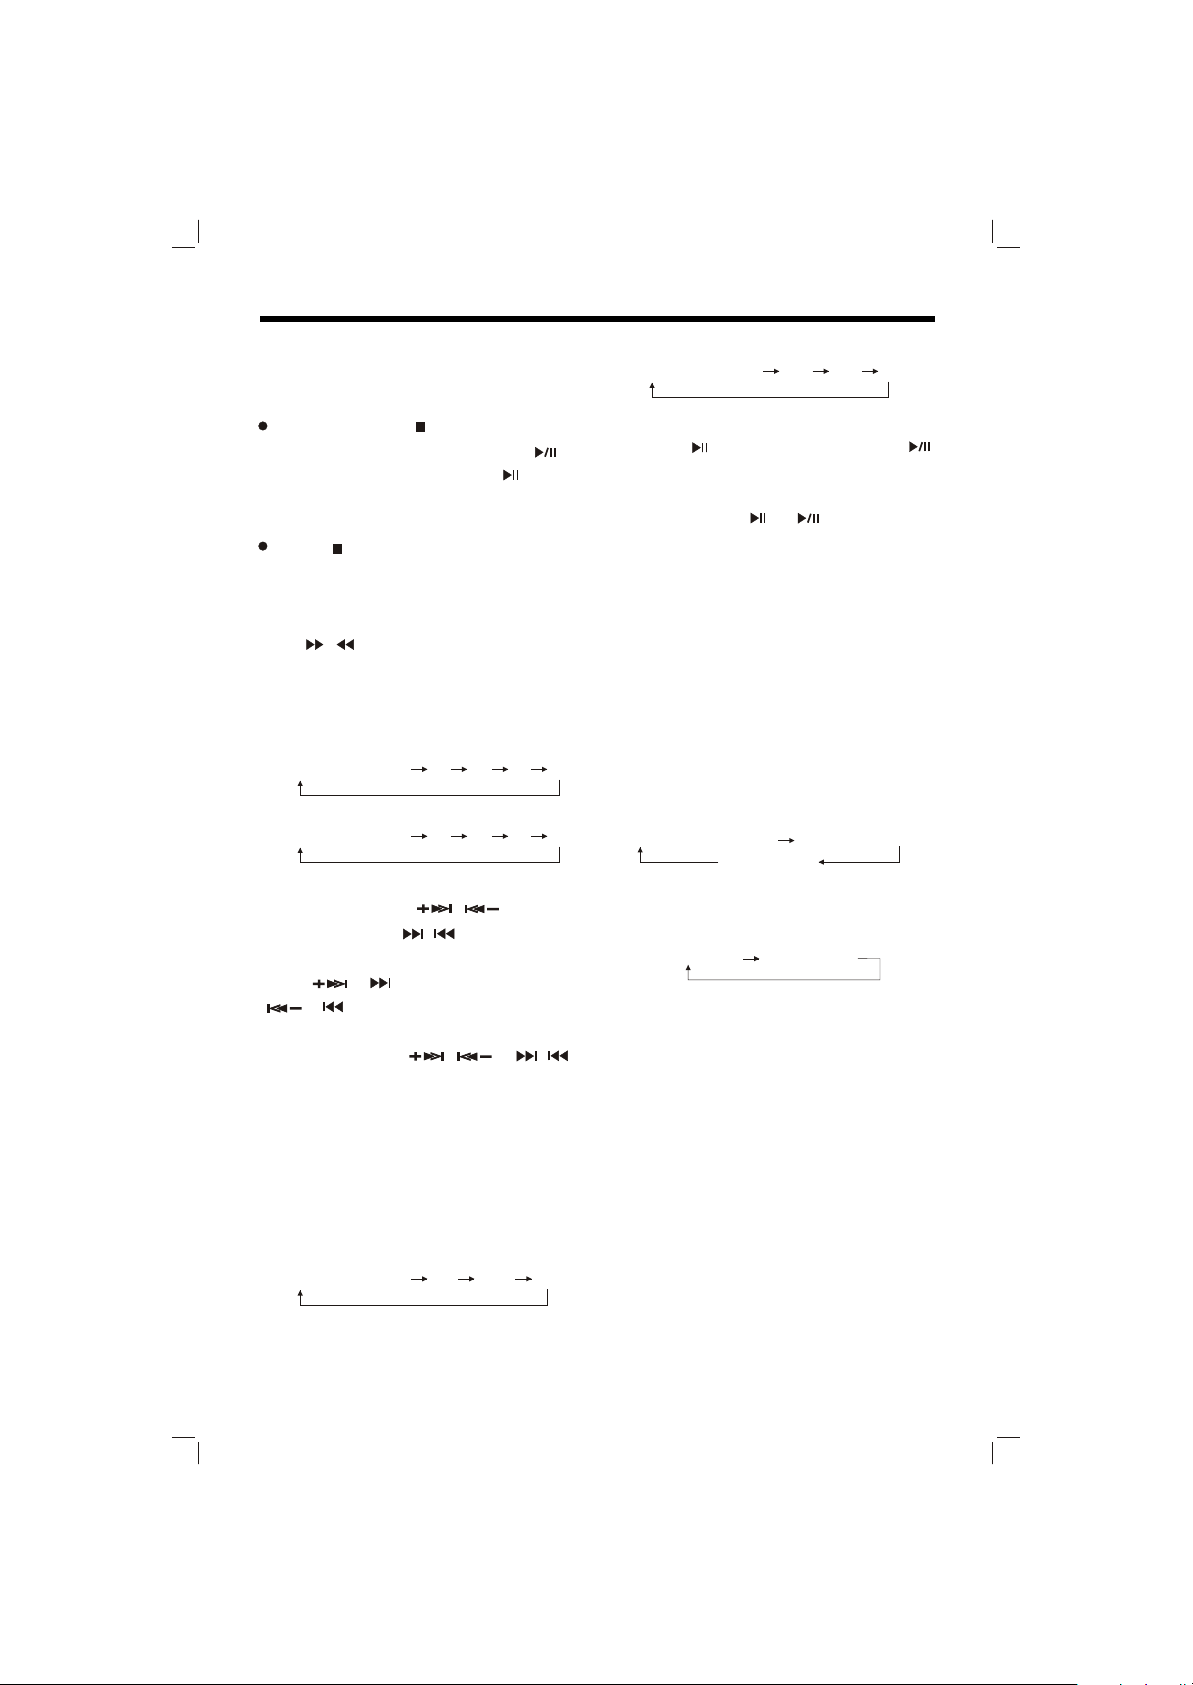
Each time the button is pressed, the
speed of rapid forward /reverse changes
according to the disc as follow.
FOR DVD:
Normal playback 2X 4X 6X 8X
FOR VCD/CD/MP3:
Normal playback 1X 2X 3X 4X
SKIPPING TRACK
Press MANU/SKIP / buttons on
the front panel or / buttons on the
remote control during playback.
Press or to skip to next track, and
or to back one track.
Note: For some VCD2.0 discs (PBCplayback control), / or /
buttons may be unavailable.
SLOW MOTION PLAY
Press SLOW button on the remote
control during play.
Each time the button is pressed, the
speed of slow forward changes
according to the disc as follow.
FOR DVD:
Normal playback 2X 4X 8X
FOR VCD:
Normal playback 1X 2X 3X
PAUSING PLAYING
Pressing on the remote control or
on the front panel during playback will
stop play temporary. To return to normal
playback, press or once again.
MUTE FUNCTION
Pressing the MUT button on the front
panel or MUTE button on the remote
control will mute the sound, but the disc
continues playing. When you unmute
the sound (press MUT or MUTE again),
sound will resume.
REPEATING PLAYING
FOR DVD:
Press RPT button on the front panel or
on the remote control to select repeat
mode as follow:
CHAPTER REPEAT ON TITLE REPEAT ON
REPEAT OFF
FOR VCD/CD:
Press RPT button to select repeat mode
as follow.
REP-ONE REPEAT OFF
1.
Continuously repeat the current
chapter/track, when REP-ONE
mode is selected.
2.
When the player finishes playback of
the current disc last chapter/track, it
will stop and display the elapsed
time. When REPEAT OFF mode is
selected, REP-ONE disappears
from screen display.
REPEAT feature does not support
3.
VCD2.0 (with PBC ON).
18
Page 19
OPERATION
REPEATING PLAYING A PASSAGE
A-B repeat allows a passage to be
repeated continuously. Press A-B
button on the remote control at the start
of the required passage, then press A-
B button again at the end of the
passage. To revert to normal playing,
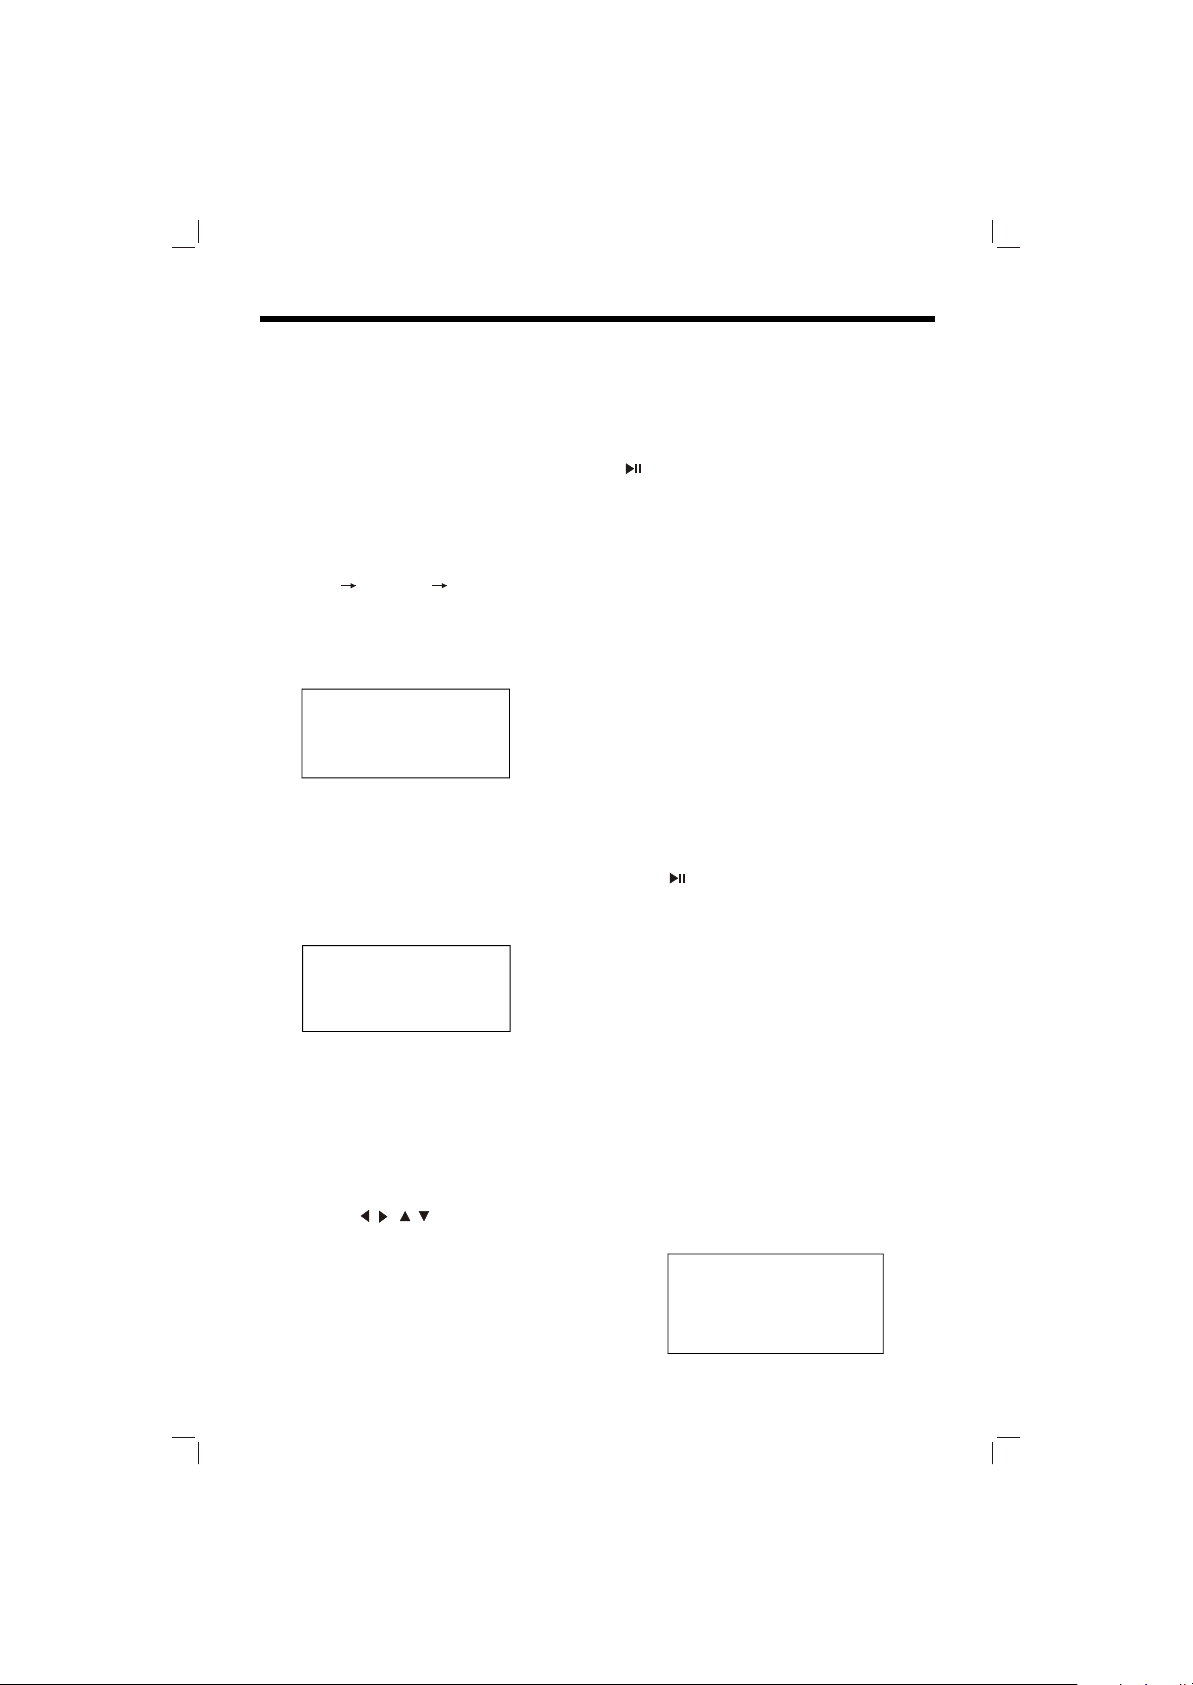
press A-B button again. Each time the
button is pressed, the screen will
display as follows:
A TO B SET A A TO B SET B A TO B CANCELLED
TIME SEARCH (GOTO)
FOR DVD
Press GOTO button twice, the screen
will display the following message:
TITLE 01/01 TIME -- : --: --
You can select the item you want to
watch through TIME setting by using
numeric buttons and OK button on the
remote control.
FOR CD/VCD (WITH PBC OFF):
Press GOTO button once, the screen
will display the following message:
GO TO -- : --
Use numeric buttons to input the time
directly.
ZOOM FUNCTION
Allows the picture to be increased in
size. Press ZOOM button on theremote
control to toggle among 1.5 scale, 2.0
scale and 3.0 scale.During Zoom
mode, press / , / buttons to move
pictures left, right, up or down direction.
PLAYING IN RANDOM ORDER (NOT
FOR DVD)
In stop and PBC OFF mode, press RDM
On the front panel or RANDOM button
on the remote control, track selection
will be made in random order. The
display screen will show “RANDOM
ON” on the left-top corner. Then press
button to start RANDOM playback.
Press RDM or RANDOM button again
in stop mode, “RANDOM OFF” appears
and release the mode.
PLAYING IN PROGRAMMED ORDER
For CD:
In stop mode, press PROGRAM button,
the screen will display “PROGRAM
P00:00”. For example: press numeric
button 4, “PROGRAM P01:04” appears,
it means track 4 will be played first,
then press numeric button 6 and
“PROGRAM P02:06” appears. Press
the different numeric button to select
the corresponding track, and then you
can program tracks to your need. If
you want to complete program setting,
press button or OK button to play
tracks in programmed order.
PREVIEWING PLAYING (FOR CD
ONLY)
When play a CD, press INT button on
the front panel to play first several
seconds of each track on the current
disc. Press again to stop intro and
listen to track.
ON-SCREEN DISPLAY FUNCTION
Press the DISPLAY button during
playback to display the contents of the
current disc on the screen.
Example:
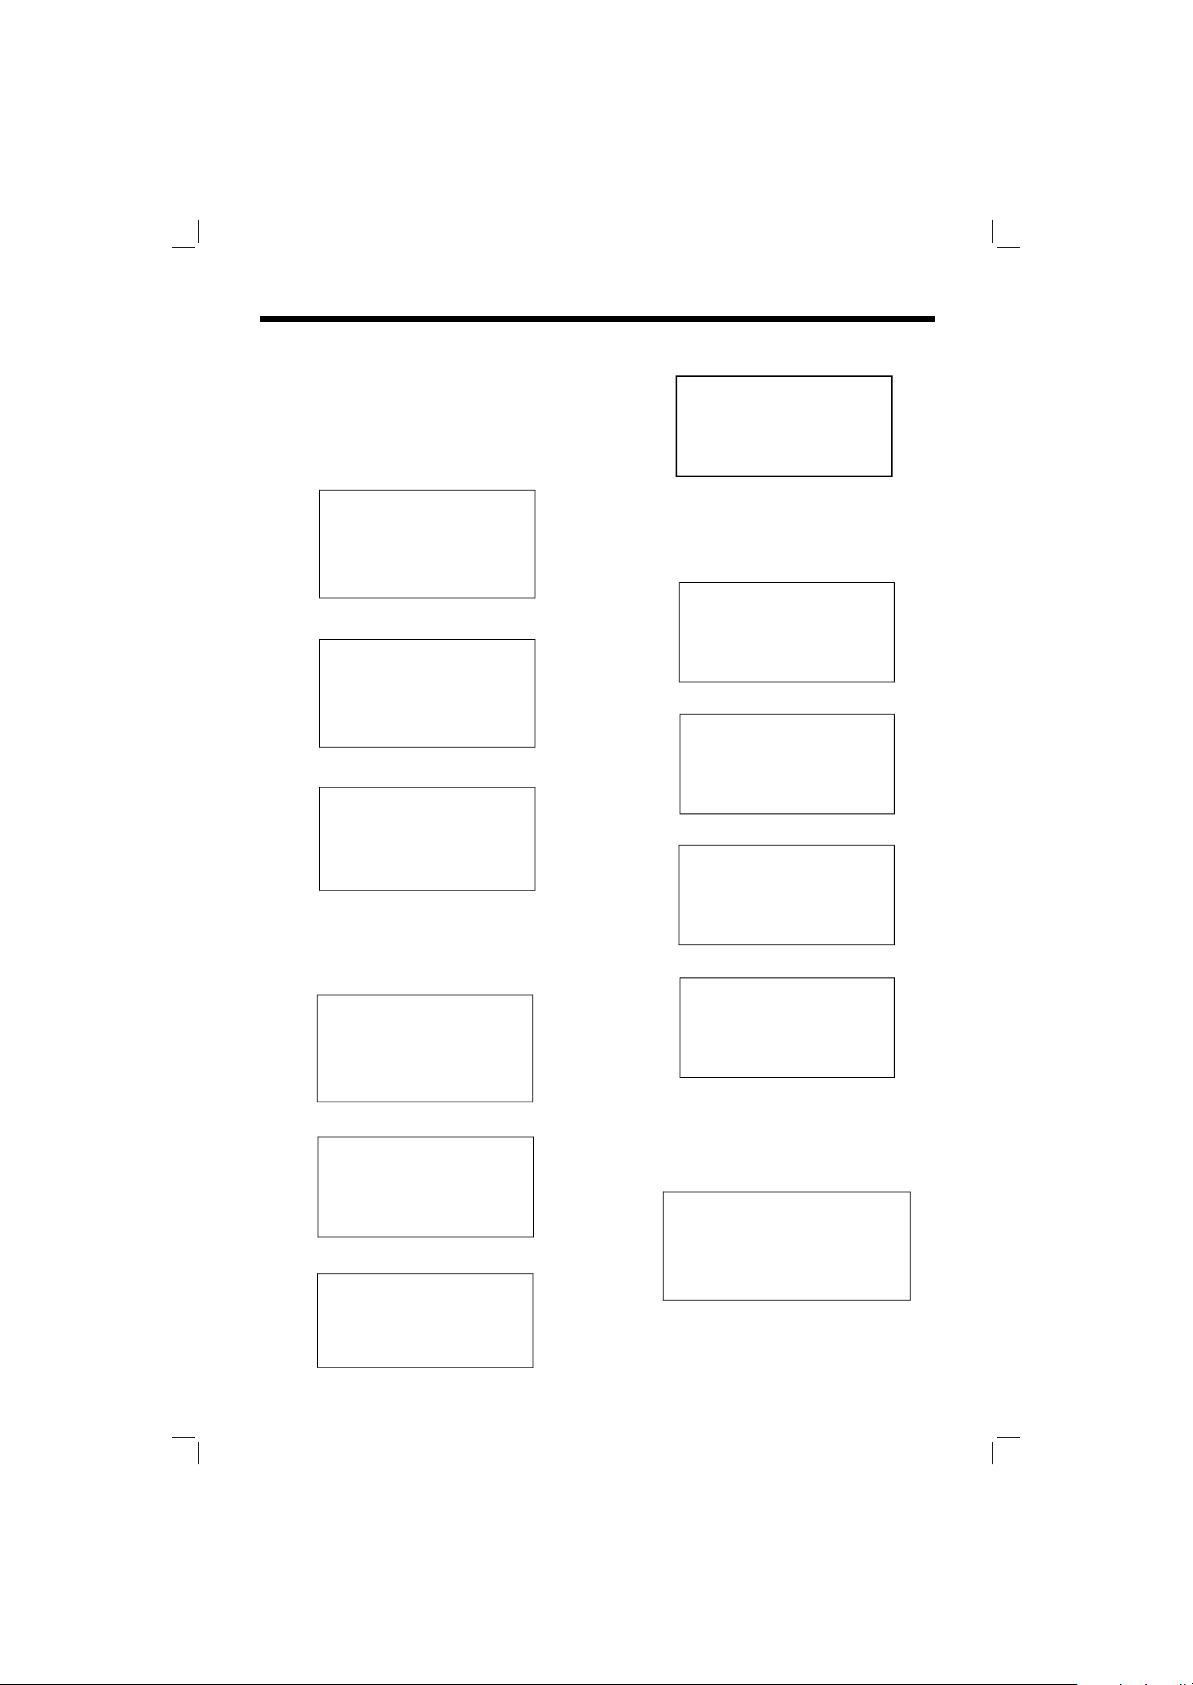
FOR DVD:
(1) Press DISPLAY for the first time:
TITLE 01/03 CHAPTER 002/025
00:02:25
19
Page 20
OPERATION
Title Number, Total Title Number,
Chapter Number, Total Chapter Number
of this Title of the disc currently being
played will be shown on the screen,
along with the elapsed time.
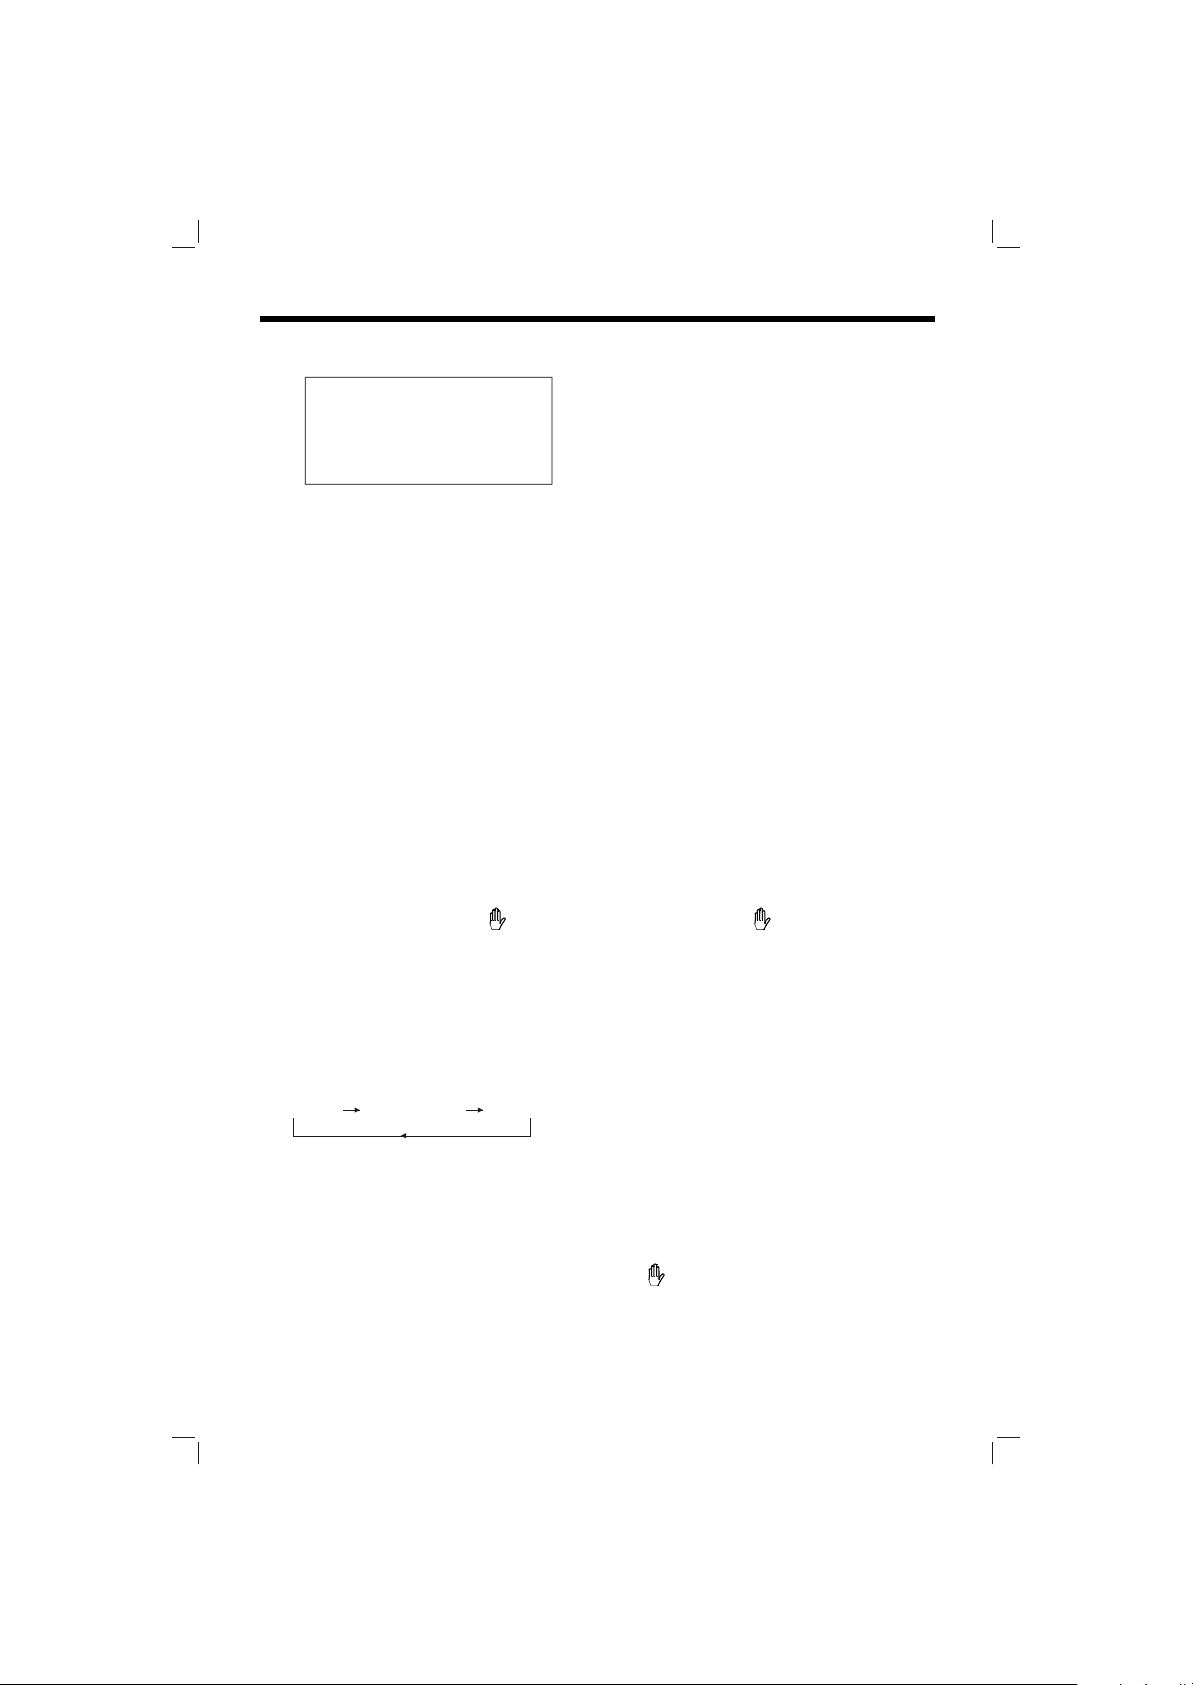
(2) Press DISPLAY for the second time:
TITLE REMAIN
01:46:58
(3) Press DISPLAY for the third time:
CHAPTER ELAPSED
00:00:24
(4) Press DISPLAY for the fourth time:
CHAPTER REMAIN
00:01:39
(5) Press DISPLAY for the fifth time:
The message on the screen will be cleared.
FOR VCD:
(1) Press DISPLAY for the first time:
SINGLE ELAPSED
00:25 01/13
(4) Press DISPLAY for the fourth time:
TOTAL REMAIN
40:35 01/13
(5) Press DISPLAY for the fifth time:
The message on the screen will be cleared.
FOR CD:
(1) Press DISPLAY for the first time:
SINGLE ELAPSED
00:25 01/14
(2) Press DISPLAY for the second time:
SINGLE REMAIN
03:15 01/14
(3) Press DISPLAY for the third time:
TOTAL ELAPSED
00:25 01/14
(4) Press DISPLAY for the fourth time:
TOTAL REMAIN
40:35 01/14
(2) Press DISPLAY for the second time:
SINGLE REMAIN
03:15 01/13
(3) Press DISPLAY for the third time:
TOTAL ELAPSED
00:25 01/13
(5) Press DISPLAY for the fifth time:
The message on the screen will be cleared.
FOR Mp3:
(1) Press DISPLAY for the first time:
CHAPTER ELAPSED 01/18 00:25
20
Page 21
OPERATION
(2) Press DISPLAY for the second time:
CHAPTER REMAIN 01/18 04:25
(3) Press DISPLAY for the third time:
The message on the screen will be cleared.
MULTI-AUDIO LANGUAGES
FUNCTION
For DVD:
Press L/R (ST) button on the front
panel or ST (AUDIO) button on the
remote control during playback. Each
time the button is pressed, the audio
soundtrack language changes on
sequential order.
Notes:
- The language number is different
according to the disc.
- Some discs only contain one
language soundtrack.
- When no different language
soundtrack are recorded, will be
displayed at screen left top corner.
For VCD/CD:
Press L/R (ST) button on the front
panel or ST (AUDIO) button on the
remote control during playback. It is
possible to switch the sound between
mono and stereo sound.
MONO LEFT MONO RIGHT STEREO
MENU FUNCTION (For DVD Only)
Press MENU button while the disc is
playing and the disc root menu will be
displayed. You can navigate with the
remote control navigation keys and
select a feature with the OK button on
the remote control.
TITLE MENU FUNCTION (For DVD
Only)
If the DVD has multiple titles recorded
on the disc. It can select preferred title
from the title menu to start playback.
1. Press TITLE during playback.
- The title menu is display.
2. Select preferred title by the cursor
buttons and confirm by OK button on
the remote control.
MULTI-SUBTITLE LANGUAGES
FUNCTION (For DVD only)
Press SUB-T during playback.
Each time the button is pressed, the
subtitle language changes in sequential
order.
Notes:
- The language number is different
according to the disc.
- Some discs only contain one subtitle
language.
- When no different subtitle language
are recorded, will be displayed at
screen left top corner.
MULTI-ANGLE FUNCTION (For DVD
only)
Press ANGLE during playback.
Each time the button is pressed, the
angle changes in sequential order.
Notes:
- The angle number is different
according to the disc.
- The function only works for discs
having scenes recorded at
different angles.
- When no different angle is recorded,
will be displayed at screen left
top corner.
21
Page 22
OPERATION
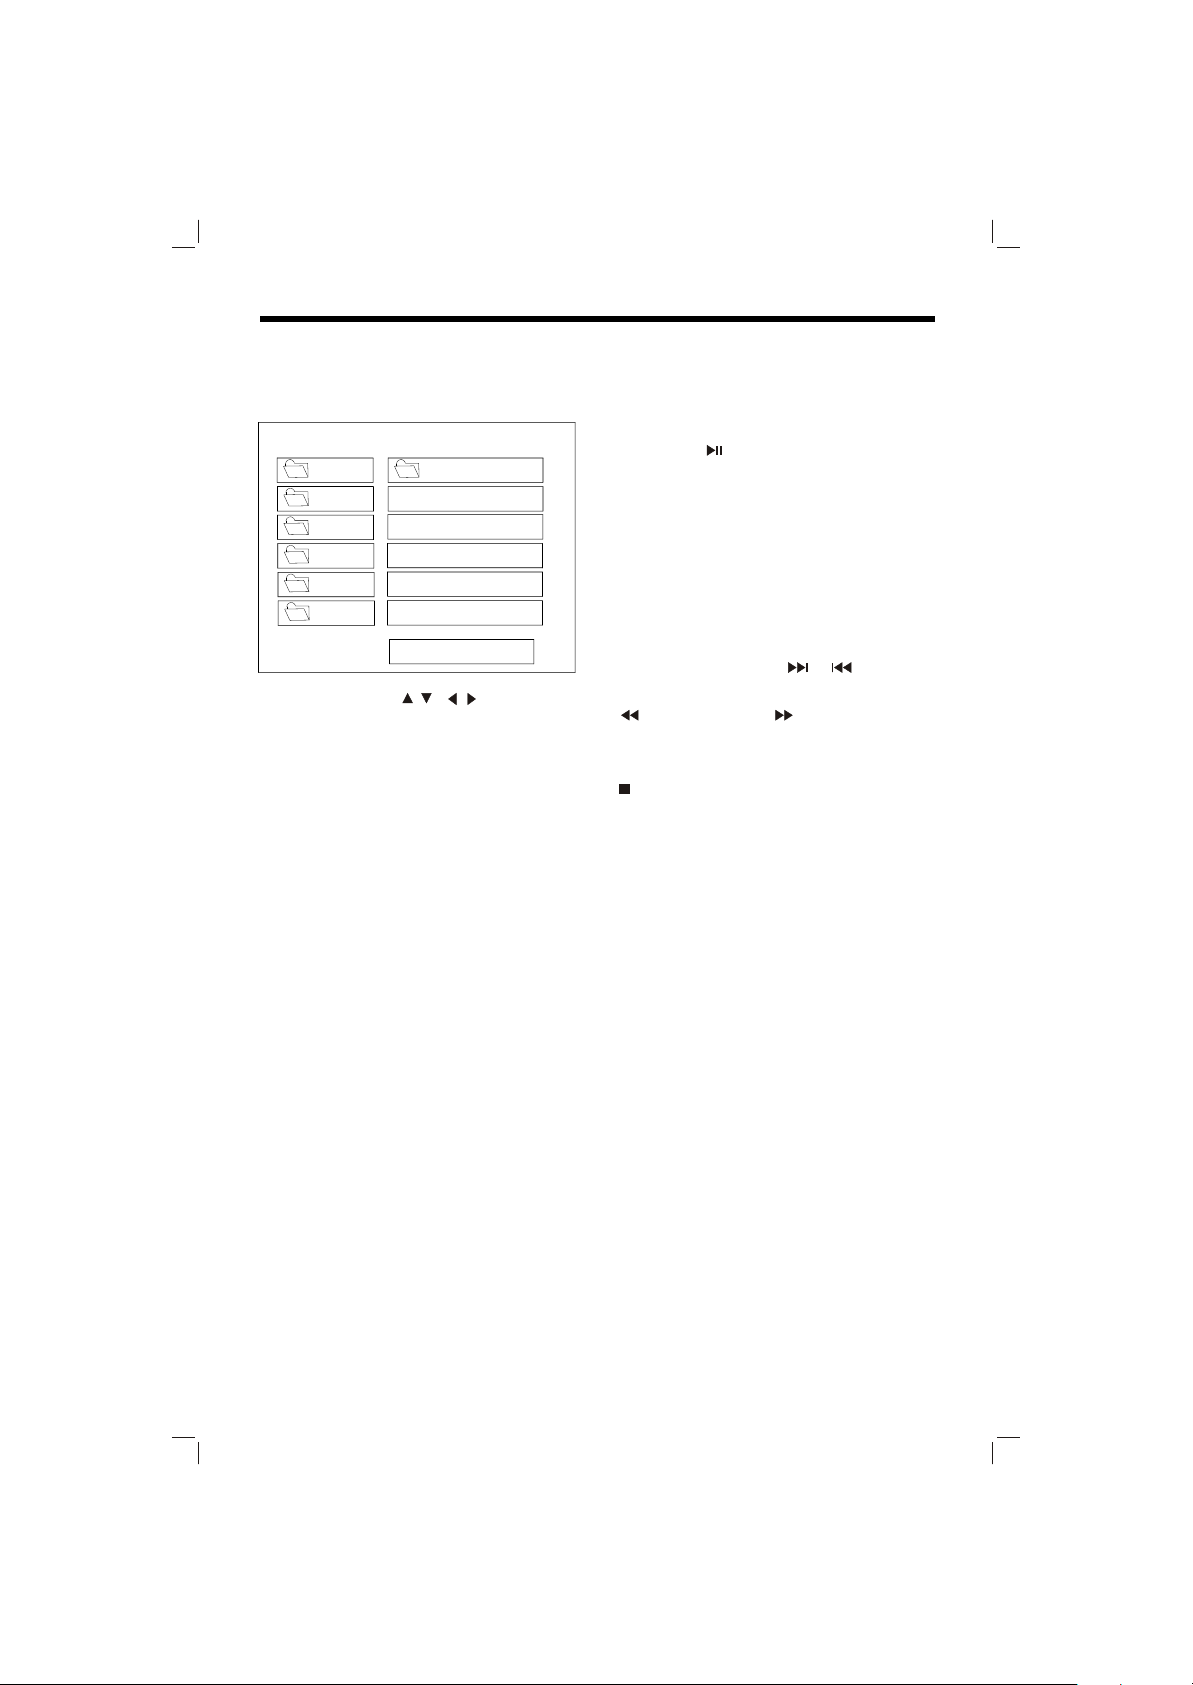
MP3 Disc Play
MP3 disc is playing as the format of
FOLDER. For example:
PLAY MODE
ROOT
CD01
CD02
CD03
CD04
CD05
SMART NAVI
In stop mode, use / , / on the
remote control to select the item or
folder (such as CD01, CD02...) and
press OK button on the remote control
to confirm, then select the desired track
(such as 001 PLUMT, 002 RZID...) on
the current folder to play.
Pressing RPT button on the front panel
or on the remote control repeatedly can
select two kinds of repeat play mode.
REP-ONE: Play the same song over and
again.
FOLDER REP: Play all songs in the
current directory in sequence,
over and again.
Pressing RDM on the front panel or
RANDOM button on the remote control
to play tracks in random order. Press
RDM or RANDOM button again to
release the mode.
In stop mode, press PROGRAM button,
“AUTO PLAY” in the menu will change
into “PROGRAM P0”. For example: first
press numeric button 4, “PROGRAM
P01:0004” appears on the left-top corner
of the screen, it means track 4 will be
MP3 001 PLUMT
MP3 002 RZID
MP3 003 ASCIS
MP3 004 DCYI
MP3 005 BFZ
DISC
played first, then press numeric button
6 and “PROGRAM P02:0006” appears.
Press the different numeric button to
select the corresponding track, and
then press button or OK button to
complete program setting and to play
tracks in programmed order. And
“PROGRAM P0” changes into “PROGEND” on the menu.
When the tracks played in programmed
order, press PROGRAM button to exit
program mode, and “AUTO PLAY”
shows in the menu.
During playback, use or to skip an
item ahead or back.
: Rapid reverse, : Rapid advance.
Note: The FOLDER cannot be selected
during playing. It can be selected after
(Stop) button pressed.
AV IN OPERATION
When you connect another audio/video
system to the unit through the AV IN
terminals on the back of the unit, press
MOD button on the front panel or
MODE on the remote control to select
AV IN mode.
22
Page 23
SETUP
INITIAL SETUP
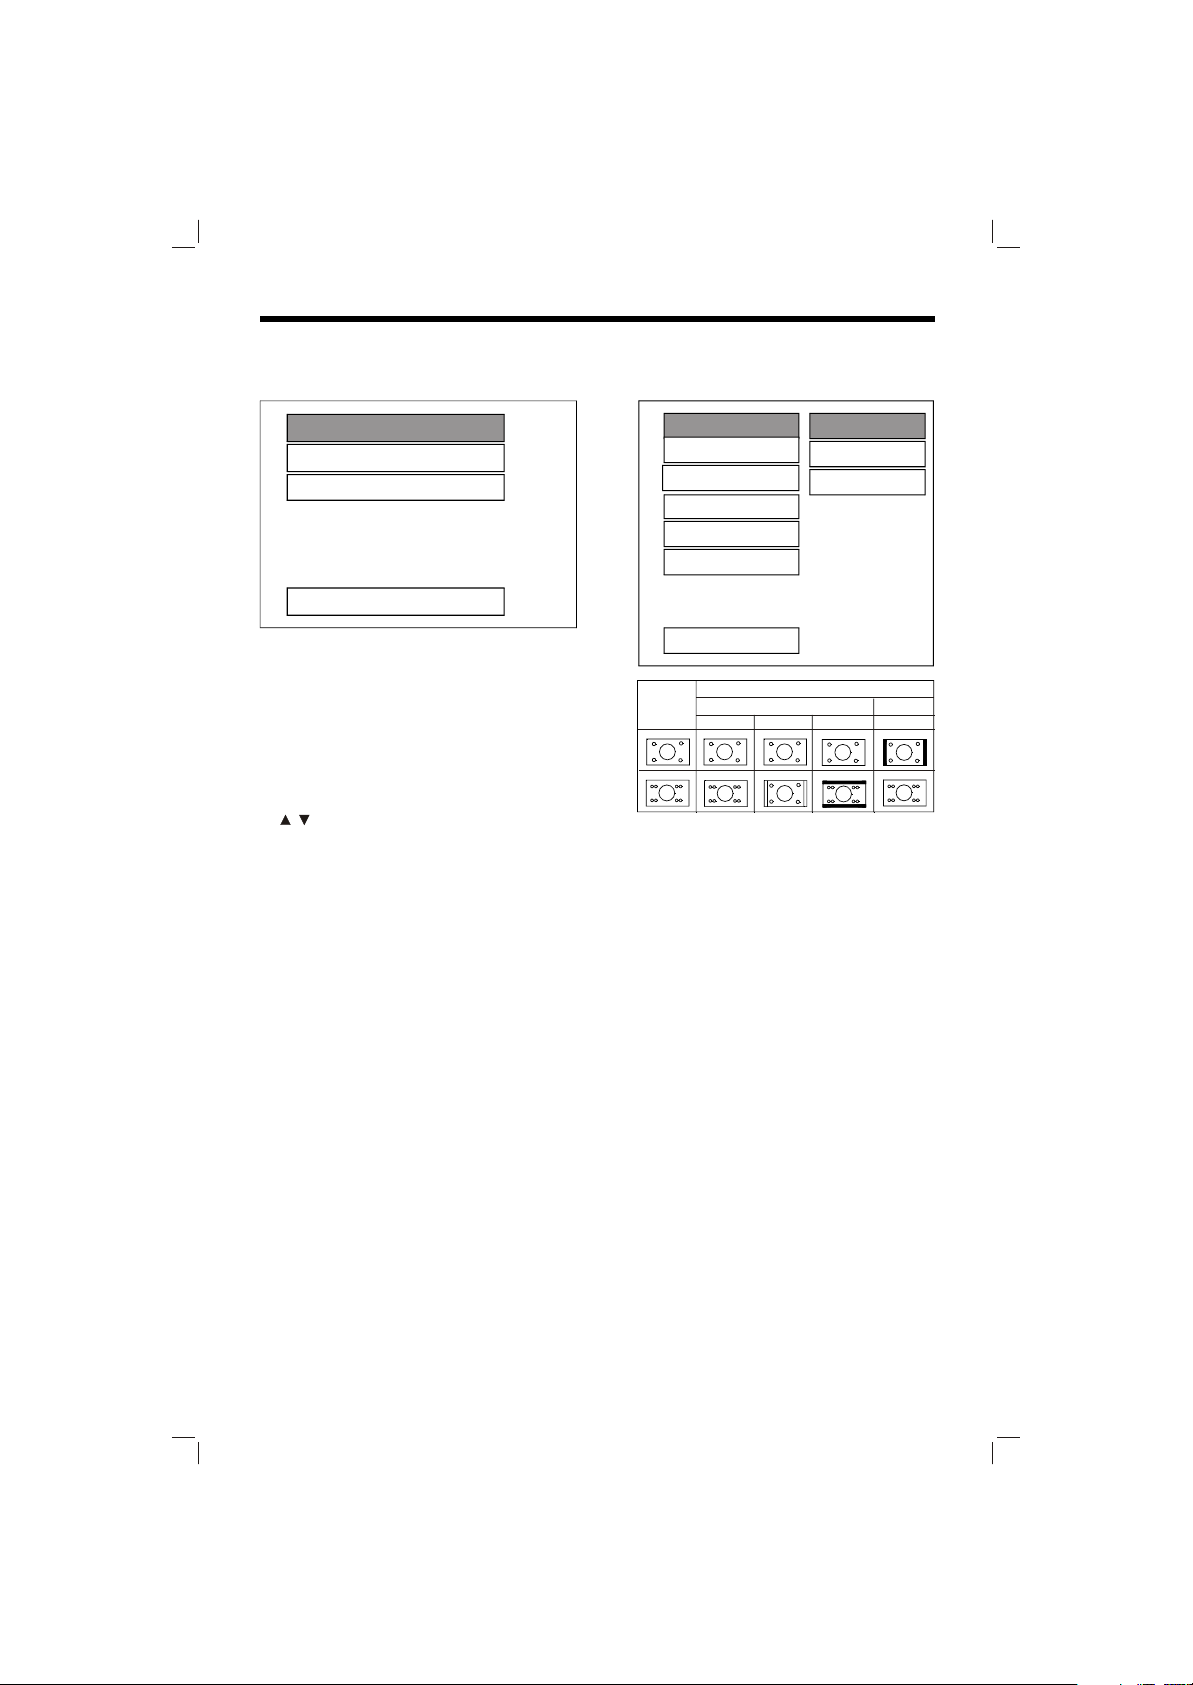
SETUP MENU --- MAIN PAGE
GENERAL SETUP
-- GENERAL PAGE --
GENERAL SETUP
AUDIO SETUP
PREFERENCES
EXIT SETUP
1. Press SETUP on the remote control
or on the DVD unit in the stop mode.
(Press the stop button twice to ensure
that the player is in STOP mode.)
2. The initial SETUP menu is displayed.
3. Select the preferred item by using the
/ buttons.
4. Press OK button on the remote
control.
a/. GENERAL SETUP
This setup page includes all the
item of TV display & Audio output
feature. For details please refer to
GENERAL SETUP MENU.
b/. AUDIO SETUP
This setup page includes all the
items for AUDIO. Please refer to
AUDIO SETUP MENU.
c/. PREFERENCES SETUP
This setup page includes all the
configuration of support feature.
For details please refer to
PREFERENCES SETUP MENU.
Vide oMaterial
4:3
16:9
TV DISPLAY
PIC MODE
ANGLE MARK
OSD LANG
CAPTIONS
SCR SAVER
MAIN PAGE
Normal
TVScreen
4:3
Pan Scan
NORMAL/PS
NORMAL/LB
WIDE
Wide(16:9)
Letter-box
TV display setup
This is to select the appropriate TV
aspect ratio (4:3 or 16:9) according
to the connected TV set.
Normal/PS (For 4:3 TV)
Played back in the PAN & SCAN
style. (If connected to wide-screen
TV, the left and right edges are cut
off.)
Normal/LB (For 4:3 TV)
Played back in letterbox style. (If
connected to wide-screen TV,
black bands appear at top
and bottom of the screen.)
Wide (For 16:9 TV)
Select when a wide-screen TV set is
connected.
23
Page 24
SETUP
-- GENERAL PAGE --
TV DISPLAY
PIC MODE
ANGLE MARK
OSD LANG
CAPTIONS
SCR SAVER
AUTO
HI-RES
N-FLICKER
-- GENERAL PAGE --
TV DISPLAY
PIC MODE
ANGLE MARK
OSD LANG
CAPTIONS
SCR SAVER
ENGLISH
FRENCH
GERMAN
SPANISH
MAIN PAGE
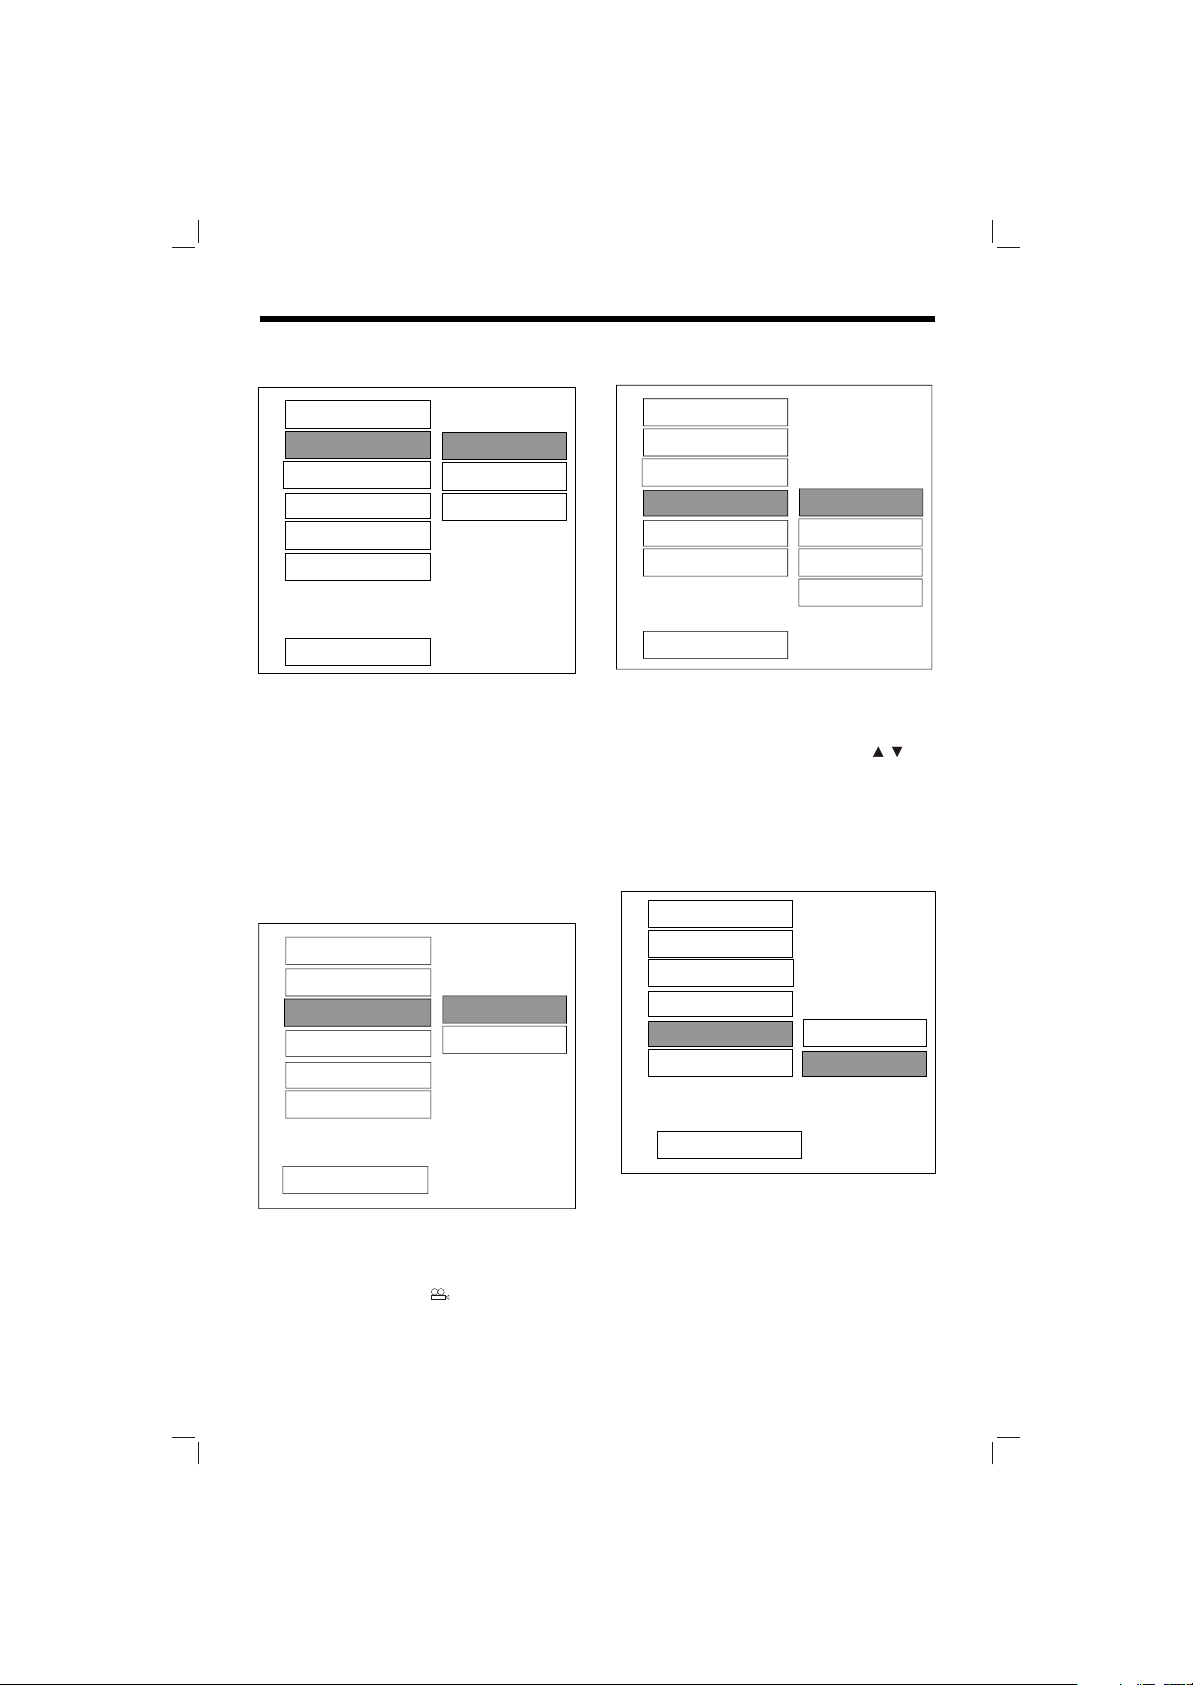
PIC mode setup
Select AUTO, the player PIC mode will
depend on DVD disc.
Select HI-RES format for best image
resolution.
Select N-FLICKER format on image or
picture with noise or distortion.
-- GENERAL PAGE --
TV DISPLAY
PIC MODE
ANGLE MARK
OSD LANG
CAPTIONS
SCR SAVER
MAIN PAGE
ANGLE MARK display setup
If it is set to ON, when the multi-angle
DVD disc is playing, “ ” (the angle
mark) will appear on the screen; if it is
set to “OFF”, the mark will not appear.
ON
OFF
MAIN PAGE
OSD LANG type setup
Select the preferred OSD (On Screen
Display) language by using the /
buttons.
-- GENERAL PAGE --
TV DISPLAY
PIC MODE
ANGLE MARK
OSD LANG
CAPTIONS
SCR SAVER
MAIN PAGE
ON
OFF
CAPTIONS setup
When play DVD disc, activate the
CAPTIONS feature by selecting ON
and the captions (such as the actor
dialogue) appear on the screen;
deactivate this feature by selecting
OFF and the captions will not appear.
24
Page 25
SETUP
-- GENERAL PAGE --
TY DISPLAY
PIC MODE
ANGLE MARK
OSD LANG
CAPTIONS
SCR SAVER
MAIN PAGE
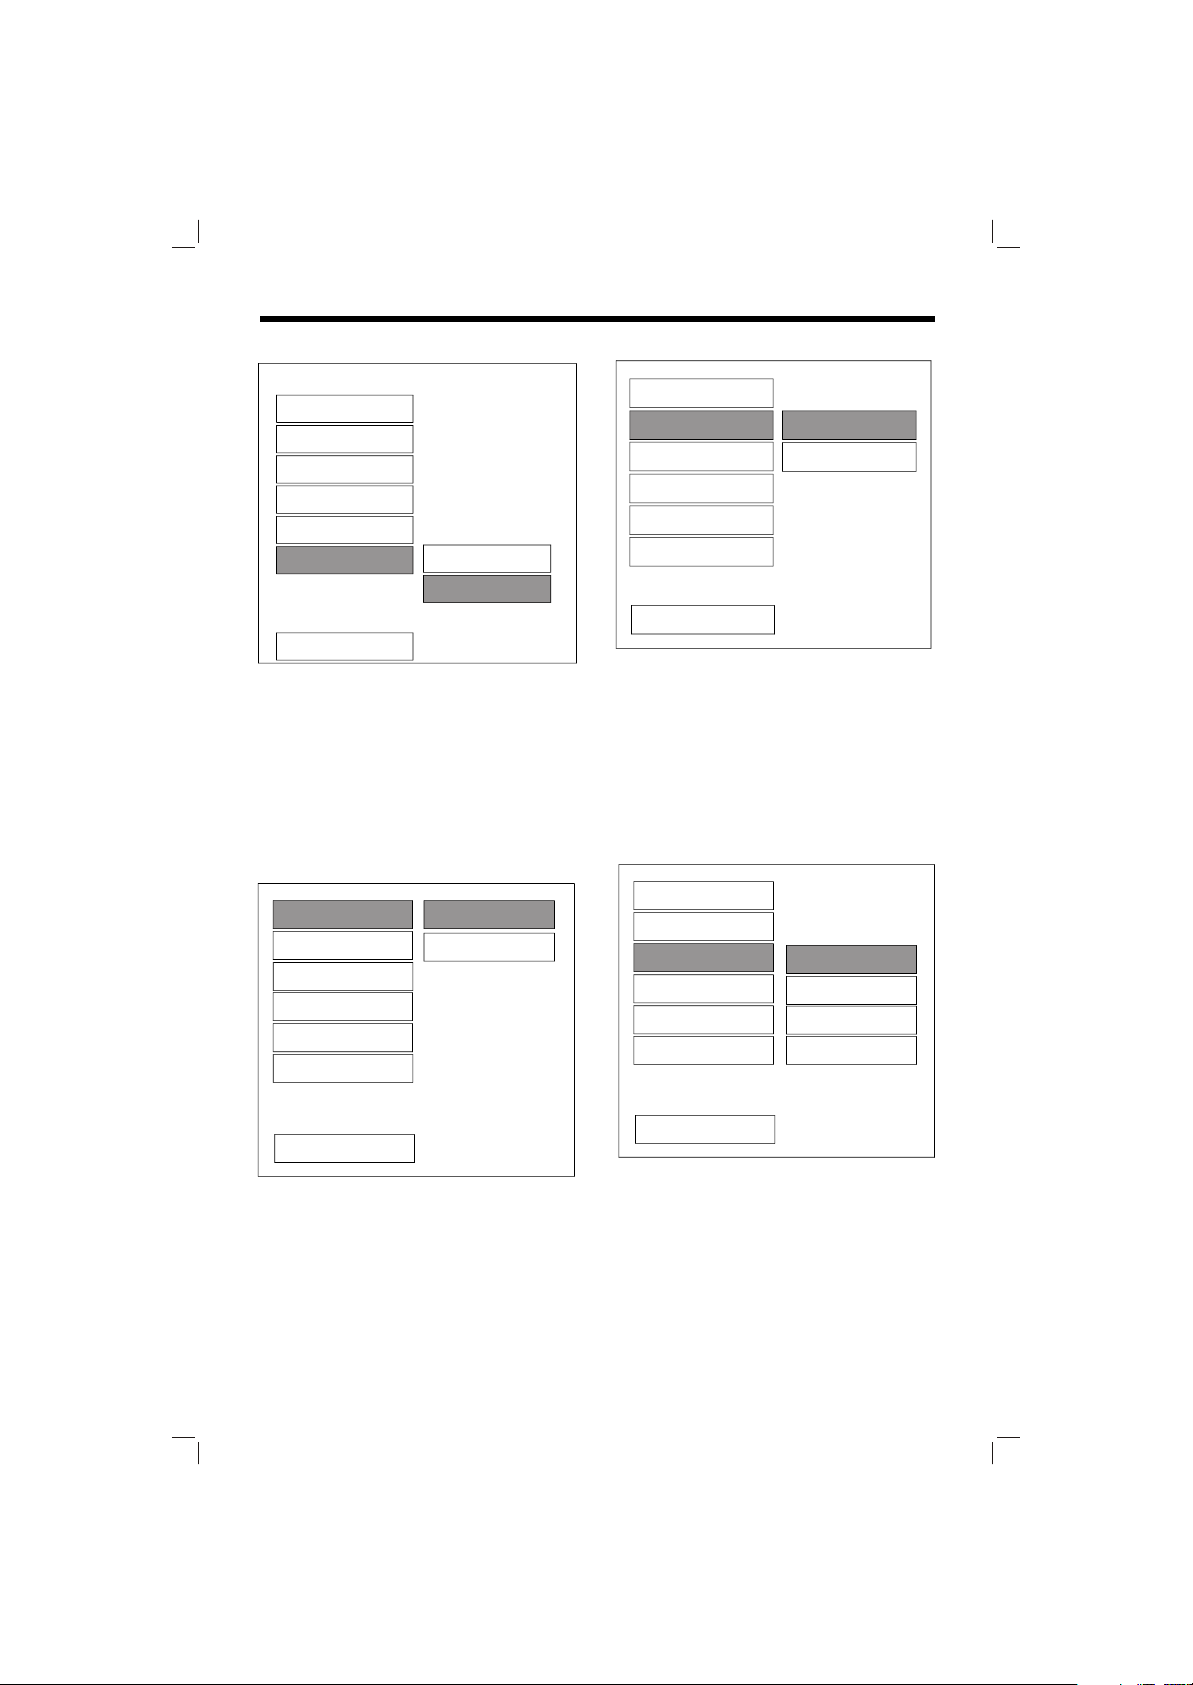
SCR SAVER setup
Select the SCR SAVER ON/OFF.
AUDIO SETUP
-- AUDIO SETUP --
OP MODE
DUAL MONO
DYNAMIC
PRO LOGIC
LPCM OUTPUT
ON
OFF
OFF SPDIF
ON
-- AUDIO SETUP --
SPDIF
OP MODE
DUAL MONO
DYNAMIC
PRO LOGIC
LPCM OUTPUT
MAIN PAGE
LINE OUT
RF REMOD
OP MODE
- LINE OUT: Line out mode, with digital
dialog normalization.
- RF REMOD: RF remodulation mode,
with heavy compression and digital
dialog normalization.
It is recommended to select LINE OUT
mode.
-- AUDIO SETUP --
SPDIF
OP MODE
DUAL MONO
DYNAMIC
PRO LOGIC
LPCM OUTPUT
STEREO
L-MONO
R-MONO
MIX-MONO
MAIN PAGE
SPDIF
This is to activate the digital audio output
on or off.
MAIN PAGE
DUAL MONO
DUAL MONO reproduction mode, used
only when the input consists of two
independent audio channels (1/1 mode).
Possible selections are:
- STEREO: Reproduce both channels as is.
- L-MONO: Reproduce the left channel only.
- R-MONO: Reproduce the right channel only.
- MIX-MONO: Mix both channels.
25
Page 26
SETUP
SPDIF
OP MODE
DUAL MONO
DYNAMIC
PRO LOGIC
LPCM OUTPUT
MAIN PAGE
-- AUDIO SETUP --
FULL
6/8
4/8
2/8
OFF
-- AUDIO SETUP --
SPDIF
OP MODE
DUAL MONO
DYNAMIC
PRO LOGIC
LPCM OUTPUT
LPCM 48K
LPCM 96K
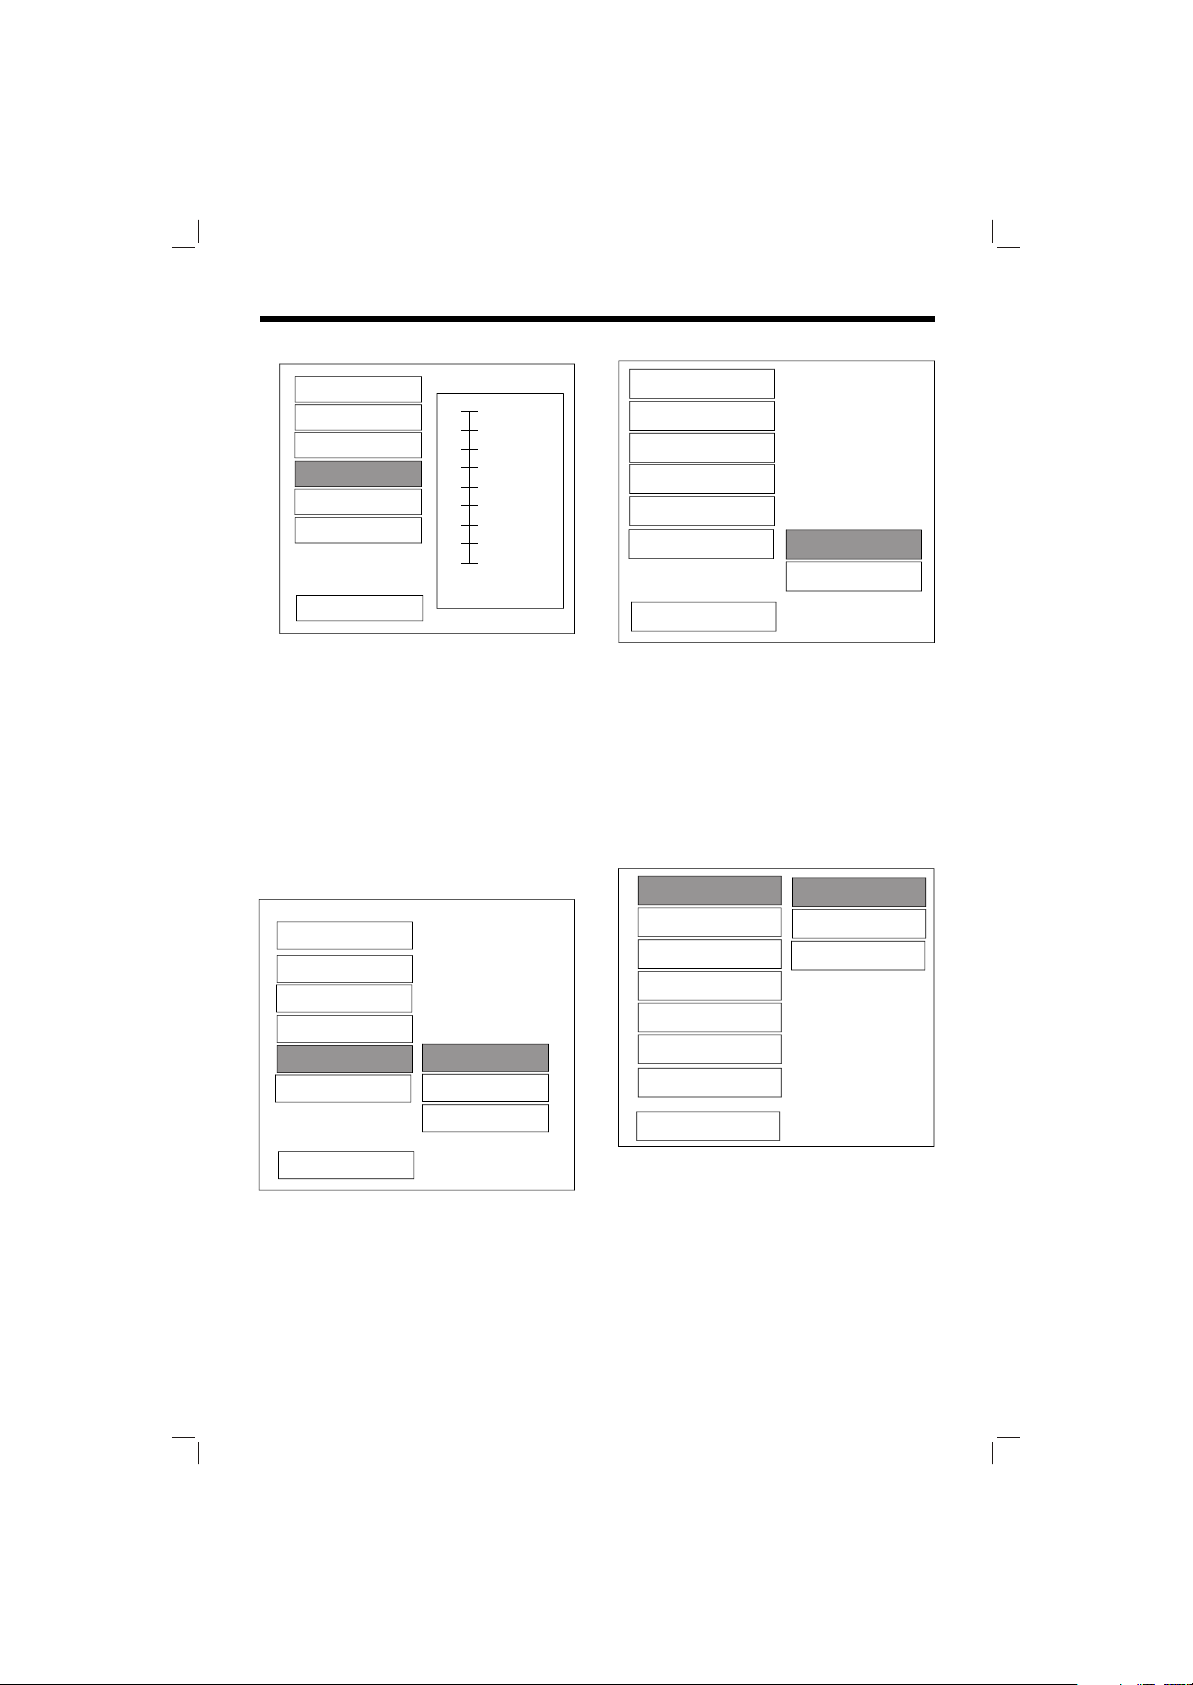
Dynamic range Control
Select DYNAMIC and adjust the
dynamic range of a Dolby Digital
encoded program. There are 8 steps
between full compression and off
compression.
-- AUDIO SETUP --
SPDIF
OP MODE
DUAL MONO
DYNAMIC
PRO LOGIC
LPCM OUTPUT
MAIN PAGE
PRO LOGIC
When select ON, it will convert the 2channel audio input into 5-channel
output. When select OFF, it will cancel
this function. When select AUTO, it will
depend on the disc.
OFF
ON
AUTO
LPCM OUTPUT
Select the LPCM (Line Pause Code
Modulation) OUTPUT between LPCM
48K and LPCM 96K. The higher the
sampling frequency is, the better the
output audio quality is.
It is recommended to select LPCM 96K.
PREFERENCES SETUP
--PREFERENCES PAGE--
TV TYPE
AUDIO
SUBTITLE
DISC MENU
PARENTAL
PASSWORD
DEFAUL TS
MAIN PAGE
TV type setup
This player can play discs recorded in
either PAL or NTSC format.
Select NTSC format, when the unit is
connected to NTSC TV.
Select PAL format, when the unit is
connected to PAL TV.
Select AUTO format, the player TV
output format will be according to the
DVD disc format.
26
AUTO
NTSC
PAL
Page 27
SETUP
--PREFERENCES PAGE--
TV TYPE
AUDIO
SUBTITLE
DISC MENU
PARENTAL
PASSWORD
DEFAUL TS
MAIN PAGE
ENGLISH
FRENCH
SPANISH
CHINESE
JAPANESE
GERMAN
--PREFERENCES PAGE--
TV TYPE
AUDIO
SUBTITLE
DISC MENU
PARENTAL
PASSWORD
DEFAUL TS
MAIN PAGE
ENGLISH
FRENCH
SPANISH
CHINESE
JAPANESE
GERMAN
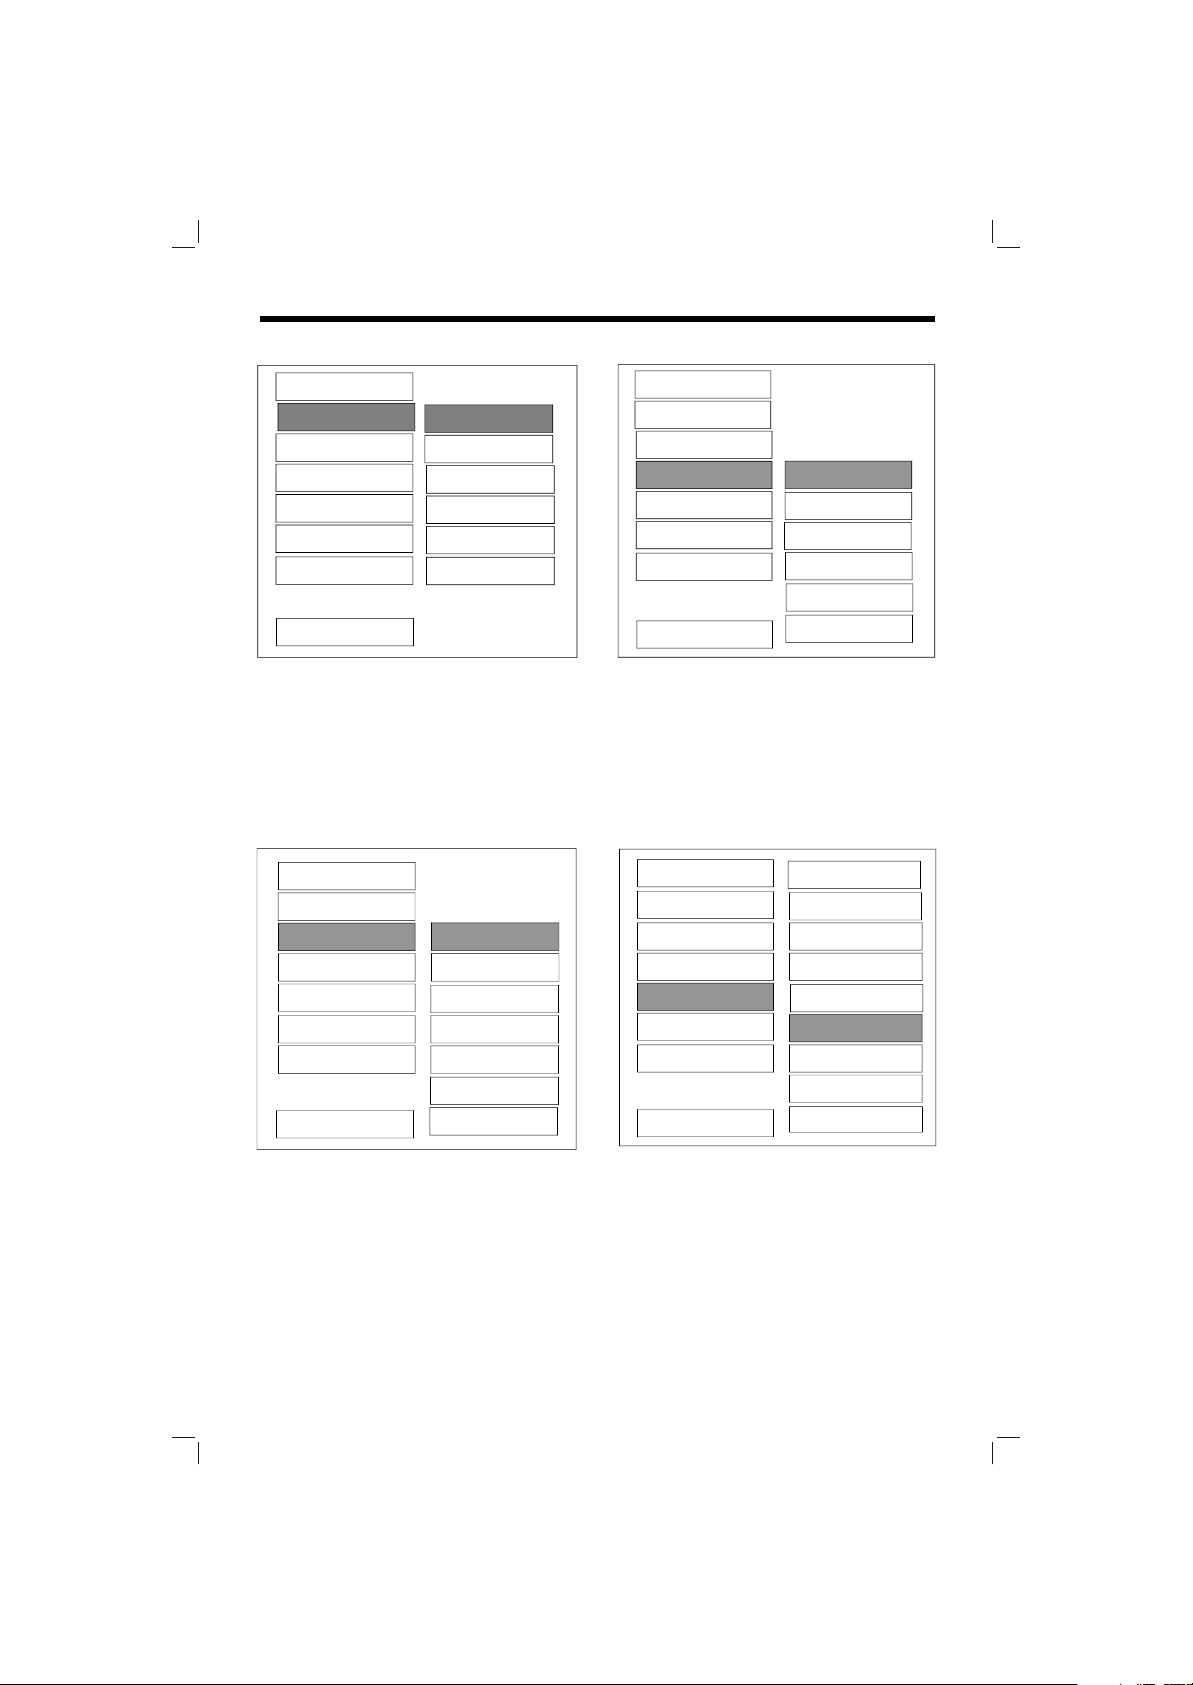
AUDIO language setup
Select the preferred AUDIO soundtrack
by using the cursor buttons.
DISC MENU language setup
Select the preferred DISC MENU language
by using the cursor buttons
--PREFERENCES PAGE-- --PREFERENCES PAGE--
TV TYPE
AUDIO
SUBTITLE
DISC MENU
PARENTAL
PASSWORD
DEFAULTS
MAIN PAGE
ENGLISH
FRENCH
SPANISH
CHINESE
JAPANESE
GERMAN
OFF
SUBTITLE language setup
Select the preferred SUBTITLE
language by using the cursor buttons.
TV TYPE
AUDIO
SUBTITLE
DISC MENU
PARENTAL
PASSWORD
DEFAULTS
MAIN PAGE
PARENTAL
Select suitable parental guidance by
the cursor buttons and confirm by
pressing OK button on remote control
(need to enter password to confirm).
1 G
2
3 PG
4 PG 13
5
6 PG-R
7 NC-17
8 ADULT
NO-PARENTAL
27
Page 28
General Setup TV display Normal/PS
PIC mode AUTO
Angle mark ON
OSD Language English
Captions OFF
SCR Saver OFF
Audio Setup SPDIF OFF
OP Mode Line Out
Dual Mono Stereo
Dynamic FULL
PRO logic OFF
LPCM Output LPCM 48K
Preferences TV Type AUTO
Audio English
Subtitle English
DISC menu English
Parental 6 PG-R
Password 3308
SETUP
--PREFERENCES PAGE--
TV TYPE
AUDIO
SUBTITLE
DISC MENU
PARENTAL
PASSWORD
DEFAULTS
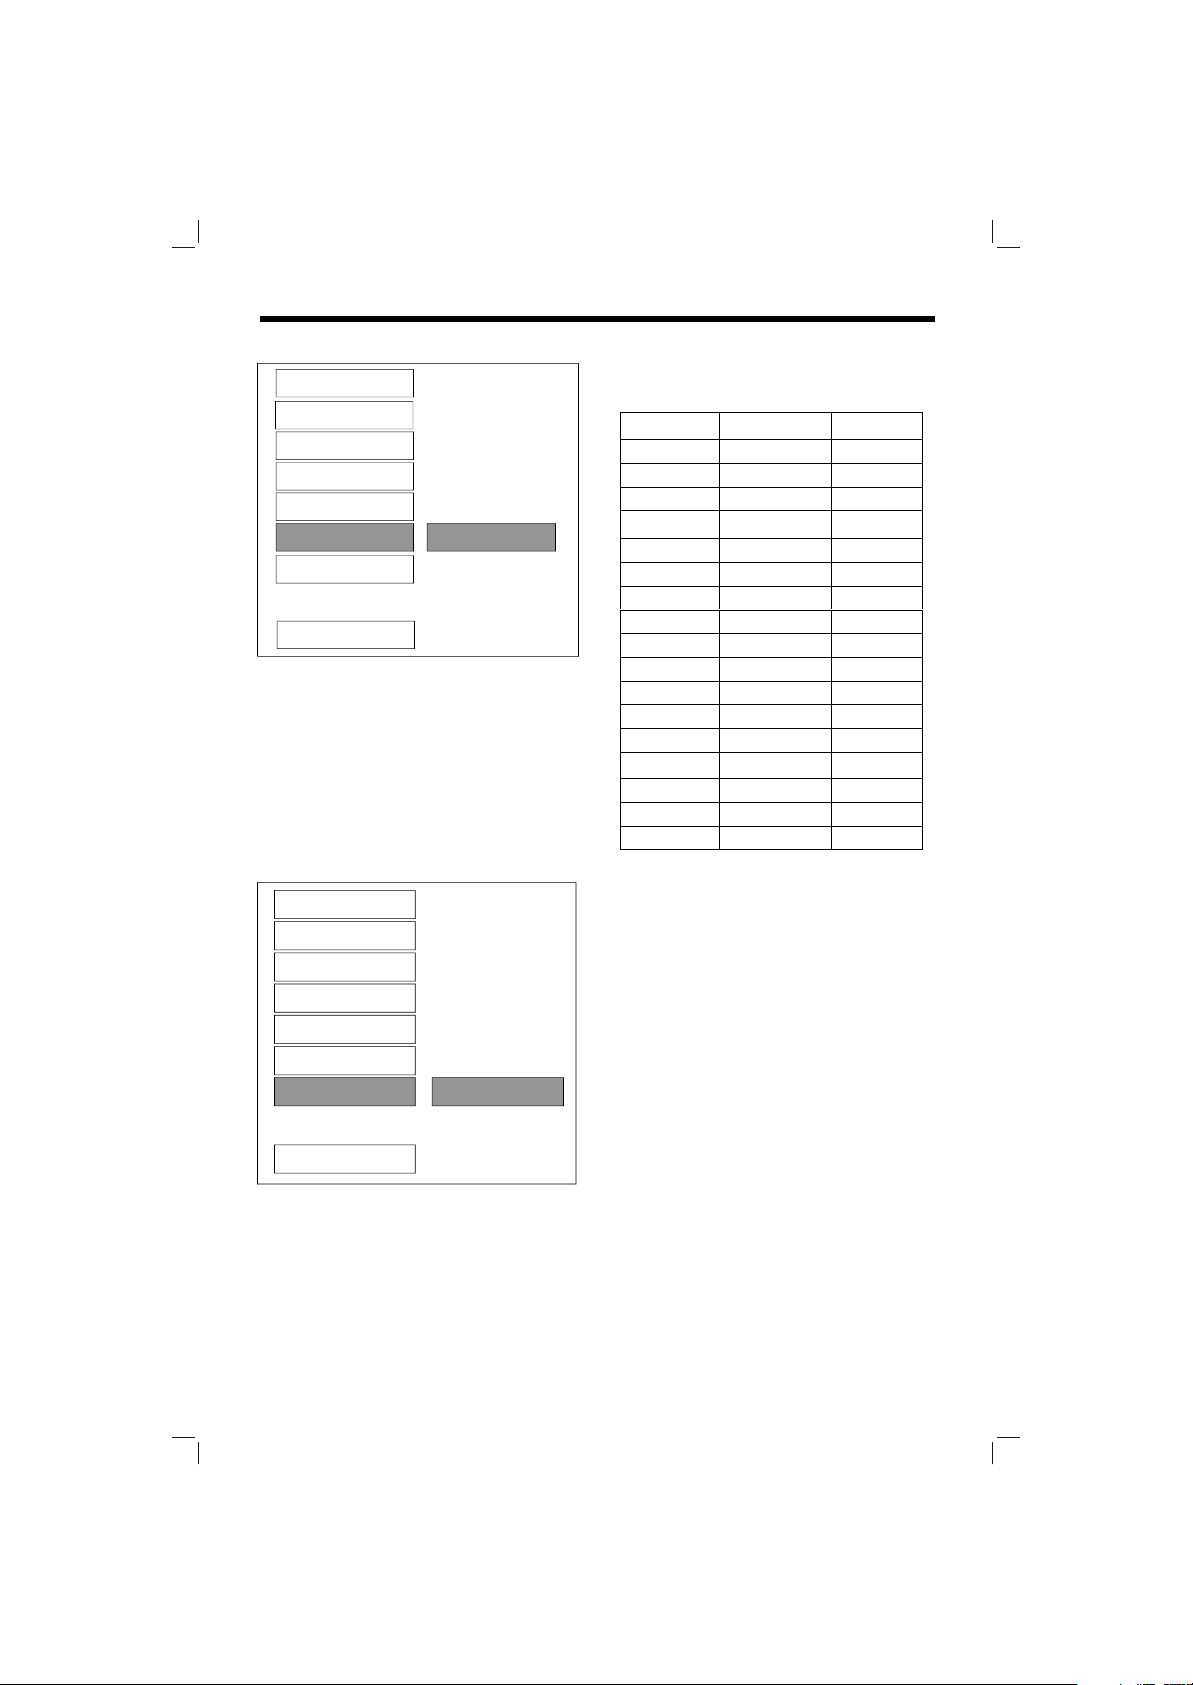
DEFAULTS TABLE
CHANGE
PASSWORD
Select CHANGE and press OK button.
Type the old password (The initial
factory code is 3308) and key in 4
characters password now you want to
use, and retype again to confirm key in
correctly.
DEFAULTS
Select reset to revert to factory initial
settings.
MAIN PAGE
--PREFERENCES PAGE--
TV TYPE
AUDIO
SUBTITLE
DISC MENU
PARENTAL
PASSWORD
DEFAUL TS
MAIN PAGE
RESET
28
Page 29
TROUBLE SHOOTING
If it appears that your DVD unit is faulty,
first consult this checklist. It may be that
something simple has been overlooked.
Under no circumstances should you
try to repair the player yourself, as
this will invalidate the warranty. Only
qualified service personnel can
remove the cover or service this
player.
NO POWER
If the power supply is connected to
the car accessory circuits, but the
engine is not moving, switch the
ignition key to “ACC”.
Check if the fuse is blown. Then
replace the new fuse.
Check if the on/off button on the front
of the player is set to on.
NO PICTURE
Check if the monitor or TV is switched
on.
Check if select proper mode, such as
Disc Play mode and AV mode.
Check the video connection.
DISTORTED PICTURE
Check the disc for fingerprints and
clean with soft cloth, wiping from
centre to edge.
Sometimes a small amount of picture
distortion may appear. This is not a
malfunction.
COMPLETELY DISTORTED PICTURE
The disc format is not according to the
TV-set used (PAL/NTSC).
NO COLOR IN PICTURE
The disc format is not according to the
TV-set used (PAL/NTSC).
DISC DOES NOT PLAY
Ensure the disc label is upwards.
Clean the disc.
Check if the disc is defective by trying
another disc.
NO SOUND
Check audio connections.
If using a HIFI amplifier, try another
sound source.
DISTORTED SOUND FROM HIFI
AMPLIFIER
Check to make sure that no audio
connections are made to the amplifier
phono input.
THE PLAYER DOES NOT RESPOND
TO THE REMOTE CONTROL
Aim the remote control directly at the
sensor on the front of the player.
Avoid all obstacles which may
interfere with the signal path.
Inspect or replace the remote control
battery.
DISTORTED OR B/W PICTURE
The disc format is not according to the
TV-set used (PAL/NTSC).
NO AUDIO AT DIGITAL OUTPUT
Check the digital connections
Check the Digital Audio menu to make
sure that the digital output is correctly
set.
Check if the audio format of the
selected audio language matches your
receiver's capabilities.
BUTTONS DO NOT WORK
Press Reset button on the housing of
the DVD unit.
THE RADIO DOES NOT WORK
Check if the antenna cable is
connected firmly.
THE RADIO STATION AUTOMATIC
SELECTION DOES NOT WORK
If the signals are too weak, select a
station manually.
29
Page 30

SPECIFICATIONS
GENERAL
Power Supply Requirements : DC 12 Volts, Negative Ground
Chassis Dimensions : 178 (W) x 160 (D) x 50 (H)
Tone Controls
Bass (at 100 Hz) : 10 dB
Treble (at 10 kHz) : 10 dB
Maximum Output Power : 4x40 watts
Current Drain : 15 Ampere (max.)
CD PLAYER
Signal to Noise Ratio : More than 55 dB
Channel Separation : More than 45 dB
Frequency Response : 20Hz 20 kHz
RADIO
FM
Frequency Coverage 87.5 to 107.9 MHz
IF 10.7 MHz
Sensitivity (S/N=30dB) 4 V
Stereo Separation >25dB
AM
Frequency Coverage 530 to 1710 kHz
IF 450 kHz
Sensitivity (S/N=20dB) 36 dBu
30
Page 31

SPECIFICATIONS
Supply voltage: 12V DC (11V-15V), test voltage 14.4V, negative ground
Current consumption: Less than 2A
Signal system: Compositive video 1.0Vp-p 75
Discs played: (1) DVD-VIDEO disc
5” (12 cm) single-sided, single-layer
5” (12 cm) single-sided, double-layer
(2) Compact disc (CD-DA/CD-R/CD-RW/MP3)
(3) 5” (12 cm) VIDEO CD
Audio output level: 10k (2 ch 2.0 Vrms)
Power output: 4 x4 0W
Note:
Specifications and design are subject to modification, without notice, due to
improvements in technology.
CAUTION:
To avoid electric shock, this unit must not be exposed to dripping water or water
splash.
Minimum distances around the apparatus for sufficient ventilation.
The ventilation should not be impeded by covering the ventilation openings with
items, such as newspapers, table-cloths, curtains, etc.
No naked flame sources, such as lighted candles, should be placed on the
apparatus.
The use of apparatus in tropical and/or moderate climates.
Before scrapping the appliance, remove the batteries and place them in the
appropriate battery collection container.
This product incorporates copyright protection technology that is protected
by method claims of certain U.S. patents and other intellectual property rights
owned by Macrovision Corporation and other rights owners. Use of this
copyright protection technology must be authorized by Macrovision
Corporation, and is intended for home and other limited viewing uses only
unless otherwise authorized by Macrovision Corporation. Reverse engineering
or disassembly is prohibited.
31
Page 32

www.pyleaudio.com
88-V1005-01
 Loading...