

Page 1
ww.pyleaudio.com
w
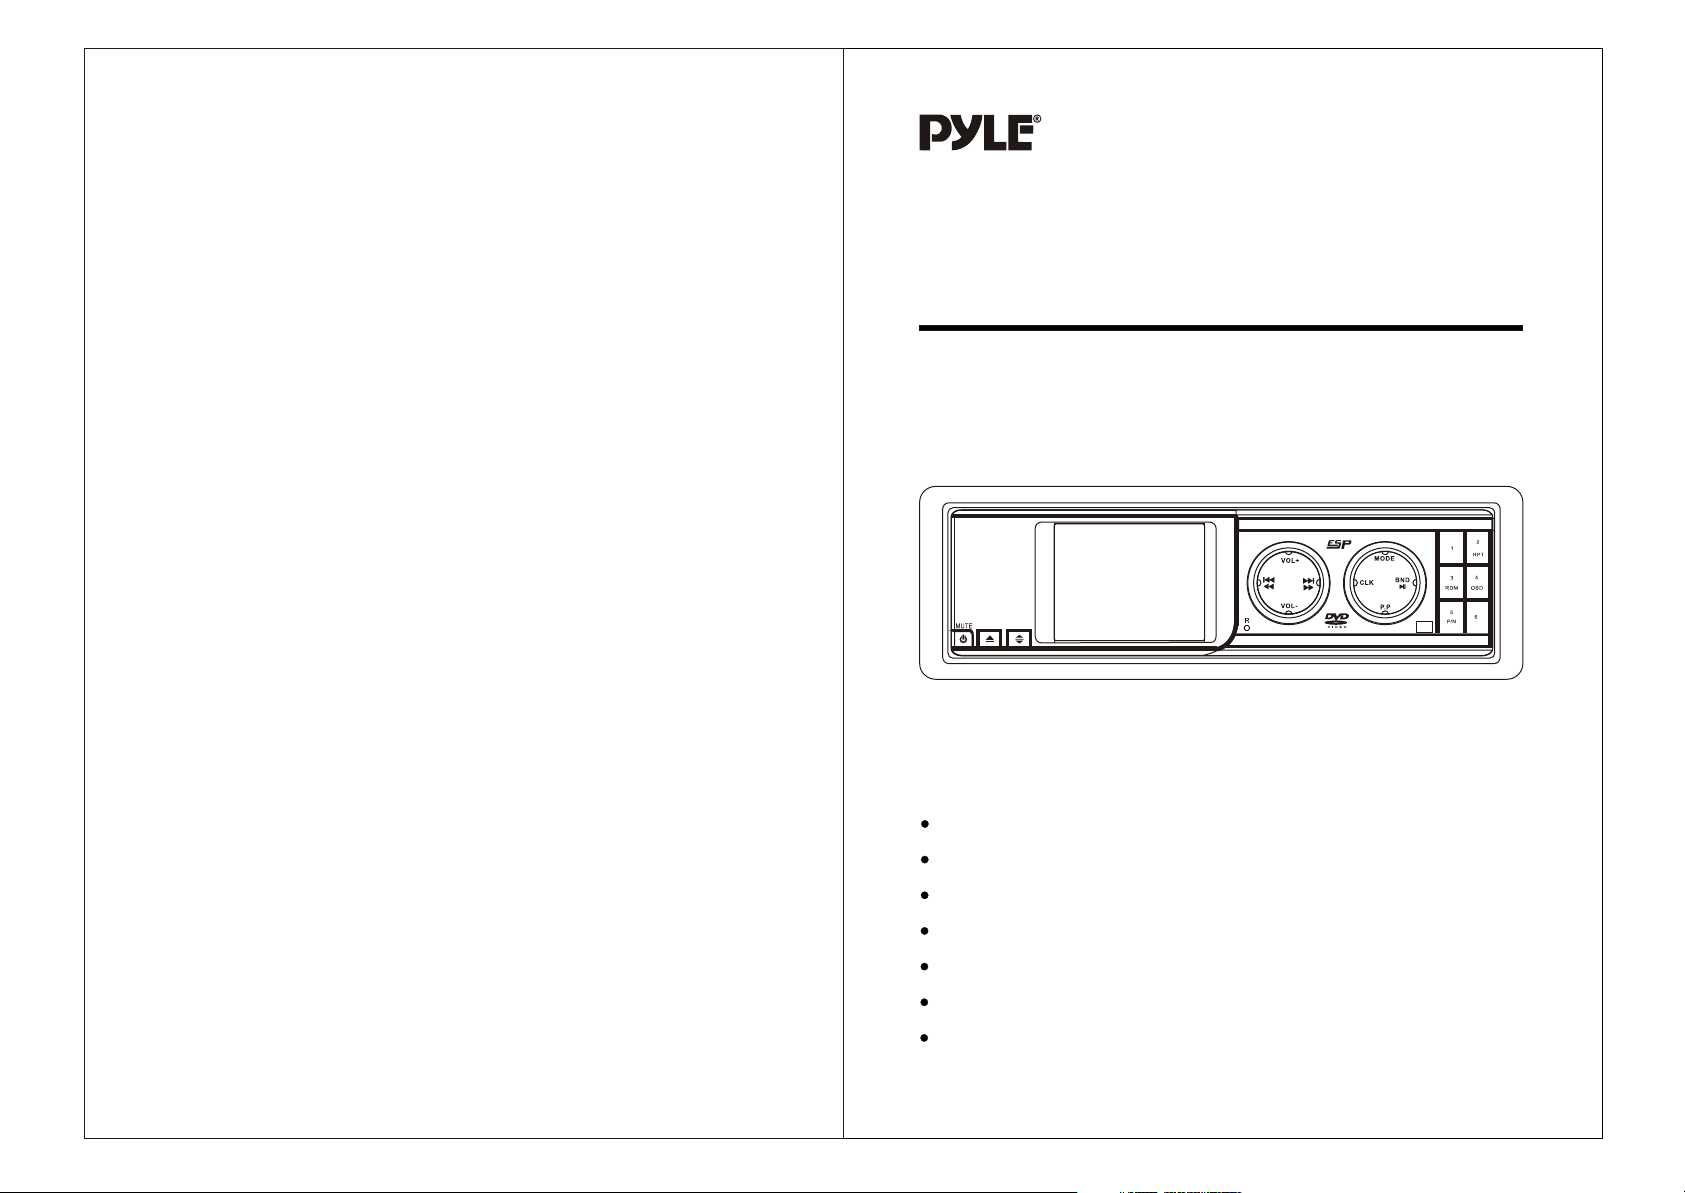
PLDTF5M
,,
OWNER S MANUALOWNER S MANUAL
Mobile Audio SystemMobile Audio System
PLL Synthesizer Stereo Radio
Digital Compact Disc Player
Automatically Memory storing
Hiding Panel
Preset Equalization
Auxiliary Input Funxtion
Remote Control
Page 2

Page 3
Characteristics And Specifications
Contents
CHARACTERISTICS
FM
Frequency range
Intermediate frequency
Practicality neat (S/N 30dB)
Stereo separation
AM
Frequency range
Intermediatef requency
Practicalityn eat (S/N 20dB)
SPECIFICATIONS
Power
Dimensions
: 87.5-108.0MHz
: 10.7MHz
: less than 22dB
: more than 25dB
: 522-1620KHz
: 450KHz
: less than 48dB
: DC12-13.8V, -earth
: 178(L)X160(W)X50(H)MM
Safety Precaution........................................................................ 2
User Guide................................................................................... 3
Function Characteristic ..............................................................4
Disc Handling And Maintenance ..................................................5
Playable Disc ............................................................................. 6
Wiring Connection...................................................................... 7
Panel s Diagram ...........................................................................8
Remote Control s Diagram............................................................9
The Panel Button s Function Instructions ............................10~11
,
Basic Operations .................................................................................12~16
MP3 Functions...........................................................................17
DVD Video Control.....................................................................18
DVD-VR Control........................................................................ 19
NOTICE: The specification and design of this product are subject to changes
without prior notice.
-28-
VCD Control.............................................................................. 20
Advanced Operations...........................................................21-23
Troubleshooting...................................................................24-25
Installation................................................................................26
Anti-Theft System .....................................................................27
Characteristics And Specifications.......................................... 28
-1-
Page 4
Safety Precaution
VOL-
VOL+
FA/FM
MODE
BAD
CLK
MUTE
1
2
3
4
5
6
R
IR
CAUTION
RISK OF ELECTRIC SHOCKRISK OF ELECTRIC SHOCK
DO NOT OPENDO NOT OPEN
Caution:
The lightning flash
with an arrowhead
symbol, within an
equilateral triangle,
is intended to alert
the user to
"dangerous voltage"
Warning:
To reduce the risk
of electric shock,
don't open the
cabinet. Refer
servicing to
qualified
personnel only.
and to prevent from
a risk of electronic
shock.
WARNING: Do not use this DVD player where contact with or immersion in
water is possible. Not for use in Marine Apps.
WARNING: Do not use in high temperature areas, there is the danger of fire.
WARNING: The unit should be connected only to a power supply of the type
described in the operating instructions or as marked on the unit.
If you are not sure of the type of power supply have a qualified
dealer install this unit.
!!
The exclamation
point within an
equilateral triangle
is intended to
alert the user to
important operating
and maintenance
(servicing).
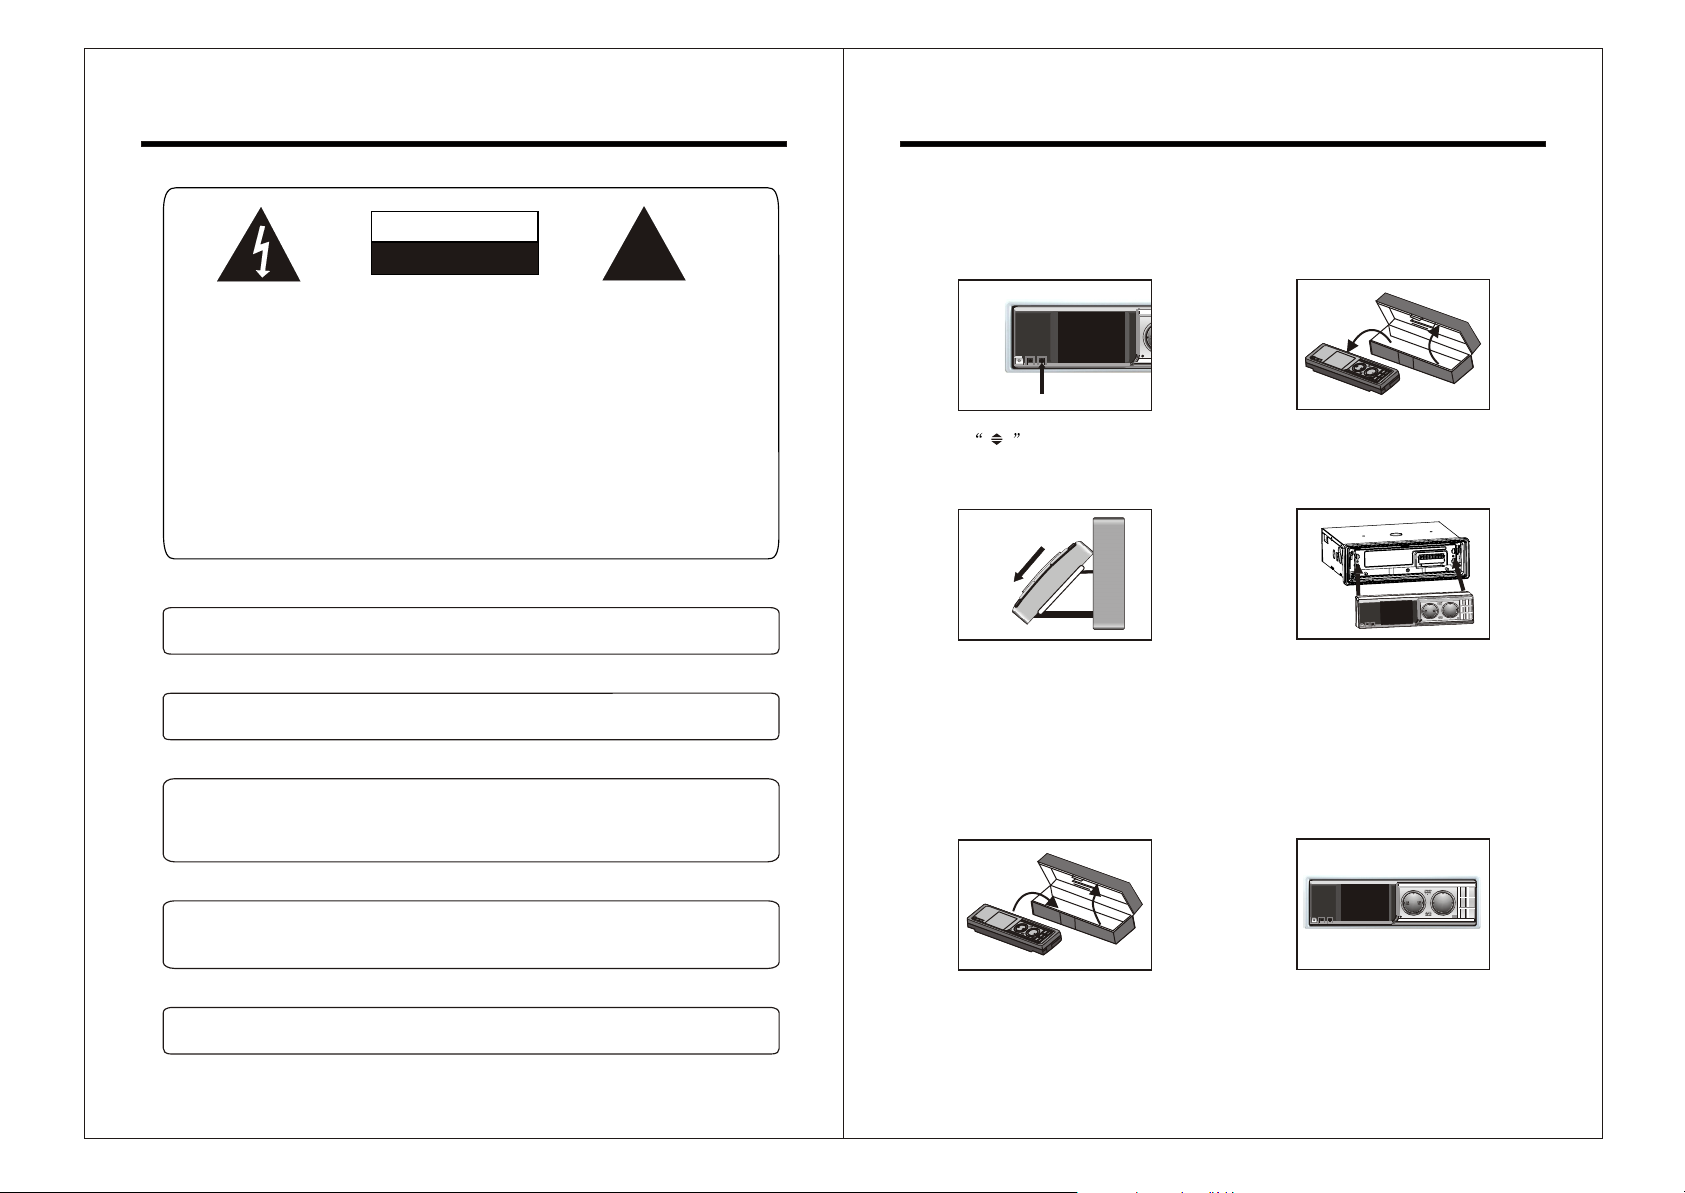
Anti-Theft System
This unit is equipped with a detachable panel.
Panel can be detached and taken with you, helping to deter theft.
Removing the Panel
1
Press this BUTTON
1. Press button front panel
slide to the angle of 15 degrees.
2. press again resume to original mode.
When the front panel slide to the angle
of 15 degree, the front panel can be
taken out by hand, after that, slide
panel bracket is automatically back to
original position and the unit is switch
off.
2
3
Installation the Panel
1
V
V
OL
OL
V
V
OL-
OL-
1. Take out the front panel from the
case.
2
UT
M
2. Install the front panel back to the
bracket.
Notice: First the one side of the front
panel to the bracket, then press
another side, when you heard a
sound, It means that install connectly.
3
+
+
M
O
D
E
C
C
LK
LK
1
1
B
N
N
2RP
D
D B
T
P.
P.
P
P
3R
D
M
4O
S
D
5P
/N
6
6
2
1
DE
O
M
L+
VO
4
3
D
BA
K
CL
M
/F
FA
L-
VO
6
IR
5
R
E
1
2
MODE
VOL+
CLK
4
3
BAD
VOL-
FA/FM
IR
6
WARNING: Do not open the cabinet or touch any parts in the inner
mechanism. Consult your local dealer for technical service if the
V
V
OL
OL
+
+
V
V
M
O
O
O
L
L
D
-
-
E
C
C
L
L
K
K
1
1
B
B
N
N
2
D
D
R
P
T
P.PP
.P
3
RD
M
4
O
S
D
5
P
/N
6
6
MUTE
R
5
opening is required.
3. Place the panel into the case and
NOTE: To ensure proper use of this product, please read this Instruction
Manual carefully and retain for further reference.
-2-
take it with you when you leave the
car.
3.When the panel installed into the unit,
press POWER button turn on.
-27-
Page 5
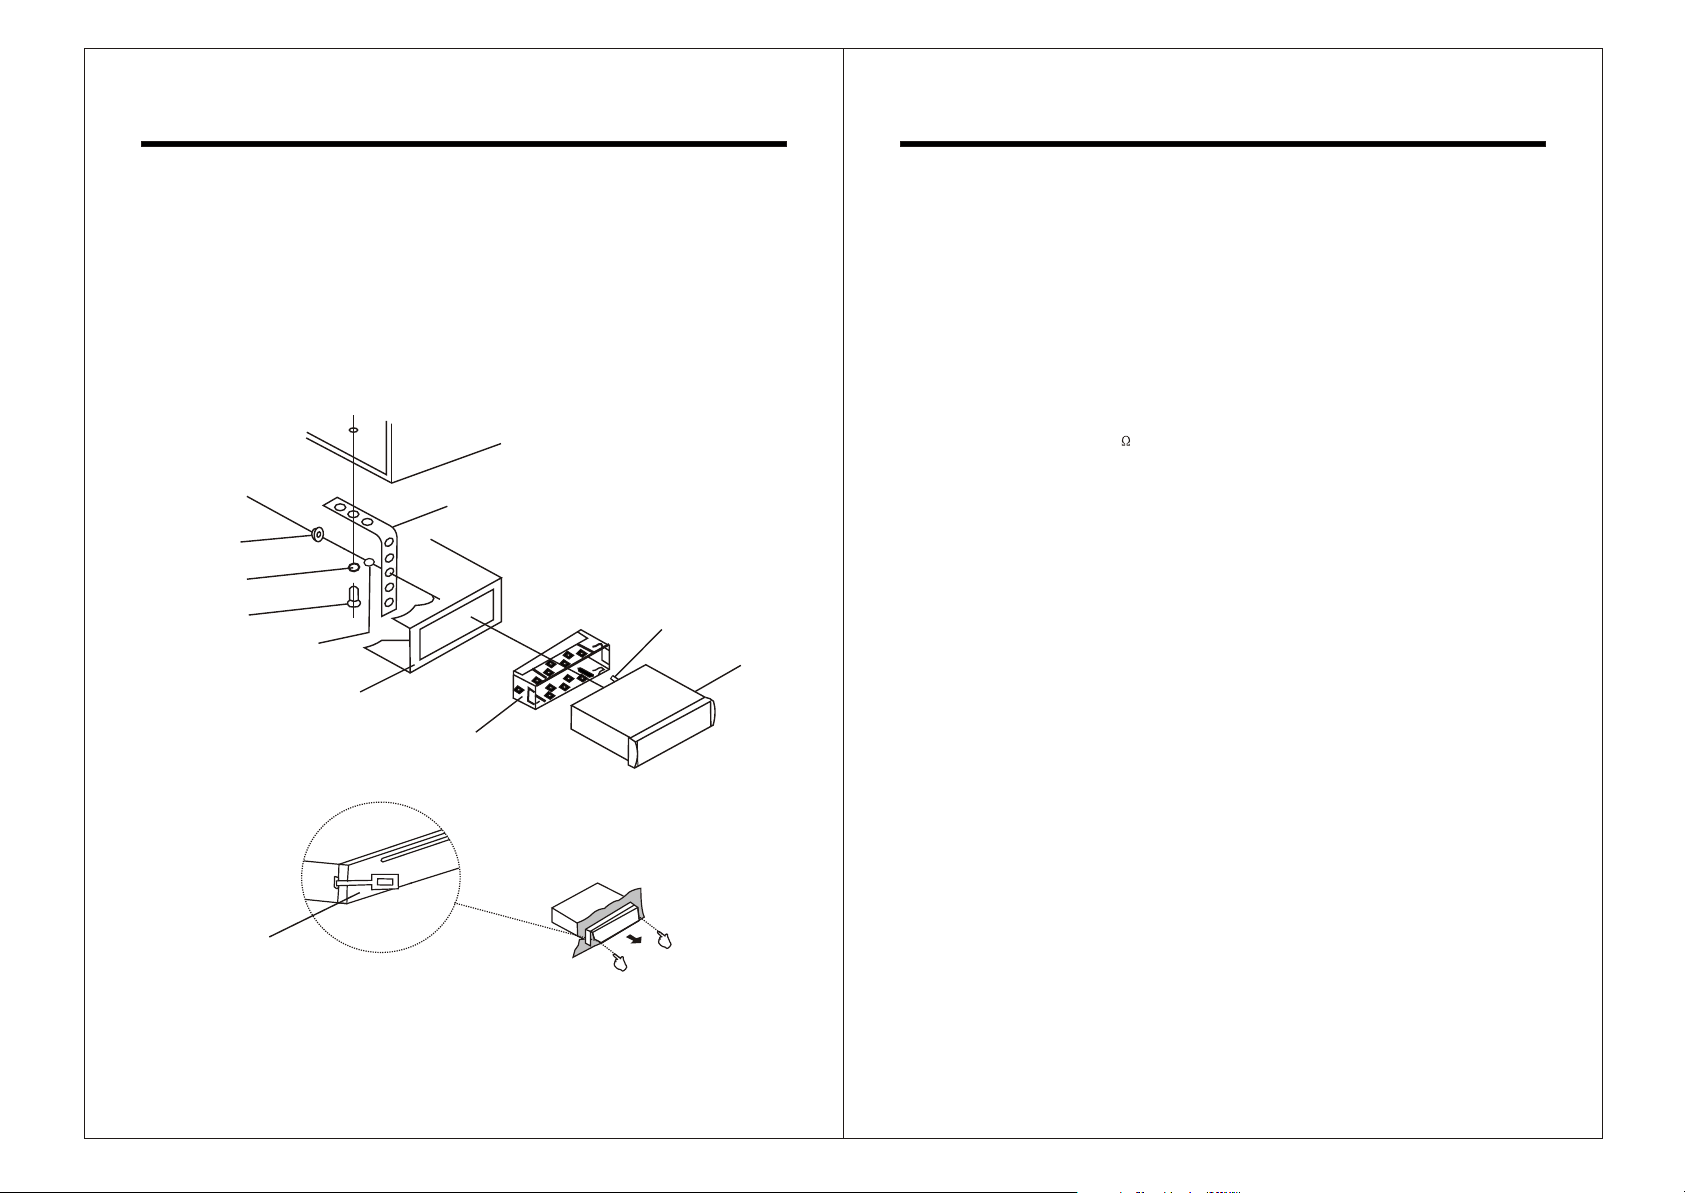
Installation
User Guide
CAUTION:
1. Always use an experienced installation technician.
2. The location of the player must not obstruct the driver .
3. Do not install the player in excessive dusty, shakable, high-temperature
or humid condition.
Note : these conditions will adversely affect the player s operation.
4. Follow the player connecting diagram, using the appendixes provided with
the unit.
Body
Mounting metal bar
Hex. nut
Flat washer
Screw
Flexible washer
Car panel
Mounting collar
,
Hex. bolt
T-key
Follow the arrowhead direction to take out the unit with T-key.
Unit
1. Before operating this product, please
read this instruction manual and the
attached information carefully.
2. This product is used at the 12 -
13.8 V D.C. Ground. In the condition
of the negative ground connect with
the metal body of car, it is safe to
operate.
3. Do not use the fuse whose rating
amperage is over that of the
appendix s.'
4. Do not use the loudspeaker whose
resistance is lower than 4 in order
not to damage the unit.
5. To ensure the product is in normal
operation, it must be far away from
water, dust and magnetic reflection
region.
6. When playing discs, be sure the
symbol side must be upward,
otherwise it cannot play properly.
7. During high speed operation, if the
disc has serious scratches and
breaks or rough surface, the life of
the optical laser head may be
shorten. Please pay attention to the
following points:
1) Do not use discs with poor quality;
2) Store and use the DVD discs
carefully;
3) Do not write on the discs with an
ink-pen or other writing materials,
nor Mark on them;
4) When playing DVD disc, do not
take it out randomly;
5) When a disc is inserted into this
products, do not try to insert
another Disc into this product;
6) When taking out the playing disc,
do not touch the recording surface
of the disc;
7) Do not expose the disc under
direct sunlight or high
temperature.
8. When wiping discs, please move
the cloth from the center hole
towards the outer edge. Attention:
do not use chemical solution or
common cleanser.
9. Fix the unit in the steady parts. If
you have parked your car in hot or
cold situations, wait until the
temperature in the car becomes
normal before operating the unit.
10.The electronic antenna of your car
fixed will rise automatically when
you operate it, if it has.
11.In rainy day or wet area, dew may be
coated on the laser lens of this
product, which cannot work properly,
if this happens. In this case, please
take out the disc and keep this
product stop working for one hour
until the steam vapored, then this
unit can resume to normal operation.
12.If this product is out of order, please
shut off the power sources
immediately and contact with
authorized repairman in time. Do not
disassemble it by yourself.
-26-
-3-
Page 6
Function Characteristic
Troubleshooting
DVD Player Features
1. Fully Compatible
Fully compatible with most of the
discs on the market.
Please refer to the list on page 5 for
details.
2. Intelligent Disc Upgrade
Support the intelligent disc upgrade
function to keep up with the market
competition.
3. Single Chip
Integrate the servo and MPEG2
chips to enhance the stability and
achieve the high-performance level.
4. Unique HDCD Function Support
Support HDCD function. HDCD, the
abbreviation of High Definition
Compatible digital, which is a
recording/playing technology that
improves the CD audio quality. It is
able to restore 20Bits audio data truly
to enhance the quality and quantity
of the digital audio in the highest level.
At the same time, it is also compliant
with the ordinary audio data of the
CDDA format .
5. Support Picture CD and Photo CD
The unit is compatible with the
Picture-CD and Photo CD player,
without requiring other support from
additional software. It will activate
the media player menu to process
automatically. (In other words,playing
automatically.)
6. Support DVD Audio
The unit is fully compatible with the
high-quality audio DVD Audio discs,
without requiring the support from
additional software. It will enable the
end-users to enjoy an excellent audio
effect.
7. Support DVD-R
The unit is compatible with the
DVD-VR discs recorded by the DVD
player equipped with the recording
function.
8. Car back video input function
This unit includes car back video
input function. (When car back
camera connects this player), during
the operation of car backing, this
player changes from play mode to
car back video input mode
automatically. Then the screen shows
you back view, it protects you more
safety.
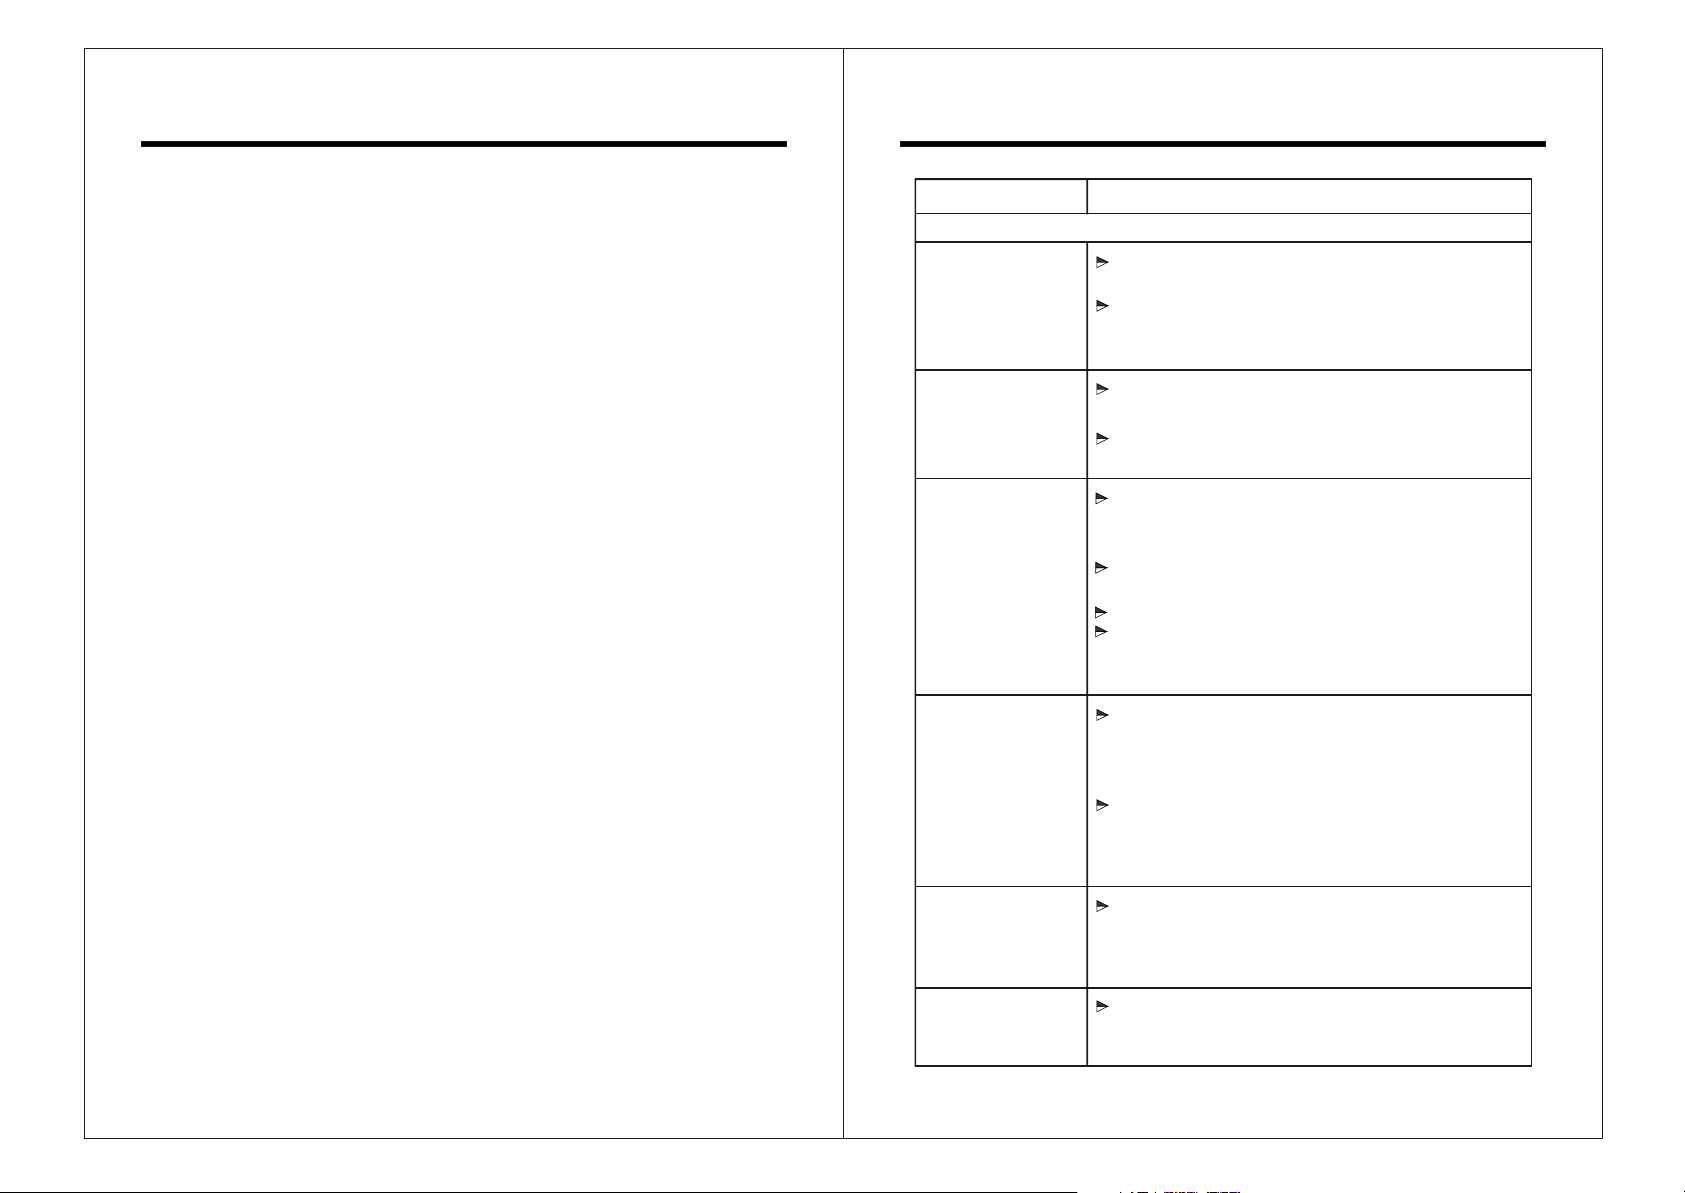
Problem
Operations
Remote Control
does not worke
properly.
Remote Control
does not worke
properly.
Fails to play disc
The player fails to
play from the
beginning.
Stop playing
automatically
Dying
Action
Remove the obstacle between DVD player and
Remote Control.
The operating distance of Remote Control is too far
from the sensor of DVD video player. Operate it
within the valid distance.
Point the Remote Control at the sensor of the DVD
video player.
If the batteries in Remote Control are exhausted,
please replace them with new ones.
No disc is inserted. ( No disc symbol appears on
screen)
Please insert the disc to play.
The disc is placed upside down. Turn it over, place
it correctly (disc label upward).
The disc is dirty. Please clean it.
There may be humidity inside the unit. Please turn
on the power and for 30 minutes in no disc running
mode.
Because the playing mode is in Program/Random
/ Repeat mode , press these relative function
buttons again to return to playing mode. ( Please
refer to the Advanced operations part.)
While the DVD Title/Chapter or DVD Setup menu
is displaying on monitor, or while playing VCD
with PBC function, the Installation menu will be
displayed on monitor.
Some discs have memorized the pause command
automatically in the original record. So the unit
will stop playing automatically at this memorized
command part.
It is a normal phenomenon that the unit dying
occasionally during operation. Press RESET button
to restart the unit.
-4-
-25-
Page 7
Troubleshooting
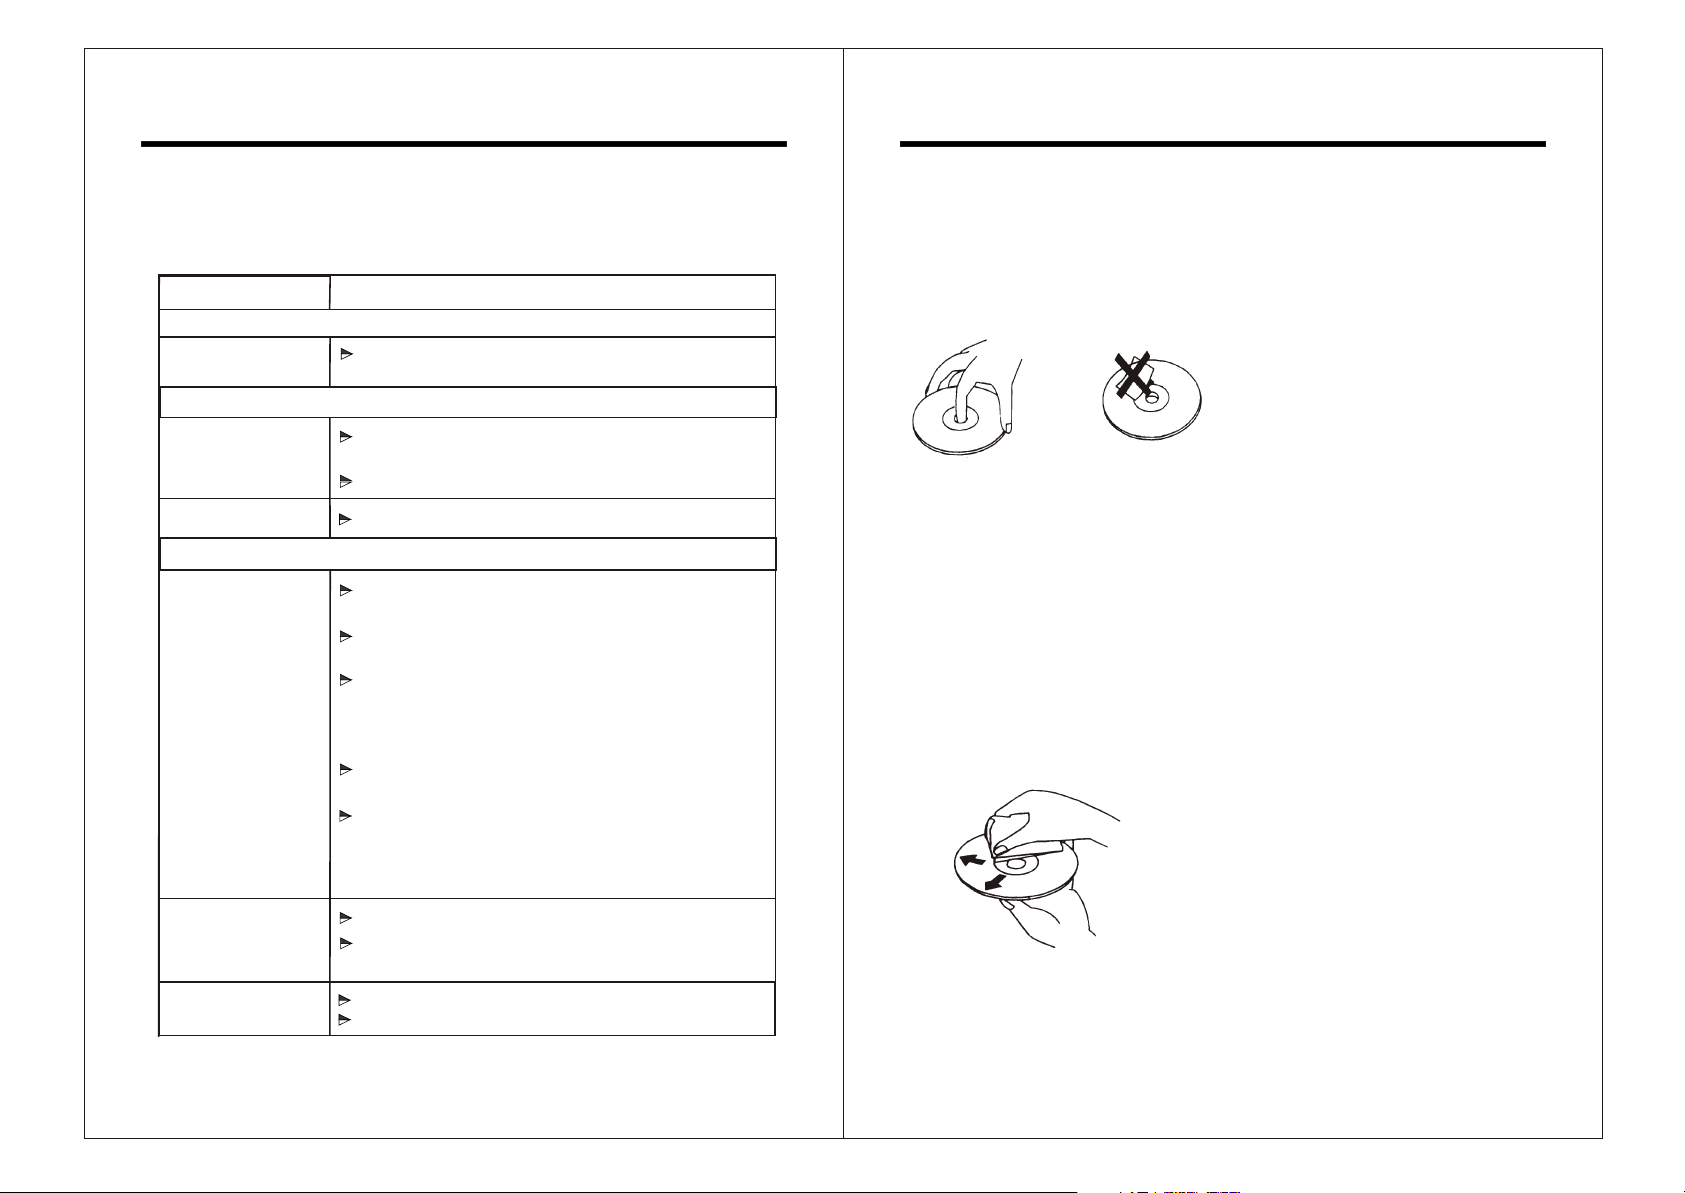
Disc Handling And Maintenance
What appears to be trouble is not always serious, when you meet
following problems in using, please check the following points before
calling a service.
Problem
POWER
The power supply
has disconnected.
PICTURE
NO PICTURE
Picture Distortion
SOUND
NO SOUND
Please check whether the DC power has been
connected correctly.
Please check whether the disc has been inserted
correctly.
Please check whether the disc format.
The disc is too dirty and needs cleaning.
If the unit is playing in Fast-forward or Pause mode,
press Play to return to normal playing mode.
If the unit is playing in fast-backward mode, press
Play to return to normal speed playing mode.
When the unit is in System Setting Menu/ Program
Menu, press System Setting / PRG Play button to
exit this mode. Or press Play to return to normal
playing mode.
If the unit is in Mute mode, please press Mute again
to ensure the normal sound playing.
If the sound track 2 of S-VCD has not been recorded,
there will be no sound output when the track 2 is
selected. Open the Control Menu, and select track 1
in the audio caption to play.
Action
Disc UsingDisc Using
1 To keep the disc clean, please hold the
disc edge only, do not touch its surface.
2 Do not stick the label or adhere things
on the disc.
Correct
3 Do not expose the disc into direct
sunshine or near the hot sources.
4 After playing, please store it into the
disc box.
Incorrect
Disc CleaningDisc Cleaning
1 Before playing, wipe the disc with a
clean cloth, from the centre hole
towards the outer edge .
Disc StoringDisc Storing
After playing, please store the disc into
the disc box and keep them in room
temperature. It
using life of the disc effectively.
can help to extend the
Noise
No Stereo Effect
The disc is dirty and needs cleaning.
If the CD playing is DTS standard format, the noise
can t come from Digital output option or interphase.'
Check whether the digital output is turned on.
Press Stereo to select stereo output.
-24-
2 Never use alcohol, thinner, cleaning
fluid, static electricity prevention
liquids or any other solvent to clean
discs.
-5-
Page 8

Playable Disc
Advanced Operations
This unit can play DVD, S-VCD, VCD, CD, MP3 etc. format discs.
Recorded
Disc typesDisc types
DVD
S-VCD
VCD
CD
Disc symbolsDisc symbols
VIDEOVIDEO
SVCD
COMPACT
DIGITAL VIDEO
COMPACT
DIGITAL AUDIO
Recorded
Contents
Contents
Audio+Video
(Motion Picture)
Audio+Video
(Motion Picture)
Audio+Video
(Motion Picture)
Audio
Disc SizesDisc Sizes
12cm
12cm
12cm
12cm
Playing timePlaying time
About 2 hours
(single side
disc)
About 4 hours
(double sides
disc)
About 45
minutes
About 74
minutes
About 74
minutes
If the new password is entered
successfully, press Up/Down to
change the parental control rating
level.
This Rating setting includes 9 levels,
details please refer to the Parental
Control section.
3. The parental control function is only
valid after the parental lock setting is
performed the disc eject operation.
4. The Password item is used to set the
new password or change the old one.
Before you enter this option, the
system will request you to input the
old password first. The new
password will be accepted only when
the old one is input correctly. (This
unit's omnipotence code is 3351.)
Other Settings
It can resume all settings to the default
value.
3
M
P
NOTICE:
Some DVD, S-VCD, VCD discs playing operation may be limited by the software
designer s special regulation, please refer to the instruction manual of disc. This
unit can play recorded discs (CD-R,CD-RW) too, but it depends on the quality and
recorded situation, some kinds of discs cannot play in this unit.
PAY ATTENTION :
This player cannot playback diameter 8cm disc. To avoid damage of it, please
do not insert and play the above mentioned disc by this player.
Audio
12cm
About 600
minutes
-6-
-23-
Page 9
Advanced Operations
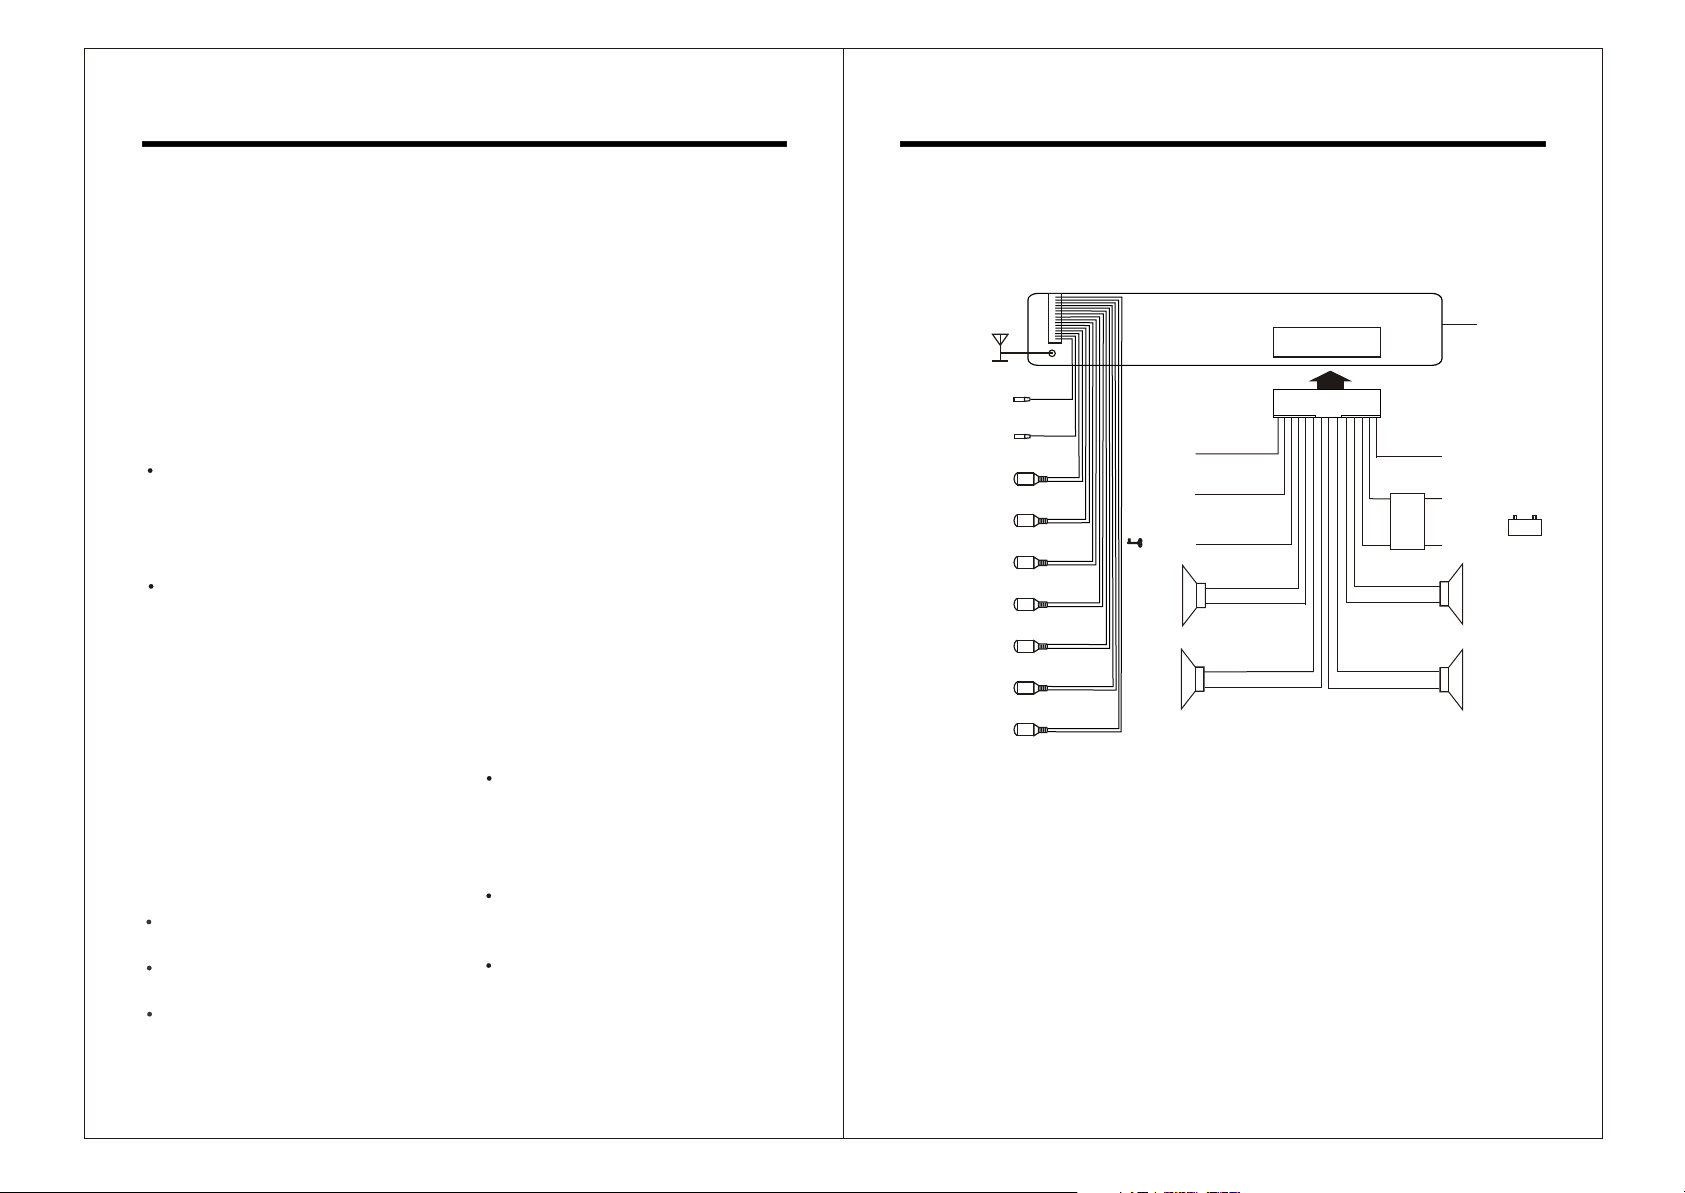
Wiring Connection
adjustment has 2 options for
your setting: 4:3 and 16:9. This
option is used to display image due
to the panavision on the normal TV
set. The option will display in 16:9
Full-screen mode, when the DVD
player is connected with the TV and
open the Full-screen mode.
3. The Display Mode item can be
modified only when the TV Display
mode is set to 4:3. Two options are
provided: Mailbox and Plane-scan.
Mailbox: This option will display the
panoramic movie in a smaller portion
of the screen. And the movie might
appear with black bars both at the top
and the bottom of the screen now.
Pan-scan
: This option refers to
pictures where the left and right
edges of the picture are cut off to fit
the whole screen size. It is the
default display mode of normal TV
set.
This mode will be selected when the
picture is displayed in panoramic
view and complete scan format.
AUDIO Setup
1. You can operate as following:
Press Up/Down to move among
different options.
Press Left/Right to change the
options.
Press ENTER to go back to the Audio
Setup page.
2. The Dynamic Range Compression
(DRC) It is divided into 2 options:
ON and OFF. When the option is set
up ON, the dynamic range will
compress by reducing treble and
increasing soft sounds, making a
clear volume even at a low level.
3. The 2.0 multichannel surrounding
stereo audio output is set up via the
2.0 Speaker Setup. This option is
used to set on the speaker volume
and position adjustment. You can
enjoy the best sound quality if the
distance between you and each
speaker is equal. After you press
certain option and enter, you will see
the speaker setup page.
LOCK Setup
1. You will enter the Lock Setup page,
which is used to set the Parental
Control.
2. The Rating option is used to set the
rate.
Before you enter this Rating option,
the system will request you to input
the password first. If the password
entered is correct, you can change
the parental control rating level.
If you haven' t set any password for
Parental Control, the system will
request you to input a new password.
If you make a mistake on password
and haven' t pressed ENTER to
confirm, you can press DELETE
button and enter your 4 digital
password again.
-22-
ANTENNA
SIDE BRAKE
B+ 12V
BACK CAMERA
VIDEO CONTROL
AUX LINE INPUT
SUBWOOFER
RCA LINE OUTPUT
VIDEO INPUT
VIDEO OUTPUT
Brown/white
L(White)
R(Red)
(Green)
L(White)
R(Red)
(Yellow)
(Yellow)
Brown
Black
Black
Green
Brown
Brown
Y ellow
Black
POWER
ANTENNA
AMPLIFIER CONTROL
ACC +
FRONT
L SP
REAR
L SP
Blue
Blue/White
Red
+
White
-
White/Black
+
Green
-
Green/Black
-7-
Pink
DIMMER CONTROL
FUSE
HOLDER
10A
Grey
Grey/Black
Purple
Purple/Black
UNIT
Yellow B+
Black B-
+
FRONT
R SP
-
+
REAR
R SP
-
-
+
Page 10

Panel s Diagram
,
Advanced Operations
1 2
13
14
1. LCD
2. Radio searching down/DVD last song
& fast-backward
3. Radio searching up/DVD next song &
fast-forward
4. Clock display button
5. Radio/video switch
6. Band & Play/pause button
7. Radio preset(1-6)
8. Remote control receiver
3
1112
15
9. Brightness control
10. Volume control & function button
11. Reset button
12. Angle adjustment
13. Discs eject button
14. Power on/off & mute button
15. Disc slider window
5
4
6
8910
The Features in Playing VCD
7
Discs
For VCD discs, it supports a special
function: Programmed Playing, which is
not available in DVD discs. It allows
you to enter the song number in which
you want the disc to play.
1. The program playing function is only
valid when the PBC is off or the unit
is in stopping or returning to stop
mode.
2. Please refer to the relational details
instruction of audio operations part
to know more on how to set up the
program playing for VCD discs.
System Setup Menu
Press Setup button on remote control to
pop-up the System Setup Menu when
the unit is under stop/ playing mode.
When the cursor is located at the top
of the screen, press Left/Right arrow
head buttons to switch between
different pages.
Press the Down arrow head button to
move to the setup page, and Up/Down
arrow head buttons to select the
options that you want to change.
Press Right arrowhead button on the
selected caption to unfold the option list.
Press Up / Down arrowhead buttons
to change the selection up and down,
then ENTER to confirm.
Setting up the Audio
Language
1. You will first see the LANGUAGE
menu page if the Setup Menu has
been set up.
2. The Menu Language is used to select
the setup menu and OSD (On-screen
Display)language used in disc
playing and instructing operation
processes.
The language selection includes:
Chinese, English, French, German,
Spanish, Italian, Korean, Polish.
3. Disc Audio : When you begin to play
a DVD disc, this unit will select its
default valid language automatically.
Notice: if the language annal in the
disc is not available in the language
list of disc menu, the original default
language annal of the disc will be
used.
If the disc matches with the playing
language appointed, the language
appointed will be selected.
4. The functions of Disc Subtitle and
Disc Menu are similar to that of the
Disc Audio. They are used to set a
default playing language for the DVD
subtitle and Menu display language.
DISPLAY Setup
1.You will enter the DISPLAY Setup
Menu page.
2.TV Aspect: Depending on the types
of your television, The image
-8-
-21-
Page 11

VCD Control
Remote Control s Diagram
,
Items
Icon Symbols
Functions (Press
Up/Down to select
the items needed.)
Display the current
chapter number and
Chapter
Control
2/32
the total number of the
disc chapters. Users
can jump to the
chapter number
needed.
Display the time that
the disc has elapsed.
You can input the
Time
Control
0:01:45
desired time from
which you want to start
playing directly. The
time searching
function is valid only to
the current song.
Display the current
Audio
Control
Stereo
audio language used.
You can also switch to
other audio languages
desired.
Display the current
audio mode. You can
Sound
Control
Normal
select between normal
mode and 3D
surrounding effect
mode.
Note: Press to move upward, and to downward.
Selecting
Methods
Press / or
digital button
to select the
Chapter
(Track )
needed
directly.
Press digital
button to
select time
needed, then
Enter to
confirm.
Press / to
select Stereo/
Right/Left
sound channel.
Press / to
change the
Audio mode.
1
2
3
4
5
6
CLOCK
1
4
7RPT
SETUP
STOP
MO/ST
MODE
7
8
9
10
OSD
SEL
11
1. Clock display button
2. Random button
3. Repeat button
4. Set up button
5. Radio/stereo&DVD/stop button
6. Radio/video interchange
7. Direction button / / /
8. Radio searching down/ DVD last song
& fast-backward
9. On screen display
10. Volume up
11. Sel [Volume control & Loud adjust] button
8RDM
0/10
PRG
AMS
MUTE
2
3
6
5
9P/N
10+
TITLE
ZOOM
22
21
20
19
18
BND/
ENTER
17
16
15
MENU
+
_
AUDIO
14
13
12
12. Volume down
13. Language menu
14. Menu button
15. Radio searching up / DVD next song
& fast-forward
16. Confirm button
17. Band & Play/pause button
18. Title/zoom button
19. Radio / auto-memory & scan
storage and DVD/programme
20. PAL/NTSC switch
21. Digital button 1-9, 0/10,10+
22. Power ON/OFF & mute button
-20-
-9-
Page 12

The Panel Button s Function Instructions
,
DVD-VR Control
Power on/off & mute button
Press this button once to turn on the
player. In turn on mode, press short
to activate the selecting mode of
mute on/off; press and hold for more
than 2 seconds to turn off the player.
Discs eject button ( )
In disc playing mode, Press it to eject
a CD , and change to radio mode
automatically. After ejecting the disc,
it will enter again automatically if not
take it out in 10 seconds, but not
playing.
Reset button (R)
Press to reset all the settings to the
default .
Radio searching up / DVD next
song & fast-forward
1 In RADIO mode, press to
adjust the receiver frequency up.
Press and hold it for more than 2
seconds to search up automatically.
2 In disc playing mode, press to
select the next track.
3 In playback mode, press it
continuously for more than 2
seconds as fast forward function.
DVD playback consists 4 speeds:
X2, X4, X16, X100.
Playback VCD / SVCD consists 3
speeds: X2,X4,X8. Press playback
button again, player resume to
normal playback operation.
''
''
Radio searching down/ DVD last
song & fast-backward
1 In RADIO mode, press to
adjust the receiver frequency down.
''
Press and hold it for more than 2
seconds to search down
automatically.
2 In disc playing mode, press to
select the last track.
3 In playback mode, press it
continuously for more than 2
seconds as fast backward function.
DVD playback consists 4 speeds:
X2,X4,X16,X100.
Playback VCD/SVCD consists 3
speeds:X2,X4,X8. Press playback
button again, player resume to
normal playback operation.
Band & Play/pause button
(BAND/ )
In Radio mode, push down the button
to select needed band [FM1,FM2,
FM3, AM1, AM2 AM3].
In disc playing mode, press this
button to switch to Disc playing
mode. When playing the disc, press
it to pause playing, press again to
resume playing.
Clock display button (CLK)
1. Press to enter time display mode,
press again to exit this mode.
2. In time display mode, press SEL
button to enter second setting
-10-
status, second digital flashes ,
depress VOL +/- to adjust the
second. Press SEL again to
enter minute setting status,
depress VOL +/- to adjust.
Press SEL another time to enter
hour setting status, depress
''
VOL+/- to adjust.press it again
to exit the hour mode,press
another times to exit time display
mode.
' '
''
''
''
''
Items
Group
Control
Track
Control
Time
Control
Audio and
digital
audio
output
Control
Subtitle
Control
Angle
Control
Page
Control
Sound
Control
Functions (Press
Icon Symbols
1/17
2/32
0:01:45
1.ENG
D
3/2.1
OFF
1/1
1/1
Normal
Note: Press to move upward, and to downward.
Up/Down to select
the items needed.)
Display the current
group number and the
total number of the disc
groups.
Users can jump to the
group number needed.
Display the current
track number and the
total number of the
disc tracks.
Users can jump to the
track number needed.
Display the time that
the disc has elapsed.
You can input the
desired time from
which you want to start
playing directly.
Display the current
audio language used
and the digital audio
output. You can also
switch to other audio
languages needed and
digital audio outputs.
Display the current
subtitle language used.
You can also switch to
other subtitle
languages needed.
Display the current
angle when playing
AVTT.
You can also switch to
other angles.
Display the current
page number when
playing AOTT.
You can also switch to
other pages.
Display the current
audio mode. You can
select between normal
mode and 3D
surrounding effect mode.
-19-
Selecting
Methods
Press / or
digital button
to select the
Title needed
directly.
Press / or
digital button
to select the
Track needed
directly.
Press digital
button to
select Time
needed,then
Enter to
confirm.
Press / to
select
Language and
Audio output.
Press / to
switch the
Subtitle.
Press / to
change the
Angle.
Press / to
change the
Page.
Press / to
change the
Audio mode.
Page 13

DVD Video Control
The Panel Button s Function Instructions
,
Items
Title
Control
Chapter
Control
Time
Control
Audio and
Digital
Audio
Output
Control
Subtitle
Control
Angle
Control
Sound
Control
Icon Symbols
1/17
2/32
0:01:45
1.ENG
D
3/2.1
OFF
1/1
Normal
Note: Press to move upward, and to downward.
Functions (Press
Up/Down to select
the items needed.)
Display the current
title number and the
total number of the disc
titles. Users can jump
to the title number
needed.
Display the current
chapter number and
the total number of the
disc chapters.
Users can jump to the
chapter number
needed.
Display the time that
the disc has elapsed.
You can input the
desired time from
which you want to start
playing directly.
Display the current
audio language used
and the digital audio
output. You can also
switch to other audio
languages needed and
digital audio outputs.
Display the current
subtitle language used.
You can also switch to
other subtitle
languages needed.
Display the current
angle. You can also
switch to other angles.
Display the current
audio mode. You can
select between normal
mode and 3D
surrounding effect
mode.
Selecting
Methods
Press / or
digital button to
select the Title
needed directly.
Press / or
digital button to
select the
Chapter
needed
directly.
Press digital
button to select
Time needed,
then Enter to
confirm.
Press / to
select
Language and
Audio output.
Press / to
switch the
Subtitle.
Press / to
change the
Angle.
Press / to
change the
Audio mode.
Volume control & function
button
A) Press VOL+/- button, increase
or decrease the volume.
B) press front panel SEL menu
function, then press VOL+/ button once, screen shows VOL
menu, within 5 seconds press
''
menu:
ATTENTION:
COLOR CONTRAST
BRIGHTNESS, these 3 function
operate in DVD & VCD mode only.
Press button selects menu
downward, press button
selects menu upward. When
selected certain a menu, press
VOL+/- for adjustment.
''
' '
''
''
''
again, screen show following
BASS TREBLE FADER LOUD
BRIGHTNESS CONTRAST COLOR
''
''
Brightness control(PP)
Press it adjust tint & brightness,
pictures can be switched in
DAYLIGHT/NORMAL/USER/NIGHT
mode.
Radio preset 1-6
1 In radio mode, from 1-6, press and
hold any one button for more than
2 seconds to store the radio
program to the memory you are
listening.
2 In radio mode, from 1-6, press any
one button to call out the memory.
3 In disc playing mode, press 2RPT
once means Single song/Full disc/
Menu repeat, shut off it if you do
not use this function.
4 In disc playing mode, press 3RDM
once means Random playing, shut
off it if you do not use this function.
''
''
5 In disc playing mode, press 4OSD
button shows function control
menu. Menu select refer to DVD
video control section.
6 In DVD/VCD mode, press 5P/N
means interchange between the
PAL/NTSC system.
''
''
Radio/video Switch(MODE)
1. In radio mode, press M ODE
button to switch in different playing
modes. This operation will be
invalid if there is no disc in the unit.
2. In any mode, press and hold it for
more than 2 seconds to video/AUX
input mode.
''
Angle adjustment ( )
This player include 5 multi angles
position, press
angle adjust approximately 15
degrees, press more than 3
seconds front panel resume to in
initial position press this button is no
operation.
''
button once
''
LCD
Display all selected functions.
Disc slider window
Insert the disc into slider, CD will
begin to play, and the name and
number of the song will appear too.
-18-
-11-
Page 14
Basic Operations
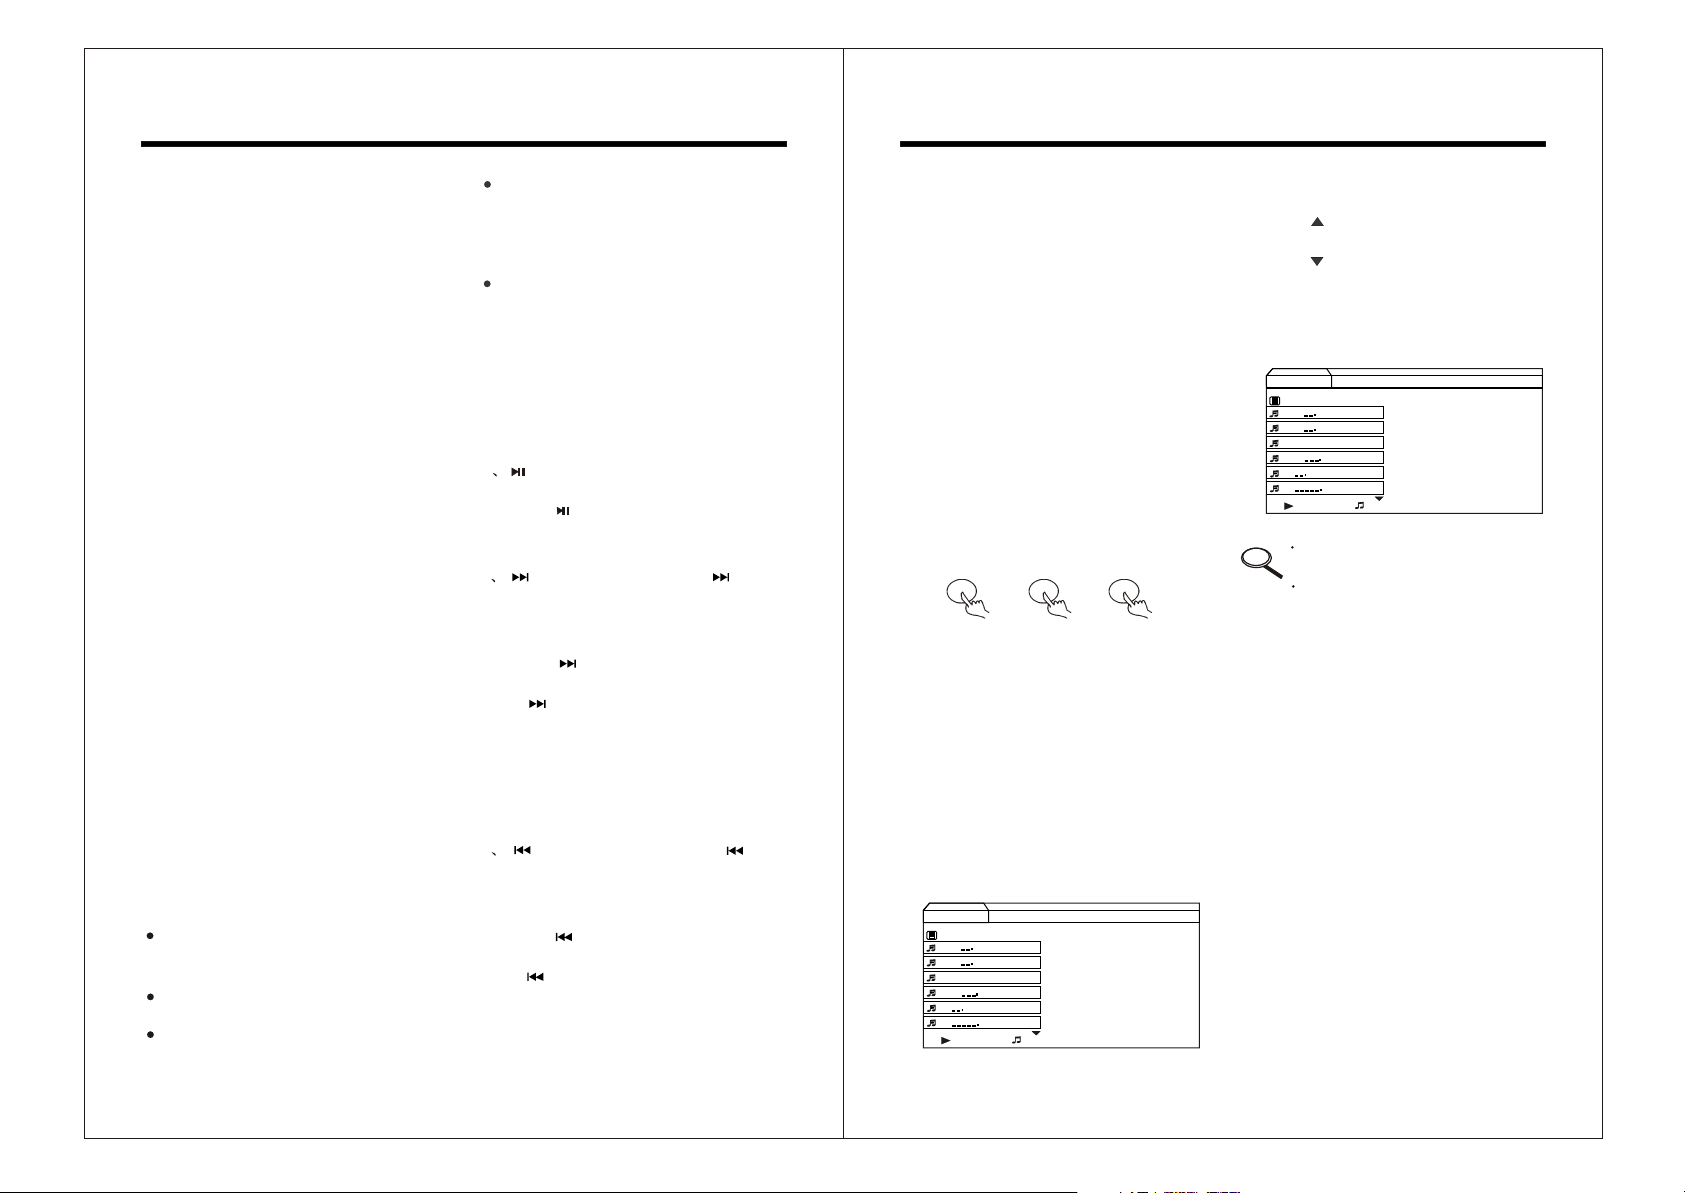
MP3 Functions
Turn on the DVD player
First, press the POWER/MUTE button
to turn on the unit.
Notice:
1. Press POWER/MUTE button once to
turn on the unit. In turn on mode,
press short to switch on the sound
channel output, press and hold it for
more than 2 seconds to turn off the
unit.
2. When the unit is off, press POWER/
MUTE to replay the disc. It can
memorize the last play mode, which
belongs to DVD, VCD or CD.
3. You can end the standby state in
power disconnecting mode.
Warning!
The unit is set with the screen saver
function. When the unit is in pause
mode, and no operations are
performed within 5 minutes, it will
enter Screen Saver mode
automatically. when you begin to
operate the unit again, screen saver
will stop and return to normal mode
automatically.
EJECT BUTTON
1. Press EJECT to pop-up the disc.
2. Input the disc into the disc tray.
Notice:
If the position inputted is improper,
disc or the unit function may be
damaged.
When the tray heads out, insert the
disc.
Insert the disc with label upward.
Please make sure only one disc is
inserted once.
If there is a disc in it, do not try to
insert another.
If the format of the disc inserted is
recognized by the unit, the TV screen
will show the corresponding disc
symbol, and the unit will begin to play
automatically.
If the format of inserted disc is not
recognized by the unit, the unit will
change to radio mode automatically
the monitor will show a disc symbol
with a question mark on the top right
corner of the screen.
Basic Playing
1 (PLAY/PAUSE): Press it to pause
the playing disc.
Press to enter pause mode, when
the unit is playing a disc, press again
to resume playing.
2 (fast-forward): Press and
hold more than 2 seconds in playing
mode, the playing content will
start fast-forward.
Press continuously to increase
the playing speed.
In mode, the picture on screen
will move fast, and the sound will be
interrupted. There are 4 speed levels
for DVD discs playing: X2, X4, X16,
X100. And 3 speed levels for discs
except for DVD:X2, X4, X8.
Press PLAY to resume normal playing.
3 (fast-backward): Press and
hold more than 2 seconds in playing
mode, the playing content will start
fast-backward.
Press continuously to decrease
the playing speed.
In mode, the picture on screen
will move slow, and the sound will be
interrupted. There are 4 speed
levels for DVD discs playing: X2, X4,
X16, X100. And 3 speed levels for
MP3 adopts to a standard which is the
newest compressed technique of video
digital playing, one disc can store more
than 600 types of music, or more than 160
songs, and have the same quality as CD.
DISC PLAYING
Use the digital button to select the song
playing directly.
1. According to the basic operating process,
insert the disc correctly, the player will
start to search the disc information, and
then show the message on the screen.
2. If you select songs in the same file,
please press the digital button directly
to choose the song number to play.
Example: to select the108th song.
1 0/10 8
++
Press "PLAY" button to confirm.
3.If you select songs in different files:
press screen show button once to
select song in next file, press
language channel button to select last
file.
SELECTING THE SONG BY MENU
1. Insert the disc, wait until the player
searching finished, TV
display the main MENU.
Music
List
3
1-27
M
P
3
2-28
M
P
M
P
3
M
P
M
P
0:02:59
3
M
P
3
3
5/12
3-21 oyo11
4-30
5-
6-
screen will
2. In playing, you can choose the song that
you like.
3. Press button on remote control to
search the last songs.
¡® ¡¯
¡® ¡¯
4. Press button on remote control to
search the next songs.
5. Press Play/Pause button to confirm,
the player will play the song selected
a few seconds later.
Music
List
3
1-27
M
P
3
2-28
M
P
3
3-21 oyo11
M
P
3
4-30
M
P
3
5-
M
P
3
6-
M
P
5/12
0:02:59
The other functions, please
Notice
refer to the basic operating part.
When the song number selected
is over 10, for example, to select
the 18th, press digital button 1
first, then 8, it can play the18th
song then.
-12-
-17-
Page 15

Basic Operations
Basic Operations
Radio/auto-memory & scan
storage/programme
1. In radio mode, press this button on
remote control to use auto-memory
and scan storage function.
2. In MP3 or CD playing mode, press
PRG to enter programming dialogue. ''
3. In VCD playing mode, press stop
5/12
''
+
+
-
-
Function
button first, then PRG button to
program.
Press / / / direction buttons
to select the track, and then ENTER
to confirm after selecting the song.
Icons:
Music
List
3
1-27
M
P
3
2-28
M
P
3-21 oyo11
4-30
5-
6-
Icon symbol
3
M
P
3
M
P
3
M
P
3
M
P
0:02:59
Means selecting the
+
playing song;
Means selecting the
+
current list;
Means deleting the
programmed song
-
which is playing now;
Means deleting all the
songs that have
-
programmed already.
Program
TITLE/ZOOM BUTTON
1. In playback mode, press remote
control ZOOM button as enlarge
picture function, then press
select the desired angle.
Press first time enlarge picture 2
times, press twice enlarge picture
4 times, press third time, screen
shows Normal Picture symbol,
picture resume to original size.
2. Press short to activate selecting title
function, press digital button to select
the song that you want to play.
discs except for DVD:X2, X4, X8.
Press PLAY to resume normal playing.
4 (LAST SONG):
Press on remote control in 3
seconds before a chapter or track
playing, the playing content will jump
to previous one and continue to play
automatically.
Press after a chapter or track has
played for over 3 seconds, the playing
content will jump to the beginning of
the previous chapter or track and
continue to play automatically.
Press and hold on remote control
for more than 2 seconds to start fast backward.
5 (NEXT SONG):
Press on front panel, the playing
content will jump to the next chapter
or track and continue to play
automatically.
Press and hold on remote control
for more than 2 seconds to start fast forward.
Using DVD Video Menu
When you insert a DVD disc into the
DVD player and start to play:
1 .The unit will start to play from the
beginning of the disc automatically,
and then pop-up the MENU.
2 .Press / / / on MENU to
move the highlight.
3 .Press Enter on selected option to
confirm.
Advanced Operations
REPEAT PLAY
RPT: Press 2 RPT button if you
want to repeat playing the whole
disc or a specific track/chapter of the
disc.
1. Press 2 RPT to switch among
different repeat modes.
2. When 2 RPT is pressed, the
results of repeating may differ due
to the disc types. Refer to the
diagram below:
Chapter
Titie
Off
DVD
Language Channel button
I n disc playing mode, press this button
to switch in different sound channels,
which changes as follows:
Left channel Right channel Stereo
In radio mode, press this button once to
turn on the key-press sound, press it
again to turn off the key-press sound.
VCD/SVCD PBC MENU
Some VCD and S-VCD discs(especially
Karaoke discs) have some menus.
They are used to select the contents
Track
All
Off
VCD/SVCD
CD/MP3/WMA
-16-
-13-
Page 16
Basic Operations
Basic Operations
you want to enjoy. This type of menu can
also be called PBC (Playback Control).
MENU SET-UP
When playing this type of discs:
1. Press the MENU button long to setup
PBC.
2. Press the digital buttons to enter the
segment of the track you want to play.
If the segment or track has two digits,
please input the two digits
continuously.
Warning!
If no operations are executed within
10 seconds after the PBC MENU is
displayed, the unit will continue to
play from the first track.
Select button
Press SEL' ' button to select the volume
mode to adjust as following:
BASL TRE BAL FAD LOU
BRT CNT CLR
1 BAS adjustment
Press 'SEL' button once, BAS will
be activated, then depress VOL '+/-'
button to adjust the bass output.
2 TRE adjustment
Press 'SEL' button twice, TRE will
be activated, then depress VOL '+/-'
button to adjust the treble output.
3 BAL
Press 'SEL' button three times, BAL
will be activated, then depress
VOL'+/-' button to adjust left or right
sound channel output.
4 FAD
Press 'SEL' button four times, FAD
will be activated, then depress
VOL'+/-' button to adjust front or
rear louder-speaker output.
5 LOU
Press 'SEL' button five times, LOUD
will be activated, then depress
VOL'+/-' button to adjust. LOUD ON
to increase Loudness, and LOUD
OFF to decrease.
6 Adjust the video effect in VCD, DVD
reading mode. Press 'SEL' button
six times, CLR will activate this
function, then depress VOL '+/-'
button to adjust the display colour.
Press 'SEL' button seven times, CNT
will activate this function, then depress
VOL '+/-' button to adjust the display
contrast degree. Press 'SEL' button
eight times, BRT will activate this
function, then depress VOL '+/-' button
to adjust the display brightness.
If you do not performance any operation
after press 'SEL' , it will exit this
function automatically.
CONTROL OPERATION
1. Press OSD button to pop-up the
Control Menu.
2. The On-Screen display function is
valid only in DVD/DVD Audio/DVD VR/ VCD discs, and the display
results may differ among some types
of disc.
N/P/AUTO
In order to get the best display effect of
image. You must adjust the signal
system to make it match with TV set.
1. There are three kinds of TV colour
signal systems to select: NTSC, PAL
or AUTOMATISM mode.
2. Press 5P/N every time it will select a
kind of TV colour signal system
conversion among NTSC, PAL and
AUTOMATISM mode.
RANDOM PLAYING
1. Press 3RDM every time, the unit will
execute random playing disc
automatically.
2. In random playing mode, press it
again to resume normal playing mode.
Warning!
This function is only valid in , VCD,
S-VCD and CD discs. When shut off
PBC function, random playing is valid
only in VCD/S-VCD discs.
DIGITAL BUTTON
In radio mode
1. Press and hold any one button 1-6 on
remote control for over 2 seconds to
store the radio stations to the
memory you are listening .
2. From 1-6, press any one button to
call out the memory.
In disc playing mode
1. Digital buttons are used to select the
songs. If certain
two digits, please input two digits
continuously. ''
segment or track has
10+ is only valid in
VCD mode.
2. In disc playing mode, press and hold
' '
7RPT button long means Single
song repeat / Full disc repeat/
Catalogue repeat. Press long again to
shut off this function.
3. In disc playing mode, press and hold
' '
8RDM button long means Random
playing. Press long again to shut off
this function.
4. In DVD or VCD mode, press and hold
' '
9P/N more than 2 seconds means
interchange between PAL/NTSC
systems.
CLOCK DISPLAY BUTTON
1. Press to enter time display mode,
press again to exit this mode.
2. In time display mode, press SEL
button to enter second setting status,
second digital flashes , depress
VOL +/- to adjust the second. Press
' '
SEL again to enter minute setting
' '
status, depress VOL +/- to adjust.
Press SEL another time to enter
hour settingstatus, depress VOL+/ to adjust.press it again to exit the
hour mode,press another times to exit
time display mode.
' '
' '
''
RADIO/STEREO/STOP
BUTTON
1. In disc playing mode, press this
button on remote control to stop
playing.
2. In radio mode, press this button
means sound channels changing
function.
-14-
-15-
 Loading...