

Page 1
PLD7HB
PLD7HB
USB
SD
_
_
MENU
MODE
_
AV/DVD
7 inch h ea drest mon it or TFT-LCD c ol or monito r
Adju st able head re st monito r
PLD7H B
USB
_
MENU
MODE
SD
_
_
AV/DVD
HTTP://WWW.PYLEAU D I O.COM
Page 2
OP E RATIN G INSTRU C TIONS
2. PART NAMES AND FUNCTIONS
Thank y ou for purchasing h eadrest moni tor. Please read this manual
caref ully before opera ting and reser ve it for future refe rence. It will b e
helpf ul to you if you encoun ter any operat ional problem.
USE INSTRUCTION
1. Please connect the power line and th e video line for t he unit and
power b ox.. Putting thro ugh the nine cor e cables of the unit to t he
nine co re connector on the p ower box. Conn ect the audio and
video w ith AV IN on the b ox. Connect the DVD o utput signal w ith
DVD OUT 1/DVD OUT2 for outp ut signal. Con nect the power line ,
Red for AC C, Yellow for +12v AND Black for GND.
2. Connect the power wire, turn on the po wer, it will disp lay the
“DVD” p icture.
3. It will be auto identify for the PAL syste m and NTSC system. If
the con nection is correc t it will be show th e picture with clearly
and col orful.
4. To adjust the brigh tness, contrast, color, tint for t he best result
that yo u need.
5. This set is with USB transfer line, it w ill be convenience for
conne ct with USB driver.
1. MAINLY SPECIFICATION
Name: H eadrest DVD monitor
Pixel f ormat:1440X234 Resolution
Syste m:
Power :
Consu mption: 7W
Funct ion: AV+DVD+S D+USB
Pictu re: 7 inch (16:9)
With fu nction remote con trol 6M
PAL/NTSC
DC+12 V / ±10%
1
PLD 7HB
USB
14
15
_
MENU
MODE
13
12
SD
+
11
6
10
9 8
AV/DVD
5
4
7
3
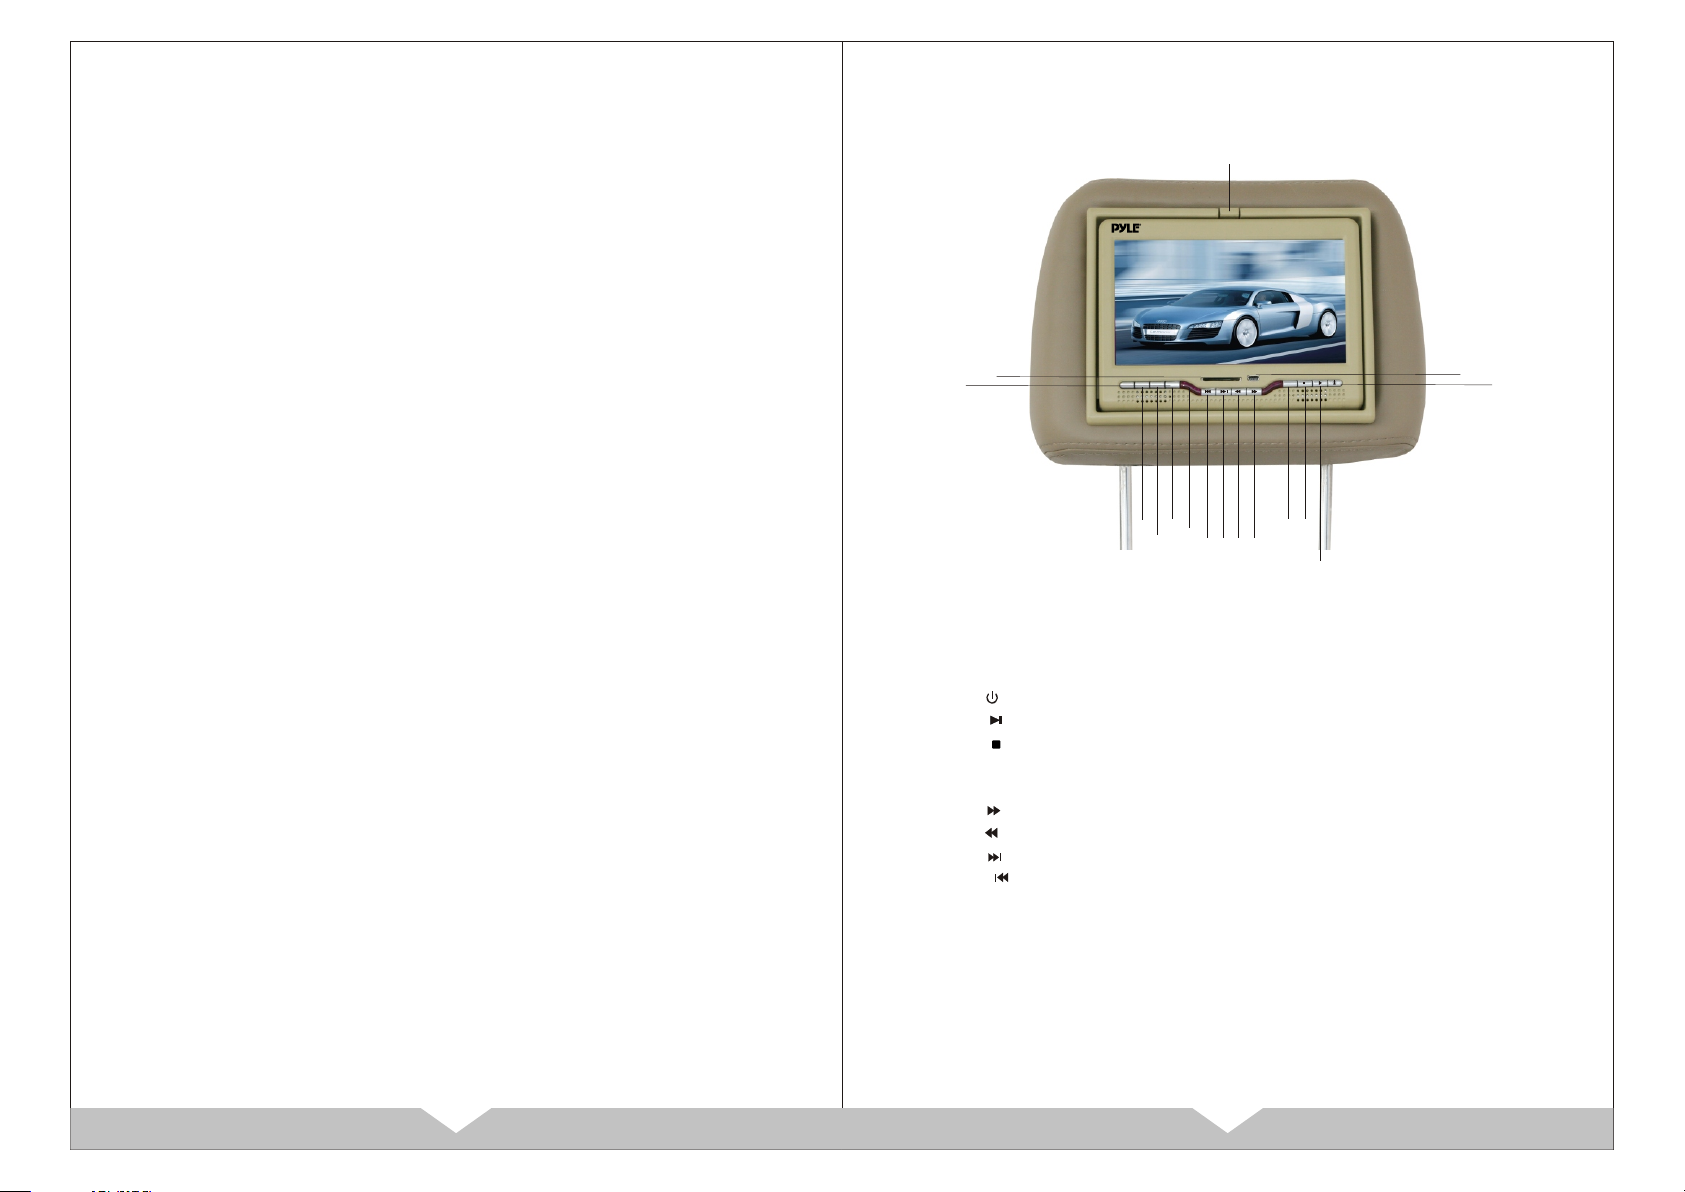
1. Press to open the monitor,
2. Powe r: ON/OFF
3. Play : DVD Stop, Press wil l resume playb ack
4. Stop : ON Play, Press t o stop play.
5. AV/ DVD: AV/DVD selection butto n
6. IR receiver window
7. Forw ard
8. REV
9. Next b utton
10. Pre vious button
11. + : Volume + or su b manual up
12. Manu: pre ss to manual
13. - :Volume - or sub manual down
14. Mode: Sel ection for 16: 9 or 4:3
15. SD: SD carder reader
16. SUB : Mini U SB connector
16
2
1
2
Page 3
3. REMOTE CONTROL UNIT
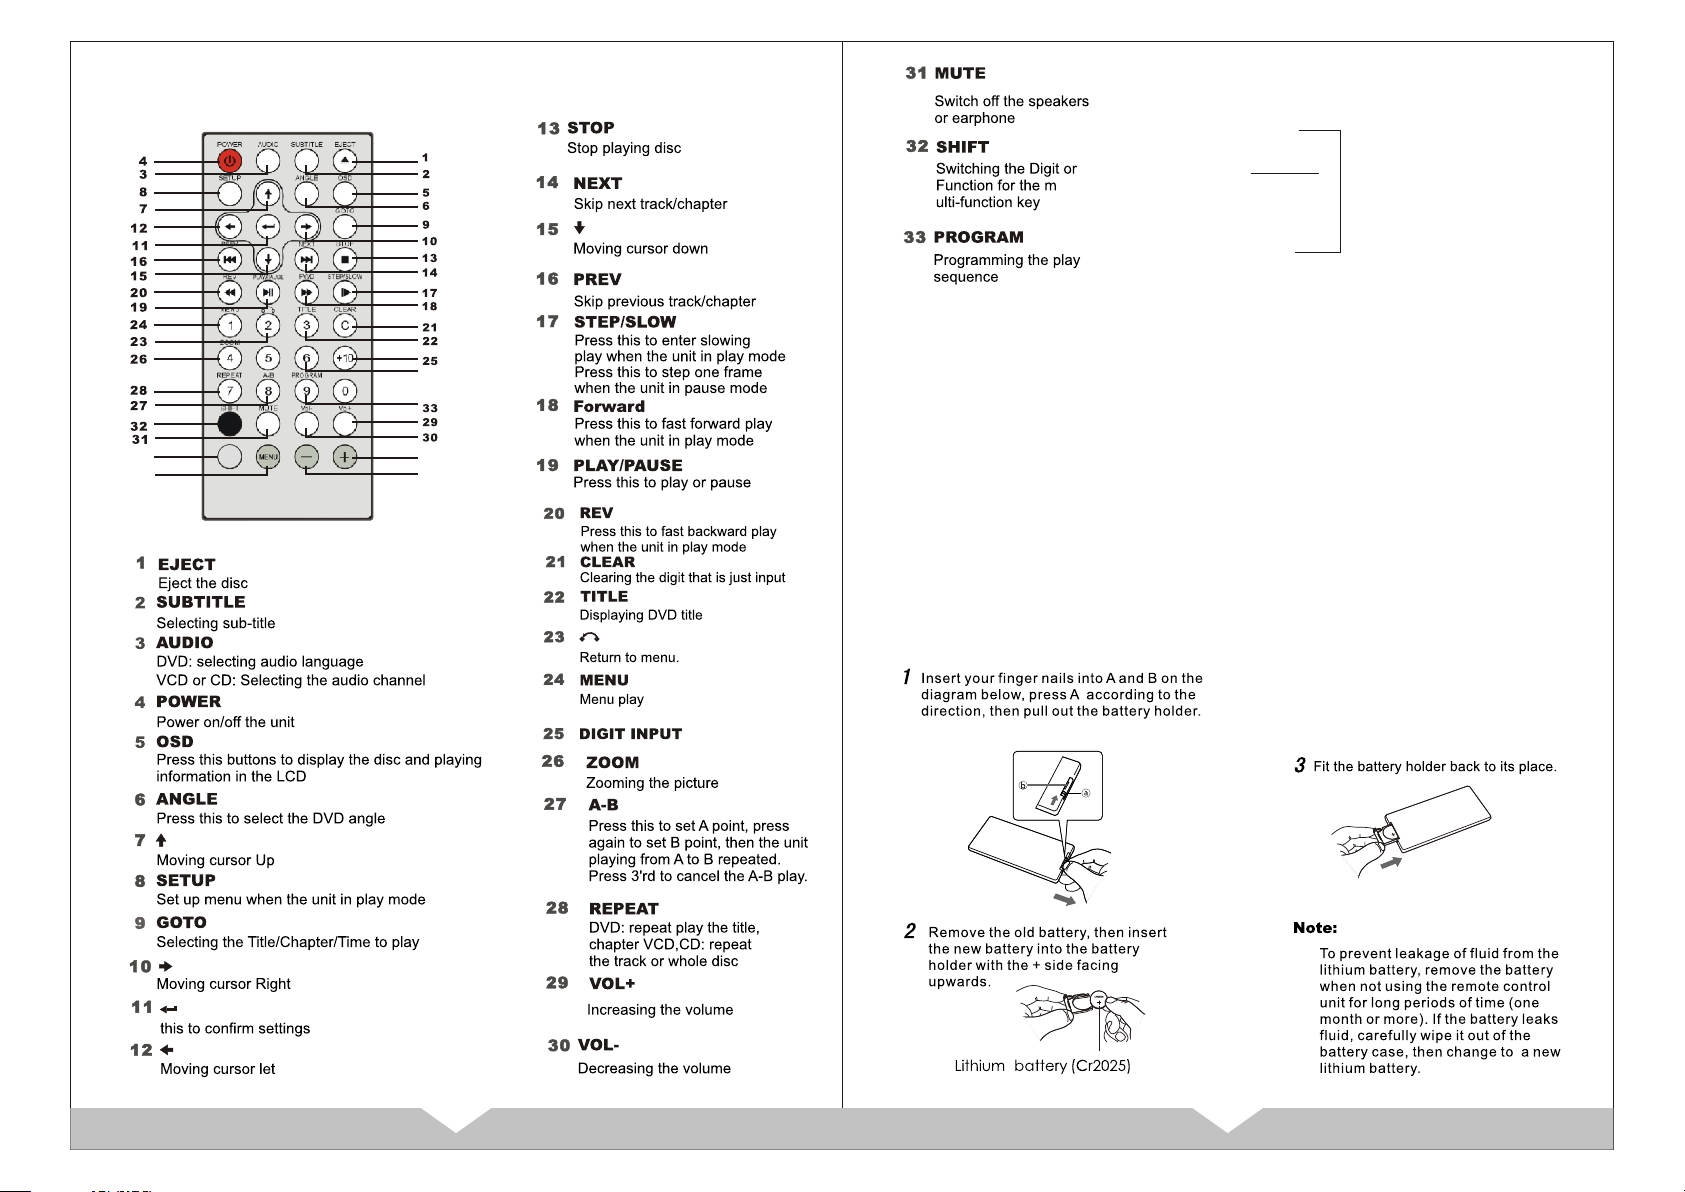
34 AV/DV D
AV/D VD f un ct io n se le ct io n
35 M E NU
36
37
AV/D VD
34
35
36 +
UP
Display eff ec t ad ju st
37 -
DOWN
Precautions before using remote control unit
1. Please pull out the PVC when the remot e control unit is first using.
2. Don't drop or step on remote control u nit or subject it to shocks.
3. Note that it may not be possible to oper ate the main unit if there
are obs tacles between it and the remote se nsor.
4. Usin g the remote contro l unit within th e specified operating range.
Remote control unit operating range
1.Hor izontal: ±30 degre e
2.Vert ical: ±30 degree
3. Dist ance: 5M
Replacing the battery
3
4
Page 4

4. CONNECTING THE PLAYER TO OTHER COMPONENTS
CONNE CTTING TO THE POWER BO X
PLD7H B
USB
SB
U
USB Con nector
MINI USB Co nn ec to r
_
MENU
MODE
+
_
MENU
MODE
+
AV/DVD
PLD7H B
USB
SD
AV/DVD
USB
SD
USB CON NECTING TO TH E USB
Use the U SB line, (mini USB co nnector and US B port 1.1), Please
refer ence the followin g drawing as bel ow:
5
USBUSB
MODEMODE
__
__
MENUMENU
__
SDSD
AV/DV DAV/DV D
1. Be sure the dish in eject, connector t he USB, it will be play the USB
2. It wil l display “READ USB ”, then play the f ile.
3. The menu and the method same as the way of M P3 and JPEG.
4. Pull out the USB when you want to stop pla ying.
NOTE:
Be sure t he DVD is in ejected, t hen connect th e USB, it will be work.
Be sure t he format of the file i n USB is fit with the unit, otherwise m ust
forma tting the USB befor e connect with U SB
CONNE CTTING WITH SD CARD
S D
SD CARD
▼
USBUSB
MODEMODE
__
__
MENUMENU
__
SDSD
AV/D VDAV/D VD
1. Plug the SD card to the SD card slot, it wil l be read the file of SD
card.
2. It wil l display “READ CAR D” on the screen , then will show the fi le
of SD car d.
3. The menu and the method same as the way of M P3 and JPEG.
4. Pull out the SD card when you want to stop t he playing.
NOTE:
It unit j ust work with SD card .
Be sure t he DVD is in ejected, t hen the SD card wi ll be work.
Be sure t he direction of SD ca rd is in correct w hen plug in the SD card .
6
Page 5

5.BASIC OPERATIONS
A Using O SD
1. Press OSD to show the play and disc
infor mation in the LCD when the main unit
is in pla y mode.
2. Press OSD again to disable the
infor mation display.
B Selec ting an audio
MENU
-
+
"A UDI O" Ke y
"S UBT ITL E" Key
"A NGL E" Ke y
"S TOP" K ey
" PLAY " Key
AV/DVD
MENU
-
+
" PLAY /PAUSE " Key
1. Press AUDIO to select the audio
langu age when the main unit is in play
mode fo r DVD disc.
2 .Press AUDIO to s elect the audio channel
whe the m ain unit is in play mode for VCD, CD disc .;
C Selec ting a sub-title
Press SUBTITLE to select the sub-title
when the main unit is in play mode.
D Selec ting an angle
1. Press ANGLE to select the play angle wh en
the mai n unit is in play mode fo r DVD disc,
there i s no function for oth er disc.
2. It wil l be no working if the di sh not have this f unction.
E Stopping the playing
1. Press STOP to pause the pl aying, the unit
can mem orize the play point.
2 . Press P LAY to con tinues play from the
pausi ng point
3 .Press STOP to stop the d isc.
NOTE: The unit can not p lay to continues playing for some d isc.
F Pausing the disc
1 .Press PLAY/PAUSE to pa use the
playi ng when playing.
2 .Press PLAY/PAUSE to co ntinues
playi ng.
AV/DVD
"O SD" K ey
G Scanning forward and bac kwward
1. Press F MD t o fa st the playin g.
2. Chang e th e pl aying speed t o X2 X 4 X8 X 20 , and
norm al f or e ve ry pressing t o ba ck t he normal spe ed .
3. Press R EV t o ba ckward play in g, c ha nge the playi ng
spee d to X 2 X4 X 8 X2 0, and normal f or e ve ry pressing
to bac k th e no rm al speed.
"R EV" K ey
"F MD" K ey
AV/DVD
MENU
-
+
H Slow playing the disc
1. Press STEP/SLOW in t he remote cont rol unit
to slow p laying. Change th e playing spee d to
"S TEP /SL OW" Key
1/2、1/3、1 /4、1/5、1/6 and 1/7 for ev ery
press ing STEP/SLOW.
2 .Press STEP/ SLOW to skip frame when the
AV/DVD
MENU
-
unit is i n pause mode.
+
Note: The sound is mut e when the main un it is
in fast o r slow playing exce pt CD and MP3 disc . Press PLAY to
resum e normal playing.
I Repea t playing the disc
1 .A-B play mode : Press A-B, the LCD will show
Repea t A-. Press A-B again, th e main unit will
repea t the play from A to B.. P ress A-B again,
the uni t will resume norma l playing.
2 .Repeat play ing the title, c hapter or track.:
" " KeyRep eat
"A -B" K ey
"S HIF T" Ke y
AV/DVD
MENU
-
+
Press R EPEAT to s elect the title, ch apter
or trac k when the unit is in pla y mode. DVD:
title , chapter; VCD or CD: t rack.
NOTE:
Pleas e press SHIFT to select the FUNCTION mode of remot e control
unit fi rst
J Searc hing the disc
Press S EARCH
"S EAR CH" K ey
Using c ursor key and ENTER t o select the
prope r playing item. Inp ut digit to sele ct
playi ng time, title, cha pter or track.
Press E NTER to confirm the p laying item
Press S EARCH to resume the p lay mode.
K Zoom playing
Press Z OOM every times,
The pic ture will change to
2X 3X 4X 1/ 2X 1/3X, 1/4X and nor mal.
"Z OOM " Key
AV/DVD
MENU
-
+
7
8
Page 6

L Program playing
The mai n unit may play the lis t according to t he following program list:
1. Pres s PROGRAM, the menu w ill shown in the L CD
Hint: T is for Titl e, C is for Chapter for
DVD dis c.
NOTE: There is no titl e, chapter or track for some disc.
3 Using t he cursor key to move t he cursor to PLAY
in=co n, and press ENTER to s tart play the li st.
4 Using t he cursor key to move t he cursor to CLE AR icon, and
Press E NTER to clear the pla y list.
5 Press P LAY/PAU SE or select the EXIT icon and press ENTER to
exit pr ogram menu.
NOTE: The program li st will be cance l whe the main unit is po wer
off or eject the disc.
There is no program functi on for some disc.
The unit can not play the list i f you select the item that does
not exi t in the disc.
M Playi ng MP3 and JPEG disc
1.
2.
3.
4.
Direc tory
File
Mp3 ico n
JPEG ic on
Using t he cursor key to move t he cursor to the d irectory,
fild, M P3 icon or JPEG icon.
Selec ting MP3 icon and pre ss ENTER if you wa nt to play Mp3,
selec ting JPEG icon and pr ess ENTER if you w ant to play JPEG.
Selec ting a file and press ENTER if you want t o play the file.
Press A- B to repeat A-B playin g.
NOTE: The LCD will be off if there is no operation on the u nit over 3
minut es when playing CD, MP3. And the Power L ED will be
flash i n the status.
LCD wil l be on for any operation on the unit.
6.BASIC SETTING
The uni t with two inputs: AV and DVD. Turn on the power,
press AV/DVD on the unit o r remote control to select the inpu t.
AV/DVD mode
When th e unit is playing, pr ess the MENU on th e unit or remote
contr ol to enter the menu se tting, selec t the mode that you wan t,
then pr ess the + or on remote co ntrol to selec t that you want.
1).B RI GHTNESS
2).C OL OR
3).C ON TRAST
4).T IN T
5).L AN GUAGE
6).M OD E
Operation
1).Pr ess the " MENU " one ti me on unit or remote co ntrol to menu
of brig htness setting, p ress + or to select what yo u want.
2).Pr ess the MENU two times on unit or remote c ontrol to menu
of colo r setting, press + or to select what you wan t.
3).Pr ess the MENU three times o n unit or remote cont rol to menu
" "
" " "- "
" "
of cont rast setting, pre ss + or to select what y ou want.
4).Pr ess the MENU four times on unit or re mote control to menu
of Tint se tting, press + or to select what you want.
5).Pr ess the MENU five times on unit or re mote control to menu
" "
" " "- "
" "
of lang uate setting, pre ss + or to select what y ou want.
6).Pr ess the MENU six times on unit or rem ote control to menu
" "
of mode s etting, press + or to sele ct what you want.
" " "- "
" " "- "
" " "- "
" " "- "
9
10
Page 7

7.MAIN UNIT SETTINGS
Press S ETUP when the m ain unit is in pla y mode. The set u p menu
will be d isplayed in LCD.
1、SYSTE M SETUP
1).TV SYS ETM
Pleas e select the proper v ideo signal
syste m if you want to see on a TV set.
Defau lt: NTSC
NOTE: The picture ma y be a grey
pictu re if the system is not
corre ctly set.
2).SCRE EN SAVER
This fu nction can save in st op, no disc
over 1 mi nutes.
Selec t OFF to turn on the save r, Select
ON to dis able saver.
Defau lt is saver.
3).TV TYPE
5).RATING
This se tting can control t he unit play
SY ST EM S ET UP
paren t lock DVD disc. Leve l is divided
in to 2 lev el: normal and children.
Selec ting Normal the lock is cancel.
Defau lt: Normal
OTE: The parent lock l evel can not be set if the parent lock is l ocked.
6).DE FAULT
To restor e the factory setti ng, please
selec t this item and press E NTER.
8).EX IT SETUP
Exit th e setting.
Selec ting a TV scale , with 16:9, 4:3 LB
and 4:3 P S.
NOTE: Picture scale is dep ending the
disc. P lease select the co rrect
scale .
4).PASSWORD
Defau lt setting: 0000. W hen unlock,
new par ent lock can be input and select
the par ent lock level..
11
2. LANGUAGE SETUP
1).OSD LA NGUAGE
Selec ting a OSD language: Please
enter t he OSD language sel ect menu,
use cur sor key to move the cur sor to
the lan guage what you want and press
ENTER .
2).AU DIO LANG
Selec ting a audio language Please
enter t he audio language select menu,
use cur sor key to move the cur sor to
the lan guage what you want and press
ENTER .
If the di sc not have the langu age, it is
not sho wing this language.
12
Page 8

3).SU BTITLE LANG
Selec ting a sub-title la nguage:
Pleas e enter the sub-til e language
selec t menu, user cursor k ey
to move t he cursor to the lang uage
what yo u want and press ENTE R
4). MEN U LANG
Selec ting a menu language:
Pleas e enter the menu language
selec t menu, use cursor ke y to
move th e cursor to the langu age
what yo u want and press ENTE R.
5).EX IT SETUP
Exit th e language settin g
NOTE: The language w ill be the
disc de fault language if the
langu age you want is not visible.
Defau lt language: English
9. The discs l isted on the b elow can be pl ayed on this p layer with out
any adapt er.
8. CAUTIONS ON USING THIS PLAYER
1.Be su re the anode and cath ode is correct c onnection.
2. To reduce the risk of fir e or electric shock, do not expose th is
appli ance to rain or moisture.
3.Do no t open the cabinet, r efer servici ng to qualified personnel only.
4.Ins tallation shoul d be very fasten . Preventing the fa llen unit hurt
peopl e when moving on or a sudden brake.
5.DC 12 V should best be conn ected to the pow er adapter to preve nt
from th e over-voltage dr op the may influ ence the normal work of
monit or.
6.A few hi gh lights or dark spo ts may occur on th e LCD screen. It is
a very co mmon phenomenon to the active mat rix display techn ology,
and nev er necessary means any defects or f aults.
7.Do no t using the disc that i s scratched se riously, oth erwise will
damag e the DVD.
13 14
 Loading...