

Page 1

PLD193T
OWNER'S MANUAL
Mobile Video System
Anti Theft Flip Down Detachable Panel
AM/FM Digital Pll Tuning Radio
Car DVD/VCD/CD/MP3 Player/TV Tuner
Auxiliary Input Function
Parental Control
Remote Control
www.pyleaudio.com
Page 2

CONTENTS
Safety Information.......................................................................................
Disc Notes ..................................................................................................
Installation ..................................................................................................
Electric Connection ....................................................................................
Remote Control ..........................................................................................
Basic Operation ........................................................................................
MP3/WMA/JPEG Disc Play .....................................................................
AUX Operation .......................................................................................
On-Screen Display Function ...................................................................
Multi-Audio Language Function ...............................................................
Multi-Subtitle Language Function ............................................................
Multi-Angle Function .............................................................................
Title Menu Function ...............................................................................
TV
Operation .......................................................................................
Setup .........................................................................................................
General Setup ........................................................................................
Speaker Setup .......................................................................................
Dolby Digital Setup ................................................................................
Preferences Setup .................................................................................
Defaults Table ........................................................................................
Specifications ...........................................................................................
Trouble Shooting ......................................................................................
2
3
4
7
8
10
14
14
15
16
16
16
16
16
17
17
19
19
20
21
22
23
1
Page 3

SAFETY INFORMATION
CAUTION:
THIS DVD PLAYER IS A CLASS I LASER PRODUCT. HOWEVER THIS DVD
PLAYER USES A VISIBLE/INVISIBLE LASER BEAM WHICH COULD CAUSE .
HAZARDOUS RADIATION EXPOSURE IF DIRECTED. BE SURE TO OPERATE
THE DVD PLAYER CORRECTLY AS INSTRUCTED.
USE OF CONTROLS OR ADJUSTMENTS OR PERFORMANCE OF
PROCEDURES OTHER THAN THOSE SPECIFIED HEREIN MAY RESULT IN
HAZARDOUS RADIATION EXPOSURE.DO NOT OPEN COVERS AND DO NOT
REPAIR YOURSELF. REFER SERVICING TO QUALIFIED PERSONNEL.
WARNING:
TO REDUCE THE RISK OF FIRE OR ELECTRIC SHOCK, DO NOT EXPOSE THIS
EQUIPMENT TO RAIN OR MOISTURE.
TO REDUCE THE RISK OF FIRE OR ELECTRIC SHOCK, AND ANNOYING
INTERFERENCE, USE ONLY THE RECOMMENDED ACCESSORIES.
THIS DEVICE IS INTENDED FOR CONTINUOUS OPERATION.
This product incorporates copyright protection technology that is protected
by method claims of certain U.S. Patents and other intellectual property rights
owned by Macrovision Corporation and other rights owners.Use of this
copyright protection technology must be authorized by Macro vision Corporation,
and is intended for home and other limited viewing uses only unless
otherwise authorized by Macrovision Corporation. Reverse engineering or
disassembly is prohibited.
REGION MANAGEMENT INFORMATION:
This DVD Player is designed and manufactured to respond to the Region
Management Information that is recorded on a DVD disc. If the Region number
described on the DVD disc does not correspond to the Region number of this
DVD Player, this DVD Player cannot play this disc.
2
Page 4
DISC NOTES
Disc formats supported by this
player
VIDEO
MPM
CD-RW
DVD
12 cm disc
(Single-sided disc only)
Video CD
12 cm disc
CD
12 cm disc
MP3
P
3
12 cm disc
Discs which cannot be played
with this player
DVD-ROM
DVD-R/DVD-RAM
CDV
CD-G
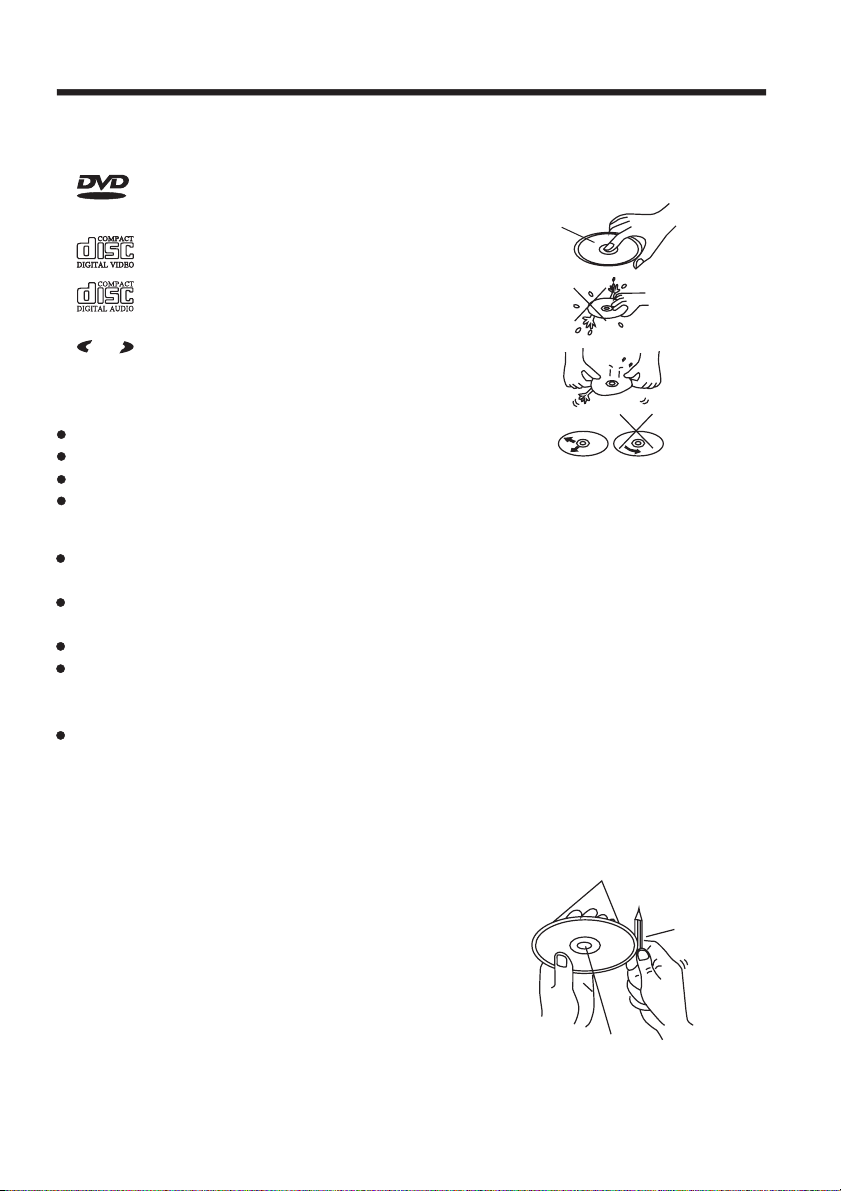
Handling and Cleaning
Dirt, dust, scratches and warping disc
will cause misoperation.
Do not place stickers or make
scratches on discs.
Do not warp discs.
A disc should always be kept in its
case when not in use to prevent from
damaging.
Do not place discs in the following
places:
1.Direct sunlight
2.Dirty, dusty and damp areas
3.Near car heaters
4.On the seats or dashboard
Disc Cleaning
Use a dry soft cloth to wipe the surface.
If the disc is quite dirty, use a soft cloth
slightly moistured with isopropyl (rubbing)
alcohol. Never use solvents such as
benzine, thinner or conventional record
cleaners as they may mar the surface of
the disc.
Note:
A disc may become somewhat scratched
(although not enough to make it
unusable) depending on your handle it
and conditions in the usage environment.
Note these scratches are not an
indication of any problem with the player.
Label side
up
Do nottouch
the
underside
of thedisc
Do not
bend
Wipe the disc from
center
toward theoutside
edge
Preparing New Discs with
Rough
Spots
A new disc may have rough edges on
its inside and outside edges.If a disc
with rough edges is used, the proper
setting will not be performed and the
player will not play the disc.Therefore,
remove the rough edges in advance
by using a ball point pen or pencil as
shown on the right.To remove the
rough edges, press the sid e of the pen
or pencil against the inside and outside
edges of the disc.
Rough spots
on
outside edge
Ball pointpen
or pencil
Rough spots
on inside
edge
3
Page 5
INSTALLATION
NOTES:
Choose the mounting location where the unit will not interfere with the normal
driving function of the driver.
Before finally installing the unit, connect the wiring temporarily and make sure
it is
all connected up properly and the unit and the system work properly.
Use only the parts included with the unit to ensure proper installation. The use
of
unauthorized parts can cause malfunctions.
Consult with your nearest dealer if installation requires the drilling of holes or
other
modifications of the vehicle.
Install the unit where it does not get in the driver s way and cannot injure the
passenger if there is a sudden stop, like an emergency stop.
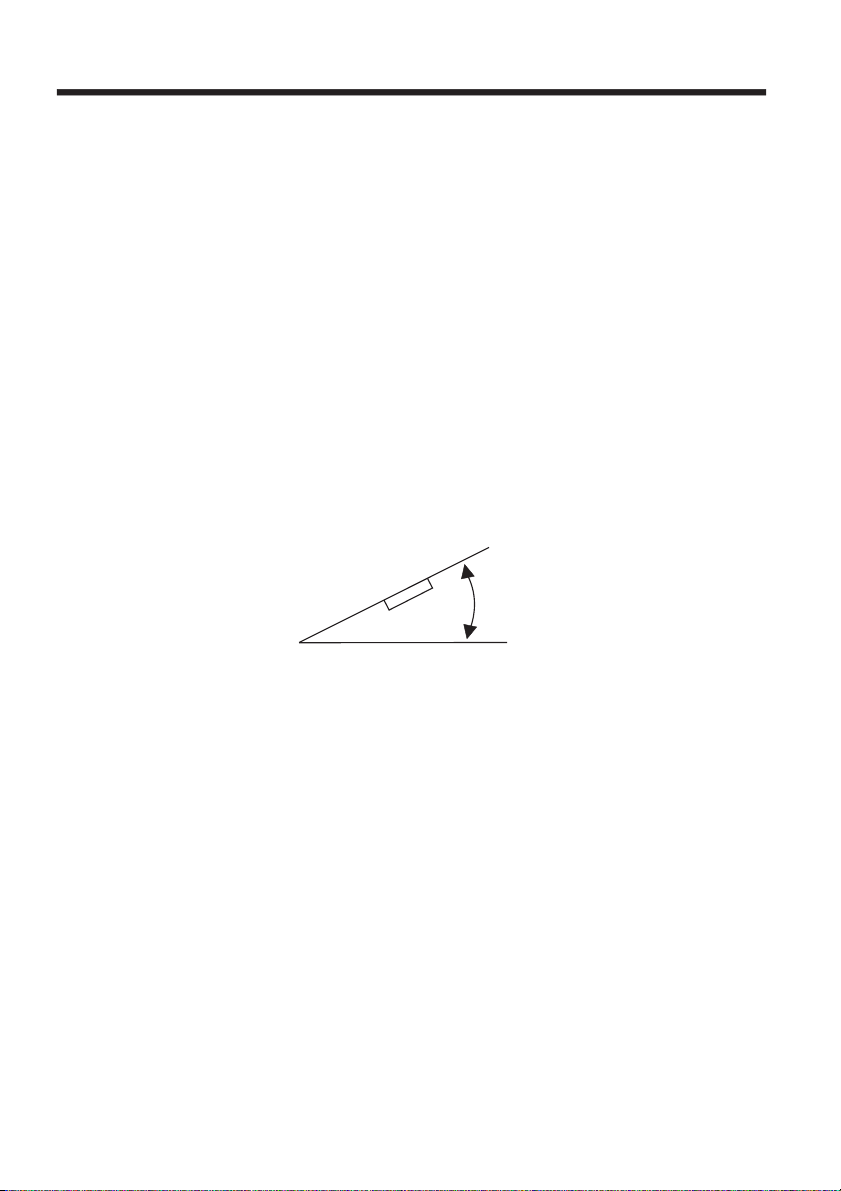
If installation angle exceeds 30 from horizontal, the unit might not give its
optimum
performance.
'
30
Avoid installing the unit where it would be subject to high temperature, such
as from
subject to dust,
DIN FRONT/REAR-MOUNT
This unit can be properly installed either from "Front"(conventional DIN
Front-mount)
screw holes at the sides of
illustrated installation methods.
direct sunlight, or from hot air, from the heater, or where it would be
dirt or excessive vibration.
or "Rear"(DIN Rear-mount installation, utilizing threaded
the unit chassis). For details, refer to the following
4
Page 6
INSTALLATION
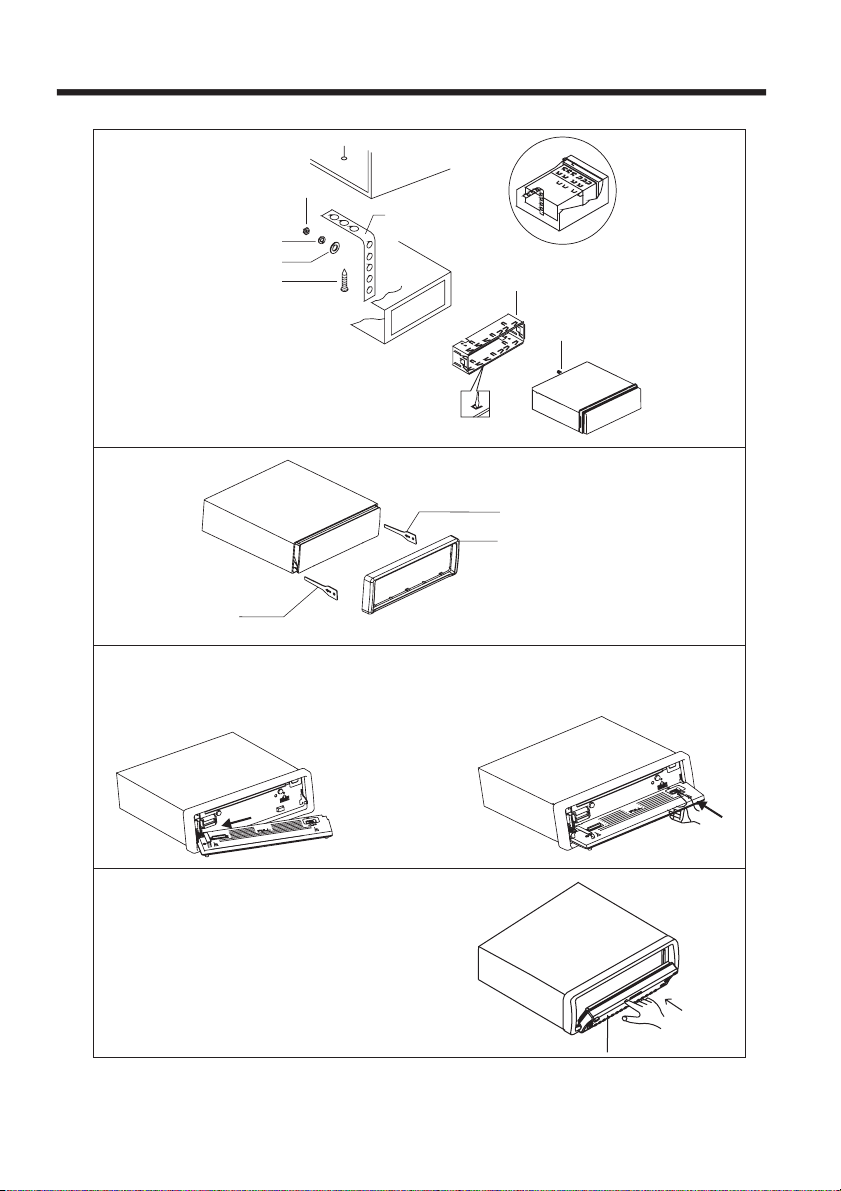
DASH BOARD
HEX NUT
SPRING WASHER
PLAIN WASHER
TAPPING SCREW
KEY PLATE
1.WHILE INSTALLING THE FRONT PANEL, PLEASE MOUNT THE LEFT SIDE FIRST,
AND MAKE THE DIRECTION HOLE ON THE FRONT PANELAIM AT THE LEFT GUIDE
ON THE UNIT
2.THAN PUSH THE RIGHT SIDE TO THE RIGHT GUIDEMOUNT
METALMOUNTING
STRAP
CONSOLE
SLIDE BRACKET
HOUSING
HEX BOLT
KEY PLATE
PLASTIC TRIM OUT
3.PUSH IT TO INSTALL THE
FRONT PANEL COMPLETELY .
5
Page 7
INSTALLATION
CAUTION: DO NOT INSTALL THE DETACHABLE PANEL BEFORE
CONNECTING THE WIRE.
1. The unit is designed for negative terminal of the battery which is connected to the
vehicle metal. Please confirm it before installation.
2. If the car interior is extremely hot, as after being parked in the sun, do not use the
player until the car has been driven for a while to cool off the interior.
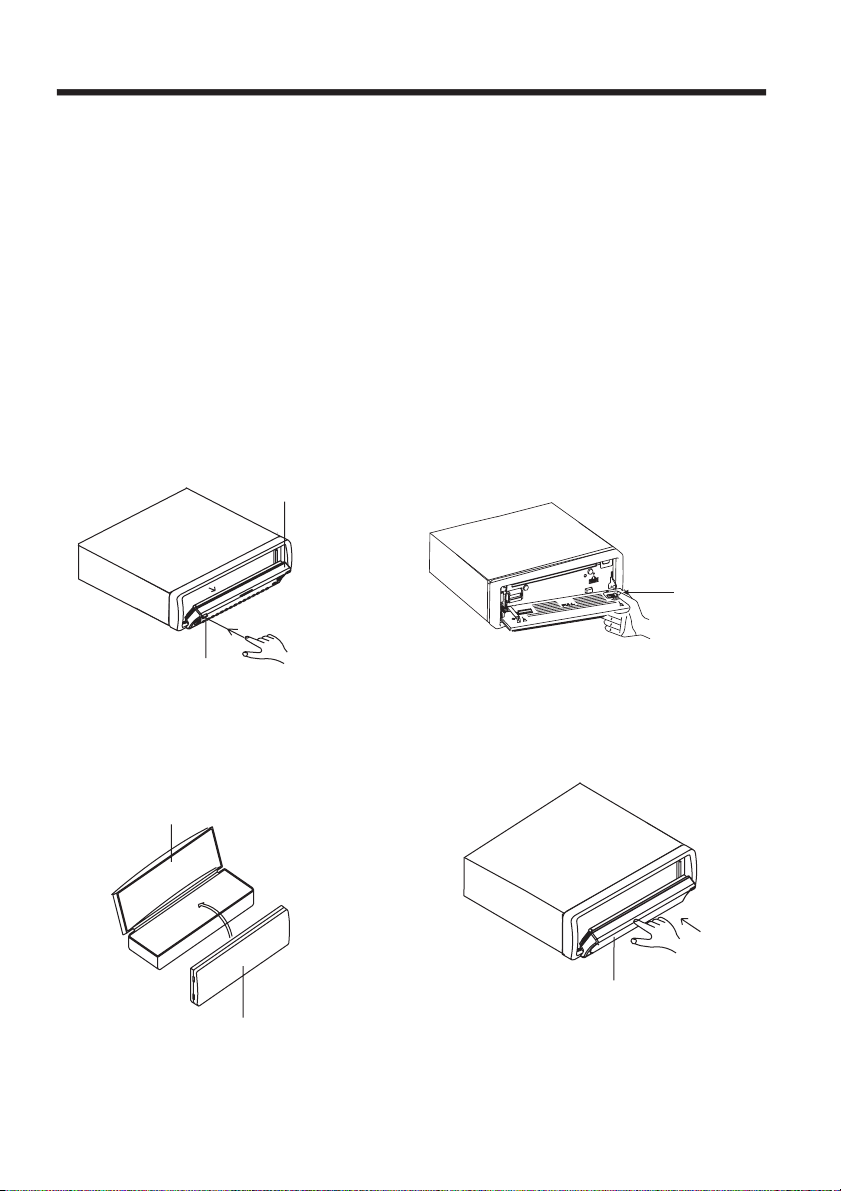
3. Press the OPEN button to flip down the front panel (see fig.1), Slide the guide knob
to remove the right side first, then take away the front panel. (see fig.2) and put it in the
protective case (see fig.3) for safe keeping.
4. Install the front panel back into its bracket and then push it back to the position for
playing (see fig.4).
FRONT PANEL
GUIDE KNOB
OPEN BUTTON
(FIG.1)
PROTECTIVE CASE
FRONT PANEL
FRONT PANEL
(FIG.3) (FIG.4)
6
(FIG.2)
Page 8

ELECTRIC CONNECTION
WIRING CONNECTION
MAIN UNIT
TV ANT IN
ANTENNA CONNECTOR
IGNITION
SWITCH(B+)
MEMORY
BACK-UP(B+)
GROUND(B-)
ANTENNA
AUTO
RED
YELLOW
BLACK
BLUE
CHOKE
BOX
FUSE
REAR RCAOUTPUT
CABLE (optional)
FRONT RCA OUTPUT
CABLE
(FOR RCALINE OUT VERSION ONLY)
AUX(optional)
RCA CABLE
VIDEO INYELLOW
RCH INRED
LCHINWHITE
GREY SUBWOOFER
VIDEO OUT2 YELLOW
COAXIAL OUT BROWN
RCH RED
LCH WHITE
FRONT RCA RED R
VIDEO OUT 1YELLOW
FRONT RCA WHITE L
FRONT
Lch SPK.
REAR
Lch SPK.
WHITE
WHITE/BLACK
GREEN
GREEN/BLACK
GREY
GREY/BLACK
VIOLET
VIOLET/BLACK
7
FRONT
Rch SPK.
REAR
Rch SPK.
Page 9
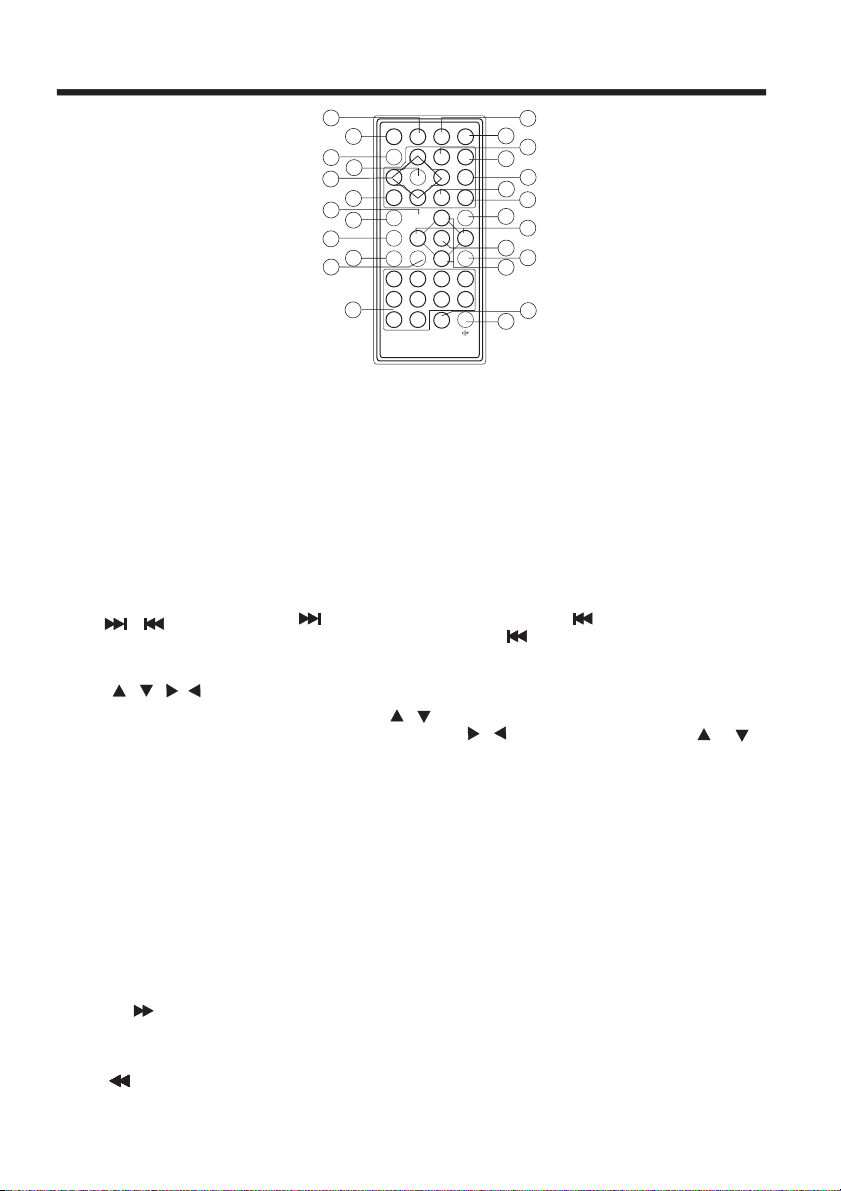
REMOTE CONTROL
1. CLK
2. MODE
3. STOP
4. SETUP
5. MO/ST(AUDIO)
6. SUBTITLE
LO/DX
7. REPEAT
8. GOTO
9. /
10. SEL
11. VOL+/VOL-
12. / / /
13.MENU
SUB WOOFER
14.BAND(OSD)
15.POWER
16.PLAY/PAUSE
17.MUTE
18.TITLE/PBC
(A/P)
19.SLOW
20.ANGLE
21.EQ
22. SEARCH
23.ENTER
24.SKIP
25.0-9
26.+10
16
15
14
23
12
6
8
4
20
7
21
25
3
17
1
2
18
5
19
22
9
10
24
11
26
13
Press it to change the display to clock display.
Press it button on the select TV ,DISC,RADIO AUX IN mode.
Press it to stop playback.
Display the SETUP menu.
In radio mode,press it to select STEREO or MONO (IN disc mode,
press it to changing of theAUDIO soundtrack on multi-audio
soundtrack DVD disc. Changing of the sound mode of the
VCD/CD disc)
Changing of the SUBTITLE language on multi-subtitle language
DVD disc. In radio mode,.Press this button for distance reception
when you are located at weak signal location, depress it for
stronger signal.
Switch the Repeat mode of DVD/VCD/CD/MP3 disc.
Disc search button, cooperatively used with numeric buttons
Press to skip to the next track & press to skip back one track.
(In DVD mode , press continually twice to skip back one track.)
Press it to change audio mode through volume ,bass,treble
balance and fader modes.
Press it to adjust volume level
Cursor buttons in MENU mode. Note: For models without built-in
FM Modulator, the / buttons can be used for volume up/down
control. In TV mode, press / to fine tune. Press the /
to select channel upward and downward..
Press it to display the root menu of the DVD disc/Press and hold
for more than 2 seconds can have sub woofer, press it again for more
than 2 seconds to release this mode.
Display statistical disc information during playback (To change
the band in radio stations)
Press it to turn on the unit ,press it again to turn off.
Press once to pause a play, press again to resume playback.
Press it to mute down sound.
Display the TITLE menu that is stored in DVD disc changing
between PBC ON and PBC OFF on the VCD disc.(Auto store
and preset scan function in radio stations .)
Changing for slow forward/reverse playback motion
Changing of the view angle on multi-angle DVD disc.
Press it to turn to equalization function
In TV mode, Press it to search TV channel automatically.
In DISC mode, Press it to start forward rapidly.
Confirm the Track/Chapter selected with the number key or
selected with the cursor buttons on TV screen.
In TV mode, press it to ADD and DELETE channel .
In DISC mode,press it to reverse rapidly
Numeric buttons.
Tens digit select button, cooperatively used with numeric buttons.
8
Page 10
REMOTE CONTROL
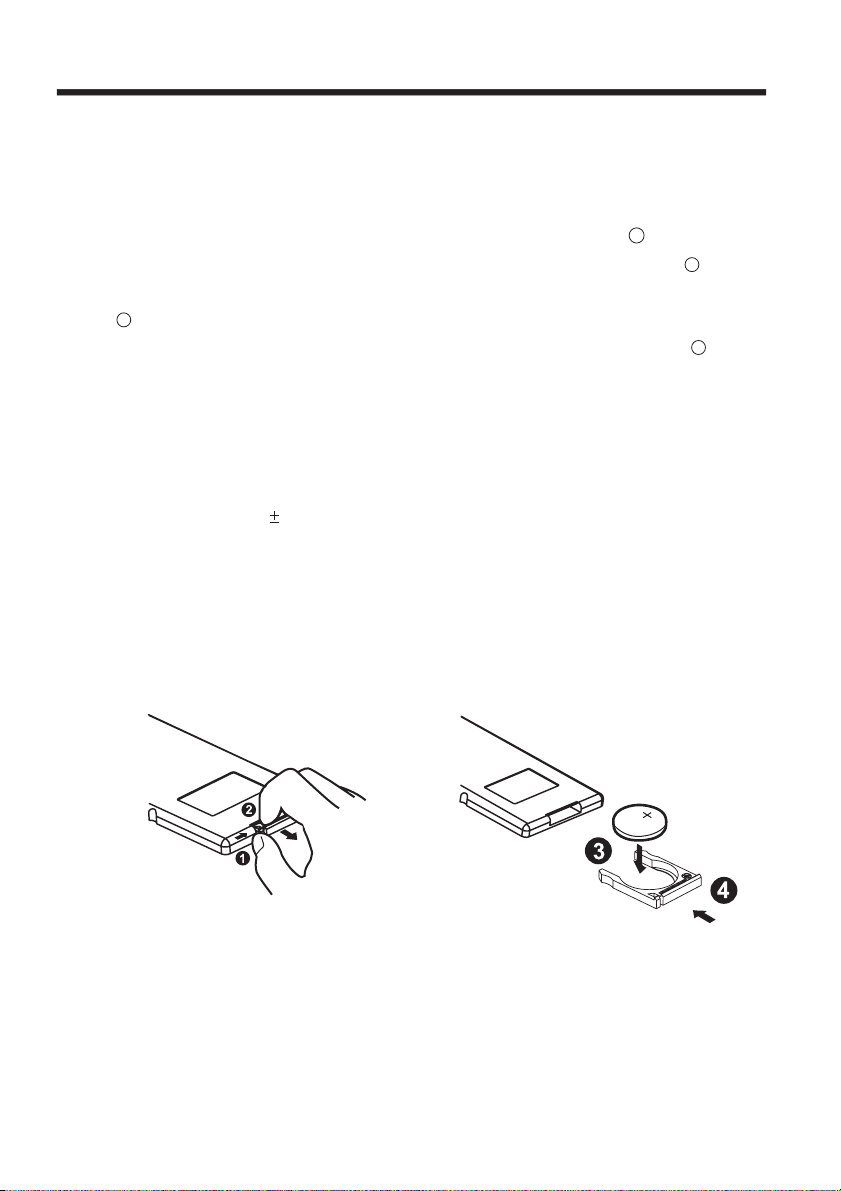
Preparing the Remote Control
Inserting the Batteries
1.First push to inside as the direction indicated by the arrow (See )And then
Remove the battery holder as the direction indicated by the arrow (See ).
2.Replace the battery Set a new battery property with (+)side up as illustrated
(See ).
3
3.Insert the battery holder. Push in the holder to the original position(See ).
1
2
4
Using the Remote Control
Face the remote control towards the player frontfaceIR mark (remote control
receiver).
Operation angle: About 30 degree in each the direction of the front of the IR mark.
signal
To prevent damage to the unit, be sure to follow the connection diagram
(page 7).
9
Page 11
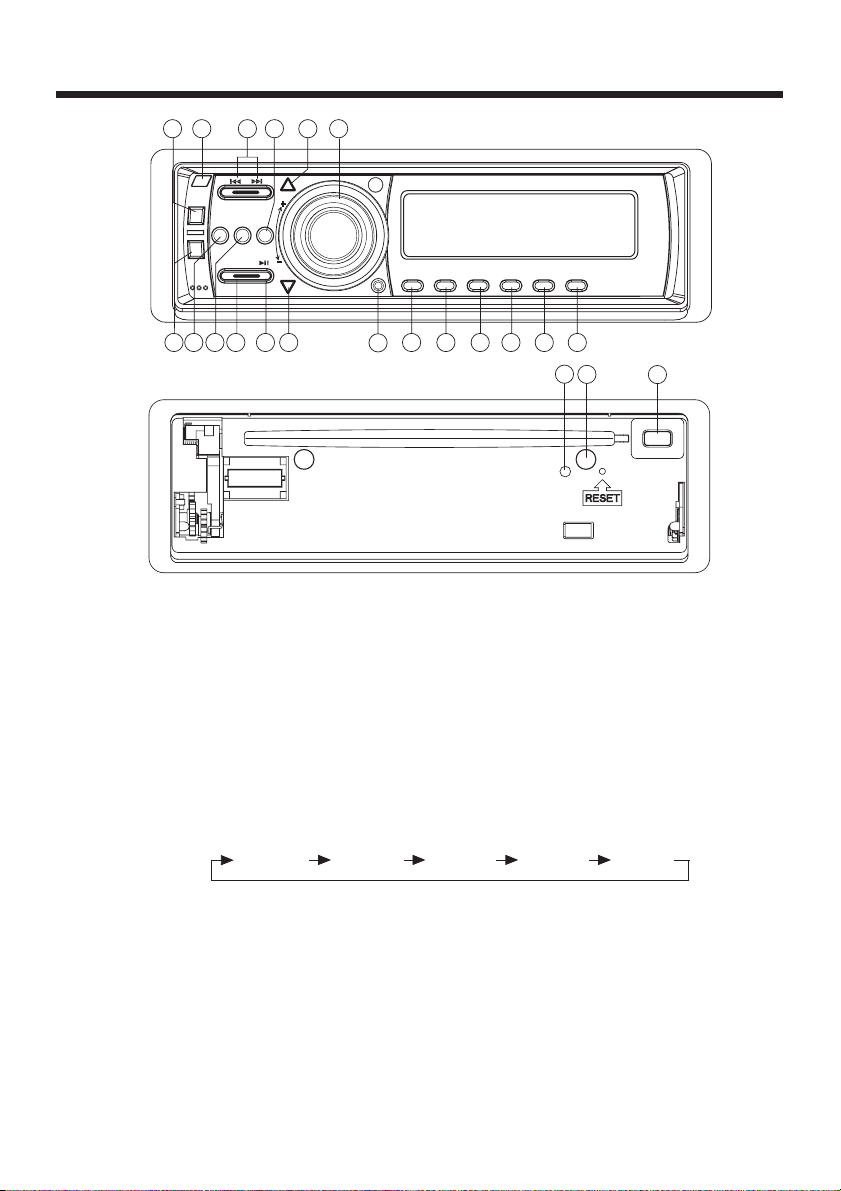
BASIC OPERATION
1
5
13
17
2
15
18
22
16
12
4
14
6
3
8
7
10
9
11
21
20
19
EJ
1.OPEN BUTTON
Press it to flip down the front panel then you can insert the cd disc into the cd
compartment. and you can find the EJ button , press it to eject the disc .
2-3.VOL+/VOL- & SEL BUTTON
Press it repeatedly to change audio mode through volume, bass, treble, balance,
and fader modes. Rotate VOL + /VOL- knob to adjust the selected mode.
(The corresponding value will show on the display.)
When mode has not been adjusted for several seconds, display returns to normal
radio or CD display.
VOL BAS TRE BAL FAD
A.Volume:
Note: The unit is initially set to volume mode.
B.Bass:
knob.
C.Treble:
knob.
D.Balance:
and right speakers by using VOL + / VOL- knob.
E.Fader:
rear speakers by using VOL + / VOL - knob.
Adjust volume level by using VOL + / VOL- knob..
Press SEL button one time. Adjust bass level by using VOL + / VOL -
Press SEL button two times. Adjust treble level by using VOL + / VOL -
Press SEL button three times. Adjust sound balance between left
Press SEL button four times. Adjust sound balance between front and
10
Page 12
BASIC OPERATION
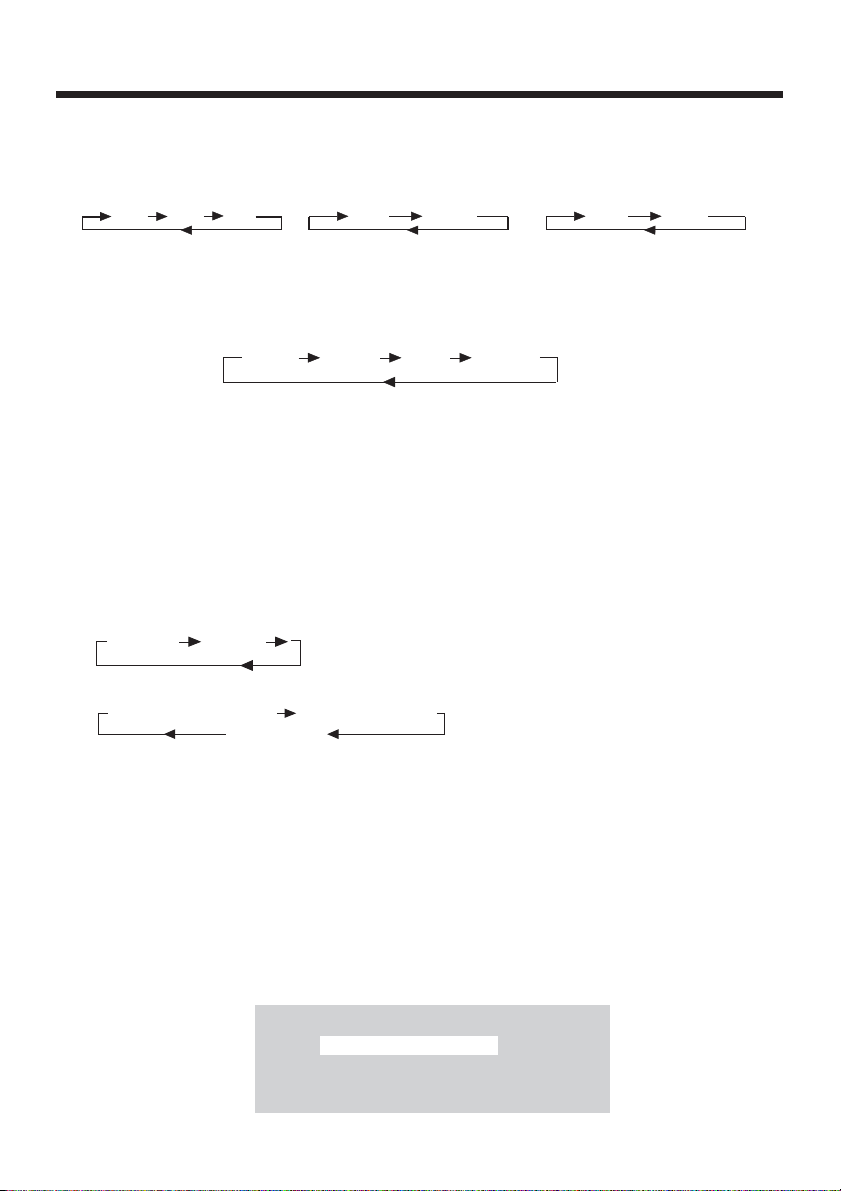
4.BAND BUTTON
In RADIO mode, press the BAND button on the front panel or on the remote
control to select your desired radio band and word which band is selected will be
displayed on LCD. Press it to change the bands as below :
FM MW LW
For 3 Bands (Europe)
5.EQ BUTTON
Press it to turn to equalization function and to select desired audio mode.
There are four kinds of mode as below:
JAZZ CLAS POP ROCK
6-7-8-9-10-11.PRESET STATION
A.To memorize the current frequency, press any one of the six preset buttons[1-6]
on the front panel or on the remote controller hold for more than 2 seconds.
B.To recall the preset memory, press one of the preset buttons [1-6].
C.Press button to select the first track/chapter to play.
D.Long press button to select repeat mode as follow.
1/TOP
a.In the state of VCD/CD/MP3 disc playing, press the button on the front panel
to select the first track/chapter to play.(depend on the disc used for VCD)
b.In the state of DVD disc playing, the 1TOP button is not available.
2/RPT
VCD/CD:
REP-ONE REP-ALL
FM MW
For 2 Bands (Europe)
FM AM
For 2 Bands (USA)
DVD:
CHAPTER REPEAT ON TITLE REPEAT ON
REPEAT OFF
a.Continuously repeat at the current chapter/track, when selected
REP-ONE mode.
b.Select REP-ALL mode to continuously repeat all chapter/track on the
current disc.
c.REPEAT feature does not support VCD2.0 (with PBC ON).
E.Long press button to scan disc.
3/INT
a.In the state of CD disc playing, press the 3/INT button on the front panel
to play the previous 6 seconds part of each track/chapter on disc.
b.In the state of DVD/MP3 disc playing, the 3/INT button is not available.
c.In the state of VCD disc playing , long press the 3/INT button, the screen will
display as follow (long press it again will release this mode.):
SELECT DIGEST TYPE:
TRACK DIGEST
DISC INTERVAL
TRACK INTERVAL
11
Page 13
BASIC OPERATION
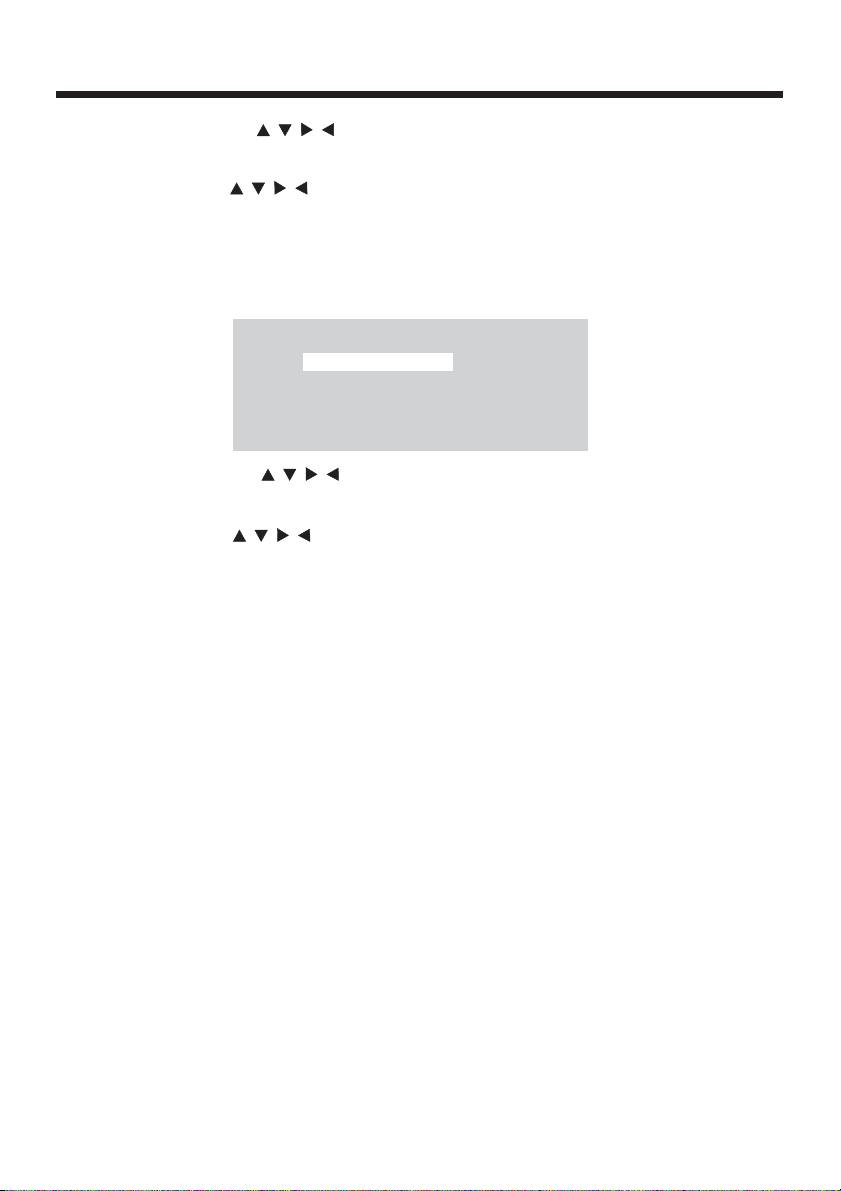
1). You can use the buttons on the remote control to select the item,
and then press the ENTER button to confirm .
2).
In Track Digest OR Disc/Track Interval MODE.
You can use the buttons to select the items ,and then press the
ENTERtoconfirm.
You can also select the items using the corresponding number buttons, and
then press the ENTER to confirm .
d.In the state of DVD disc playing , long press the 3/INT button, the screen will
display as follow (long press it again will release this mode.):
// /
// /
SELECT DIGEST TYPE:
TITLE DIGEST
CHAPTER DIGEST
TITLE INTERVAL
CHAPTER INTERVAL
1). you can use the buttons on the remote control to select the item,
and then press the ENTER button to confirm .
2).
In Title/Chapter Digest OR Interval MODE.Title/Chapter
You can use the buttons to select the items ,and then press the
ENTER to confirm .
You can also select the items using the corresponding number buttons, and
then press the ENTER to confirm .
F. Long press to play disc in random.
In the DVD/VCD/CDdisc playing, press the 4/RDM button on the front panel
to play in random (depend on the disc used for VCD).
4/RDM
// /
// /
12.AS/PS BUTTON
When shortly pressing the APS button on the front panel or the A/P button on the
remote controller, the radio searches for each preset station. When the field
strength level is more than the threshold level of stop level, the radio is holding at
that preset number for few seconds with releasing mute, and then searches again.
In FM band, FM 1,FM 2 and FM 3 is checked one at a time When long pressing the
APS or A/P button (more than 1 second), the radio searches from the current
frequency and checks the signal strength level until 1 cycle search is finished.
And then 6 strongest stations are preset to the corresponding preset number.
The AS operation is implemented in the each band of selected band. When the
AS operation is finished, the radio executes the preset scan.
13.MU BUTTON
Press it to mute down sound. Press it again to release this mode and recover
previous volume level.
14.CLK BUTTON
Press it to change the display to clock display. Press it again to return to previous
display. In clock display, press and hold for about 2 seconds until the hour display
flashes. Rotate VOL+/- button to adjust hours ,press CLK button to flash minute
then Rotate VOL+/- button to adjust minutes.
12
Page 14
BASIC OPERATION
15.PWR BUTTON
Press it to turn on the unit. Press it again to turn off.
16. BUTTON
Pressing during playback will stop play temporary. Return to normal playback,
press once again.
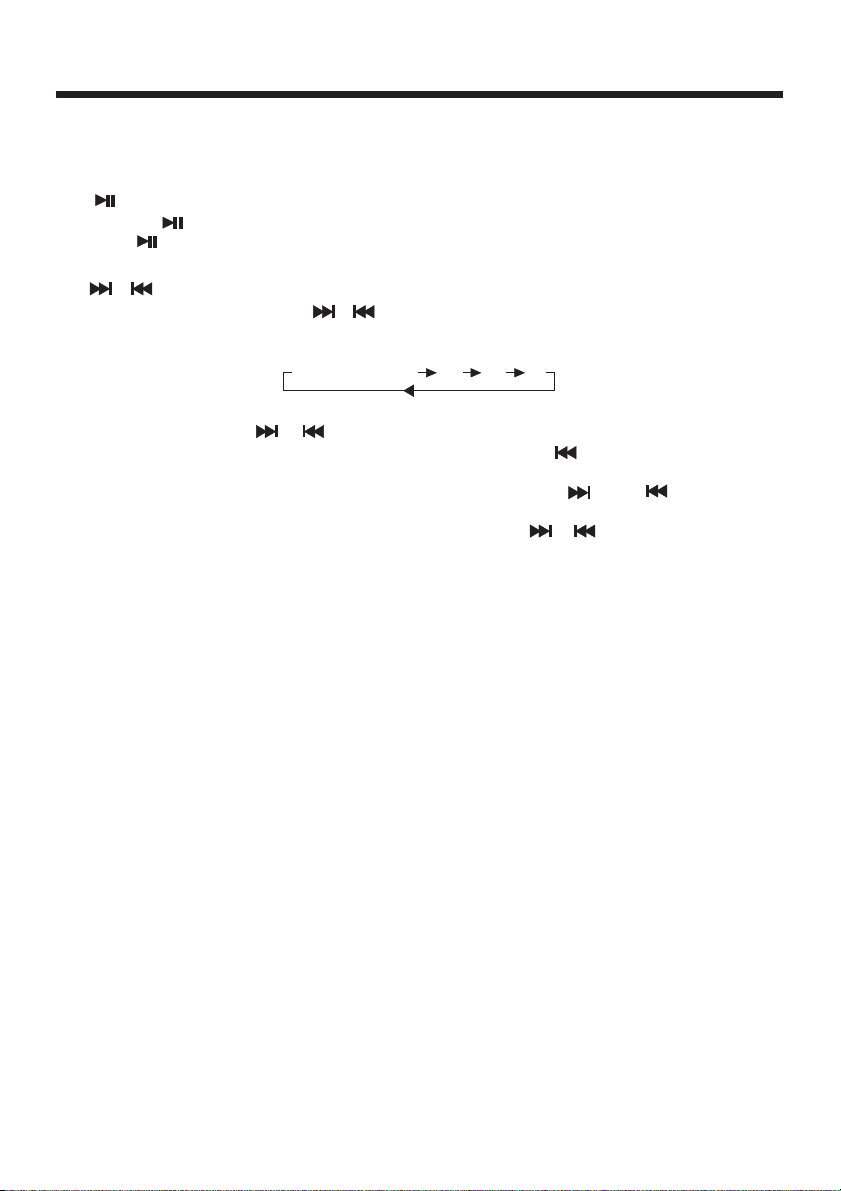
17. / BUTTONS
A.When long Pressing the / button (more than 2 seconds ) during play.The
speed of rapid forward/reverse changes according to the disc as follow.
DVD/VCD/CD/MP3:
B.Shortly press the / button during playback to skip to next track or back
one track.(Note: In DVD mode, press continually the button twice to skip to
back one track.)
Note:For some VCD 2.0 dics (PBC-playback control), and buttons
may be unavailable.
C.Press UP or DN button on the remote controller or / on the fornt panel
to manually tune up or down for your desired station. Press them hold for more
than 2 seconds to automatically tune up or down for the stronger station.
18.MOD BUTTON
Press it repeatedly select TV, DISC ,AUX IN , RADIO mode.
Normal Playback 2x 4x 8x 16x
19.EJECT BUTTON
In CDP playing ,Press the eject button to eject the disc form the disc slot.
20.FLASHING LED
If the front panel is not on the main unit, LED will be flashing.
21.RESET BUTTON
RESET button is placed on the housing and must be activated with either a
ballpoint pen or thin metal object. The RESET button is to be activated for
the following reasons:
A. Initial installation of the unit when all wiring is completed.
B. All the function buttons do not operate.
C. Error symbol on the display.
Note:If press RESET button , the unit can't work yet, please use a cotton swab
soaked in isopropyl alcohol to clean the socket on the back of the front panel.
22.ST BUTTON
Press ST button to select stereo or mono reception for radio stations.
13
Page 15
BASIC OPERATION
MP3/WMA/JPEG DISC PLAY
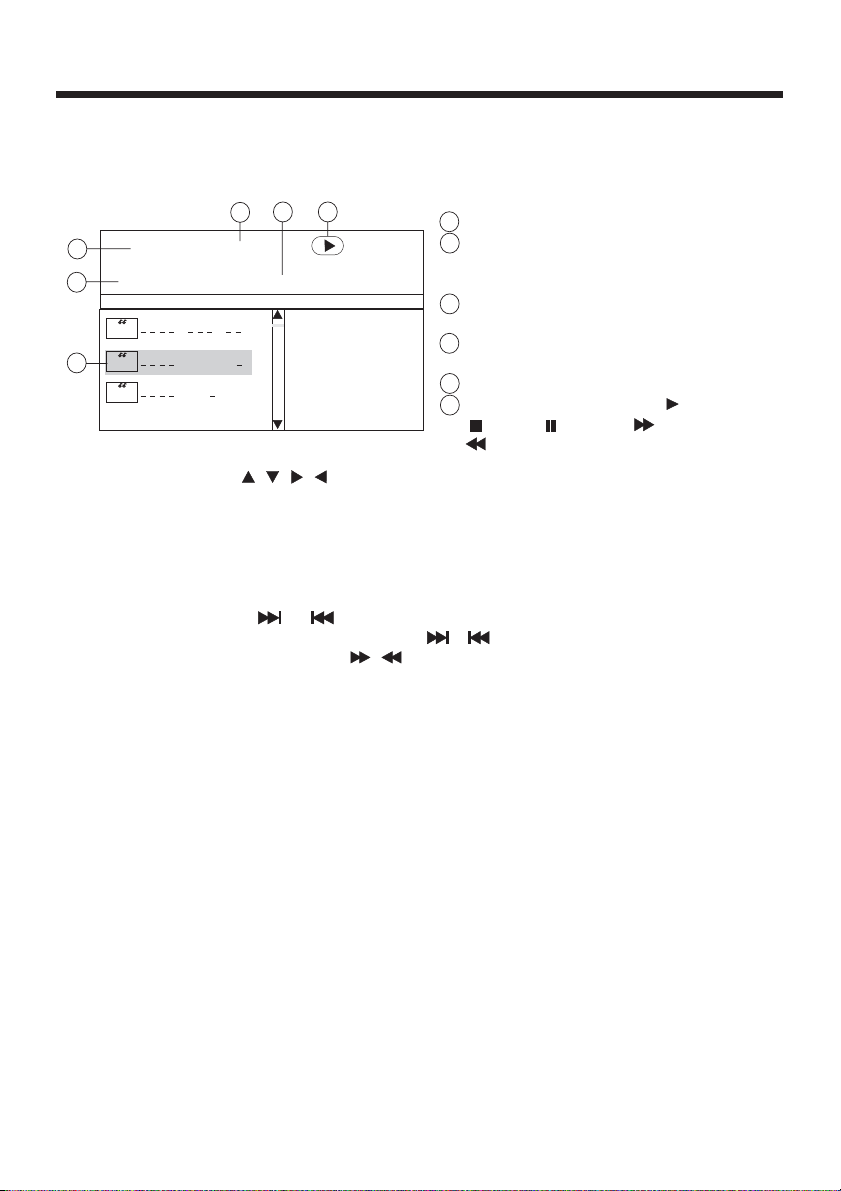
1.When inserting an MP3/WMA/JPEG disc
Ex: When Mp3 file is detected.
56
4
00:56 04:07
3
003/112
2
Mp3
Mp3
1
Mp3
..............
K
woman
new
Repeat one
P
1
ton
Instopmode,use/// ontheremotecontroltoselect the item or folder,
then press ENTER button to confirm.
Pressing REPEAT button repeatedly can select two kinds of repeat play mode.
2. REP-ONE:
Play the same song over and over again.
3. REP-ALL:
Play all songs in the discover and over again.
In the playback, use or to skip an item ahead or back.
In the playback, when long pressing the / button on the front panel (more
than2 seconds ) or short press on the remote control to rapid forward/
/
reverse.
1
.Current track(file)(highlighted bar)
.Current track (file) number/total
2
number of tracks(files) in the current
folder.
.Elapsed playing time of the current
3
track(
not available for JPEG disc)
.total playing time.
4
( not available for
JPEG disc)
.Selected playback mode
5
.Operation mode icon. (Play),
6
(stop), (pause), (forward)
(reverse).
AUX OPERATION
When the unit connect external A/V , you can press MODE to switch the AUX
input mode.
14
Page 16
BASIC OPERATION
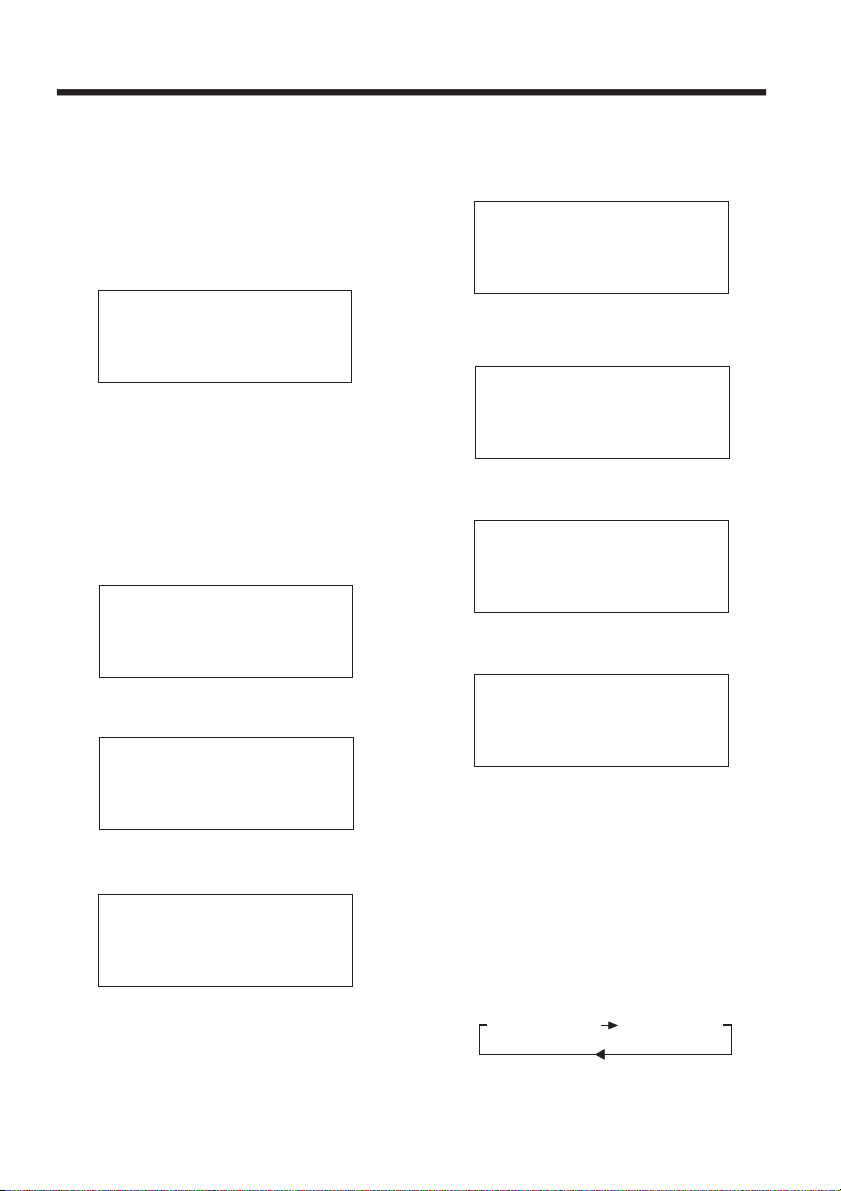
ON-SCREEN DISPLAY FUNCTION
Press the button during
playback to display the contents of the
current disc on the screen.
Example :
1. DVD:
A.Press for the first time:
OSD
OSD
2.Example for VCD/SVCD/CD:
A.Press for the first time:
OSD
SINGLE ELAPSED
TRACK 01/16 00:49
TITLE ELAPSED
TT 01/01 CH 01/38 0:02:06
Title Number, Total Title Number,
Chapter Number, Total Chapter Number
of this Title of the disc currently being
played will be shown on the screen,
along with the elapsed time.
B.Press for the second time:
C.Press for the third time:
D.Press for the fourth time:
E.Press for the fifth time:
OSD
TITLE REMAIN
TT 01/01 CH 01/38 3:24:36
OSD
CHAPTER ELAPSED
TT 01/01 CH 01/38 0:02:56
OSD
CHAPTER REMAIN
TT 01/01 CH 01/38 0:04:32
OSD
The message on the screen will be
cleared.
B.Press for the second time:
C.Press for the third time:
D.Press for the fourth time:
E.Press for the fifth time:
OSD
SINGLE REMAIN
TRACK 01/16 02:45
OSD
TOTALELAPSED
TRACK 01/16 00:60
OSD
TOTALREMAIN
TRACK 01/16 78:46
OSD
The message on the screen will be
cleared for SVCD and VCD.
NOTE:
For CD and MP3,the message will
always display on the screen.
3.Example for MP3:
Each time is pressed, the message
OSD
displayed on screen changes as follows:
SINGLE ELAPSED SINGLE REMAIN
15
Page 17
BASIC OPERATION
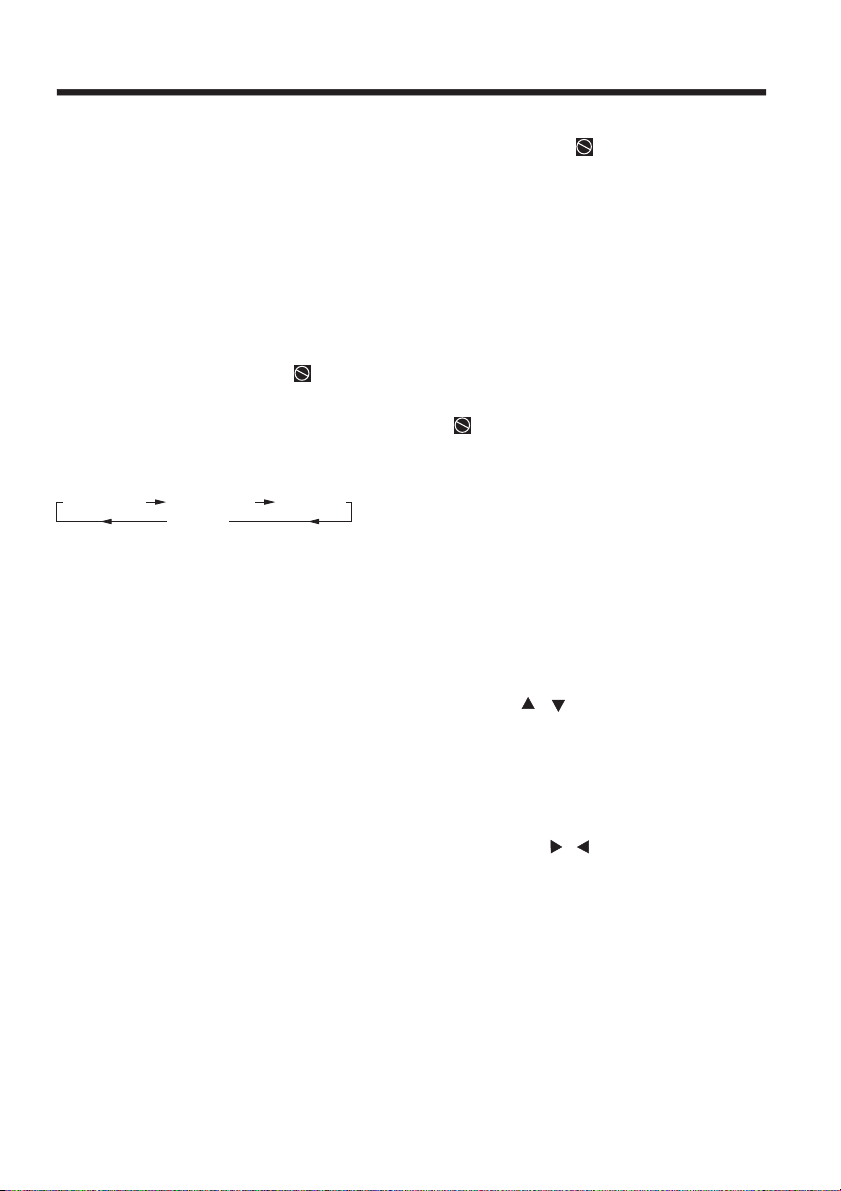
Multi-audio Language Function
For DVD:
AUDIOPress during playback.
Each time the button is pressed,
number of the audio soundtrack
language changes on sequential order.
NOTES:
- The language number is different
according to the disc.
- Some disc only contain one language
soundtrack
- When no different language
soundtrack are recorded will be
display at screen left top corner.
For VCD/CD:
AUDIOPress during playback. It is
possible to switch the sound between
monaural and stereo sound.
MONO LEFT MONO RIGHT
STEREO
MIX-MONO
Title Menu Function
For DVD:
If the DVD has multiple titles recorded
on the disc. It can select preferred title
from the title menu to start playback.
- Press during playback.The title
- Press the cursor button shown in TV
For VCD:
control while the disc is playing, you can
switch between "PBC on"and "PBC off"
mode.
Multi-subtitle Language
TITLE
menu is display.
screen, select preferred title by the
cursor button and confirmed by
ENTER key.
TITLE/PBCPress button on the remote
Function
(for DVD Only)
Press during playback.
SUBTITLE
Each time the button is pressed, number of
the subtitle language changes in
sequential order.
Notes:
The language number is different
according to the disc.
- Some discs only contain one subtitle
language.
- When no different subtitle language
are recorded, will be displayed
at screen left top corner.
Multi-angle Function
(for DVD Only)
Press ANGLE during playback. Each
time the button is pressed, number of
the angle changes in sequential order.
Notes:
- The angle number is different
according to the disc.
- The function only work for disc having
scenes recorded at different angles.
- When no different angle are recorded,
will be displayed at screen left top
corner.
TV Operation
Switching to TV mode
1.Connect the TV antenna to the TV.IN
(from Ant) jack on the back of the unit.
2. Press the mode button on the remote
control to select the TV mode.
Auto searching TV channels
Press the SEARCH button on the remote
controller to star search channel
automatically.
Selecting channel
- Press the / button to choose the
channel upward and downward.
- The numeric button (0-9) allow you to
select the corresponding channel directly.
Note:
In TV mode, the +10 button is not available.
Fine TV channel
You can press / button on the remote
controller to fine TV channel. It can be
improve the picture quality .
Channel ADD/DEL
In TV mode ,after search channel
automatically, when you want delete the
no sign channel, press the SKIP button (the
screen display SKIP),the channel will be
deleted. Also, you can press numeric button
to select channel, then press SKIP to add
channel(the screen display SAVE).
16
Page 18
SETUP
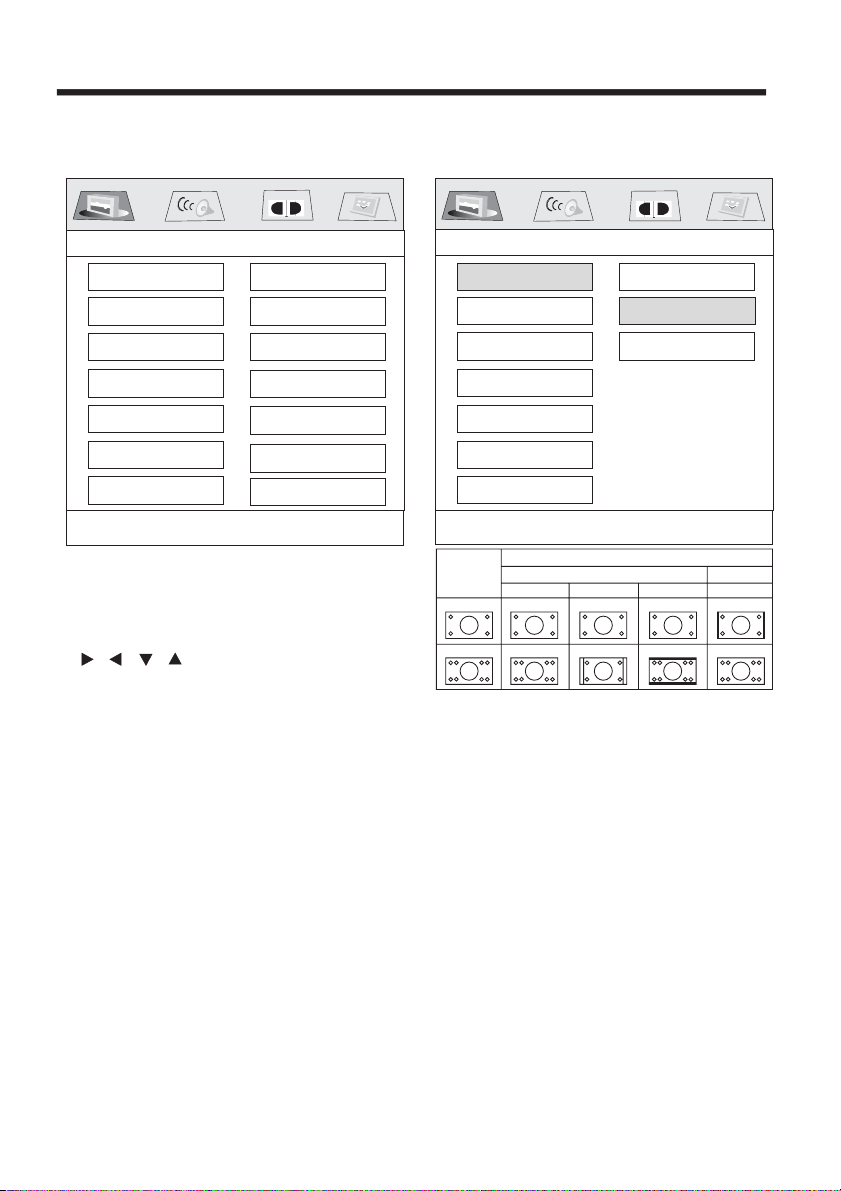
GENERAL SETUP
--- GENERAL PAGE ---
DOLBY
-----General setup page----
TV Display
Angle Mark
OSD Lang
Spdif Output
Captions
Screen Saver
Last Memory
LB
ON
ENG
SPDIF/RAW
ON
ON
ON
Go To General Setup Page
1. Press button on the remote
SETUP
control .
2.The SETUP menu is displayed.
3.Select the preferred item by using the
/ / / buttons
4.Press ENTER button.
a.GENERAL SETUP
This setup page includes the item
of TV display & audio output feature.
The detail please refer to
GENERAL SETUP MENU.
b.SPEAKER SETUP
This is to activate the audio output
from DOLBY AC3 5.1 DOWNMIX
to 2 channel mode. Please refer to
SPEAKER SETUP MENU.
c.DOLBY DIGITAL SETUP
Please refer to
DOLBY DIGITAL
SETUP.
d.PREFERENCE SETUP
This setup page includes all the
configuration of support feature.
The detail please refer to
PREFERENCES SETUP MENU.
DOLBY
-----General setup page----
TV Display
Angle Mark
OSD Lang
Normal/PS
Normal/LB
Wide
Spdif Output
Captions
Screen Saver
Last Memory
Set TV Display Mode
Video
Material
4:3
Normal
TV Screen
Pan Scan
Letter-box
Wide(16:9)
1.TV DISPLAY SETUP
This is to select the appropriate TV
aspect (4:3 or 16:9) according to the
connected TV set.
Normal/PS (For 4:3 TV)
Played back in the PAN & SCAN style.
(If connected to wide-screen TV, the
left and right edges are cut off.)
Normal/LB (For 4:3 TV)
Played back in letterbox style.
(If connected to wide-screen TV, black
bands appear at top and bottom of the
screen.)
Wide (For 16:9 TV)
Select when a wide-screen TV set is
connected.
17
Page 19
SETUP
DOLBY
-----General setup page----
TV Display
Angle Mark
OSD Lang
Spdif Output
Captions
Screen Saver
Last Memory
ON
OFF
TV Display
Angle Mark
Osd Lang
Spdif Output
Captions
Screen Saver
Last Memory
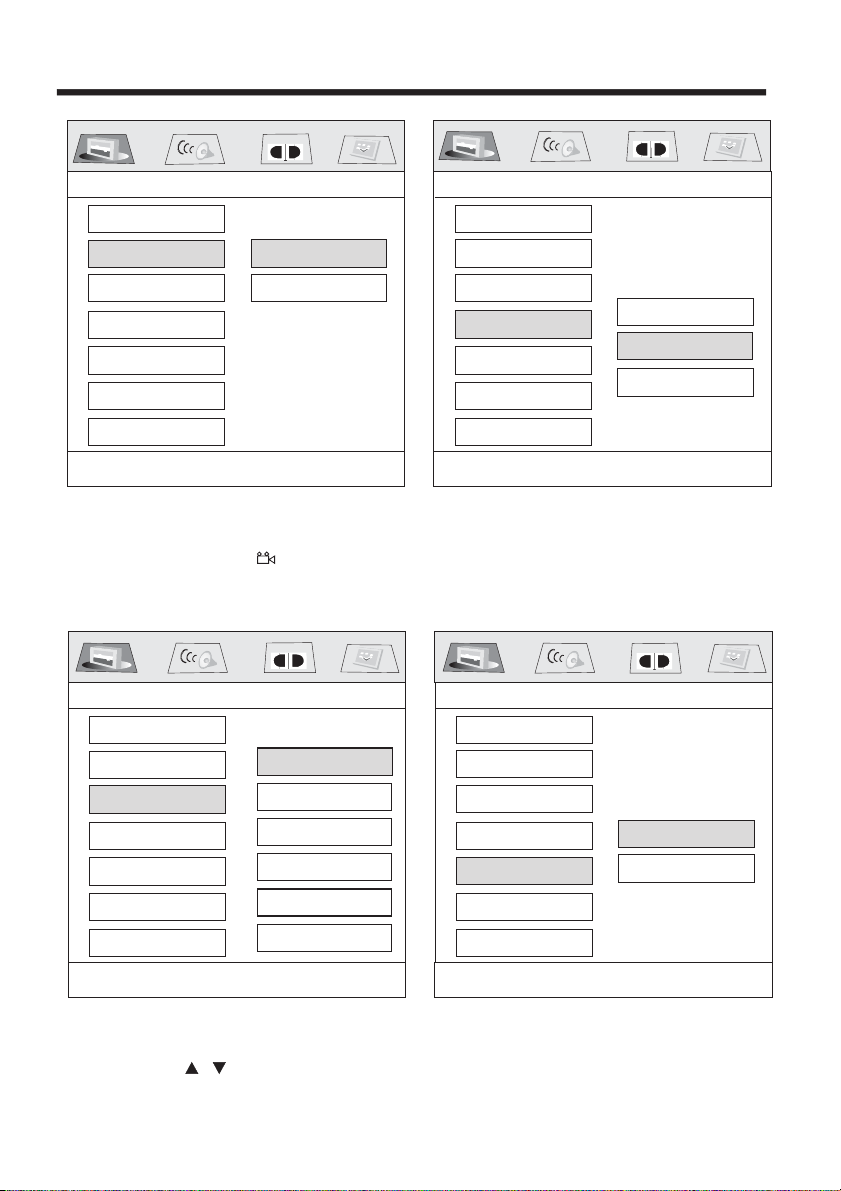
Set Angle Mark
2.ANGLE MARK DISPLAY SETUP
If it is set to ON, when the multi-angle
DVD disc is playing, (the angle
mark) will appears on the screen; if is
4.SPDIF OUTPUT
This is to activate the audio output
from SPDIF OFF mode to SPDIF/RAW
mode to SPDIF/PCM mode.
set to OFF, the mark will not appear.
DOLBY
-----General setup page----
TV Display
Angle Mark
OSD Lang
Spdif Output
Captions
Screen Saver Screen Saver
Last Memory
English
French
German
Spanish
Italian
Portuguese
TV Display
Angle Mark
OSD Lang
Spdif Output
Captions
Last Memory
DOLBY
-----General setup page----
SPDIF OFF
SPDIF/RAW
SPDIF/PCM
Setup SPDIF
DOLBY
-----General setup page----
ON
OFF
Set OSD Language
3.OSD LANG TYPE SETUP
Select the preferred OSD language
by using the / buttons.
Closed Caption
5.CAPTIONS SETUP
Activate the CAPTIONS feature by
selecting ON. And release this feature by selecting OFF.
18
Page 20
SETUP
DOLBY
-----General setup page----
TV Display
Angle Mark
OSDLang
Spdif Output
Captions
Screen Saver
Last Memory
ON
OFF
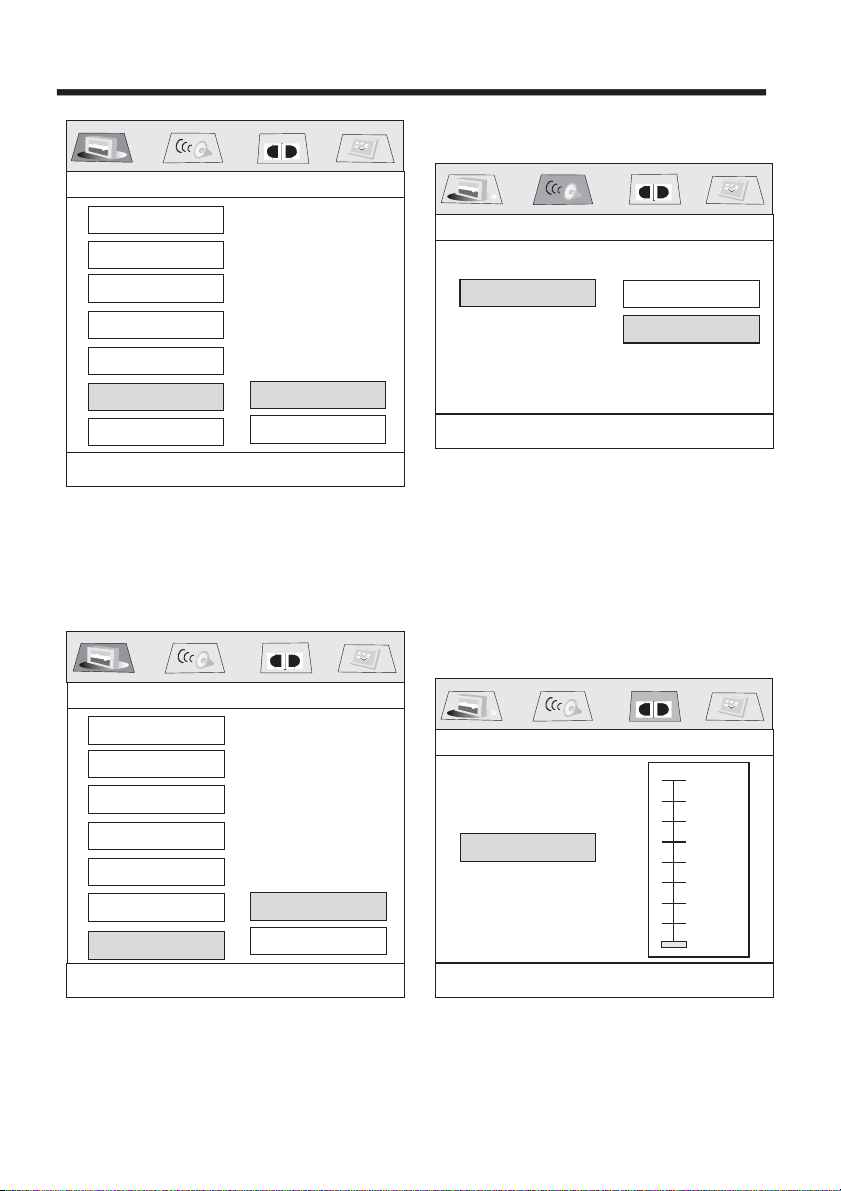
Screen Saver
6.SCR SAVER SETUP
Select the SCR SAVER output
ON/OFF.
DOLBY
-----General setup page----
TV Display
Angle Mark
OSD Lang
Spdif Output
Captions
Screen Saver
Last Memory
ON
OFF
SPEAKER SETUP
--- SPEAKER SETUP PAGE ---
DOLBY
-----Speaker Setup Page----
DOWNMIX
Set Downmix Mode
This is to activate the audio output from
DOLBY AC3 5.1 DOWNMIX to 2 channel
mode. Select the preferred SPEAKER
connection by using the cursor buttons.
Select the LT/RTto activate the Dolby
surround compatible output.
Select the STEREO to activate simple
stereo mode.
LT/RT
STEREO
DOLBY DIGITAL SETUP
DOLBY
-----Dolby Digital Setup----
FULL
6/8
DYNAMIC
4/8
2/8
OFF
Set Last Memory State
7.LAST MEMORY SETUP
Select the LAST MEMORY output
ON/OFF.
Set DRC OFF
DYNAMIC RANGE CONTROL
Select DRC and adjust the dynamic
range of a Doby Digital encoded
program. There are 8 steps between
full compression and off compression.
19
Page 21
SETUP
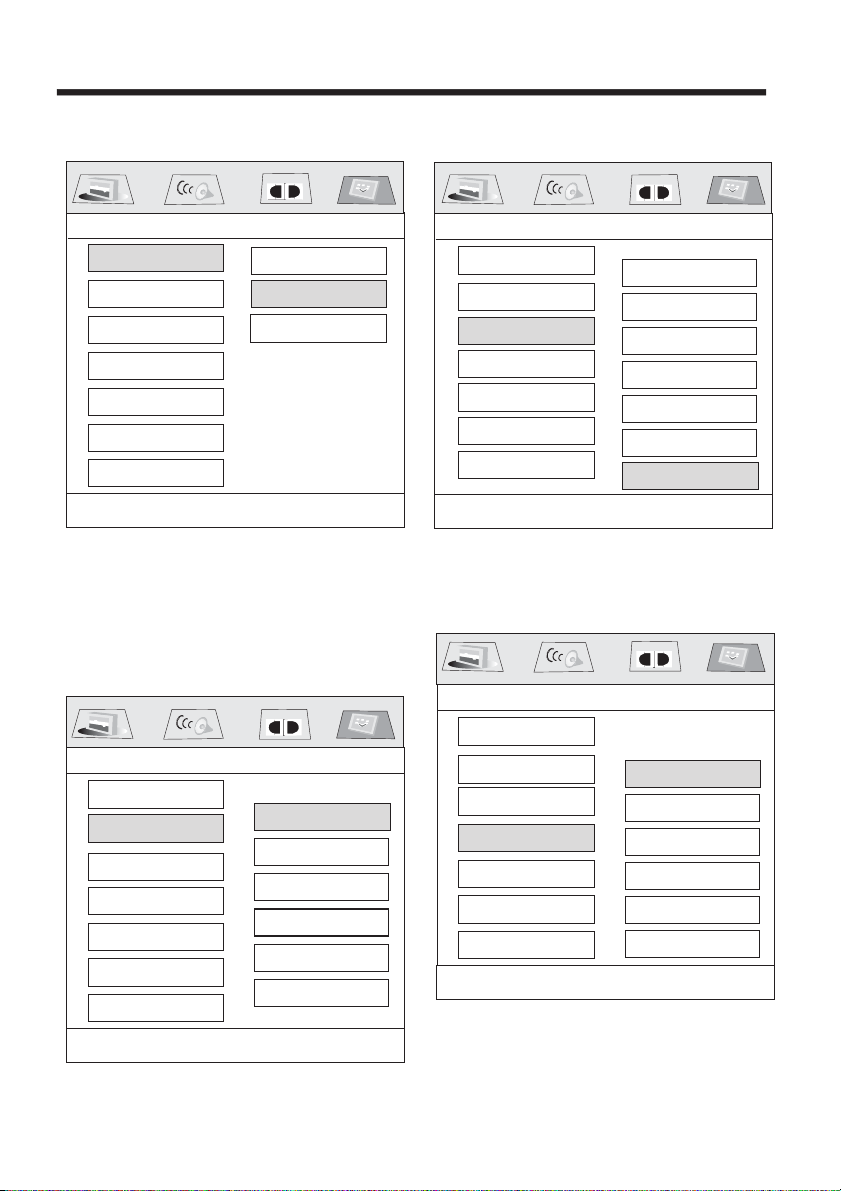
PREFERENCES SETUP
--- PREFERENCES PAGE ---
DOLBY
DOLBY
-----Preference Page----
TV Type
Audio
Subtitle
PAL
AUTO
NTSC
Disc Menu
Parental
Password
Default
Set TV standard
1.TV TYPE SETUP
This player can play discs recorded
in either PAL or NTSC format.Select
NTSC format, when you connected to
NTSC TV.Select PAL format, when
you connected to PAL TV.Select AUTO
format, the player TV output format
will according to the DVD disc format..
DOLBY
-----Preference Page----
TV Type
Audio
Subtitle
Disc Menu
Parental
Password
Default
Preferred Audio Language
2.AUDIO LANGUAGE SETUP
Select the preferredAUDIO soundtrack by using the cursor buttons.
English
French
Spanish
German
Italian
Portuguese
-----Preference Page----
TV Type
Audio
Subtitle
Disc Menu
Parental
Password
Default
English
French
Spanish
German
Italian
Portuguese
OFF
Preferred Subtitle Language
3.SUBTITLE LANGUAGE SETUP
Select the preferred SUBTITLE
language by using the cursor buttons.
DOLBY
-----Preference Page----
TV Type
Audio
Subtitle
Disc Menu
Parental
Password
Default
English
French
Spanish
German
Italian
Portuguese
Preferred Menu Language
4.DISC MENU LANGUAGE SETUP
Select the preferred DISC MENU
language by using the cursor
buttons.
20
Page 22
SETUP
DOLBY
-----Preference Page----
TV Type
Audio
Subtitle
Disc Menu
Parental
Password
Default
1KID SAF
2G
3PG
4PG13
5PGR
6R
7NC 17
8 ADULT
OFF
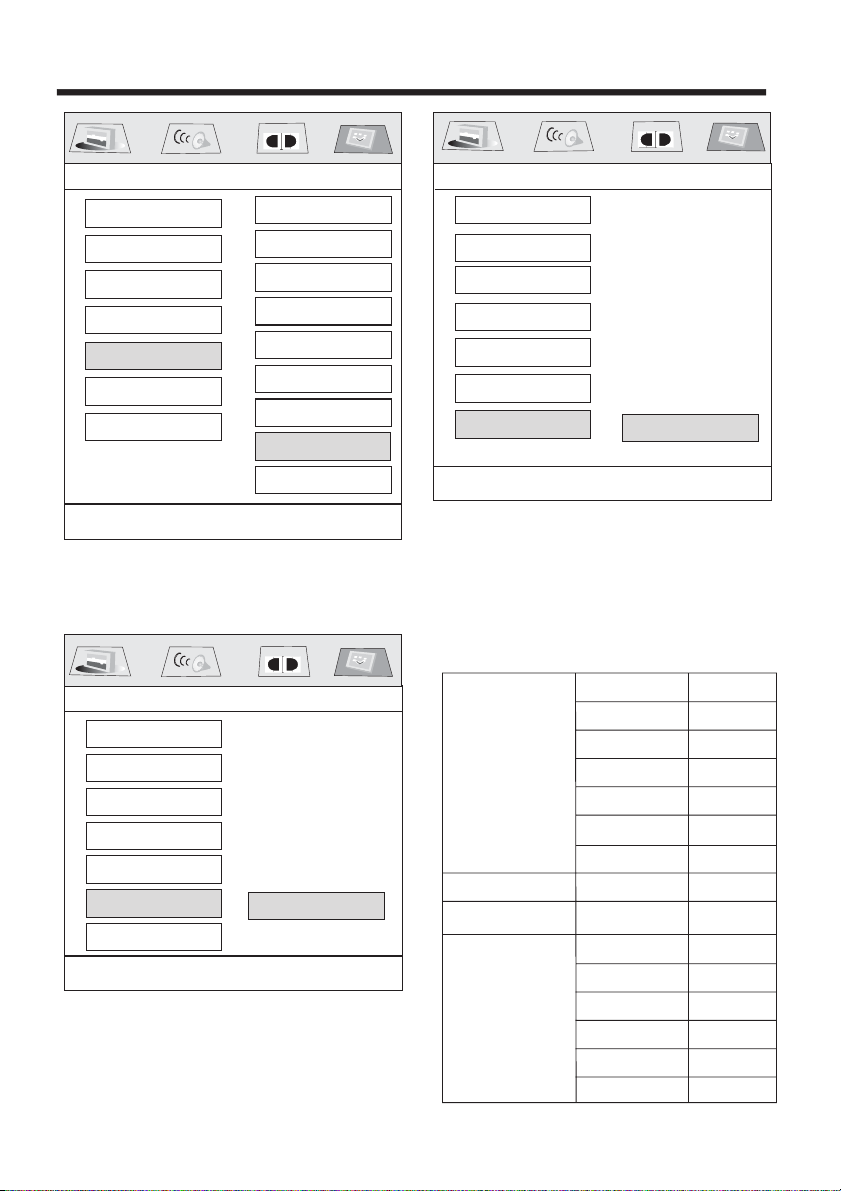
Set Parental Control
5.PARENTAL
Select suitable parental guidance by
the cursor buttons and conformed by
pressing ENTER button.
DOLBY
-----Preference Page----
TV Type
Audio
Subtitle
Disc Menu
Parental
Password
CHANGE
Default
Change Password
6.PASSWORD
Select the change and press ENTER
button. Type the old password (The
initial factory code is ) and key
in 4 characters password now you
want to use, and retype again to
confirm key in correctly.
1379
DOLBY
-----Preference Page----
TV Type
Audio
Subtitle
Disc Menu
Parental
Password
Default
RESET
Load Fcatory Setting
7.DEFAULTS
Select reset to become factory initial
setting.
DEFAULTS TABLE
TV DISPLAY
ANGLE MARK
GENERAL SETUP
SPEAKER SETUP
DOLBY DIGITAL
PREFERENCES
21
OSD LANGUAGE
SPDIF OUPUT
CAPTIONS
SCR SAVER
LAST MEMORY
DOWNMIX
DYNAMIC
TV TYPE
AUDIO
SUBTITLE
DISC MENU
PARENTAL
PASSWORD
NORMAL/LB
ON
ENGLISH
SPDIF/RAM
ON
ON
ON
STEREO
OFF
AUTO
ENGLISH
OFF
ENGLISH
8 ADULT
1379
Page 23
SPECIFICATION
GENERAL
Supply Voltage :12v Dc (11v-15v)
Current Consumption More Then 10 A
SIGNAL SYSTEM
DISCS PLAYED
:
:Compositive Video 1.0vp-p 75
(1)Dvd-video Disc
5"(12 Cm) Single-sided, Single-layer
5"(12 Cm) Single-sided, Double-layer
(2)Compact Disc (cd-da, Video Cd)
5"(12cm) Disc
AUDIO SIGNAL OUTPUT :
CHARACTERISTICS
RADIO
FM TUNER SECTION
Tuning Range :87.5-107.9MHz
IF Range :10.7MHz
Usable sensitivity(30dB) :15dB
AM TUNER SECTION
Frequency Range :530-1710KHz
IF Range :450KHz
Usable sensitivity(30dB) :45dB
TV TUNER
TV System :NTSC or PAL
TV Sensitivity :
NOTE:
Specifications and design are subject to modification, without notice, due to
improvements in technology.
2ch&4ch Line Out
(1)Frequency Response 20 Hz - 20 Khz
(2)S/n Ratio 90 Db (jis)
(3)WowAnd Flutter
Below Measurable Limits
22
Page 24
TROUBLE SHOOTING
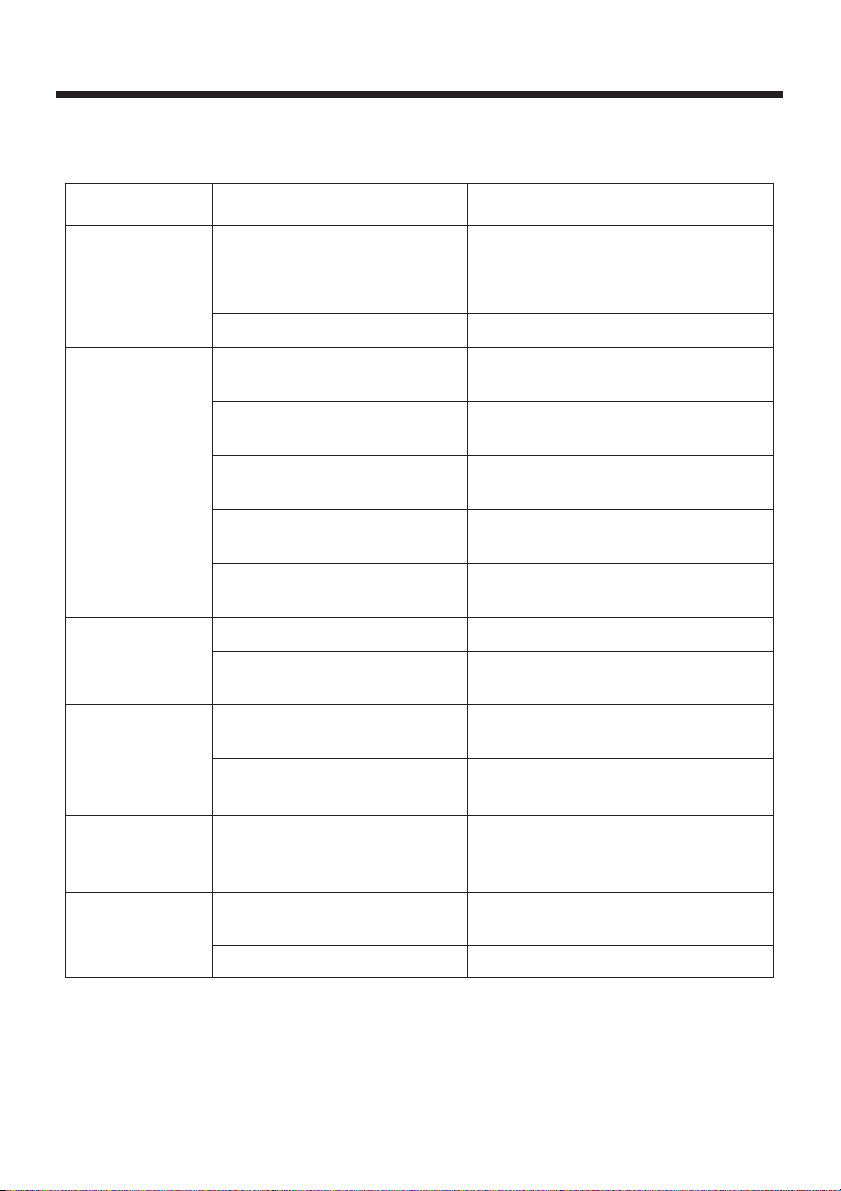
Before going through the check list, check wiring connection. If any of the problems
persist after check list has been made, consult your nearest service dealer.
SYMPTOM CAUSE SOLUTION
If the power supply is properly
NO POWER
DISC CANNOT
BE LOADED
OR EJECTED
The car ignition switch is
not on
The fuse is blown
Presence of disc inside the
player.
Inserting the disc in reverse
direction
The disc is extremely dirty
or defective
Temperature inside the car
is too high
connected to the car accessory
terminal,switch the ignition key
"ACC"
to
Replace the fuse
Remove the disc in the player,
then put a new one
Insert the compact disc with
the label facing upward
Clean the disc or try to play a
new one
Cool off or until the ambient
temperature return to normal
NO SOUND
SOUND SKIPS
THE OPERATION KEYS
DO NOT WORK
THE RADIO
DOES NOT
WORK
Condensation
Volume is in minimum Adjust volume to a desired level
Wiring is not properly
connected
The installation angle is
more than 30 degrees
The disc is extremely dirty
or defective disc
The built-in microcomputer
is not operating properly
due to noise
The antenna cable is not
connected
The signals are too weak
Leave the player off for an hour
then try again
Check wiring connection
Adjust the installation angle less
than 30 degrees
Clean the compact disc, then
try to play a new one
Press the RESET button.
Front panel is not properly fixed
into its place
Insert the antenna cable firmly
Select a station manually
888-J9080-04
23
 Loading...