

Page 1

PLCD46
INSTRUCTION MANUAL
OPEN
+
+
SEL
-
-
E
UT
M
FLAT CLASS
BND
M1/TOP
CLK
Det achable Front Panel CAR Radio & CD Player
POP
TRACK
M3/INT
LOC LOUD MUTE DISC
POWER
LUD
ROCK
M2/RPT
CH
M4/RDM
RPT
RDM
M5
CDP
INT
COMPACT
DIGITAL AUDIO
M6
EJECT
DSP
LOC
APS
160WATTS
ANTI-THEFT DETACHABLE SYSTEM
AUTO-LOADING COMPACT DISC PLAYER
AM/FM STEREO WITH DIGITAL TUNING RADIO
www.pyleaudio.com
Page 2
DEAR CUSTOMER
Selecting fine audio equipment such as the unit you have just purchased is only the start
of your musical enjoyment. Now it is time to consider how you can maximize the fun and
excitement your equipment offers.
We want you to get the most out of your equipment by playing it at a safe
level. One that lets the sound come through loud and clear without annoying blaring or
distortion - and, most important, without affecting your sensitive hearing.
Sound can be deceiving. Over time your hearing " comfort level " adapts to higher volumes
of sound. So what sounds " normal " can actually be loud and harmful to your hearing.
Guard against this by setting your equipment at a safe level BEFORE your hearing adapts.
To establish a safe level:
. Start your volume control at a low setting
. Slowly increase the sound until you can hear it comfortably and clearly, and without
distortion we want you listening for a lifetime.
Once you have established a comfortable sound level:
. Set the dial and leave it there.
Taking a minute to do this now will help to prevent hearing damage or loss in the
future. After all, we want you listening for a lifetime.
ABOUT THIS MANUAL
This product features a number of sophisticated functions ensuring superior reception and
operation. All are designed for the easiest possible use, but many are not self-explanatory.
This operation manual is intended to help you benefit fully from their potential and to
maximize your listening enjoyment.
We recommend that you familiarize yourself with the functions and their operation by reading
through the manual before you begin using this product. It is especially important that you
read and observe the " precaution " on the next page and in other sections.
In this operation manual, the Basic Operation for each sound source is outlined at the
beginning of its explanation, covering simple operation for that source, such as merely playing
music.
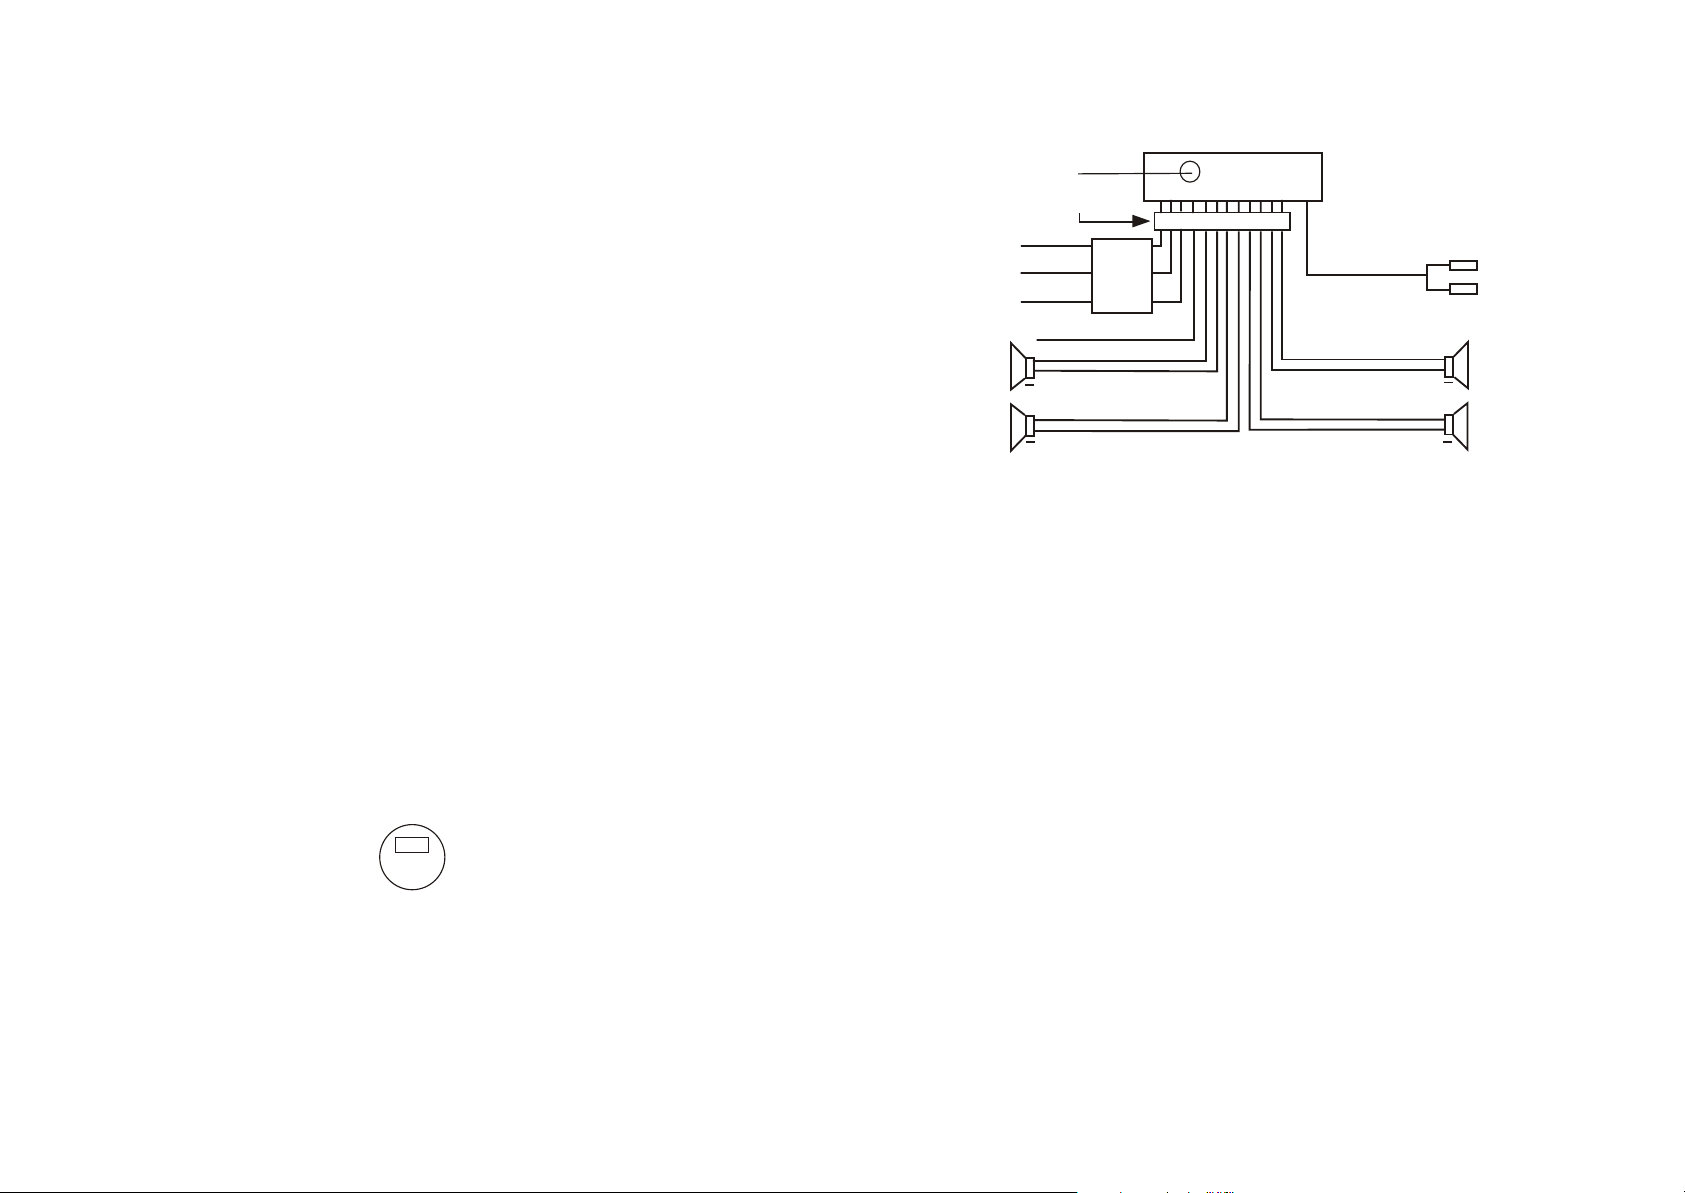
Speaker Connection
ANTENNA PLUG
12 P
MEMORY B+
BLACK(GND)
RED (B+)
FRONT
YELLOW
BLUE AUTO ANT
++
LEFT
SP
++
REAR
NOTE:
In spite of having any kinds of speaker system, make sure use 4 ohms
impedance of speaker to reduce the distortion during high volume level.
FUSED
FILTER
BOX
0.5A &7A
FUSES
WHITE
WHITE/BLACK
GREEN/BLACK VIOLET/BLACK
RCA LINE OUT
GRAY
GRAY/BLACK
VIOLETGREEN
++
++
RED R
WHITE L
FRONT
RIGHT
SP
REAR
USA EUROPE
IMPORTANT:
This radio is set to USA frequency by factory, if European
frequency is required please flip the frequency step switch on
the side of the unit.
After the switchover of the frequency switch, the frequency convert
function will not be valid until the RESET button has been pressed.
1 10
Page 3
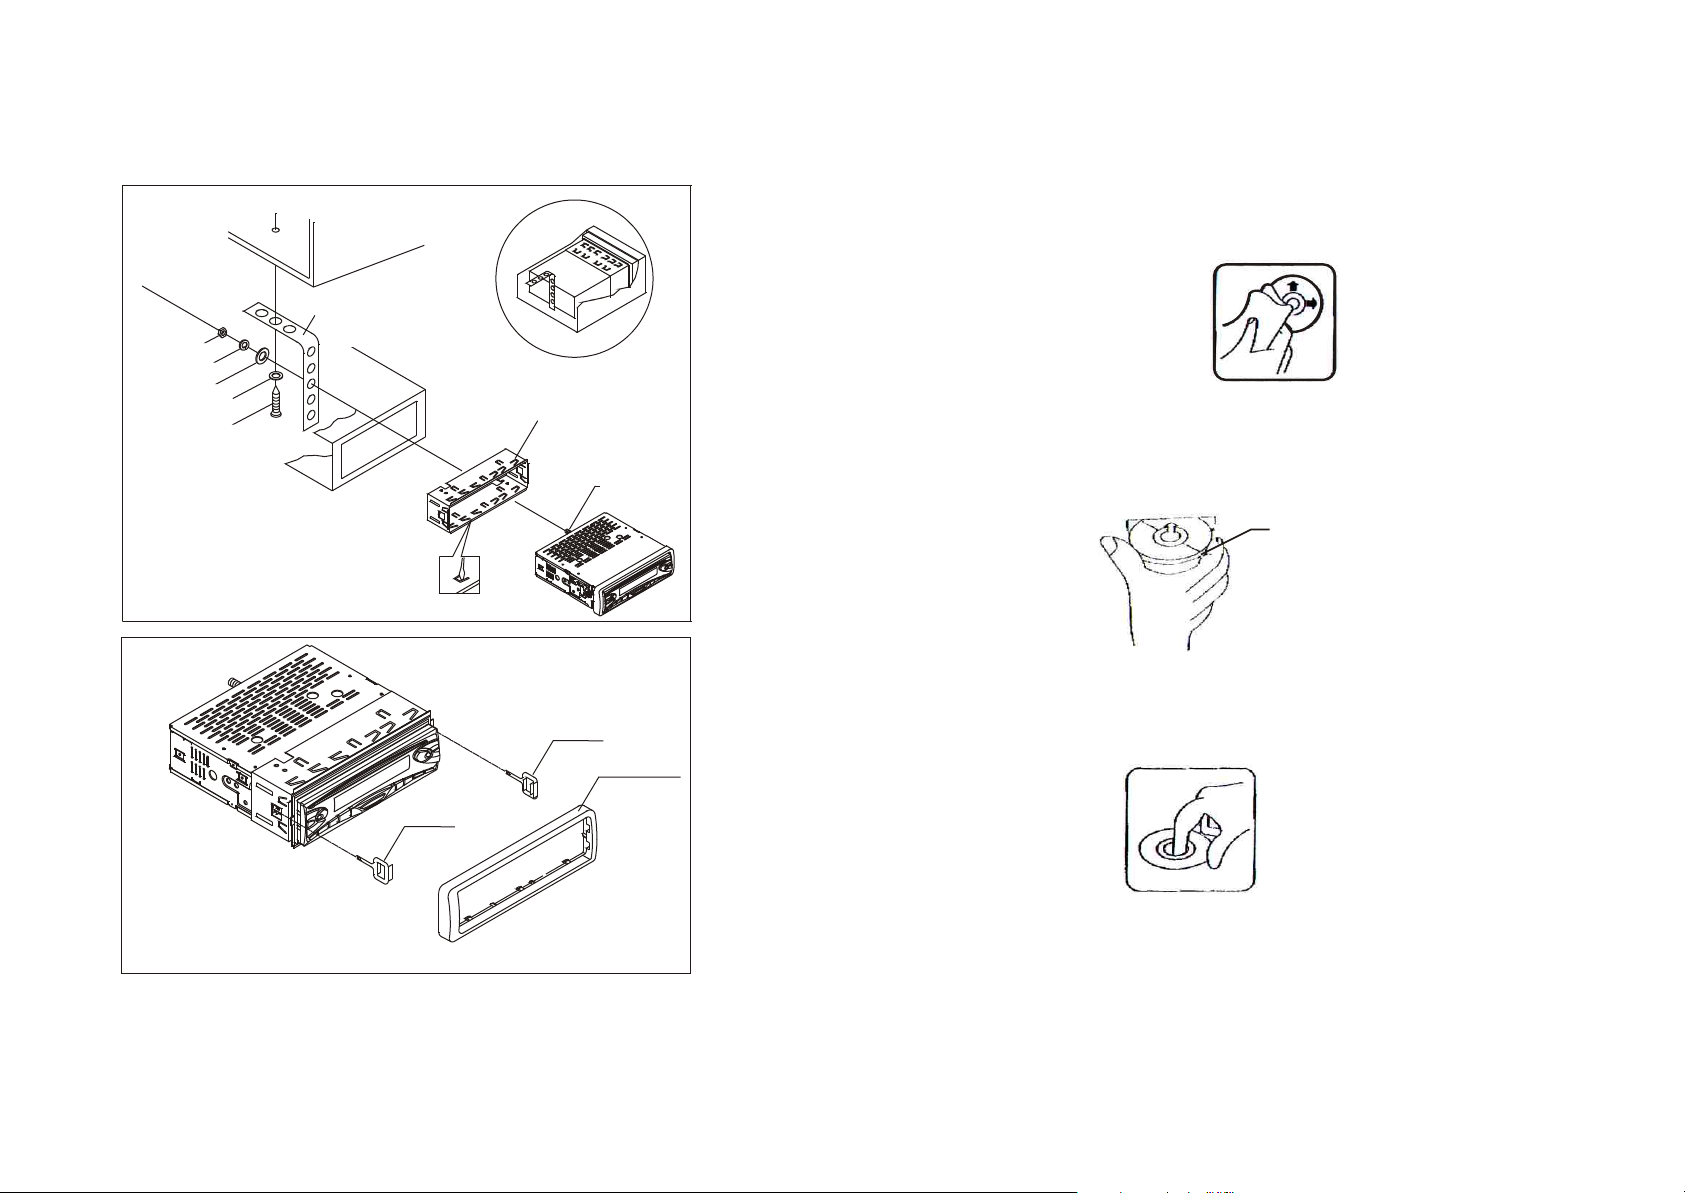
INSTALLATION
DASH BOARD
METAL MOUNTING STRAP
HEX NUT
SPRING WASHER
PLAIN WASHER
PLAIN WASHER
TAPPING SCREW
CONSOLE
SLIDE BRACKET HOUSING
HEX BOLT
KEY PLATE
PLASTIC TRIM OUT
DISC PLAY:
Cleaning discs
Before playing, clean the disc with a clean, lint-free.
Flip the disc in the direction of the arrow.
NOTE:
. Do not use so solvents such as benzine, thinners. Commercially available
cleaners or anti static spray damage the unit.
Insert a disc with the label surface down. Doing so may damage the unit.
Label
surface up
NOTE:
. Do not try to insert another disc when one has been already inserted.
Doing so may damage the unit.
.Handle the disc by its edge. And to keep the disc clean, do not touch
the surface.
KEY PLATE
.Do not stick paper or tape on the disc.
.Do not expose the disc to direct sunlight or heat sources such as hot air
ducts. Or leave it in a car parked in direct sunlight where there can be a
considerable rise in temperature.
9 2
Page 4
LOCATION AND FUNCTION OF CONTROLS
SPECIFICATION
1 2 3
OPEN
+
+
SEL
-
-
UTE
M
8 9 10 11 12 13 14
Det achable Front Panel CAR Radio & CD Player
POP
TRACK
M3/INT
LOC LOUD MUTE DISC
POWER
LUD
ROCK
FLAT CLASS
BND
M2/RPT
M1/TOP
CLK
4 5 6 7
EJECT
CH
M4/RDM
RPT
RDM
M5
CDP
INT
COMPACT
DIGITAL AUDIO
M6
APS
DSP
LOC
15 16 17 18 19 20
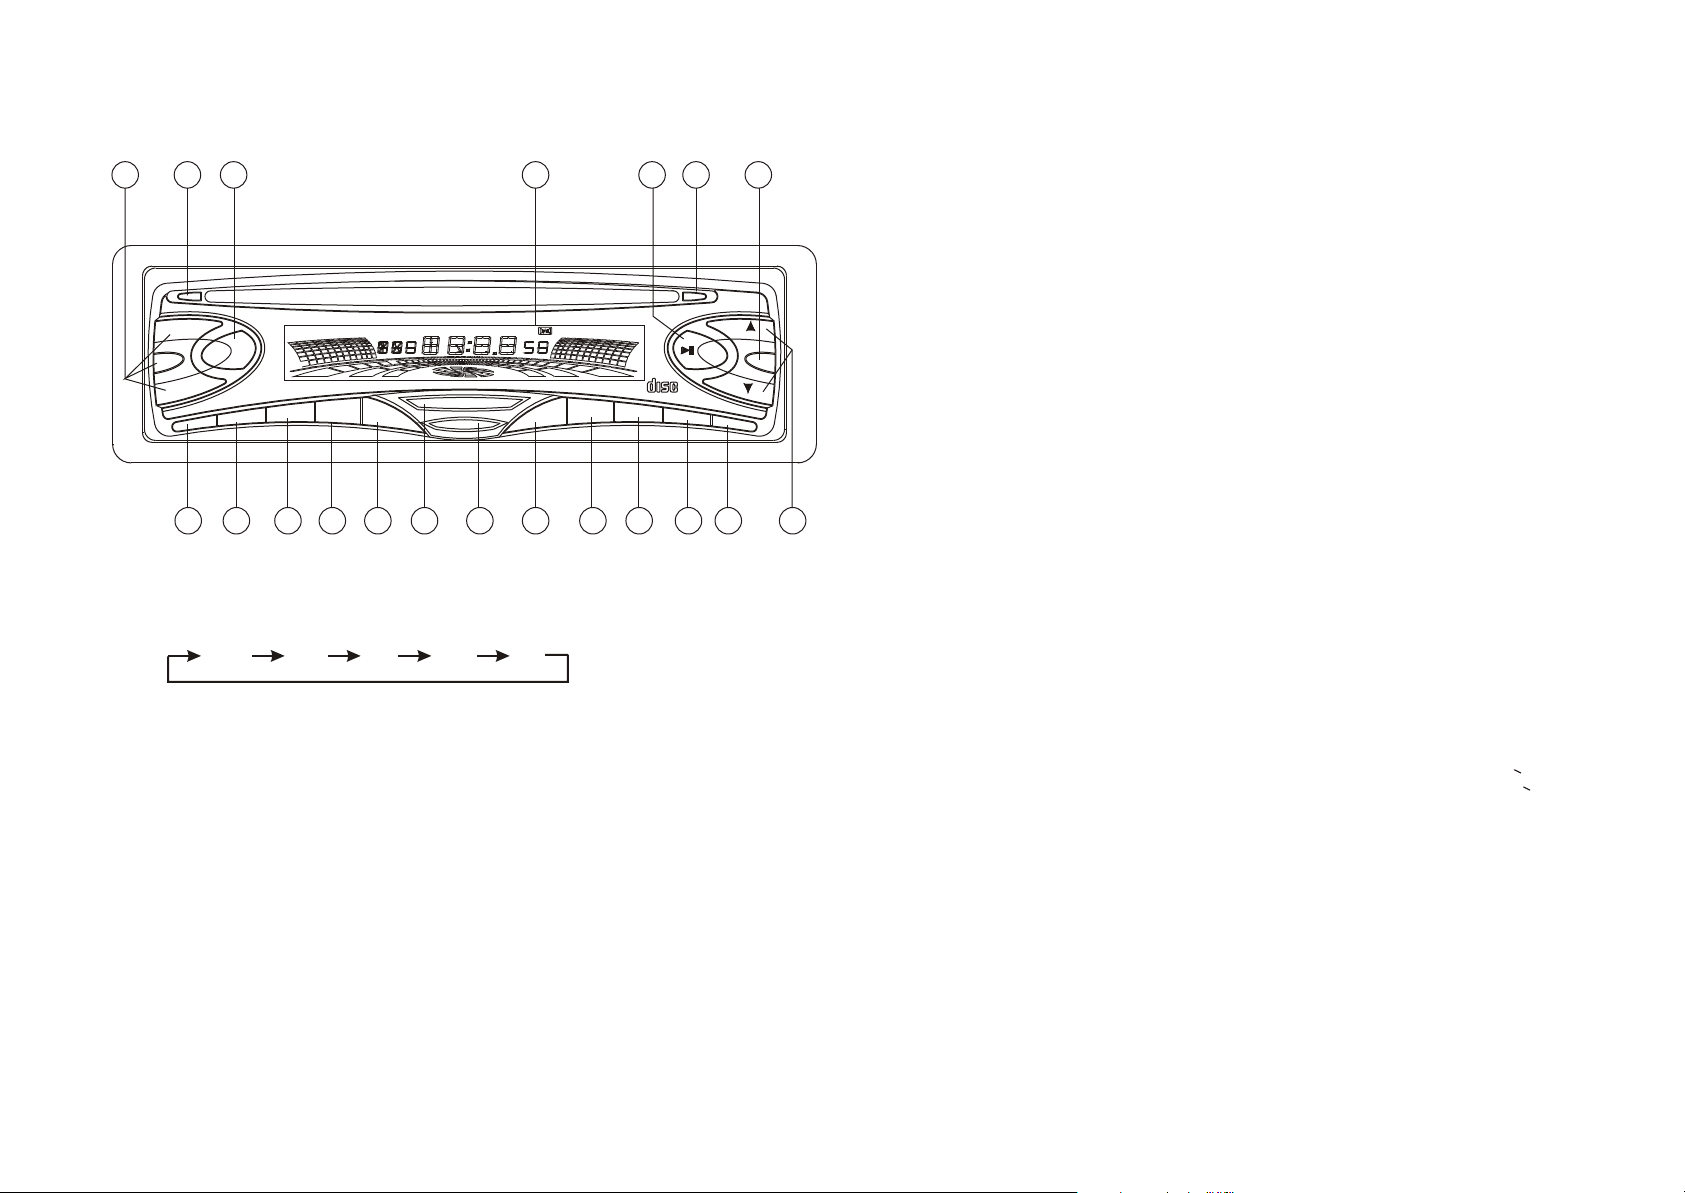
1. SEL( AUDIO MODE SELECT)/VOLUME +/- BUTTON
Press SEL button to change the mode in the sequence of
BAS TRE BAL FAD VOL
1). The volume level can be adjusted at any time by pressing the audio level+ or
- button as select mode has been initially defaulted at volume mode.
2). The volume level is also obtained by stepping through the SEL button until
the function VOL is displayed and then press + or - button to adjust the
sound level.
3). Press and hold the + or - button to adjust the sound level.
BASS CONTROL
1). Press the SEL button to select the bass mode until BAS appears on the display.
2). Press + or - to adjust the bass effect.
GENERAL
Power requirement..............................................................................................DC 13.8V.
Current consumption..............................................................................................7A MAX.
Power output.........................................................................................................40W X 4
FM SECTION
Frequency range.....................................................................87.5MHz -108.0MHz(EUROPE).
Frequency range...........................................................................87.5MHz -107.9MHz(USA).
Usable sensitivity.........................................................................................................3uV.
I.F Frequency........................................................................................................10.7MHz.
AM(MW) SECTION
Frequency range........................................................................522KHz - 1620KHz(EUROPE).
Frequency range............................................................................. 530KHz - 1710KHz(USA).
LINE - OUT [OPTION]
Output...............................................................................1000mV @ FM 10% THD POWER.
Impedance............................................................................................................600 ohm.
CD PLAYER
System........................................................................................compact disc audio system.
Usable disc......................................................................................................compact disc.
Signal format.............................................................................sampling frequency 44.1KHz.
No of quantization bits 1bit.
Frequency characteristics...............................................................................5-40Hz < 5dB
10K-20KHz < 5dB.
Signal to noise radio................................................................70dB [1KHz] [IEC - A net work].
Number of channels..............................................................................................2 STEREO.
Chassis dimensions.......................................................................183[W] X 53[H] X 165[D].
TREBLE CONTROL
1). Press the SEL button to select the treble mode until TRE appears on the display.
2). Press + or - to adjust the treble effect.
3 8
Page 5
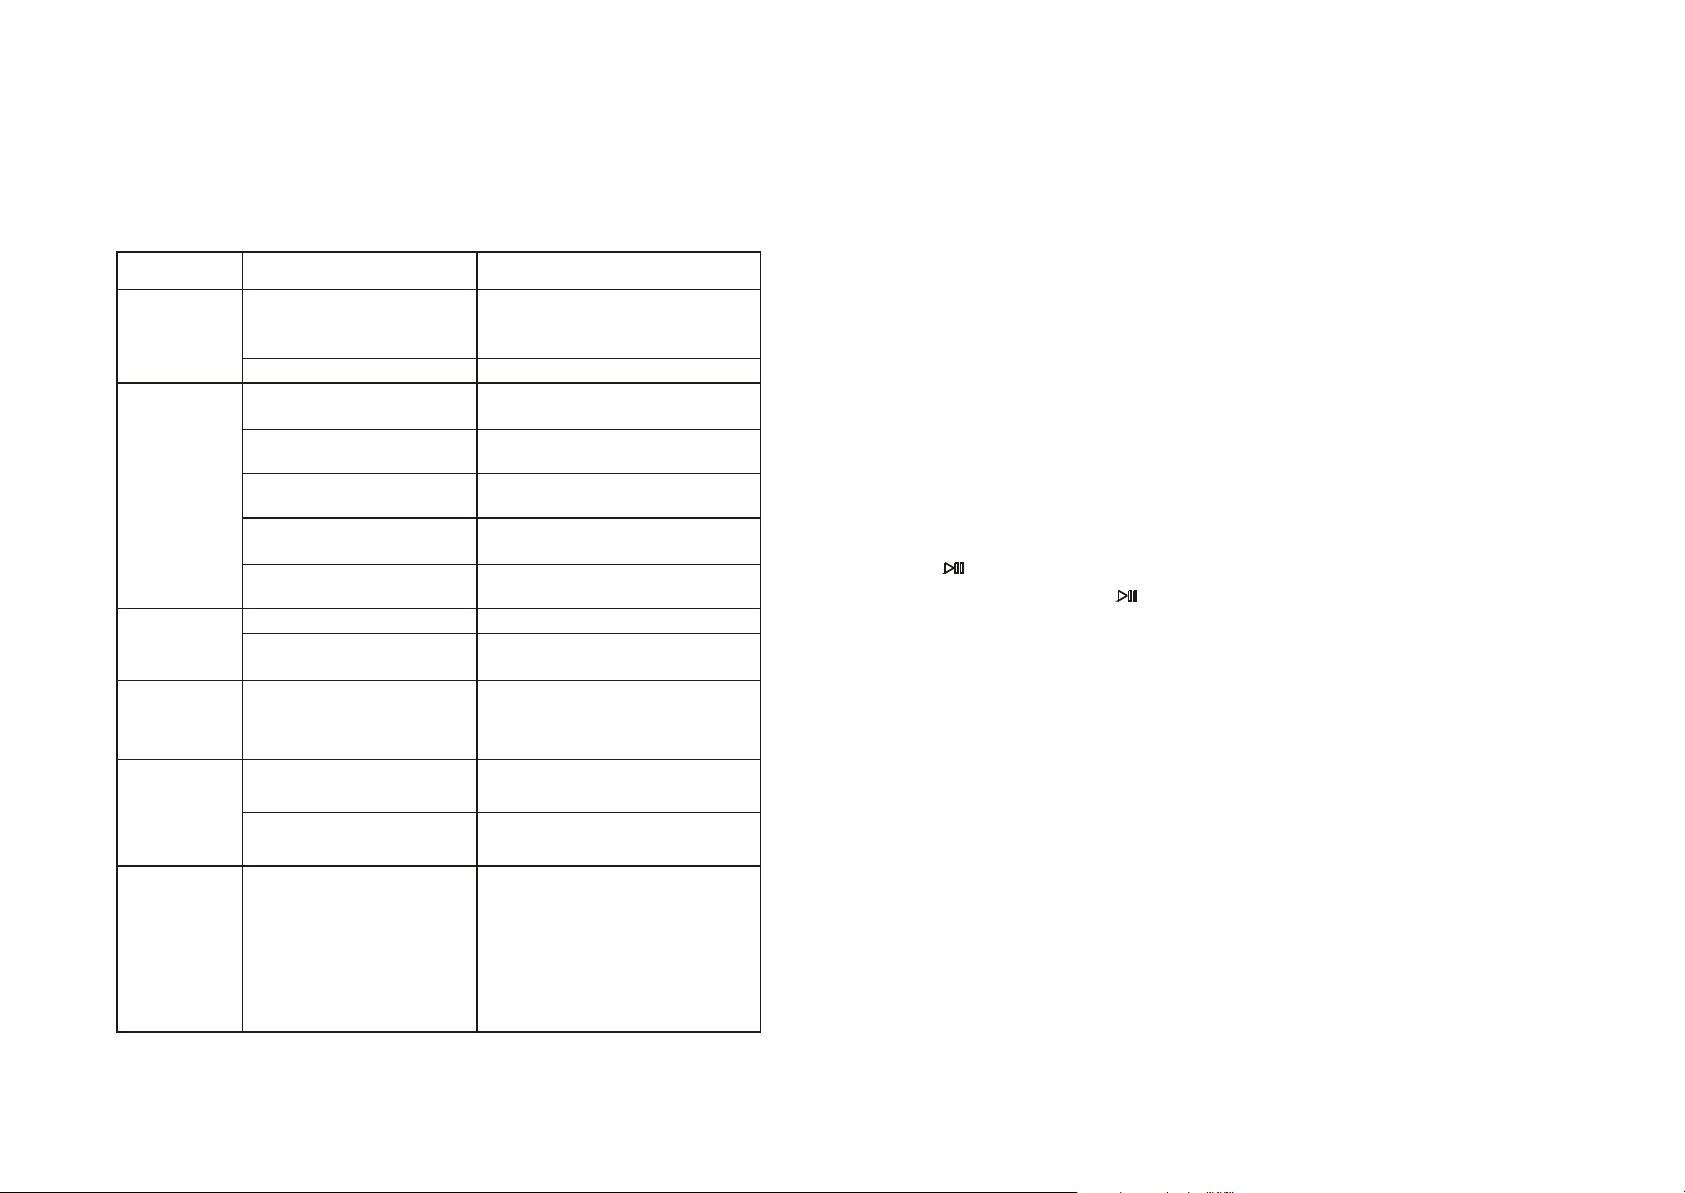
TROUBLE SHOOTING
Before going through the check list, wiring connection, should any of the
problem persist after check list has been made, consult your nearest service
dealer.
Symptom
No power
Disc cannot
be loaded or
ejected
No sound
The operation
keys do not
work
The built-in microcomputer
is not operating properly
due to noise
Cause
The car ignition is not on. If the power supply is properly
The fuse is blown
Presence of CD disc inside
the player
Inserting the disc in upside
down
Compact disc is extremely
dirty or defective
Temperature inside the
car is too high
Condensation
Volume is in minimum
Wiring is not properly
connected
connected to the car accessory
switch the ignition key to " ACC "
Replace the fuse
Remove the disc in the player
then put a new upward
Insert the compact disc with
the label facing upward
Clean the disc or try to play a
new one
Cool off until the ambient
temperature returns to normal
Leave the player off for an
hour or so, then try again
Adjust volume to a desired level
Check wiring connection
Press the RESET button
front panel is not properly
fix into its place
Solution
BALANCE CONTROL
1). Press the SEL button to select the balance mode until BAL appears on the display.
2). Press the + button or - button to increase or decrease the sound level of
left or right speaker.
FADER CONTROL
1). Press the SEL button to select the fader mode until FAD appears on the display.
2). Press the + button or - button to increase or decrease the sound level of
front or rear speaker.
2. OPEN BUTTON
Press it to eject the front panel when you want to take away.
3. BAND BUTTON
Press it to select your desired radio band and word which band is selected
will be displayed on LCD.
4. LCD ( LIQUID CRYSTAL DISPLAY)
5. CD ( CD PLAY, PAUSE) BUTTON
At tuner mode, press button to switch to CD mode. At CD mode,
press it to pause the CD program and press it again to resume CD
playback.
6. EJECT BUTTON
Press it to eject the disc from the slot.
Sound skips
The radio does
not work
the radio
station
automatic
selection does
not work
The installation angle
is more than 30 degrees
The disc is extremely
dirty or defective
The antenna cable is not
connected
the signals are too weak
7 4
Adjust the installation angle
to less than 30 degrees
Clean the compact disc/try to
play a new one
Insert the antenna cable firmly
select a station manually
7. DSP( DISPLAY) BUTTON
Press it to apply those functions, press it continually to switch between 4
preset equalizer curves: FLAT, POP, CLAS, ROCK. The sound quality will
be changed. Press it again to resume initial default mode.
8. MUTE BUTTON
Press this button to eliminate the sound temporarily, press it again to
resume normal play state.
Page 6

9. CLOCK ADJUSTMENT BUTTON
During TUNING or CD state, press the button to change to clock function.
To adjust hour:
with time on display, push the tune button adjust hour, when adjustment is
completed, release the button.
To adjust minute:
with time on display, push the tune button adjust minute. When adjustment is
completed, release the button.
10.11.12.15.16.17,PRESET STATION [ 1-6 ] / TOP, RPT, INT,RDM.
A]. To memorize the current frequency, press and any one of the six preset
buttons for more than 2 seconds.
B]. To recall the preset memory, press one of the preset button [1-6].
C]. TOP BUTTON
Press the button during playback to return to the first track of CD.
D]. INT: Preview all tracks
Press INT to play first ten seconds of each track on current CD. Press again
to stop scan and listen to track.
E]. REPEAT BUTTON
Press the button to continuously repeat same track. Press again to
stop repeating.
F]. Random button: play all tracks
Press it to play all tracks on CD in random order. Press again to stop
random play
19. LOCAL/DISTANCE BUTTON
Press it for distance reception when you are located at weak signal location,
depress it for stronger signal.
20. [TUNE/SEEK UP] BUTTON and TRACK UP BUTTON
1). The frequency scans up by one step when pressing button once(50k for Europe,200k for USA).
Hold it for more than 2 seconds to seek for a station of higher frequency.
2). During CD mode, press button allow you to track forwards.
Hold the button allow you to skip forwards.
[TUNE/SEEK DOWN] BUTTON and TRACK DOWN BUTTON
1). The frequency scans down by one step when pressing button once(50k for Europe,200k for USA).
Hold it for more than 2 seconds to seek for a station of lower frequency.
2). During CD mode, press button allow you to track backwards.
Hold the button allow you to skip backwards.
13. POWER BUTTON
Press the button to turn on or off the unit.
14. LOUD( LOUDNESS) BUTTON
Press this button to enhance the bass sound while reduce half volume
level.
18. AS/PS BUTTON
Select 6 strong stations and store them in current band.
Select a band( if needed)
Hold AS/PS button for more than 3 seconds. The news stations replace
the stations already stored in that band.
Scan stations in current band
Select a band( if needed).
Press AS/PS button for less than 3 seconds. Radio pauses for 5 seconds
at each station. Press AS/PS again to stop scanning when desired
stations is reached.
65
 Loading...