


Operation Manual-4CH Duplex DVR system
1
TABLE OF CONTENTS
1. INTRODUCTION................................................................................................................3
2. PHYSICAL UNIT.................................................................................................................3
2.1 Front Panels..............................................................................................................3
2.2 Rear Panel.................................................................................................................3
2.3 Remote Control.........................................................................................................4
3. GETTING STARTED..........................................................................................................6
4. HARDWARE SETUP..........................................................................................................7
4.1 Hard Disk Drive Installation.......................................................................................7
4.2 Monitor Connection...................................................................................................7
4.3 Camera Connection..................................................................................................8
4.4 Mouse Connection....................................................................................................8
4.5 DVR Power Connection............................................................................................8
5. SETUP................................................................................................................................9
5.1 CAMERA..................................................................................................................11
5.2 RECORD..................................................................................................................11
5.3 ALARM....................................................................................................................12
5.4 SCREEN..................................................................................................................14
5.5 AUDIO.....................................................................................................................15
5.6 SYSTEM..................................................................................................................15
5.6.1 HARD DISK SETUP.....................................................................................16
5.6.2 ACCOUNT SETUP........................................................................................17
5.6.3 PASSWORD SETUP....................................................................................17
5.6.4 KEYPAD TONE.............................................................................................18
5.6.5 TIME SET......................................................................................................18
5.6.6 EVENT LIST..................................................................................................19
5.6.7 F/W UPGRADE.............................................................................................19
5.6.8 USB TEST.....................................................................................................19
5.7 LANGUAGE.............................................................................................................20
5.8 LOGOUT.................................................................................................................20
5.9 EXIT.........................................................................................................................20
6. PLAYBACK WITH TIME SEARCH FUNCTION...............................................................21
7. BACKUP via USB memory stick.......................................................................................21

Operation Manual-4CH Duplex DVR system
2
8. RECORDING LENGTH....................................................................................................24
9. PLAYBACK WITH BACK-UP VIDEO DATA ON PC.........................................................25
9.1 Install.......................................................................................................................25
9.2 Program Interface....................................................................................................25
9.3 Button Function.......................................................................................................26
10. SPECIFICATION............................................................................................................29
11. APPENDIX......................................................................................................................30
11.1 System Connect Sketch Map................................................................................30
11.2 Fitting Come Along With DVR...............................................................................30
11.3 Model D31xx series used the compatible USB Stick............................................31
Operation Manual-4CH Duplex DVR system
3
1. INTRODUCTION
This system provides total video security solution for 4-channel digital surveillance system
supporting duplex (simultaneous playback and record) functionality.
Either mouse or remote control unit can operate all DVR menu setting.
2. PHYSICAL UNIT
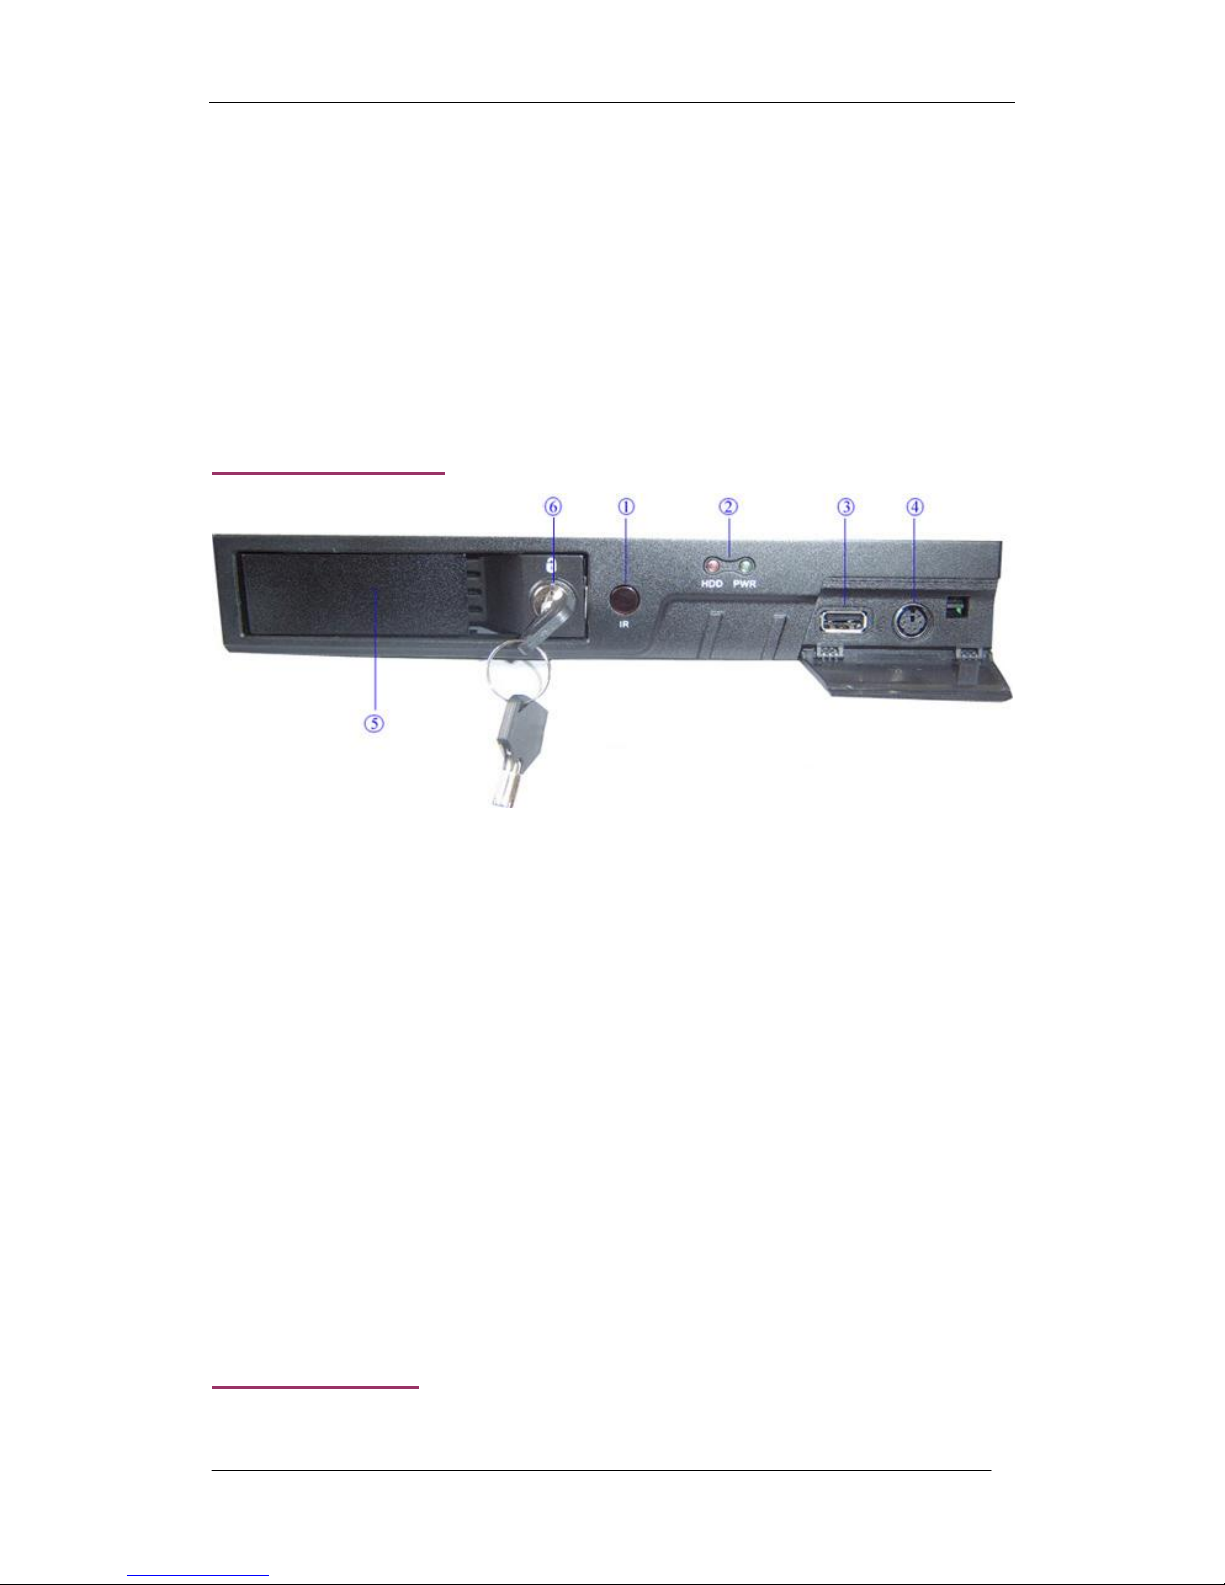
2.1 Front Panels
① IR Remote Receiver
② LED Light
(a) GREEN (PWR): The DVR unit is powered up and running.
(b) RED (HDD): System is in Recording Mode or in Playback Mode.
③ USB PORT
Use this port to backup with USB disk.
④ PS/2 MOUSE PORT
Use this port for PS/2 mouse connection. If you have USB port mouse, use USB - PS/2
adapter to connect with this port.
⑤ HDD BOX Press-button
⑥ HDD Lock
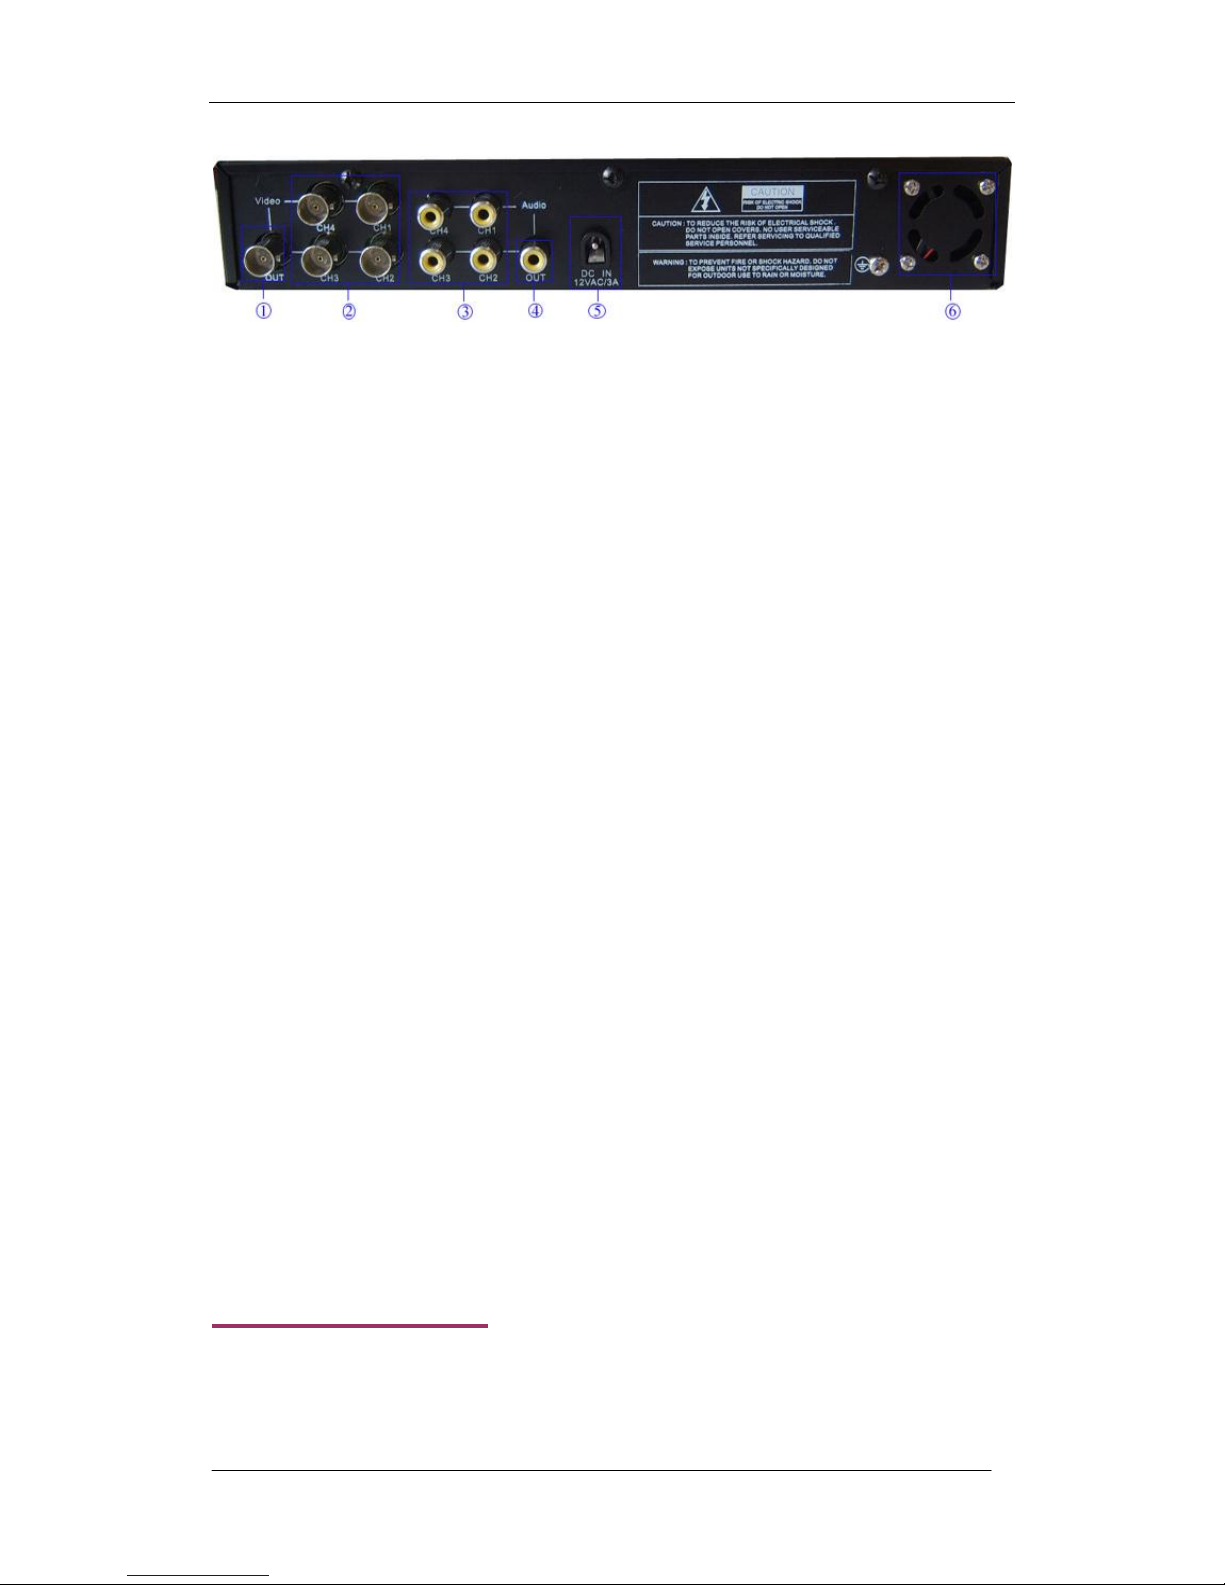
2.2 Rear Panel
Operation Manual-4CH Duplex DVR system
4
① VIDEO OUTPUT
Use this port to connect DVR to the monitor. There is one video output.
② VIDEO INPUT
Use this BNC port to connect cameras to DVR system. You might need BNC adapter for
each (CH1-CH4) camera connection.
③ AUDIO INPUT
Use “AUDIO IN” port for microphone connection. If signal audio input is from channel 1,
there will be audio output in channel 1 view and quad view. If signal audio input is from
channel 2、channel 3 or channel 4, there won’t be audio output until in channel 2、channel 3
or channel 4.
④ AUDIO OUT
Use “AUDIO OUT” port for speaker (mono) connecting. And this port is audio output for
playback.
⑤ AC-DC POWER ADAPTER JACK
Connect the power adapter into DVR and plug the power cable into the wall. Some DVR
models do not have a power adapter so you may not see this. In case, just plug power cable
from the behind the DVR into the wall. Below is the information of input/output voltage for
the power adapter.
[Input: AC 100-240V, 50/60Hz, 1.5A / Output: DC +12V == 5A]
⑥ Fan
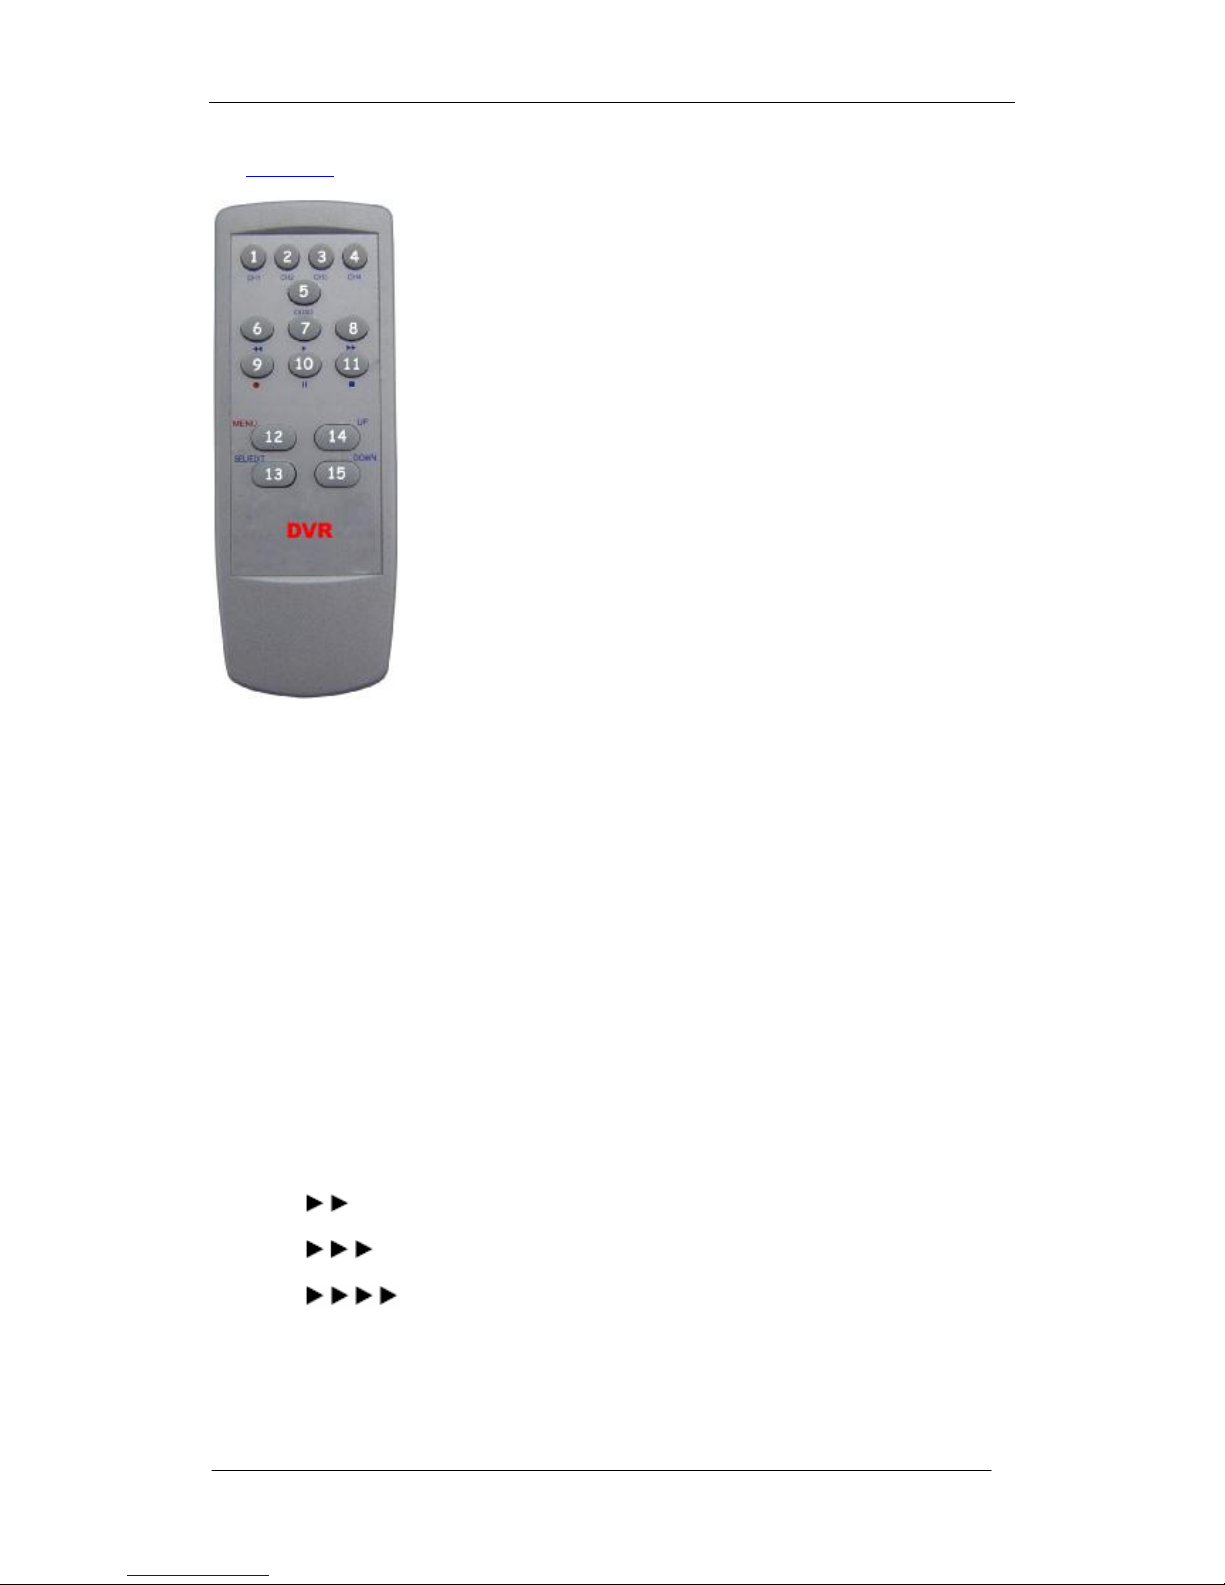
2.3 Remote Control
A series of button on DVR remote unit make a system to operate its basic functions, such as
recording, playback, fast-forward, reverse, etc. For more details about the DVR menu, refer
Operation Manual-4CH Duplex DVR system
5
to “ 5. SETUP”.
** The remote control feature can vary but the functionality of each
button is same.
① Quad , CH1 , CH2 , CH3 , CH4
Use this button for full screen display for each camera channel or
quad display on the monitor screen. If you push “Quad” camera
selection button, DVR will display all 4 channels (cameras) at the
same time in quad screen.
② ● REC
Press “REC” button to start manual recording. Then you will see this
mark ‘●’ on the selected channel of the screen, which means that the
channel is now recording.
To stop manual recording, press “REC” again during recording mode.
Also user can press “REC” button to reduce value when adjust parameters.
③ ■ STOP
To stop playback, press the “STOP” button.
④ ► PLAY
After recording, press “PLAY” button to start video playback.
Playback will start with the oldest unread video data and then continue playing.
⑤ ►► FWD
This is the fast forward button. To play the recorded stream faster, press the “FWD” button.
There are three levels of fast forward playback speed.
(a) FF 1 ( ) : Play two times faster (x2) than the normal play.
(b) FF 2 ( ): Play three times faster (x3) than the normal play.
(c) FF 3 ( ): Play four times faster (x4) than the normal play.
To change the fast forward play back speed level, press the “FWD” button again.
⑥ REW

Operation Manual-4CH Duplex DVR system
6
This is the rewind button. To play the recorded stream backward, press the “REW” button.
[NOTE]: The fast forward and reverse playback speeds will vary depending on the frame
rate and record quality settings, as well as the number of channels recorded.
⑦ ▍▍ PAUSE
To pause the video playback, press the “PAUSE” button. Then the video displaying will be
stopped.
To continue playback, push the “PLAY” button.
⑧ MENU
It displays menu option or go back to the previous.
⑨ UP(▲) / DOWN(▼)
To change a menu field, use the “UP” or “DOWN” buttons.
⑩ SEL/EDIT
Use this button to change values on main menu or sub menu setting. Press this button to
increase value.
3. GETTING STARTED
Install a hard disk drive into your DVR.
Connect DVR to monitor.
Connect cameras (up to 4) to DVR.
Connect other peripheral devices (mouse, USB Drive) if necessary.
Plug the power cord into the power jack on the wall.
Connect the power adapter into DVR to turn on the DVR.
Start TV Monitoring and Recording.
¨ Make sure that a hard disk drive and camera(s) are properly installed.
¨ The hard disk (IDE HDD) jumper setting must be set to “master “ jumper setting.
¨ After installation of hard drive, the hard drive drawer must be locked with key.
¨ If the power is turned off while recording (i.e. a power failure), the DVR will enter
“Power Recovery” modes at start up, detect that it has been shut down, and then
Operation Manual-4CH Duplex DVR system
7
reinitiate the recording process.
4. HARDWARE SETUP
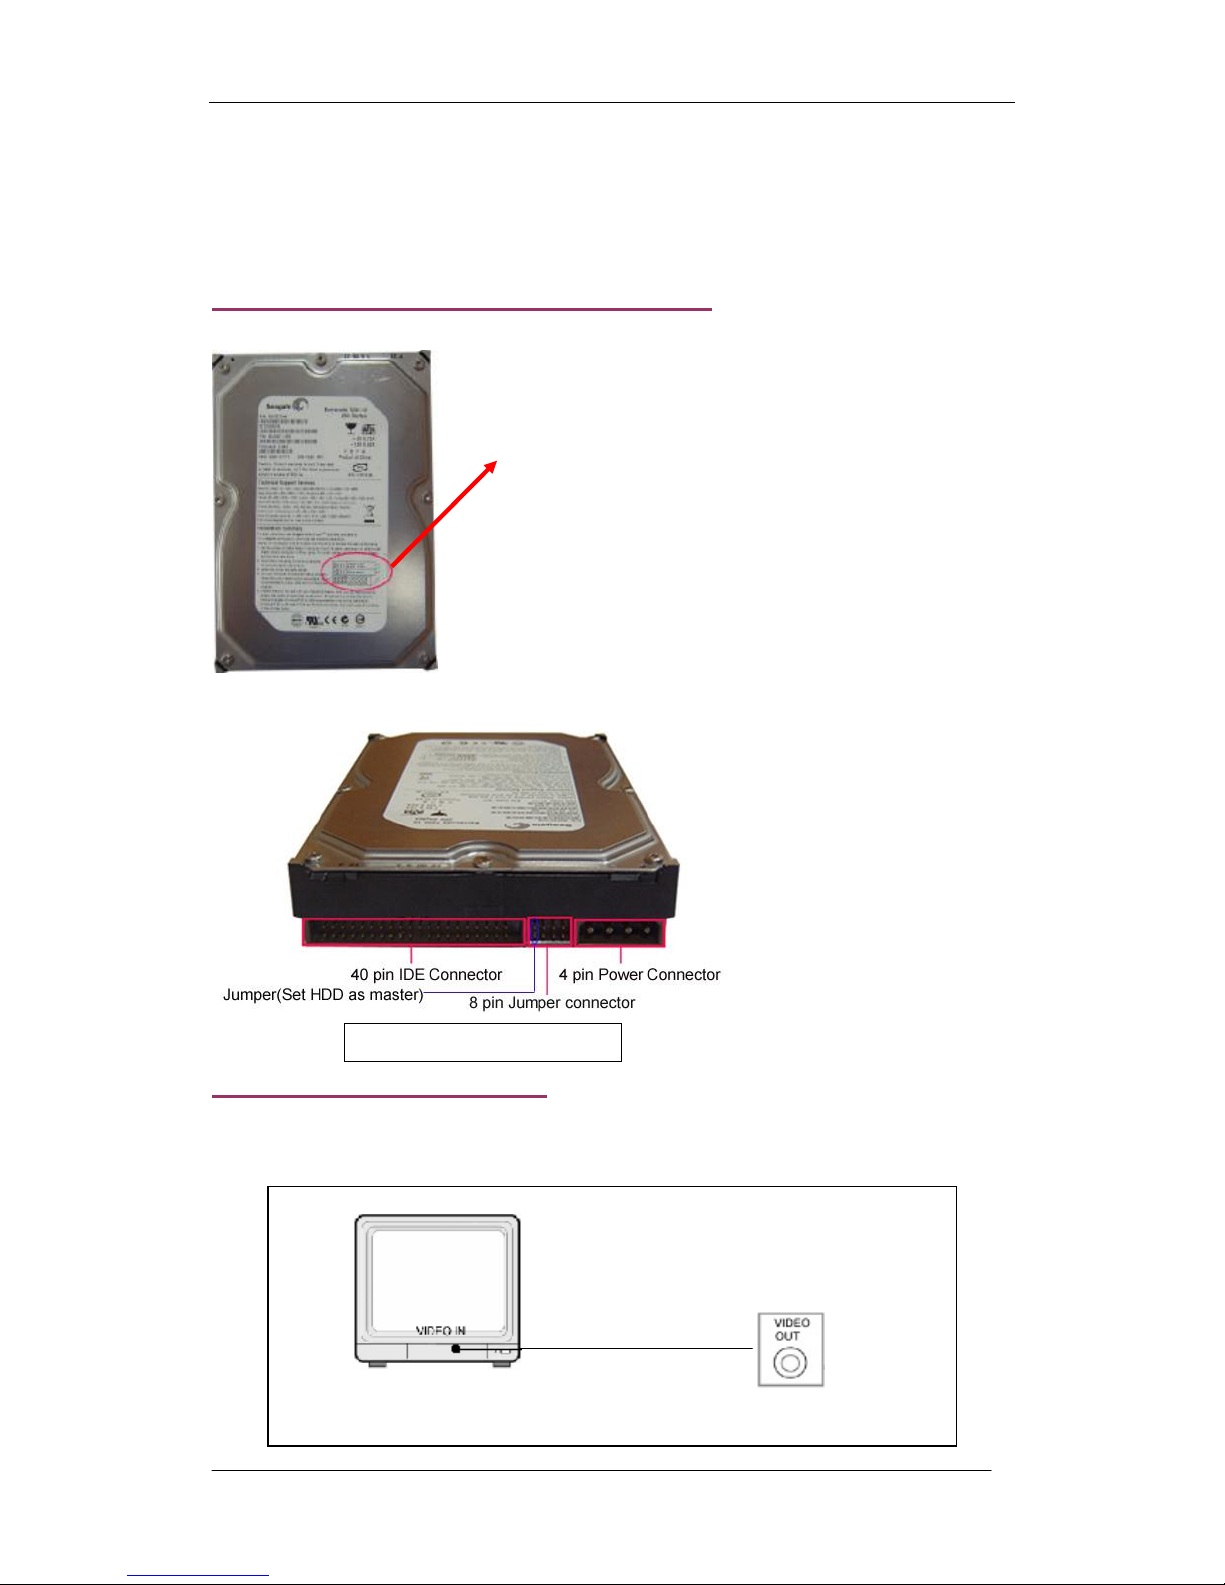
4.1 IDE Hard Disk Drive Installation
(A) Make sure that HDD Jumper setting as “Master”
Before installing hard drive, set jumper as “Master”.
The master jumper setting varies depending on the hard
drive manufactures.
Refer to manufacture’s manual for master jumper setting.
For example, the model of HDD is Seagate.
(B) Connect the ribbon cable (IDE) cable & power cable
4.2 Monitor Connection
To display video image from cameras on the monitor, the DVR’s video output signal should
be transferred to your TV set or monitor.
“
VIDEO OUT
”
port on DVR
Back side of hard disk drive
Connect a monitor with the
“
VIDEO OUT
”
port on DVR
“
VIDEO IN
”
port on MONITOR
Operation Manual-4CH Duplex DVR system
8
Connect “VIDEO IN” of the monitor to “VIDEO OUT” of the DVR system.
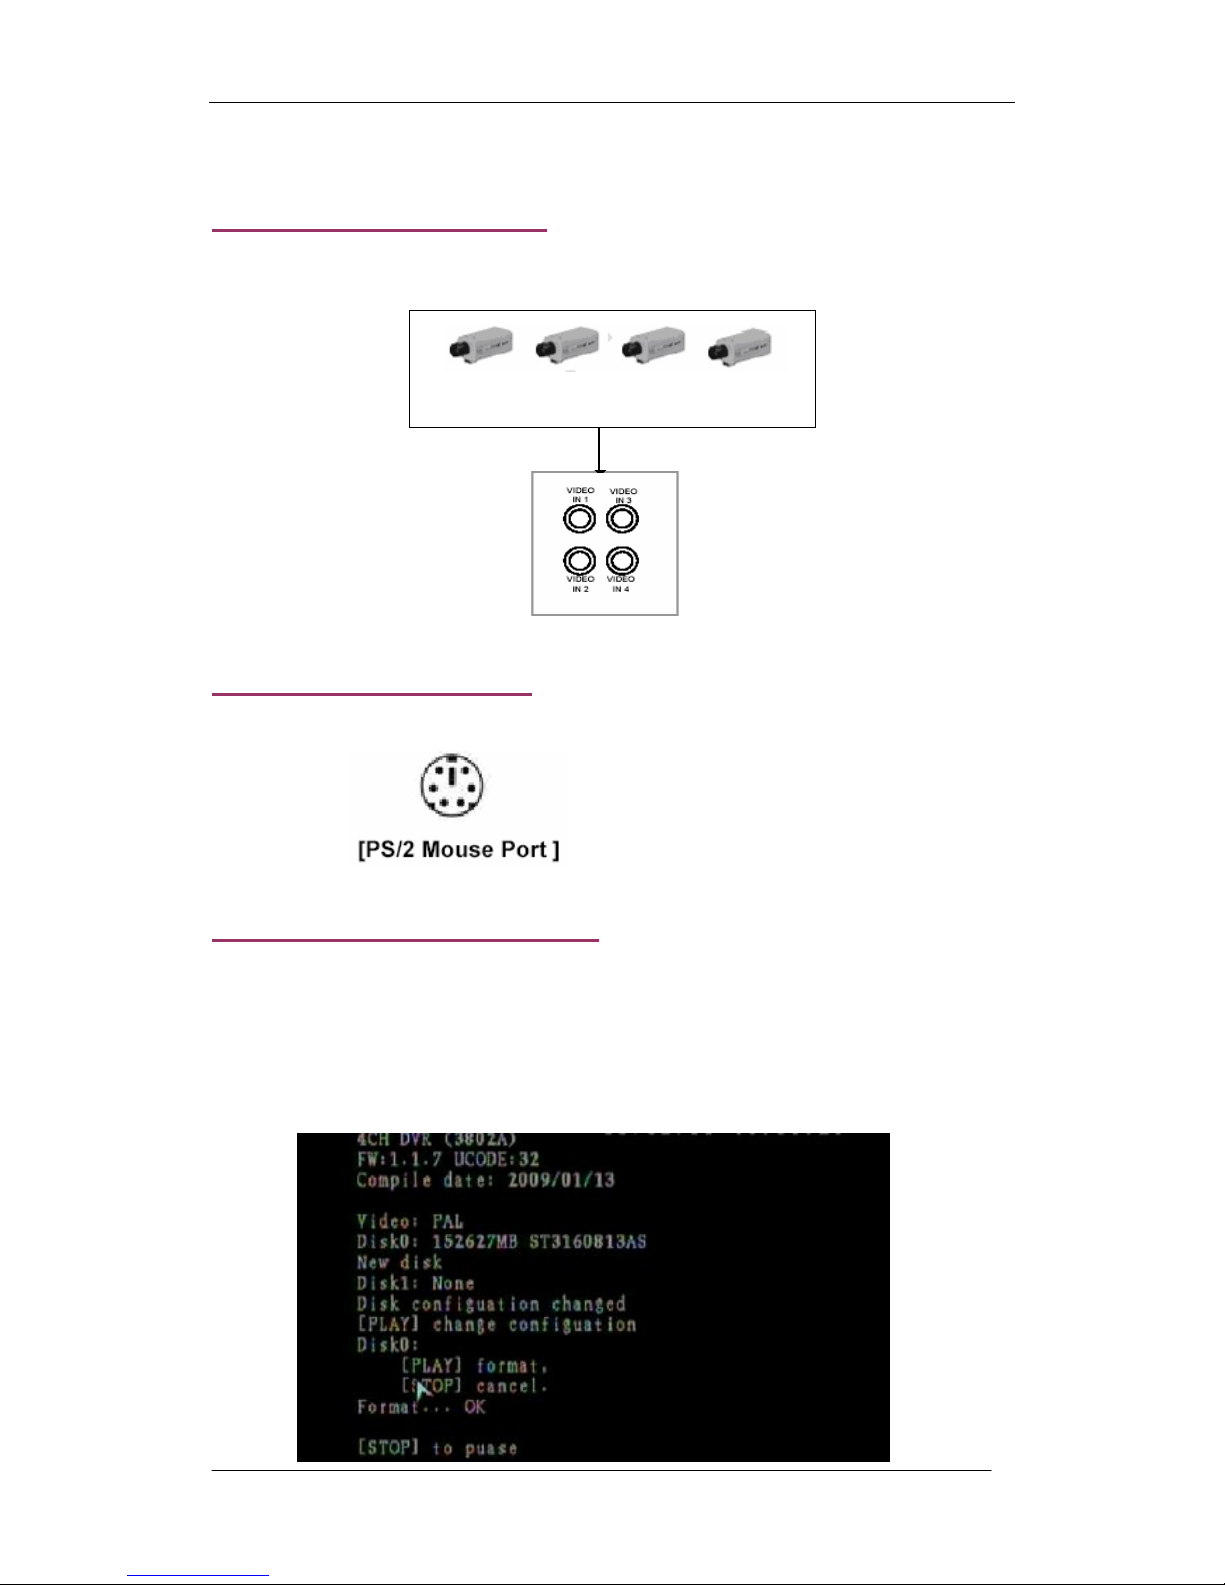
4.3 Camera Connection
Connect between “VIDEO IN” of your DVR and “VIDEO OUT” of camera with video cable
and plug in the camera’s power adapter.
4.4 Mouse Connection
Connect PS/2 mouse with the port below on the DVR.
4.5 DVR Power Connection
Connect a DVR power adapter to the adapter jack at the rear panel of DVR unit.
It will boot up the system.
If users install a new hard disk drive, it will ask for HDD formatting before a system starts to
run (Below Fig). Choose format option pressing “PLAY ” button.
“
VIDEO IN
”
on DVR
“VIDEO OUT” on CAMERA
Operation Manual-4CH Duplex DVR system
9
Below is the information of input/output voltage for the power adapter.
² Input: AC 100-240V, 50/60Hz, 1.5A
² Output: DC +12V == 5A
5. SETUP
After installing a new hard drive on the
system, user had better to format the hard
drive first. And there are three password
levels in the system, including admin
(highest), operator, and guest (lowest). If the user does not login the system, he can
only view live video display. And when the user login the system, if he can’t operate
the system in thirty seconds the system will be locked automatically.
The system allows up to four user accounts. The administrator can set up the login name,
password and level for each user. (Please refer to Section 5.6.2 for Account Setup.)
The admin can operate everything, and the operator can operate everything except
examining user accounts and modifying its password level, and the guest can operate live
video display, and image playback.
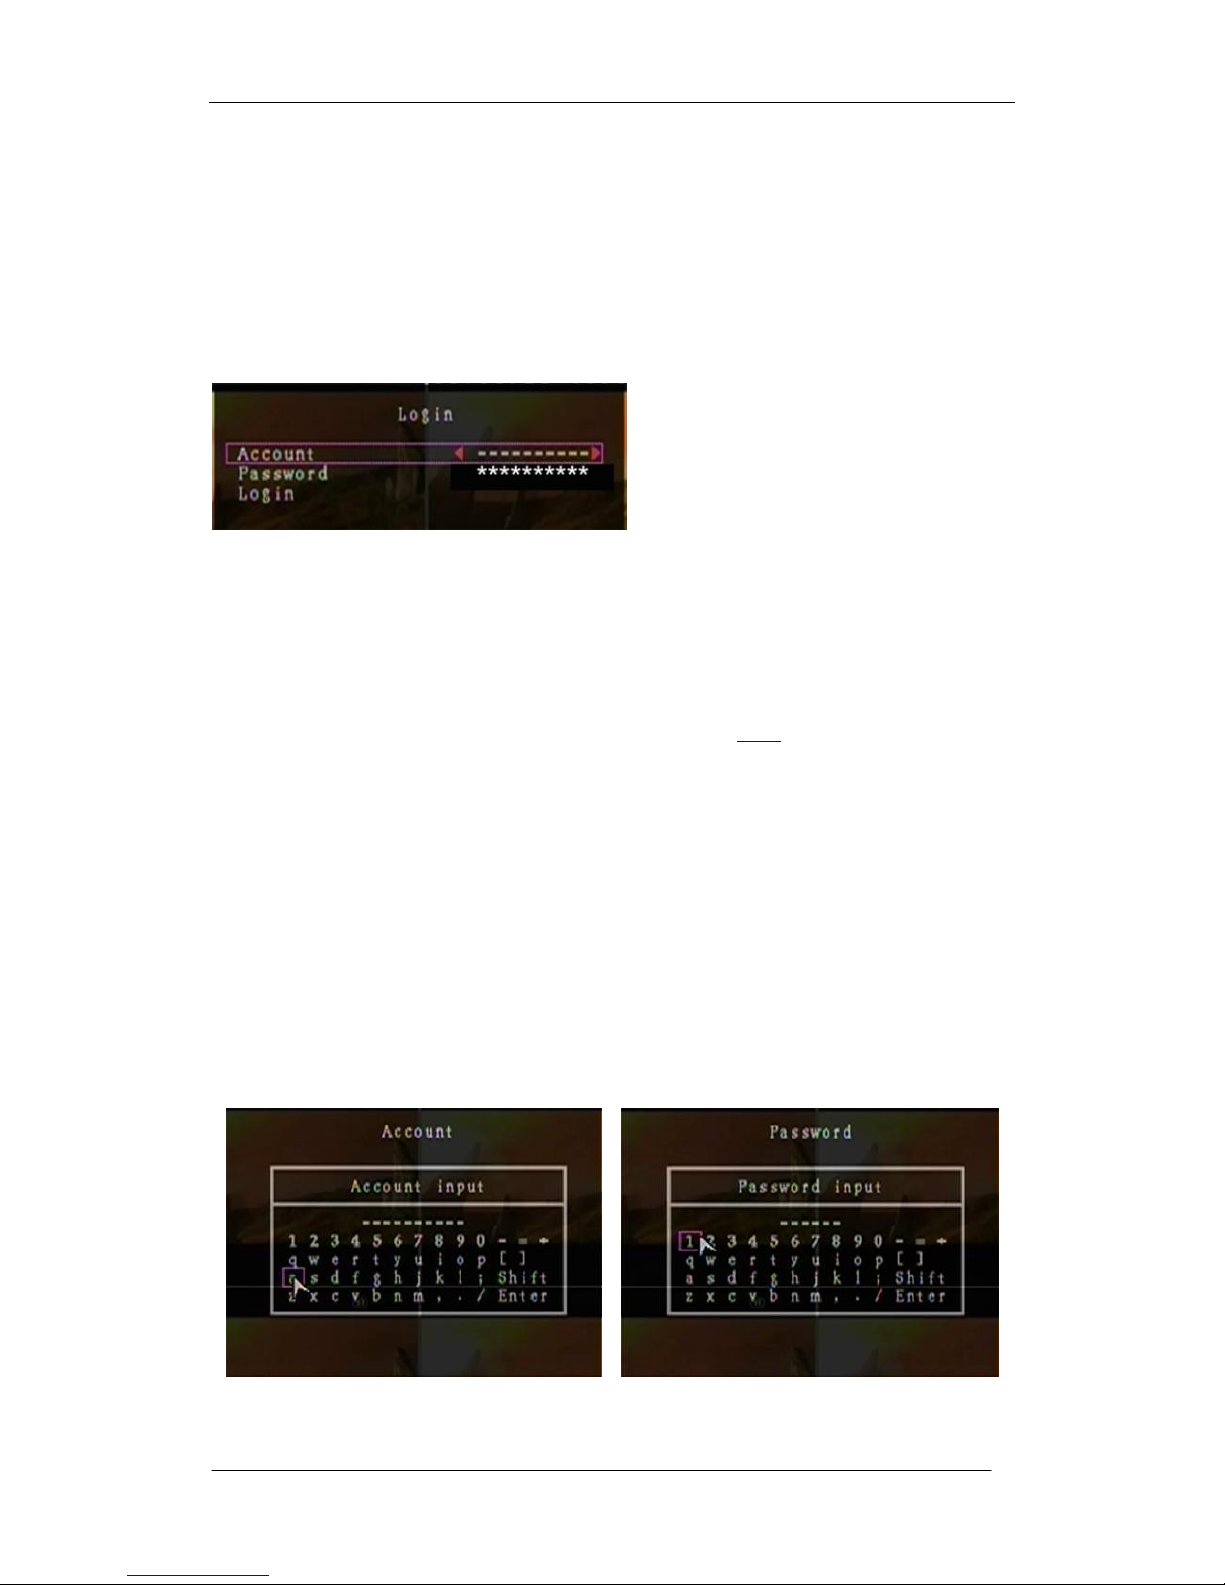
After system boot-up, hold a right mouse click button and there will be login window. Hold a
left mouse click button to click the order of “Account”, and input correct account. Then left
click the order of “Password” and input correct password. At last left click “Login” to enter
system. There is one factory-preset login “account/password” “admin/111111” at admin
level. The user can use it to login the system for the first time.
After login the system, hold a right mouse click button and there will be a piece of suggestive
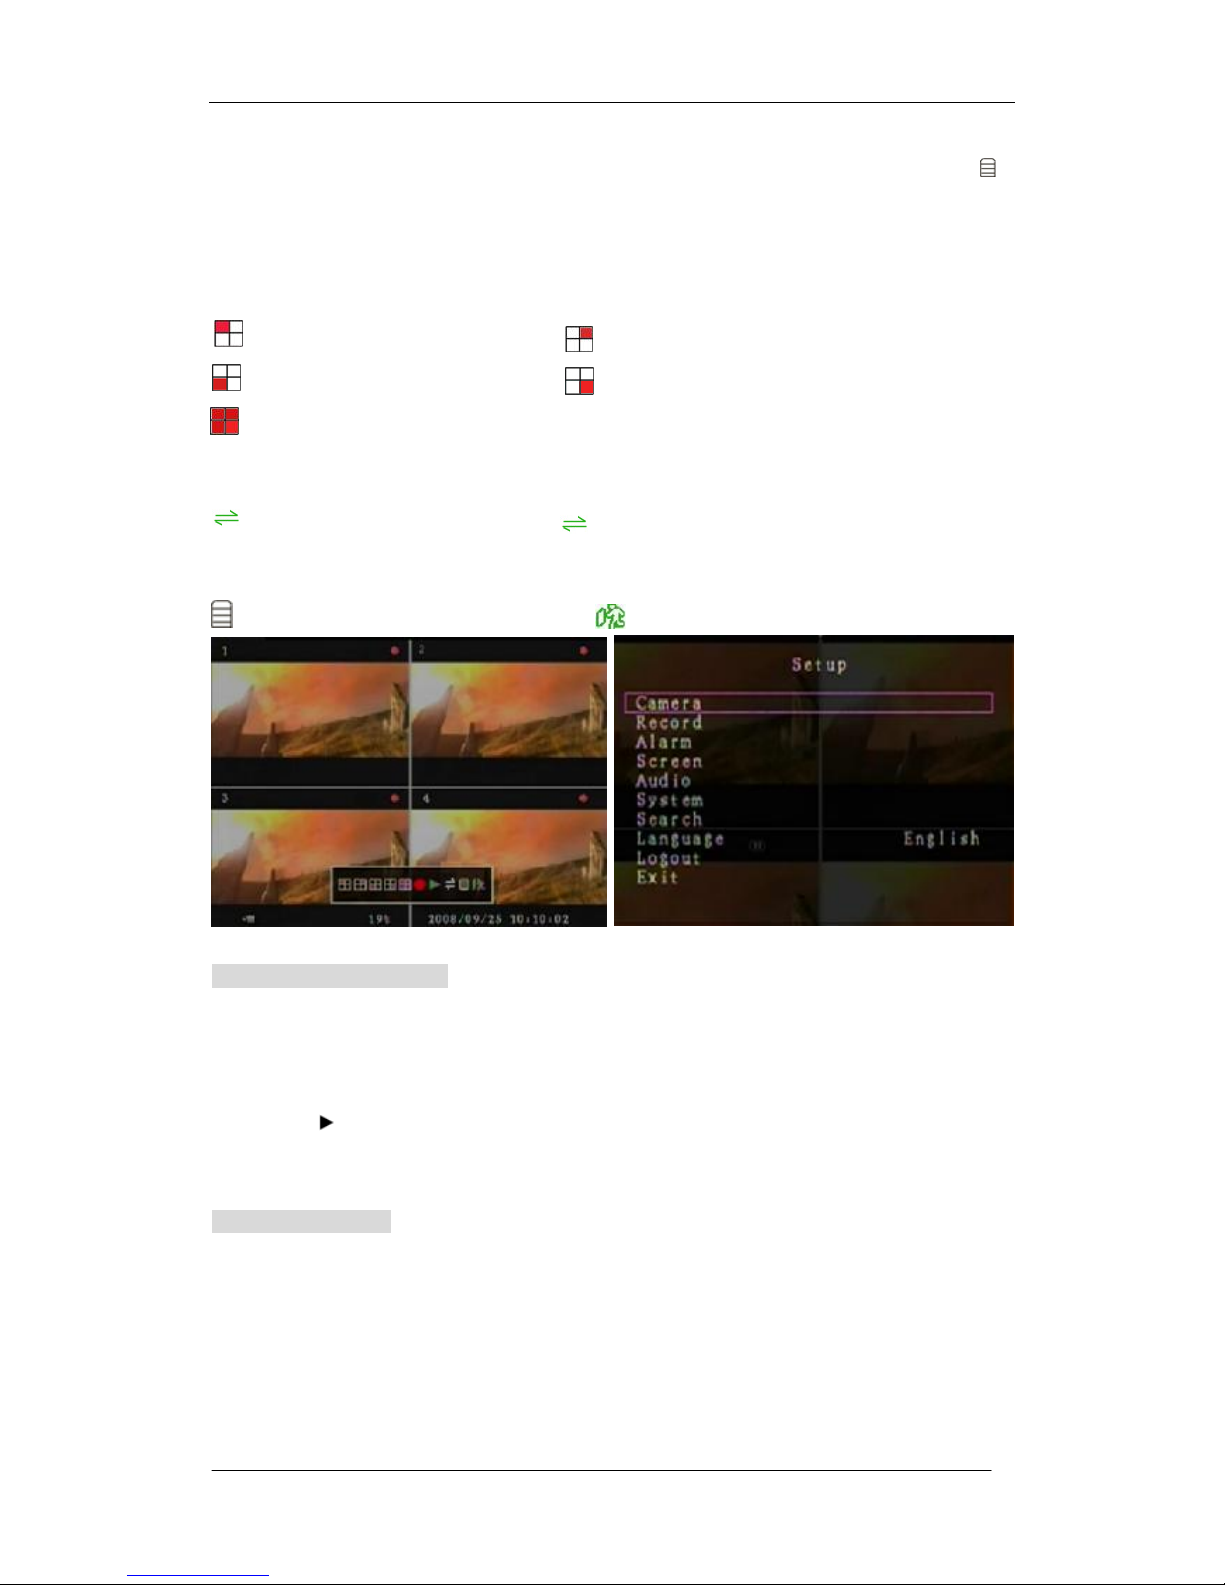
Operation Manual-4CH Duplex DVR system
10
window options on the monitor (Fig (a)). Hold a left mouse click button to click the icon “ ”.
Or press the MENU button to make any changes of DVR settings. You will see the screen
below on the monitor (Fig (b)).
Suggestive window options:
Channel 1 view Channel 2 view
Channel 3 view Channel 4 view
All channel view ● Manual recording or Stop manual recording
► Play record list
Channel auto sequence. The iron “ ” won’t display if the order of “auto sequence” is
“OFF”.
Menu option Logout.
The DVR Remote Control
Press the “UP” or “DOWN” key on the DVR remote control to move the cursor. Press
“SELECT” button on the remote control in order to change the settings. In the MAIN MENU,
the cursor “ ” will be shown on the screen right next to each sub menu. To go back to the
previous, press “MENU” button on the remote control.
The Mouse Control
Move the mouse up or down to move the cursor. Hold a left mouse click button to change
the settings. Click a right mouse to go back to the previous.
Fig (b)
Fig (a)
 Loading...