

Page 1

2-in-1 WiFi Camera & Dash Cam
User Manual
PDVRCAM50W
Page 2

2-in-1 Wifi Camera & Dash Cam
USER MANUAL
PDVRCAM50W
Page 3

Table of Contents
Page 4

PDVRCAM50W Dashcam
Page 5

Introduction
T
he 3-in-1
Car/Sport HD Camcorder
is an easy-to-use, high-definition (1080P Full HD) car camcorder
with a 1.5” LCD display and built-in Wi-Fi. It records both audio and video with time & date stamp
which can be used to pinpoint the exact time an event occurred. The events are recorded to a Micro
SD card which can be used as evidence for auto insurance companies if there are any legal
complications during an insurance claim. Pyle Audio’s HD Camcorder is perfect for all motorists
and is budget-friendly. One button switch to Car mode, Photo mode and Sports mode makes it a
perfect device; you will find aspects of a Dash Cam and high-end camera all in one to make a truly
superior product. You can download the video directly to your smartphone via Wi-Fi and share it
with your friends. With our HD Camera’s WiFi functionality, there’s virtually no need to use a card
reader and/or connect it to your computer anymore.
Features
• HD video quality and real time recording (30fps/60fps).
• One button switch to Car Video / Photo / Sports Video mode.
• Waterproof up to 20 meters (use waterproof case).
• Auto recording, video motion detection recording and manual recording (video or snapshot)
modes.
• Smart impact-sensing recording (non-over writable video) and locks up current and post impact
sensing video clips.
• Records up to 474/237 total minutes (at 720P/1080FHD) on a 32GB micro SD (not included).
• Auto overwrites when SD is full (for regular recording in Car Mode).
• Built-in microphone and speaker.
• 170° wide angle lens.
• Records 1-min, 3-min or 5-min continuous video clips.
• Built-in rechargeable battery for up to 90-mins of usage (recording without Wi-Fi on).
• Download free Wi-Fi viewer app for live preview, playback, archive, setup and sharing.
Important
This guide provides important information on the use and operation of your PDVRCAM50W and the
images/features shown throughout the manual are subject to change without notice due to system
and firmware upgrades. Please read all the information carefully prior to using the product for the
best performance and to prevent any damage/injuries or misuse of the device(s). Customers are
entitled to have read through this complete user’s manual before using the PDVRCAM50W. Any
unapproved changes or modifications will void your warranty. Please ensure to have a complete
understanding of the following restrictions.
NOTE: Please check the state laws and regulations to determine if windshield mounting is legal in your
Country and state
.
Page 6

Restrictions
When using this product, the safety precautions below must be taken in account to avoid possible
legal liabilities and/or accidental damage. Retain and follow all product safety and operating
instructions. Observe all warnings in the product operating instructions. To reduce the risk of bodily
injury, electric shock, fire and damage to the equipment, observe the following precautions:
PLEASE NOTE that under certain circumstances, audio/video recording may be PROHIBITED by
law.
• DO NOT
use this product near water. For example: near a bathtub, washbowl, kitchen sink, or
swimming pool.
• DO NOT
place this product on an unstable surface or table. This product may fall, causing serious
damage to the product.
• DO NOT
disassemble this product. Opening or removing covers may expose you to dangerous
voltages or other risks. Incorrect reassembly can cause electric shock during subsequent use.
• DO NOT use this product to infringe on one’s privacy; spying, intercepting and related activities
are illegal and punishable by law. Monitoring one’s private activities without consent is illegal and
this product is not designed or manufactured for these purposes.
• DO NOT use this product to carry out any illegal activities (bootlegging movies, etc.). The Seller
and Manufacturer of the product shall not be responsible for any consequences of illegal conducts
made by users.
• DO NOT put the plastic packaging bags within arm’s reach of children or babies. Plastic bags can
be a suffocation hazard when placed over the nose and/or mouth.
• DO NOT plug the AC adapter into the outlet in improper situations.
• Plugging in an AC adapter with wet hands might cause electric shock.
• Plugging in the AC adapter unsteadily might cause fire or electric shock.
• DO NOT cover the AC adapter when it is connected to an outlet, place the adapter near appliances
with high-heat, or put it on a heated floor. The above mentioned operation might cause a fire or
other possible incidents.
Page 7

Disclaimers
•
Please make sure that you are following the regulations and laws set by your Country and State
DMV(Department of Motor Vehicles) prior to mounting your camera. This manual does not intent
to provide any specific legal advice.
• Please check the PDVRCAM50W‘s features periodically to ensure that it is operating as
required.
• During a car accident, the impact of the collision must be hard enough to trigger the G-Sensor In
order for the PDVRCAM50W’s to begin recording (G-Sensor is set to be off in Sports Mode).
• Please use the PDVRCAM50W as a tool while driving and use safety while driving.
• The Seller and Manufacturer of PDVRCAM50W shall not be held responsible for any traffic
violations related to the positioning or improper use of our product.
• Avoid mounting the camera outside of an airbag deployment zone.
• Knowing that most vehicles run off 12v DC power supply from the battery, please double check
our cigarette power adapter’s output rating before attempting to run power directly from the car
battery.
Conditions
Please read the following messages to make sure your working environment is suitable.
• If your vehicle does not automatically cut the power off to your cigarette lighter port, then you
may have to manually turn off or unplug the charger to prevent it from overheating.
• The temperature should be kept between –10˚C and 50˚C (14˚F to 122˚F) while using this
product. The relative humidity should be kept between 20% and 80%.
• Avoid putting the product in places where temperature or humidity may change rapidly.
• Keep it dry, dustless and avoid lens exposure in direct sunlight.
• Keep product away from heat sources (such as electric heaters).
• Do not use the camera near harmful chemicals.
• Do not place this product near any strong magnetic objects
• Do not disassemble the product.
• Do not shake or strike the product.
• Please obey the local government’s environment protection policy.
Page 8

Package Contents
1 x PDVRCAM50W 1 x Suction Cup 1 x Car Charger
1 x USB cable Waterproof Case User’s Manual
1 x Bicycle Stand Mount Adaptor Helmet Adapter
2 x Helmet Base &Wire Rope, Velcro Ties
Page 9

Product Basics
Page 10

Quick Start
MOUNTING THE CAMERA
Please make sure that you are following the regulations and laws set by your Country or state DMV
(Department of Motor Vehicles) prior to mounting your camera. This will avoid any accidents and
traffic violations that can occur if the camera is mounted in a location that is prohibited by law.
NOTE: The Seller or Manufacturer of PDVRCAM50W shall not be held responsible for any traffic
violations related to the positioning or improper use of our product.
Determine where you will be mounting the camera. The following diagram depicts mounting
locations on a vehicle based in the state of California (U.S.) and its restrictions.
NOTE: According to CA VC Section 26708 (13) (A) “A video event recorder with the capability of
monitoring driver performance to improve driver safety, which may be mounted in a seven-inch
square in the lower corner of the windshield farthest removed from the driver, in a five-inch square
in the lower corner of the windshield nearest to the driver and outside of an airbag deployment zone,
or in a five-inch square mounted to the center uppermost portion of the interior of the windshield. As
used in this section, “video event recorder” means a video recorder that continuously records in a
digital loop, recording audio, video, and G-force levels, but saves video only when triggered by an
unusual motion or crash or when operated by the driver to monitor driver performance.”
Page 11

Using the suction cup and rotating bracket, mount the PDVRCAM50W to the inside of your
vehicles windshield (use the adjustment knob to loosen and tighten the PDVRCAM50W as
needed).
NOTE: The PDVRCAM50W can also be used to record both exterior and interior (front and rear) of
your vehicle. For interior recording, simply follow the steps above and rotate the camera so that the
lens is facing the inside of your vehicle.
INSERT THE SD CARD
Insert your micro SD card into the PDVRCAM50W’s micro SD slot. Make sure that you insert the
SD card correctly (picture below). The SD card will make a clicking sound, indicating that it has
been locked into the camera.
Page 12

CONNECT THE POWER CABLE
1. Connect the car chargers cable into the PDVRCAM50W’s power socket located on the
bottom side of the PDVRCAM50W.
NOTE: Use the brackets adjustment knob to make adjustments as needed.
2. Depending on where you’ve chosen to mount the PDVRCAM50W, run the power cable
around the trim of your vehicle so that it will not obstruct your view while driving.
3. Insert the car charger into your vehicles cigarette lighter port as shown. A red light on the
car charger will light up, indicating that it is connected
Page 13

TURNING THE CAMERA ON
There are two ways to turn on your PDVRCAM50W
1) Start your vehicle and the PDVRCAM50W will automatically turn on and begin recording.
2) Press and hold the power button to manually turn on the PDVRCAM50W
NOTE: The PDVRCAM50W will automatically turn on/off whenever your vehicle turns on/off,
respectively.
.
LIGHT INDICATORS
Page 14

USED AS ACTION CAMERA
A quick guide on how to attach your camera to helmets, gear and equipment.
Note : Please switch to Sports Mode by pressing the On/Off button before placing it
into the waterproof case.
Page 15

BASIC OPERATIONS
SET THE DATE & TIME
1. Turn on your camera
• Press and hold the Power button until the “Welcome” screen appears
2. Press the Menu button twice to get into the “Setup” menu
3. Select Date&Time
• Press the “Down” button until Date&Time option is highlighted
• Press the “OK” button
4. Change the Date & Time
• Use the “Up” and “Down” buttons to change the date and the time
• Use the “ON/OFF/MODE SWITCH” button to go to the next screen and use the “OK”
button to confirm the change.
FORMAT YOUR SD CARD
1. Turn on your PDVRCAM50W
• Press and hold the Power button until the “Welcome” screen appears
2. Press the Menu button twice until the “Setup” settings appears on the screen
3. Select the Format option
• Press the “Down” button until the “Format” option is highlighted
4. Confirm Formatting
• Press “OK” to confirm the formatting of your SD Card
CHANGE TO DEFAULT SETTINGS
1. Turn on your PDVRCAM50W
• Press and hold the Power button until the “Welcome” screen appears
2. Press the Menu button twice until the “Setup” settings appear on the screen
3. Select the “System” option
• Press the “Down” button until “System” option is highlighted, then press OK.
4. Select the “Default Settings” option
• Press the “Down” button until “Default Settings” option is highlighted
5. Confirm “Default Setting”
• Press “OK” to confirm your PDVRCAM50W will switch back to its default settings
Page 16

BUTTONS & SETTINGS
BUTTONS
UP/ZOOM IN
The UP/ZOOM IN button is used to navigate throughout the menu and make setting selections. It
can also Zoom-In up to 2x its original distance while in video or photo mode.
(Note:Press and hold this button to enable/disable the LED sensor when recording.)
MENU/BACK
The MENU button allows access to your PDVRCAM50W menu settings. Pressing the Menu button
again will access to Setup settings. While in the Car / Sports Video mode, you may access the Car /
Sports Video and Setup settings. While in Photo mode, you may access the Photo and Setup
settings. While in Playback mode, you may access the Playback and System settings.
DOWN/ZOOM OUT
The DOWN/ZOOM OUT button is used to navigate throughout the menu and make setting
selections. It is also used to Zoom-out while in video or photo mode.
CAMERA/ Wi-Fi
The Camera/Wi-Fi button is used to start and stop manual recording while in Video mode. It is also
used to take pictures while in Photo mode. It can be used to make setting changes and select
which event to view during playback. Press and hold this button to activate the Wi-Fi connection,
Press this button (when Wi-Fi is connected) to switch off the Wi-Fi.
Page 17

PLAYBACK
The PLAYBACK button switches to the Playback screen which allows you to view the video and
photos that have been recorded. In Car/Sports/Photo Mode settings, press this button to enter
Setup Settings.
MIC/LOCK
The MIC/LOCK button is used to switch the audio record on/off (press and hold). This function also
locks the current video recording on your PDVRCAM50W. By locking the video file, it will prevent
the file from being manually deleted.
POWER / MODE
The POWER/MODE button is used to switch between Car mode, Photo and Sports mode, it also
used to manually turn the PDVRCAM50W on or off when needed(press and hold), but in most
cases the PDVRCAM50W will automatically turn itself on and off whenever the vehicle does.
SETTINGS
The PDVRCAM50W’s settings are divided into 5 categories: Car Mode, Photo Mode, Sports
Mode, Playback settings, and Setup settings.
NOTE: The “Setup” settings can be accessed from The Car Video, Photo and Sports Video
settings.
CAR MODE SETTINGS
The Video configuration menu consists of settings and options that are used to configure the
PDVRCAM50W’s video recording settings. In the Car Video mode, press the “Menu” button to
open up the Video configuration menu.
CAR MODE SETTINGS
The Video settings consist of the following configuration options.
• Resolution – Video resolution configuration.
• Video Quality – Video quality configuration.
• Loop Recording – Overwrite configuration.
• Exposure – Adjust the amount of light that will affect your image sensor.
• Motion Detection – Enables/Disables motion detection recording.
Page 18

• G-Sensor – G-force sensor configuration
• Parking Mode – Enables the “Hit and Run” protection video/photo recording function (even
when the vehicle is turned off)
• Date Stamp – Enables/Disables the date stamp on recorded events.
RESOLUTION
The PDVRCAM50W supports various video resolutions that you can select from. The higher the
resolution, the better your video quality and the bigger the video size will be.
Use the UP/DOWN keys to scroll through the options. Press the CAMERA/WI-FI button to select
your desired settings. The available options include:
• 1080HD @30fps (default)
• 720P @30fps
• 720P @60fps
VIDEO QUALITY
The PDVRCAM50W supports various video qualities that you can select from. The higher the
quality, the better your video quality will be. Use the UP/DOWN keys to scroll through the options.
Press the CAMERA/WI-FI button to select your desired settings. The available options include:
• Super Fine (default)
• Fine
• Normal
LOOP RECORDING
The loop recording option serves as two features: “Overwrite” and “Segment Length”. The
overwrite feature allows the DVR to delete previously recorded events in increments when
the SD card becomes full. The segment length feature is the length each recorded event
can be before generating a new file. Use the UP/DOWN keys to scroll through the options.
Press the CAMERA/WI-FI button to select your desired settings. The available options
include:
• Off – Disables overwrite and enables the default 24 hour segment recording.
NOTE: Setting this feature to off will create on long video which will stop recording as soon as the
file exceeds the memory cards capacity.
• 1 Minutes– Enables the DVR to record/overwrite in 1 minute increments
• 3 Minutes (default)– Enables the DVR to record/overwrite in 3 minute increments
• 5 Minutes – Enables the DVR to record/overwrite in 5 minute increments
EXPOSURE
The exposure option lets you select the numeric exposure value for your video recording. The
Page 19

exposure feature consists of the following options:
MOTION DETECTION
The motion detection option is used to enable/disable motion detection recording. While the
PDVRCAM50W is on, and the PDVRCAM50W is on standby, any movement in front of it will trigger
a recording. The Motion Detection feature consists of the following options:
• Off/Disable(default)
• On/Enable
NOTE: Make sure the “Auto Power Off” function is set to “Off” to let the PDVRCAM50W stay on
during standby mode. When motion detection is active or turned ON, the G sensing will be
deactivated. Please make sure motion detection is turned OFF for 2G and 4G sensor to function
properly.
DATE STAMP
The date stamp option is used to enable/disable the date & time stamp from being displayed on
playback videos. The date stamp feature consists of the following options:
• Off/Disable
• On/Enable (default)
G-SENSOR
The G-Sensor option is used to enable/disable the PDVRCAM50W’s G-force/impact sensor which
will lock the previous and current file from being deleted by the overwrite feature. The G-force acts
as a sensor for the PDVRCAM50W to secure any video files recorded in the event that the vehicle
gets hit. Any force that is acted upon the vehicle will result in locking the current recording video file.
NOTE: Formatting the SD card will result in erasing all of the files, including the locked video files.
The G-Sensor feature consists of the following options:
• Off/Disable
• 2G (default)- Represents 9.8m/s2 of force (passenger car turning on a corner)
• 4G- Represents 19.62m/s2 of force (bump on the road)
• 8G- Represents 39.2m/s2 of force (car collision)
(Note:The examples above are only for reference)
Page 20

PARKING MODE
Parking protection functionality offers peace-of-mind while you’re away from your vehicle from
collisions with other drivers who may bump into your vehicle and leave the scene. Any force that is
acted upon the vehicle will activate the PDVRCAM50W to switch on, record and lock the segment.
Parking Mode feature consists of the following options:
• On
• Off (default)
SETUP SETTINGS
The Setup menu configures the PDVRCAM50W’s system settings such as date and time,
language, default settings, etc. It can be accessed from the Car Mode, Photo and Sports Mode.
Press the Menu button twice to access the Setup menu.
SETUP SETTINGS
The Setup settings consist of the following configuration options. Press the Menu Button twice.
• Sound – Beep / Volume / Audio Recording configuration.
• LED Sensor – Enables/Disables the infrared night vision (LED light).
• Auto Power Off – Auto System Shut Off configuration.
• Screensaver – Backlight/screensaver duration configuration.
• Date/Time – Date and Time configuration.
• Flip Screen– Flips your screen upside-down.
• Language – Language settings.
• TV Mode – TV mode configuration
• Frequency – Light frequency configuration.
• White Balance– White balance configuration.
• Wi-Fi Password– Change Device Wi-Fi password.
• System – Include Firm Version / Default Setting / Card info configuration.
• Format– Formats your SD card.
SOUND
The Sound option includes Beeping sound / Volume adjust / Audio Recording configuration. The
Sound settings consist of the following options:
Page 21

• Beep Sound – Enables/Disables button sound, press “OK” to switch.
• Volume – Volume up or down (of the beeping sound); press “OK” to switch.
• Audio Recording – Enable / disable the audio recording along with video recording.
NOTE: Some states prohibit the use of audio recording. Please make sure you contact your local
law enforcement agency if you are unclear on your Country or state’s laws and guidelines.
LED SENSOR
The LED Sensor enables/disables the LED night vision sensor, to control the LED light on/off.
• On
• Off(default)
AUTO POWER OFF
The auto power off option is an auto shut-down feature, which, after a set time frame of inactivity
(not recording) or standby, the PDVRCAM50W shuts off. The auto power off feature consists of the
following options:
• Off (default)
• 1 Minute
• 3 Minutes
• 5 Minutes
SCREENSAVER
The backlight option controls the time you want your screen to stay on before the screen turns off
during video recording. For safety purposes, it is recommended for the screen on the
PDVRCAM50W is not on while the vehicle is in motion. The backlight feature consists of the
following option:
• Off
• 1 Minute (default)
• 3 Minute
• 5 Minutes
DATE/TIME
The Date and Time option is used to set and configure the PDVRCAM50W’s current date and
time format. The button configurations are listed and described below:
• UP/DOWN – Use these to scroll through each selection
• POWER/MODE – This button scrolls through the date and time (i.e. Month to Day to Year, etc.)
• CAMERA/WI-FI – Press this button to accept and save your date/time.
Page 22

FLIP SCREEN
The image rotation flips the screen, vertically. This provides the option of having the
PDVRCAM50W mounted upside down. The image rotation setting feature consists of the following
options:
• Off (default)
• On – Selecting this option flips the screen
LANGUAGE
The language option lets you change the language of the PDVRCAM50W. The language feature
consists of the following options:
• English (default)
• French
• Spanish
• Italian
• Chinese
• Russian
• Japanese
FREQUENCY
The frequency option switches between the two most commonly used refresh rates “60Hz” and
“50Hz”. By default the PDVRCAM50Wis set to 60Hz which is standard for United Sates and
Japan. The frequency feature consists of the following options:
•50Hz – Standard for Europe and China.
•60Hz (default) – Standard for United Sates and Japan.
WHITE BALANCE
The white balance option lets you remove unrealistic color casts, so that objects which appear
white in person are rendered white in your photo. The white balance feature consists of the
following options:
• Auto (default)
• Daylight
• Cloudy
• Tungsten
• Fluorescent
Page 23

Wi-Fi Password
The Wi-Fi Password option is used to set and configure the PDVRCAM50W’s current Wi-Fi
password.
• UP/DOWN – Use these to scroll through from “1” to “10” or “a” to “z”.
• POWER/MODE – This button scrolls through from the previous to next.
• CAMERA/WI-FI – Press this button to accept and save your new Wi-Fi password.
SYSTEM
This option includes Firm Version / Default Setting / Card info configuration.
• Default Settings - The default setting option is used apply the PDVRCAM50W’s manufacturer
default settings.
• Firm Version - The version option is used to view the PDVRCAM50W’s firmware.
• Card info - The Card info option is used to view the information of the Memory card.
Update firmware:
1) To update your PDVRCAM50W’s firmware, make sure you have the firmware file downloaded
and
copied into the root of the micro SD card (on your PC).
2) Insert the micro SD card into your PDVRCAM50W device.
3) Turn on the PDVRCAM50W. The power light will turn on and the screen will remain black.
4) Wait for the firmware to install into the PDVRCAM50W
5) Once complete, the PDVRCAM50W screen will display its welcome screen
6) To check if the firmware has been updated, go into the Setup Settings menu and check the
“Version” number
NOTE: Please remember to remove the firmware file from your micro SD card to prevent the
firmware from flashing every time you restart your PDVRCAM50W device.
FORMAT
The format setting option is used to erase all files inside your SD card, including protected files. The
format feature consists of the following options:
• Cancel
• Ok
Page 24

PHOTO MODE SETTINGS
The Camera configures the PDVRCAM50W’s photo snapshot settings. In the Photo mode, press
the “Menu” button to open up the Camera configuration menu.
PHOTO MODE SETTINGS
The Camera settings consist of the following configuration options.
• Resolution – Photo resolution configuration.
• Quality – Picture quality configuration.
• Capture Mode – Used to configure single or timed snapshots.
• Burst Mode – Burst mode option.
• Date Stamp - Enables/Disables date stamp on recorded events.
• Sharpness – Image sharpness configuration.
• Exposure – Image exposure adjustment.
RESOLUTION
The PDVRCAM50W supports various “Mega Pixel” resolutions that you can select from. The
resolution feature consists of the following options:
• 10MP
• 8MP
• 6MP
• 3MP (default)
QUALITY
The PDVRCAM50W supports various picture qualities that you can select from. The higher the
quality, the better your video quality will be.
Use the UP/DOWN keys to scroll through the options. Press the CAMERA/WI-FI button to select
your desired settings. The available options include:
• Super Fine (default)
• Fine
• Normal
Page 25

CAPTURE MODE
The capture mode option lets you configure how the PDVRCAM50W will operate every time the
snap shot button is pressed. For example, you can set it to take an instant snap shot every time or
you can implement a timer delay which will automatically take a snap shot when the set time has
expired. The capture mode feature consists of the following options:
• Single (default)
• 2S Timer
• 5S Timer
• 10S Timer
BURST MODE
The burst mode option lets you enable the “multiple shot” option. When you take a snapshot, it will
take multiple shots in a single take; up to 5 pictures. The burst mode feature consists of the
following options:
• Off (default)
• 5 pictures
DATE STAMP
The date stamp option lets you enable or disable the time stamp from being displayed on all the
photos. The date stamp feature consists of the following options:
• Off
• On (default)
SHARPNESS
The sharpness option lets you select the image sharpness of the photos being taken. They make
edges appear more defined by darkening the darker pixels and brightening the brighter pixels. The
sharpness feature consists of the following options:
• Strong
• Normal (default)
• Soft
EXPOSURE
The exposure option lets you select the numeric exposure value for your snap shots. The exposure
feature consists of the following options:
Page 26

SPORTS MODE SETTINGS
SPORTS MODE SETTINGS
The Video settings consist of the following configuration options:
• Resolution – Video resolution configuration.
• Video Quality – Video quality configuration.
• Exposure – Adjust the amount of light that will affect your image sensor.
• Anti-Shaking – Enables/Disables anti-shaking configuration.
• Date Stamp – Enables/Disables date stamp on recorded events.
RESOLUTION
The PDVRCAM50W supports various video resolutions that you can select from. The higher the
resolution, the better your video quality and the bigger the video size will be.
Use the UP/DOWN keys to scroll through the options. Press the CAMERA/WI-FI button to select
your desired settings. The available options include:
• 1080HD @30 fps (default)
• 720P @30 fps
• 720P @60 fps
VIDEO QUALITY
The PDVRCAM50W supports various video qualities that you can select from. The higher the
quality, the better your video quality will be. Use the UP/DOWN keys to scroll through the options.
Press the CAMERA/WI-FI button to select your desired settings. The available options include:
• Super Fine (default)
• Fine
• Normal
Page 27

EXPOSURE
The exposure option lets you select the numeric exposure value for your video recording. The exposure feature
consists of the following options:
Anti-shaking
The Anti-shake enables/disables the anti-shake function in Sports mode.
• On (default)
• Off
DATE STAMP
The date stamp option is used to enable/disable the date & time stamp from being displayed on
playback videos. The date stamp feature consists of the following options:
• Off/Disable
• On/Enable (default)
PLAYBACK SETTINGS
The Playback settings menu provides actions for video clips or photos that have been recorded in
the PDVRCAM50W. In the Playback mode, you can press “OK” button to play/pause and press the
“Menu” button twice to open up the Playback configuration menu.
PLAYBACK SETTINGS
The Playback settings consist of the following configuration options.
• Delete – Delete video/photo files
• Protect – Protect video/photo files
DELETE
This option allows you to delete video or photo files in your SD card. You may choose to delete one
file at a time or delete all simultaneously. The available options include:
• Delete Current – Delete selected video/photo
• Delete All – Delete all videos and photos in the PDVRCAM50W
NOTE: Any protected files will not be deleted if “Delete All” is selected
Page 28

PROTECT
The Protect option helps prevent any video files or photo files from being deleted. When selecting
“Delete All”, the protected file will not be erased.
NOTE: When “Formatting” the SD card, protected files will also be erased.
The available options include:
• Lock / Unlock Current – Protects the selected file. If the file is already protected, selecting this
option will unprotect the file.
• Lock All – Locks all files on the SD card.
• Unlock All – Unlocks all files on the SD card.
PLAYING BACK VIDEOS
You can play back recorded events using two methods; directly from the PDVRCAM50W or on a
computer.
PDVRCAM50W
To play back events directly from the PDVRCAM50W navigate to the playback screen using the
Playback button. You can use the following buttons to play back and delete the recorded events:
NOTE: Traffic lights may flash during playback.
Page 29

COMPUTER
To playback recorded video on a PC or Mac:
1. Remove the Micro-SD card from the camera by gently pushing on the SD card allowing it to pop
out from its slot.
2. Insert the Micro-SD card into a Micro-SD card reader (not included) connected to your PC (your
PC should load the SD card as a new Removable Drive).
3. When prompted, select the “Open folder to view files” option to view its contents (you should
see folders labeled “LOCK”,”JPG”,”VIDEO”,”SPORT”).
4. Open the LOCK folder to view a list of all the recorded video locked by G-force.
5. Open the JPG folder to view a list of all the Pictures.
6. Open the VIDEO folder to view a list of all the recorded video in Car mode.
7. Open the SPORT folder to view a list of all the recorded video in Sports mode.
8. Once inside the folder you can double-click any of the recorded MOV or JPG files to open them
up in your default media player.
Page 30
Wi-Fi Control
Download App
Download the free Wi-Fi viewer app from iOS App Store or Android Apps on Google Play
• Download the App named “iSmart DV”
Instantly Preview the captured pictures or video on your iPhone, Android, or Tablets
Free to download – requires iOS 6.0 or later, and Android 2.2 or later
Ensure that you have a proper memory card installed to the camera prior to using the app
(must be compatible with your PDVRCAM50W)
Turn on the Wi-Fi on your device
1. Turn on your PDVRCAM50W
• Press and hold the Power button until the “Welcome” screen appears
2. Turn on your Wi-Fi
• Press and hold the CAMERA/WI-FI button until the “ Waiting for Wi-Fi connection..” screen
appears.
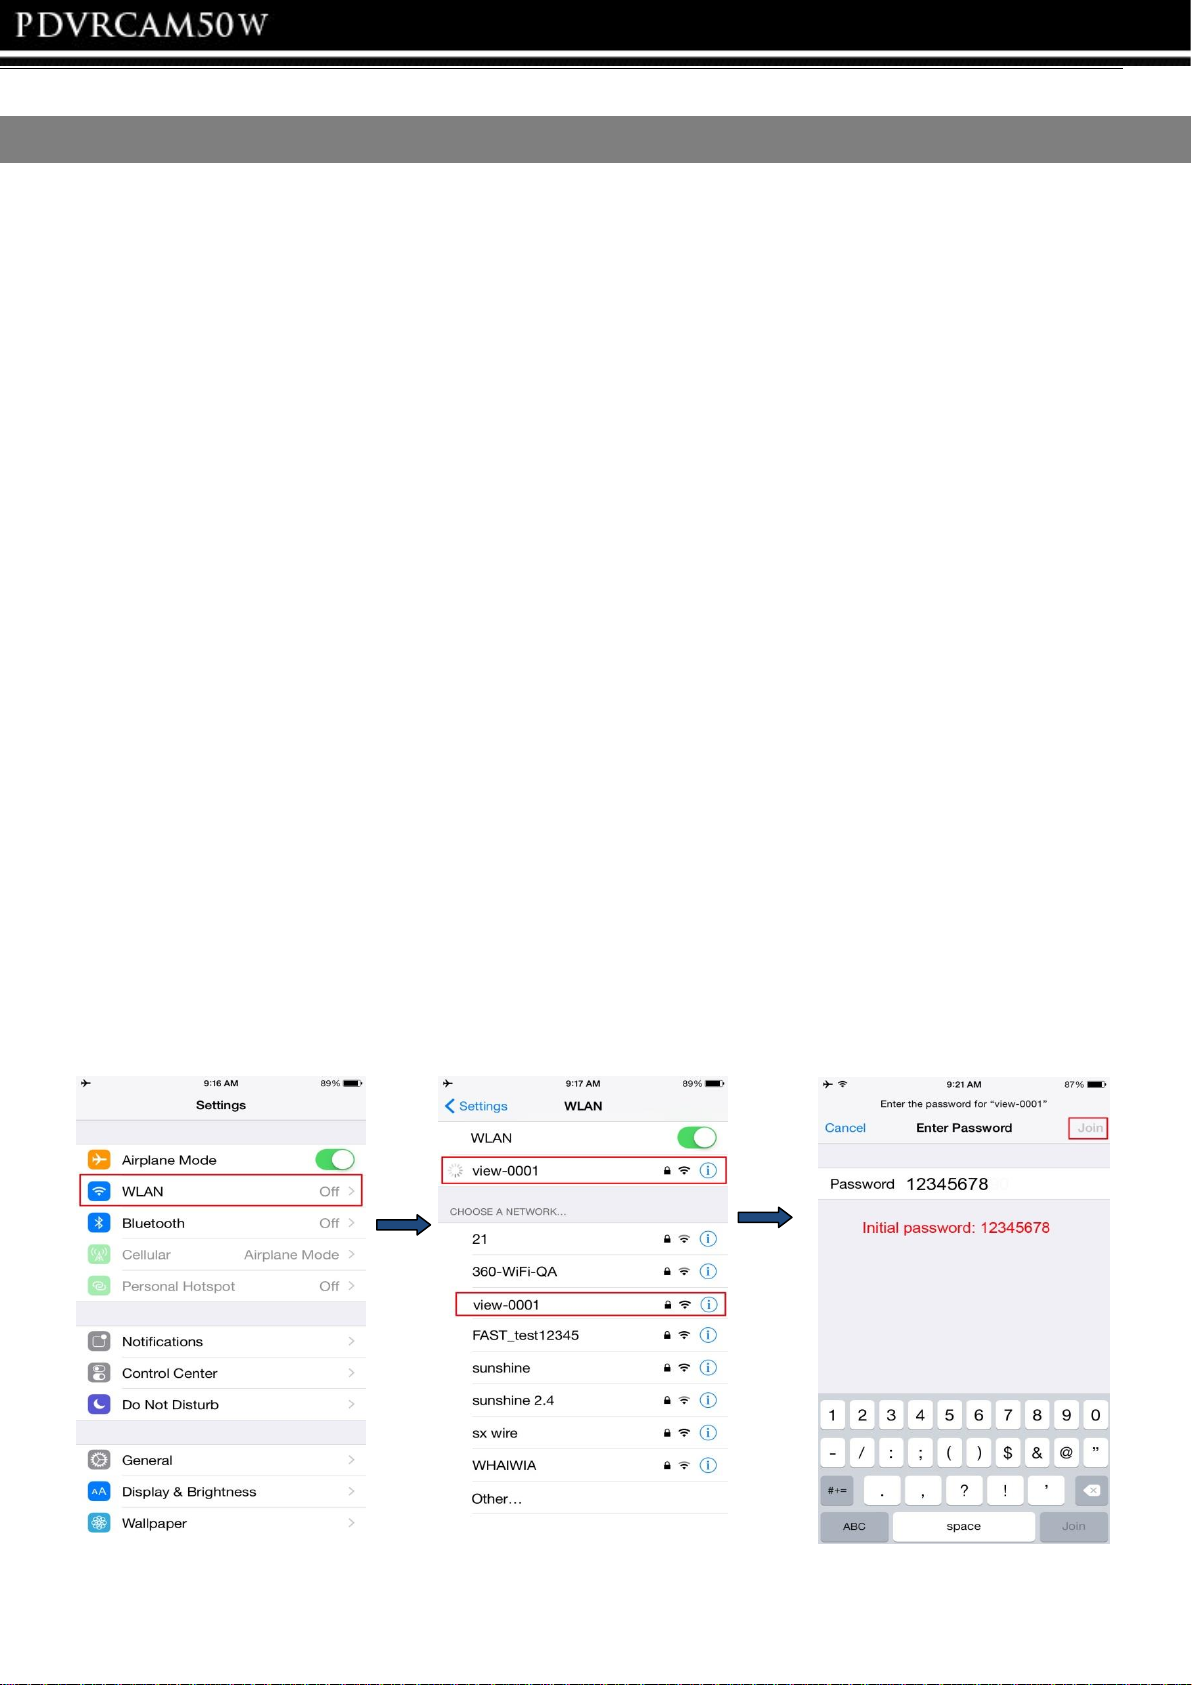
Connect the device Wi-Fi/Bluetooth
1. Enter the Settings of your smartphone
• Turn the Wi-Fi/Bluetooth on
• Find the Wi-Fi/Bluetooth network named “Pyle Audio” and select it.
2. Connect the Wi-Fi
• Type in the initial password “12345678” and you will be connected
• “ Wi-Fi connection is ready..” screen will appear on your PDVRCAM50W.
Page 31

Application
1. Record
• Choose the Camcorder icon at lower right corner to switch to Video Recording mode.
• Choose the Camera icon at lower right corner to switch to Photo Capturing mode.
• Press the small red spot in the middle of the screen bottom to REC.
2. Download / Delete files
• Press the icon at lower left corner to enter files browser and download / delete the files.
3. Change Settings
• Press the Settings icon at upper right corner to enter device settings.
• Press the Resolution / AWB / Timer icon in the middle of the screen to change the settings.
Page 32

Specifications
LCD Size
1.5” TFT LCD
Image Sensor
Digital HD Full Color CMOS
Viewing angle
170°A+ grade high-resolution ultra-wide-angle
Language for options
English/French/Spanish/Italian/Traditional Chinese/ Simplified
Chinese/Japanese/Russian
Video resolution
1080P 1920*1080 @ 30fps, 720P 1280*720 @ 30fps,
720P 1280*720 @ 60fps
Video/Photo formats
MOV / JPEG
Recording video format
M-JPEG
Photo pixels
3M/6M/8M/10M Pixels
SD slot
Micro SD card (supports up to 32GB, class 4 or above)
Overwrite
Yes
Wi-Fi
Yes, Built-in
Microphone
Built-in (Menu: On/Off)
Speaker
Built-in
Recording frame rate
30fps/60fps
Video recording mode
*Auto record when the ignition is turned on and stop when engine is turned
off (with car cigarette lighter cable is connected)
*Manual record by pressing REC button
*Video Motion Detection record
Shooting mode (photo)
Single, 2s timer, 5s timer, 10s timer,
Frequency
60Hz/50Hz
TV standard
NTSC/PAL
USB port
USB 2.0
PC mode (via USB)
Mass Storage or PC Camera
Power supply
Input: DC12V-24V, Output: 5VDC / 1.0A
Rechargeable battery
3.7V / 700 mAh (Charging time: 120-Minutes. Recording time: 90-Minutes.
Standby Time: 120-Minutes)
Camera size (L*W*H)
2.9”x1.5”x1.6”(without bracket and waterproof case)
Operating temperature
-10°C to 50°C (14°F~122°F)
Non-Operating temperature
-20°C to 65°C (-4°F~149°F)
Operating humidity
≤85% RH
If you encounter any difficulty in the operation of this product after reading the manual, please feel
free to contact the reseller. We will be happy to answer your questions and help you in any way we
can.
 Loading...