

Page 1
PCMX265W
PORTABLE SOUND SYSTEM FOR USB AND SD CARD
USER'S MANUAL
www.PyleAudio.com
Page 2
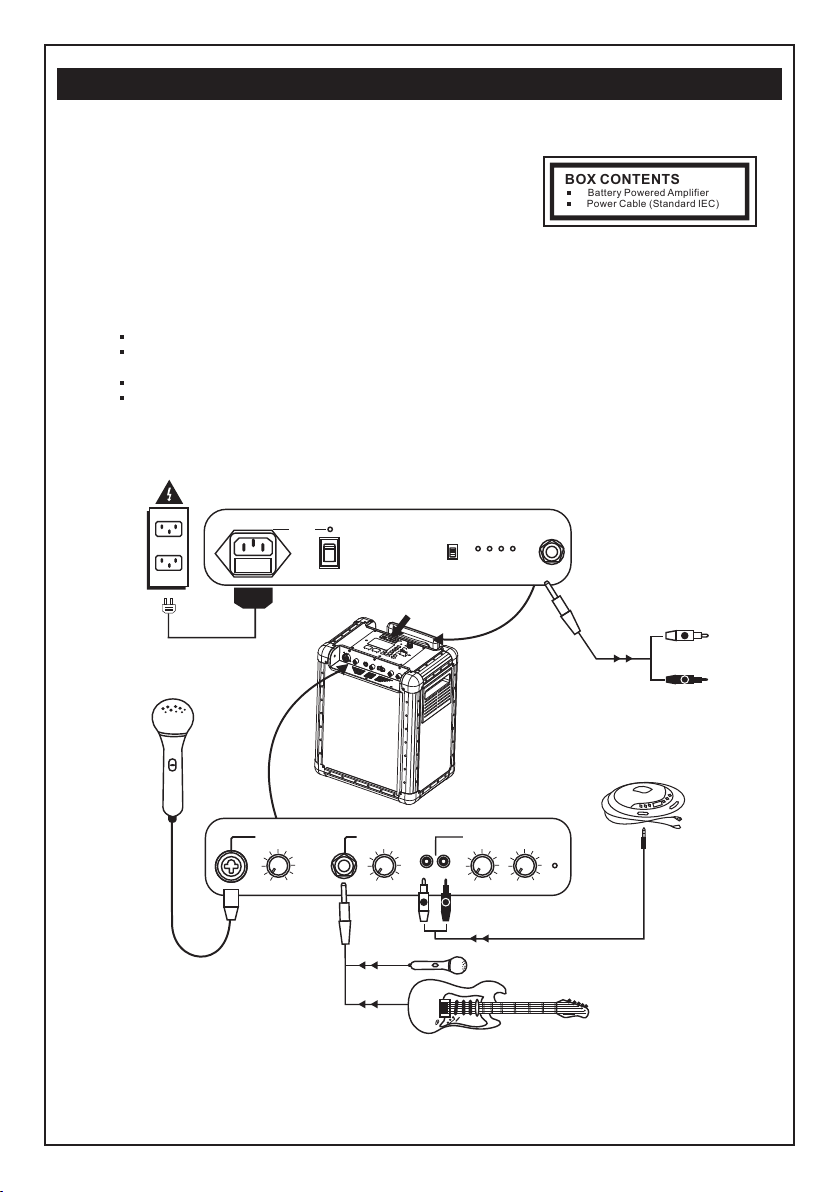
QUICK SETUP GUIDE
1. Make sure al l it em s li st ed on the front of th is g ui de a re i ncluded in th e bo x.
2. READ SAFET Y IN STRUCTION BOO KL ET B EF OR E USING
THE PRODUCT.
3. MAKE SURE TH AT YOU HAVE C OM PL ETELY CHARGED
THE BATT ERY PRI OR TO FIRST U SE F OR M AX IM UM
BATT ERY LIF E.
4. Study this s et up d ia gr am.
5. Place prod uc t in a n ap pr opriate posit io n fo r op er ation.
6. Make sure al l in pu t de vi ces such as micro ph on es ,C D players, mp3 pl ay er s, a nd l inked ampli fi er s/
PAs ar e tu rn ed o ff and volu me s et ti ng s are set at "zer o"
7. Connect al l de vi ce s as s hown above.
8. Connect th e st er eo o ut puts to the power a mp li fi er (s), tape dec ks , an d/ or a ud io sources.
9. Switch eve ry th in g on i n the following o rd er.
audio input s ou rc es ( i .e . microphones , in st ru me nts, CD/MP3 P la ye rs )
last, any amp li fi er s
10.
When turnin g of f, always rever se t hi s op er ation by.
turming off a mp lifiers
last, any inp ut d ev ic es
BOX CONTENTS
Batter y Power ed Ampli fier
Power Ca ble (Standa rd IEC)
AC FUSE INPU T RANG E
MIC 1 BAL ANCED
CHARG E
110-T750mAL 250 V
100-120V-60 Hz 20W
230-T315mA L 250V
220-240V-50 Hz 20W
SOUND S YSTEM
USB/S D
ON
OFF
BATTERY LE VEL
ON
LOW 1 2 3
OFF
LINK
OUTPU T
USB /SD
L
R
To RCA inp ut on add ition al
(Ca ble sol d separ ately )
INSTR UMENT /MIC 2
GAIN
GAIN
USB/S D/AUX
MASTE R
GAIN
VOLUM E
LEFT
RIGHT
L
R
POWER
(Ca ble sol d separ ately )
OR
Page 3

FEATURES
Microphon e 1 ba la nc ed i nput with gain co nt ro l.
Instrumen t/ Mi cr op hone 2 input with g ai n co nt ro l.
Auxuliary i np ut w it h ga in control (ste re o RC A) .
Master Volum e Co nt ro l.
Voltage Sele ct or.
Link Output j ac k
Produce siz e: 34 9x 45 8x273mm(wxh xd )
DIAGRAM AND PARTS DE SCRIP TION
DISPLAY PANEL:
12 13
USB SD
1 2 4
14 15 1617 21
3 8
IN
5
USB SD
USB/ SD
Sing le
Repe at
Time
Reve rse
OUT
Loo p
6
18 19 2011
Push
Track /Fold er
Sear ch
Pitc h
Relo op
7
9
10
Page 4

1.
CUE: To define and record a return point from which playback it again.
PLAY/PAUSE: Each time you press the PLAY/PAUSE button, the operation changes from play to pause or from
2.
pause to play.
3.
RE VE RS E: P us h th e re ve rs e bu tt on t o pl ay your track in reverse, p us h th e re ve rs e bu tt on a ga in t o
ca nc el t hi s fe at ur e.
4.
SKIP I< < BU TTON: Use thi s sw it ch t o re start the tra ck o r to s el ec t th e last track.
5.
IN BUTTON (LOOP SYSTEM): This button sets the beginning point of the loop and light is illuminate.
6.
OUT BUTTON (LOOP BUTTON): When you press this button, you set the end point of the seamless loop
and you start the loop. To finish the loop, press again this button.
7.
RELOOP BUTTON (LOOP SYSTEM): This button is used to start the last saved loop. To finish the loop,
press the reloop button.
8.
SKIP >> I BU TTON: Use thi s kn ob t o se le ct the next tra ck .
ID3: When you pressing the ID3 button, Able to show the name of songs on led display.
9.
PITCH CONTROL: Use this fader to increase or decrease the speed of the track. Slide up to decrease the
10.
pitch and slide down to increase the pitch.
11.
DISPLAY: LCD Display ln di ca te t he Tr ack/Numbers /Time/R em ai n/ Pi tch/Conti nu e/ Si ng le .
USB PORT: Allows the connection of any USB memory stick.
12.
SD C ARD S LO T: Sl ot f o r in ser ti ng SD c ard . Th e con ta ct s o f th e c ar d mus t po int d ownwa rd s. Th e
13.
unit cannot r ea d ca rd s wi th a capacity of mo re t ha n 4G B. The unit i s no t co mp at ible to SDHC ca rd s
and only.
TIME BUTTON: Used this knob to choose the time mode, Elapsed time, remaining time or total remaining
14.
time.
REPEAT BUTTON: Use this button to repeat one track or all the track of the CD.
15.
16.
SING LE: Press these to switch betw een the SINGLE and CONT INUE play mode. The selected mode is
ind ica ted on the LCD. In SI NGL E mode, aft er ea ch track, the unit stops th e reading. In CO NTI NUO US
mode, the unit read all track and stops.
17.
USB/SD: To select audio source between USB storage and SD card.
18.
PITCH BEND - BUTTON: The pitch will drop while the - button is pressed and return to the original pitch when it
is released.
PITCH BEND + BUTTON: The pitch will automatic ally rise when the + button is pressed and return to the original
19.
pitch when it is released.
PITCH BUTTON: If you this button, the adjustement of the pitch potentiometer is available.
20.
FOLDER/TRACK SEARCH: Allows you to navigate through folders or tracks similarly in either USB or CD mode.
21.
When navigating a standard CD turn the rotary to the right to advance the selection or turn the rotary to the left to
decrease the selection.
Page 5

CONTROL PANEL:
MIC 1 B ALANC ED
GAI N
ACT IVE SPE AKER WI TH USB PL AYER H T-3053 0
INS TRUME NT/MI C 2
GAI N
LEFT
AUX
RIGH T
USB /SD/A UX
GAI N
MAS TER
VOL UME
POW ER
22 23 24 25
MICROPHON E 1 BALANCED INPUT WITH GAIN CONTROL(1 /4” AND XLR ):This jack can either take a 1/4”
22.
balance d or a XLR balance d cable. An XLR Cable is included with the micro phone.
23.
INSTRUMENT/MICROPHONE 2 INPUT WITH GAIN CONTROL(1/4”): This mono input accepts a 1/4” input such
as a microphone, guitar, or other musical instrument.
USB / S D /AU X U LIAR Y I N PUT WIT H GA I N C O NTR OL ( STE REOR C A ) : T his kno b co n tro ls t h e
24.
lev el o f the U SB/ SD a n d th e RC A i n p ut. T his s tere o RC A i n p u t c a n b e use d to con ne ct a C D,
MP3 , or ot her a u dio s ourc e . To con nect t o a po rtab le d e v i ce w i th a 1 / 8 ” h e a d phon e ja c k , y o u
ne e d a s t and ard (1 / 8” to RC A ) a dap t er wh i ch is NOT i n clu d ed .
MASTER VOLUME CONTROL: This knob controls the master volume of the.
25.
POWER PANEL:
AC FUS E INPUT R ANGE
CHA RGE
110-T75 0mAL 25 0V
100-12 0V-60H z 20W
230-T3 15mAL 25 0V
220-24 0V-50H z 20W
OFF
ON
USB /SD
LOW 1 2 3
ON
OFF
ATAKA SO UND Gmb H, MAIN Z GER MANY WWW. ATAKASO UND.D E
115V 230 V
SOU ND SYST EM
BATTE RY LEVEL
OUT PUT
MADE IN CH INA
LIN K
26
POWER ADAPTER(IEC ): Inse rt the includ ed power cable here to charge the unit. Note that the can run off the
26.
power adapter while it simultan eously charges the battery. The charg e indicato r illuminates when the battery is
charging.
27.
VOITAGE SELECTOR: Set this to the correct voltage for your location standard.
28.
POWER ON/OFF SWITCH
USB/SD CHARGING SWITCH
29.
BATTERY LEVEL INDICATOR: While the uni t is power ed ON, these four light s indi cate the power left in the
30.
battery. Battery life varies based on volume and usage.
LINK OUTPUT: This 1/4” jack is a stereo line level output that can be connected to the stereo input of an amplifier
31.
or amplified loudspeaker such as another.
27
28
29
30 31
Page 6

IMPORTANT NOTES
Use this trou bl es ho ot ing guide if: The s ou nd i s di st orted at high v ol um es .
Input i s clippin g: Try low er ing the inp ut gain or th e volum e co ntrol on yo ur sound so urce or mus ic
instrumen t.
Output is cli pp in g: L ow er the main vol um e le ve l.
Th er e is to o much ba ss : Tr y ad ju sti ng t he to ne o r EQ co nt ro l on yo ur s oun d so urc e to l ower th e
bass level. t hi s wi ll a ll ow you to play the mu si c lo ud er b efore clippin g (d is to rt ion) occurs .
The link cabl e: i s be in g pl ugged into the in st ru me nt o r MIC input ins te ad o f th e RC A lin e input.
Im por ta n t: Wi th al l lar ge sp eak er s , in i ti al "b rea k-i n" pe rio d is ne ede d to pe r fo rm at op ti mal l e ve ls.
To properly "br ea k- in " yo ur, play an audio so ur ce a t me di um volume for a few h ou rs .
SPECIFICATIONS
Input Volt ag e: AC 1 00-120V/ 60Hz 2 20 -2 40 V/ 5 0Hz
Output Wattage: (Pea k) 4 00 W
Output Wattage: (RMS ) 40 0W, 1 %T HD
Frequency R es po ns e: 7 0Hz~ 50kHz +/- 3d B
Bottom pole m ou nt s pe ci fications : St an da rd P ole Mount found a t pr of es si onal audio reta il er :
Depth 80m m (3 .1 5” )
Diamete r 35 .5 mm ( 1. 40 ”)
Tim e re qu ir ed t o fully charge th e: u nd er 4 h ou rs
Battery lif e: O ve r 12 h ou rs* at full volum e of f ul l vo lu me of the when fu ll y ch ar ge d.
“Note: Batt er y li fe m ay v ary based on temp er at ur e, a ge, and volum e us ag e of p ro du ct.
 Loading...