

Page 1

HDD & DVD Player / Recorder
DVDR5520H / DVDR5570H
User Manual
Read your Quick Start Guide and/or User Manual rst for quick tips
that make using your Philips product more enjoyable.
Register your product and get support
at www.philips.com/welcome
This product comes with
Home Service
Refer to the inside page for details.
Premium
Page 2

Premium Home Service
English
United Kingdom, Ireland
Dear valued customer,
hank you for buying a Philips DVD Recorder.
T
Your product comes with the Philips ‘Premium Home Ser vice’ warranty.
Should you require any assistance in operating your set, Philips offers you professional suppor t via:
Philips Support Center website
www.philips.com/support
or
Philips Consumer Care Helpline
where our trained representatives will guide you, step-by-step, to solve any issues you have.
If we are unable to provide a solution, Philips will be pleased to pick-up your DVD Recorder from your home; and provide
a service replacement set, within 7 days. That’s the Philips ‘Premium Home Service’ commitment to you. This service comes
free-of-charge (except for Consumer Care Helpline) and applies to all Philips DVD Recorders du ring the Ph ilips warranty
period.
For more information, please contact a representative via the Philips Consumer Care Helpline.
* Refer to the back page of this manual for the Philips Customer Care phone number in your country.
Please have with you the model number, serial number and purchase date of your product when contacting Philips Customer Care..
*
2
Page 3
Italia
DICHIARAZIONE DI CONFORMITA’
Si dichiara che l’apparecchio DVDR5520H,
DVDR5570H, Philips risponde alle prescrizioni
dell’art. 2 comma 1 del D.M. 28 Agosto 1995 n.
548.
Fatto a Eindhoven
SHOWVIEW® is a registered trademark of
Gemstar Development Corporation. The
SHOWVIEW® system is manufactured under
license from Gemstar Development
Corporation.
English
Philips Consumer Electronics
Philips, Glaslaan 2
5616 JB Eindhoven, The Netherlands
Norge
Typeskilt nnes på apparatens underside.
Observer: Nettbryteren er sekundert
innkoplet. Den innebygde netdelen er
derfor ikke frakoplet nettet så lenge
apparatet er tilsluttet nettkontakten.
For å redusere faren for brann eller elektrisk
støt, skal apparatet ikke utsettes for regn eller
fuktighet.
LASER
Type Semiconductor laser
InGaAlP (DVD)
AIGaAs (CD)
Wave length 658 nm (DVD)
90 nm (CD)
Output Power 30 mW (DVD+RW write)
1.0 mW (DVD read)
1.0 mW (CD read)
Beam divergence 84 degrees (DVD)
61 degrees (CD)
Manufactured under license from Dolby
Laboratories. “Dolby”, “Pro-Logic” and the
double-D symbol are trademarks of Dolby
Laboratories.
DivX Ultra Certi ed products: “DivX,
DivX Ultra Certi ed, and associated
logos are trademarks of DivX, Inc. and
are used under license.
HDMI, and HDMI logo and High-De nition
Multimedia Interface are trademarks or
registered trademarks of HDMI licensing
LLC.
For Customer Use:
Read carefully the information located at
the bottom or rear of your DVD
Recorder and enter below the Serial No.
Retain this information for future
reference.
Model No. DVD/HDD RECORDER
DVDR5520H, DVDR5570H
Serial No. _______________
Trade mark of the DVB Digital Video
Broadcasting Project (1991 to 1996)
3
Page 4
DK
English
Advarsel: Usynlig laserstråling ved åbning
når sikkerhedsafbrydere er ude af funktion.
Undgå utsættelse for stråling.
Bemærk: Netafbryderen er sekundært
indkoblet og ofbryder ikke strømmen fra
nettet. Den indbyggede netdel er derfor
tilsluttet til lysnettet så længe netstikket
sidder i stikkontakten.
S
Klass 1 laseraparat
Varning! Om apparaten används på annat
sätt än i denna bruksanvisning speci cerats,
kan användaren utsättas för osynlig
laserstrålning, som överskrider gränsen för
laserklass 1.
Observera! Stömbrytaren är sekundärt
kopplad och bryter inte strömmen från
nätet. Den inbyggda nätdelen är därför
ansluten till elnätet så länge stickproppen
sitter i vägguttaget.
SF
Luokan 1 laserlaite
Varoitus! Laitteen käyttäminen muulla kuin
tässä käyttöohjeessa mainitulla tavalla
saattaa altistaa käyttäjän
turvallisuusluokan 1 ylittävälle
näkymättömälle lasersäteilylle.
Oikeus muutoksiin varataan. Laite ei saa
olla alttiina tippu-ja roiskevedelle.
Huom. Toiminnanvalitsin on kytketty
toisiopuolelle, eikä se kytke laitetta irti
sähköverkosta. Sisäänrakennettu verkko-osa
on kytkettynä sähköverkkoon aina silloin,
kun pistoke on pistorasiassa.
CAUTION
VISIBLE AND INVISIBLE LASER
RADIATION WHEN OPEN. AVOID
EXPOSURE TO BEAM
ADVARSEL
SYNLIG OG USYNLIG LASERSTRÅLING
VED ÅBNING UNDGÅ UDSÆTTELSE
FOR STRÅLING
VARNING
SYNLIG OCH OSYNLIG
LASERSTRÅLNING NÄR DENNA DEL ÄR
ÖPPNAD BETRAKTA EJ STRÅLEN
VARO!
AVATTAESSA OLET ALTTIINA
NÄKYVÄLLE JA NÄKYMÄTTÖMÄLLE
LASER SÄTEILYLLE. ÄLÄ KATSO
SÄTEESEEN
VORSICHT
SICHTBARE UND UNSICHTBARE
LASERSTRAHLUNG WENN
ABDECKUNG GEÖFFNET NICHT DEM
STRAHL AUSSETZEN
ATTENTION
RAYONNEMENT LASER VISIBLE ET
INVISIBLE EN CAS D’OUVERTURE
EXPOSITION DANGEREUSE AU
FAISCEAU
Disposal of your old product
Your product is designed and manufactured with high quality materials
and components, which can be recycled and reused.
When this crossed-out wheeled bin symbol is attached to a product it
means the product is covered by the European Directive 2002/96/EC.
Please inform yourself about the local separate collection system for
electrical and electronic products.
Please act according to your local rules and do not dispose of your old products with
your normal household waste. The correct disposal of your old product will help
prevent potential negative consequences for the environment and human health.
4
Page 5
‘CONSUMERS SHOULD NOTE THAT NOT ALL HIGH
DEFINITION TELEVISION SETS ARE FULLY
COMPATIBLE WITH THIS PRODUCT AND MAY C AUSE
ARTIFACTS TO BE DISPLAYED IN THE PICTURE. IN
CASE OF 525 OR 625 PROGRESSIVE SCAN PICTURE
PROBLEMS, IT IS RECOMMENDED THAT THE USER
SWITCH THE CONNECTION TO THE ‘STANDARD
DEFINITION’ OUTPUT. IF THERE ARE QUESTIONS
REGARDING OUR TV SET COMPATIBILITY WITH THIS
MODEL 525p AND 625p DVD PLAYER, PLEASE
CONTACT OUR CUSTOMER SERVICE CENTER.’
This product incorporates copyright protection technology that is protected by US
patents. Use of this copyright protection
technology must be authorised by Macrovision, and is intended for home and other
limited viewing uses only unless otherwise
authorised by Macrovision. Reverse
engineering or disassembly is prohibited.
U.S. Patent Number 4,631,603; 4,819,098;
4,907,093; 5,315,448; and 6,516,132
This product complies with the radio
interference requirements of the
European Community.
This product complies with
the requirements of the
following directives and
guidelines: 2006/95/EC +
2004/108/EC
English
CAUTION!
This unit does not contain any userserviceable parts. Please leave all
maintenance work to quali ed
personnel.
5
Page 6

Table of Contents
English
General
Care and Safety Information .......................................................................................... 8
Setup precautions ................................................................................................................................................. 8
Cleaning discs ........................................................................................................................................................8
Hard Disk Drive (HDD) handling care...........................................................................................................8
Energy saving message ........................................................................................................................................8
Product Information ....................................................................................................... 9
Intro duct ion ...........................................................................................................................................................9
Accessories supplied ...........................................................................................................................................9
Region codes ..........................................................................................................................................................9
Special features ............................................................................................................................................10~11
Product Overview
Remote Control ........................................................................................................ 12~14
Using the remote control ................................................................................................................................14
Main Unit ......................................................................................................................... 15
Connections & Setup
Step 1: Basic Recorder Connections ......................................................................16~20
Connecting the antenna cables ................................................................................................................16-17
Connecting the video/audio cables ....................................................................................................... 18~20
Step 2: Optional Connections .................................................................................21~25
Connecting to a Cable Box or Satellite Receiver .....................................................................................21
Connecting to a VCR or other similar device ........................................................................................... 22
Connecting to a VCR and Cable Box/Satellite Receiver .........................................................................23
Connecting to an AV ampli er/receiver ......................................................................................................24
Connecting to digital input .............................................................................................................................24
Connecting to a camcorder ........................................................................................................................... 25
Step 3: Installation and Set-up ................................................................................26~27
Watch T V
Control TV Programmes ....................................................................................... 28~30
Viewing live TV................................................................................................................................................... 28
About Time Shift buffer - temporary HDD storage .......................................................................28~29
Pause live TV function ...................................................................................................................................... 30
Instant replay function ..................................................................................................................................... 30
FlexTime function .............................................................................................................................................. 30
Watching digital TV broadcast ......................................................................................................................30
Using the toolbar options ................................................................................................................................31
Main Menu
Using the Home menu .............................................................................................32~33
About the Home menu .....................................................................................................................................32
Viewing media information ..............................................................................................................................33
Recording
Before Recording ......................................................................................................34~37
Recording media ................................................................................................................................................ 34
Default recording settings .......................................................................................................................35~37
Record TV Programmes ......................................................................................... 38~44
Record current TV programme .................................................................................................................... 38
Record a speci c section of TV programmes .......................................................................................... 38
Simultaneous record and play function ........................................................................................................39
Automatic recording from Satellite Receiver ............................................................................................ 40
About timer recording ......................................................................................................................................41
Timer recording (ShowView system) ................................................................................................... 41~42
Timer recording (manually) .....................................................................................................................42~43
Changing/Deleting a scheduled recording .................................................................................................. 44
Record from external devices ................................................................................ 45~ 47
Recording from an external device (Camcorder/VCR/DVD player) .................................................. 45
Recording from a DV Camcorder .........................................................................................................46~47
6
Page 7

Table of Contents
Copy TV programmes from HDD......................................................................... 48~ 49
About copying ....................................................................................................................................................48
Copying recordings to recordable DVD..................................................................................................... 48
Changing the screen display for recordable DVD ....................................................................................49
Copy Files
Copy les between HDD, USB and DVD ............................................................. 50~51
Copying les from HDD to USB or recordable DVD .............................................................................50
Copying les from USB to HDD or recordable DVD .............................................................................51
Copying les from CD/DVD to HDD or USB ...........................................................................................51
Playback
Playback from HDD .................................................................................................52~54
Hard Disk navigation .........................................................................................................................................52
Content searching ..............................................................................................................................................52
Basic operation ...................................................................................................................................................53
Delete/Lock/Protect a title in the HDD .................................................................................................... 54
Repeat hard disk playback ............................................................................................................................... 54
Playback from USB device ............................................................................................55
Playback from Disc .................................................................................................. 56~58
Playable discs .......................................................................................................................................................56
Starting disc playback ................................................................................................................................ 57~58
Additional Playback Features ................................................................................ 59~66
Edit Recordings
Edit Recordings - Hard Disk .................................................................................... 67~71
Changing the title name ....................................................................................................................................67
Selecting the genre .............................................................................................................................................67
Video editing ................................................................................................................................................68~71
Edit Recordings - Recordable DVD ........................................................................72~77
About editing recordable DVDs ................................................................................................................... 72
Changing the disc/title name .......................................................................................................................... 73
Making the edited DVD±RW compatible .................................................................................................. 73
Deleting all recordings/titles .......................................................................................................................... 73
Finalising the DVD±R for playback ................................................................................................................74
Deleting a recording/title .................................................................................................................................74
Lock/Unlock the disc for playback ................................................................................................................75
Protecting the recorded titles (DVD±RW) ................................................................................................75
Video editing ................................................................................................................................................76~77
System Settings
System Menu Options ............................................................................................. 78~90
System menu navigation ...................................................................................................................................78
Language settings ................................................................................................................................................79
Playback settings .........................................................................................................................................80~81
Video Output settings ...............................................................................................................................82~83
Audio settings ............................................................................................................................................. 84~85
Analogue Tuner settings .......................................................................................................................... 86~88
Digital Tuner settings ....................................................................................................................................... 89
Setup settings .............................................................................................................................................. 90~91
Other
Other Information ....................................................................................................92~94
Setting up Progressive Scan feature ............................................................................................................. 92
Copyright notice ................................................................................................................................................ 92
5.1 multi-channel recording .............................................................................................................................93
Installing the latest software .......................................................................................................................... 94
Frequently Asked Questions .................................................................................. 95~97
Troublesho oting ..................................................................................................... 98~103
Display panel symbols/messages ....................................................................... 104~105
Glossary / Speci cation ...................................................................................... 106~108
English
7
Page 8
Care and Safety Information
English
IMPORTANT NOTE!
DO NOT disconnect the recorder from
the power supply unless you are
intending not to use this product for a
long period of time. Power is needed to
enable the recorder to perform essential
tasks like timer recordings and
automatically updating the system date/
time.
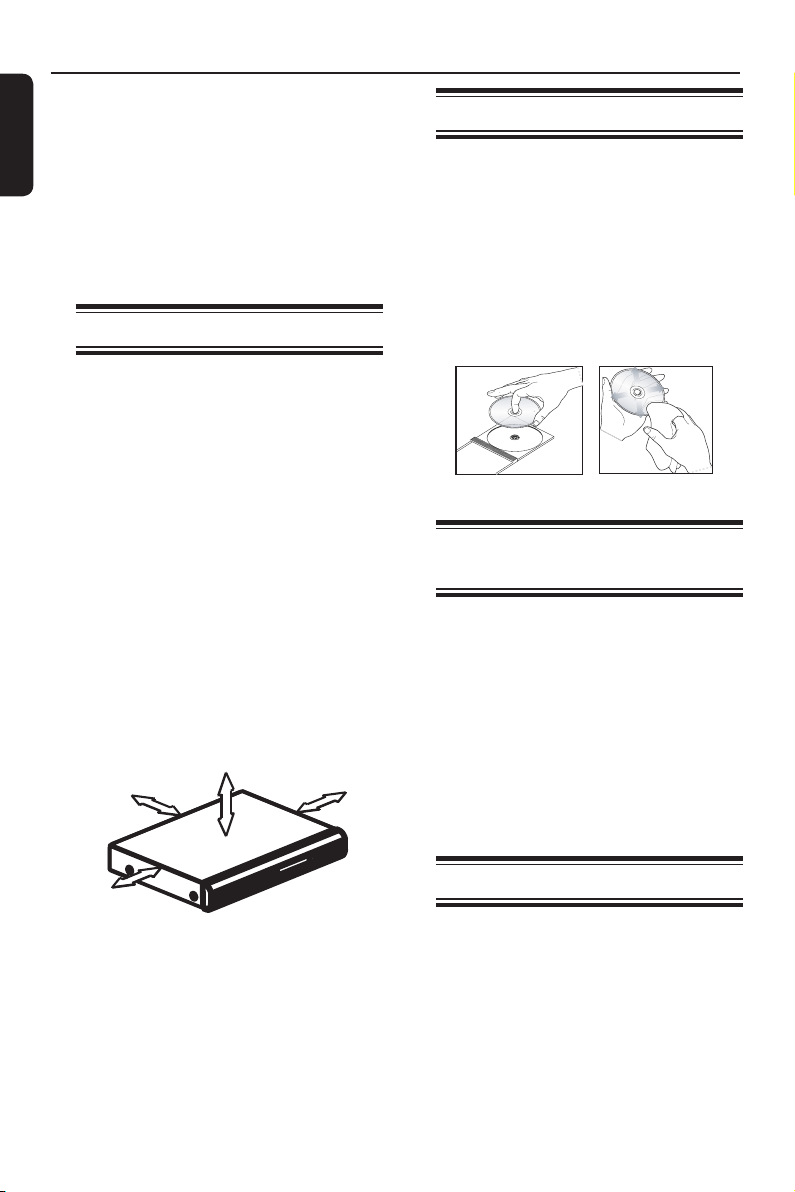
Setup precautions
Finding a suitable location
– Place this unit on a at, hard and
stable surface. Do not place the unit on a
carpet.
– Do not place this unit on top of other
equipment that might heat it up (e.g.,
receiver or ampli er).
– Do not put anything under this unit
(e.g., CDs, magazines).
– Install this unit near the AC outlet where
the AC power plug can be easily reached.
Space for ventilation
– Place this unit in a location with
adequate ventilation to prevent internal
heat build up. Allow at least 10 cm (4”)
clearance from the rear and the top of
this unit and 5cm (2”) from the left and
right to prevent overheating.
5cm
10cm )
10cm
Cleaning discs
CAUTION!
Risk of damage to discs! Never use
solvents such as benzene, thinner,
cleaners available commercially, or antistatic sprays intended for discs.
Wipe the disc with a micro bre cleaning
cloth from the centre to the edge in a
straight line movement.
Hard Disk Drive (HDD)
handling care
To avoid damage to the hard disk and
losing important data:
– Do not move the recorder or subject
it to vibration whilst in operation.
– Do not remove the AC power plug
from the mains socket without switching
the recorder to standby mode.
It is recommended to archive important
recording to a recordable DVD as
backup.
5cm
Avoid high temperature, moisture,
water and dust
– This unit must not be exposed to
dripping or splashing.
– Do not place any object or items that
can damage this unit (e.g., liquid lled
objects, lighted candles).
8
Energy saving message
In order to minimise the power
consumption in standby mode, we
recommend you to leave this unit with
Eco mode enable and turn off the front
panel display brightness. See Playback
settings - { Display } option and Setup
settings - { Eco mode } option.
Page 9
ALL
2
Product Information
Introduction
This DVD/Hard Disk Drive (HDD)
recorder changes the way you watch TV.
You have full control over the TV
programmes you watch, because the
Time Shift Buffer function stores all the
programmes that the recorder is tuned
to. You can ‘pause’ TV programmes with
Pause Live TV function, or repeat any
scene with the Instant Replay function.
This recorder is also equipped with
digital terrestrial tuner (DVB-T - Digital
Video Broadcasting - Terrestrial) to
enhance your selection of programmes.
You can receive analogue TV channels,
free-to-air digital terrestrial TV channels
and digital radio signals.
Recording has never been easier with the
built-in Hard Disk Drive, you can record
up to 180~300 hours of video in SEP
(Super Extended Play) recording mode.
Model Hard Disk
Drive
(HDD)
DVDR5520H 160 GB 180
DVDR5570H 250 GB 300
On top of that, you can store the DivX
movies, music les and digital camera
photos in the HDD Media Jukebox.
DVDR5520H DVDR5570H
DivX les 150 270
Photos 10,000 10,000
Music les 4,500 7,000
When you want to save or share a
recording, simply copy it to a recordable
DVD. You can also copy recordings
from your video camera or camcorder
through the i-Link connection.
Maximum
recording
hours
Before you can start using this recorder,
you must complete the basic connection
and initial recorder set-up in three simple
steps.
Step 1: Basic recorder connections.
Step 2: Optional connections for other
devices.
Step 3: Installation and set-up.
Please take time to read this user manual
before using your recorder. It contains
important information and notes
regarding the operation of your DVD
recorder.
Helpful Hint:
– Refer to the type plate at the rear or
bottom of the product for identi cation and
supply ratings.
Accessories supplied
– Quick Start Guide
– RF antenna cable
– Scart cable
– Remote control and batteries
– Tuner interlink cable
Region codes
DVD movies are usually not released at
the same time in all regions of the world,
thus all DVD players/recorders are
programmed to a speci c region code.
Countries DVD Region code
Europe
English
9
Page 10

Product Information (continue d)
English
Special features
Pause Live TV
Every TV programme is now under your
control, allowing you to take a break
without missing a moment. You can
pause any live TV programme by simply
pressing PAUSE LIVE TV button and
resume playback by pressing the PAUSE
LIVE TV button again. You can now
continue watching the remainder of the
programme or if you want to return to
the live TV programme again, just press
the LIVE TV button.
Instant Replay
You can repeat any scene of a live TV
programme by turning the rotary wheel
one click to the left, as often as you like.
If you wish to return to the live TV
programme again, just press the LIVE TV
button.
To enjoy Instant Replay, you need to
turn your recorder on and watch your
favourite TV programmes via your
recorder.
FlexTime
You can be truly exible with your time
now with FlexTime. FlexTime allows you
to start watching a TV programme while
it is still being recorded, you do not need
to wait for the recording to nish before
starting to watch it. Alternatively, you
can also watch another earlier recorded
programme, play a DVD or DivX movie
or enjoy some music while the recorder
is recording the TV programme.
Time Shift Buffer (TSB)
As soon as you turn on your recorder,
the TV channel it is tuned to will be
stored into the Time Shift Buffer. Think
of this as a temporary storage for TV
programmes allowing you great exibility.
It can contain up to 6 (six) hour of TV
programmes and will automatically ush
anything that is older. You can mark
portions of the Time Shift Buffer and
copy them to your recordings list for
later viewing or copying to recordable
DVD. The recorder needs to be turned
on for the Time Shift Buffer to be active.
When the recorder is turned off, the
Time Shift Buffer is automatically cleared.
Digital and analogue tuner
This product features analogue TV
reception, digital terrestrial TV and
DVB-T Radio reception. To select
between the three modes, simply press
the LIVE TV button repeatedly.
Analogue TV
To enjoy Pause Live TV, you need to turn
your recorder on and watch your
favourite TV programmes via your
recorder.
Digital TVDVB-T Radio
ShowView
This is a simple programming system for
recorders. To use it, enter the
programming number associated with
your television programme. You can nd
this number in your favourite listings
magazine.
10
Page 11

Product Information (continue d)
SAT recording
This function enables you to record a
programme from your Satellite Receiver
or any other device. Make sure that the
device is connected to the
EXT2-TO VCR/SAT socket of this
recorder, and the timer setting has been
done on the connected device.
Follow TV
With this function you can align the
sequence of the channels on your TV
(analogue only) with those on your
recorder. This enhances the ef ciency of
the system for recordings. Make sure
you have connected the TV to the
EXT1 TO TV socket of this recorder.
* The Follow TV feature may not work
properly on every TV.
i.LINK
i.LINK, also known as ‘FireWire’ or ‘IEEE
1394’, is a digital connection for
connecting your camcorder to enable
you to make high quality copies of your
camcorder videos. The connector can be
found behind the front ap door.
Media Jukebox
The Hard Disk drive of this recorder
serves as a media jukebox that allows you
to store all sources of recordings (TV
recordings, videos, music and photos).
The titles recorded or copied to the hard
disk will automatically be saved under
separate contents based on the
characteristics of the recordings.
Keyword search
Keyword search saves you from having to
scroll through lists of les on your
recorder’s hard disk. Simply type in
keywords using the alphanumeric keypad
on the remote control and instantly nd
your favourite TV recordings, music les
and DivX videos.
5.1 channel audio recording
Digital 5.1 channel audio recording lets
you capture - along with the video - the
original sound from digital-channel
programme sources. These recordings
play back in multi-channel only when
connected to a 5.1 channel speaker
system.
English
Skip Commercial Block
After recording, the commercial scenes
in the title will be checked and marked if
‘Smart’ chaptering feature is activated
(see page 37). This recorder will
automatically insert chapter markers at
the beginning and the end of the
commercial scenes. When watching the
recording from the hard disk, you can
now skip over commercials by pressing
the NEXT > button.
11
Page 12
Remote Control
English
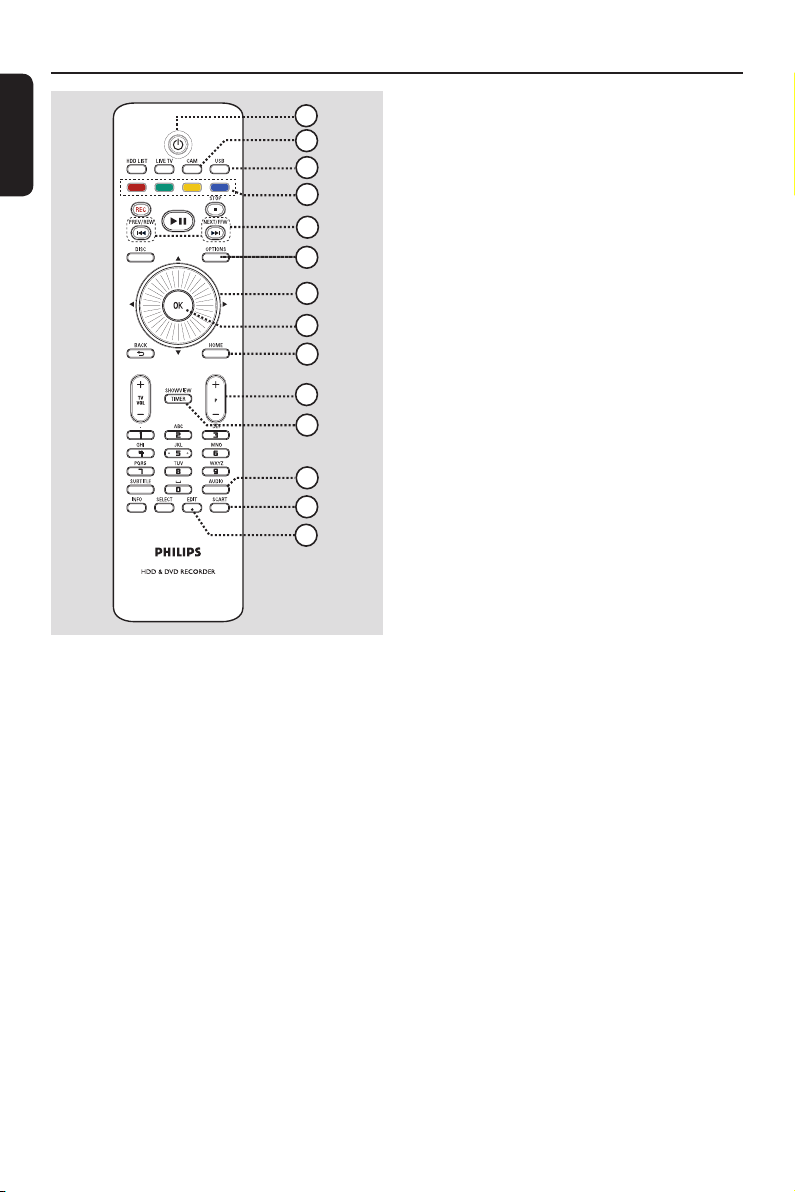
PAUSE LIVE TV
a 2
– Turns on this unit or turns off to normal
standby mode.
b CAM
– Switches to the camcorder that is
connected to the DV IN CAM2 socket.
c USB
– Switches to USB mode and shows the
content of the USB device.
d Colour coded buttons
– These buttons can be used to select the
coloured options available in some
menus.
e . (PREV/REW) /
> (NEXT/FFW)
– Skips to the previous or next chapter/
track. Hold down the button to make a
reverse/forward search.
1
2
3
4
5
6
7
8
9
10
11
12
13
14
f OPTIONS
– Enters/exits the Options menu. This
menu provides various setting options.
g Navigation cursor / Rotary wheel
– In recorder’s Live TV mode, turning the
rotary wheel to skip backward or
forward in the Time Shift Buffer .
– b B : Cursor buttons for moving to the
left/right. Skip or replay the scene by a
speci ed length of time in the Time Shift
Buffer.
– : Cursor buttons for moving up/
down.
h OK
– Con rms an entry or selection.
i HOME
– Enters/exits the recorder’s Home menu.
j P +-
– While in Live TV mode, select the next
or previous TV channel or the external
input source (EXT1, EXT2, CAM1).
– While in camcorder mode, select other
external input source (EXT1, EXT2,
CAM1).
k TIMER (SHOWVIEW)
– Enters/Exits the timer programming
mode.
l AUDIO
– Selects an audio language/channel.
m SCART
(only effective when your TV is connected
with the Scart cable to EXT1 of your
recorder)
– Switches to the device that is connected
to the EXT2 Scart connector of your
recorder. If no device is connected to
EXT2, it switches to TV preset instead.
To switch back to recorder mode, press
this button again.
n EDIT
– Enters/exits the editing menu.
12
Page 13
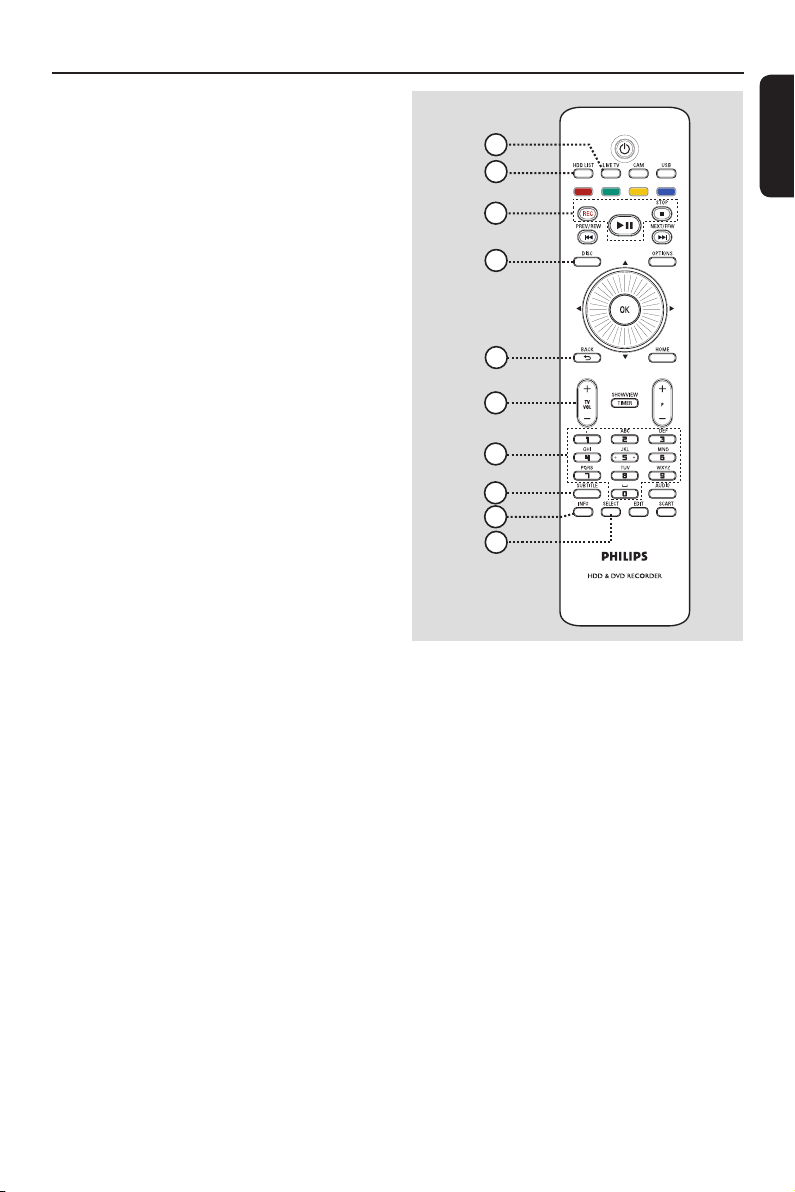
o
LIVE TV
– Switches to live TV mode. It activates
the Time Shift Buffer that allows you to
pause or replay the TV programme at
any time.
– Press repeatedly to toggle between
analogue TV, digital TV and digital radio.
p HDD LIST
– Shows the list of your recordings stored
in the internal hard disk.
Remote Control (continued)
15
16
17
18
PAUSE LIVE TV
English
q PAUSE LIVE TV u
– Pauses or resumes a live TV programme.
– Starts or pauses playback of any recorded
title or disc.
STOP x
– Stops playback/recording.
– Hold down this button to open or close
the disc tray.
REC
– Starts recording the currently viewed TV
programme. Press repeatedly to set the
recording length in 30-minute increments.
r DISC
– Shows the content of the disc.
s BACK
– Returns to the previous menu.
t TV VOL +-
– Adjusts the volume of the TV (for Philips
TVs or compatible brands only).
u Alphanumeric keypad
– Used to enter numbers or letters (using
SMS style entry).
– Selects a chapter/track/title number to
play.
– Selects the recorder’s preset tuner
channels.
19
20
21
22
23
24
v SUBTITLE
– Selects a DVD or DivX subtitle language.
w INFO
– Displays on-screen information.
x SELECT
– Selects multiple les for copying or
deleting.
– Toggles between ‘T’ (title) and ‘C’
(chapter) selection during disc playback,
then use the . / > keys to select
the previous or next title/chapter.
– Toggles between upper and lower case
characters while using the alphanumeric
keypad.
13
Page 14

Remote Control (continued)
English
Using the remote control
A Open the battery compartment cover.
B Insert two batteries type R03 or AAA.
Match the indications (+-) inside the
battery compartment.
C Close the cover.
D Point the remote control directly at the
remote sensor on the front panel and
select the desired function.
CAUTION!
– Remove batteries if they are
exhausted or if the remote control
is not to be used for a long time.
– Do not mix batteries (old and new
or carbon and alkaline, etc.).
– Batteries contain chemical
substances, they should be disposed
of properly.
Using the alphanumeric keypad to
enter the characters
– Press a number button repeatedly until
the required character or the number
appears.
– To enter special symbols, press button
repeatedly.
– To select upper/lower case (capital/
small) letters, press SELECT.
– To enter a space, press button .
14
Page 15

Main Unit
English
a STANDBY-ON
– Turns on this unit or turns off to normal
standby mode.
b Disc tray
c OPEN CLOSE ç
– Opens or closes the disc tray.
d Display panel
– Shows information about the current
status of the recorder.
e HOME
– Enters/exits the recorder’s Home menu.
f : Cursor buttons for moving to the
left/right. In recorder’s Live TV mode,
replay or skip the scene by a speci ed
length of time.
: Cursor buttons for moving up/
down. In camcorder (CAM) mode, select
CAM2, CAM1, EXT1 or EXT2 input
source.
g OK
– Con rms an entry or selection.
h u
– Pauses or resumes a live TV show.
– Starts or pauses playback.
. >
– Skips to the previous or next chapter/
track. Hold down the button to make a
reverse/forward search.
x
– Stops playback/recording.
i
z
– Starts recording the currently viewed TV
programme. Press repeatedly to set the
recording length in 30-minute increments.
– Lights up while recording is in progress.
Sockets behind the ap
Flip down the door as indicated by the
OPEN label at the right hand corner.
j DV IN (CAM2) socket
– Input for digital camcorders (also
referred to as FireWire or IEEE1394).
k S-VIDEO -VIDEO-AUDIO (CAM1)
socket
– S-video/Composite video and audio
inputs for camcorder/DVD player/VCR
or other similar device.
l USB socket
– Input for USB ash drive, USB memory
reader or digital camera.
* Not all brands and models of digital
cameras are supported, except those
compliant with the PTP standard.
15
Page 16
Step 1: Basic Recorder Connections
English
DIGITAL
HDMI
ANTENNA INPUT
OUT
CVBS-OUT
EXT2
S-VIDEO
OUT
P
Y
L
R
B
P
R
COAXIAL
COAXIAL
AUDIO
COMPONENT
DIGITAL
DIGITAL OUT
OUT
VIDEO OUT
IN
G-LINK
TO TV ANTENNA
INPUT
ANALOG
ANTENNA INPUT
ANTENNA INTERCONNECT CABLE
(OPTIONAL, REFER TO MANUAL)
TO TV
EXT1
DIGITAL ANTENNA
LOOP THROUGH
TO VCR/SAT
Option 1
MAINS
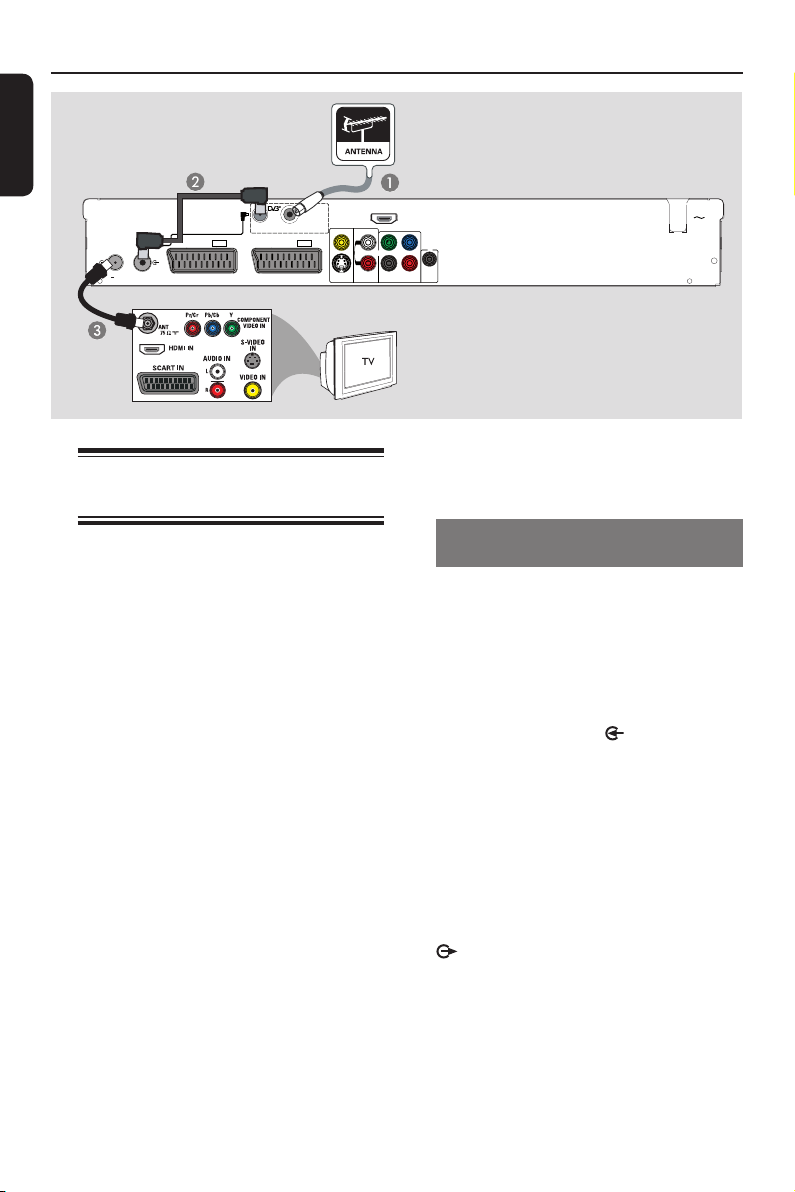
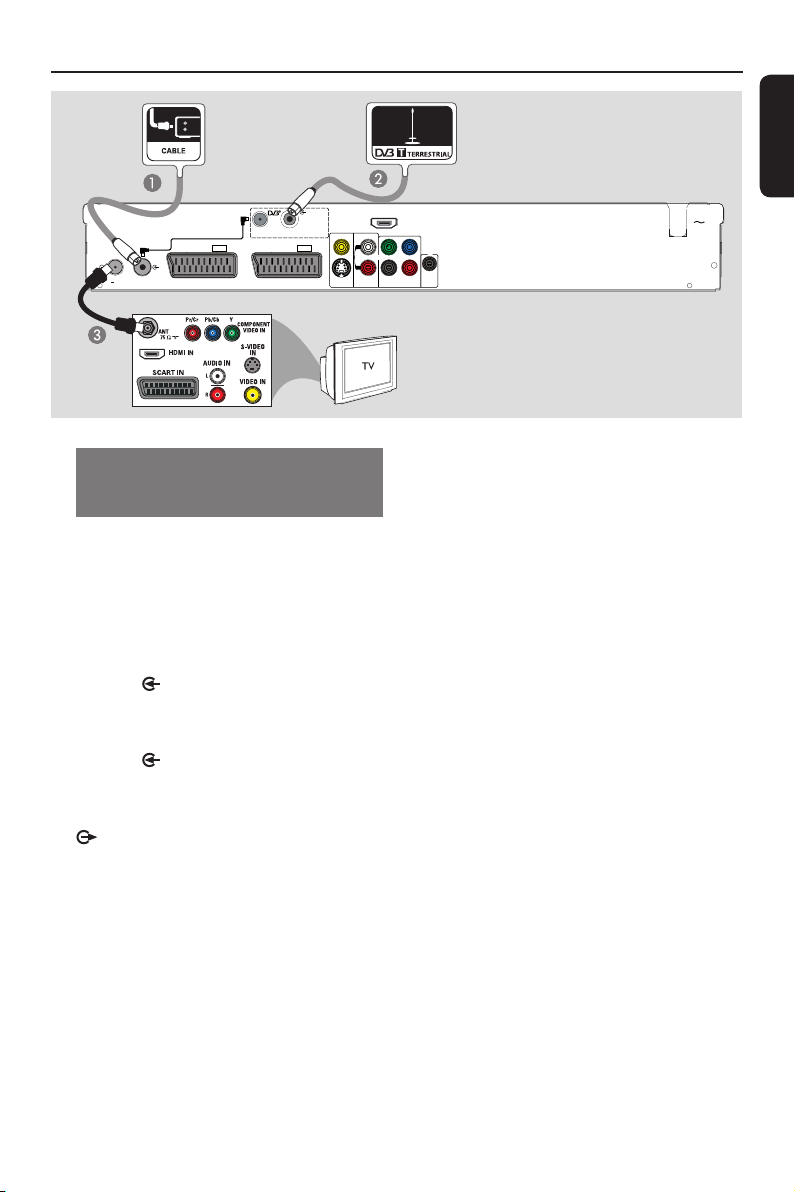
Connecting the antenna
cables
These connections enable you to watch
and record TV programmes.
This recorder has two types of tuner
input, one for digital TV reception and
one for analogue TV reception. If you
have a separate indoor digital terrestrial
antenna or you want to connect your
recorder to Cable TV as well as antenna,
follow option 2. Otherwise, follow
option 1.
Helpful Hints:
– Depending on how you have currently
connected your TV channel (directly from an
off-air antenna or cable box or VCR), you’ll
have to disconnect some of the cables before
you make the antenna connection.
– If you want to connect to a VCR and/or a
separate Cable Box/ Satellite Receiver, see
‘Step 2: Optional Connections’ for details.
Before you start ...
Select a suitable antenna connection.
Option 1: Connecting to a single
off-air antenna
Use this connection if you have only an
off-air antenna and wish to receive both
analogue and digital TV programmes.
A Connect the existing Antenna cable (it
can be from the off-air wall socket or
Cable Box) to the DIGITAL
ANTENNA INPUT socket on the
recorder.
Connect the Tuner interlink cable
B
(supplied) to the DIGITAL
ANTENNA LOOP THROUGH and
ANALOG ANTENNA INPUT
sockets on the recorder.
C Connect a RF antenna cable (supplied)
from the TO TV ANTENNA INPUT
socket on the recorder to the
antenna input socket on your TV (usually
labelled as ANT, ANTENNA IN, RF IN).
16
Page 17
Step 1: Basic Recorder Connections (continued)
DIGITAL
HDMI
ANTENNA INPUT
ANTENNA INTERCONNECT CABLE
DIGITAL ANTENNA
LOOP THROUGH
(OPTIONAL, REFER TO MANUAL)
G-LINK
TO TV ANTENNA
INPUT
ANALOG
ANTENNA INPUT
TO TV
TO VCR/SAT
EXT1
Option 2: Connecting to Cable TV
antenna and/or separate indoor
terrestrial antenna
Use this connection if you have a
separate indoor digital terrestrial antenna
or want to connect your recorder to
Cable TV as well as off-air antenna.
OUT
CVBS-OUT
EXT2
S-VIDEO
OUT
P
Y
L
R
B
P
R
COAXIAL
COAXIAL
AUDIO
COMPONENT
DIGITAL
DIGITAL OUT
OUT
VIDEO OUT
IN
English
Option 2
MAINS
Connect the existing Cable TV antenna
A
cable to the ANALOG ANTENNA
INPUT socket on the recorder.
Connect the digital terrestrial antenna
B
cable to the DIGITAL ANTENNA
INPUT socket on the recorder.
C Connect a RF antenna cable (supplied)
from the TO TV ANTENNA INPUT
socket on the recorder to the
antenna input socket on your TV (usually
labelled as ANT, ANTENNA IN, RF IN).
Helpful Hint:
– Only free-to-air digital TV channels can be
received (no reception of ‘conditional access’
/ Smartcard channels).
17
Page 18
Step 1: Basic Recorder Connections (continued)
O
English
ANTENNA INTERCONNECT CABLE
DIGITAL ANTENNA
LOOP THROUGH
(OPTIONAL, REFER TO MANUAL)
G-LINK
TO TV ANTENNA
INPUT
ANALOG
ANTENNA INPUT
TO TV
TO VCR/SAT
EXT1
Option 1
TV
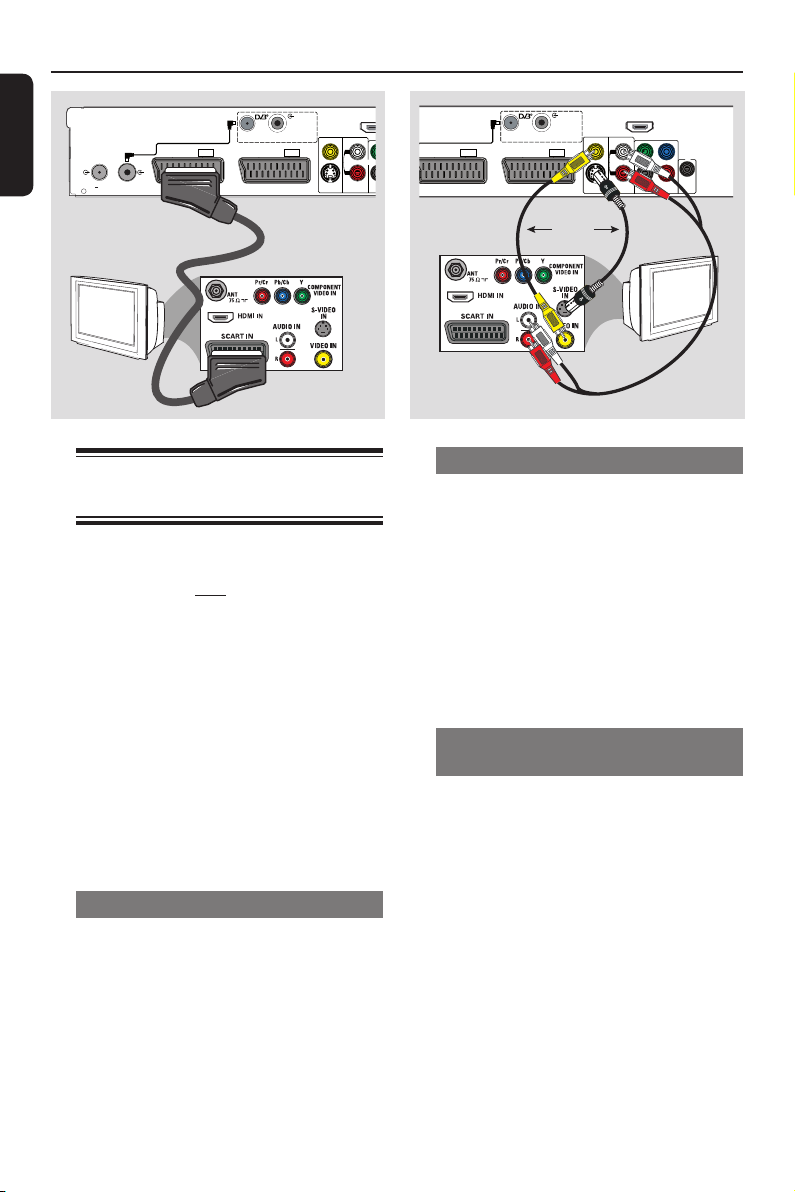
Connecting the video/audio
cables
This connection enables you to view the
playback from this recorder. You only
need to choose one of the options
below to make your video connection.
– For a standard TV, follow option 1, 2
or 3.
– For a progressive scan TV, follow
option 4.
– For a HDMI TV, follow option 5.
Helpful Hint:
– Audio connection is only required if you
are connecting this recorder to your TV using
the S-VIDEO, CVBS or COMPONENT VIDEO
socket.
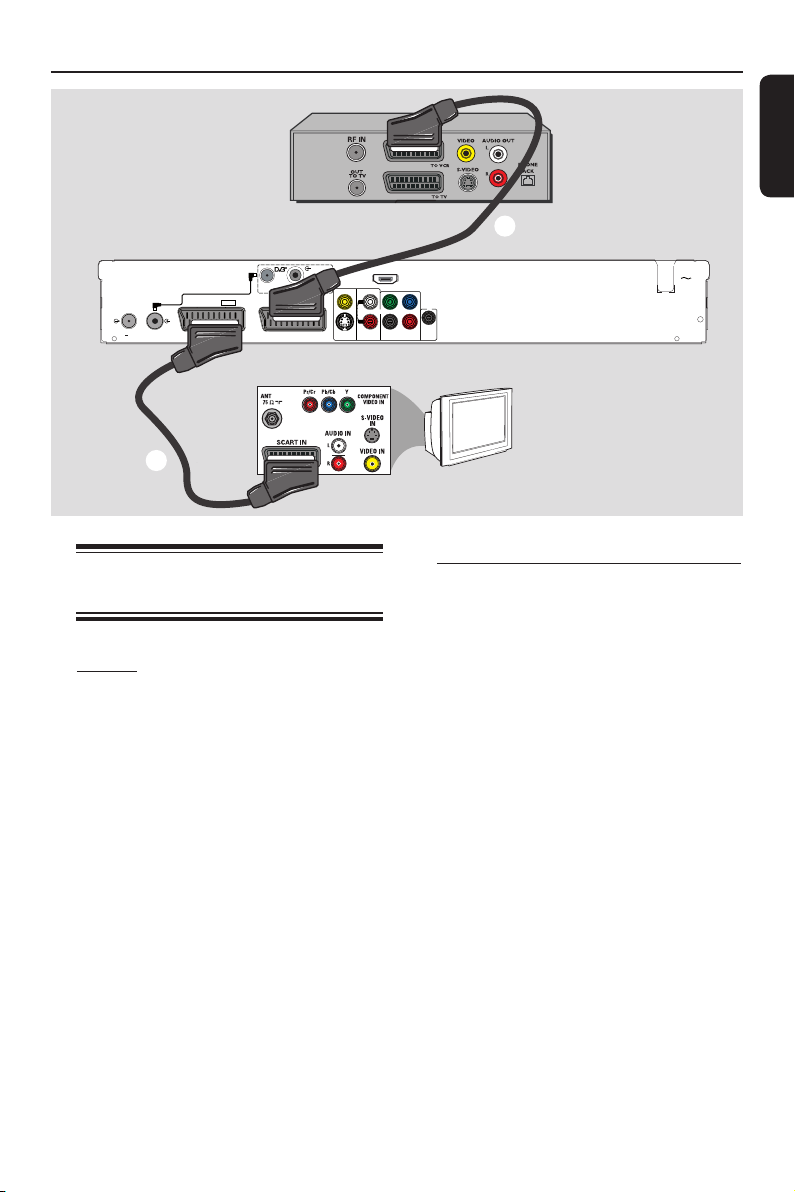
Option 1: Using the Scart socket
Connect a scart cable (supplied) from the
EXT1-TO TV socket on the recorder
to the corresponding SCART socket on
the TV.
DIGITAL
ANTENNA INPUT
EXT2
CVBS-OUT
S-VIDEO
OUT
DIGITAL
HDMI
OUT
Y
L
R
C
AUDIO
DIGI
OUT
ANTENNA INTERCONNECT CABLE
(OPTIONAL, REFER TO MANUAL)
TO TV
EXT1
DIGITAL ANTENNA
LOOP THROUGH
TO VCR/SAT
ANTENNA INPUT
EXT2
Option 3
OR
CVBS-OUT
S-VIDEO
OUT
HDMI
OUT
L
R
AUDIO
OUT
P
Y
P
COAXIAL
COMPONENT
DIGITAL OUT
VIDEO OUT
Option 2
B
R
COAXIAL
DIGITAL
IN
TV
Option 2: Using the S-Video socket
A Connect a S-video cable (not supplied)
from the S-VIDEO OUT socket on the
recorder to the S-Video input socket
(usually labelled as Y/C or S-VHS) on the
TV.
B Connect the audio cables (not supplied)
from the AUDIO OUT sockets on the
recorder to the audio input sockets on
the TV.
Option 3: Using the Video (CVBS)
socket
A Connect a composite video cable (yellow
- not supplied) from the CVBS OUT
socket on the recorder to the video
input socket (usually labelled as A/V In,
Video In, Composite or Baseband) on the
TV.
B Connect the audio cables (not supplied)
from the AUDIO OUT sockets on the
recorder to the audio input sockets on
the TV.
Helpful Hint:
– Use the EXT2-TO VCR/SAT socket for
connecting the recorder to additional device.
18
Page 19
Step 1: Basic Recorder Connections (continued)
N
DIGITAL
DIGITAL ANTENNA
LOOP THROUGH
TO VCR/SAT
ANTENNA INPUT
EXT2
CVBS-OUT
S-VIDEO
OUT
G-LINK
TO TV ANTENNA
INPUT
ANALOG
ANTENNA INPUT
ANTENNA INTERCONNECT CABLE
(OPTIONAL, REFER TO MANUAL)
TO TV
EXT1
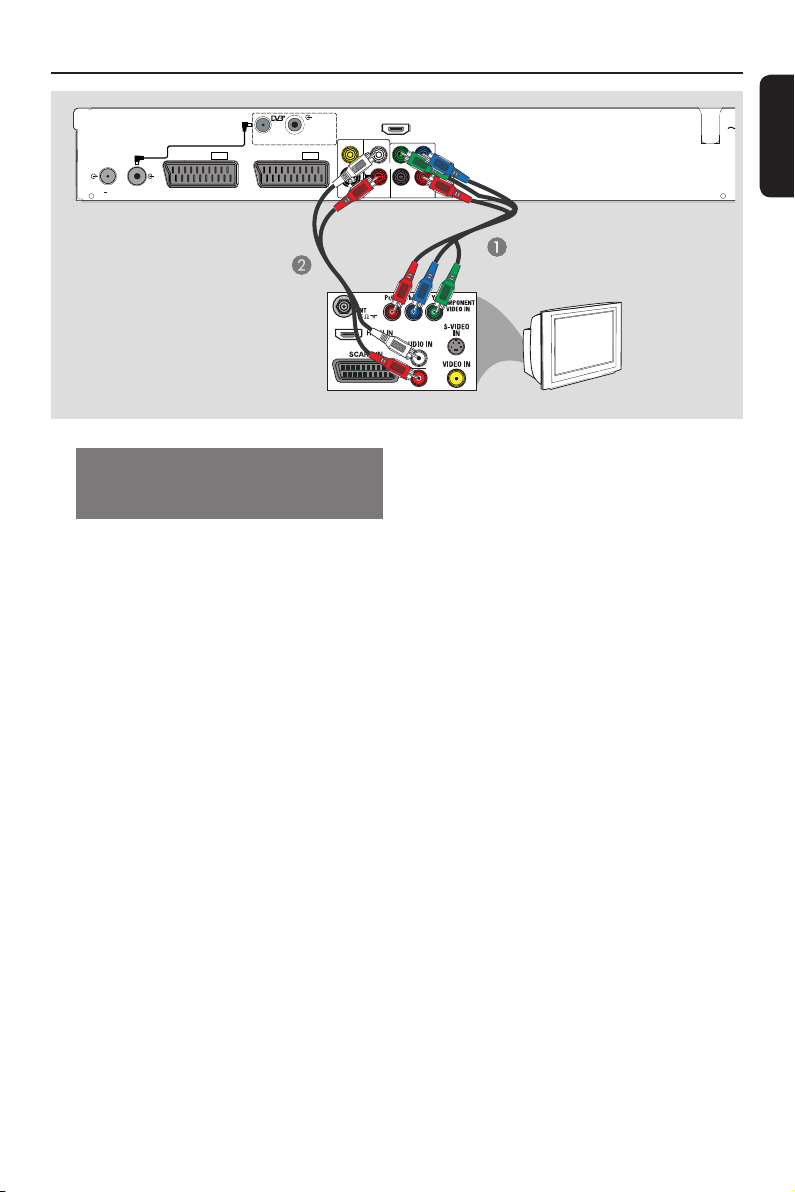
Option 4: Using Component
video socket / Connecting to a
Progressive Scan TV
The progressive scan video quality is only
available when using Y Pb Pr connection
and a progressive scan TV is required. It
provides superior picture quality when
watching DVD movies.
A Connect the component video cables
(red/ blue/green - not supplied) from the
Y PB PR sockets on the recorder to the
corresponding component video input
sockets (usually labelled as Y Pb/Cb Pr/Cr
or YUV) on the TV.
B Connect the audio cable (red/white - not
supplied) from the AUDIO OUT
sockets on the recorder to the audio
input sockets on the TV.
HDMI
OUT
L
R
P
Y
B
P
R
COAXIAL
COAXIAL
AUDIO
COMPONENT
DIGITAL
DIGITAL OUT
OUT
VIDEO OUT
IN
Option 4
TV
Note:
To enable Y Pb Pr (YUV) connection, you
must set the recorder’s video output
correctly.
A Make an addition video connection from
this recorder to your TV using Scart,
S-Video or Video (CVBS).
B Turn on your TV to the correct viewing
channel for the above video connection.
C When you have completed the
installation and set-up, change the video
output setting of this recorder as
follows:.
1) Press OPTIONS.
2) Move to { Settings } > { Video
output } > { Active video output }
> { Comp. video (YUV) }, then
press OK to con rm.
To activate Progressive Scan output, see
‘Other information - Setting up
Progressive Scan feature’ for details.
D Switch your TV to the correct viewing
channel for the Component video
connection (refer to your TVs user
manual).
MAI
English
19
Page 20
Step 1: Basic Recorder Connections (continued)
English
G-LINK
TO TV ANTENNA
INPUT
ANALOG
ANTENNA INPUT
TV
ANTENNA INTERCONNECT CABLE
(OPTIONAL, REFER TO MANUAL)
TO TV
EXT1
DIGITAL ANTENNA
LOOP THROUGH
TO VCR/SAT
DIGITAL
ANTENNA INPUT
EXT2
CVBS-OUT
S-VIDEO
OUT
HDMI
OUT
L
R
AUDIO
OUT
Y
COAXIAL
COMPONENT
DIGITAL OUT
VIDEO OUT
Option 5
P
B
P
R
COAXIAL
DIGITAL
IN
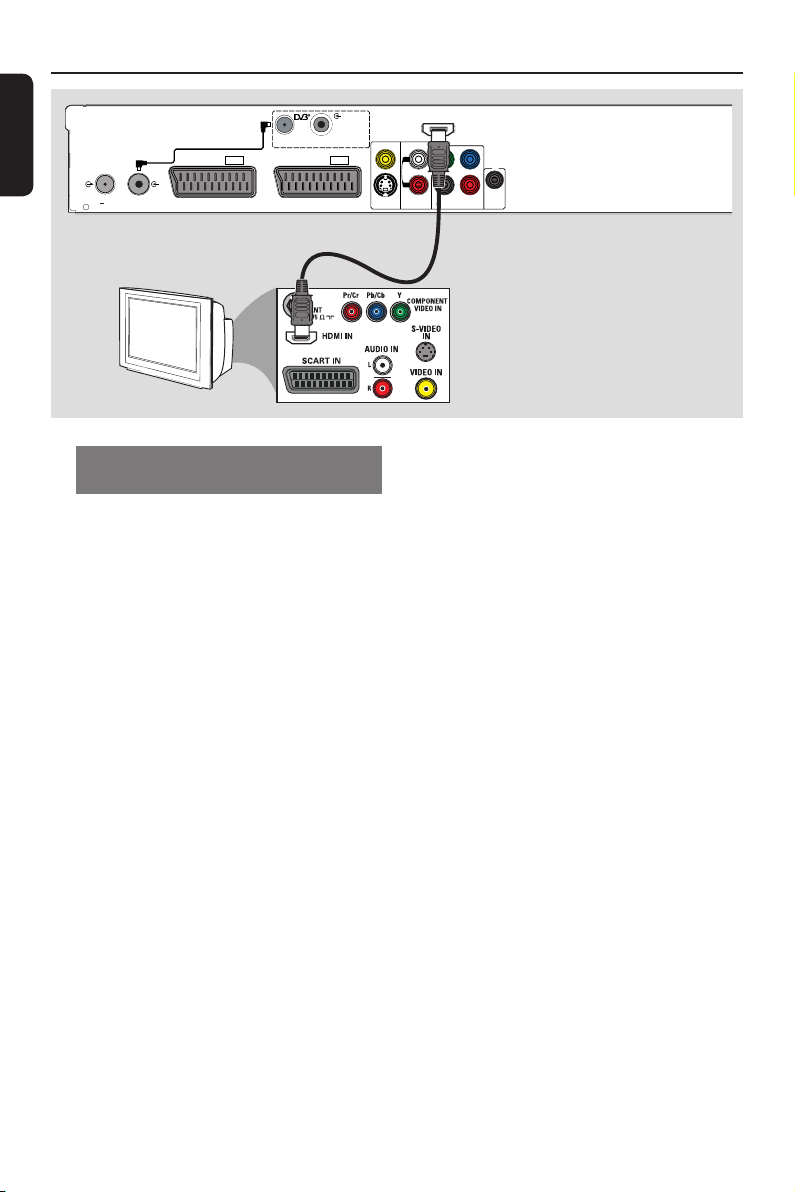
Option 5: Connecting to a HDMIcompatible TV
HDMI (High De nition Multimedia
Interface) is a digital interface that allows
pure digital video transmission without
the loss of image quality.
Connect a HDMI cable (not supplied)
from the HDMI OUT on the main unit
to the HDMI IN on a HDMI-compatible
device (e.g., HDMI TV, HDCP compliant
DVI TV).
Helpful Hints:
– Some HDMI TVs/monitors from different
manufacturers may adhere to different
standards resulting in unreliable signal
transfers.
– The HDMI connector is only compatible
with HDMI compliant devices and DVI-TVs.
– The teletext information will not be
accessible in the recorder’s Live TV mode.
Note:
To enable HDMI connection, you must
set the recorder’s video output correctly.
A Make an addition video connection from
this recorder to your TV using Scart,
S-Video or Video (CVBS).
B Turn on your TV to the correct viewing
channel for the above video connection.
C When you have completed the
installation and set-up, change the video
output setting of this recorder as
follows:.
1) Press OPTIONS.
2) Move to { Settings } > { Video
output } > { Active video output }
> { HDMI output }, then press OK
to con rm.
D Switch your TV to the correct viewing
channel for the HDMI connection (refer
to your TVs user manual).
20
Page 21
G-LINK
TO TV ANTENNA
INPUT
ANALOG
ANTENNA INPUT
B
ANTENNA INTERCONNECT CABLE
(OPTIONAL, REFER TO MANUAL)
TO TV
EXT1
DIGITAL ANTENNA
LOOP THROUGH
TO VCR/SAT
Step 2: Optional Connections
Cable Box /
Satellite Receiver
C
DIGITAL
HDMI
ANTENNA INPUT
OUT
CVBS-OUT
EXT2
S-VIDEO
OUT
P
Y
B
L
P
R
R
COAXIAL
COAXIAL
AUDIO
COMPONENT
DIGITAL
DIGITAL OUT
OUT
VIDEO OUT
IN
TV
English
MAINS
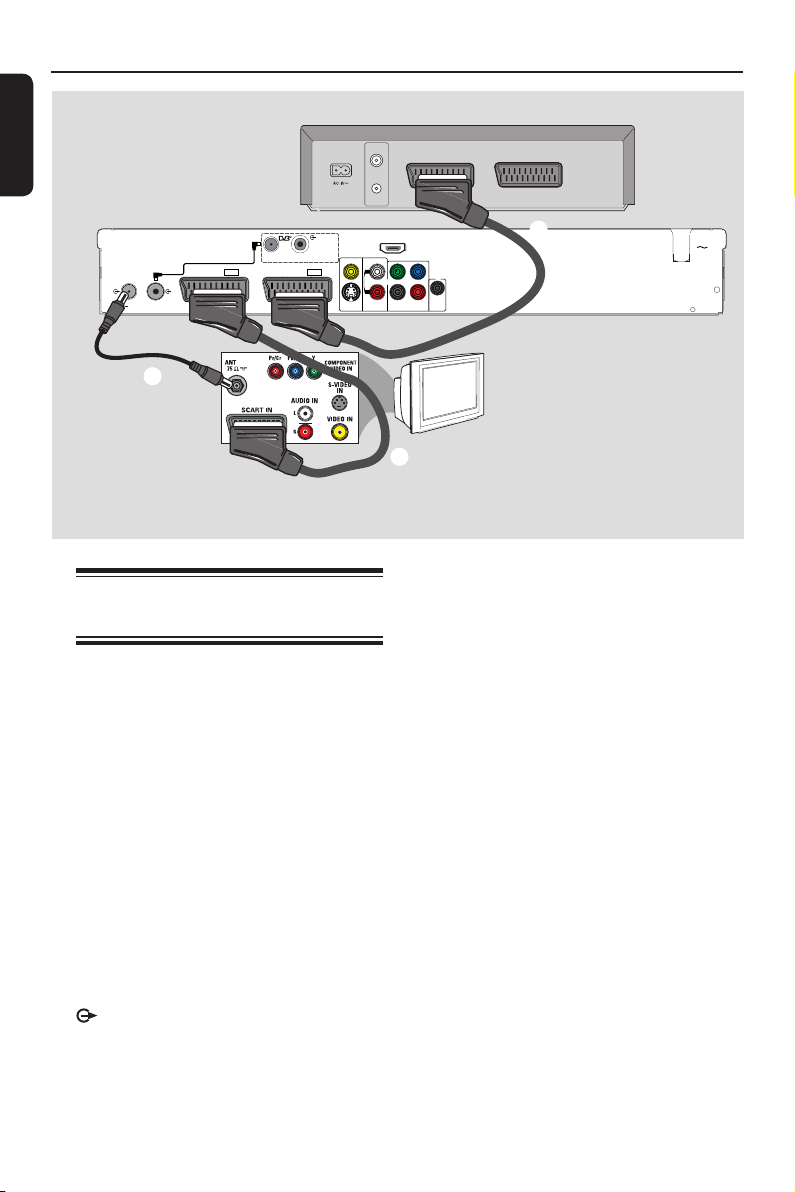
Connecting to a Cable Box or
Satellite Receiver
Option 1
If your Cable Box/ Satellite Receiver
has only an antenna output socket
(RF OUT or TO TV),
see ‘Basic Recorder Connections Connecting the antenna cables’ for
details.
Option 2 (as shown on the above illustration)
If your Cable Box/ Satellite Receiver
has a Scart output socket
A Keep the existing antenna connection
from the Cable Box/ Satellite Receiver to
your TV.
B Connect a scart cable (supplied) from the
EXT1-TO TV socket on the recorder
to the corresponding SCART socket on
the TV.
C Connect another scart cable (not
supplied) from the EXT2-TO VCR/
SAT socket on the recorder to the Scart
socket (usually labelled as TV OUT or
TO VCR) on the Cable Box/ Satellite
Receiver.
Helpful Hint:
– If your TV is connected to the recorder via
the COMPONENT VIDEO (Y Pb Pr) sockets,
then connect the external cable box/satellite
receiver to the EXT1-TO TV socket.
21
Page 22
Step 2: Optional Connections (continued)
English
ANTENNA INTERCONNECT CABLE
DIGITAL ANTENNA
LOOP THROUGH
(OPTIONAL, REFER TO MANUAL)
G-LINK
TO TV ANTENNA
INPUT
ANALOG
ANTENNA INPUT
TO TV
TO VCR/SAT
EXT1
B
Connecting to a VCR or
other similar device
This connection enables you to record
from video tape to hard disk and allows
the VCR to be used for playback on the
TV if the recorder is turned off.
Note:
Your new recorder can replace the VCR
for all your recording needs. Just unplug
all the connections to your VCR.
A Connect the antenna cables. See
‘Connecting the antenna cables’ in Step 1:
Basic Connections chapter for more
information.
B Connect a RF antenna cable (supplied)
from the TO TV ANTENNA INPUT
socket on the recorder to the
antenna input socket on your TV (usually
labelled as ANT, ANTENNA IN, RF IN).
DIGITAL
ANTENNA INPUT
EXT2
CVBS-OUT
S-VIDEO
OUT
VCR (example only)
VHF/UHF
RF IN
VHF/UHF
RF OUT
HDMI
OUT
L
R
AUDIO
SCART OUT
P
Y
B
P
R
COAXIAL
COAXIAL
COMPONENT
DIGITAL
DIGITAL OUT
VIDEO OUT
OUT
IN
SCART IN
D
TV
C
C Connect a scart cable (supplied) from the
EXT1-TO TV socket on the recorder
to the corresponding SCART socket on
the TV.
D Connect another scart cable (not
supplied) from the EXT2-TO VCR/
SAT socket on the recorder to the Scart
socket (usually labelled as TV OUT or
TO TV) on the VCR.
Helpful Hints:
– Most commercial video cassettes and
DVDs are copy-protected and therefore
cannot be recorded.
– Connect the recorder directly to the TV. If
there is a VCR or an additional device in
between, the picture quality may be poor.
MAINS
22
Page 23
Step 2: Optional Connections (continued)
Back of a Cable/ Satellite
Box (example only)
G-LINK
TO TV ANTENNA
INPUT
ANALOG
ANTENNA INPUT
B
ANTENNA INTERCONNECT CABLE
(OPTIONAL, REFER TO MANUAL)
TO TV
EXT1
DIGITAL ANTENNA
LOOP THROUGH
TO VCR/SAT
DIGITAL
ANTENNA INPUT
EXT2
A
CVBS-OUT
S-VIDEO
OUT
HDMI
OUT
Y
L
R
COAXIAL
AUDIO
DIGITAL OUT
OUT
C
D
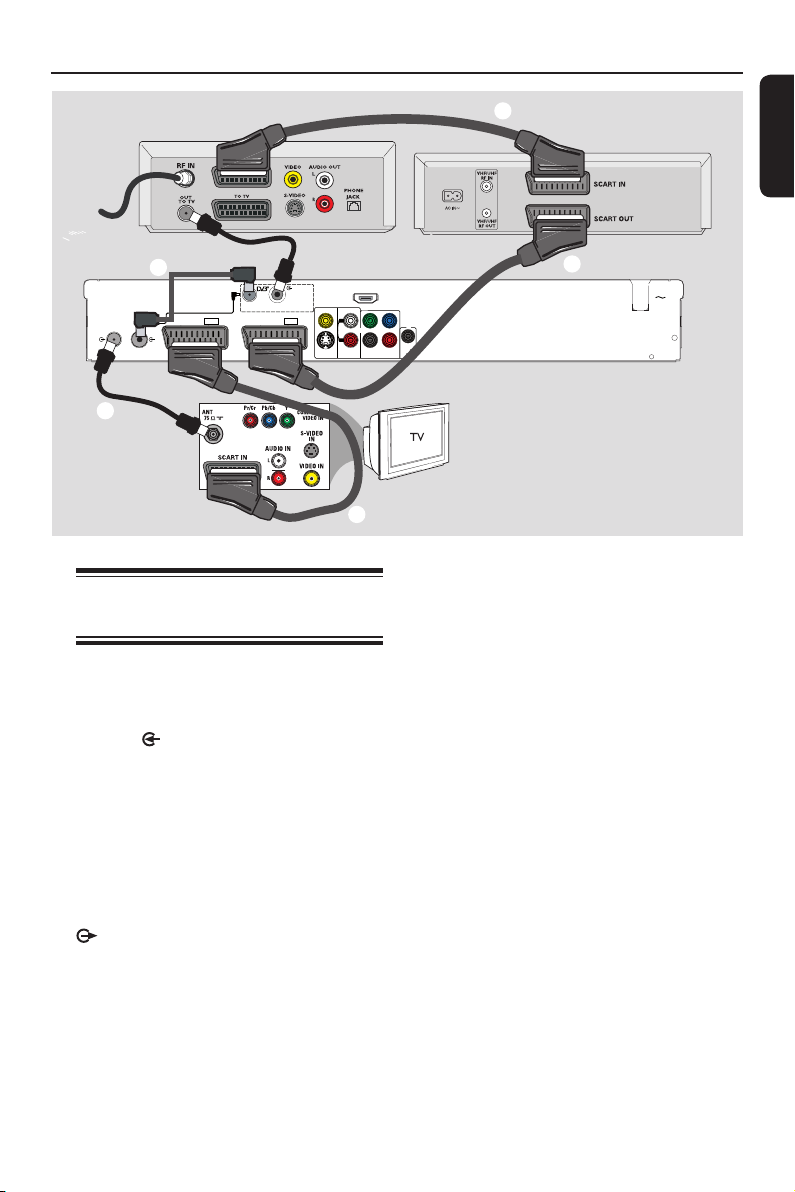
Connecting to a VCR and
Cable Box/ Satellite Receiver
A Connect the antenna output (RF OUT)
socket on the Cable Box/ Satellite
Receiver to the DIGITAL ANTENNA
INPUT socket on the recorder.
Connect the Tuner interlink cable
B
(supplied) to the DIGITAL
ANTENNA LOOP THROUGH and
ANALOG ANTENNA INPUT
sockets on the recorder.
C Connect a RF antenna cable (supplied)
from the TO TV ANTENNA INPUT
socket on the recorder to the
antenna input socket on your TV (usually
labelled as ANT, ANTENNA IN, RF IN).
D Connect a scart cable (supplied) from the
EXT1-TO TV socket on the recorder
to the corresponding SCART socket on
the TV.
F
E
P
B
P
R
COAXIAL
COMPONENT
DIGITAL
VIDEO OUT
IN
E Connect another scart cable (not
supplied) from the EXT2-TO VCR/
SAT socket on the recorder to the Scart
socket (usually labelled as TV OUT or
TO TV) on the VCR.
F Connect another scart cable (not
supplied) from the Scart socket (usually
labelled as TV IN or TO DECODER) on
the VCR to the Scart socket (usually
labelled as TV OUT or TO VCR) on the
Cable Box/ Satellite Receiver.
Back of a VCR
(example only)
English
MAINS
23
Page 24
Step 2: Optional Connections (continued)
V
English
ANTENNA INTERCONNECT CABLE
(OPTIONAL, REFER TO MANUAL)
O TV
EXT1
DIGITAL ANTENNA
LOOP THROUGH
TO VCR/SAT
DIGITAL
ANTENNA INPUT
EXT2
CVBS-OUT
S-VIDEO
OUT
HDMI
OUT
L
R
P
Y
B
P
R
COAXIAL
COAXIAL
AUDIO
COMPONENT
DIGITAL
DIGITAL OUT
OUT
VIDEO OUT
IN
AV ampli er/
receiver
Connecting to an AV
ampli er/receiver
You can connect the recorder to an AV
ampli er/receiver in order to enjoy
multichannel surround sound.
Connect a coaxial cable (not supplied)
from the COAXIAL DIGITAL OUT
socket on the recorder to the digital
coaxial input socket (or labelled as
COAXIAL IN or DIGITAL IN) of the
connected device.
Helpful Hint:
– You have to set the appropriate Digital
Audio Output setting. Otherwise, no sound or
interference may occur. See ‘System Menu
Options - Audio settings’ for details.
ANTENNA INTERCONNECT CABLE
(OPTIONAL, REFER TO MANUAL)
EXT1
DIGITAL ANTENNA
LOOP THROUGH
TO VCR/SAT
A
DIGITAL
ANTENNA INPUT
EXT2
CVBS-OUT
S-VIDEO
OUT
HDMI
OUT
P
Y
L
R
B
P
R
COAXIAL
COAXIAL
AUDIO
COMPONENT
DIGITAL
DIGITAL OUT
OUT
VIDEO OUT
IN
B
COAXIAL
DIGITAL OUT
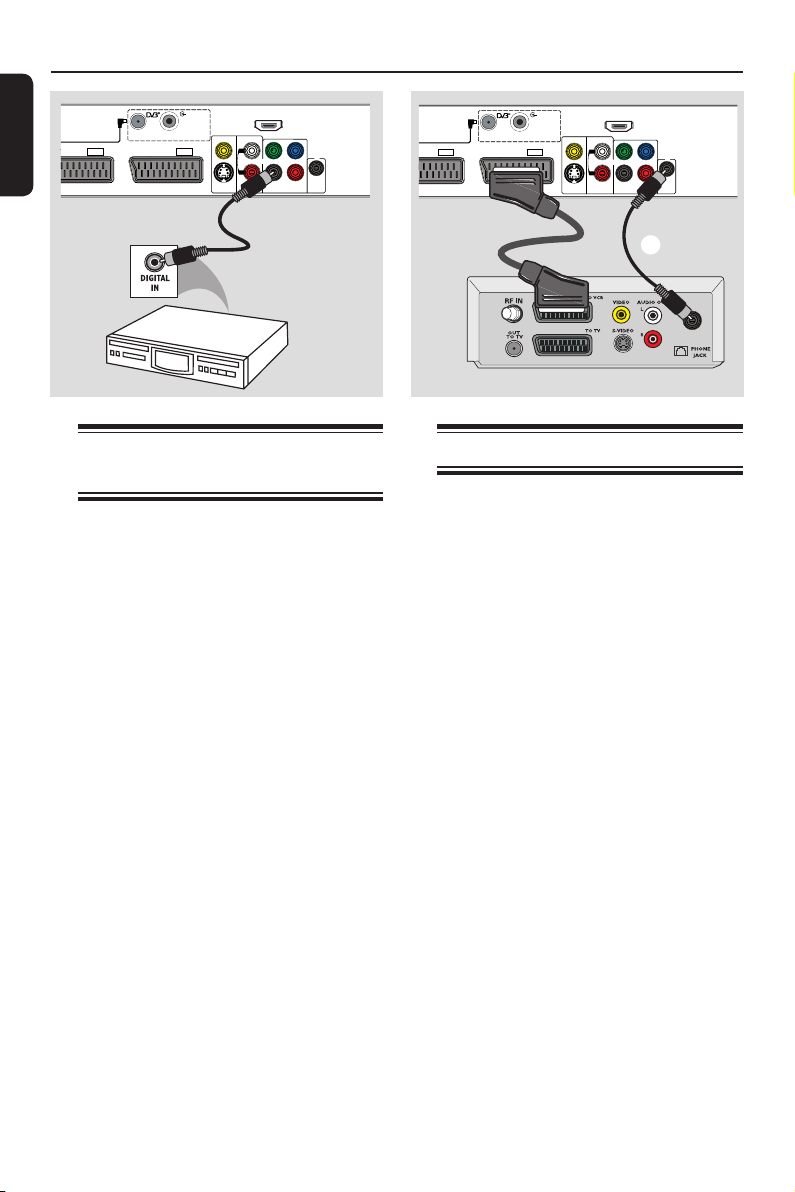
Connecting to digital input
for 5.1 multi-channel recording
This recorder is equipped with a digital
audio input socket that supports 5.1
multi-channel signal. The 5.1 multichannel surround output from the Cable
Box/Satellite Receiver can be recorded
onto this recorder, along with the video.
A Connect a scart cable from the EXT2-
TO VCR/SAT socket on the recorder
to the Scart socket (usually labelled as TV
OUT or TO TV) on the Cable Box/
Satellite Receiver.
B Connect a coaxial cable (not supplied)
from the COAXIAL DIGITAL IN
socket on the recorder to the DIGITAL
or COAXIAL output socket on the
connected Cable Box/ Satellite Receiver.
For more information, see chapter
‘Other information - 5.1 multi-channel
recording’.
24
Page 25
Step 2: Optional Connections (continued)
or
English
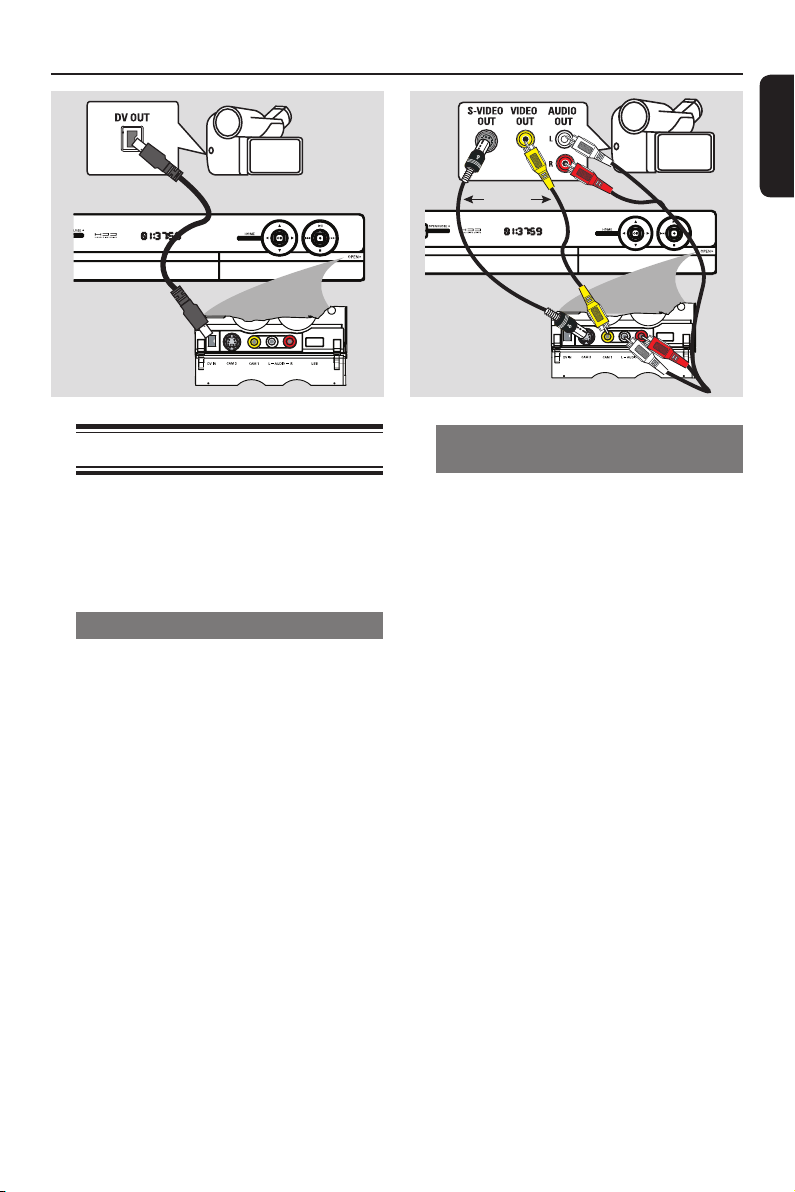
Option 1
Connecting to a camcorder
You can use the front sockets to copy
camcorder recordings. These sockets are
located behind the ap on the right hand
side which provides convenient
connections.
Option 1: Using the DV IN socket
Use this connection if you have a Digital
Video or Digital 8 camcorder. The DV
socket conforms to the i.LINK standard.
It provides the best picture quality.
A Connect an i.LINK 4-pin cable (not
supplied) from the DV IN socket on the
recorder to the appropriate DV OUT
socket on the camcorder.
B Press CAM on the remote control to
select ‘CAM2’.
Helpful Hint:
– It is not possible to record from this
recorder to your camcorder via the DV IN
socket on your recorder.
Option 2
Option 2: Using the S-VIDEO In or
VIDEO In socket
Use the S-VIDEO connection if you have
a Hi8 or S-VHS(C) camcorder. It
provides very good picture quality.
Alternatively, you can use VIDEO
connection if your camcorder has only a
single video output (Composite Video,
CVBS). It provides good picture quality.
Connect the S-VIDEO or VIDEO
A
socket at the front panel of the recorder
to the corresponding S-VHS or Video
output socket on the camcorder.
B Connect the audio cable (red/white - not
supplied) from the AUDIO L/R sockets
at the front panel of the recorder to the
audio output socket on the camcorder.
C Press CAM on the remote control
followed by P +/- repeatedly to select
‘CAM1’.
Helpful Hint:
– If you connect your camcorder to the scart
socket at the rear of this recorder, select
{ EXT1 } or { EXT2 } as the input source.
25
Page 26
Step 3: Installation and Set-up
English
The installation menu appears the very
rst time you turn on this recorder.
These settings help you set up the basic
recorder features easily, including TV
programme installation and language
settings.
Before you start ...
Complete the installation settings before
inserting a disc for playback or recording.
A Turn on the TV.
B Press STANDBY-ON 2 to turn on
the recorder.
Your TV should show the recorder’s
initial installation screen now - { Menu
Language } screen.
If not, you may need to select the
correct input on your TV. Refer to your
TVs user manual on how to select the
correct input on your TV.
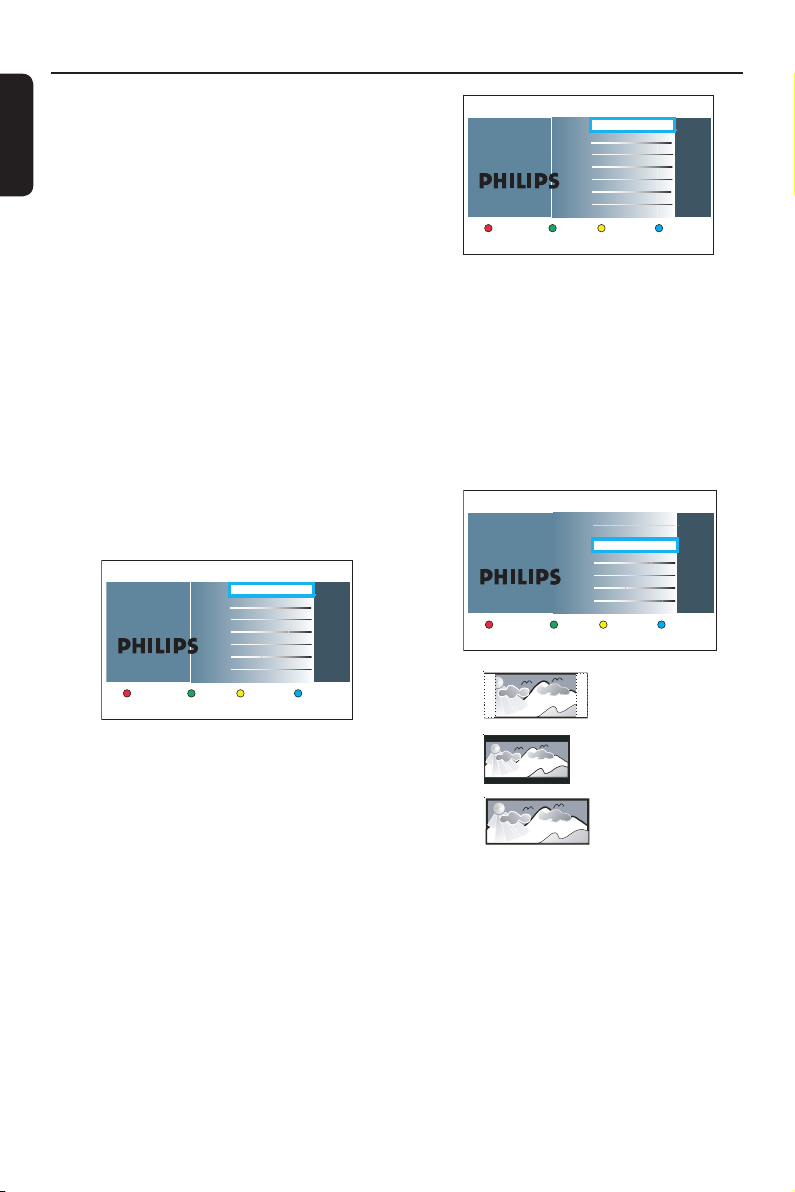
Menu Language
Next
English
Dansk
Deutsch
Español
Français
Italiano
Nederlands
Norsk
Please select your language.
Denes the languages of all
on-screen menu displays.
Country Selection
Next
A Austria
B Belgium
DK Denmark
FIN Finland
F France
D Germa
GR Greece
IRL Ireland
Country selection is
important for TV channels
search.
Previous
Note: Press the Red button on the
remote control for returning to the
previous screen or press the Green
button for proceeding to the next
installation step.
E The TV shape screen appears on the TV.
Select the appropriate TV shape in the
way you want the wide-screen movies to
be displayed and press OK to con rm.
TV shape
Select the appropriate TV shape
according to the TV you have
connected.
Previous Next
4:3 Panscan
4:3 Letterbox
16:9 Widescreen
4:3 PanScan (PS)
C Use keys on the remote control to
select the desired on-screen display
language and press OK to con rm.
D The Country Selection screen appears on
the TV. Move the selection bar to the
country you live in and press OK to
con rm.
This setting is important for automatic
installation of TV channels in your area.
26
4:3 LetterBox (LB)
16:9 (Widescreen)
F The Channel Search screen appears on
the TV. Select the type of tuner to install
and press the Green button on the
remote control to start channel search.
Page 27
Step 3: Installation and Set-up (continued)
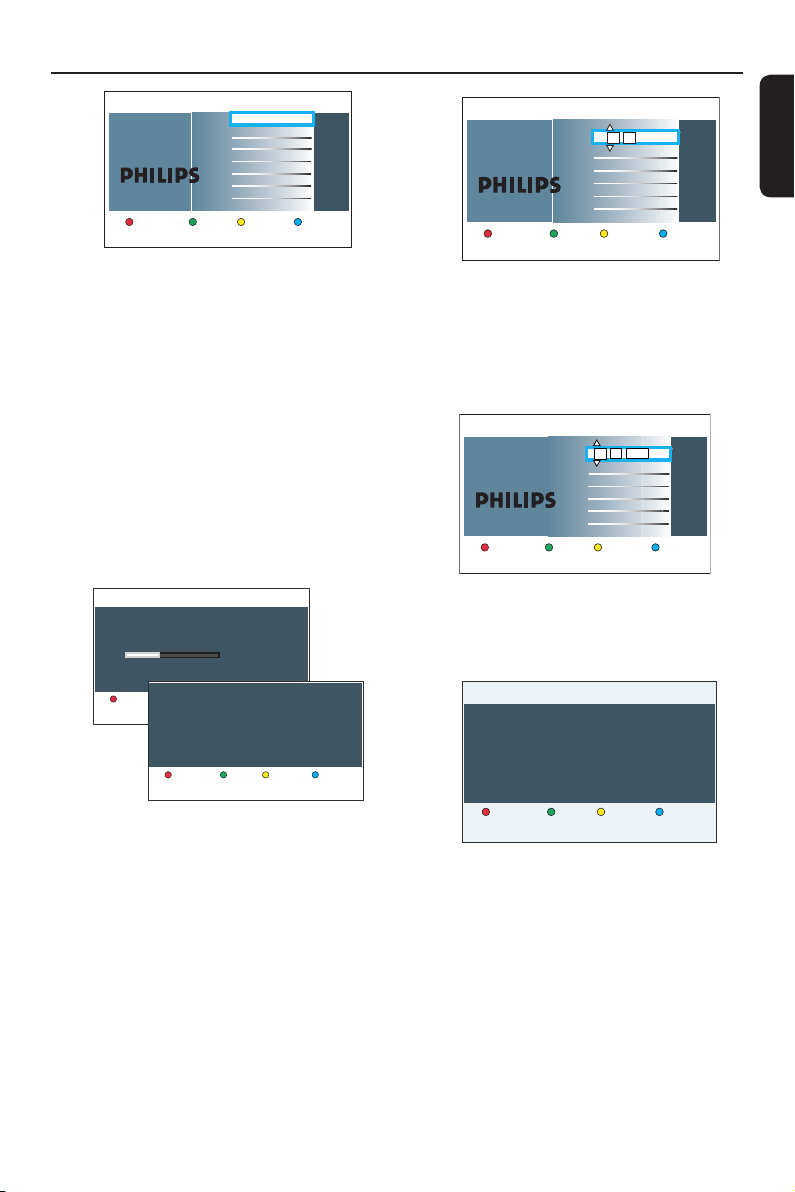
Channel search
Channel search installs Analogue
and Digital TV channels.
Antenna needs to be connected.
Previous Start
Full installation
Only Analogue TV
Only Digital TV
No TV install
Note: Make sure you have successfully
made all the required connections to this
recorder, the TV and Satellite Receiver/
Cable Box (if any) and turned them on.
The channel search will detect the signals
and save all the available programme
channels.
If { No TV install } is selected, only
recordings from external sources will be
possible.
After the channel search is nished, the
G
number of found and stored channels
appear. Press the Green button to
continue.
Digital channel search
Searching channels.
This may take a few minutes. Please wait.
Digital TV channels found: 3
Digital channel search completed
Cancel
Digital TV channels found: 9
Digital Radio channels found: 3
Next Restart
ChkSignal
Time setting is required for
making recordings. Time
format is 24h (hh:mm)
Previous Next
Time
00 00
:
I The Date entry screen appears. Use the
alphanumeric keypad 0-9 or
keys to enter the correct date, then
press OK to con rm or the Green
button to continue.
Date setting is required to
make recordings. Please
make sure it is correct.
Previous Next
Date
31 01 2007
J The installation is now completed. Press
the Green button on the remote control
to close the screen.
Installataion Complete
You have successfully completed the installation
of your recorder.
System is now ready for use.
English
H The Time entry screen appears. Use the
alphanumeric keypad 0-9 or
keys to enter the correct time, then
press OK to con rm or the Green
button to continue.
Previous Done
The DVD recorder is now ready for
use.
27
Page 28
Control TV Programmes
English
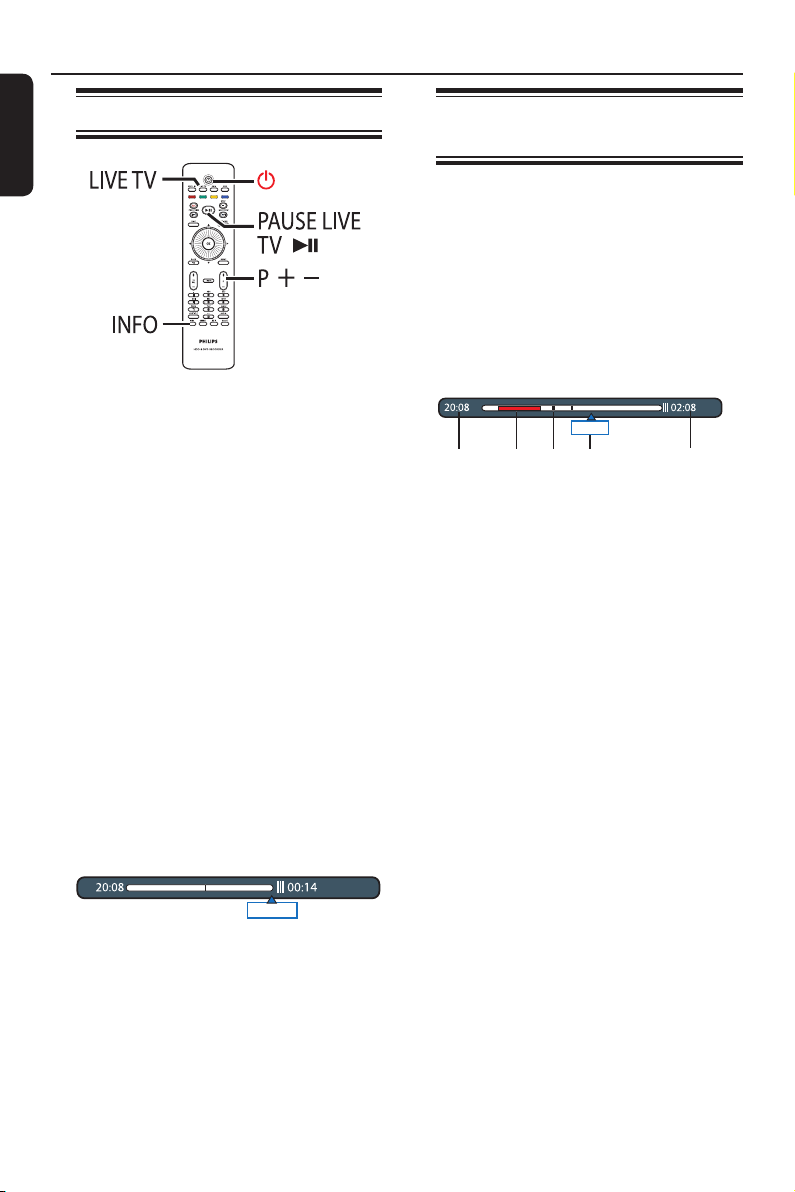
Viewing live TV
PAUSE LIVE TV
A Turn on the TV. If necessary, switch the
TV to the correct input channel for
viewing the recorder’s playback.
B Press STANDBY-ON 2 to turn on
this recorder.
You should see the TV programme on
the TV. If not, press LIVE TV.
Press LIVE TV repeatedly to toggle
C
between analogue tuner (PXX), digital
tuner (DXXX) and digital radio tuner
(RXXX).
D Press P +/− to select a desired channel.
The TV programme you are tuned to
is automatically stored in the Time Shift
Buffer. This allows you to pause the live
TV and resume playback at any time.
If you switch to another TV channel on
the recorder, a new title will be created
and a vertical line will be shown on the
Time Shift video bar.
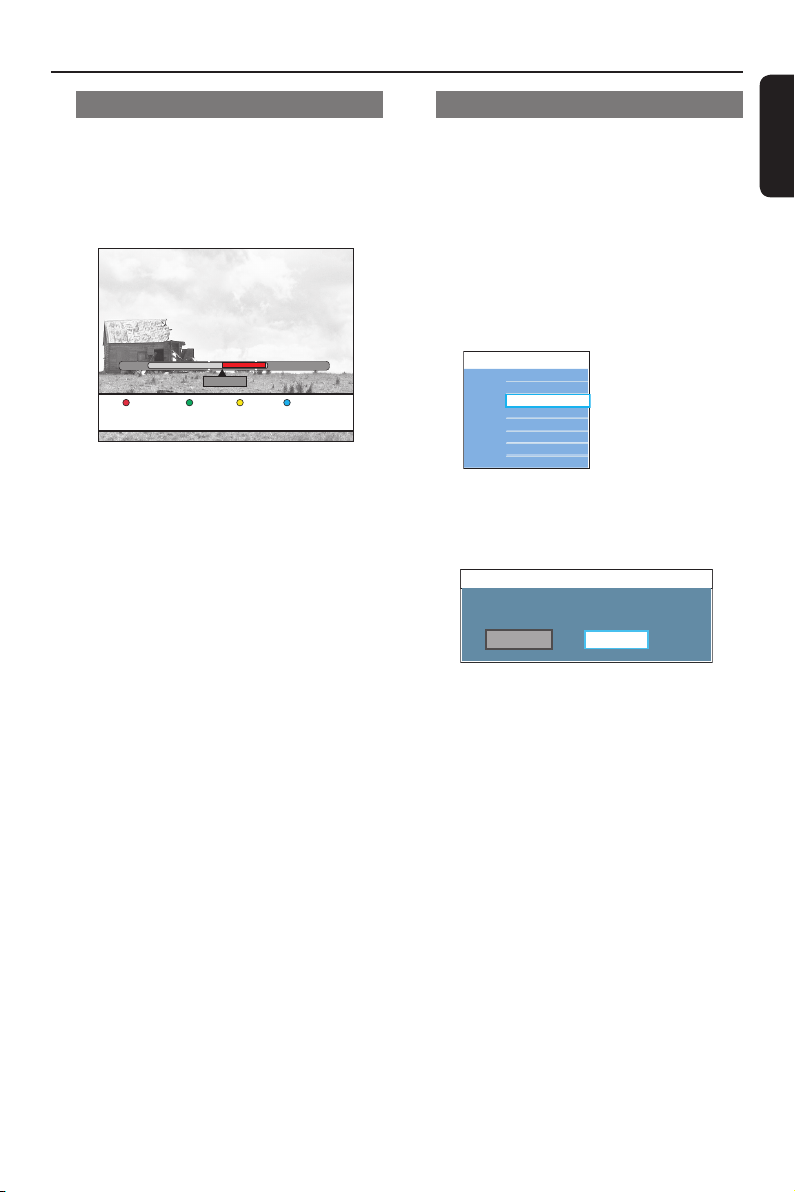
Live
You can choose to display or hide the
Time Shift video bar by pressing the
INFO on the remote control.
About Time Shift Buffer temporary HDD storage
The current TV programme will be
stored in the temporary hard disk
storage called ‘TSB’ (Time Shift Buffer)
once the recorder is turned on. It
continuously stores up to 6 (six) hours of
TV programmes.
The Time Shift video bar indicates the
status and timing of the stored TV
programmes.
22:04:30
12 45
The Time Shift video bar consists of the
following information:
a
The TV programme start time.
Once it has exceeded 6 (six) hours, the
start time will be changed accordingly.
b
Clips that are selected to be recorded
onto the hard disk (marked Red).
c
Title markers (when you switch to a TV
channel for more than 2 minutes, a new
title marker will be created).
d
Current position and time of the TV
programme broadcast.
e
Present time
Helpful Hint:
– The Time Shift Buffer stores and retains
up to the last 6 (six) hours of TV
programmes when the recorder is turned on.
If you switch the recorder to standby mode,
all the contents in the Time Shift Buffer will
be cleared.
3
Now
28
Page 29
Control TV Programmes (continued)
Marking the contents for recording
You need to ‘mark’ the contents in the
Time Shift Buffer before it can be
recorded to the hard disk. The recording
will take effect when you put the
recorder to standby mode.
21:00
Cancel Rec.
22:13
23:30
Prog Info
To nd a scene within the Time
Shift Buffer
Rotate the rotary wheel to skip backward
or forward in the Time Shift Buffer.
Fast rotate the rotary wheel for fast
backward/forward search.
To mark the starting point of
recording
Press REC once.
To mark the end of the recording
Navigate to the end of the scene and
press STOP x.
To cancel the marked recording
Press the Red button.
Helpful Hints:
– Marking of recording can be done forward
or backward within the Time Shift Buffer.
– You can set the length of skip search
interval, see chapter ‘System Menu Options Playback settings - { Replay interval } / { Skip
interval }’ for details.
Clearing the Time Shift Buffer
All the contents in the Time Shift Buffer
will be cleared when you switch the
recorder to standby mode, except for
the marked contents which will then be
stored into the hard disk. You can also
clear the contents using the following
steps while the recorder is turned on.
A Press OPTIONS on the remote control.
The tools menu appears.
Tools
Audio language
Time search
Reset TSB
Settings
B Move to { Reset TSB } and press OK.
A warning message on clearing the
Time Shift Buffer appears.
Warning
This action will clear the Time Shift Buffer.
Do you want to continue?
Yes No
C To proceed, select { Yes } in the menu
and press OK on the remote control.
Otherwise, select { No } in the menu and
press OK on the remote control to
abort the operation.
Note:
In addition, executing the following
actions will also clear the contents in the
Time Shift Buffer:
– Press CAM on the remote control.
– Access { Tuner } option in the system
settings menu.
– Change the { Record mode } or
{ Clock } setting.
English
29
Page 30

Control TV Programmes (continued)
English
Pause live TV function
Before you start ...
Turn on the recorder to LIVE TV mode
to watch your favourite TV programmes.
A Press PAUSE LIVE TV u on the
remote control to pause playback.
B To resume playback, press the same
button again.
If you want to return to the live TV
programme, just press LIVE TV.
Instant replay function
Before you start ...
Turn on the recorder to LIVE TV mode
to watch your favourite TV programmes.
Rotating the rotary wheel anti-clockwise
to replay the live TV programme.
The scene is jumped back by 30
seconds (default setting) at each step of
movement. Fast rotate the rotary wheel
to increase the search speed.
If you want to return to the live TV
programme, just press LIVE TV.
Watching digital TV
broadcast
This DVD recorder is able to receive
free-to-air DVB-T (Digital Video
Broadcast-Terrestrial) and radio stations.
As new services are added over time,
make sure to regularly update and install
new channels. See chapter ‘System Menu
Options - Tuner settings - { Digital }’ for
details.
Press LIVE TV repeatedly to switch to a
A
digital TV tuner.
Press P +/- to select a desired
B
channel.
While watching digital TV broadcast, you
C
can have the following options:
Changing the subtitle/audio language
This operation works only for broadcasts
with multiple subtitle/audio languages.
Press AUDIO or SUBTITLE on the
remote control.
Showing the programme
information
Press INFO on the remote control to
A
display programme information screen.
Goto Prog Info
FlexTime function
While recording is in progress, press
on the remote control to go back to the
beginning of the recording and start
playback.
OR
Press PREV . until you reach the
scene to begin.
30
Press the Blue button for { Prog Info }.
B
The display consists of an information
box showing the description of the
current programme and the name of the
next programme of that channel.
To view the programme information
on other channels, press the P +/-.
To view the next day programme,
press the Yellow button for { Next }
Page 31

Control TV Programmes (continued)
Using the toolbar options
While in live TV mode, press OPTIONS
on the remote control.
If the selection in the menu is greyed
out, that means the feature is not
available or cannot be changed in the
current state.
Tools
Audio language
Subtitle language
Time search
Reset TSB
Settings
Changing audio soundtrack
language
This option is only available if the TV
programme broadcast more than one
audio language.
A Move to { Audio language } and press
B to enter its options.
B Press repeatedly until the audio
language you want is selected.
{ 01 } is the original broadcast language
and { 02} is the additional broadcast
language.
C Press OK to con rm.
Lang I
Changing subtitle language
This option is only available if the TV
programme broadcast more than one
subtitle language.
A Move to { Subtitle language } and
press B to enter its options.
B Press repeatedly until the language
you want is selected.
The languages may be numbered or
abbreviated, such as ‘en’ for English.
C Press OK to con rm.
Searching by time
This option allows you to skip to a
speci c time in the Time Shift Buffer.
Press the Green on the remote control
for { Goto }, then enter the time where
you want playback to start.
Or;
A In Options menu, move to { Time
search } and press B to enter the time
eld (hours : minutes : seconds).
B Use the alphanumeric keypad 0-9 to
enter the time where playback should
start.
C Press OK to con rm.
Playback skips to the time entered.
English
Clearing the Time Shift Buffer
A Move to { Reset TSB } and press B.
B Press OK.
A warning message appears.
C To proceed, select { Yes } in the menu
and press OK on the remote control.
The contents in the Time Shift Buffer
(TSB) will be cleared.
31
Page 32

Using the Home menu
English
About the Home menu
Home menu allows access to contents on
your Hard Disk recording, media les on
Hard Disk, and contents of disc and USB.
It also allows transferring of content
among various media types.
PAUSE LIVE TV
A Press HOME on the remote control.
The Home menu appears.
Source Content
Hard Disk
Disc Tray
USB
Recordings
Video files
Music
Photo
C Use the cursor keys to select recordings,
audio/video les or photos.
D Press u to start playback.
B Move the selection bar to a desired
media or function and press B or OK to
select.
{ Hard Disk }
To access the contents stored on the
hard disk, such as your recordings,
photos, music or video les.
{ Disc Tray }
To access the contents of the disc. In
case the tray is empty, nothing will be
shown.
{ USB }
To access the contents of the connected
USB ash drive or camera. In case there
is no device connected or the device is
not able to detect by the recorder,
nothing will be shown.
32
Page 33

Using the Home menu (continue d)
Viewing media information
To view general information on the
selected media such as size, remaining
space, media type etc.
A Press HOME.
The Home menu appears.
B Move the selection bar to a desired
source.
If the media information is available, a
text label will be appeared next to the
blue softkey.
C Press the Blue button on the remote
control to display the information.
{ HDD Info }
Recorder hard disk information.
– Remaining hard disk size for video
partition (TV recordings and DivX
movies).
– Space used by protected/unprotected
titles.
– Free time for recording based on the
current active recording mode.
– Remaining hard disk size for data
partition (for music and photo les)
and its free space size for recording.
English
{ DVDR Info }
DVD±R or DVD±RW information.
– Disc name, type and status
– Total size.
– Used space.
– Available space.
– Space used by protected titles.
{ USB Info }
USB drive information.
– Name.
– Total memory size.
– Available space.
D Press the Blue button again returns to
the previous menu.
33
Page 34

Before Recording
English
Recording media
The recording media for this recorder
are internal hard disk drive and DVD±R/
±RW/+R DL.
– The hard disk has a high storage density
which enables long recording duration
and quick access to the recording titles.
DVD±RW (DVD Rewritable)
– Discs that are rewritable can be used for
multiple recordings once the existing data
is erased.
DVD±R (DVD Recordable)
– Discs can only be used for a single
recording. Each new recording is always
added at the end of all previous
recordings as existing recordings cannot
be overwritten.
– Editing can be done on DVD±R discs as
long as they have not been nalised.
– You can also delete unwanted recordings.
However, the disc space occupied by the
deleted recordings cannot be recovered
for further recording.
– To play a DVD±R disc on other DVD
players, it must be nalised. After this is
done, no more data can be added to the
disc. See ‘Edit Recordings - Recordable
DVD - Finalising the DVD±R for
playback’ for details.
DVD+R DL (DVD+R Double Layer)
– It contains the same usage as DVD+R, the
only difference is the capacity of 8.5 GB.
It offers two recordable layers on a single
DVD disc. The layers are accessible from
the same side of the disc, so recording
can occur completely uninterrupted.
Supported disc type and media
speeds
Disc
DVD+R 1x - 16x
DVD+RW 2.4x - 8x
DVD-R 1x - 16x
DVD-RW 2.4x - 4x
DVD+R DL 2.4x
Helpful Hints:
– In some cases, you may not be able to add
new recording to a recordable DVD that
contains recordings from other DVD recorders.
– If the newly recorded title in the hard disk
is not accessible, turn the recorder off and on
again to recover the recording.
– If you are unable to t a title to a
recordable DVD, split the title to remove the
unwanted sections. See ‘Edit Recordings Hard Disk - Video editing’ for details.
– If power failure occurred while copying the
recordings from hard disk is in progress, it
may lead to a bad disc.
Media speeds
34
Page 35

Before Recording (continued)
Default recording settings
You can preset your recording settings in
the recording setup menu.
PAUSE LIVE TV
A Press OPTIONS on the remote control.
The tools menu appears.
Tools
Audio language
Time search
Reset TSB
Settings
B Move to { Settings } and press OK.
The system settings menu appears.
D Use keys to select the setting you
wish to change and press B to access its
options.
Instructions and explanations of the
options are provided in the following
pages.
If the option in the menu is greyed
out, that means the feature is not
available or not possible to change at the
current state.
E Press OK to con rm any new settings.
To return to the previous menu screen,
press BACK .
F To exit, press OPTIONS.
Helpful Hints:
– Changing the Recording Mode clears the
contents in the Time Shift Buffer, only the
marked contents (in red bar) will be recorded
into the hard disk of this recorder.
Your recording picture quality will be
–
changed according to the selected record
, including watching the live TV through
mode
the recorder.
English
Language
Recording
Playback
Video output
Audio
Analogue tuner
Digital tuner
Setup
Preferences
Record mode
Auto protect
SAT recording
Chapters
Audio record mode
C Move to { Recording } and press B.
35
Page 36

Before Recording (continued)
English
Recording settings (underlined options are the factory default settings)
Record mode
Auto protect
The recording mode de nes the picture quality of recordings
and the maximum recording time.
DVDR5520H
Record Mode
HQ (high quality)
SP (standard play)
SPP (standard play plus)
LP (long play)
EP (extended play)
SLP (super long play)
SEP (super extended play)
23
45
56
68
90
135
180
1
2
2.5
3
4
6
8
1 hr 55 mins
3 hrs 40 mins
4 hrs 35 mins
5 hrs 30 mins
7 hrs 20 mins
11 hrs 5 mins
14 hrs 45 mins
DVDR5570H
Record Mode
(250GB)
HQ (high quality)
SP (standard play)
SPP (standard play plus)
LP (long play)
EP (extended play)
SLP (super long play)
SEP (super extended play)
40
77
96
115
153
230
300
1
2
2.5
3
4
6
8
1 hr 55 mins
3 hrs 40 mins
4 hrs 35 mins
5 hrs 30 mins
7 hrs 20 mins
11 hrs 5 mins
14 hrs 45 mins
Note: When copying from hard disk to a recordable DVD, the
recording mode of the selected recording in the hard disk will
automatically be transferred. Selecting another recording mode
is not possible. The factory default setting is SPP.
With this feature, delete and edit on the protected titles are not
possible.
{ On } – New recorded titles will be automatically
protected.
{ Off } – Disable the function.
Note: To delete a protected title, rst press the Blue button
on the remote control to turn off the protect feature, then
press the Red button to delete.
SAT recording
36
This feature is only available if you have connected a Satellite
Receiver or other device to the EXT2-TO VCR/SAT scart
socket of this recorder. See ‘Record to Hard Disk - Automatic
recording from Satellite Receiver’ for details.
{ On } – Enable this recorder to start and stop
recording when a signal is received from
the connected device.
{ Off } – Disable the function.
Page 37

Before Recording (continued)
Recording settings (underlined options are the factory default settings)
Chapters
Automatically divides a recording (title) into chapters by inserting
chapter markers at a speci c interval. This enables you to access
a speci c point in the recording quickly.
{ Smart } – Chapter markers will be inserted at the
beginning and end of each commercial block
automatically after recording ended.
– For DV camcorder recording only, a chapter
marker is inserted whenever there is a break
in the time code on the DV tape.
{ Off } – No chapter marker is inserted in the
recording.
{ Standard } – Chapter markers are inserted automatically
during recording at approximately 5 ( ve)
minutes interval.
Notes: { Smart } setting
– This can only happen when you put the recorder to standby
mode after the recording is completed. While in standby mode,
minor noise and heat will be generated due to commercial
chapter marking operation is in progress. Every one hour of
recording requires at least 30 minutes of processing time.
Previous recordings before you turn on this feature will not be
processed.
– When watching the recording, you can press NEXT >
button on the remote control to skip over commercials.
– Accuracy of commercial block detection depends on the
broadcasting parameters.
English
Audio record
mode
Select the type of audio mode for digital recording.
{ Stereo } – Disable digital audio input. Record audio in
stereo mode.
{ Multichannel } – Record audio in multi-channel mode.
Note: Multi-channel recordings from digital terrestrial tuner can
only be played back on this recorder.
37
Page 38

Record TV Programme
English
CAUTION!
– Copy prohibited contents cannot be
recorded on this recorder.
– When the hard disk is full, making a
new recording automatically deletes the
oldest unprotected title on the hard disk
to make space for the new recording.
Record current TV
programme
Follow the instructions below to record
the TV programmes to this recorder’s
hard disk, where you can store for future
viewing and copy to a recordable DVD
disc if required.
A While the Time Shift Buffer is at ‘LIVE’
position, press REC on the remote
control.
It starts recording from the current
position, up to maximum of 6 (six) hours.
21:00
Cancel Rec.
Press REC repeatedly will set the
recording time length in 30-minute
increments, up to a maximum of 6 (six)
hours.
B You can turn off your TV and the
recorder to standby mode while
recording.
The recorder continues recording and
stops at the designated end time.
LIVE
23:30
Prog Info
Record a speci c section of
TV programmes
This is only possible for the TV
programmes that can be found in the
Time Shift Buffer.
PAUSE LIVE TV
A Rotate the rotary wheel or press b / B
to search within the Time Shift Buffer for
the point where you want to begin or
end the recording.
B Press REC to mark the rst point and
press STOP x to mark the second
point.
A red marking will be visible on the
video bar to indicate the marked
recording.
21:00
Cancel Rec.
To cancel the recording, press the Red
button for { Cancel Rec }.
22:13
23:30
Prog Info
If you wish to stop the recording before
the scheduled time, press STOP x.
38
Page 39

Record TV Programme (continued )
Simultaneous record and play
function
While recording a TV programme to the
hard disk, you can play a previously
recorded title from hard disk, playback a
DVD video disc or you can also playback
music, photo slideshows or DivX videos
from hard disk, optical disc or USB. It is
also possible to watch playback from
other connected devices.
PAUSE LIVE TV
Playback from HDD
A Press HDD LIST on the remote
control.
Source Content
Hard Disk
Disc Tray
USB
Previous HDD Info
B Use keys to reach the title you want
to play.
C Press u to start playback.
Recordings
Video files
Music
Photo
Playback from DVD
A Press OPEN CLOSE ç on the
recorder’s front panel.
B Load in a disc to start playback.
Playback from USB
A Insert a USB ash drive to the USB
socket.
B Press USB on the remote control.
C Select a le and press u to start
playback.
Playback from other device
This is only possible if this recorder is
connected to the TV using the
EXT1 TO TV socket.
Press SCART to view the picture from
the device which is connected to the
EXT2-TO VCR/SAT socket of this
recorder.
If there is no device connected to the
EXT2-TO VCR/SAT socket, pressing
SCART switches to TV preset.
Watching other TV programmes
Use the TVs channel up/down button to
select a different TV channel.
Helpful Hint:
– Remember to switch the TV back to its
video input channel if you want to watch the
TV channel through the recorder or play
back the recorded disc.
English
39
Page 40

Record TV Programme (continued )
English
Automatic recording from
Satellite Receiver
The feature is only applicable to the
Satellite Receiver (or any similar devices)
that is connected to the EXT2-TO VCR/
SAT scart socket of this recorder. In
addition, the Satellite Receiver must have
a timer function that is able to control
the recording function of this recorder.
Before you start ...
Ensure that the { SAT recording }
mode in the recording setting is set to
{ On }.
A Use the Satellite Receiver’s timer
programming function to program the
recording (refer to the Satellite
Receiver’s user manual).
Each recording can be programmed up
to 6 (six) hours.
B Turn off the Satellite Receiver to standby
mode.
C Turn off the recorder to standby mode.
Leave the recorder and Satellite
Receiver in standby mode for the
recording.
The recorder starts recording when it
detects a signal from the Satellite
Receiver.
Helpful Hint:
– The recorder’s timer recordings take
priority over automatic satellite recording.
Automatic Satellite recording stops if the
recorder’s timer recording is due to start.
40
Page 41

Record TV Programme (continued )
About timer recording
Use the timer recording to automatically
start and stop a recording at a later date/
time. This recorder tunes to the right
programme channel and begins recording
at the speci ed time.
With this recorder, you can schedule up
to 40 recordings at a time and up to 6
(six) hours for each recording. During
timer recording, changing the recorder’s
channel is not possible.
Note: If the scheduled timer recording
is longer than 6 (six) hours, it splits into
two or more titles.
There are two ways to program a
timer recording
– Using the ShowView
– Using manual timer programming
PAUSE LIVE TV
OK
Timer recording (ShowView
system)
This is a simple timer programming
system. To use it, enter the ShowView
programme number associated with your
television programme. You can nd this
number in your TV listings magazine.
A Turn on the TV to the correct viewing
channel for the recorder.
B Press TIMER (SHOWVIEW) on the
remote control.
The timer menu appears.
List of timers
C Press the Blue button on the remote
control for { ShowView }
The ShowView entry menu appears.
Timer details
Start time
Stop time
Date
Source
Channel
Title name
Repeat
VPS/PDC
Recording target
New Timer ShowView
English
TIMER
(SHOWVIEW)
About ‘VPS/PDC’
‘VPS’ (Video Programming System) or
‘PDC’ (Programme Delivery Control) is
used to control the start and duration of
TV channel recordings. If a TV
programme starts earlier or ends later
than was scheduled, this recorder will
then turn on and off at the correct time.
ShowView System
Enter ShowView program number :
Clear Store
Cancel
D Use the alphanumeric keypad 0-9 to
enter the ShowView programme number
(e.g. 5-312-4 or 5,312 4, key in ‘53124’).
To clear the programme number, press
the Red button for { Clear }.
To cancel the programme and exit the
menu, press the Yellow button for
{ Cancel }.
41
Page 42

Record TV Programme (continued )
English
E
To con rm your entry, press the Green
button for { Store }.
A message to enter channel list
appears.
Select { OK } in the menu and press OK
F
to con rm.
The programme information appears.
New timer
Start time
Stop time
Date
Source
Channel
Title name
Repeat
VPS/PDC
Recording target
Clear all
G To change the recording settings, move
to the respective eld and press B.
{ Repeat } - Once
{ VPS/PDC } - Off
{ Recording target } - HDD
H Select a setting and press OK.
I Once complete, store the setting by
pressing the Green button for { Store }.
J To exit, press TIMER (SHOWVIEW).
The ‘TIMER’ icon lights up on the
display panel if a timer recording is set.
20:30
21:30
16/01/07
Analogue
P05
Show
Once
On
HDD
Store
Start time
20 30
Cancel
- Weekly
- Mon~Fri
- Daily
- On
- DVD
Timer recording (manually)
A Turn on the TV to the correct viewing
channel for the recorder.
B Press TIMER (SHOWVIEW) on the
remote control.
The timer menu appears.
List of timers
C Press the Green button on the remote
control for { New Timer }
The new timer entry menu appears.
New Timer
Start time
Stop time
Date
Source
Channel
Title name
Repeat
VPS/PDC
Recording target
Clear All Store
Timer details
Start time
Stop time
Date
Source
Channel
Title name
Repeat
VPS/PDC
Recording target
New Timer ShowView
Start time
Cancel
Helpful Hint:
– If the recorder is not in standby mode, a
noti cation message appears before the
timer recording begins. If you ignore the
message, the recorder automatically switches
to the respective channel and starts
recording.
42
Page 43

Record TV Programme (continued )
{ Start time }
{ Stop time }
{ Date }
{ Source }
{ Channel }
{ Title name }
{ Repeat } Select a repeat
{ VPS/PDC } Turn on or off the
{ Recording
target }
Enter the start time of
recording (hours :
minutes).
Enter the end time of
recording (hours :
minutes).
Enter the date for
recording (Day/
Month/Year).
Select the source
(analogue tuner or
digital tuner) to
record.
Select the TV channel
or the external input
channel for recording.
Enter the title name
for this recording.
recording setting
{Once, Weekly,
Mon~Fri, Daily}.
VPS/PDC setting.
Select the destination
for recording (HDD
or DVD).
Helpful Hint:
– If the recorder is not in standby mode, a
noti cation message appears before the
timer recording begins. If you ignore the
message, the recorder automatically switches
to the respective channel and start recording.
English
D Select the entry eld and press B.
E Use keys or the alphanumeric
keypad 0-9 to select or enter the
recording information, then press OK to
con rm.
F Once complete, store the setting by
pressing the Green button for { Store }.
G To exit, press TIMER (SHOWVIEW).
The ‘TIMER’ icon lights up on the
display panel if a timer recording is set.
43
Page 44

Record TV Programme (continued )
English
Changing/Deleting a
scheduled recording
A Turn on the TV to the correct viewing
channel for the recorder.
B Press TIMER (SHOWVIEW) on the
remote control.
The timer menu appears.
List of timers
20:30 - P05 TELE-Once
09:00 - P03 TELE-Once
11:30 - P04 TELE-Once
Delete New Timer
C Select a scheduled recording which you
want to delete or edit.
D To delete the scheduled recording, press
the Red button on the remote control
for { Delete }.
E To change the scheduled recording, press
the Yellow button on the remote
control for { Change }.
The timer entry menu appears.
Timer details
Start time
Stop time
Date
Source
Channel
Title name
Repeat
VPS/PDC
Recording target
Change
20:30
21:30
16/01/07
Analogue
P05
ABC
Once
On
HDD
ShowView
Once complete, store the setting by
G
pressing the Green button for { Store }.
H To exit, press TIMER (SHOWVIEW).
New timer
Start time
Stop time
Date
Source
Channel
Title name
Repeat
VPS/PDC
Recording target
Clear all
20:30
21:30
16/01/07
Analogue
P05
Show
Once
On
HDD
Store
Start time
20 30
Cancel
F Make the necessary changes in the
respective entry eld.
44
Page 45

Record from external devices
Recording from an external
device (Camcorder/VCR/
DVD player)
When you connect your external device
to this recorder, you can choose to make
a recording from the external device to
the hard disk or a recordable DVD.
Copy-protected material cannot be
recorded on this recorder.
Before you start...
Mark the contents in the Time Shift
Buffer for which you wish to record to
the hard disk. Otherwise, all the contents
will be cleared when you start camcorder
recording.
PAUSE LIVE TV
Switching to camera mode will clear the
Time Shift Buffer.
Select a media type to record.
Hard Disk Optical Disc Cancel
D Select the destination for recording and
press OK to con rm.
E Press P +/- repeatedly to select the
correct input channel that matches the
connected socket of the device.
{ CAM 1 } : S-VIDEO or VIDEO
socket at the front.
{ EXT 1 } : EXT1 TO TV scart socket
at the back.
{ EXT 2 } : EXT2-TO VCR/SAT scart
socket at the back.
F Turn on the external device and nd the
place where you want the recording to
begin, then put the external device to
pause mode.
G Press REC to start recording and start
the external device playback.
To pause the recording, press u.
To continue recording, press u again.
A new chapter marker is created after
recording restarts (for recordable DVD
only).
English
A Turn on the TV to the correct viewing
channel for the recorder.
B Connect the external device (e.g.
camcorder, VCR, DVD player) to this
recorder.
C Press CAM on the remote control.
A warning message appears. All the
contents in the Time Shift Buffer will be
cleared, only the ‘marked’ contents will
be stored onto the hard disk.
H To stop the recording, press STOP x.
A new title will be created when you
begin another recording.
I To exit, press LIVE TV.
Helpful Hint:
– While recording from an external device to
the hard disk or recordable DVD is in
progress, you can press the OK button to
generate chapter marker at a speci c point.
45
Page 46

Record from external devices (continued)
English
Recording from a DV
Camcorder
When you connect a DV camcorder to
the DV IN socket of this recorder, you
can control both the camcorder and this
recorder using the recorder’s remote
control. Furthermore, the smart
chaptering feature ensures the chapter
markers are created at each break in the
images.
Before you start...
Mark the contents in the Time Shift
Buffer for which you wish to record to
the hard disk. Otherwise, all the contents
will be cleared when you start camcorder
recording.
PAUSE LIVE TV
Press CAM on the remote control.
C
A warning message appears. All the
contents in the Time Shift Buffer will be
cleared, only the ‘marked’ contents will
be stored onto the hard disk.
Switching to camera mode will clear the
Time Shift Buffer.
Select a media type to record.
Hard Disk Optical Disc Cancel
D Select the destination for recording and
press OK to con rm.
E Turn on the DV camcorder and start
playback.
F Press REC to start recording.
DV control
A Turn on the TV to the correct viewing
channel for the recorder.
B Connect your Digital Video or Digital 8
camcorder to the DV IN socket of this
recorder.
46
G To use the recorder’s remote control to
control the camcorder’s operation during
recording, press the Green button on the
remote control for { DV control }.
The DV control buttons display on the
screen.
00:11:25
Cancel
HIDECHAPTER DIVIDE
Page 47

Record from external devices (continued)
H You can navigate to the respective
control keys on the screen to control the
playback of your DV camcorder.
I To stop the recording, press STOP x.
Both the recorder and camcorder
stop.
J To exit, press LIVE TV.
Helpful Hints:
– Some camcorders cannot be controlled by
on-screen DV control buttons.
– Mixing of PAL and NTSC video format
recording on a same recordable DVD is not
possible.
– If a part of the tape is blank, the recording
will pause. Recording starts automatically
when there is a recordable signal. However,
if there is more than 5 ( ve) minutes of
blank tape, the recording ends automatically.
English
47
Page 48

Copy TV programmes from HDD
English
About copying
Content Sorting
Recordings
Video files
Music
Photo
TV programmes recorded to the hard
disk will be kept as ‘Recordings’ content.
It allows you to edit your recording easily
and copy to a recordable DVD for safe
keeping or later viewing.
The time required for copying is
depending on the recording mode that
was used on the hard disk recordings. It
is not possible to change the recording
mode for the copying process. It is
therefore important that you choose the
appropriate recording mode when you
set up the recording to the hard disk.
The copying process is done at a higher
speed than the recording. The maximum
copying speed is up to 4x. You cannot
shorten the time required for recording
even with high-speed discs.
Hard disk Recordable DVD
HQ
SP
SPP
LP
EP
SLP
SEP
Hours of recordings can
be stored in an empty
4.7GB recordable DVD
HDD
recording
mode
New
All
Genre
Protected
Delete order
Last played
Time required
for copying 1 hour
of recording
1
2
2.5
3
4
6
8
15.0 mins
8.0 mins
7.0 mins
6.0 mins
4.5 mins
3.5 mins
2.5 mins
Copying recordings to
recordable DVD
A Turn on the TV to the correct viewing
channel for the recorder.
B Insert a recordable DVD into the
recorder.
C Press HDD LIST on the remote
control.
D Use keys to reach the title you
want, then press the Green button on
the remote control for { Copy }.
The making disc copy information
appears.
Check Disc
Title CH8 15-Jul-2007 13:54
Length 52 min
Available Space 2 hr 03 min
Copying Time 19 min
Erase disc Start Cancel
E Press the Green button to start copy.
Otherwise, press the Yellow button to
abort the operation.
If you are using a DVD±RW for
recording, you can press . / > to
select the space in the disc where you
want the recording to be placed (e.g. the
space of a deleted title).
Helpful Hint:
– If you are unable to t a title to a
recordable DVD, split the title to remove the
unwanted sections. See ‘Edit Recordings Hard Disk - Video editing’ for details.
48
Page 49

Copy TV programmes from HDD (continued)
Changing the screen display
for recordable DVD
If the recordable DVD has been used in a
computer drive or in another recorder,
the screen menu may not be displayed
correctly.
Before you can make recording to this
disc on this recorder, you must change
the screen display of the disc to ‘Philips’
type.
A Load in a recordable DVD.
B Press HOME on the remote control.
C Move to { Disc Tray }.
Source Titles
Hard Disk
Disc Tray
USB
Adapt menu
Title 01
Title 02
Title 03
Title 04
Title 05
Title 06
Title 07
Title n
English
D If { Adapt menu } appears, it means this
disc has a different menu format. Press
the Red button on the remote control.
A message to con rm your action
appears on the TV.
E Press OK to con rm adapt menu action.
49
Page 50

Copy les between HDD, USB and DVD
English
A part of this recorder’s hard disk drive
can be used as a Media Jukebox, allowing
you to store and playback your videos,
music and photos. You can copy these
les from either USB or DVD to the
hard disk, from hard disk to USB and
recordable DVD and even directly
between USB and recordable DVD.
Notes:
It is not possible to copy video or
TV recordings from the hard disk to
a USB device.
The Media Jukebox supports the
following les:
– MP3 and Windows Media music (.mp3
and .wma)
– JPEG digital camera photos (.jpg)
– DivX movies (.avi and .divx)
Copying les from HDD to
USB or recordable DVD
You can copy the les from the
recorder’s hard disk to your USB thumb
drive or recordable DVD. When copy
to USB, only data les (MP3, WMA,
DivX and JPEG) are allowed.
E Use the cursor keys to reach the title
you want. To make multiple selections,
press SELECT.
F Press the Green button for { Copy }.
Media type selection screen appears.
Target for copy.
Choose destination for copy.
To Disc
To USB
G Select the destination for copying and
press OK to con rm.
Otherwise, press BACK to return to
the previous menu.
H Press OK again to start copy.
Otherwise, select { Cancel } in the menu
and press OK to abort the operation.
A Turn on the TV to the correct viewing
channel for the recorder.
B Insert a recordable DVD into the
recorder or a USB thumb drive to the
USB socket.
C Press HOME.
D Select the media where the les are
stored and press B.
50
Page 51

Copy les between HDD, USB and DVD (continued)
Copying les from USB to
HDD or recordable DVD
You can copy the data les (MP3, WMA,
DivX and JPEG) in your USB drive to this
recorder’s hard disk drive or recordable
DVD.
A Turn on the TV to the correct viewing
channel for the recorder.
B Connect the USB ash drive/memory
card reader or digital camera to the USB
socket at the front panel of the recorder.
C Press USB on the remote control to
view the les.
D Navigate in the menu and select the les
to copy. To make multiple selections,
press SELECT.
E Press the Green button for { Copy }.
Media type selection screen appears.
Target for copy.
Choose destination for copy.
To Hard Disk
To Disc
F Select the destination for copying and
press OK to con rm.
Otherwise, press BACK 2 to return to
the previous menu.
G A con rmation dialogue appears, press
OK to start copy.
Copy
1 item(s) selected for copying.
Copy Cancel
Otherwise, select { Cancel } in the menu
and press OK to abort the operation.
Copying les from CD/DVD
to HDD or USB
You can only copy the data les (MP3,
WMA, DivX and JPEG) from your disc to
this recorder’s hard disk drive or USB
device.
A Turn on the TV to the correct viewing
channel for the recorder.
B Insert a CD/DVD into the recorder.
C Press DISC on the remote control.
The disc content menu appears.
D Use the cursor keys to reach the title
you want. To make multiple selections,
press SELECT.
E Press the Green button for { Copy }.
Media type selection screen appears.
Target for copy.
Choose destination for copy.
To Hard Disk
To USB
F Select the destination for copying and
press OK to con rm.
Otherwise, press BACK 2 to return to
the previous menu.
G A con rmation dialogue appears, press
OK to start copy.
Otherwise, select { Cancel } in the menu
and press OK to abort the operation.
Helpful Hint:
– All DivX (.avi or .divx) les will be copied
to the Video partition of the hard disk, while
all music (.mp3 or .wma) and digital camera
photos (.jpg) will be copied to the Data
partition.
English
51
Page 52

Playback from Hard Disk
English
Hard Disk navigation
The Hard Disk drive serves as a media
jukebox which allows you to store all
sources of recordings (TV recordings,
videos, music and photos). The titles
recorded or copied to the hard disk will
automatically be saved under separate
contents based on the characteristics of
the recordings.
A Press HOME.
The Home menu appears.
{ Recordings }
Contains recordings from the Time Shift
Buffer (TV programmes).
{ Video les }
Contains only DivX or compatible video
les (.avi or .divx).
Hard Disk
Source Content
Hard Disk
Disc Tray
USB
Previous HDD Info
Content
Sorting
Recordings
Video files
Music
Photo
Titles
B Select a contents type and press B to
access its sorting display options.
Content Sorting
Recordings
Video files
Music
Photo
The sorting options are varied with the
New
All
Genre
Protected
Delete order
Last played
kind of content selected.
C Select a sorting option and press B to
view the titles.
D To exit the menu, press HOME.
Content searching
You can search for content of a speci c
type on the Hard Disk by lters and
keywords. This feature is only applicable
to Recordings and Music les.
A If content search is available, press the
Blue button for { Search }.
B Select your preferred search criteria
shows on the TV and press the Red
button to start searching.
Search
Search
BackClear
{ Music }
Contains only audio les (.mp3 or .wma).
{ Photo }
Contains only picture les (.jpg or .jpeg).
52
C When the search is completed, a list of
all matching content items will be
displayed.
Page 53

Playback from Hard Disk (continue d)
Basic operation
Each recording stored on the hard disk is
displayed in the HDD list with an Index
Picture.
A Press HDD LIST on the remote
control.
Titles Info
Title 1
Title 2
Title 3
Title 4
Title 5
Delete Protect Copy Child Lock
B Use keys to reach the title you want
to play, then press u to start playback.
This recorder has resume playback
ability. Playback always begins at the last
stopped point. To start playback from
the beginning, press OK.
Symbols at the { Info } screen indicating:
– title is still part of the recording
in the ‘Time Shift Buffer’.
– title is locked.
P – title is protected.
C – title is copy-protected.
– title is set for auto commercial
c
block chapter marking.
– title has been viewed.
– title has been edited.
Time 00:37:34 SP
Date 07.07.2007
Genre Others
. (PREV/REW) /
> (NEXT/FFW)
– Move to the beginning or previous/
next chapter.
– Press and hold for Fast backward/
forward search. Press the button again
to increase the search speed (4x, 16x,
64x, 256x).
Rotary wheel
– Rotate the rotary wheel by one click
to the left or right to skip backward or
forward in the Time Shift Buffer.
– Rotating the rotary wheel for fast and
easy navigation within the Time Shift
Buffer.
INFO
– Show or hide the title information,
video bar and additional features that can
be accessed via the colour coded button.
PAUSE LIVE TV u
– View a still picture or resume
playback.
STOP x
– Stop playback.
D To exit the menu, press HOME.
PAUSE LIVE TV
English
C During playback, you can use the
following buttons on the remote control
to access additional playback features.
53
Page 54

Playback from Hard Disk (continue d)
English
Delete/Lock/Protect a title in
the HDD
These options are displayed at the
bottom of the hard disk title content
menu.
A Press HDD LIST on the remote
control.
B Use keys to reach the title you
want.
C Press the matching colour coded button
on the remote control to access the
options displayed at the bottom of the
menu.
Delete
Copy Child Lock Protect
Chld Unlck Unprotect
{ Delete }
Red button – Delete the selected title
from the hard disk.
{ Copy }
Green button – Copy the selected title
to a recordable DVD. Copy to USB
device only possible for data les.
Repeat hard disk playback
While playback the title in the hard disk,
you can select to repeat playback the title
or a speci c segment within the title.
Press the Yellow button on the remote
control for { Repeat }.
The title will be played back
repeatedly until you press the Yellow
button again.
Press the Blue button on the remote
control for { Repeat A-B }.
The rst press to mark the starting
point of repeat playback and the second
press to mark the ending point.
The marked segment will be played
back repeatedly until you press the Blue
button again.
Repeat Repeat A-B
{ Child Lock } / { Chld Unlck }
Yellow button – Lock or unlock the
selected title from viewing. A four-digit
pin code is required to play the locked
title or to unlock the title.
Note: This option only visible if the
{ Child lock } setting is enabled. See
‘System Menu Options - Playback settings
- { Access }’.
{ Protect } / { Unprotect }
Blue button – Protect or unprotect the
title against editing or automatic deletion
of recordings.
D To exit the menu, press HOME.
54
Page 55

Playback from USB device
You can view, copy or delete the
contents of a USB ash drive/memory
card reader or digital camera through
this recorder.
A Connect the USB ash drive/memory
card reader or digital camera directly to
the USB socket on the front panel (as
shown in the above illustration).
B Press USB on the remote control to
view the les.
The content menu appears.
Content
Video
Music
Photo
Root
Folder 01
Folder 02
D To stop playback, press STOP x or
remove the USB ash drive/memory card
reader or digital camera from the USB
socket.
Helpful Hints:
– The USB socket only supports playback
and copying of JPEG/MP3/WMA/DivX les.
– The USB socket does not support the
connection of other USB devices except to a
USB ash drive/memory card reader or
digital camera.
– When the USB device does not t into the
USB socket, a USB extension cable is
required.
English
C Select the le to play and press u to
start playback.
During playback, the available playback
settings are displayed at the bottom of
the screen.
For more playback information, see
‘Playing an audio CD (MP3/WMA)’,
‘Playing a JPEG photo (slideshow)’ or
‘Playing a DivX disc’ for details.
55
Page 56

Playback from Disc
English
Playable discs
Using this recorder, you can play and
record on the following discs:
Recording and Playback
DVD±RW
(DVD Rewritable);
can be recorded on
over and over.
DVD±R
(DVD Recordable);
can be recorded
only once.
DVD+R DL
(DVD+R Double Layer);
same as DVD±R.
Playback only:
DVD Video (Digital Versatile
Disc)
CD-RW (CD-Rewritable)
Audio/ MP3/ JPEG contents
CD-R (CD-Recordable)
Audio/ MP3/ JPEG contents
Audio CD (Compact Disc
Digital Audio)
ReWritable
Recordable
IMPORTANT!
– If the inhibit icon ‘X’ or
appears on the TV screen when a
button is pressed, it means the
function is not available on the
current disc or at the current time.
– DVD discs and players are
designed with regional restrictions.
Before playing a disc, make sure the
disc is for the same region zone as
your player.
Starting disc playback
A Press STANDBY-ON 2 to turn on
the recorder.
B Press OPEN CLOSE ç on the front of
the recorder.
You can also hold down the STOP x
button on the remote control to open
and close the disc tray.
C Place the disc into the tray with the label
facing up, then press OPEN CLOSE ç.
For double-sided discs, load the side
which you want to play facing up.
D Turn on the TV to the correct viewing
channel for the recorder.
E Playback may start automatically.
Otherwise, press DISC. Navigate to the
track/title to play and press u.
MP3/WMA-Disc
Video CD
(Formats 1.0, 1.1, 2.0)
Super Video CD
DivX, DivX Ultra
56
Helpful Hints:
– This recorder has resume playback ability
(for certain type of disc). Press PLAY to
resume playback or press OK to start
playback from the beginning.
– If the pin code entry dialogue appears on
the TV, this means that the child lock was
activated for the inserted disc. You have to
enter your four-digit pin code.
Page 57

Playback from Disc (continued)
Playing a DVD video disc
Normally the DVD disc contains a disc
menu. You may have to make your
selection (e.g.,, subtitle or audio language)
within the disc menu.
A Insert a DVD.
If the disc menu appears, use keys
to select a play option and press OK to
con rm or the alphanumeric keypad
0-9 to input your selection.
To access the disc menu
Press DISC on the remote control.
To select the previous or next
chapter/title
During playback, press SELECT on the
remote control to toggle between
‘TITLE’ or ‘CHAPTER’, then press . /
>.
B To stop playback, press STOP x.
Playing a (Super) Video CDs
(Super) Video CDs may feature ‘PBC’
(Play Back Control). This allows you to
play the video CDs interactively,
following the menu on the display.
A Insert a (Super) Video CD.
If the disc index menu appears, use
keys to select a play option or use the
alphanumeric keypad 0-9 to input
your selection and press OK to con rm.
To return to the previous menu, press
BACK on the remote control.
B To stop playback, press STOP x.
Playing a DVD recordable disc
A Insert a DVD recordable disc.
The Index Picture screen appears.
Title
Title 1
Title 2
Title 3
Title 4
Title 5
Empty title
00:05:12
HQ
15.07.06
02:00:24
SP
28.07.06
00:35:12
SP
English
Delete
Child Lock
Protect
B Use keys to select a title to play,
then press u.
C To stop playback, press STOP x.
Helpful Hint:
– If the message ‘EMPTY DISC’ appears on
the display panel, this means that there are
no recordings on this disc.
57
Page 58

Playback from Disc (continued)
English
Playing an audio CD (MP3/WMA)
MP3 (MPEG1 Audio Layer-3) les are
highly compressed music les. The MP3
format lets you store about ten times
more data (music, pictures) on a single
CD-ROM than a regular CD.
A Insert an audio CD.
The content menu appears.
Otherwise, press DISC.
Video
Music
Photo
RootContent
Images
MP3
B Select the audio album or track to play
and press u.
Track 01
Track 02
Track 03
Track 04
Track 05
Track 06
Track 07
Album
Track number 06/14
Track time 04:12:10
C During playback, you can press . /
> to select the next/previous track.
D To stop playback, press STOP x.
Helpful Hints:
– If both JPEG pictures and MP3/WMA are
in the same disc, you can choose to playback
the JPEG pictures or MP3/WMA by selecting
{ Photo } or { Music } in the menu.
– Only the rst session of a multi-session CD
will be played back.
– This recorder does not support MP3PRO
audio format.
– If any special characters are present in the
MP3 track name (ID3) or album name, it
might not be displayed correctly on the
screen because this recorder does not
support the characters.
Playing a DivX le
See ‘System Menu Options - Setup
Settings - { DivX VOD }’ for information
on purchasing or renting movies from
DivX VOD service. This recorder can
only playback DivX movies which are less
than 4GB.
A Press HOME.
B Select the media where the DivX le is
stored and press B.
C Select { Video } in the content menu.
D Use the cursor keys to reach the title
you want to play, then press u to start
playback.
During playback, you can;
If multilingual subtitles are available on
the DivX disc, you can press SUBTITLE
on the remote control to change the
subtitle language.
If the DivX title provides different audio
tracks, you can press AUDIO on the
remote control to change the audio
stream.
To select the character set that supports
the recorded subtitle:
1) Press OPTIONS.
2) Move to { Character set } in the
menu and press B.
3) Make your selection and press OK.
E To stop playback, press STOP x.
Helpful Hints:
– Subtitle les with the following le name
extensions (.srt, .smi, .sub, .ssa, .ass) are
supported but do not appear on the le
navigation menu.
– The subtitle le name has to be the same
as the le name of the movie.
– The subtitle can only be displayed up to an
average of 45 characters.
58
Page 59

Additional Playback Features
Playing JPEG photo les
(slide show)
A Press HOME.
Source
Hard Disk
Disc Tray
USB
B Select the media where the JPEG photos
are stored and press B.
Content
Video
Music
Photo
C Select { Photo } in the menu and press
B.
From Hard Disk only, { Photo folders }
and { Photo albums } options appear.
Press B again to select the option you
want the photo les to appear.
Note: { Photo albums } option is not
available on optical disc and USB.
E Select a le and press u to start the
slide show playback or press OK to
show the overview images.
During playback, the available playback
settings are displayed at the bottom of
the screen.
Zoom Speed Dn Speed UpRepeat
{ Zoom }
Red button – Activate zoom mode. The
slideshow playback will pause.
{ Zoom In } Blue button: enlarge the
{ Zoom Out } Yellow button: revert to
{ End } Red button: exit zoom
{ Repeat }
Green button – Toggle between repeat
on and off.
picture.
the actual size.
mode and continue
slideshow playback.
English
D Press B repeatedly until a list of photo
le names appear.
The rst 4 photos found in the
currently selected folder will be displayed
at the right hand panel.
Photo folders Info
roll 1
roll 2
roll 3
07.07.20 07
Copy To Album
100 photo(s)
{ Speed Dn } / { Speed Up }
Yellow and Blue buttons – Change the
slideshow playback speed.
{ Slow } 10 (ten) seconds interval.
{ Medium } 5 ( ve) seconds interval.
{ Fast } 3 (three) seconds interval.
F To stop playback, press STOP x.
59
Page 60

Additional Playback Features (continued)
English
Helpful Hints:
– If both JPEG photos and MP3s are in the
same disc, you can choose to playback the
JPEG photos or MP3s by selecting { Photo }
or { Music } in the menu.
– If the JPEG photo is not recorded with an
‘exif’ type le, the actual thumbnail picture
will not be shown on the display. It will be
replaced with a ‘blue mountain’ thumbnail
picture.
– Some types of JPEG le cannot be played
on this recorder.
– It may require longer time for the recorder
to display the disc content on the TV due to
the large number of songs/pictures compiled
into one disc.
– Unreadable disc or disc with no name will
be displayed as ‘Unknown Data’.
– During JPEG photo playback, pressing
OPTIONS button switches to live TV mode.
Supported JPEG picture formats
File format:
– The le extension has to be ‘*.JPG’ and
‘*.JPEG’.
– This recorder can only display digital
camera pictures according to the JPEGEXIF format, typically used by almost all
digital cameras. It cannot display Motion
JPEG, progressive JPEG and other JPEG
formats, or pictures in formats other
than JPEG, or sound clips associated with
pictures.
– The JPEG photos with resolution more
than 13 megapixel cannot be supported.
Playing musical slideshow
This is only possible if both the JPEG
photo les and music are stored in the
same media.
A Press HOME.
B Select the media where the music are
stored and press B.
Video
Music
Photo
C Select { Music } in the menu and press
B.
D Use the cursor keys to reach the folder/
le you want to play, then press u to
start playback.
Track 01.mp3
Track 02.mp3
Track 03.mp3
Track 04.mp3
Track 05.mp3
Track 06.mp3
Track 07.mp3
SlideShow
E Press the Red button on the remote
control for { SlideShow }.
The { Photo Content } menu
appears.
F Select a photo le and press u to start
slideshow playback.
The music keeps playing back and will
be repeated if reaches the end of the
playlist or track.
RootContent
Images
MP3
Artist
Track Name
Album
Track number 06/14
Track time 04:12:10
RepeatShufe
60
G Press STOP x to stop the slideshow.
Page 61

Additional Playback Features (continued)
Creating a photo playlist
(album)
You can customise the JPEG photos
slideshow playback by storing your
selection in an album.
This recorder can handle up to a
maximum of 100 albums. Each album can
contain up to 100 images.
Note:
This feature is only available for photos
stored in the Hard Disk.
A Press HOME.
B Select { Hard Disk } in the menu and
press B.
C Move to { Photo } > { Photo folders }
in the menu, then press B.
Name sort
Date sort
Photo foldersSorting
roll 1
roll 2
roll 3
F Use the cursor keys to navigate and press
SELECT to select the photo.
A marking appears on the top right
hand corner of the selected photo(s).
To delete a photo or the selected
photo(s), press the Red button for
{ Delete }.
G Press the Yellow button on the remote
control for { To Album }.
The { Add Photo to Album } menu
appears.
H Create a new album or select an existing
album, then press OK to add the
photo(s) to it.
The selected photos are now stored
in the album.
I To exit the menu, press HOME.
English
Delete
Copy To Album
D To select all the photos in the selected
folder, press SELECT on the remote
control.
E To select a speci c photos in the folder,
press OK to show the overview images.
Delete Copy To Album Rotate
61
Page 62

Additional Playback Features (continued)
English
Editing the album
You can re-arrange the photo position in
the album in order to create the desired
slideshow playback order, or remove the
photo(s) from the album. However, the
photos in the ‘Photo folders’ remain
unchanged.
Note:
This feature is only available for photos
stored in the Hard Disk.
A Press HOME.
B Select { Hard Disk } in the menu and
press B.
C Move to { Photo } > { Photo albums }
in the menu, then press B.
A list of photo albums appears.
Photo folders Info
Alb0001
Alb0002
Alb0003
07.07.20 07
CopyDelete
D Use keys to select an album and
press OK to view the overview images.
100 photo(s)
To change the photo(s) position in
the album
F Press the Yellow button on the remote
control for { Move }.
A ‘navigator’ appears in the menu, it
enables you to select the position
between the photos.
G Use the cursor keys to move the
‘navigator’ around the menu and press
OK to con rm the position where you
want to insert the photo(s).
To rotate the selected photo(s)
H Press the Blue button for { Rotate }.
The photo rotates in 90 degree
clockwise increments for each press.
To remove the photo(s) from the
album
Press the Red button for { Remove }.
I To exit the menu, press HOME.
Deleting an album
A Select an album from the { Photo
albums } list.
B Press the Red button for { Delete }.
Changing the album information
Remove Copy RotateMove
E Use the cursor keys to navigate and press
SELECT to select the photo.
A marking appears on the top right
hand corner of the selected photo(s).
62
A Select an album from the { Photo
albums } list.
B Press EDIT on the remote control.
C Make the necessary changes on the
respective elds (name or date) and press
OK and EDIT to exit the menu.
Page 63

Additional Playback Features (continued)
Searching forwards/
PAUSE LIVE TV
backwards
You can fast forward or fast reverse a
disc during playback and select a desired
search speed.
A During playback, press and hold .
(reverse) or > (forward) until the
search speed status bar (4X) appears on
the TV.
The sound will be muted.
English
Selecting another title/
chapter/ track
When a disc contains more than one
track, title or chapter, you can change to
a different track, title or chapter as
follows.
During playback,
Press > to go to the next title/chapter/
track.
. to return to the start of the
Press
current title/chapter/track.
Pressing
start of the previous title/chapter/track.
OR
Use the alphanumeric keypad 0-9 to
input the title/chapter/track number.
OR
Press SELECT on the remote control
to toggle between ‘Title’ or ‘Chapter’,
then press
previous or next title/ chapter.
. twice can return to the
. / > to select the
B Press . (reverse) or > (forward)
repeatedly to cycle through the different
search speed (4X, 8X, 32X).
C To resume normal playback, press u.
Pausing playback / slow
motion play
A During playback, press u to pause
playback and display a still picture.
B Press and hold . (reverse) or >
(forward) until the slow motion status
bar (1/8X) appears on the TV.
The sound will be muted.
C Press. (reverse) or > (forward)
repeatedly to cycle through the different
slow motion speed (1/8X, 1/4X, 1/2X).
D To resume normal playback, press u.
63
Page 64

Additional Playback Features (continued)
English
During disc playback, press INFO on the
remote control to display the available
playback options. These options are
varied depending on the disc type and can
be selected by pressing the matching
colour coded buttons on the remote
control.
Scan
Shufe
Repeat Repeat A-B
Scan disc
(for CD, VCD, DVD±R/±RW disc only)
This function allows you to preview the
rst 10 seconds of each track on the disc.
A During playback, press the Red button
on the remote control.
The recorder skips to the next track
after 10 seconds of playback.
B To resume normal playback, press the
Red button again.
Shuf e play
(for CD, MP3 disc only)
Select shuf e play mode to allow the
recorder to randomly select and play
tracks on the disc.
A Press the Green button on the remote
control.
It starts play back of all the tracks
within the folder in a random order.
B To cancel shuf e playback, press the
Green button again.
Repeat play
The repeat play options vary depending
on the disc type.
A During playback, press the Yellow
button on the remote control to select
one of the repeat options.
Repeat chapter (DVD, DVD±R/±RW
only)
Repeat track/title
Repeat folder/playlist (if applicable)
Repeat entire disc (video CD, audio
CD, DVD±R/±RW only)
B To cancel repeat playback, press the
Yellow button repeatedly until the
repeat mode is off or press STOP x.
Repeat playback a speci c
segment (A-B)
You can repeat the playback of a speci c
segment within a title/chapter track. To
do this, you must mark the start and end
of the segment you want.
A During playback, press the Blue button
on the remote control.
This indicates that the start point has
been marked.
B Press the Blue button again to mark the
end of the segment.
A visual marker is placed on the
programme bar.
Playback skips to the start of the
marked segment. The segment is
repeated until the repeat mode is
cancelled.
64
C To cancel repeat playback, press the
Blue button once again.
Page 65

Additional Playback Features (continued)
Using the Toolbar options
PAUSE LIVE TV
A During playback, press OPTIONS on
the remote control.
The available options might differ
depending on the state of playback or
media type.
Tools
Audio language
Subtitle language
Angle
Zoom
Time search
Settings
B Use keys to select a setting.
C Press B to enter its options.
Instructions and explanations of the
options are provided in the following
pages.
If the selection in the menu is greyed
out, that means the feature is not
available or cannot be changed in the
current state.
1 en
Note:
Select { Settings } to access the system
setup menu options. See ‘System Menu
Options’ for details.
Changing audio soundtrack
language
This operation works only on DVDs with
multiple soundtrack language, or VCDs
with multiple audio channel, or DVD±R/
±RW recorded with 5.1 multi-channel.
A Move to { Audio language } and press
B to enter its options.
B Press repeatedly until the audio
language or soundtrack you want is
selected.
The languages may be numbered or
abbreviated, such as ‘en’ for English.
{ Lang 1 } is the original broadcast
language and { Lang II } is the additional
broadcast language.
C Press OK to con rm.
Helpful Hint:
– While in disc playback mode, you can also
press the AUDIO on the remote control
repeatedly to select different audio language.
English
D To exit, press OPTIONS.
65
Page 66

Additional Playback Features (continued)
English
Changing subtitle language
This operation works only on DVDs with
multiple subtitle languages. You can
change to the language you want while
playing DVD.
A Move to { Subtitle language } and
press B to enter its options.
B Press repeatedly until the language
you want is selected.
The languages may be numbered or
abbreviated, such as ‘en’ for English.
C Press OK to con rm.
Helpful Hint:
– While in disc playback mode, you can also
press the SUBTITLE on the remote control
repeatedly to select different subtitle language.
Switching camera angles
This option is only available with DVDs
that contain sequences recorded from
different camera angles. This allows you
to view the picture from different angles.
A Move to { Angle } and press B to enter
its options.
The camera angles available for
selection appear.
B Select the camera angle you want to
switch to and press OK to con rm.
Zooming in/out
This option only available on DVDs and
recordable DVDs playback. It allows you
to enlarge the picture on the TV screen
and to pan through the enlarged picture.
A Move to { Zoom } and press OK to
enter zoom in mode.
The zoom status bar appears and
displays the zoom factor.
Zoom 200%
End Zoom InZoom Out
B Press the Blue button on the remote
control to zoom in or Yellow button to
zoom out.
C Use the cursor keys to pan through the
zoomed picture.
D To exit zoom mode, press the Red
button.
Searching by time
This option allows you to skip to a
speci c point in the current disc.
A Move to { Time search } and press B
to enter the time eld (hours : minutes :
seconds).
B Use the alphanumeric keypad 0-9 to
enter the time where playback should
start.
C Press OK to con rm.
Playback skips to the time entered.
66
Page 67

Edit Recordings - Hard Disk
Changing the title name
Some TV channels transmit the name of
the programme. In this case, the
programme name will automatically be
stored when recording to the hard disk.
Otherwise, only the programme number
and date/time of the recording will be
stored as title name.
A Press HDD LIST on the remote
control.
Titles Info
Title 1
Title 2
Title 3
Title 4
Title 5
B Use keys to reach the title you
want.
C Press EDIT on the remote control.
The HDD edit menu appears.
Edit Title name
Photo Rolls
Title name
Genre
Video edit
Time 00:37:34 SP
Date 07.07.2007
The Wall
Selecting the genre
You may select the genre type provided
in the list for easy and fast searching of a
recorded title.
A Press HDD LIST on the remote
control.
B Use keys to reach the title you
want.
C Press EDIT on the remote control.
The HDD edit menu appears.
Edit Genre
Title name
Genre
Video edit
D Move to { Genre } in the menu and
press B.
E Select a genre type and press OK to
con rm.
Movie
Sports
News
Music
Games & Shows
Children
Others
Cultural
English
D Move to { Title name } in the menu and
press B.
E Use keys to change the character/
number or make an entry by using the
alphanumeric keypad 0-9.
Use the cursor left/right keys to move
to the previous or next eld.
To switch between upper and lower case
characters, press SELECT.
To clear the title name, press the Red
button for { Clear }.
F Press OK to con rm the changes.
67
Page 68

Edit Recordings - Hard Disk (continued)
English
Video editing
This recorder allows you to edit the
video content after a recording has been
made. You can insert/delete chapter
markers or hide unwanted scenes.
When you play back a recording in video
edit mode, the entire recording will be
played back including the hidden scenes.
PAUSE LIVE TV
A Press HDD LIST on the remote
control.
B Use keys to reach the title you
want.
C Press EDIT on the remote control.
The HDD edit menu appears.
Edit Video edit
Title name
Genre
Video edit
00:11:25
No Chapter HideChapter Divide
Video bar:
In the video bar, the record playback
head represents the actual position of the
playback.
E Press the matching colour coded buttons
on the remote control to access the
options displayed at the bottom of the
menu.
{ No Chapter }
Red button – Erase all the chapter
markers in the current title.
{ Chapter }
Green button – Access chapter editing
menu.
{ Divide }
Yellow button – Divide the recording
into two separate titles.
{ Hide } / { Stop Hide }
Blue and Green buttons – De ne the
scene to hide.
{ Show } / { Stop Show }
Blue and Green buttons – Make the
hidden scene visible.
D Move to { Video edit } and press OK to
start video edit playback.
68
F To exit, press EDIT.
Helpful Hint:
– The edited title will be appeared with
symbol in the menu.
Page 69

Edit Recordings - Hard Disk (continued)
Merge/split a speci c chapter
within a recording
You can create a chapter by inserting
chapter marker (using the SPLIT option)
or remove a chapter marker (using the
MERGE option).
A During hard disk recording playback,
press u to pause playback at the scene
where you want to edit.
Use b / B keys on the remote control
for fast reverse or forward search.
B Press the Green button on the remote
control for { Chapter }.
The chapter editing menu appears.
No Chapter
Chapter
Merge
Back Split
Divide Hide
C Press the matching colour coded buttons
on the remote control to access the
options displayed at the bottom of the
menu.
{ Merge }
Merge the current chapter with the
chapter before it.
Note: If the previous chapter was
selected to be hidden, then the joined
chapter will also become hidden.
Title
Chapter 1 Chapter 2 Chapter 3 Chapter 4
Chapter 1 Chapter 2 Chapter 3
(for example, chapter 2 is selected)
{ Back }
Return to the previous screen.
{ Split }
Insert a new chapter marker at the
current point of playback. This allows you
to access a speci c point in the recording
easily or set a chapter you wish to hide
(for example, commercial scenes).
Title
Chapter 1 Chapter 2 Chapter 3 Chapter 4
Chapter
Chapter 1 Chapter 3 Chapter 4
Chapter
2a
2b
English
PAUSE LIVE TV
(for example, chapter 2 is selected)
Helpful Hint:
– There is a limit on chapter markers that
can be stored within a title and on the hard
disk drive.
69
Page 70

Edit Recordings - Hard Disk (continued)
English
Dividing titles
You can divide a title into two or more
titles. You can use this function to
separate and delete undesired portions of
a recording, such as commercials.
CAUTION!
Once a title has been divided, it
cannot be reversed.
A During hard disk recording playback,
press u to pause playback at the scene
where you want to edit.
No Chapter HideChapter Di vide
Use b / B keys on the remote control
00:11:25
for fast reverse or forward search.
B Press EDIT on the remote control.
C Press the Yellow button on the remote
control for { Divide }.
A new title and new Index Picture will
be created from the current point of
playback.
Title1 Title 2
Hiding unwanted scenes
You can choose to hide certain scenes
for playback (e.g., skipping a commercial
scene) or make the hidden scene visible
again.
A During hard disk recording playback,
press u to pause playback at the scene
where you want to edit.
Use b / B keys on the remote control
for fast reverse or forward search.
B Press EDIT on the remote control.
C Press the Blue button on the remote
control for { Hide }.
It sets the start marker for hide.
No Chapter
Chapter Divide
Stop Hide Cancel
Hide
D Press B on the remote control to search
for the end of the scene to hide.
E Press the Green button for { Stop
Hide }.
It sets the end marker for hide.
The ‘hidden’ area will be marked in
blue.
Otherwise, cancel the operation by
pressing the Blue button on the remote
control for { Cancel }.
70
Title 3Title1 Title2
(for example, title 1 is selected)
F To exit, press EDIT.
Page 71

Edit Recordings - Hard Disk (continued)
Showing the hidden scene
A During hard disk recording playback,
press EDIT on the remote control.
The hidden chapter will be played
back while in video editing mode
Hidden
scenes
00:11:25
No Chapter
NO CHAPTER HIDECHAPTER DIVIDE
Chapter
Divide
Show
B Press the Blue button on the remote
control for { Show }.
It marks the beginning of scene to
show.
C Press B on the remote control to search
for the end of the scene to show.
D Press the Green button for { Stop
Show }.
Otherwise, cancel the operation by
pressing the Blue button on the remote
control for { Cancel }.
Deleting all chapter markers
During recording, the chapter marker is
set automatically at a speci c interval if
the function is active. You can choose to
delete all the chapter markers when the
recording has nished.
A During hard disk recording playback,
press EDIT on the remote control.
00:11:25
No Chapter HideChapter Di vide
B Press the Red button on the remote
control for { No Chapter }.
All the chapter markers in the current
title will be deleted.
English
Helpful Hints:
– All the hidden chapters will be played back
while in video editing mode.
– The selection of scenes to hide or show
can only be done within a title.
71
Page 72

Edit Recordings - Recordable DVD
English
About editing recordable
DVDs
This recorder offers various disc edit
options. You can change the disc content
and settings of a recorded DVD from the
editing menu. If a DVD±R has been
nalised, it cannot be edited. The edited
contents may not be available if you play
the disc on another DVD player.
PAUSE LIVE TV
The displayed options in the editing menu
differ depending on the situation and disc
type.
– Change disc name
– Make DVD compatible (DVD±RW
only)
– Finalise disc (DVD±R only)
– Change title name
– Delete all titles
– Video editing
Index Picture screen
The Index Picture screen shows your
recordings on a recordable DVD. It
appears on the TV once you load a
recordable DVD or when playback is
stopped.
Title
Title 1
Title 2
Title 3
Title 4
Title 5
Empty title
00:05:12
HQ
15.07.06
02:00:24
SP
28.07.06
00:35:12
SP
An Index Picture screen represents each
recording information save :
A The title’s Index Picture.
B The title’s information (length of
recording, record mode and date).
C The empty space for recording.
Helpful Hint:
– If the disc is not recorded from this
recorder, the format of Index Picture screen
might be different. You have to adapt the
disc menu to the format of this recorder
before editing. See ‘About Home - Changing
the disc format for recordable DVD’ for
details.
72
Edit Disc name
Photo Rolls
Disc name
Compatible
Finalise
Title Name
Delete all
Video edit
Clear
The Wall
Page 73

Edit Recordings - Recordable DVD (cont inued)
Changing the disc/title name
The original disc/title name is generated
automatically by the recorder. You can
change the disc/title name by following
the steps below.
A Insert a recorded DVD into the
recorder.
The Index Picture screen appears.
B Press EDIT on the remote control.
The editing menu appears.
C Move to { Disc name } or { Title
name } in the menu and press B.
D Use keys to change the character/
number or make an entry by using the
alphanumeric keypad 0-9.
Use the cursor left/right keys to move
to the previous or next eld.
To switch between upper and lower case
characters, press SELECT on the
remote control.
E Press OK to con rm the changes.
Making the edited DVD±RW
compatible
English
The edited DVD±RW may still display
the original titles or hidden scenes when
played back on other DVD players. This
function allows you to make an edited
DVD±RW compatible with other players.
A Insert a recorded DVD±RW into the
recorder.
The Index Picture screen appears.
B Press EDIT on the remote control.
The editing menu appears.
C Move to { Compatible } and press OK.
If the option is not available for
selection, it means that the disc is already
compatible.
D Press OK to proceed.
Deleting all recordings/titles
Allows you to delete all the recordings
from the current recordable DVD.
A Insert a recorded DVD into the
recorder.
The Index Picture screen appears.
B Press EDIT on the remote control.
The editing menu appears.
C Move to { Delete all } and press OK.
A warning message appears.
D To proceed, select { Erase } in the menu
and press OK on the remote control.
Otherwise, select { Cancel } in the menu
and press OK to abort the operation.
73
Page 74

Edit Recordings - Recordable DVD (cont inued)
English
Finalising the DVD±R for
playback
It is necessary to nalise a DVD±R or
DVD±R (DL) disc before you can play it
on another DVD player. Otherwise, the
DVD±R can only be played back on this
recorder.
Note:
After a DVD±R disc has been nalised,
no further recordings or editing can be
made to it. Make sure that you have
completed all the recordings and editing
before nalising the disc.
A Insert a recorded DVD±R into the
recorder.
The Index Picture screen appears.
Otherwise, press DISC.
B Press EDIT on the remote control.
The edit menu appears.
C Move to { Finalise } and press OK.
A warning message appears.
D To proceed, select { Finalise } in the
menu and press OK on the remote
control.
Finalisation may take more than 30
minutes, depending on the length of
recordings.
Do not try to open the disc tray or
turn the power off as this may render the
disc unusable.
Otherwise, select { Cancel } in the menu
and press OK to abort the operation.
Deleting a recording/title
You can delete a speci c title from the
disc. However, for DVD±R discs, the
deleted space cannot be used for further
recordings.
A Insert a recorded DVD into the
recorder.
The Index Picture screen appears.
Otherwise, press DISC.
B Use the cursor keys to reach the title
you want.
Title
Title 1
Title 2
Title 3
Title 4
Title 5
Empty title
Delete
C Press the Red button on the remote
control for { Delete }.
A warning message appears.
D To proceed, select { Delete } in the
menu and press OK on the remote
control.
For DVD±RW disc, ‘Empty Title’ will
be appeared in the Index Picture screen
where the title was deleted. The empty
space can be used for new recordings.
For DVD±R disc, ‘Deleted title’ will
be appeared in the Index Picture screen
where the title was deleted. During
playback, the deleted title will be skipped.
Child Lock
00:05:12
HQ
15.07.06
02:00:24
SP
28.07.06
00:35:12
SP
Protect
74
Otherwise, select { Cancel } in the menu
and press OK to abort the operation.
Page 75

Edit Recordings - Recordable DVD (cont inued)
Lock/Unlock the disc for
playback
You can choose to lock the recorded
disc from viewing.
Before you start ...
Turn on the Child Lock feature. See
‘System Menu Options - Playback settings
- Access - Child lock’ for details.
A Insert a recorded DVD into the
recorder.
The Index Picture screen appears.
Otherwise, press DISC.
B Press the Yellow button on the remote
control for { Child Lock }.
Note:
Once the disc is locked, a four-digit pin
code is required to play the disc or to
unlock the disc.
Protecting the recorded titles
(DVD±RW)
You can choose to protect the recorded
title on a DVD±RW in order to prevent
the recordings from being accidentally
erased or edited.
A Insert a recorded DVD±RW into the
recorder.
The Index Picture screen appears.
Otherwise, press DISC.
B Use the cursor keys to reach the title
you want.
C Press the Blue button on the remote
control for { Protect }.
Note:
Once the title has been protected, the
Blue button option changes to
{ Unprotect }. Select this to cancel the
protect setting if required.
Protect
Unprotect
English
75
Page 76

Edit Recordings - Recordable DVD (cont inued)
English
Video editing
This recorder allows you to edit the video
content after a recording has been made.
You can add/delete chapter marker or
hide unwanted scenes.
Title
Chapter Chapter Chapter Chapter
chapter markers
When you play back a recording in video
edit mode, the entire recording will be
played back including the hidden scenes.
A Insert a recorded DVD into the
recorder.
The Index Picture screen appears.
Otherwise, press DISC.
B Use the cursor keys to reach the title
you want, then press u to start
playback.
C Use b / B keys on the remote control to
search for the scene you want to edit,
then press u to pause playback.
D Press EDIT on the remote control.
The video editing menu appears.
No Chapter HideChapter Title
00:11:25
E Press the matching colour coded buttons
on the remote control to access the
options displayed at the bottom of the
menu.
PAUSE LIVE TV
{ No Chapter }
Red button – Erase all the chapter
markers in the current title.
{ Chapter }
Green button – Access chapter editing
menu.
No Chapter
{ Merge }
Merge the current chapter with the
chapter before it.
Note: If the two chapters were
hidden, then the joined chapter will
also be hidden.
{ Back }
Return to the previous screen.
{ Split }
Insert a new chapter marker at the
current point of playback. This allows
you to access a speci c point in the
recording easily or set a chapter you
wish to hide.
{ Hide } / { Show }
Hide or show the current chapter. During
playback, the hidden chapter will be skipped.
Chapter
Merge
Back Split Hide
Title Hide
76
Page 77

Edit Recordings - Recordable DVD (cont inued)
{ Title }
Yellow button – Access title editing
menu.
No Chapter
Chapter
Title
Hide
English
Divide
Back Index Pic.
{ Divide } for DVD±RW only
Create a new title from the current
point of playback. The existing title will
be divided into two titles.
Caution! Once a title has been
divided, it cannot be reversed.
{ Back }
Return to the previous screen.
{ Index Pic }
Use the current scene as the Index
Picture.
Note: In the Index Picture screen,
normally the rst frame of a recording
is shown as the title’s Index Picture.
{ Hide } / { Show }
Blue button – Hide or show the current
chapter.
Helpful Hints:
– All the hidden chapters will be played back
while in video editing mode.
– The selection of scenes to hide or show can
only be done within a title.
– There is a limit on chapter markers that
can be stored within a title and the hard disk
drive.
77
Page 78

System Menu Options
English
System menu navigation
The system menu provides various setup
options for your recorder.
Before you start ...
Mark the contents in the Time Shift Buffer
for which you wish to record to the hard
disk. Otherwise, all the contents will be
cleared when you access { Tuner } or
{ Setup } option.
PAUSE LIVE TV
A Press OPTIONS on the remote
control.
The tools menu appears.
Tools
Audio language
Time search
Reset TSB
Settings
C Use the cursor keys to move the
selection bar up/down/left/right to cycle
through the menu options.
Instructions and explanations of the
options are provided in the following
pages.
If the selection in the menu is greyed
out, that means the feature is not
available or cannot be changed in the
current state.
D Press OK to con rm the selection or
new setting.
To return to the previous menu screen,
press BACK .
E To exit, press OPTIONS.
Note:
For { Recording } setting, see
‘Before Recording - Default
Recording settings’ for details.
B Move to { Settings } and press OK.
The system settings menu appears.
Language
Recording
Playback
Video output
Audio
Analogue tuner
Digital tuner
Setup
78
Page 79

System Menu Options (conti nued)
Language settings (underlined options are the factory default settings)
Audio language
Subtitle language
Subtitle type
Dual language
Select the preferred audio language for Digital Terrestrial Tuner
(DTT) reception, DVDs with multiple sound tracks, VCDs with
multiple audio channels, or DVD±R/±RW recorded with 5.1
multi-channel.
Select the preferred subtitle language for DVD playback and
Digital Terrestrial Tuner (DTT) reception.
Notes:
– If the selected audio/subtitle language is not available on the
disc, the disc’s default language will be used instead.
– For some DVDs, the subtitle/audio language can only be
changed via the DVD disc menu.
Digital Terrestrial Tuner (DTT) reception may carry multiple
subtitle types. Select the subtitle type you want to be shown.
{ Off } – No subtitle displays on the screen.
{ Normal } – Display normal subtitles.
{ Hard of hearing } – Display special subtitles. For example,
descriptions for sound and action.
Select the recording language to be used for TV programmes
(analogue TV channels only) which transmitting an additional
audio language. For example, if a programme is available in
English and Spanish, with Spanish being the additional language
option.
{ Lang. I } – Original broadcast language.
{ Lang. II } – Additional audio language.
English
Menu language
Select the menu language for this unit’s on-screen display. This
setting will be taken from the initial installation.
79
Page 80

System Menu Options (conti nued)
English
Playback settings (underlined options are the factory default settings)
Access
Access Control
Enter PIN of your choice.
This will be used to access locked features
Child lock:
Change PIN:
When this is selected, you will be prompted to enter the fourdigit pin code.
Notes:
– When doing this for the rst time, use the alphanumeric
keypad 0-9 on the remote control to enter any four-digit pin
code you prefer.
– If you forget your four-digit pin code, key in ‘1504’. Then
enter any four-digit you prefer and enter the same pin code
again to con rm it.
With this feature, you can prevent children from viewing certain
discs or the recorded titles in the hard disk.
{ On } – Enable child lock function.
A four-digit pin code must be entered in
order to play the locked disc or title in the
hard disk.
{ Off } – All discs can be played.
Notes:
– This recorder can memorise settings for 50 discs.
– When this feature is enabled, it appears as { Child Lock } at
the bottom of the coloured options screen whenever you select
a title in the content menu. You can press the Yellow button
on the remote control to set the child lock on or off.
Set a new pin code. Follow the instructions in the menu to
change the pin code.
Note: To cancel the change, press BACK on the remote
control
.
Display
OSD:
Front panel
brightness:
80
Set the level of on-screen display information.
{ Full } – Complete information is always displayed
during use.
{ Reduced } – The help text and colour button bar will be
removed from the display.
Set the front panel display brightness.
{ Bright } – Normal brightness.
{ Dimmed } – Medium brightness.
{ Off } – Turn off the display.
Page 81

System Menu Options (conti nued)
Playback settings (underlined options are the factory default settings)
PBC
Replay interval
Skip interval
Play Back Control feature is only applicable to VCD/SVCD only.
It allows you to play Video CDs (2.0) interactively, following the
menu on the display.
{ Off } – The VCD/SVCD skips the index menu and
playback directly from the beginning.
{ On } – The index menu (if available) appears on the
TV when you load a VCD/SVCD.
Note: This option is not visible unless a VCD/SVCD is in the
disc tray
Set the replay interval (minutes : seconds) and press OK to
con rm. The maximum setting is 59 minutes and 59 seconds.
In live TV mode, use b key on the remote control to do the
skip backward playback.
Set the skip interval (minutes : seconds) and press OK to
con rm. The maximum setting is 59 minutes and 59 seconds.
In live TV mode, use B key on the remote control to do the
skip ahead playback.
.
English
81
Page 82

System Menu Options (conti nued)
English
Video Output settings (underlined options are the factory default settings)
TV shape
Active video output
Video format
The picture shape can be adjusted to t your TV.
{ 4:3 Letterbox } – For a ‘wide-screen’ display with
black bars on the top and bottom.
{ 4:3 Panscan } – For a full-height picture with the
sides trimmed.
{ 16:9 Widescreen } – For wide-screen TV
(frame ratio 16:9).
Select the type of video output that matches the video
connection between this recorder and your TV.
{ SCART (RGB) } – For SCART connection.
{ Comp. Video (YUV) } – For Component video connection.
To enable progressive scan feature, go to
{ Video format } setting.
{ HDMI output } –
Note: Video output setting is not required for S-Video or
Composite (CVBS) video connection.
This feature is only applicable to Component video connection.
You can choose between progressive and interlaced video
format, check your TV for compatibility.
{ Progressive } – Turn on progressive scan mode. Select this
{ Interlaced } – For TV that is not compatible with
Note: If you choose a setting that is incompatible with your
TV, you may not be able to see any picture at all. In this case,
wait for 15 seconds for auto recovery or turn off the
progressive scan as below:
1) Disconnect this unit’s ~MAINS from the power supply.
2) Hold down . on this unit whilst reconnecting its
~MAINS to the power supply.
For HDMI connection.
if your TV is progressive-scan compatible.
progressive-scan video.
82
Page 83

System Menu Options (conti nued)
Video Output settings (underlined options are the factory default settings)
HDMI
Black level
Vertical
This feature is only applicable to HDMI connection.
{ Auto } – Automatically select the best supported
video resolution.
{ Native } – Follow the native video resolution.
{ Manual } – Select a suitable video resolution depending
on the capability of the connected TV/device
to further enhance the HDMI video output
(480i/576i, 480p/576p, 720p 50/60Hz, 1080i
50/60Hz, 1080p 50/60Hz, 1080p 25/30Hz,
1080p 24Hz). ‘i’ denotes interlace and ‘p’
denotes progressive.
Adapt the colour dynamic for NTSC disc.
{ Normal } – Normal colour contrast.
{ Enhanced } – Improve the colour contrast and brightens
the picture of an NTSC-compatible DVD.
This feature is only available in progressive scan mode.
Use keys to adjust the vertical position of the picture on
your TV screen, press OK to con rm the setting.
English
83
Page 84

System Menu Options (conti nued)
English
Audio settings (underlined options are the factory default settings)
Audio output
HDMI audio
Digital input
This setting is only required if you are using the recorder’s
COAXIAL/OPTICAL OUT socket to connect other audio/video
device.
{ All } – The connected device supports multi-
channel audio formats. The digital audio
format will be output as on disc.
{ PCM only } – The connected device does not support
multi-channel formats. The recorder
converts multi-channel to PCM (Pulse Code
Modulation) format.
This setting is only required if you are using the recorder’s HDMI
OUT socket to connect your TV or other display device.
{ Auto } – Auto selection of the best supported audio
output through the HDMI connection.
{ Disable } – Disable HDMI audio output. In this case, an
alternative audio connection is required
from the recorder to your TV.
Setting for digital audio input.
{ Off } – Disable digital audio input. 5.1-channel
recording from the external source is not
possible.
{ On } – Enable digital audio input from the device
connected to EXT 2-TO VCR/SAT or
DIGITAL/OPTICAL input socket on this
recorder.
84
Page 85

System Menu Options (conti nued)
Audio settings (underlined options are the factory default settings)
Sound mode
Night mode
This setting is only required if you used the recorder’s AUDIO
OUT L/R sockets to connect other audio/video device.
{ Stereo } – The sound output through the left and right
audio channels. Use this setting when this
recorder is connected to a TV or Stereo
system.
{ Surround } – The connected audio/video device is
compatible with Dolby Surround. Dolby
Digital and MPEG-2 multi-channel are mixed
to a compatible two-channel output signal.
This mode optimises playback of sound at low volume. High
volume outputs will be softened and low volume outputs are
brought upward to an audible level. This feature is only
applicable to DVD disc playback.
{ On } – Turn on night mode.
{ Off } – Turn off night mode. Select this to enjoy the
surround sound with its full dynamic range.
English
85
Page 86

System Menu Options (conti nued)
English
Analogue Tuner settings
Auto search
Follow TV
Press OK on the remote control to start the automatic TV
channel search process and replace all previously stored
analogue TV channels. This process may take several minutes.
This feature is only available if you have connected this recorder
to your TV using the EXT1-TO TV scart socket. It allows you
to copy the preset order from your TV to the recorder
(analogue channels only).
1) Press OK the remote control to access.
2) Press OK to con rm the message on the TV, ‘TV 01’
appears on the display panel. Use the TV’s remote
control to select programme number {1} at your TV, then
press OK on the recorder’s remote control.
– If the recorder nds the same TV channel as on the TV, it
stores it as ‘P01’. ‘TV 02’ will then appear on the display panel.
– If no video signal is received from the TV, ‘NO TV’ will
appear.
– If you make a mistake, press BACK button to return to
‘TV 01’ setting.
3) Use the TV’s remote control to select programme
number {2} at your TV, then press OK on the recorder’s
remote control. Repeat the above steps until you have
assigned all the TV channels.
4) To exit the menu, press OPTIONS.
Note: The Follow TV feature may not work properly on every
TV. In case no channels are matched, please proceed with
manual install.
Manual install
86
Use this setting only if the automatic install detected the wrong
tuner signals.
{ Entry mode } – Select manual search based on channel
allocation or frequency entry
{ CH (channel), S-CH (speci ed hyperband
channel), MHz (frequency) }, then press
OK.
{ Entry } – Use the alphanumeric keypad 0-9 to
enter the frequency value or the channel
number, then press OK and the Green
button for { Store }.
OR
– Press the Blue button on the remote
control for { Search }, once you have
found the correct frequency/channel, press
the Green button for { Store }.
Page 87

Analogue Tuner settings
System Menu Options (conti nued)
Manual install
continued ...
{ Preset } – Use the alphanumeric keypad 0-9 to
enter the preset number for the channel to
store (e.g. ‘01’), press OK and the Green
button for { Store }.
{ Preset name } – Use the alphanumeric keypad 0-9 to
enter the preset channel name, press OK
and the Green button for { Store }. All
channels can have a name of up to four
characters.
{ Decoder } – Select { On } if the current TV channel is
transmitted by coded TV signals that can
only be viewed properly with a decoder
which is connected to the EXT2-TO VCR/
SAT socket.
{ TV system } – Set the TV system that produces the least
distortion of picture and sound. See last
page ‘TV System Guide’ for more
information.
{ NICAM } – NICAM is a digital sound transmission
system. It can transmit either one stereo
channel or two separate mono channels.
Selects { On } to improve the sound
transmission or { Off } if the reception is
poor.
English
{ Finetune } – Use keys to adjust the frequency of
the TV channel if the reception is poor and
press OK to con rm.
87
Page 88

System Menu Options (conti nued)
English
Analogue Tuner settings
Sort channels
Favourites
Change the order of the stored channels according to your
preference.
01 BBC
02 RTL4
03 ARD
04 ORF2
05
06 TELET
07
01 BBC
02 RTL4
03 ARD
04 ORF2
05
06 TELET
07
01 BBC
01 RTL4
02 ARD
03 ORF2
04 BBC
05
06 TELET
07
1) Select the channel that you want to move and press B.
2) Move the selection bar to the preset number for which you
want to place the channel and press b or OK to con rm.
De ne your favourite channels that can be quick accessed by
using the programme up/down button (P +-) on the remote
control.
1 BBC
2 RTL4
3 ARD
4 ORF2
5
6 TELET
7
X
– Mark (or unmarked) your favourite channels using the OK
button on the remote control.
Note: Unmarked channels
can only be accessed by pressing
the corresponding number button on the remote control.
88
Page 89

Digital Tuner settings
System Menu Options (conti nued)
Full
Update
Check Signal
Check the antenna connection and position.
Position the antenna to reach best signal quality.
Frequency
045.00
Signal strength
Signal quality
Sort channels
Press OK on the remote control to make a completely new
digital TV and radio install. This process may take several
minutes. Once complete, press BACK on the remote control
to exit.
Press OK to update new digital TV and radio installation.
This adds only the new channels to your existing preset list,
after the last free preset position. Once complete, press BACK
on the remote control to exit.
Note: New channels refer to the channels that are currently
not installed.
Press OK to display signal strength and quality information of
the digital tuner. It will help to nd the best position of your
digital terrestrial antenna.
Use keys to change the frequency and press OK to check
the signal strength and quality.
Change the order of the stored channels according to your
preference.
{ Digital TV } – Set the preset order for digital TV channels.
{ Digital Radio } – Set the preset order for digital radio
channels.
1) Select the channel that you want to move and press B.
2) Move the selection bar to the preset number for which you
want to place the channel and press b or OK to con rm.
English
Favourites
1 BBC
2 RTL4
3 ARD
4 ORF2
5
6 TELET
De ne your favourite channels that can be quick accessed by
using the programme up/down button (P +-) on the remote
control.
{ Digital TV } – Set list of favourite digital TV channels.
{ Digital Radio } – Set list of favourite digital radio channels.
X
– Mark (or unmarked) your favourite channels using the
OK button on the remote control.
Note: Unmarked channels
can only be accessed by pressing
the corresponding number button on the remote control.
89
Page 90

System Menu Options (conti nued)
English
Setup settings (underlined options are the factory default settings)
Clock
Clock preset:
Time:
Date:
Country
Remote control
Set the clock for your recorder before you can use any of the
timer recording features.
The time/date can be set automatically on this recorder if the
stored TV channel transmits a time signal.
{ Auto } – The recorder automatically detects the rst
available channel which is transmitting the
time/date information.
{ XXX } (preset channel) – Select the TV channel to use for
transmitting the time/date information.
{ Off } – Disable automatic clock setting. Select this
before setting the time/date manually.
Set the time manually.
{ 00 : 00 } – Use keys to set the hours and
minutes. Use b B keys to move in the
entry eld. Once complete, press OK.
Set the date manually.
{ 31/01/2007 } – Use keys to set the day, month and
year, Use b B keys to move in the entry
eld. Once complete, press OK.
Select the country of your residence for auto channel tuning.
You only need to set this if you are using more than one Philips
remote control in the same room.
{ DVD } – Enable control of this recorder using the
Philips DVD player’s remote control (not
supplied).
{ Native } – Disable second RC control function.
Eco mode
90
This is an energy saving mode.
{ On } – When switches to standby mode, the
power consumption is less than the normal
standby power.
{ Off } – Turn off eco mode.
Page 91

System Menu Options (conti nued)
Setup settings (underlined options are the factory default settings)
Screen saver
DivX(R) VOD
Version Info
The TV screen turns black to prevent damage to the screen due
to over exposure to a static image for too long.
{ Off } – Disable screen saver function.
{ 5, 10, 30 minutes } – Set the TV to screen saver mode after
a period of inactivity (for example, recorder
is put to pause or stop state).
Philips provides you with the DivX® VOD (Video On Demand)
registration code that allows you to rent or purchase videos
from DivX® VOD service at www.divx.com/vod. All the
downloaded videos from DivX® VOD can only be played back
on this unit
This is only an information screen that shows the current
version of software installed in your recorder. You may require
this information for future online software upgrades.
English
91
Page 92

Other Information
English
Setting up Progressive Scan
feature
(for Progressive Scan TV only)
The progressive scan displays twice the
number of frames per second than
interlaced scanning (ordinary normal TV
system). With nearly double the number
of lines, progressive scan offers higher
picture resolution and quality.
Before you start...
– Ensure that you have connected this
recorder to a progressive scan TV using
the Y Pb Pr connection.
– Ensure that you have completed the
initial installation and set-up.
A Turn on the TV to the correct viewing
channel for the recorder..
B Turn on the recorder and press
OPTIONS on the remote control.
The tools menu appears.
C Move to { Settings } and press OK.
The system settings menu appears.
D Move to { Video output } and press
OK.
G Read the noti cation message on the TV
and con rm your action by selecting the
in the menu and press OK.
The setup is now completed and you
can start to enjoy the high quality picture.
Otherwise, select { Cancel } and press
OK to go back to the previous menu.
H To exit the menu, press OPTIONS.
If no picture is displayed:
A Disconnect this unit’s ~MAINS from the
power supply.
B Hold down . on this unit whilst
reconnecting its ~MAINS to the power
supply.
Helpful Hints:
– If a blank/distorted screen appears, wait
for 15 seconds for the auto recovery.
– There are some progressive scan TVs that
are not fully compatible with this unit,
resulting in an unnatural picture when
playing back a DVD VIDEO disc in the
progressive scan mode. In such a case, turn
off the progressive scan feature on both the
recorder and your TV.
Language
Recording
Playback
Video output
Audio
Analogue tuner
Digital tuner
Setup
Move to { Active video output } >
E
TV shape
Active video output
Video format
HDMI
Black level
Vertical
{ Comp. video (YUV) } in the menu
press OK to con rm.
and
F Move to { Video format } >
{ Progressive }
OK to con rm.
92
in the menu and press
Copyright notice
The making of unauthorised copies of
copy-protected material, including
computer programmes, les, broadcasts
and sound recordings, may be
infringement of copyrights and constitute
a criminal offence. This unit should not
be used for such purposes.
Page 93

Other Information (cont inued)
5.1 multi-channel recording
Digital 5.1 multi-channel recording lets
you capture the original sound from
digital multi-channel sources such as the
Cable Box/Satellite Receiver, when you
record a video that produces the full
cinema sound experience (Dolby Digital,
DTS surround or DTS ES, Dolby Digital
EX).
Notes:
– 5.1 multi-channel recording is only
possible in HQ and SP recording mode.
– 5.1 multi-channel recording is only
possible through DTT broadcast or audio
signal received from Digital/Optical input
socket or EXT-2-TO VCR/SAT socket
on this recorder.
– 5.1 multi-channel recordings cannot be
played back on other players.
Preparation for 5.1 multi-channel
recording
A Connect your Cable Box/ Satellite
Receiver to this recorder’s EXT2-TO
VCR/SAT socket and COAXIAL
DIGITAL IN socket.
B Turn on the TV to the correct viewing
channel for the recorder.
C Press OPTIONS, then move to
{ Settings } and press OK.
D Move to { Audio } in the menu and press
OK.
Move to { Digital input } >
E
{ On }
in
the menu and press OK to con rm.
F Press OK to con rm and followed by
OPTIONS to exit the menu.
Start recording
A Press LIVE TV on the remote control.
To record from the cable box/satellite
B
receiver, press LIVE TV repeatedly to
switch to analogue tuner mode followed
by P +/- repeatedly to select
{ EXT 2 }.
To record from the digital terrestrial
tuner, press LIVE TV repeatedly to
switch to digital tuner mode.
‘D’ with the channel number appears
on the top left corner on the TV.
Press REC to start recording.
C
English
Language
Recording
Playback
Video output
Audio
Analogue tuner
Digital tuner
Setup
Audio output
HDMI audio
Digital input
Sound mode
Night mode
93
Page 94

Other Information (cont inued)
English
Installing the latest software
Periodically Philips will issue software
upgrades to enhance the user experience.
Only upgrading to higher versions of
software is possible.
A Get the version information of this unit
by pressing OPTIONS on the remote
control.
The tools menu appears.
Tools
Audio language
Time search
Reset TSB
Settings
B Move to { Settings } and press OK.
The system settings menu appears.
Language
Recording
Playback
Video output
Audio
Analogue tuner
Digital tuner
Setup
Clock
Country
Remote control
Eco mode
Screen saver
DivX VOD
Version Info
F Visit Philips website ‘www.philips.com/
support’ to check the availability of the
latest software upgrade and download
the software to a CD-R or USB ash
drive
G Insert the CD-R or USB ash drive to the
recorder and con rm upgrade operation.
The software starts to install on this
unit automatically.
Note:
Do not remove the CD-R or USB when
the recorder is preparing for software
upgrade.
H Once software upgrade is completed, you
can now power off and on the unit.
C Move to { Setup } and press OK.
A warning message on clearing the
Time Shift Buffer appears.
D Press OK to continue.
E Move to { Version Info } in the menu to
view the version information.
Write down the information for your
current software version.
94
Setup
Clock
Country
Remote control
Eco mode
Screen saver
DivX VOD
Version Info
Version Info
(c) PHILIPS 2007 Version
Information :
Number :
Please visit our website
www.philips.com/support
for software updates and additional
product information.
Page 95

Frequently Asked Questions
What kind of disc should I use for
recording?
You can only record on DVD±R, DVD±RW
or DVD+R DL discs. DVD±R/±RW is the
most compatible recordable DVD format in
the market today. They are fully compatible
with most of the existing DVD-Video players
and DVD-ROM drives in computers.
What is the capacity of a DVD±R and
DVD±RW?
4.7GB, or equivalent to six CDs. You can
store only one hour of recording on a single
disc at the highest quality (DVD standard)
and about 8 hours recording at the lowest
quality (VHS standard). The recording mode
indicates the number of hours that can t on
a single disc.
What is the difference between
DVD±R and DVD±RW?
DVD±R is ‘recordable’ and DVD±RW is
“erasable” and “rewritable”. With a DVD±R,
you can record multiple sessions on the
same disc. But when the disc is full, you
cannot record any more on the disc. The
DVD±RW allows you to record over the
same disc repeatedly.
Can I copy a VHS tape or DVD from
an external player?
Yes, but only if the VHS tape or DVD is not
copy protected.
What is DV?
Using DV, also known as i.LINK, you can
connect a DV-equipped camcorder to this
recorder using a single DV cable for input
and output of audio, video, data and control
signals.
– This recorder is only compatible with
DV-format (DVC-SD) camcorders.
Digital satellite tuners and Digital VHS
video recorders are not compatible.
– You cannot connect more than one DV
camcorder at a time to this recorder.
– You cannot control this recorder from
external equipment connected via the DV
IN socket.
What are Titles and Chapters?
A DVD disc contains Titles and Chapters,
which are similar to the Titles and Chapters
of a book. A Title is often a complete movie
and is broken down into Chapters, or
individual scenes from the movies.
Title
Chapter Chapter Chapter Chapter
chapter markers
Programmes are recorded as a single title.
They may consist of one chapter or a few
chapters within a title, depending on the
recording settings.
How do I set up Titles and Chapters?
The recorder automatically creates a new
Title every time you start a new recording.
You can then add Chapters to these
recordings manually or have them
automatically inserted at a speci c intervals.
English
95
Page 96

Frequently Asked Questions (continued)
English
What does ‘ nalising’ a disc do?
Finalising a disc locks the disc so it can no
longer be recorded. This is only required for
DVD±R. It will then be compatible with
virtually any DVD players. To remove a disc
without nalising it, simply stop recording
and eject the disc. You can still record on
the disc if there is storage space for more
recordings.
How good is the quality of the
recording?
There are a few picture quality levels to
choose from, ranging from ‘HQ’ (1 hour
recording at high quality) to ‘SEP’ (8 hours
recording at VHS quality) on a recordable
DVD.
DVDR5520H
Record Mode
HQ (high quality)
SP (standard play)
SPP (standard play plus)
LP (long play)
EP (extended play)
SLP (super long play)
SEP (super extended play)
23
45
56
68
90
135
180
1
2
2.5
3
4
6
8
1 hr 55 mins
3 hrs 40 mins
4 hrs 35 mins
5 hrs 30 mins
7 hrs 20 mins
11 hrs 5 mins
14 hrs 45 mins
DVDR5570H
Record Mode
Some recordings listed on the HDD
menu cannot be played or copied to
disc.
Some TV broadcasts or videos from external
device that are recorded to this recorder
may contain copy protection signals. Such
material cannot be played back from the
HDD or copied to a recordable DVD.
The copy-protected recordings are marked
with the icon
either fully protected (copy never) or
partially protected (copy once). For copy
once recording, playback is possible but once
copied to a recordable DVD, the recording
will be removed from the HDD.
What is HDMI?
High-De nition Multimedia Interface (HDMI)
is a high-speed digital interface that can
transmit uncompressed high de nition video
and digital multichannel audio. It delivers
high quality picture and sound quality,
completely free from noise. HDMI is fully
backward-compatible with DVI.
As required by the HDMI standard,
connecting to HDMI or DVI products
without HDCP (High-bandwidth Digital
Content Protection) will result in no Video
or Audio output.
C
in the HDD menu. They are
HQ (high quality)
SP (standard play)
SPP (standard play plus)
LP (long play)
EP (extended play)
SLP (super long play)
SEP (super extended play)
96
(250GB)
40
77
96
115
153
230
300
1
2
2.5
3
4
6
8
1 hr 55 mins
3 hrs 40 mins
4 hrs 35 mins
5 hrs 30 mins
7 hrs 20 mins
11 hrs 5 mins
14 hrs 45 mins
What is DVB?
Digital Video Broadcasting (DVB) is a
standard for digital television maintained by
the DVB Project. This recorder has an
integrated digital TV tuner (DVB-T) that
enables reception of free digital video and
radio broadcasts via a terrestrial antenna. It
offers the best possible digital audio and
video quality.
More stations can be transmitted in the same
frequency band and additional media services
such as city guides, web-content are possible.
The number of these free-to-air stations
might vary from country to country.
Page 97

Frequently Asked Questions (continued)
Why does it take so long to display the
contents on my USB device?
– This could be due to the large numbers
of les (>500 les/folders) or size of the
les (>1MB).
– There could be other non-supported les
in the device that this unit is trying to
read/display.
What if unsupported devices (e.g. USB
mouse, keyboards) are plugged into
the unit?
The device may cause this unit to be
unstable. Remove the unsupported device
and unplug the mains cord. Wait for a few
minutes before reconnecting the mains cord
and power on this unit again.
What happens when I plug in a USB
HDD?
HDD is not supported as the large storage
capacity makes navigation very dif cult.
Transfer the music les (mp3) and photos
(jpg) into a ash drive if you want to
playback on this recorder.
Why does this unit fail to detect my
USB portable music player?
The portable music player may require
propriety software that is bundled with our
system in order to access the contents (eg.
playlist).
What types of le does the system
support?
We support only FAT16 and FAT32, not
NTFS.
Why does the le name appear to be
different from what was displayed on my
computer (e.g. from ‘Good Bye. jpg’ to
‘Good_B~1.jpg’)?
– The length of the le name is restricted
by the le system of the device (FAT16),
which only supports eight (8) characters.
– The computer may be able to display the
full le name as the operating system can
convert the le system.
Why can’t I rotate the pictures in my
device?
In order to rotate the pictures in the USB
device, the picture must contain EXIF
information, stored by most digital cameras.
This EXIF information may have been
removed when you edit or copy the picture
from other devices using editing
programmes.
Why can’t this unit play some of my
music les, photos or movies?
The music les may not be playable because
of different formats and encoding bit-rates.
Similarly, the photos may be of low
resolution or too high resolution for this unit
to support.
When playing a DivX movie, why the
subtitle cannot be displayed properly?
– You have to make sure that the subtitle
le has the exact same le name as the
movie le. If for example the lename of
the movie is “Movie.avi”, then you will
need to name the text le “Movie.sub” or
“Movie.srt”.
– You may need to change the ‘Character
set’ or ‘DivX subtitle’ display of this
player to which supports the recorded
DivX subtitle.
Character set /
DivX Subtitle
Standard English, Irish, Danish,
Central
Europe
Cyrillic Belarusian, Bulgarian,
Greek Greek
Subtitle language
Estonian, Finnish, French,
German, Italian, Portuguese,
Luxembourgish, Norwegian
(Bokmål and Nynorsk),
Spanish, Swedish, Turkish
Polish, Czech, Slovak,
Albanian, Hungarian,
Slovene, Croatian, Serbian
(Latin script), Romanian,
Ukrainian, Macedonian,
Russian, Serbian,
English
97
Page 98

Troubl esh oot ing
English
WARNING!
Under no circumstances should you try to repair the system yourself, as this
will invalidate the warranty. Do not open the system as there is a risk of
electric shock.
If a fault occurs, rst check the points listed below before taking the system for
repair. If you are unable to solve a problem by following these hints, consult
your dealer or Philips for help.
Problem (General) Solution
No power.
The message ‘IS TV ON?’
appears on the display
panel.
The buttons on the
recorder do not work.
– Press the STANDBY-ON button on the front of the unit
to turn on the power.
– Make sure the mains cord is properly connected and the
AC outlet has power.
– This recorder will not operate until you complete the
rst installation. See ‘Step 3: Installation and Set-up’ for
details.
– There is a technical problem. Disconnect the recorder
from the power outlet for 30 seconds, then connect
again. If the recorder still will not operate, then reset it
to the default factory settings :
1) Disconnect the recorder from the power outlet.
2) Press and hold down STANDBY-ON button on the
front of the recorder while reconnecting to the power
outlet.
3) Release STANDBY-ON button when ‘STARTING’
appears on the display.
4) Wait until the recorder’s demo start scrolling on the
display, press STANDBY-ON again to turn on the
recorder. All the information stored in the memory
(programmes, time) will be cleared. The initial
installation menu will be displayed on the TV.
Remote control does not
work.
98
– Aim the remote control directly at the sensor on the
front of this recorder (not towards TV).
– Remove any obstacles between recorder and the remote
control.
– Batteries are weak, replace the batteries.
Page 99

Troubl esh oot ing (continued)
Problem (General) Solution
No picture.
– Turn on your TV and set it to the correct Video In
channel for the recorder. You may go to Channel 1 on
your TV, then press the channel down button on your
TV’s remote control until you see the recorder’s built-in
live TV.
– Check the video connection between the recorder and
the TV.
English
No sound.
No TV signal received from
the recorder.
The message ‘Disc contains
unknown data’ appears.
– Check the recorder audio connection. See ‘Basic
Recorder Connections - Connecting the video/audio
cables’ for details.
– Set the Analogue output or Digital output correctly,
based on the device you have connected to this
recorder. See ‘System Menu Options - Audio settings’ for
details.
– Make sure that the antenna cables are correctly
connected. See ‘Step 1: Basic Recorder Connections Connecting the antenna cables’ for details.
– Install the TV channel. See ‘System Menu Options -
Analogue Tuner settings’ for details.
– This message may appear if you insert a disc that
contains junk data. DVD±Rs that have not been nalised
are very sensitive to ngerprints, dust, or dirt. This may
cause problems during recording. To use the disc again,
do the following :
1) Make sure that the surface of the disc is clean.
2) Press OPEN/CLOSE on this recorder.
3) Insert the disc but do not close the tray.
4) Hold down button number {5} on the remote control
until the tray closes. This recorder starts the repair
process.
5) If the disc is recovered, the Picture Index screen will
appear.
The message ‘NO
SIGNAL’ or ‘X’ appears.
– Check that the antenna cable is plugged in rmly.
– No aerial signal received for the current channel or no
video signal received from the external input channel
(EXT1, EXT2, CAM1 or CAM2).
– If you connect the recorder to a Cable Box/Satellite
Receiver, make sure that it is turned on.
99
Page 100

Troubl esh oot ing (continued)
English
Problem (Playback) Solution
Disc will not play.
The picture is distorted
or black and white during
playback.
There is picture or sound
interference with the TV
reception.
Distorted sound coming
from a connected hi-
ampli er.
– Insert the disc with the label facing up.
– The child lock is on. See ‘System Menu Options -
Playback settings - Child lock’ for details.
– Wrong region code. Check the rear or bottom of the
DVD recorder for the supported region code.
– There is no recording on the disc or wrong disc type.
See ‘Playback from Disc - Playable discs’ for details.
– Make sure the disc is not scratched or warped.
– The disc does not match with the TV colour system
standard (PAL/NTSC).
– The disc is dirty. Clean the disc.
– Sometimes a small amount of picture distortion may
appear. This is not a malfunction.
– Check that the antenna cable is plugged in rmly.
– Fine-tune your TV channel. See ‘System Menu Options -
Analogue Tuner settings - Manual install - Finetune’ for
details.
– Do not connect any cables from this recorder to the
‘Phono’ input of your ampli er.
– If you are playing a DTS CD, connect COAXIAL or
OPTICAL-DIGITAL AUDIO OUTPUT socket on this
recorder to a Hi-Fi system or ampli er. If the Hi-Fi
system or ampli er does not support DTS, distorted
sound might occur.
No surround sound from
the Coaxial/Optical
output.
Unable to display JPEG
pictures.
Unable to play DivX
movies.
100
– If this unit is connected to the TV through the HDMI
connection, there may be no surround sound on Coaxial/
Optical output, depending on the TVs audio capabilities.
In this case, press OPTIONS on the remote control, go
to Audio Output setting and set the { HDMI audio } to
{ Disable }.
– This unit only supports pictures in JPEG-Exif le format,
using 4:2:2 or 4:2:0 chroma subsampling, with a
resolution not exceeding 4096 x 4096 (horizontal/
vertical). JPEG pictures that downloaded from the
internet or have been modi ed using computer may not
be able to display properly.
– Ensure that the DivX le is encoded according to the
‘Home Theatre Pro le’ with the DivX encoder.
– Check that the DivX movie downloaded is a complete
le.
 Loading...