

Page 1

Mounting
1.
Find
A typical location
the
a suitable
subwoofer
location
is
shown
in
the vehicle
below:
in
which
to
mount
the
amplifier.
2. Make
3. Mark the location for mounting hole screws by positioning the cabinet where you
Traublahootin.
If
installation with the electrical wiring diagram on the previous pages.
persist.
Net
Net
sure
there is sufficient
wish
to
install
it.
Make a small
Thoroughly
Then attach
and press
you experience operation
PROBLEM
~irQ
LED
W'JfkIIlI.
LED
No
read
net
'm
......
dean
the
area
the
supplied double adhesive tape, and put the
down
on it securely.
the
following
POSSIBLE REASON SOLUTION
• rc+12v b
00.
Pa.M!r
•
No
'en'
but
sIaiJs
tx:M8'
•
FLB&
.
"""
·
ArrPfl8l"to
'
HealLH
• G!t'l
•
ca
IIeCIcIII
air
circulation around the intended mounting location.
mark
to identify
you
plan
to
attach
or
perfonnance problems with this product, compare
troubleshooting
pDMII'"
wie
'b
rentE
Me
broIGIn
-.
t'd:
c:orWoI
net
set
~
the
position
the
subwoo1er,
tips
which
may
• Check
•
•
•
•
•
• Check heed unit volume level
• Ensure you have set
• Check
fu888
Check
remote
Replace
am.....,.
Replace
am.....,.
Mow
ulil
Tum
head
gain level control
all
connections
and
fuae
fuse
to
\'eIlIed
unit
pcIINeI".
and
remove
using a vacuum
subwoofer
help
eliminate
connections
on
connections
with
correct
with
correct
area
dcrNn
up
remote
on
If
problems
type
type
the amplifier
and
the
unit.
in
the
the
problems.
Ie bat1ay
to
heed
and
and
ground
deaner.
place
your
unit
AQTB8
8"
1000W
Slim
Acvtive
Low-Profile
Waterproof
•
•
---
Amplified
Subwoofer
•
Super
Marinel
System
-
www.lanzar.com
OWNER'S
ANUAL
Page 2
AQTB8
AQTB8
8” 1000 Watts Low-Profile Super Slim Active Amplified
Marine/Waterproof Subwoofer System
AQTB8
1000
AQTB8
Page 3

AQTB8
AQTB8
AQTB8
AQTB8
AQTB8
Page 4

Front
panel
controls
and
features
6
Rear
panel
controls
and
features
•
CD
POWER
@ PHASE SHIFT
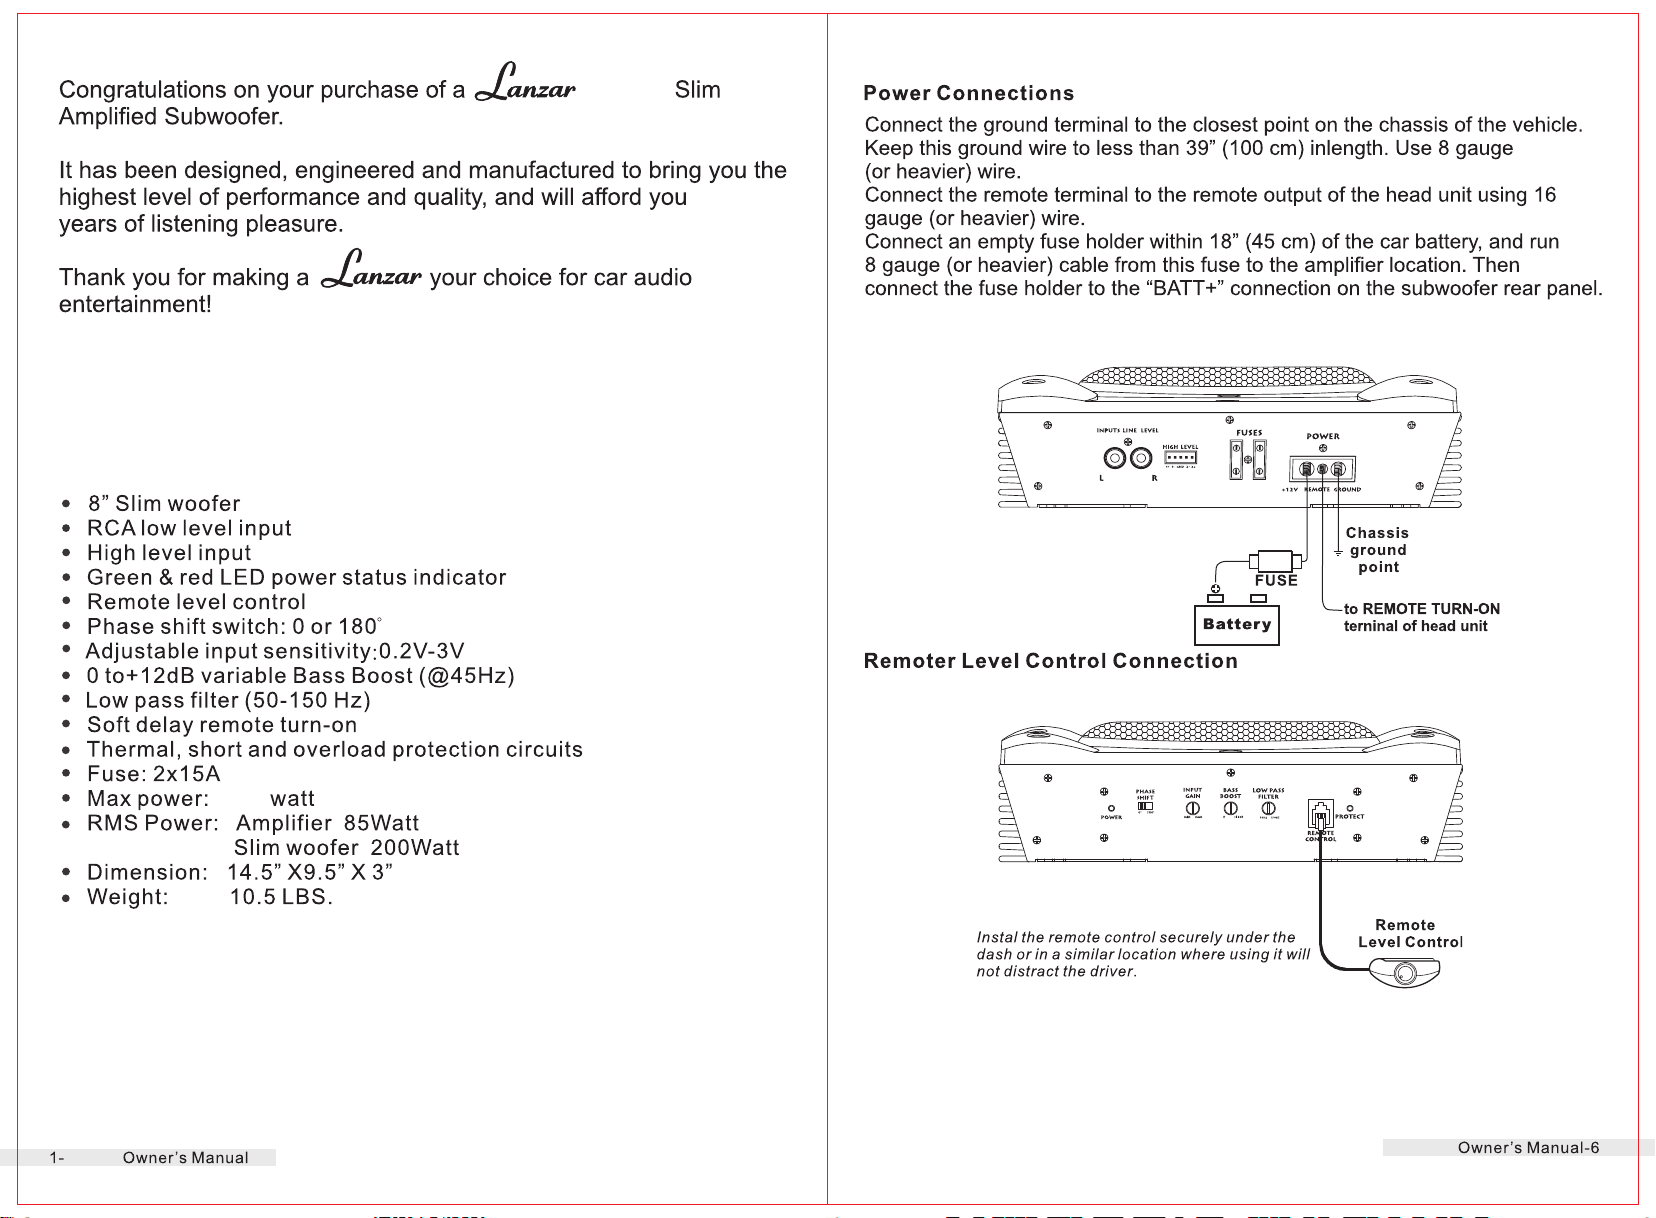
Use this switch to help compensate for time alignment problems
system. Such problems usually result from having the subwoofer at a
different distance from the listener than the other speakers
® INPUT GAIN CONTROL
After you have installed your system, tum this control to minimum.
Turn the head unit on (and the subwoofer will turn on via the remote
connection). Tum the head unit volume to about 2/3 full level.
Slowly turn up the subwoofer input gain control until you hear a small
amount
completely
@BASSBOOST
The bass boost feature will increase the sound level the bass frequencies.
®
LOW
This control permits you define the frequency range you want the subwoofer
amplifier to receive. The subwoofer will reproduce all sound BELOW the
frequency you set.
If
the rest
control relatively high.
system, you will probably want the subwoofer to only receive lower
frequency signal.
ON
LED
INDICATOR
of
distortion. Then reduce the level until the distortion is
gone.
PASS FILTTER
of
Leave the control at this setting.
your system is weak on the mids , you may wish to set this
If
the midrange is well covered by the rest
•
•
in
in
the system.
of
the
your
.....
.
•
4
CDLOW
@HIGH
®FUSE
@POWER
LEVEL
Low
level inputs are the recommended
to the subwoofer
signal source (such as a sound processor).
LEVEL
If
your head unit does
outputs
and connect the outputs properly as shown in the connection diagram
in this manual .
The fuse is rated
NEVER replace the fuse with a wire
RCA
INPUTS
way
to introduce the audio signal
if
RCA outputs are present on
(speaker
for
the audio source for the . Use the supplied cable
at
TERMINALS
level)
not
15A.
INPUTS
have RCA
Do
not
use a fuse with a different value and
outputs,
AQTB8
or
coin.
your
head unit
you can use the speaker
or
other
® REMOTE LEVEL CONTROL PORT
Attach the included remote level control to control the volume level
subwoofer independently.
(j)
PROTECT
AQTB8
3- Owner's Manual
LED
INDICATOR
of
the
Owner's Manual-4
AQTB8
 Loading...