

Page 1
PYWM24
TV Wall Mount Bracket
Fits for 26-52'' LED/LCD/OLED & Plasma Flat Screen TV
with 2x Standard Weight Support, Weight Up to 110lbs.
Page 2
CAUTION:
Please read this instruction carefully before assembly.
Fits for 26-52" plasma and LCD TV.
•
• Weight Capacity: 50Kg (110Lbs).
CAUTION:
SAFETY WARNING:
• Never let children climb on product or play with product.
• Do not sit or stand on product.
• Do not fasten a TV that is heavier than the recommended load rating to the mount.
• Using suitable concrete wall or wood stud wall.
• Improper installation may cause property damage and/or personal injury, so the
installation must be done by two qualied contractors. The manufacture is not
liable for damage or injury caused by incorrect mounting, assembly or use.
• Improper handling can result in cuts and lacerations.
• Pictures for reference only, subject to our available products.
• Keep this instruction for future reference.
CAUTION:
This mount is intended for use with TV weights not exceeding "maximum weight
capacity 132lbs." The wall itself has to be capable of supporting 2X standard
weight plus 200lbs. Please don't over tighten screws in order to avoid any injury.
Use with products heavier than the maximum weights indicated may result in
collapse of the mount and its accessories causing possible injury.
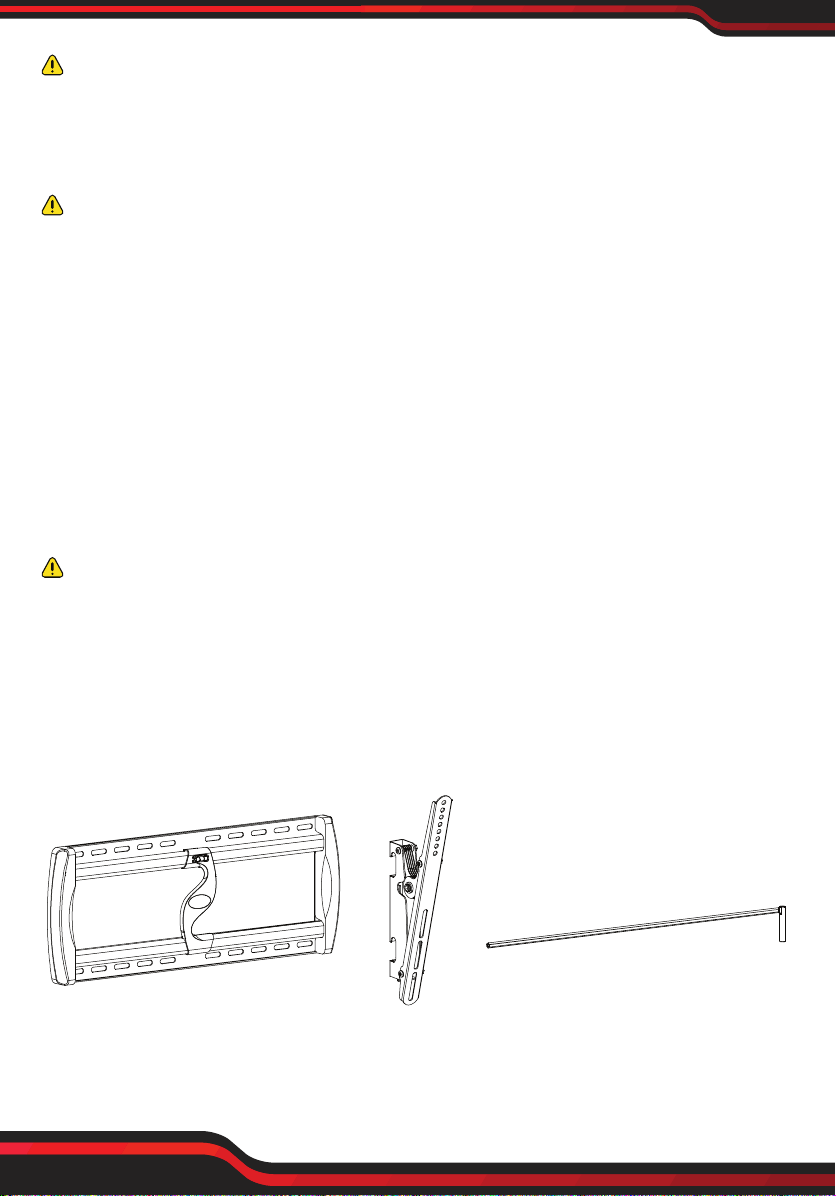
PART LIST
A-Wall plate 1pc B-Bracket 2pcs C -Adjusting pole 1pc
www.PyleUSA.com
2
Page 3
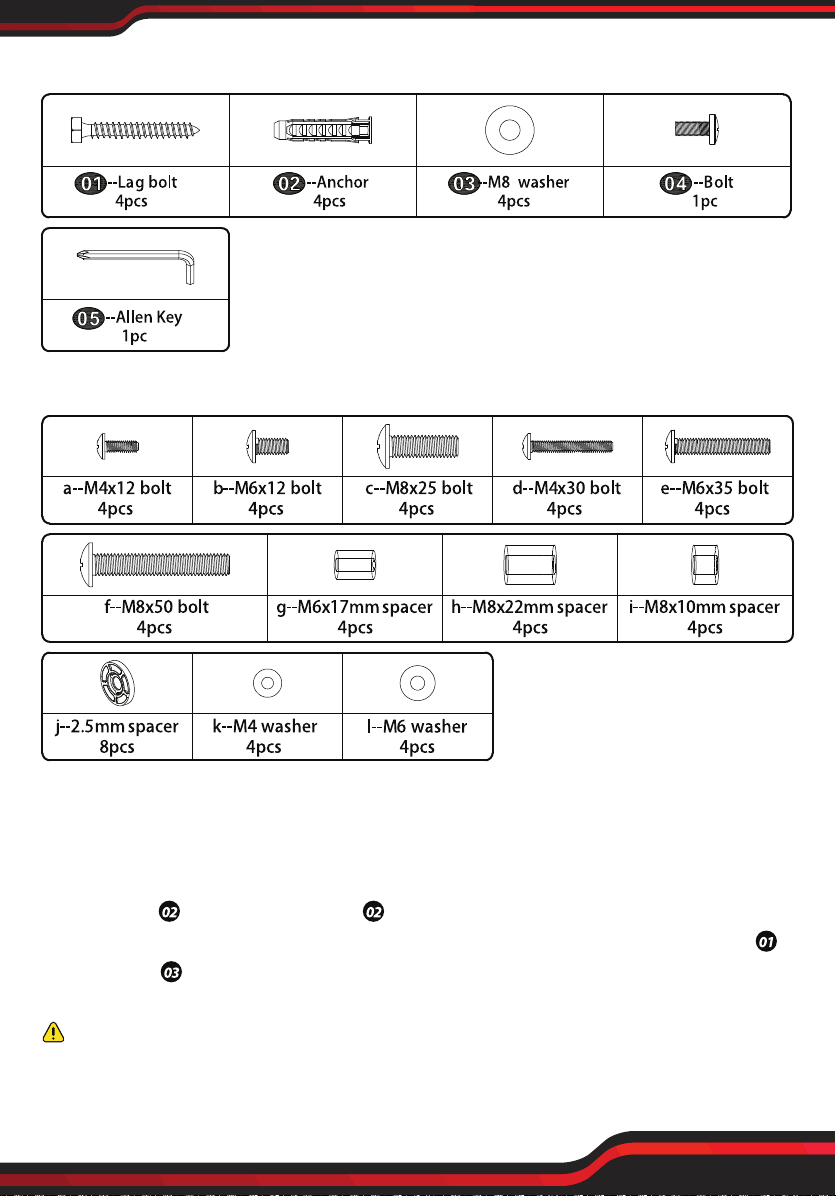
WALL MOUNTING HARDWARE
TV MOUNTING HARDWARE
Step 1:Remove the plaster board on the surface of concrete wall when assembling
mount on the concrete wall. Hold Wall plate (A) against wall at desired position on
concrete wall, then using a pencil mark 4 hole locations. Then drill holes according
pencil marks using 3/8" size drill bit to a depth of 2.5". Then you will need to use
wall anchors . Insert wall anchors into holes, you may need to use hammer to
lightly tap wall anchors into wall. Then x Wall plate (A) to the wall with screws
and washers . (Figure 1)
CAUTION:
The concrete wall minimum thickness no less than 5.5 inches, and surface covering
can't more than 3/8 inches.
www.PyleUSA.com
3
Page 4
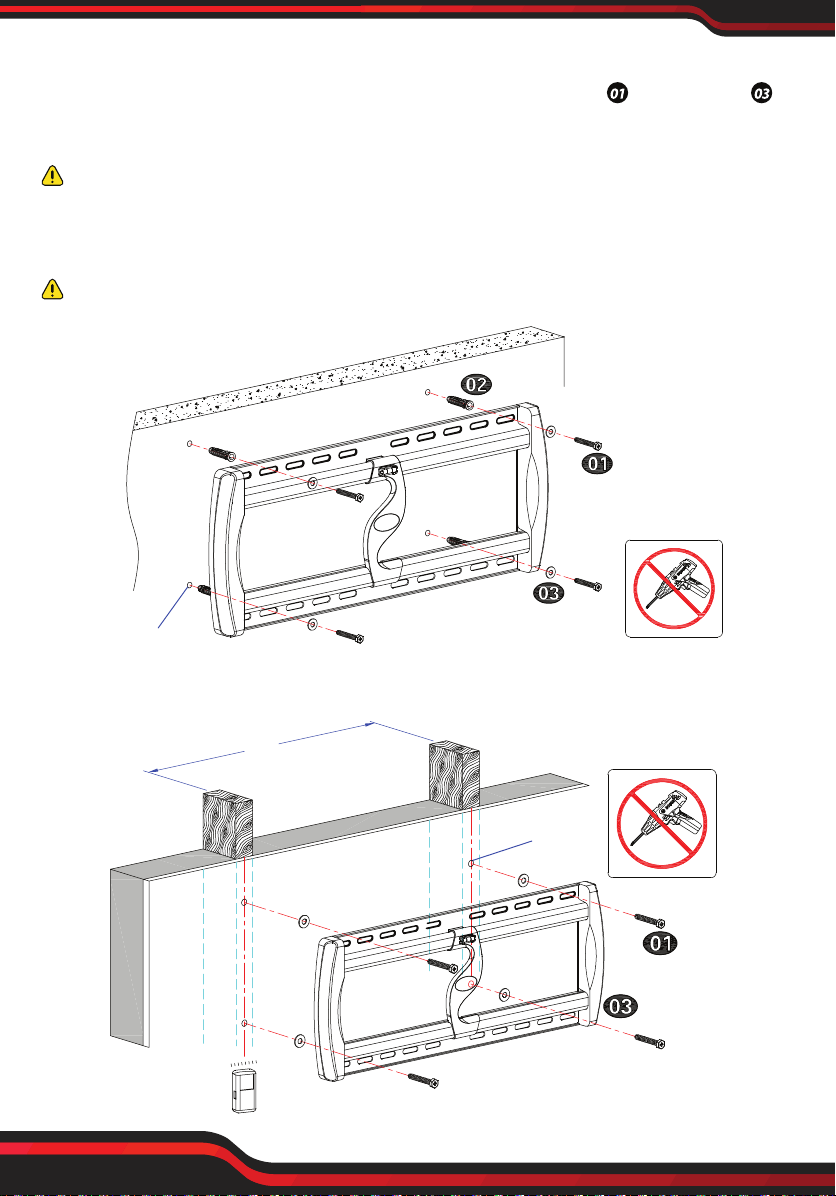
If you mount TV mount into wood studs, pre-drill the mark 4 holes using 7/32" drill
bit to a depth of 2.5", x Wall plate (A) to the wall with lag bolt and washers .
(Figure 2)
CAUTION:
The wood stud min size is 2x4 inches, and surface covering can't more than 5/8
inches. Drill hole on the wooden pillars middle line.
CAUTION: Don't use it on the concrete block.
Concrete wall
No!
A
3/8"
Figure 1 (keep the Wall plate level)
Wood Double Studs
Stud nder
www.PyleUSA.com
4
16''
No!
7/32"
A
Figure 2 (keep the Wall plate level)
Page 5
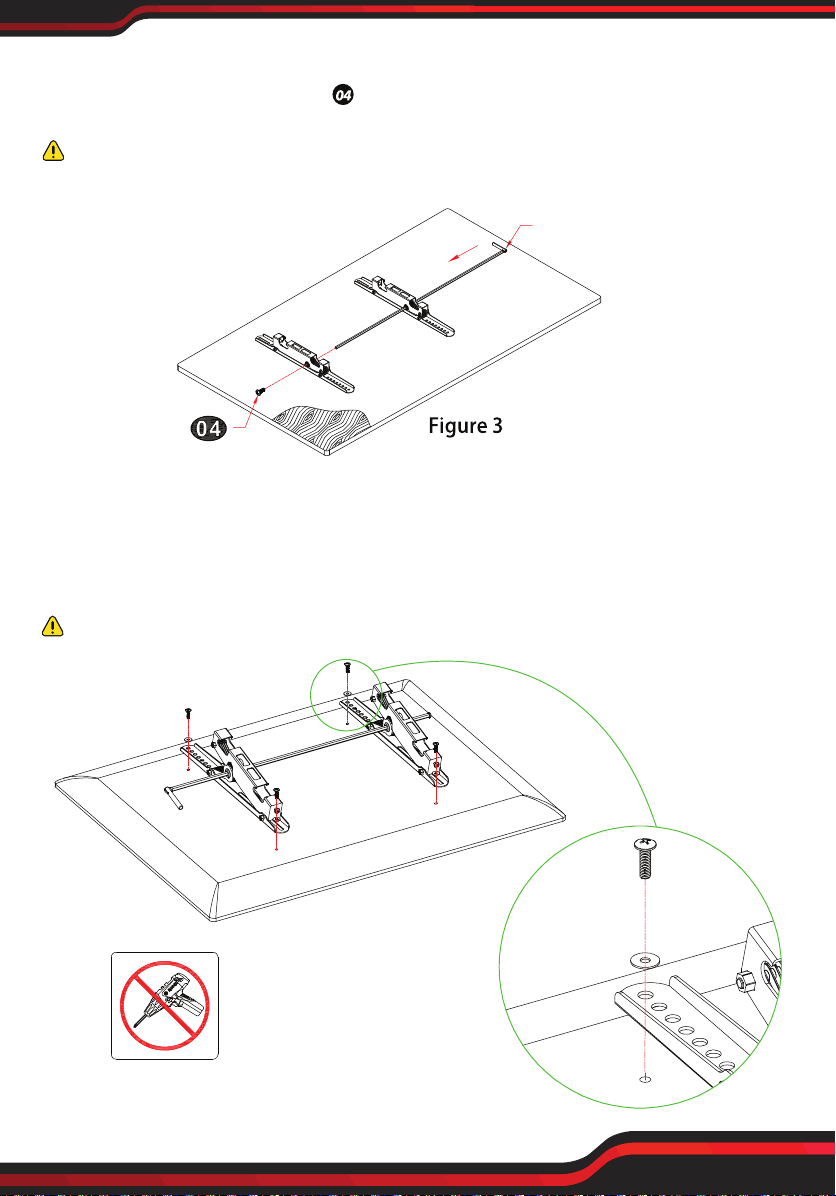
Step 2:Putting the brackets (B) on a at table, then insert adjusting pole( C )
into brackets and locking screw tightly.
CAUTION: You only need to insert the adjusting pole in the center of the two
brackets on this step. DO NOT twist the adjusting pole during the inserting process.
Adjusting pole (C)
bolt
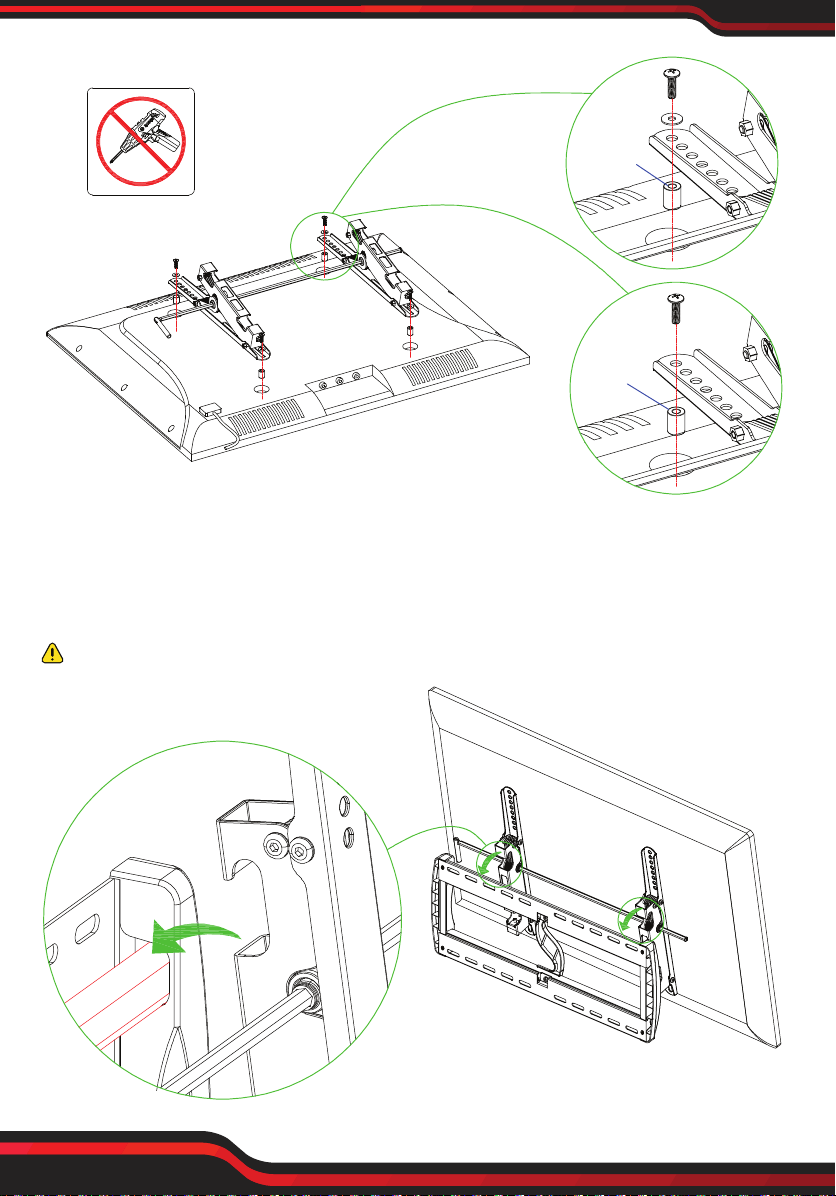
Step 3:Attach TV Bracket (B) to the back of TV, choose corresponding bolt, washer
and spacer to x the holes of TV rear. (Figure 4) If the back of TV is not at, or the
bolts used to assemble TV are too long, or there is interfere between TV bracket
and cable inlets, we highly recommend you to use spacers.
CAUTION: Using incorrect bolts may damage your TV.
No!
B
B
Figure 4
a \b
k\l
www.PyleUSA.com
5
Page 6
No!
d\e
k\l
g\h\i\j
B
B
Figure 4
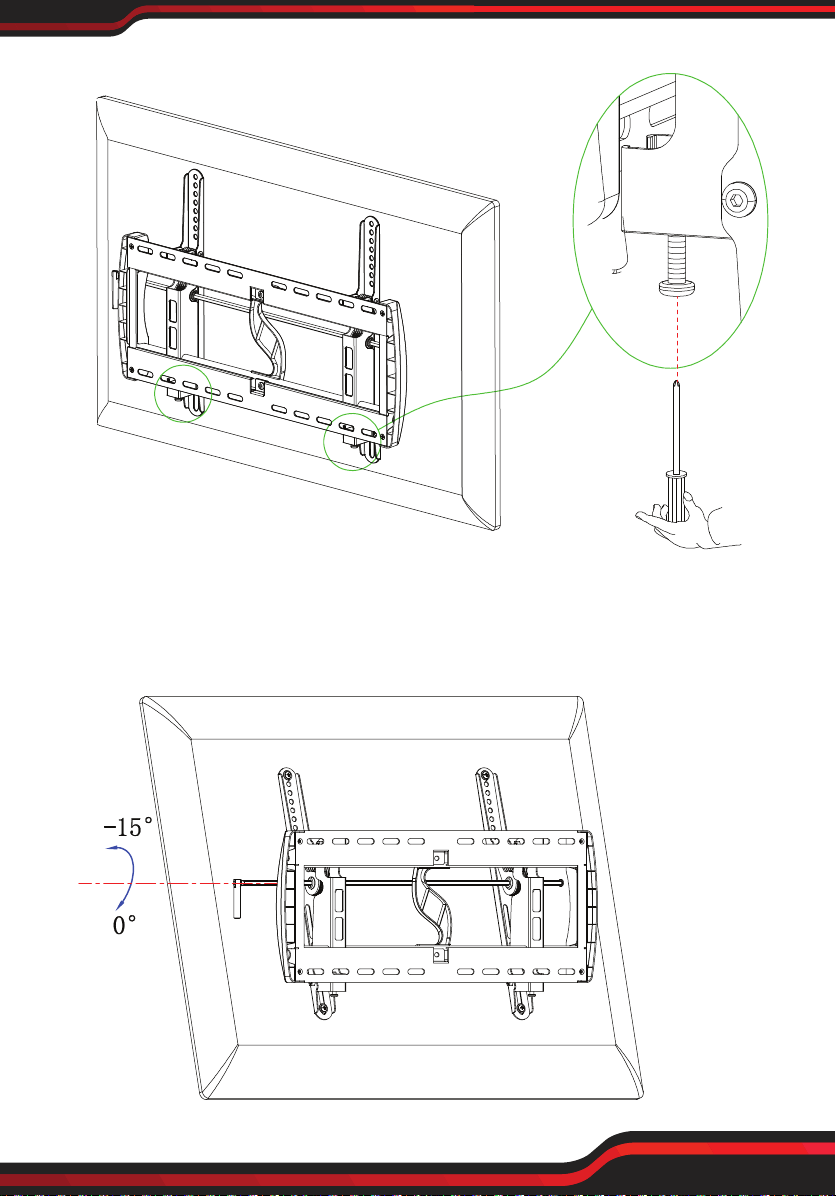
Step 4: Hang the pre-assembled TV unit on the Wall Plate. Pull down to release
the safety catch on both Brackets to attach the assembly to the bottom part of the
Wall Plate. (Figure 5)
CAUTION: This step must require 2 or more professional to nish.
h\i\j
c\f
www.PyleUSA.com
6
Figure 5
Page 7
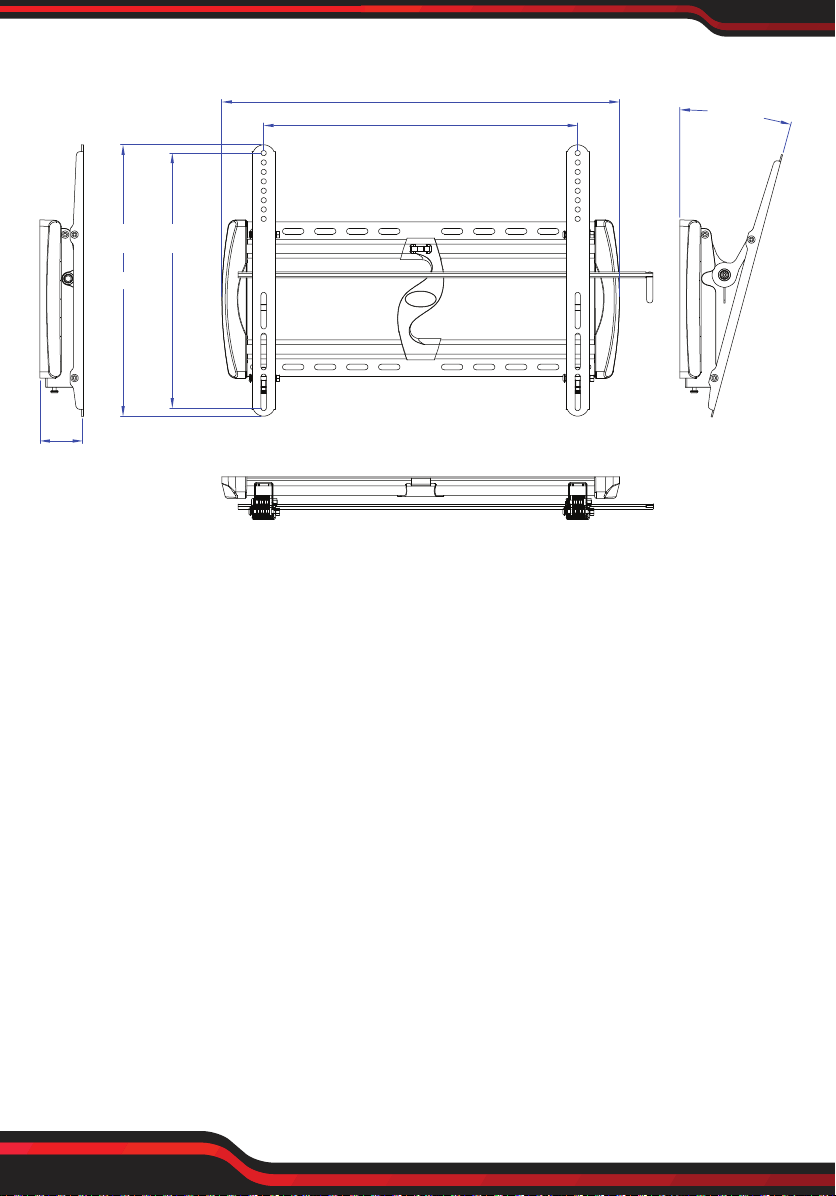
Step 5: Tighten the safety screws. (Figure 6 )
Figure 6
Step 6: Adjust angle by loosening thea djusting pole (C) to allow the Brackets to
tilt forward up to 0°/-15 d°egrees. (Figure 7) Once the desired tilt angle is achieved,
tighten the all screws to secure the television in the new position.
C
Figure 7
www.PyleUSA.com
7
Page 8
PRODUCT DIMENSIONS:
633mm
MAX:500mm
MAX:400mm
425mm
68mm
PAY EXTRA CARE AND ATTENTION WHEN YOU FASTEN TWO TV MOUNTS
TO THE BACK PANEL OF TV IN STEP 2. MAKE SURE THE APPROPRIATE MOUNT
HARDWARE IS BEING USED PROPERLY.
0 ~-15°
1. Select correct Mounting Hardware according to the screw hole size of your TV,
discard any remaining screws or spacers.
2. Carefully lay your TV on its face on a non-abrasivesurface, making sure to lay
padding underneath it so as not to damage the screen.
3. Place left TV mount and right mount in the approriate position, make sure it is
CENTERED on the back of the TV and LEVEL with on another.
4. Only install this product on a perpendicular wall, do not install on the ceiling.
www.PyleUSA.com
8
Page 9
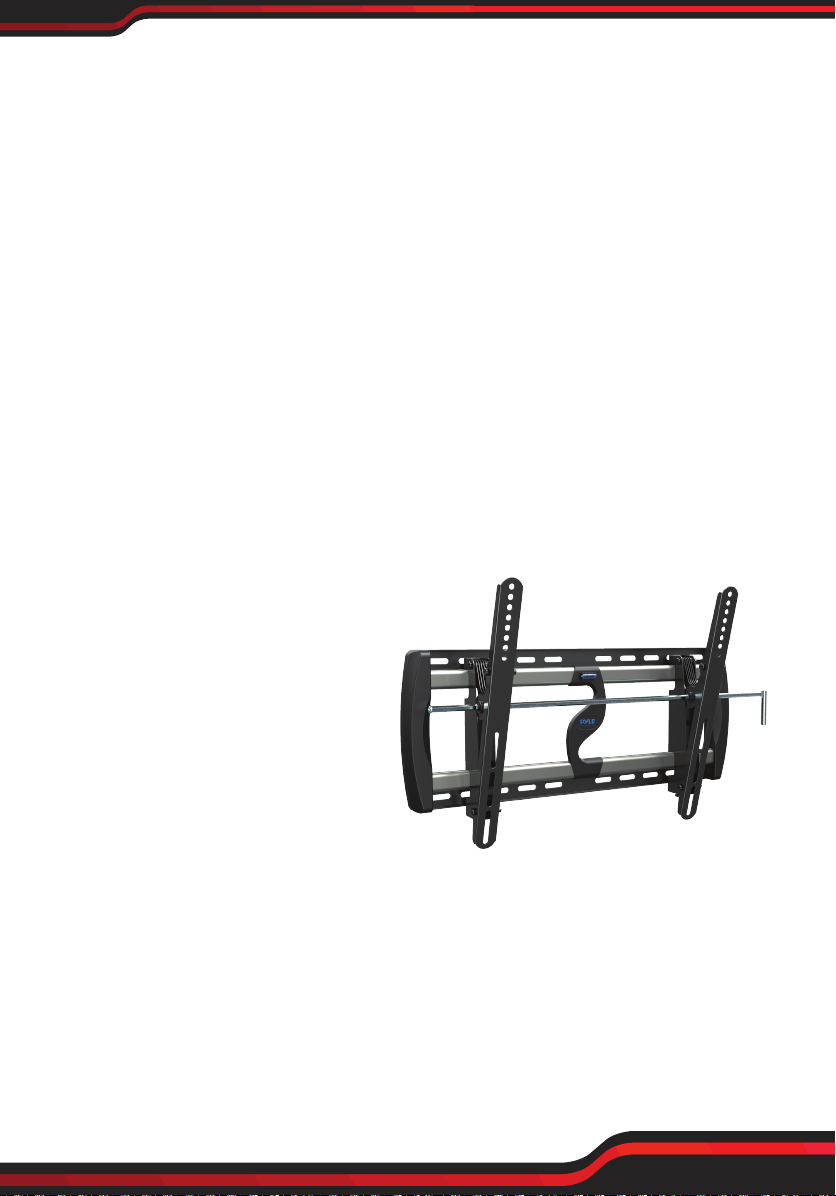
PYWM24
TV Wall Mount Bracket
Fits for 26-52'' LED/LCD/OLED & Plasma Flat Screen TV with 2x Standard Weight
Support, Weight Up to 110lbs.
Features:
• Fits for 26'' to 52'' TV or Fits for 16’’ Studs Plus Concrete Wall
• Supports 2x Standard Weight
• Saves Space with Stylish Appearance
• Tilt TV for Anti-glaring
• Reduces Glare for Better Viewing
• Easy to Install
• Heavy Duty Steel Construction
• Automatic Robot Welding Technology
• Open Wall Plate Design for Outlets
• TV can Move Easily to be Centered
• Suitable to Use for Home, School, and Oce
What's in the Box:
• (1) Wall Plate
• (2) Bracket
• Adjusting Pole
• Hanging Hardware
Technical Specs:
• Mount Type: Medium Tilt Mount
• TV Size: 26''-52''
• Fitting Studs Spacing: Up to 16''
• Max VESA: 19.69'' x 15. 75'' -inches
• Weight Capacity: 110 lbs. (50 Kg.)
• Tilt Angle: 0~-15°
• Distance to Wall: 2.68'' -inches
• Construction Material: Steel
• Product Dimension (L x W x H): 24.92’’ x 16.73’’ x 2.68’’ -inches
www.PyleUSA.com
9
Page 10
 Loading...