

Page 1
Page 2

1
CONTENTS
SAFETY INSTRUCTIONS ...................................................................................... 2
SPECIFICATIONS .................................................................................................. 3
TURNTABLE LAYOUT........................................................................................... 4
TURNTABLE OPERATION .................................................................................... 5
POWER SUPPLY ............................................................................................. 5
BASIC OPERATION ......................................................................................... 5
TURNTABLE NEEDLE REPLACEMENT ........................................................ 6
LINE IN (AUX-IN) OPERATION ............................................................................. 7
BLUETOOTH .......................................................................................................... 7
HEADPHONE OPERATION ............................................................................. 7
AUX OUT OPERATION..... ............ ... ....... ... ....... ... ....... ... ....... .. ........ .. ..7
USB /SD CARD OPERATION ................................................................................ 8
Page 3

2
SAFETY INSTRUCTIONS
1. Read these instructions - All the safety and operating instructions should be read
before this product is operated.
2. Clean only with a dry cloth.
3. Do not block any ventilation openings. Keep at least 5 cm around the apparatus for
sufficient ventilations. Install in accordance with the manufacturer’s instructions.
4. Do not install near any heat sources such as radiators, heat registers, stoves, or other
apparatus (including amplifiers) that produce heat.
5. Protect the power cord from being walked on or pinched particularly at the plugs,
convenience receptacles, and at the point where they exit from the apparatus.
6. Unplug the apparatus during lightning storms or when unused for long periods of time.
7. Refer all servicing to qualified personnel. Servicing is required when the apparatus has
been damaged in any way, such as power supply cord or plug is damaged, liquid has
been spilled or objects have fallen into the apparatus, the apparatus has been exposed
to rain or moisture, does not operate normally, or has been dropped.
8. To reduce the risk of fire or electric shock, do not expose this apparatus to rain or
moisture. The apparatus shall not be exposed to dripping or splashing and no objects
filled with liquids, such as vases, shall not be placed on apparatus.
9. The main plug is used as disconnect device, the disconnected device shall remain
readily operable.
10. Please keep the unit in a well ventilated environment.
11. Only use attachments/accessories specified or provided by the manufacturer.
Page 4

3
Belt Drive Turntable System
Ceramic Cartridge
Speaker Impedance: 4 Ohm
Maximum USB Flash Support Size: 32GB
Power: 100/240V (DC 9V Adapter)
Unit Dimensions (L x W x H): 13.8’’ x 10.2’’ x 4.7’’
Weight: 6.61 lbs.
SPECIFICATIONS
Design and specification are subject to change without notice.
Page 5
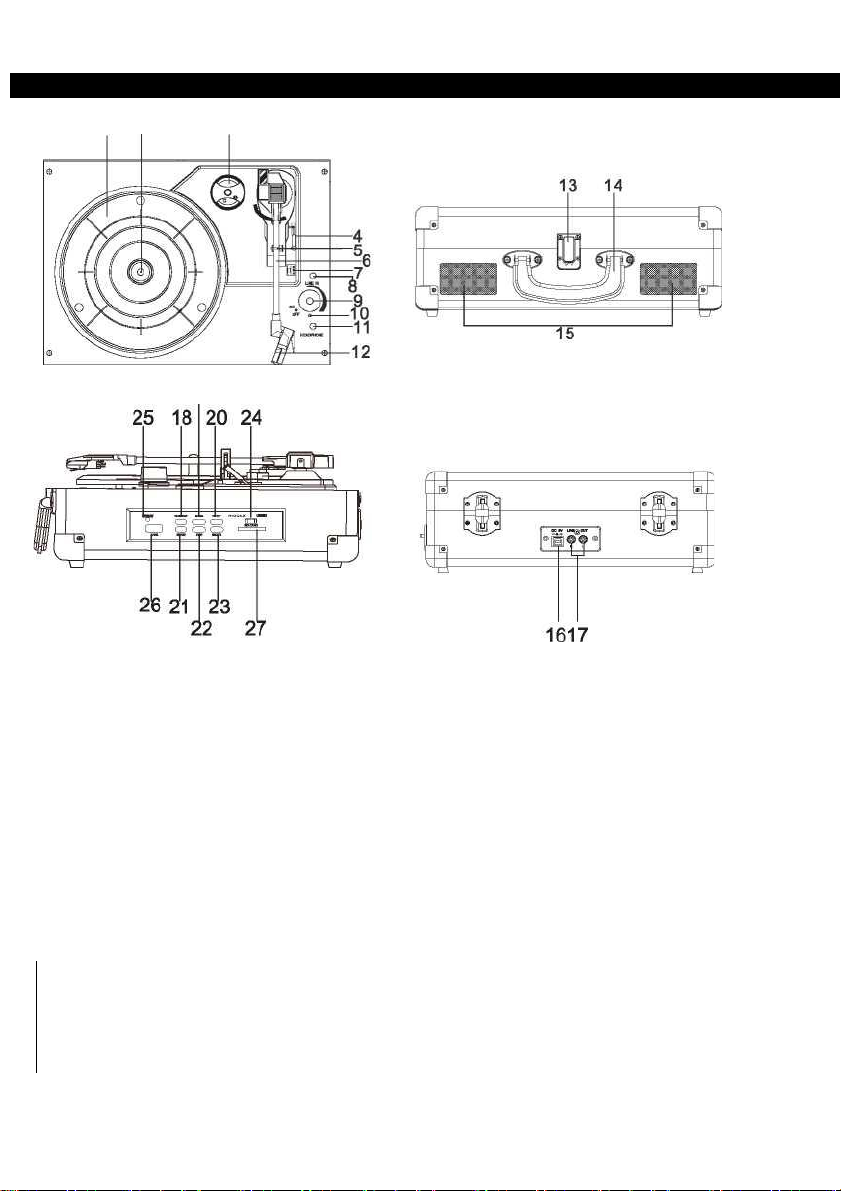
TURNTABLE LAYOUT
4
1.
TURNTABLE PLATTER
16.
POWER ADAPTOR JACK
2.
TURNTABLE SHAFT
17.
LINE OUT JACK
3.
45 RPM ADAPTOR
18.
PLAY/PAUSE BUTTON
4.
LIFT LEVER
19.
BACK BUTTON
5.
TONE ARM CLIP
20.
NEXT BUTTON
6.
TONE ARM
21.
RECORD BUTTON
7.
SPEED SELECTION SWITCH
22.
STOP BUTTON
8.
LINE-IN (AUX-IN) JACK
23.
DELETE BUTTON
9.
POWER ON/OFF AND VOLUME KNOB
24.
PHONO-USB/SD SWITCH
10.
11.
LED / POWER LIGHT INDICATOR
HEADPHONE JACK
25.
REC/DELETE/PLAY/PAUSE
LIGHT INDICATOR
12.
STYLUS CARTRIDGE
26.
USB PORT
13.
BUCKLE
27.
SD CARD SLOT
14. HANDLE
15. SPEAKERS
2
3
19
Page 6
TURNTABLE OPERATION
5
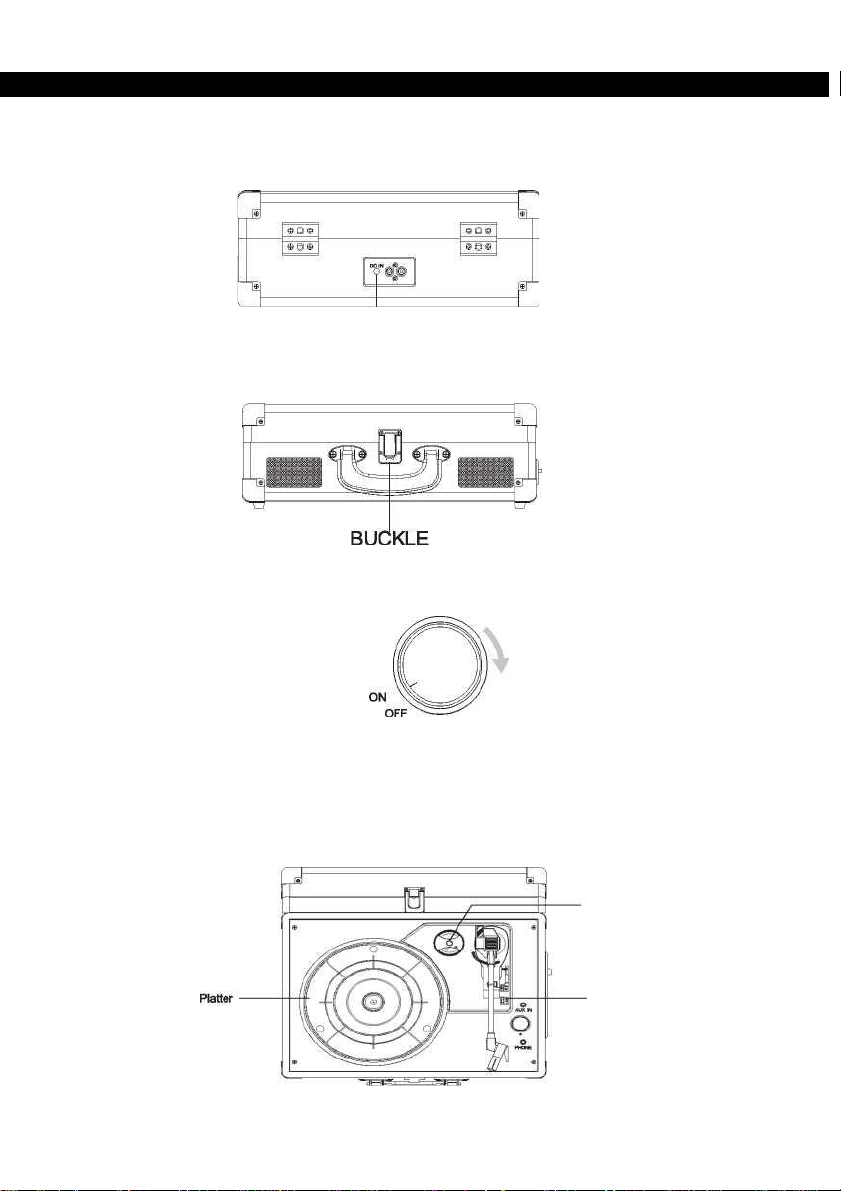
DC IN
45 RPM adaptor
Speed switch
POWER SUPPLY
Insert the adaptor plug into the DC IN jack on the rear of the unit, then connect the AC/DC
adaptor (9V, 1A AC100-240V, 50-60Hz) to a AC/DC wall outlet.
BASIC OPERATION
1. Lift the BUCKLE on the front of the turntable and open the lid.
2. Power on the unit by turning the VOLUME CONTROL KNOB clockwise. The red LED indicates
that the turntable is turned on.
3. Set the function switch to PHONO
Place a record on the TURNTABLE PLATTER and select the desired speed (33 1/3 / 45 /
78) by sliding the SPEED SELECTION SWITCH according to the record.
NOTE: When playing a 45 rpm record, use the included 45 RPM ADAPTOR located in the holder
near the tone arm.
Page 7
TURNTABLE OPERATION
6
Guide Pins (Inside)
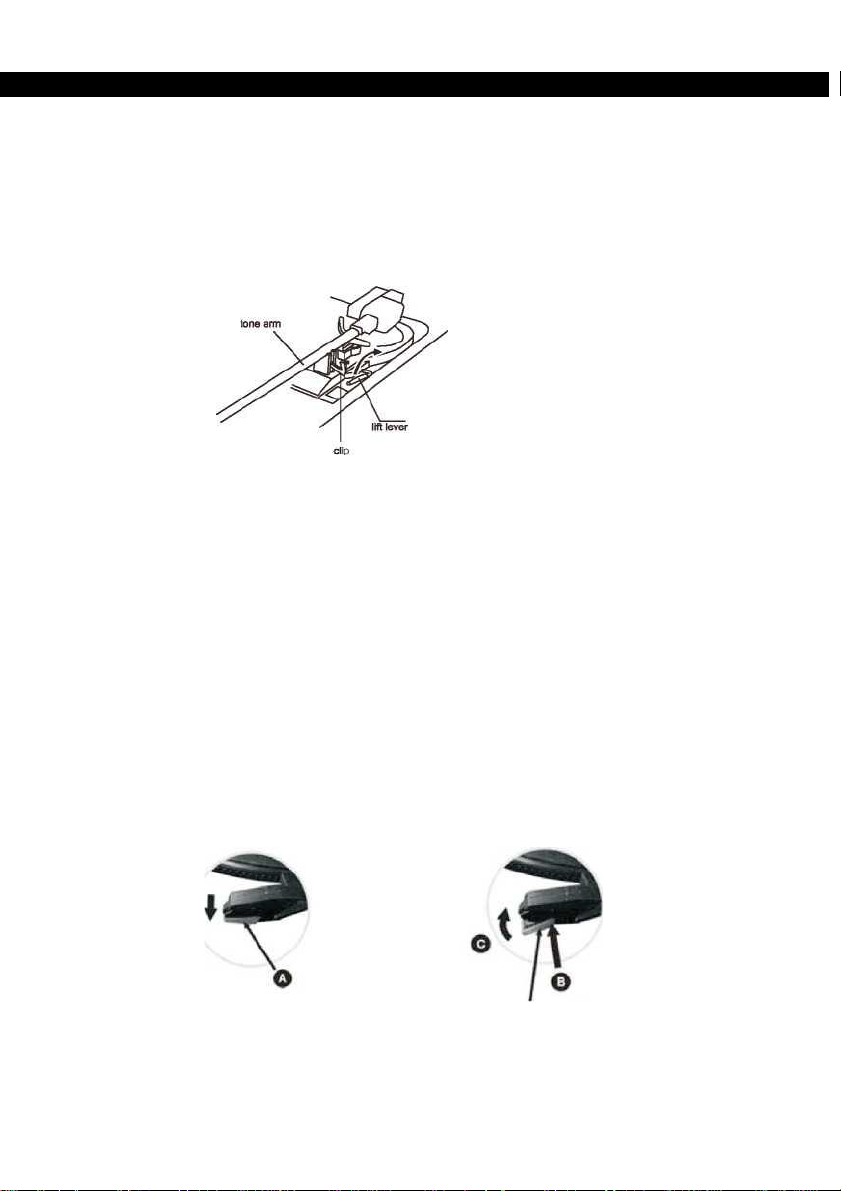
4. Open the TONE ARM CLIP to release the TONE ARM. Push the LIFT LEVER
backwards to raise the arm. Gently move the tone arm to the desired position over the
record. The turntable will begin to spin when the arm is moved toward the record.
Push the lift lever forward and lower the arm slowly onto the desired position on the
record to begin playing.
Please Note: The record will begin to spin as soon as the tone arm is moved over the record.
5. To select the volume level, turn the VOLUME CONTROL KNOB to adjust the volume.
PLEASE NOTE:
The TONE ARM will automatically stop at the end of the record and you must return the tone
arm to the arm-rest manually.
HOW TO REPLACE THE TURNTABLE NEEDLE
Removing the Stylus from the Cartridge
1. Place a screwdriver at the tip of the stylus and push downward as shown in direction
WARNING: when applying force to stylus, too much may damage or break the stylus.
2. Remove the stylus by pulling the stylus forward and pushing downward.
Installing the Stylus
1. Hold the tip of the stylus and insert the stylus by pressing as shown in direction “B”.
2. Push the stylus upward as in direction "C" until the stylus locks into the tip position.
"A"
Page 8

An external (auxiliary) audio source (i.e. personal CD/MP3 Player/Mobile phone or computer)
can be connected to this apparatus via the LINE IN JACK.
1. Plug a detachable AUX Cable (not provided) into the LINE IN socket on the
function panel of the apparatus.
2. Plug the other end of the AUX Cable into the Headphone or Line Out socket of your
External Source.
3. Power on the unit by turning the VOLUME CONTROL KNOB clockwise.
Set the Switch to PHONO, the red LED will light to show that the turntable is turned on.
4. Rotate the VOLUME knob to adjust the sound level.
NOTE: Turntable function will automatically be deactivated while using the LINE
IN (AUX-IN) function.
BLUETOOTH FUNCTION OPERATION:
1. Turn on the unit, rotate the Volume control to desired level.
Turn the Function SWITCH to PH mode, and make sure the tone-arm is on the resting state
and no AUX device is connected. A short Bluetooth starting tone can be heard, then the
Bluetooth indicator will be flashing.
2. Turn on your Bluetooth device, search for “ClassicAudio” and pair. Pairing code is “0000” is
needed.
3. A short and delightful tone will indicate successfully pairing. Play your Bluetooth device as
you normally do and the sound will be played from the unit.
NOTE:
1. Make sure your Bluetooth device is within 10 meters of this unit.
2. Check and see if there are other nearby Bluetooth devices interfering with the signal and
connection.
3. This unit could be paired by multiple Bluetooth devices, but could only be connected and
played by one at a time. Make sure no other device is actively connected while trying to connect
the one you are working on.
HEADPHONE OPERATION (Headphone not included)
Plug the headphone jack into the headphone port on the function panel to listen to the
record. The built-in speaker will stop playing once the headphones are plugged in.
NOTE: For best performance and product maintenance, unplug the turntable when not in
use.
AUX OUT OPERATION
Use a RCA cable to connect the unit with external amplifier devices to get better sound quality.
Page 9

8
USB/ SD CARD OPERATION
Power on the unit. Set the function switch to USB/SD. Insert the USB
disk into the USB port on the right panel, it will play automatically.
1. STOP
When playing or pausing, press STOP, it will enter stop mode.
2. PLAY/PAUSE
The unit is in play mode as default. Insert the USB disk into the USB port,
Press PLAY/PAUSE button during stop, the unit will be in play mode;
Press PLAY/PAUSE button during playing, the unit will be in pause mode;
Press PLAY/PAUSE button during pausing, the unit will be in play mode.
NOTE:
During PLAYBACK, the LED light will stay blue, and blink in blue when PAUSED.
3. NEXT and BACK
Press NEXT button to advance to the next song. Press BACK button to reverse to the
previous song. Press and hold the NEXT/BACK buttons for fast forward and rewind
respectively.
4. RECORD
Press RECORD button once to start recording function, the red LED will turn on. Press
RECORD button again to stop recording, Red LED will be off. During recording, all other
buttons are disabled.
This unit supports direct recording from the turntable to either an external USB drive or
SD card, when both a USB drive and SD card are inserted, long press the PLAY/PAUSE
button to change between USB and SD. NOTE: RECORD Button is for Line-In function,
as well.
5. DELETE
The delete function will only apply to the track that is currently under playback.
Press and hold the delete button longer than 2 seconds to start deleting. When deleting,
the Red LED indicator will flash twice; once the current track is deleted, it will
automatically resume PLAY mode, and play the next song.
Operation for SD card is the same, just insert the SD card into the slot before
using.
 Loading...