

Page 1
Page 2
HD VIDEO CAPTURE
With this PVRC52 HD Video Capture, you can capture up to 1080P video
from HDMI, Ypbpr (component) or composite port, such as blue ray,
set-top-box, computer, game box, VHS, etc. With remote control, can set
input signal manually, recording quality, or capture a still image by
SNAPSHOT button.
FEATURES/PORTS AND BUTTONS:
1. PWR- DC 5V power supply.
2. HDMI IN- HDMI input.
3. AV IN- Ypbpr component or composite input through adapter cable
4. MIC- to connect a microphone and record voice comments when you
play game.
5. LINE OUT- Audio output.
6. HDMI OUT- HDMI output, so can connect to monitor to pass through
display the input video.
7. HOST- Plug a USB ash (or USB HDD) to save record video.
8. SD- Plug a SD card to save recorded video.
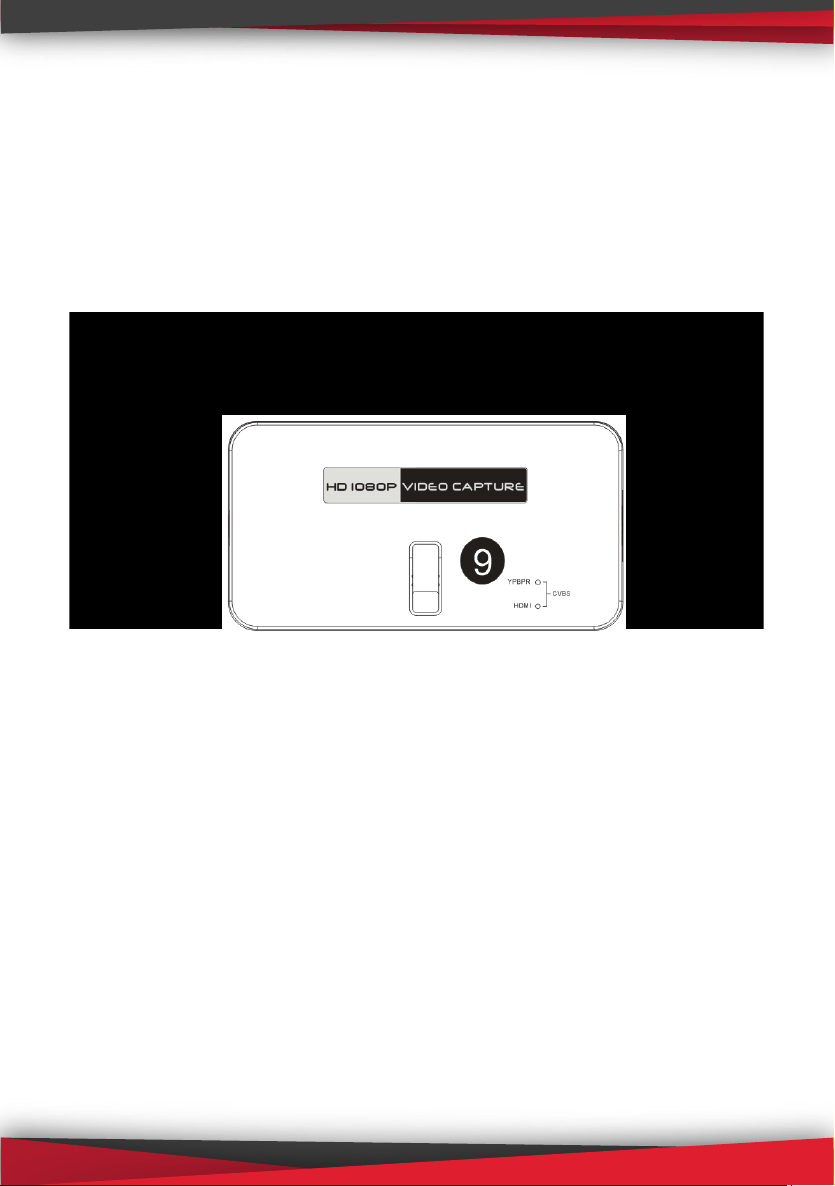
9. Record button and LED indicator- Press button to record/stop record,
the indicator shows the work status
1
www.PyleUSA.com
Page 3

CONNECTIONS:
PVRC52 have 3 input modes: HDMI, component, composite. It will
automatically recognize the input video source if only connect one
source. You can also use remote controller to choose the input source if
you connect 2 or 3 video source same time.
CONNECT WITH HDMI INPUT SOURCE:
1.Connect power with DC adaptor
2. Plug an USB disk or a SD card (Note: PVRC52 will only recognize the
rst storage device if you connect USB disk and SD card both).
3.Use HDMI cable connect Xbox or other source.
2
www.PyleUSA.com
Page 4
4. With HDMI cable connect to monitor
5. The “LINE OUT” is used to connect speaker or earphone, this will not
be necessary if you use the HDMI output because it’s already enabled
with audio output.
6. You can connect your microphone to record your comment when
playing game, it’s not necessary if you don’t need it.
Important:
1. Use “safety remove” option to remove your USB drive or HDD after
format from computer, DO NOT just plug out without clicking “safety
remove” option, otherwise you will cause problem during recording.
2. Some HDMI video sources may have HDCP protection; you cannot get
the pass through video and record it.
3. PS3 need HDMI Splitter to decode HDCP, it will not work without it.
And for PS4, without HDMI Splitter, you need to disable HDCP option
(check the steps as below).
4. Note: Disable HDCP option is only for game play, not for blue ray DVD
play.
PS4 SETTING:
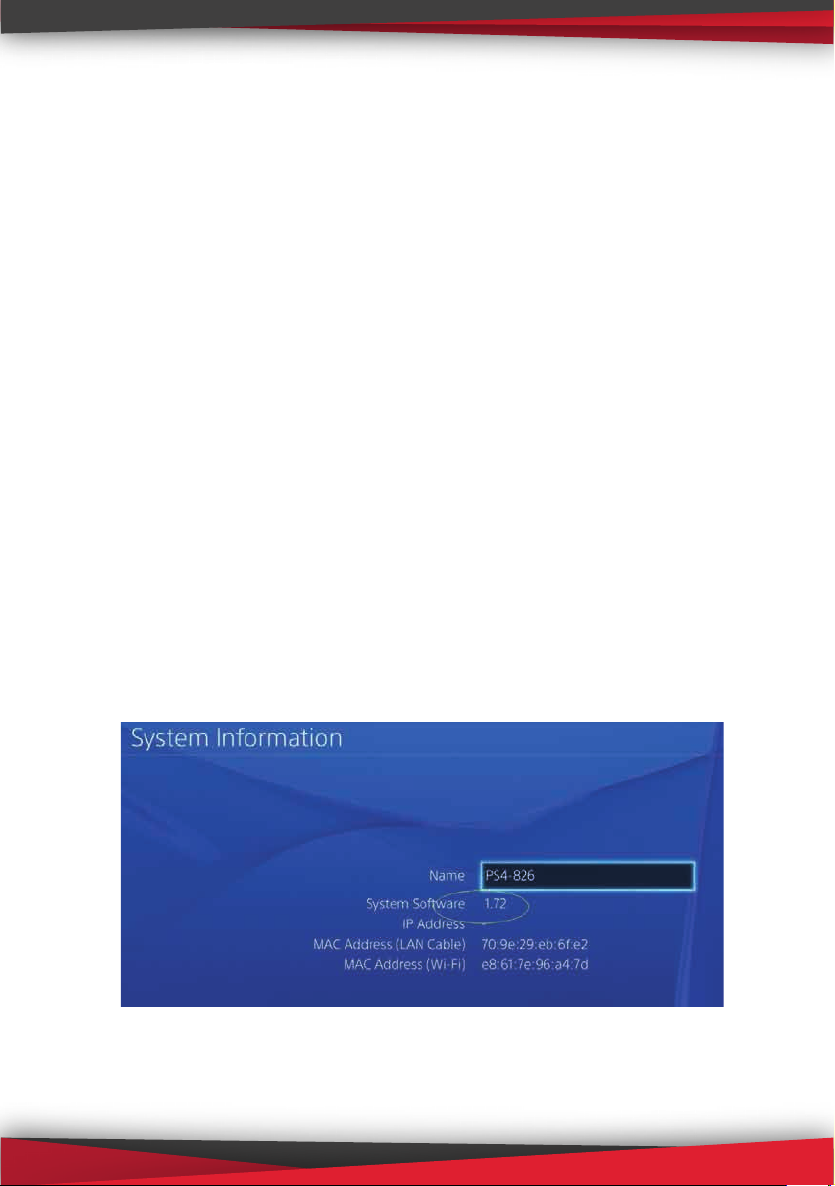
It has disabled HDCP option for rmware 1.7 or later: Make sure the
system is 1.7 later:
3
www.PyleUSA.com
Page 5

Go settings---System disable “Enable HDCP” option:
CONNECT WITH YPBPR COMPONENT VIDEO SOURCE
(SUCH AS DVD PLAYER, PS3. ETC):
1. Connect power with DC adaptor
2. Use the adapter cable in the package to connect component (red,
blue, green), just don’t mix the red with the audio cable (the audio cable
red and white will be separated with component)
4
www.PyleUSA.com
Page 6

3. With HDMI cable connect to monitor
4. Plug in an USB drive.
5. The “LINE OUT” is for connecting speaker or earphone, it’s not
necessary if you don’t need it, cause the HDMI output is also with
audio output.
6. Connect a Microphone to the MIC port if you need record speak from
microphone it’s not necessary if not need.
PS3 SETTING: FOR THE COMPONENT INPUT
Go to the settings---Video output settings, choose “Component/DTerminal”:
At the resolutions setting, make sure the “1080P” option is NOT be
ticked, otherwise some game play (e.g. GT5) cannot be recorded by
PVRC52:
5
www.PyleUSA.com
Page 7

CONNECT WITH COMPOSITE VIDEO SOURCE (SUCH AS PS2, VHS, V8,
HI8, ETC):
1. Connect power with DC adaptor
2. Connect the composite (yellow cable and red white audio cable) to
your video source with the adapter cable come with the package.
3. With HDMI cable connect to monitor
4. Plug in an USB drive.
5. The “LINE OUT” is for connecting to speaker or earphone, it’s not
necessary if you don’t need, cause the HDMI output is also with audio
output.
6. Connect a Microphone to the MIC port if you need record speakfrom
microphone, it’s not necessary if don’t need.
REMOTE CONTROLLER:
REC/STOP – Start and stop recording.
720P – Change record quality to 720P, only eect
when input source is more than 720P
1080P – Change record quality to 1080P, only
eect when input source is 1080P
CVBS/YPbPr/HDMI – Select input source.
SNAPSHOT – Used to capture still image with one press.
This will not work during recording.
6
www.PyleUSA.com
Page 8

WHEN IN USE THESE ARE LED LIGHT STATUS:
BLUE POWER LED – lit when connected to power.
RED RECORD LED – lit when recording in progress.
GREEN YPBPR LED – lit when input source YPbPr is selected.
GREEN HDMI LED – lit when input source HDMI is selected.
Two GREEN LED – lit when input source CVBS is selected.
RECORD:
You should see the pass through video on the screen after connection is
ready (no matter composite, component, or HDMI). The blue indicator
will switch on. It means the device is ready to record.
To record video --- press the record button, then you will see the
RECORD indicator will switch on, this indicates recording in progress.
There are several reasons for no actions after you press record button,
you may need check:
1. The input video source disconnected.
2. The USB drive is out of memory.
3. The format for USB drive is not suitable, e.g. exFAT. PVRC52 support
FAT, FAT32, and NTFS.
4. The USB drive is not connected well.
5. The USB drive is not ready, normally, it will take 4~8 seconds after plug
it on.
7
www.PyleUSA.com
Page 9

To stop recording, just press the button again, will see indicator ash few
seconds then turns o, means the record is stop, now you can take o
your USB ash (or SD card).
Note: please do not take the memory o when the indicator is ashing. The
recording will automatically stop if the USB ash or SD card out of memory.
After recording is stopped, connect the USB ash or SD card to
computer to see the recorded les: for 1080P recording, le will be
Encode_1080P_1, for 720 or 480p recording, le will be Encode_1.
Every record/stop operation will create a dierent recording le:
Encode_1080P_1, Encode_1080P_2, Encode_1080P_3… and so on.
The max size per le will be around 1.95GB (around 15 minutes for
1080p video), when you record a video more than 1.95GB (15 minutes),
PVRC52 will partition it in more than 1 le, for example: if you record a
45 minutes 1080p video by one click recording, you will see 3 les:
Encode_1080P_1, Encode_1080P_1_1, Encode_1080P_1_2…and so on
Sometimes you may nd some recorded video with problems, like: skip.
This is due to using a USB ash on NTFS format, and you haven’t click
“safety remove” the device when disconnect from computer (especially
for USB HDD, if not safety remove, may caused serious problem). You
might need to format it to FAT32 if that problem keeps happening.
FIRMWARE AND OTHERS:
1. Update rmware: you maybe need update rmware for this device for
some reason. Copy the rmware le in to USB disk or SD card, power
o the device (unplug power jack), plug USB disk to device, power on,
the record indicator will ash 7~8 seconds, and become blue, it means
the update is nished.
2. After long time using, you will see the number of recording le
become too big, for example Encode_1080P_234, but you want it be
start from Encode_1080P_0, to do it you just keep pressing record
button (before power on), then plug the power jack to power on the
device, after 10 seconds, the le number will start from 0.
8
www.PyleUSA.com
Page 10

3. Change the date: you may nd out that the date of the recorded le is
not synchronous with your local time. To change the time of PVRC52,
you need create a TXT le name “rtc_setup” type your local date and
time with following format (for 2014 July 31 11:00:00):
/:2014
/:7
/:31
/:11
/:00
/:00
/:0
Should be exactly same format as it (rst line be year, second line be
month..etc, end with /:0 , each line with start “/:”), and save it.
Then copy the rtc_setup le to a SD card or USB ash, connect to
PVRC52 then power on, then the time is set ready.
EDIT/CONVERT RECORDED FILES:
The PVRC52 comes with a video edit software—Arcsoft ShowBiz 3.5, you
can edit your video le with it.
After installing it on your computer,open it.
9
www.PyleUSA.com
Page 11

1. You can combine two or more video in one, just drag them into
Showbiz:
2. You can cut a video to two or more:
10
www.PyleUSA.com
Page 12
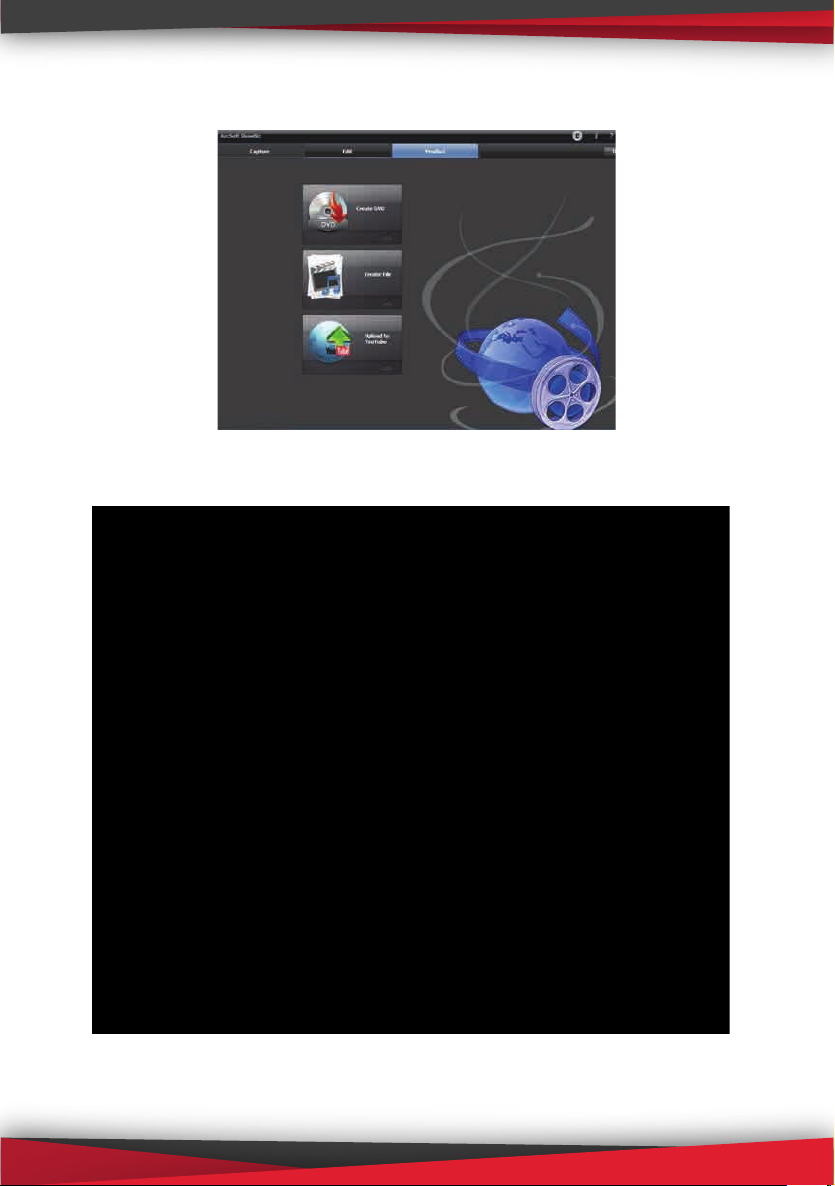
3. Click “Produce” after editing, you can create DVD or upload video to
YouTube:
4. Please click “Create le” to create multiple les for dierent devices,
such as apple, PSP, mobile phone, etc:
11
www.PyleUSA.com
Page 13

SPECIFICATIONS:
Connections
Interface
USB 2.0 Host, SD Card
Digital: HDMI
Video Input
Analog: Component Video, Composite Video
Digital: HDMI
Audio Input
Video Output
Analog: RCA L/R, 3.5mm Micro Phone In
Note: Microphone without pass through for
HDMI input
Digital: HDMI (Pass-through from HDMI,
component or composite)
Digital: HDMI (Pass-through from HDMI, L/R)
Audio Output
Analog: 3.5mm Stereo (Pass-through from HDMI
or Audio RCA L/R Input)
Package Contents
Device
HD Video Capture
Others
AV adapter cable, USB DC adapter, USB
Cable for connecting to USB DC adapter or
PC, Remote control, Software CD, User Manual
12
www.PyleUSA.com
Page 14

Hardware Extra
Codec Hardware H.264 encoder
On-board Hot Button for one-click recording
User Interface
LED indicator for working status
Dimensions 142(L)* 74(W)* 23(H) mm
Weight 110g
Standards
USB Flash Disk, Portable Hard Disk, SD Card
Storage Media
Note: The exFAT format is not supported.
Input / Pass-through:
720 x 480 (60p), 720 x 576 (50p), 1280 x 720p (50p),
1280 x 720p(60p), 1920 x 1080 (50i), 1920 x 1080 (60i),
1920 x 1080 (24p), 1920 x 1080 (25p), 1920 x 1080 (30p),
1920 x 1080 (50p), 1920 x 1080 (60p)
Resolution
Capture:
720 x 480 (60p), 720 x 576 (50p), 1280 x 720p (50p), 1280 x
720p(60p), 1920 x 1080 (50i), 1920 x 1080 (60i), 1920 x 1080
(24p), 1920 x 1080 (25p), 1920 x 1080 (30p), 1920 x 1080
(25p), 1920 x 1080 (30p)
Note: Upscaling is not supported
Record Format Video: MP4, Audio: AAC Stereo
Record Quality Max: 16Mbps@1080P 30fps
Record File Max: 1.95GB / Per File
Record Place Max: 140MB / Minute, 8.4GB / Hour
Power Supply DC 5V / 2A with Mini USB port
13
www.PyleUSA.com
Page 15

Applications
Software
Video Editing
Video Export
Operating System
CPU
Memory
Graphics Card
Arcsoft Showbiz
Timeline / Storyboard edit, Split / Divide Scenes,
Multi Trim Scenes …
Upload to YouTube
Portable Device: iPod, iPhone, iPod Touch, Apple TV,
PSP, PS3, Xbox
File: MPEG 1 / 2 / 4, WMV HD, QuickTime (MOV) …
Windows 8 (32 / 64 bit), Windows 7 (32 / 64 bit),
Windows Vista (32 / 64 bit)
Intel Core 2 Duo 2.8GHz, AMD Athlon 64X2
Dual Core 3.0GHz
4 GB RAM
VGA card with support for DirectX 10.0c or above
FAQ :
1. Why can’t I record video through HDMI port of PS3 and some DVD
player?
- Because HDCP protection of HDMI signal. You need to buy one HDMI
splitter to decode HDCP. This may be illegal in some countries and
areas.
2. Why can’t I record video with PVRC52 HD video capture device?
- Please make sure your monitor display the video rst. If not, please
check all the cables connection, and check your HDMI video source has
HDCP protection (like point 2, it that, you can’t get video on your
monitor).
- For PS4, you need to disabled HDCP option following the option in
manual. And the option is only for games, not for Blue-Ray DVDs.
- Please make sure your USB drive or USB HDD isn’t out of memory, and
don’t take your USB drive o when the REC LED is ashing.
The recording will automatically stop if the USB drive is out of memory.
14
www.PyleUSA.com
Page 16

- Please make sure your USB drive or USB HDD is the right format
- it doesn’t support exFAT format. Please format them in your computer,
and FAT32 is the best choice. Please use “safety remove” option to
remove your USB drive, don’t just plug out directly without “safety
remove” option. Sometimes maybe you still nd your recorded video
with problems if without “safety remove”.
- Usually USB drive will ash seconds (If your USB drive includes LED
inside and if none no LED inside) when you just plug it into PVRC52
device, then turn o. And it will ash after you press REC button to start
recording, if not, it means not recording.
- For recording PS3 with YPBPR (Component video), please set following
the option in manual.
3. How to update the latest rmware?
- Copy the rmware le (jedi.img) into USB drive, power o the device
(unplug power jack), plug USB drive to device, power on, the indicator
will ash 7~8 seconds, and become green, check USB drive and the
jedi.img le is disappeared, it means the update is nished.
4. How to reset the recorded les name?
- After long time using, you will see the number of recording le become
too big, for example Encode_1080P_234, but you want it be start from
Encode_1080P_0, to do it you just keep press record button (before
power on), then plug the power jack to power on the device, after 3
seconds, the le number will start from 0.
5. How to record video from HDMI port of my computer?
- Please connect all the cables following the HDMI connection in
manual.
- If you have an extra monitor and can display the video correctly please
disregard video setting.
- If you have no extra monitor, please check your display selection on the
computer. And it’s ok if you nd the picture as below:
15
www.PyleUSA.com
Page 17

- Please right click Sound icon, and select Playback device, and set
PVRC52 to be default device. You will get recording video without
audio if you don’t set this.
16
www.PyleUSA.com
Page 18

6. Why can’t I record audio from PS3 by HDMI port?
- Please set audio of your PS3.
Go to “Audio output setting” --- select “HDMI”, and choose “Manually”.
Get below picture, and don’t tick Dolby and DTS, then save the setting.
GUIDE FOR OBS
PVRC52 HD Video Capture device working with OBS can record video on
computer, and stream HD video.
OBS is an open source and free software for video recording and stream-
ing, Live RTMP streaming to Twitch, YouTube, DailyMotion, Hitbox and
more.
For recording, it will use H.264 encoding, support record FLV, MP4, MOV
format video, and can adjust recording resolution, bit rate, etc.
System requirement: CPU: core i5 or above, RAM: 4GB or above, OS:
windows 7, 8, 10.
1. Driver Installation:
Use USB cable connect PVRC52 HD Video Capture device to computer, a
new hardware will show up in device manager:
17
www.PyleUSA.com
Page 19

Double click “DrvInstall”
Click “Next’ then click “Finish”.
18
www.PyleUSA.com
Page 20

Device then will be installed successful:
19
www.PyleUSA.com
Page 21

Notice:
Caused by Availability of SHA-2 Code signing Support, maybe driver
installation has the problem for Windows7/64bit OS. Find “Windows6.1-KB3033929-x64.msu” in software CD, and run it to solve the
problem according to Microsoft Security Advisory 3033929.
If you installed the wrong drivers and can’t re-install the right drivers,
please run the “DrvUninstall.exe” in software CD to delete the installed
documents from your computer, and then install the right drivers again.
2. Download and Install OBS Studio:
Download OBS Studio from https://obsproject.com/ and install it,
follow each step and hit ok to conrm.
3. OBS Settings:
Open OBS Studio, click “+” of “Sources”
20
www.PyleUSA.com
Page 22

Choose “Video Capture Device”.
Click “OK”.
Connect the video source to PVRC52 device. Choose “IT9910 Capture
Filter (HD)” in Device select box, then click “OK”, you may see the video of
your source now (for HDMI input).
21
www.PyleUSA.com
Page 23

Choose from the input select box
“0: Video ParallelDigital In” is for HDMI input.
“1: Video YRYBY In” is for Component Video (YPbPr) input.
“3: Video Composite In” is for Composite Video (CVBS) input.
Normally you need to restart OBS Studio after change the input source,
then will show up the video.
22
www.PyleUSA.com
Page 24
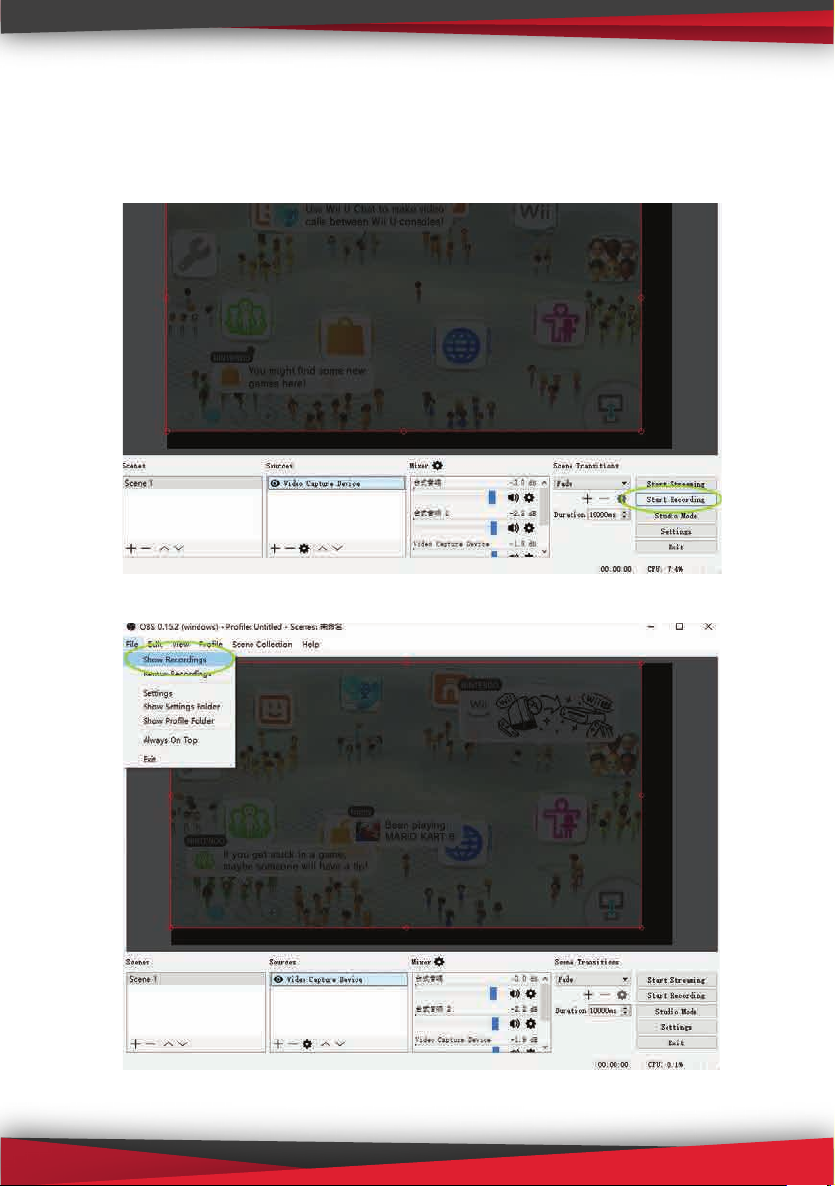
4. Video Recording:
After following the setting above and the video started to show, simply
click ”Start Recording” to record video, and click “Stop” to stop recording
video.
Check the recorded documents:
23
www.PyleUSA.com
Page 25

You can set the record resolutions:
Set the format and save path here (settings—Output---Recording):
24
www.PyleUSA.com
Page 26

You can record your comment by you microphone of computer with
video:
Settings – Audio - Mic/Auxiliary audio Device, choose Default, then click
“OK”.
On some computer, you may found the recording video no sound, do
following settings to x:
Set the Audio - Sample Rate to 44.1khz,then “OK” (you need restart OBS
after setting).
25
www.PyleUSA.com
Page 27

Set the Volume of Video Capture Device to 80% at Advanced Audio
Properties
5. Video Streaming
Go to Setting - Stream, set the Service by Choose the select box:
26
www.PyleUSA.com
Page 28

You can choose “Custom Stream Server” if your stream service is not in
the list:
Type the URL and Stream key of your server:
27
www.PyleUSA.com
Page 29

Simply click “Start Stream”, now your video is streaming:
28
www.PyleUSA.com
 Loading...