

Page 1
Page 2
Safety Precautions
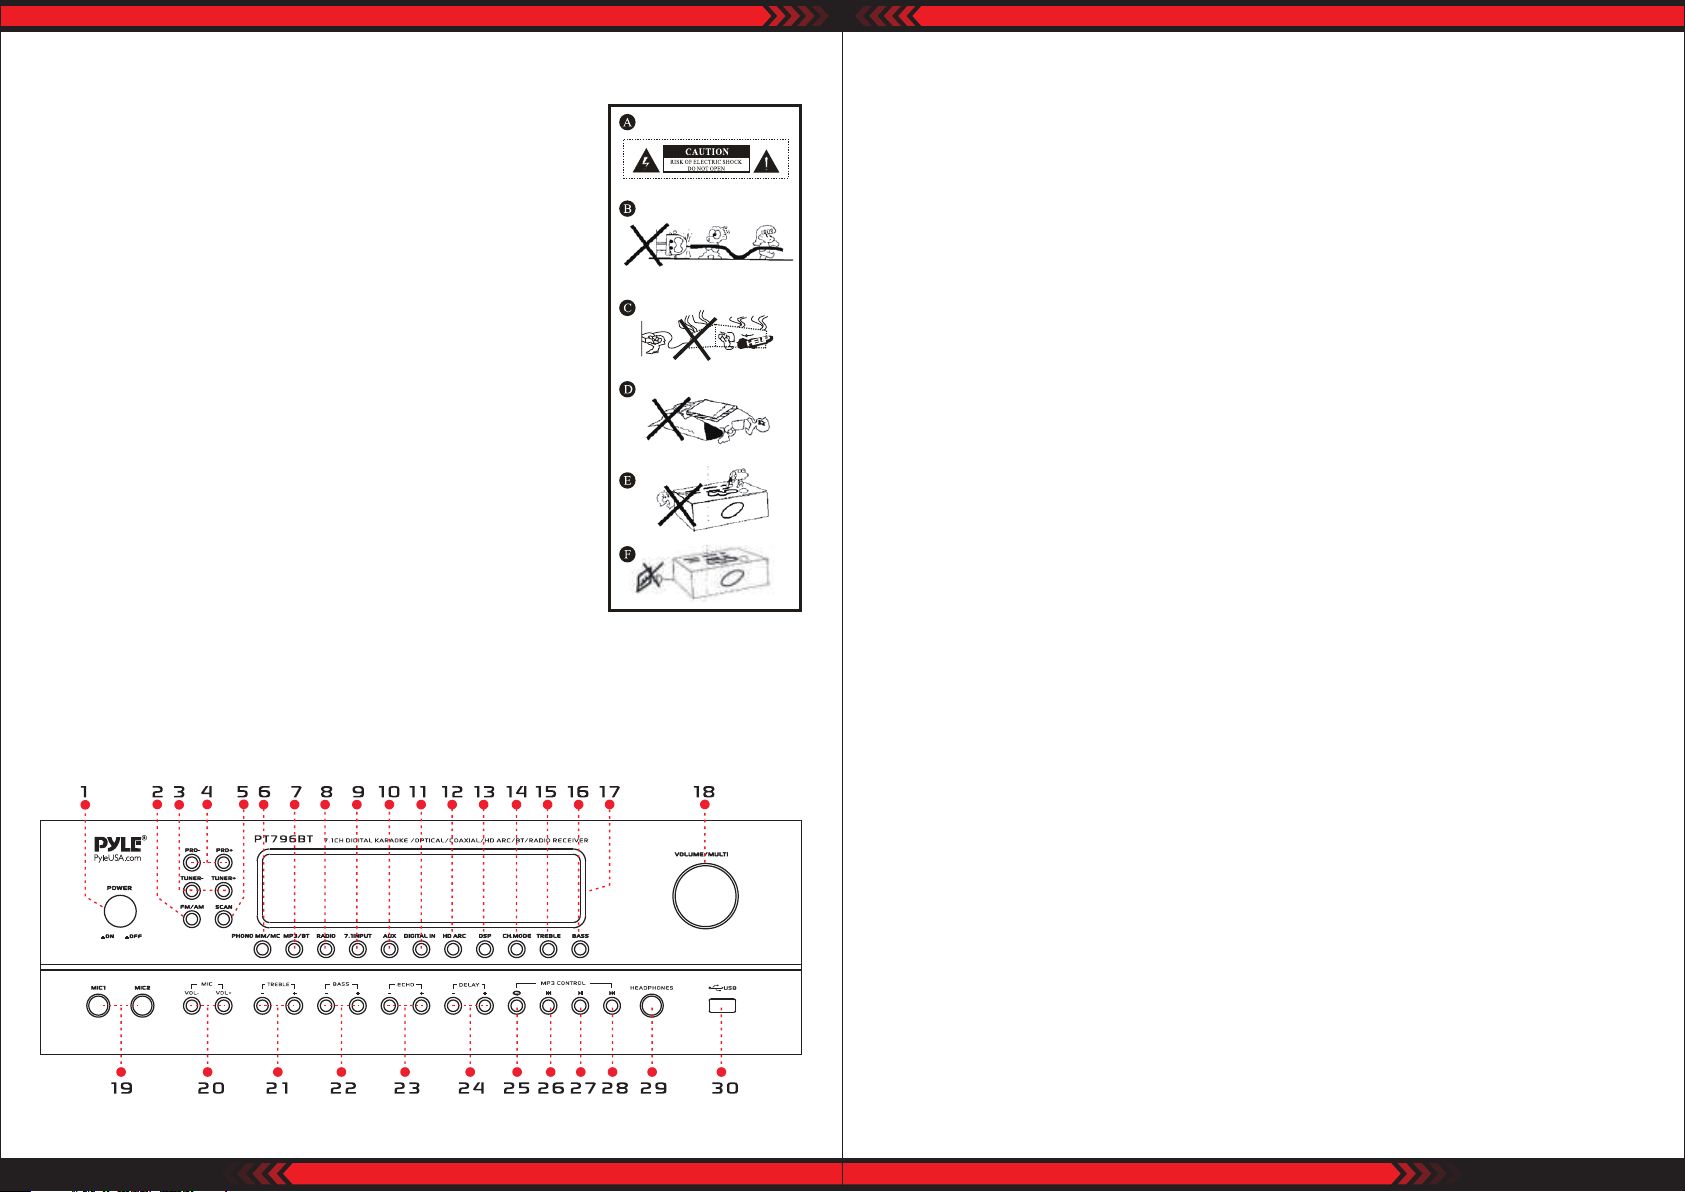
A. Avoid opening the cover or back panel. Do not open the
cover, x or touch the inner parts. No user-serviceable
parts inside, refer servicing to qualied service personnel.
B. Protect voltage line. Avoid high pressure and to be
stomped on, do not pull, push excessively.
C. Please put on this unit in the windy place, avoid direct
sunshine and nearing heater. Place the unit in a location
with adequate air circulation.
D. Do not interfere with its proper ventilation; this will cause
the internal temperature to rise and may result in a failure.
E. Avoid metals dropping in, like needle, hairpin, coin,
otherwise the unit will get short and out of work.
F. Be sure to set the line voltage AC230V/50Hz if you are not
sure of the type of power supply, consult your appliance
dealer or local power company.
For MAINS powered apparatus and for apparatus producing
internal voltages greater than 35V (peak) a.c. or d.c., having
no protection against splashing water according to annex A,
the instructions for use shall state that the apparatus shall not be exposed to
dripping or splashing and that no objects lled with liquids, such as vases, shall be
placed on the apparatus.
FRONT PANEL FUNCTION
1. POWER SWITCH: Press to switch the power ON or OFF
2. AM/FM SELECTOR: To select AM or FM band radio broadcast
3. TUNER- TUNER+ : The two keys are used to adjust to the best radio station signal.
4. AM/FM PROGRAMS: To select stored radio stations in memory
5. AM/FM SCAN: Search and store automatically in memory the radio stations with
strong signals
6. PHONO: Choose Phono moving magnetic/moving coil controls
7. USB/BT INPUT BUTTON: Press this button repeatedly to select the desired input
source USB/BT.
8. RADIO INPUT BUTTON: Press this button repeatedly to select the desired input
source RADIO.
9. 7.1 INPUT BUTTON: Press this button repeatedly to select the desired input
source 7.1 INPUT
10. AUX INPUT BUTTON: Press this button repeatedly to select the desired input
source AUX INPUT
11. DIGTAL INPUT BUTTON: Press this button repeatedly to select the desired input
source HDMI 1, HDMI2, HDMI3, OPTICAL, COAXIAL INPUT
12. HDMI (ARC) ON/OFF BUTTON: This function must be in a HDMI state. When ARC
is on, the sound of a TV program output through the power amplier to the
speakers
13. DSP: Music DSP sound eld eect selector
14. CH. MODE: 2.1/7.1 channel controls selector
15. TREBLE BUTTON: To increment end decrement level for the selected function
of master voIume, trebIe auto station seek
16. BASS BUTTON: To increment end decrement level for the selected function of
master voIume, bass auto station seek
17. DISPLAY: Function displayed on uorescent window
18. MASTER VOLUME/MULTI: Adjusts the volume level
Turn the button clockwise to increase the volume
19. MIC INPUT JACK: Karaoke mic connects to these jacks
20. MIC VOL: Adjust the volume of the microphone
21. MIC TREBLE: Adjust the treble notes of the microphone
22. MIC BASS: Adjust the bass notes of the microphone
23. MIC ECHO: Adjust the echo notes of the microphone
24. MIC DELAY: Adjust the delay notes of the microphone
25. REPEAT: This button is used to select the repeat or single station is USB
26. PREVIOUS: This button is used to select the previous station is USB/BT
27. PAUSE/PLAY: This button is used to select the pause or play station is USB/BT
28. NEXT: This button is used to select the previous station is USB/BT
29. HEADPHONE JACK: Headphone connect to this jack
30. USB INPUT JACK: USB ash disk connect to this jack
www.PyleUSA.com
2
www.PyleUSA.com
3
Page 3
REAR PANEL FUNCTION
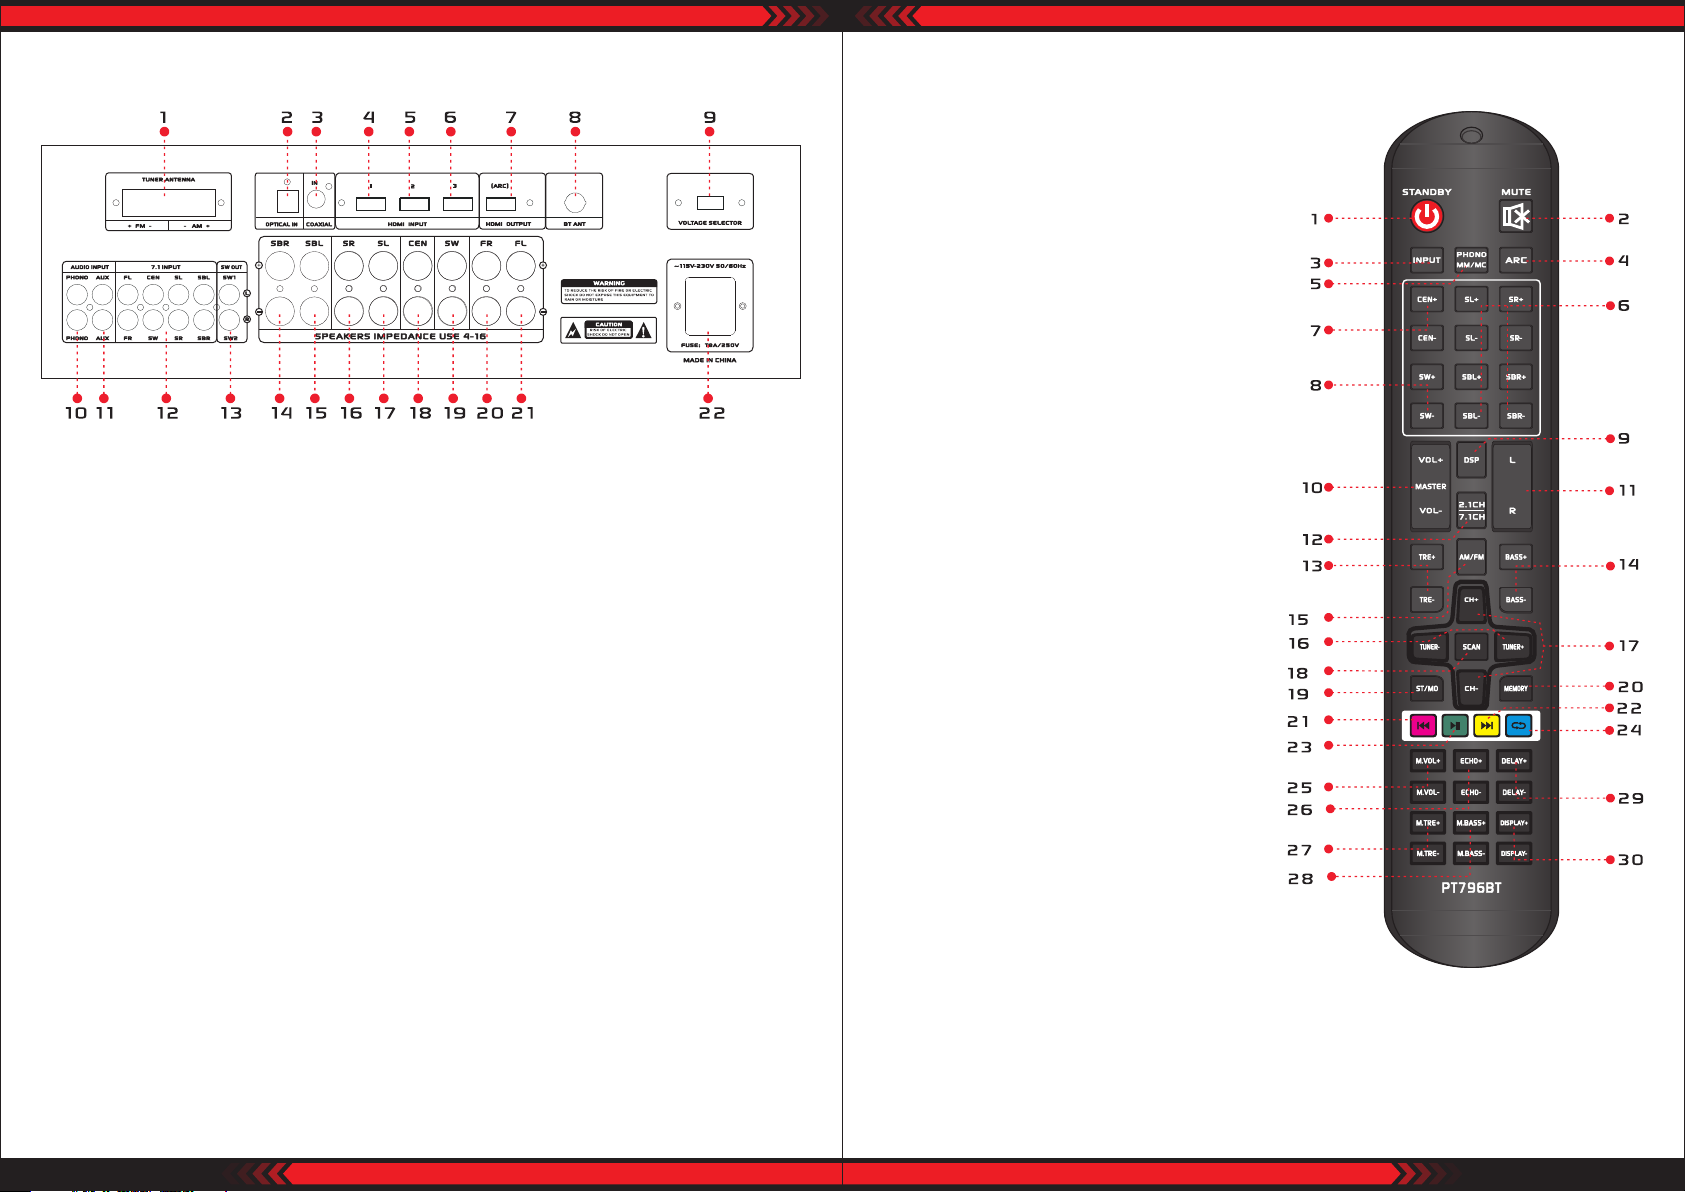
1. TUNER ANTENNA JACK: Properly connect for AM and FM antenna
2. OPTICAL INPUT JACK: Connect the optical signal output of other sound equipment
3. COAXIAL INPUT JACK: Connect the coaxial signal source output of other sound
equipment
4. HDMI 1 INPUT JACK: Connect the HDMI signal output of other sound equipment
5. HDMI 2 INPUT JACK: Connect the HDMI signal output of other sound equipment
6. HDMI 3 INPUT JACK: Connect the HDMI signal output of other sound equipment
7. HDMI OUTPUT JACK: Connect to HDMI (arc) input jack of TV
8. BT ANTENNA: This the 2.4G BT antenna
9. VOLTAGE SELECTOR: According to power voltage push this button to switch
between 110V and 220V
10. PHONO INPUT JACKS: Connect the audio output jacks of PHONO to these jacks
11. AUX INPUT JACKS: Connect the audio output jacks of AUX to these jacks
12. 7.1 INPUT JACKS: Connect the audio ou tput jacks of 7.1 to these jacks
13. SUBWOOT OUTPUT: Connect the audio input jacks of other power amplier
14. REAR SURROUND RIGHT SPEAKER OUTPUT JACK
15. REAR SURROUND LEFT SPEAKER OUTPUT JACK
16. SURROUND RIGHT SPEAKER OUTPUT JACK
17. SURROUND LEFT SPEAKER OUTPUT JACK
18. CENTER SPEAKER OUTPUT JACK
19. S.WOOFER SPEAKER OUTPUT JACK
20. MASTER RIGHT SPEAKER OUTPUT JACK
21. MASTER LEFT SPEAKER OUTPUT JACK
22. POWER SUPPLY: Connect to AC 110V/60Hz or 220V/50Hz outlet
REMOTE DEVICE FUNCTION
1. Power standby button
2. Mute button
3. Audio/video input button
4. HDMI ARC control button
5. Phono moving maganetic/
moving coil controls
6. Surround volume controls
7. Center volume control button
8. SW volume control button
9. Switch the dsp button
10. Master volume control button
11. Balance control button
12. 2.1/7.1 channel control button
13. Treble control button
14. Bass control button
15. Switch to AM/FM button
16. AM/FM TUNER- +: Scan button
the two keys are used to adjust to the
best signal of the stations. When the
best signal of the stations been been
found, auto store the stations to
corresponding station number position
17. AM/FM channel button
18. AM/FM scan controls button
19. AM/FM stereo mono controls
20. AM/FM MEMORY BUTTON:
After a station has been found, store
the station by pressing the MEMORY
button. The screen will display OK.
21. USB/BT prev control button
22. USB/BT next control button
23. USB/BT pause/play control
24. USB Mp3 repeat button
25. MIC volume control button
26. MIC echo control button
27. MIC treble control button
28. MIC bass control button
29. MIC delay control button
30. Display control button
www.PyleUSA.com
4
www.PyleUSA.com
5
Page 4
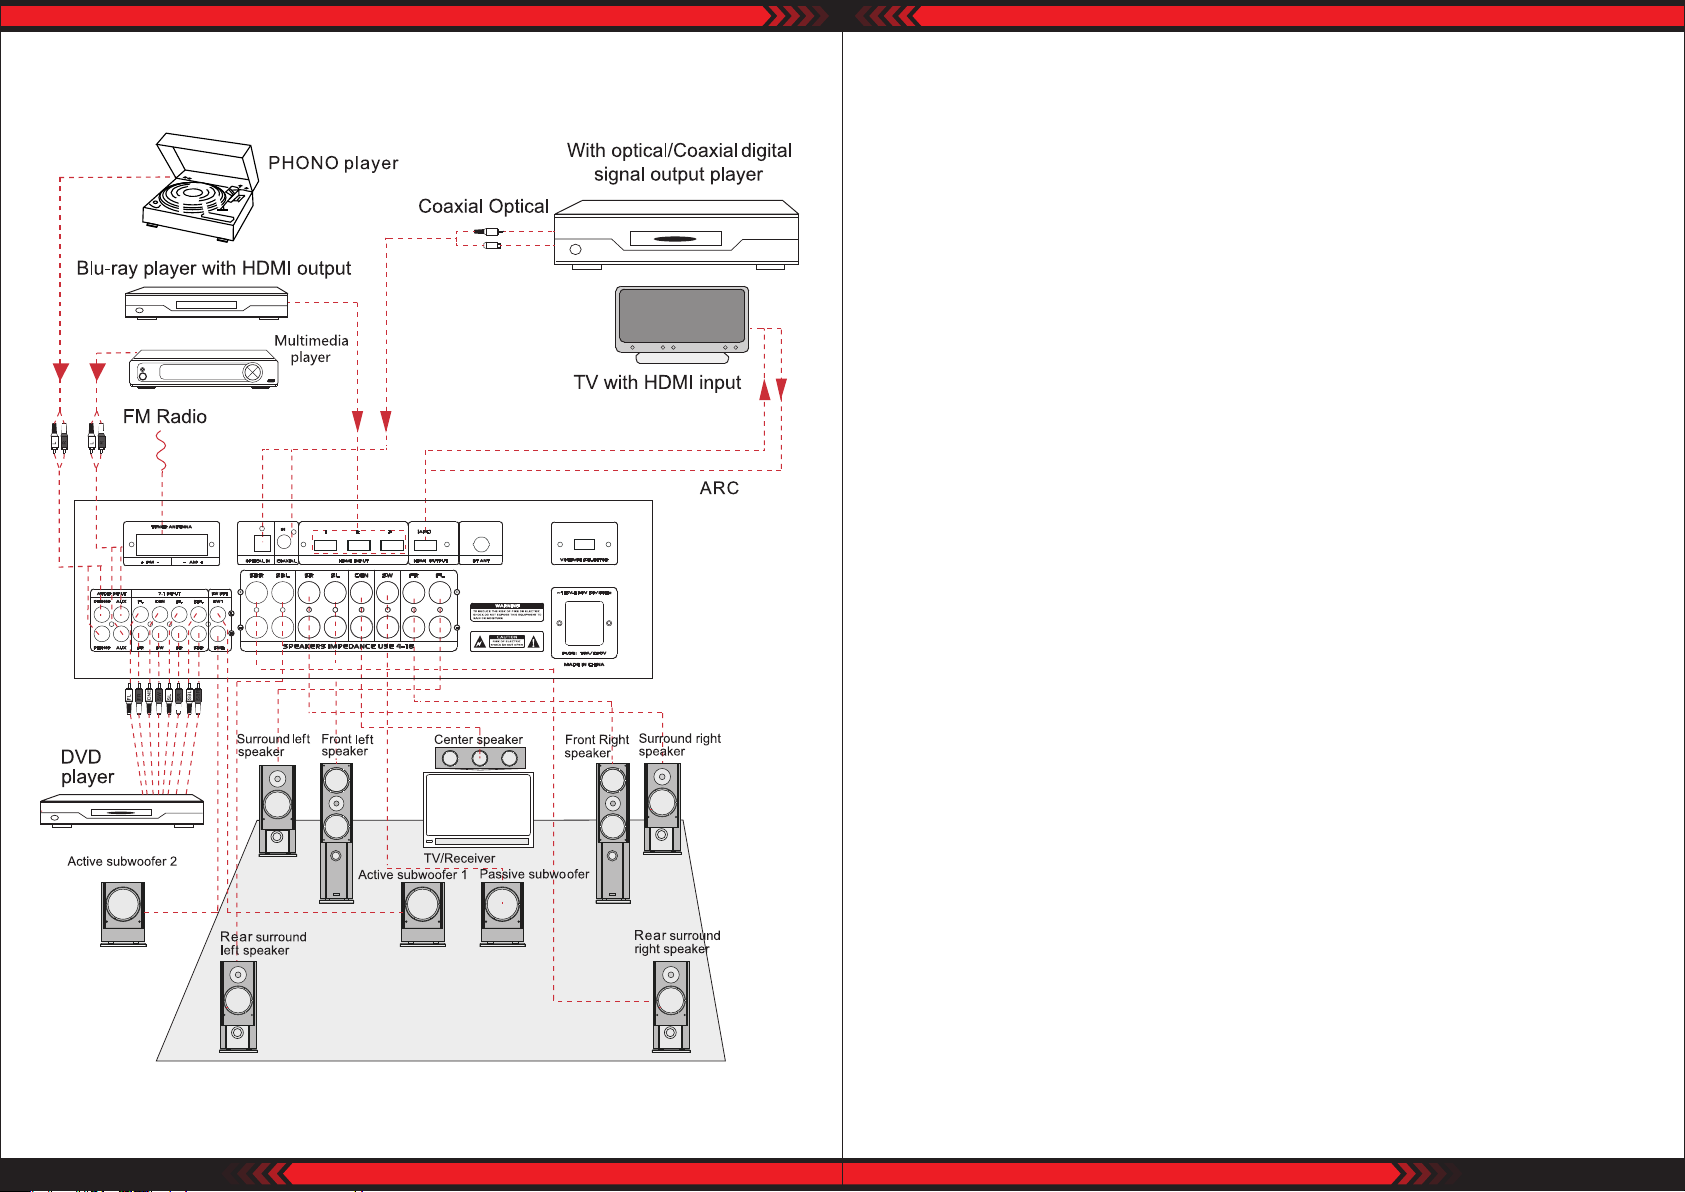
System Connection
Operating Instructions
Preparation before operation
• This product must be placed on a at, solid object to ensure that it has sufficient
capacity to support the product without falling.
• Please use this product according to the safety requirements in front of this
manual and connect with other products (TV, speaker, DVD player or player) as
required.
• Open the audio source device connected to this product
• Press the power switch button on the panel to turn ON the power.
Operation
Channel Selection
The product has 11 pairs channels input, digital channel input and analog
channel input:
Select HDMI 1-3, OPTICAL and COAXIAL digital input by pressing digital input
button on the panel or remote control.
Select AUX, BT/MP3, PHONO and FM by pressing the 'analog input' button on the
panel or remote control.
Channel Mode
Press "channel mode", select 2.1 or 7.1 channels on the panel or remote control
www.PyleUSA.com
6
Volume Adjustment
Total volume adjustment:
Rotate the "VOLUME/MULTI" VOLUME/multi-function adjusting knob on the panel,
or press the 'total VOLUME +/-' button on the remote control to adjust the VOLUME.
Center, surround, heavy bass channel volume adjustment:
Press "main menu" on the panel, adjust the screen to show "CV xx", ''the SRV xx'',
''xx'' and ''SWVxx SLV'', then rotate the MULTI-VOLUME/multifunctional adjustment
button on the panel, adjust the Volume of center channel, right surround channel,
left surround channel and the heavy bass channel.
Press the ''Center volume +/-'', ''surround volume +/-'' and ''heavy bass +/-'' button
on the remote control , adjust the volume of Center, surround and heavy bass
Channel.
www.PyleUSA.com
7
Page 5

MAIN CHANNEL TONE AND BALANCE
Press the 'MENU' on the control panel of the receiver system. Adjust the display
'TRExx' 'BASSxx' and 'L-- //--R'. ' VOLUME/MULTI' is volume/Multi-function knob.
This knob can adjust main channel bass/Treble volume level and Left/Right channel
volume balance.
USB OPERATION
Press the 'Input' button on the remote control or on the control panel of the receiver
system. Select 'USB'mode. Then insert USB ash disk. This unit can automatically
play the USB ash disk le. Then press , , button to operate the corresponding
function. Supports WMA/MP3/APE/PLAC les
Note:
1. Because video les continuously updates, this product can't play all format les.
2. If USB ash disk doesn’t work on USB mode. The operation is invalid
Wireless BT Function
1. The receiver connects to your Wireless BT-enabled device, allowing the system to
receive your Wireless BT signal and stream audio to any connected speaker system.
2. Press the 'ANALOG INPUT' on the remote control or on the control panel of the
receiver system, then enter to 'BT' mode--as indicated on the display screen.
3. Ensure BT is activated on your device and search for Wireless BT Network
Named: PYLE PRO.
4. No password is required for connecting.
ARC (Audio Return Channel) Function
The ARC (Audio Return Channel) function makes it easy for the PT796BT to play
audio from any TV with a single HDMI cable. It can be adjusted either on the front
control panel or via the included remote control.
MIC
• Insert MIC. The display will show 'OK ON'
• Press the "MIC VOL+/-", " MIC ECHO+/-", " MIC DELAY +/-" on the remote control.
Adjust the microphone Master/echo/delay volume level.
HIFI
• In ANALOG INPUT mode, press the 'HIFI' button on the remote control.
Output is 2.0ch stereo audio mode.
HDMI
1. Connect audio equipment (Blu-ray DVD player, Set Top Box ) with HDMI output
by using HDMI cable.
2. Press the 'Digital input' on the remote control or on the control panel of the
receiver system. Select the appropriate channel.
3. Press the 'CH. MODE' on the remote control to change the channel of the
broadcast program.
4. HDMI with ARC function. Set the TV audio in 'External speaker' or 'Audio
system', press 'ARC ON' on remote control. The display will show 'ARC on', This
amplier can play the TV audio. Press 'ARC o', the amplier goes back to default
channel.
Note: HDMI Version 1.4B. Support 3D 4K
Make sure the TV has ARC function and set the TV in ARC ON state.
Enable your TV to send audio signal upstream to a connected speaker system or AV
receiver while eliminating additional cable connections and clutter from an optical
audio cable (S/PDIF). ARC audio transmission links your speaker output to your
television controls, meaning you do not need an external/additional remote or
interface to congure audio levels. Enjoy an optimal multimedia home theater
experience by connecting your television and Hi-Fi equipment into one, seamless
entertainment system.
FM RADIO
Press "AUTO", " TUNE+/-", "CH+/-" button on the remote control. Operate automatic
search and save station, manually save and select the stored station function.
DSP Sound Field Control
Press 'DSP' or 'CH MODE' on the remote control. 7 dierent sound eld eects can
be selected. (LIVE/HALL/DISCO/CHURCH/ROCK/JAZZ/CLASS)
NOTE: Pressing those button on the digital input channel is invalid
DISPLAY
Press 'DISPLAY' button on the remote conlrol to adjust dierent display mode.
www.PyleUSA.com
8
www.PyleUSA.com
9
Page 6
MUTE
Press 'MUTE' button on the remote control to turn ON or OFF MUTE function.
STANDBY
Press 'STANDBY' button on the remote control to turn ON standby state.
Press again to cancel standby mode.
Troubleshooting
Problem Probable Cause Solution
No display
There’s display but
no sound output
The power socket is in poor
contact or without electricity
1. The speaker wiring is wrong.
2. The playback source doesn’t
corresponds to the selected
signal state
3. The volume level is in lowest
output state.
4. MUTE is activated
Check the power supply and plug
of the socket.
1. Connect the speaker line
according to the wiring diagram
2. Select the input state which is
playing
3. Turn the main volume & adjust
the knob clockwise.
4. Disactivate MUTE
Features:
• 7.1 Channel Receiver System
• AV (Audio/Video) Stereo Amplier
• Hi-Fi Home Theater Surround Sound
• Built-in BT for Wireless Audio Streaming
• Next-Gen Audio DSP Sound Processing Technology
• 4K Ultra HD TV Pass-Through Support
• Digital Dynamic VFD Display with AM/FM Radio
• Connect & Stream Audio from External Devices
• MP3 Digital Audio Support
• USB Flash Drive Reader
• Connection Interface: (3 IN+1 OUT) x HDMI, RCA (L/R), Speaker Binding Posts,
Optical / COAX Digital Audio
• HDMI Output + Dedicated RCA Subwoofer Output
• (2) 1/4’’ -inch Microphone Inputs
• Independent Input Source Selection
• Digital Graphic Audio Output Level Display
• Mic Echo, Bass, Treble, Volume Control Adjustment
• Over Current, Short Circuit, and Over Voltage Protection
1. The remote transmitter window
Remote control
doesn’t work
Out of control
Sound distortion Main volume adjustment is too much Turn down the main volume
The channel sound
is wrong
Music les in USB
can’t be played for
long period of time
The phone cannot
transmit audio to
the amplier via
BT.
If you are still experiencing issues, please contact your authorised local dealer or contact us
on www.PyleUSA.com.
is not aimed at the local
receiving window.
2. There are obstacles between
the unit and the remote control
3. Drained remote control batteries
Being disturbed or improperly
operated
Channel sound mode is not correct
The USB les is not supported Delete unsupported les
1. The BT function of mobile
phone is not opened.
2. No music is played on the
phone.
3. Amplier BT is not paired with
mobile phone BT.
4. Incorrect amplier input channel
5. BT can't connect.
1. Aim at the host receiving
window.
2. Remove obstacles
3. Replace new battery
Turn it OFF and than turn it ON
Press 'CH. MODE' on the panel or
remote control
1. Turn ON BT.
2. Open the phone and play
music
3. Rematch BT connection
4. Switch the amplier input into
'BT' channel.
5. Turn o other BT devices
Wireless BT Connectivity:
• Simple & Hassle-Free Pairing
• Instantly Receives Wireless Music Streaming
• Works with all of Today’s Latest Devices
What’s in the Box:
• AV Receiver
• Remote Control
• Power Cable
Smartphones, Tablets, Laptops, Computers, etc.)
• Wireless BT Version: 5.0
• Wireless BT Network Name: ‘PYLE PRO’
• Wireless Range: 30’+ ft.
Technical Specs:
• Power Output: 2000 Watt MAX
• Amplier Receiver Type: 7.1-Channel
• Speaker Impedance: 4-16 Ohm
• S/N Ratio: >80dB
• T.H.D.: <1%
This product can expose you to a chemical or
group of chemicals, which may include
“Nickel Carbonate” which is known in the
state of California to cause cancer, birth defects,
or other reproductive harm. For more info, go
to https://www.p65warnings.ca.gov/.
• Frequency Response: 20Hz-20kHz
• Radio Station Memory: 30 Presets
• Digital Audio File Support: MP3 / WMA/APE/FLAC
• Maximum USB Flash Support: Up to 1TB
• Battery Operated Remote Control, Requires (2) x ‘AAA’ Batteries, Not Included
• Power Cable Length: 3.9’ ft.
• Power Supply: 115V/230V, switchable
• Total Unit Dimensions (L x W x H): 16.9’’ x 13.8’’ x 5.5 ’’ -inches
www.PyleUSA.com
10
www.PyleUSA.com
11
 Loading...