

Page 1

PYLE
~'s
IMPORTAN
T,
P,,,1
yoou
.ro
c<f'O'K-ocing ,hou
,·.,d"II~
"
A
·
i"
,~;~;,,"II"x1.!1'
I
~n", <"';"~
)<>Llr
fd be i
oc
lu&cd.
i'I
",,,
.,I,,.
ex,,,,
"'''''
You mu"al..,
I'k
" '" " ,,'
",~
..
,,;i>I,'
r,
" ,
....
,,
"'t:'.
;'K"""d
in
,"',"";,,~
ik"" f..
'''
'
"00.
«,
" ,
')'lime
pi>oo~
nLJm""
" , nd tho
cncl=,
cop')' of.....,
origin~
prohlem
1
recei
pt;[
,proof
of d>le
'"
I''' '
purch.>e
Monlia,'ThmllchThLJI'<doy.
r,
~c.,·qAM["
IPM
r ,,,I
q"M
to ,PM
...
,
Page 2
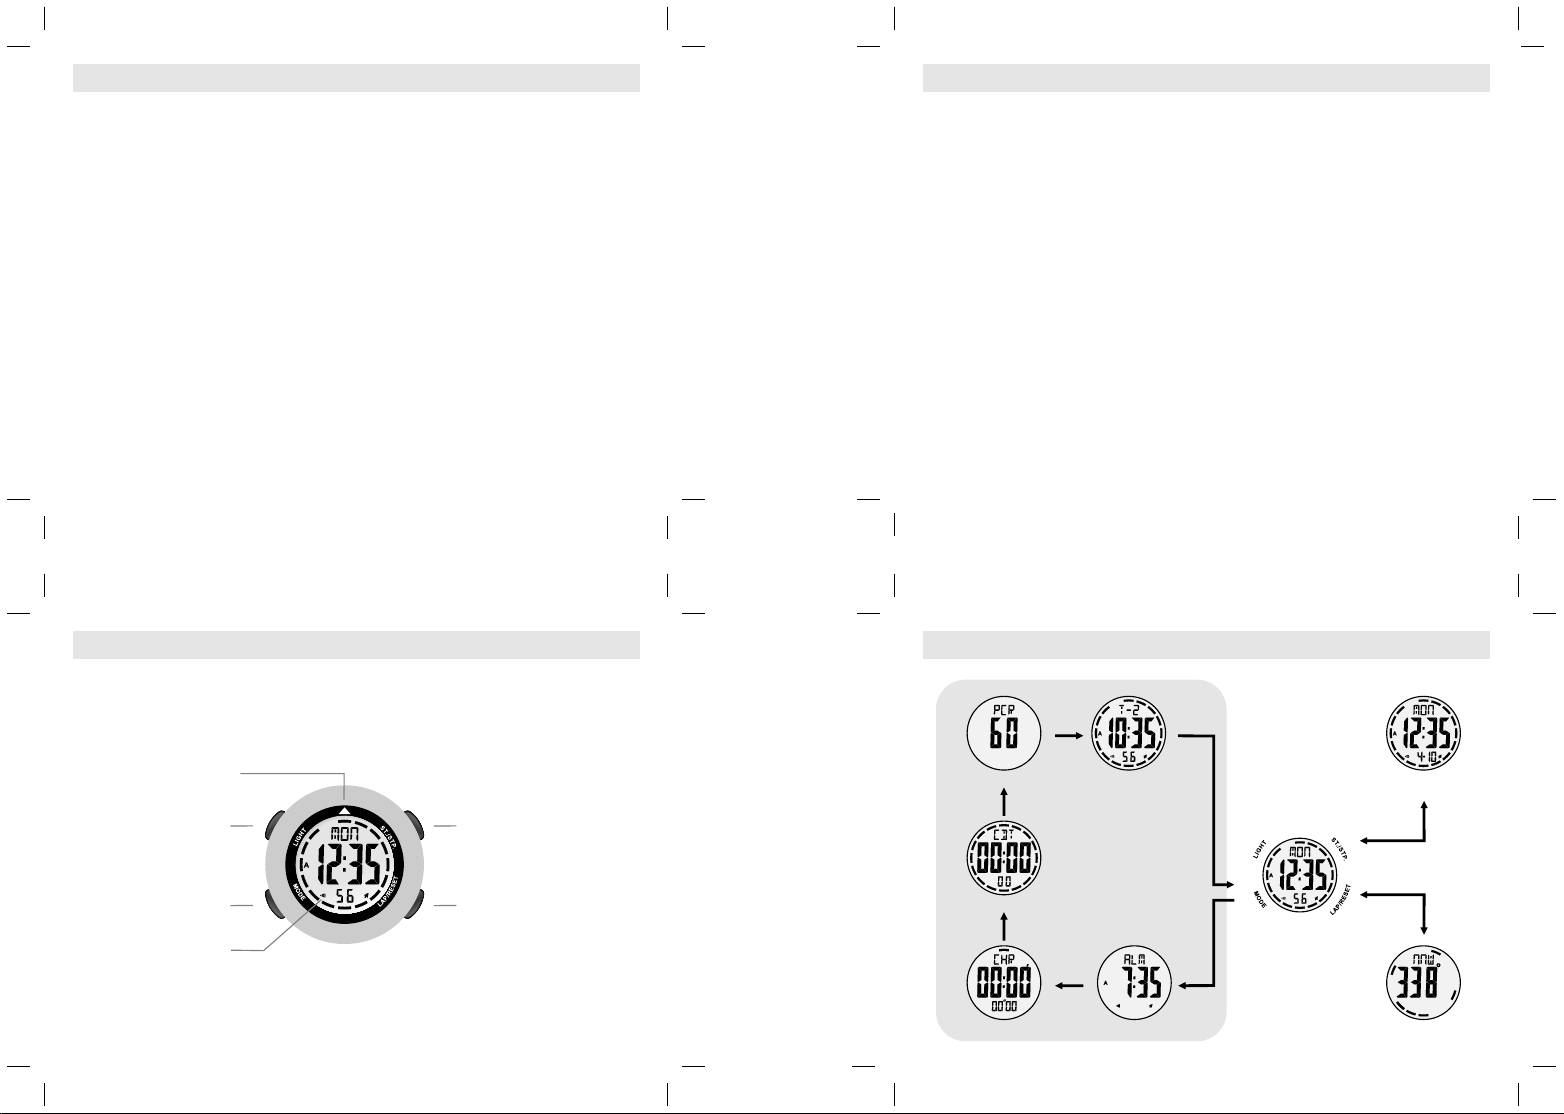
1.0 Introduc tion
Congratula tion on owning your Digital Compass Watch . To
get mos t of your pur chase, b e sure to car efully r ead this
manual and ke ep it on hand f or late r refer ence wh en
necessary.
Developed from advan ced s ensor techn ology, t his w atch
provides t he di gital compa ss fu nction.
di gi tal c ompass f un ct ion, t his W atch
timekeepin g, d aily alarm, countdown time r,
pacer and dual t ime func tion.
In order to util ize the a bove fea tures o f your wat ch, it is
advisable to u se watch i n confor mity wit h the below notes :
!
Avoid exposing your to the extre me conditions for
an unreasona ble time .
!
Avoid r ough use s or sever e impacts to your .
! Watch
Do not ope n the ca se unless a certifie d servic e
agency.
! ccasionall y
Clean the Watch o with a soft and moistene d
cloth.
!
Keep th e Watch awa y from mag nets or the appliances
con tai n m agn eti c o bje cts su ch as m obil e pho nes ,
speakers and m otors.
chronograp h,
Watch
In a dditi on to the
a lso p ro vides
Watch
! Store the Watch in a d ry place when it is n ot in use.
3.0 Funct ion of the Watch
Current Time Mode
Time Syst em:
! Hour, minute second. A.M (A) , P.M (P)
! Switch between 12- hour and 24- hour form at
! Bar graph animatio n at the rate of 1 secon d
Calendar Syst em:
! Month, da te and da y of wee k display. Auto
calculatio n of leap year/ day of week
Compass Mode
! 16 c ompass directions. i.e. N,E,S ,W, NE, SE,
SW, NW , NNE .. and etc
! Magnet ic north pointer
! Compas s lock
! Backwa rd bearing
! Declin ation setting and ca librat ion
Daily Alar m Mode
! Daily ala rm
! Hourly ch ime
Chronograp h Mode
! Meas uremen t unit: 1/10 0 second
! Meas uring cap acity: 99 hours 5 9 min utes
59.99 seconds
! Bar gra ph animat ion at the of 1/10 se cond.
Timer Mo de
! Measuremen t unit: 1 secon d
! Measuring capacity: 99 hours 59 minutes 59
seconds
! Bar graph animat ion at the of 1 secon d.
! Multi-phas e alert at last 5, 4,3,2, 1 second( s)
! Sounds long beep wh en reach zer o
Pacer Mode
! Pace r beat: 40 to 180 bea ts per minute
Dual Tim e Mode
Time Syst em:
! Hour, min ute second. A.M (A), P.M (P)
! Bar gra ph animation at the rat e of 1 second
2.0 Unit Overview
Nav igati on
arr ow
LIGH T
But ton
MODE
But ton
Dis play
ST./ST P.
But ton
LAP /RESE T
But ton
4.0 Major Funct ion Modes
[MO DE]
Pac er Mode Dua l Time Mod e
[MO DE]
Cou ntdow n Timer
[MO DE]
[MO DE]
Dai ly Alarm M odeChr onogr aph Mod e
[MO DE]
[MO DE]
Cur rent Tim e Mode
Cur rent Tim e Mode
(Da te Disp lay)
[ST./ STP.]
[LA P/RES ET]
Com pass Mo de
Page 3
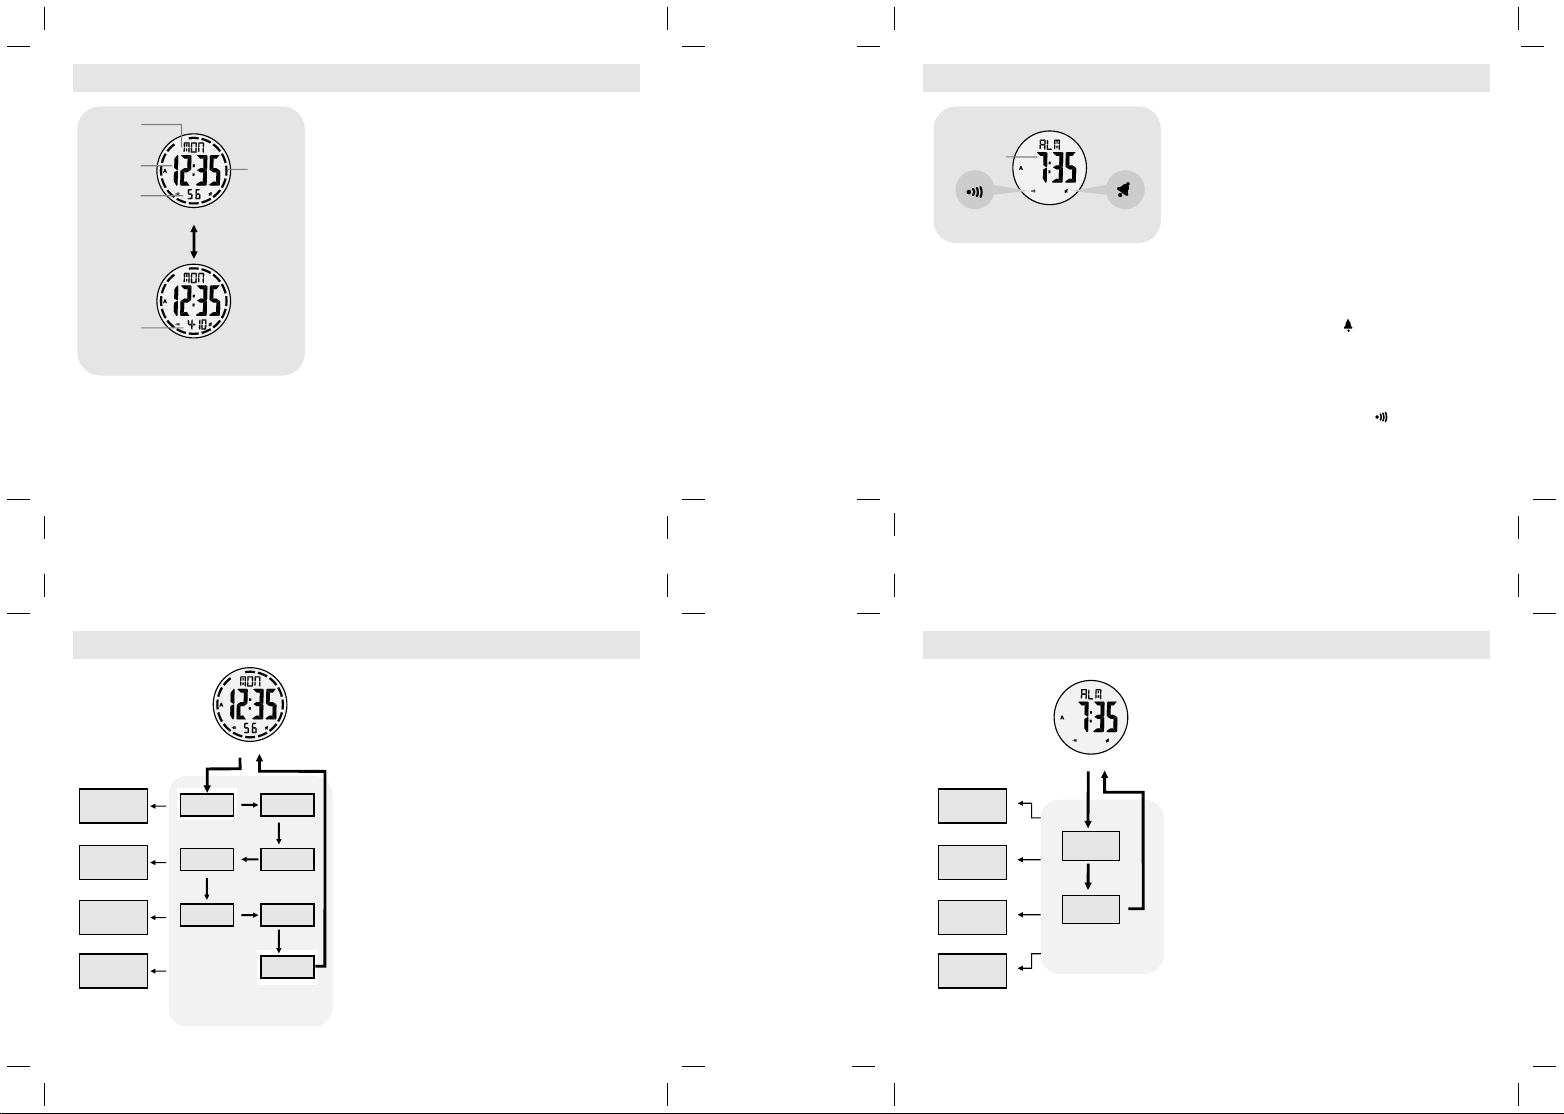
5.0 Current Time Mode - Current Time and Date Display
day o f week
cur rent ti me
(ho ur, minu te)
cur rent ti me
(se cond)
dat e, mont h
Time D ispla y
[ST./ STP.]
Dat e Displ ay
Cur rent Tim e Mode
bar g raph
ani mator
Current Time Mode
! Cur rent Time Mode includes two display s. They are
the Time Display and Dat e Display.
! Pre ss the [ST./STP.] butt on to change t he dis play
between the Time Disp lay and Date Di splay.
Time Dis play
! Th e day of week of the curre nt time is ex hibited on the
1st row of the display.
! Th e cu rrent time (hour, minut e) and the curre nt t ime
(second) a re ex hibite d on the 2 nd an d the 3rd row of
the display.
! Th e elap se of time i s anim ated ( at th e rate of 1
second) by the bar gra ph.
Date Display
! Th e day of w eek of the current time and the current
time ( hour, minu te) is ex hibite d on the 1s t row and t he
2nd of the display.
! Th e date (mo nth, dat e) of the current t ime is exh ibited
on the 3rd row of the displa y.
! Th e elap se of time i s anim ated ( at th e rate of 1
second) by the bar gra ph.
Note: Hold down the [ST./STP.] button in Da te Di splay
to switc h the d ate forma t be tween Mon th-dat e a nd
Date-month .
6.0 Alarm Time Mode - Setting the Alar m and Chi me On/O ff
Daily Alar m Mode
! Th is Watch prov ides a daily al arm function for the
ala rm time
(ho ur, minu te)
ala rm
ind icato r
Dai ly Alarm M ode
hou rly chi me
ind icato r
current t ime. When the dai ly a larm is O N, t he Watch
will be eps for 20 s econds when the alarm tim e is
reached.
! Th is Wat ch al so pr ovides a hourly chime f unction fo r
the current time. When the hourly chime is ON, the
Watch wil l sound 'bee p beep' every hour on the hou r.
Daily Alar m Display
! Th e daily al arm time ( hour, min ute) is ex hibite d on the
2nd row of the display.
To Set the Hourl y Chime ON/O FF
! To set the hou rly chime b etween ON or OFF, press the
[LAP/RESET ] button in the Da ily Alarm Mode .
! Wh en the ch ime indi cator ' ' is a ppeare d , the chime
is ON.
To Set the Daily Alarm ON/OFF
! To set the dail y ala rm bet ween ON or OFF, pre ss the
[ST./STP.] butto n in the Daily Alarm Mo de.
! Wh en the da ily ala rm indi cator ' ' is a ppeare d, the
daily alarm is ON.
5.1 Current Time Mode - Setting Current Time Mode
To Set the Curre nt Time Mode
! To sel ect th e set ting displ ay, hold down the
[MODE] button for 2 seconds in the Current Time
Mode.
! Onc e it g et into the setting display, the 'Second '
[MO DE]
[MO DE]
[MO DE]
digits start flashin g. Press the [MODE] button to
select the flashing (setti ng item) as shown in the
diagram.
! W hen the second digit s start flashin g, press the
[start/sto p] or [lap/res et] button to rese t them to
zero.
! W hen o ne of the sett ings (minute, h our, y ear,
month, date) is flashi ng, press the [ST./STP.] or
[LAP/RESET ] b utton to change the number; hold
down the [ ST./STP.] or [ LAP/RESET] button to
change the numbe r at a higher spee d.
! W hen the ' 12' or ' 24' dig its start flash ing, pr ess the
[ST./ STP.] or [L AP/ RES ET] butto n t o sel ect
between the 12 or 24 hour fo rmat.
! W hen the 1 2/24 hou r forma t is set, press th e
[MODE] button to ex it the setti ng displa y.
! I f NO key-stok e has been activate d for 1 m inute
during t he settin g d isplay, it wi ll return to C urrent
Time Mode .
[ST./ STP.]
Inc rease
the n umber
hol d [ST./ST P.]
inc rease t he
num ber at a
hig her spe ed
[LA P/RES ET]
dec rease
the n umber
hol d [LAP/ RESET ]
dec rease t he
num ber at a
hig her spe ed
Cur rent Tim e Mode
hol d
[M OD E]
sec ond
yea r
[MO DE]
mon th
Cur rent Tim e Mode
Set ting Se quenc e
[MO DE]
min ute
[MO DE]
hou r
[MO DE]
dat e
12/ 24
6.1 Alarm Time Mode - Setting the Alar m Time
To Set the Alarm Time Mod e
! To sel ect t he set ting display, hold down the
[MODE] button for 2 seconds in the Daily Alarm
Mode.
! Onc e it get into the sett ing displ ay, the 'Minute '
digits start flashin g. Press the [MODE] button to
select the flashing (setti ng item) as shown in the
diagram.
! Whe n one of the set tings (minute, ho ur) is flas hing,
press the [ST./STP.] or [LAP/R ESET] button to
change the number; hold down the [ST./STP.] or
[LAP/RESET ] button to change the numb er at a
higher speed.
! W hen the h our is set, press the [MO DE] bu tton to
exit the setting di splay.
! I f NO key-stok e has been activate d for 1 m inute
during the sett ing disp lay, it will return to Da ily
Alarm Mode.
[ST./ STP.]
Inc rease
the n umber
hol d [ST./ST P.]
inc rease t he
num ber at a
hig her spe ed
[LA P/RES ET]
dec rease
the n umber
hol d [LAP/ RESET ]
dec rease t he
num ber at a
hig her spe ed
Dai ly Alarm M ode
hol d
[MO DE]
min ute
[MO DE]
hou r
Dai ly Alarm M ode
Set ting Se quenc e
[MO DE]
Page 4
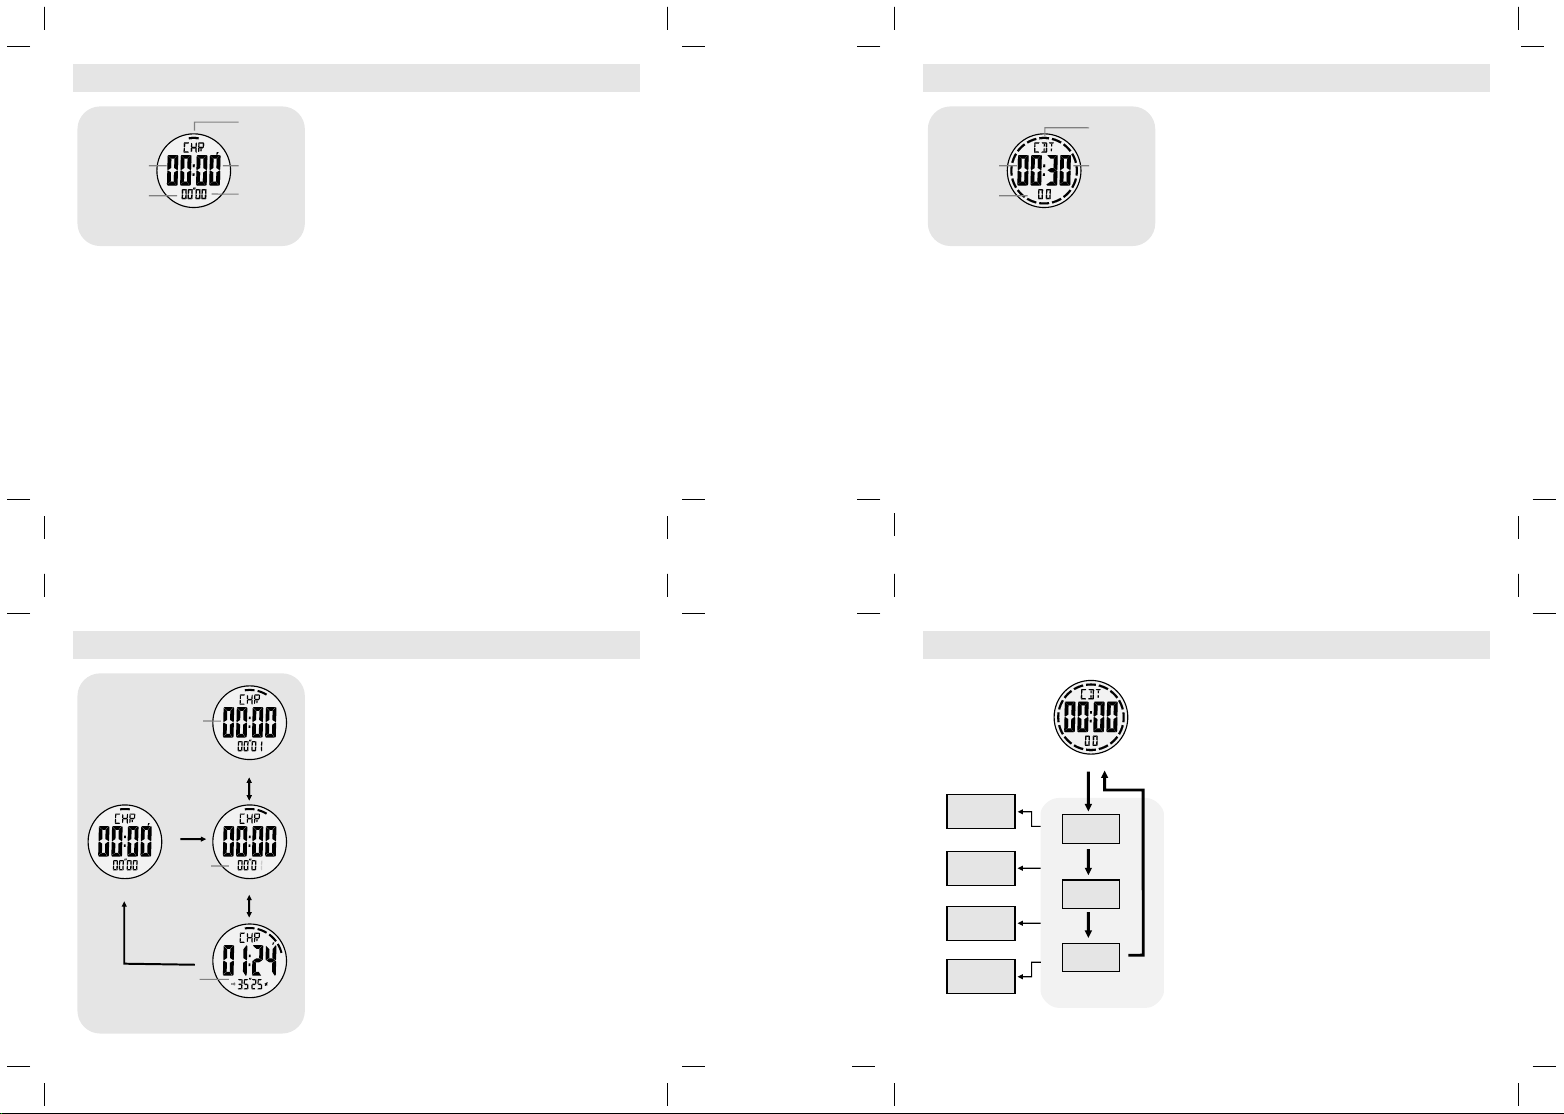
7.0 Chronograph Mode - Chronograph Mode
Chronograp h Mode
! Thi s Watch provi des a stopwatch func tion.
! The mea sureme nt unit of the chron ograph is 1/100
second, and its measuri ng capacity is 99 hours, 59
minute and 59.99 se cond.
! The Chro nograp h can be used to measur e elaps ed
time (elapse of t ime) a nd lap time (read the el apse o f
time without sto pping the me asurem ent).
Chronograp h Display
! Th e runni ng time (hour, minute) is exhibi ted on the
2nd row of the display.
! Th e runni ng tim e (seco nd, 1/ 100 second) i s exhibited
on the 3rd row of the displa y.
! Th e e lapse of ti me is animated (at the rate of 1/100
second) by the bar gra ph.
run ning ti me
(ho ur)
run ning ti me
(se cond)
bar g raph
ani mator
run ning ti me
(mi nute)
1/1 00 seco nd
Zer o Displ ay Cou ntdow n Timer Di splay
8.0 Countdown Timer Mode - Countdown Timer Display
Countdown Time r Mode
! Thi s Watch provi des a countdown time r functio n.
! The measure ment unit of the timer is 1 second, and its
measuring capa city is 99 hours , 59 minute and 59
second.
! The Count down t imer c an be used to timekeepin g for
a fix perio d o f t ime (targ et time), i.e. the Watch will
start running fr om the targe t time to zero.
! The Watch will beep for few secon ds when zero is
reached.
Countdown Time r Display
! Th e runni ng time (hour, minute) is exhibi ted on the
2nd row of the display.
! Th e runni ng time (secon d) is ex hibited on the 3rd row
of the display.
! Th e elap se of time i s anim ated ( at th e rate of 1
second) by the bar gra ph.
run ning ti me
(ho ur)
run ning ti me
(se cond)
bar g raph
ani mator
run ning ti me
(mi nute)
7.1 Chronograph Mode - Using the Chronograph
To Measure th e Elapse of Time
! In Zero Display, press the [ST./STP.] button o nce to
lap t ime
Lap D ispla y
[LA P/RES ET]
[ST./ STP.]
ela psed
tim e
Zer o Displ ay Run ning Di splay
(ru nning )
[LA P/RES ET]
ela psed ti me
(st op runn ing)
[ST./ STP.]
Sto p Runni ng Disp lay
start t he measur ement (the digits will start running );
press the [ST./STP.] button once ag ain to stop the
measuremen t (the digit s will stop run ning).
! Th e time (elapsed time) that elapsed from the 1 st
[ST./STP.] k ey-sto ke to the 2 nd [ ST./STP.] key -stoke
will be exhibite d on the displa y.
! Re peat the above ment ioned key opera tions, it will
ge t t he a ccu mu la ti ve e la ps ed t im e t ha t th e
chronograp h is running .
To Get Lap Time
! W hen t he ch ro nog rap h is runn ing , pr ess t he
[LAP/RESET ] bu tton to get and view the lap time. In
Lap Time Displa y, pres s the [LAP/RES ET] button to
return to counti ng displa y.
! Du ring th e Lap Time Display is ex hibite d, the e lapsed
ti me i s s ti ll m easu ri ng o n t he b ack gr ou nd
continuous ly.
To Reset the Chr onogra ph
! To r ecord a new set of e lapsed ti me, press the
[LAP/RESET ] button (when the chronogr aph has
stopped ) to reset the ch ronogr aph.
8.1 Countdown Timer Mode - Setting the Countdown Timer Mode
To Set the Countd own Timer Mo de (Target Time)
! To sel ect t he set ting display, hold down the
[MODE] butto n for 2 secon ds in the Countd own
Timer Mod e.
! Onc e it g et into the setting display, the 'Second '
digits start flashin g. Press the [MODE] button to
select the flashing (setti ng item) as shown in the
diagram.
! Whe n one of t he sett ings (s econd, m inute , hour) i s
flashing, pre ss the [ST./STP.] or [LAP /RESET]
button to change t he number; hold dow n t he
[ST./STP.] or [LAP/RESET ] button to change the
number at a higher spe ed.
! W hen th e hour is set, press the [M ODE] butto n to
exit the setting di splay.
! I f NO key-stok e has been activate d for 1 m inute
dur ing the setting displa y, i t wil l ret urn t o
Countdown Timer Mo de.
[ST./ STP.]
Inc rease
the n umber
Hol d [ST./ST P.]
inc rease t he
num ber at a
hig her spe ed
[LA P/RES ET]
dec rease
the n umber
hol d [LAP/ RESET ]
dec rease t he
num ber at a
hig her spe ed
Cou ntdow n Timer Mo de
hol d
[MO DE]
sec ond
[MO DE]
min ute
[MO DE]
hou r
[MO DE]
Cou ntdow n Timer Mo de
Set ting Se quenc e
Page 5
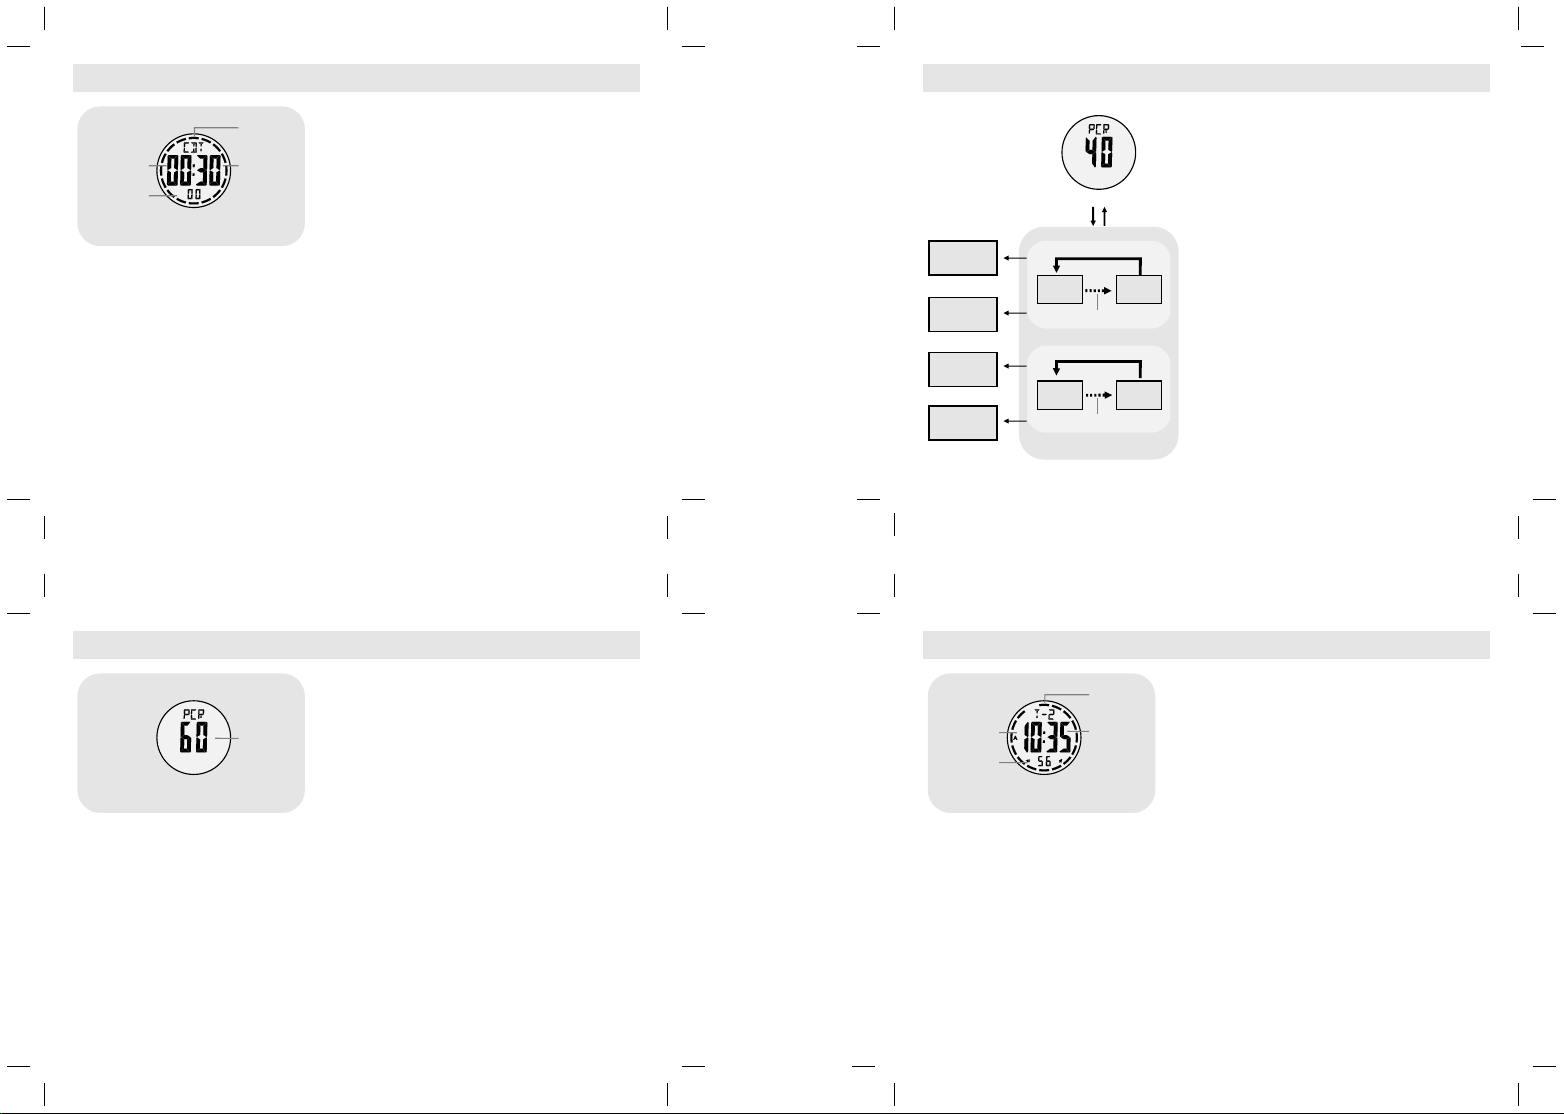
8.2 Countdown Timer Mode - Using the Countdown Timer
To Use th e Time r
! Onc e the target time has been set (for example 30
minutes), press the [ST./STP.] b utton to s tart the
measuremen t (the digits w ill sta rt runn ing); press the
[ST./STP.] butto n once agai n to stop the measureme nt
(the digits will st op runnin g).
! The elapse d time w ill be e xhibit ed on t he disp lay
throughout th e measure ment.
! Whe n the co untdow n time i s come to zero, p ress
[lap/reset ] button to re- load the tar get time.
To Re- loa d the Timer
! To re-load the t imer display to tar get time, press the
[LAP/RESET ] button (when t he time r has sto pped ) to
re-load the time r.
Tim er Ala rm So und
! The Watch will b eep once when it comes to t he last
5,4,3,2 and 1 secon d(s).
! The Wat ch will soun d a long beep when reach zero .
run ning ti me
(ho ur)
run ning ti me
(se cond)
Cou ntdow n Timer Di splay
bar g raph
ani mator
run ning ti me
(mi nute)
9.1 Pacer Mode - Setting the Pacer Mode
Pac er Mode
[ST./ STP.]
Inc rease
the n umber
Hol d [ST./ST P.]
inc rease t he
num ber at a
hig her spe ed
[LA P/RES ET]
dec rease
the n umber
hol d [LAP/ RESET ]
dec rease t he
num ber at a
hig her spe ed
hol d [MODE ] [MO DE]
40
in st ep of + 5 BPM
180
in st ep of - 5 BPM
Pac er Mode S ettin g Seque nce
180
40
To Set the Pacer Mod e (Pacer Bee ping Rate )
! To sel ect t he set ting display, hold down the
[MODE] button fo r 2 seconds in the Pa cer Mode.
! Onc e it get into the se tting d isplay, the 'Pa cer
Beeping Rate' digits start flashing. When the
'Pacer B eeping Rat e' ( in b eats per minute) i s
flashing, pre ss the [ST./STP.] or [LAP /RESET]
button to change t he number; hold dow n t he
[ST./STP.] or [LAP/RESET ] button to change the
number at a higher spe ed.
! W hen the 'Pace r Be eping Rate' is set, press t he
[MODE] button to ex it the setti ng displa y.
! I f NO key-stok e has been activate d for 1 m inute
during the setting displ ay, i t will return to Pa cer
Mode.
9.0 Pacer Mode - Pacer Display
pac er
bee ping ra te
(in b eats
per m inute )
Pac er Disp lay
Pacer Mode
! Thi s Watch provi des a pacer function .
! Whe n the pacer is act ivated , it w ill ge nerate beeps at
a pre-defined pa cer beepi ng rate.
! The pac er beeping rate can be set from 40 to 180
beats per minute (i n step of 5 beats per mi nute).
Pacer Display
! Th e pa cer beeping r ate (in beats per minu te) is
exhibited on the 2n d row of the displ ay.
To Use the Pacer
! On ce the pacer beepin g rate has b een set (fo r
example 60 BPM) , press the [ ST./STP.] button will
start the beeping . Wh en t he w atch is beepin g, p ress
the [ST./STP.] butto n once again to st op the beepi ng.
10.0 Dual Time Mode - Dual Time Mode
Dual Tim e Mode
! Thi s Watch pro vides a du al time fu nction w hich
provides the sup plemen tary func tion to curr ent time..
! The du al time is synchroni ze with the cur rent time .
Dual Tim e Display
! Th e d ual time (hour, minut e) and the du al time
(second) a re ex hibite d on the 2 nd an d the 3rd row of
the display.
! Th e elap se of time i s anim ated ( at th e rate of 1
second) by the bar gra ph.
dua l time
(ho ur)
dua l time
(se cond)
Dua l Time Mod e
bar g raph
ani mator
dua l time
(mi nute)
Page 6
10.1 Dual Time Mode - Sett ing the D ual Time Mode
To Set the Dual Time Mo de
! To sel ect t he set ting display, hold down the
[MODE] button for 2 seconds in the Daily Alarm
Mode.
! Onc e it get into the sett ing displ ay, the 'Minute '
[ST./ STP.]
Inc rease
the n umber
Hol d [ST./ST P.]
inc rease t he
num ber at a
hig her spe ed
[LA P/RES ET]
dec rease
the n umber
hol d [LAP/ RESET ]
dec rease t he
num ber at a
hig her spe ed
Dua l Time Mod e
hol d
[M OD E]
min ute
[MO DE]
hou r
Dua l Time Mod e
Set ting Se quenc e
[MO DE]
digits start flashin g. Press the [MODE] button to
select the flashing (setti ng item) as shown in the
diagram.
! Whe n one of the set tings (minute, ho ur) is flas hing,
press the [ST./STP.] or [LAP/R ESET] button to
change the number; hold down the [ST./STP.] or
[LAP/RESET ] button to change the numb er at a
higher speed.
! W hen the h our is set, press the [MO DE] bu tton to
exit the setting di splay.
! I f NO key-stok e has been activate d for 1 m inute
during the setting displ ay, it will retu rn to Dual Time
Mode.
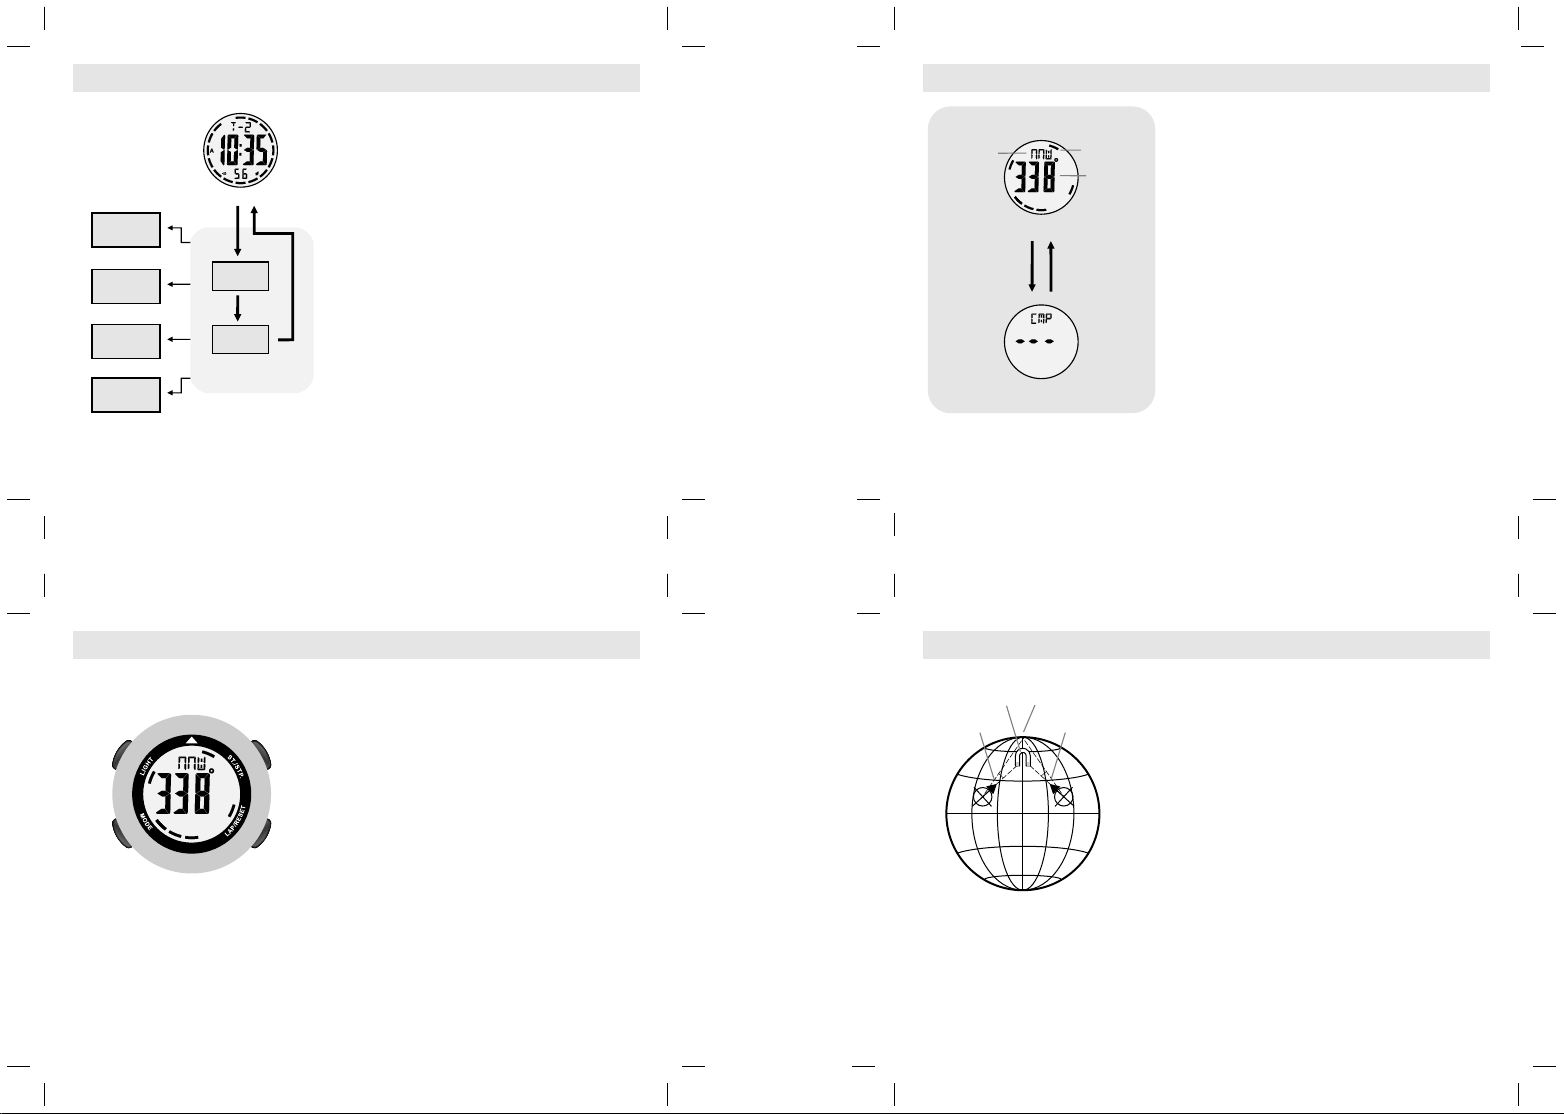
11.1 Compass Mode - Compass M ode
Com pass Mode
! T he Watc h incl udes a dig ital c ompass function.
com pass
dir ectio n
Com pass Mo de
1 min ute an y key exc ept
Com pass Sta ndby M ode
mag netic
nor th poin ter
com pass
bea ring
[LI GHT]
When t he Com pass Mo de is s elected, it p rovide s
compass directions
bearing and the mag netic nor th pole dire ction.
! T he Compass Mode also incl udes a battery savi ng
feature, tha t is the Sta ndby Mode. For sa ving the
battery, the Compa ss wi ll ch ange to th e Sta ndby
Mode after 1 minute .
Com pass Display
! T he co mpass direc tion and t he co mpass beari ng ar e
exhibited o n the 1st and 2 n d row o f the display
respective ly.
! Th e direct ion of the m agneti c north is a nimate d by the
bar graph.
Compass Stand by Mode
! To extend the battery life of the Watch, the C ompass
Mode includes a Sta ndby Mode .
! T he Wa tch w ill s wit ch t o t he S tandb y Mo de
automatica lly if NO key- stoke ha s been acti vated for 1
minute during th e Compass Mo de.
! In the Standby M ode, p ress any b utton exce pt
the [Light] butt on once to retu rn to Compas s Mode.
(N,E,S ,W, a nd etc), com pass
11.0 Compass Mode - The Precaution s
The Precautio ns when Usin g the Compas s Mode
!
Ke ep t he Wa tc h aw ay f rom m ag net s or t he
appliances that conta in mag netic f ields such a s
mobile phones , speaker s, motors an d etc.
This Watch, like most magne tic compas s, points to
!
the m agn etic no rth w hic h i s sl igh tly d iffere nt
from t he true north.
Declinatio n' sectio n for more deta il on declin ation.
Perform t he compass cali bratio n on the following
!
conditions :
1) Use the Watch the first ti me,
2)Whe n t he m agn eti c disto rti on ic on ' DIS T'
indicator is fla shing,
3) The batt ery has been re placed , and
4) Us e the Wat ch on a locati on where is ap art fr om
the p lace in whic h the c ompass had been
calibrated .
! To achiev e a n accurat e re sult, you sho uld avoid
measuring a dire ction und er the follo wing cond itions:
1) T he watch is clo se to magnet ic or metal
objects,
2) T he watch is clo se to electr ical appliance s, and
3) The wat ch is insi de a movin g o bject or a
ferroconcr ete build ing.
Check the 'W hat is M agnetic
11.2 Compass Mode - Magnetic Declination
Mag netic N orth
Mag netic
Dec linat ion
True N orth
Mag netic D eclin ation
Mag netic
Dec linat ion
What is Magnetic De clinat ion
The Mag netic North Pole which is slightl y differe nt from th e True
!
North Pole. This Wat ch, like most magnetic com pass, poin ts to
the Mag netic No rth Pole . But, eve rythin g measur e from a map is
related to the True Nort h Pole.
! Th e angular di fference betwee n Magneti c North Pole an d T ru e
North Pol e is called magnetic declinat ion. Its amoun t (d egrees
and minutes ) and direc tion (easter ly and westerly ) depend on
where you are.
For serious compass user or who intends to perform accurate
!
navigation , compass must be a djuste d to c ompens ate of
magnetic de clinat ion.
setting fo r Magn etic Declin ation. Check the coming 'Cal ibrati ng
the Compass' sec tion for mor e detail of the se tting.
Magnetic Decl inatio n Informa tion
! Mo st t opogra phic maps s hown magne tic north pole and or the
magnetic declination inf ormati on. T his manual inc ludes the
magnetic declin ation informatio n for the major cities over the
world. Ch eck the 'Magne tic Declin ation at Majo r Ci ties' section
for more detail.
! Fo r t hose cities whose na mes are not i nclude d i n the list, you
may refer to the links be low (as at 28 Aug 2004) :
1) http://www.g eolab. nrcan. gc.ca/geoma g/mirp _e.sht ml
http://www.n gdc.no aa.gov /seg/geomag /decli nation .shtml
2)
! Ge t the locati on's lati tude and longitud e before usi ng the link.
This Watch also incl udes a compen sation
Page 7
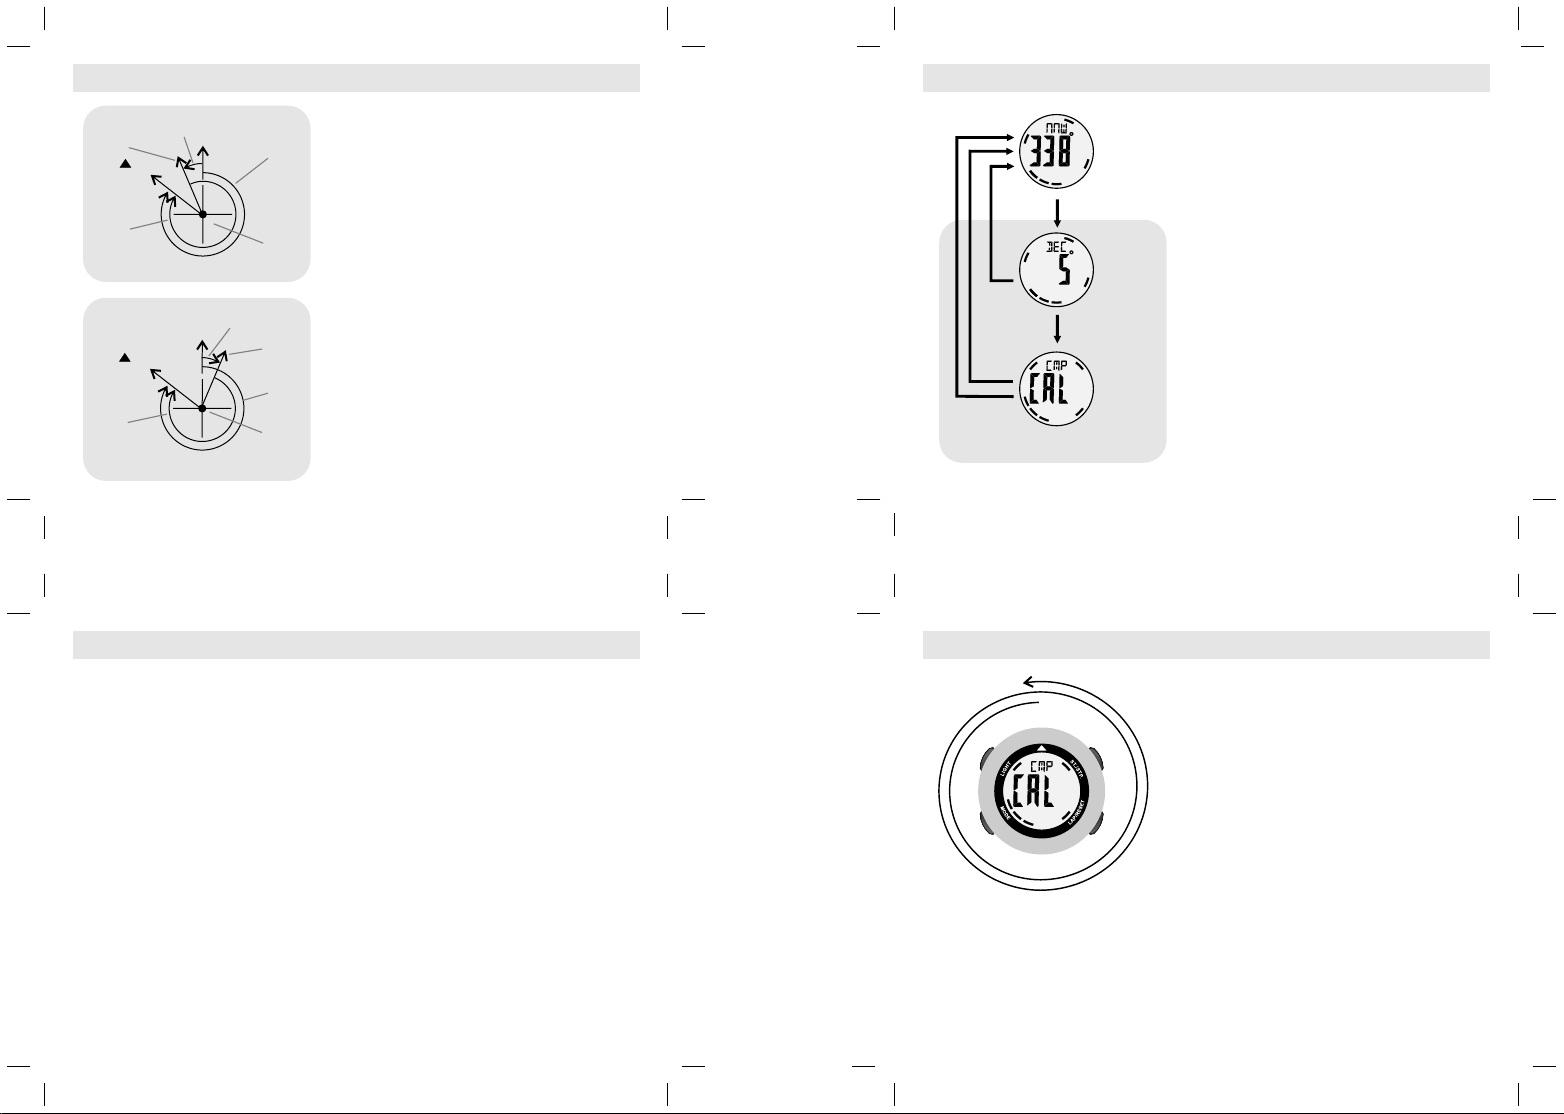
11.3 Compass Mode - Magnetic Declination Compensation
mag netic
dec linat ion
mag netic
nor th
obj ect B
mag netic
bea ring
323 °
Com pensa te the Be aring a t a place
(We sterly (W) Mag netic D eclin ation )
obj ect B
mag netic
bea ring
278 °
Com pensa te the Be aring a t a place
(Ea sterly (E) Mag netic D eclin ation )
238 W
tru e north
tru e north
0°
0°
mag netic
dec linat ion
228 E
Magnetic Decl inatio n Compens ation
!
tru e
bea ring
300 °
Compensate a n objec t's bea ring by s ubtrac t weste rly
(W) magne tic decli nat ion or a dd ea sterly (E )
magnetic decl inatio n with the magn etic bear ing.
Example 1
Wes ter ly magnet ic de cli nat ion ( W): 2 3°; the
!
magnetic bear ing (MB): 32 3°.
The true bearing (T B) = 323° (MB) - 23° (W) = 300 °
poi nt A
!
Example 2
! Eas ter ly magnet ic de clin ati on (E): 22° 8; th e
magnetic bear ing (MB): 27 8°.
! The tru e bearing (T B) = 278°(MB ) + 22°(E) = 300°
! Th is Watch will compen sate t he com pass b earing
wh ere ve r t he m ag ne tic d ec lin at ion i s e it he r
mag netic
nor th
tru e
bea ring
300 °
poi nt A
Weste rly (-ve) decli nation or East erly de clinat ion
(+ve) automatical ly, if the user input the ma gnetic
declinatio n angle of the c ity w hich close to th e use r's
curr ent location in to t he watc h at the
Decli nation Set ting Mode
! Ch eck the 'Cali brating the Co mpass' section for
more detail of the ca librat ion.
Magn etic
11.5 Compass Mode - Before the Compass Calibration
Befor e the Co mpa ss Cal ibr ation
! Perf orm t he com pass c alibra tion o n the follow ing
conditions :
1) Us e the Wat ch th e first tim e,
2) Wh en the ' DIS T' indic ato r is fla shi ng,
3)Tthe batt ery h as bee n rep lac ed, a nd
4) Us e the co mpa ss in a lo cat ion w her e is apa rt fr om
the plac e i n w hic h t he co mpa ss ha d b een
calib rat ed.
IMP ORTANT: If the wat ch has NOT been calibr ate d,
the d ire cti on re adi ng may be ina ccu rat e.
! Check
the 'Magnetic Decl inatio n a t Ma jor Cities'
section to get the ma gnetic de clinat ion of the city
which is clo se to yo ur curr ent loc ation, becau se such
angle wil l be inpu tted into the Watch during the
calibratio n.
[MO DE]
[LA P/RES ET]
[MO DE]
[MO DE]
1 min ute
Calib ratio n Seq uence
hol d
Com pass
Mod e
Mag netic
Dec linati on
Setti ng Mo de
Calib ratio n
'Ro tatio n' Mode
11.4 Compass Mode - Magnetic Declination at Major Cities
No. Cou ntry/Pl ace Major City Decli nation
1 Af ghanist an Kabul +3E
2 Au stralia Canb erra +12E
3 Au stria Vienna +3E
4 Ba hrain Manama +2E
5 Ba nglades h Dhaka +0E
6 Be lgium Bruss els +0E
7 Br azil Bras ilia -21W
8 Ca nada O ttawa -14W
9 Ch ile Santiago +3E
10 Chin a Beij ing -6W
11 Chin a Hong Ko ng -2W
12 Cost a Rica San Jose -1W
13 Cuba H avana -4W
14 Czec h Repub lic Pragu e +3E
15 Denm ark Copen hagen +3E
16 Egyp t Ca iro +4E
17 Finl and Helsinki +8E
18 Fran ce Pa ris -1W
19 Germ any Berlin +3E
20 Gree ce Athens +4E
21 Hung ary Budap est +4 E
22 Indi a New De lhi +1E
23 Indo nesia Jakar ta + 1E
24 Isra el Jerusal em +4E
25 Ital y Rome +2E
26 Japa n Tokyo -7W
27 Jord an Amman +4 E
28 Keny a Nairo bi +0 E
29 Kore a Seoul -8W
30 Mala ysia K uala Lumpu r +0E
31 Mexi co Mexi co City +6E
32 Nepa l Kath mandu +0E
NOTE: Since magnetic declination will be changed as going with time, recommend to check the update data from following site:
http://www.magnetic-declination.com/ & http://www.ngdc.noaa.gov/geomagmodels/Declination.jsp
No. Cou ntry/Pl ace Major City Decli nation
33 Neth erlands Amsterd am +0E
34 New Zea land Wellin gton +22E
35 Norw ay Os lo +2E
36 Paki stan Islamab ad +2E
37 Phil ippines Manila -1W
38 Port ugal Lis bon -3 W
39 Russ ia Moscow +10E
40 Sing apore Singa pore +0 E
41 Sout h Africa Cap e Town -24W
42 Spai n Ma drid -2W
43 Swed en Stockholm + 5E
44 Swit zerland Bern + 1E
45 Taiwan Tai-pei -4 W
46 Thai land Bangkok -1W
47 UAE Abu Dh abi + 2E
48 Unit ed Kingdom Londo n -2W
49 Unit ed States Washington, DC -11W
50 Unit ed States Juneau +22 E
51 Unit ed States Phoenix +11E
52 Unit ed States Little Rock +1E
53 Unit ed States Sacrament o +14E
54 Unit ed States Denver + 9E
55 Unit ed States Atlanta -4W
56 Unit ed States Honolulu + 10E
57 Unit ed States Boston -15W
58 Unit ed States Saint Paul +1 E
59 Unit ed States Jackson +0E
60 Unit ed States Santa Fe +9E
61 Unit ed States Oklahoma Cit y +5E
62 Unit ed States Salem +16E
63 Unit ed States Harrisbur g -11W
64 Unit ed States Salt Lake City +12E
11.6 Compass Mode - Calibrating the Compass
fin ish
Calib ratio n
'Ro tatio n' Mode
sta rt
To Cal ibr ate th e Com pas s
! To selec t Magnetic Declinat ion Settin g Mode, hold
down
the [MODE] b utton for 2 secon ds in t he
Compass Mode.
! Once it ge ts into the Setting Mod e, t
indicator w ill b e appe ared o n the 1st r ow of the
display. W hen the digit start fla shing, press the
[ST./STP.] button to set magnetic declina tion (from 90 to 90) until the desir e angle appe ared.
!
When the m agnetic d eclina tion has been set, press
the [MODE] butto n to go to the Calibr ation 'R ot ati on'
Mode.
!
Once it g ets i nto t he 'R otation' M ode, t he 'CAL'
indicator will be appea red on 1st row of the displ ay
and the north pole poi nter star ts moving .
Hold the Watc h on a flat surface which is parallel to
!
th e ho rizon, t hen s te ad ily r ota te t he W atc h
anticlockw ise and k eep the p ointe r towards the sa me
direction dur ing the rota tion.
When the rotat ion (two t urns) i s comple ted, press the
!
[MODE] button to re turn to Comp ass Mode.
he 'D EC'
Page 8
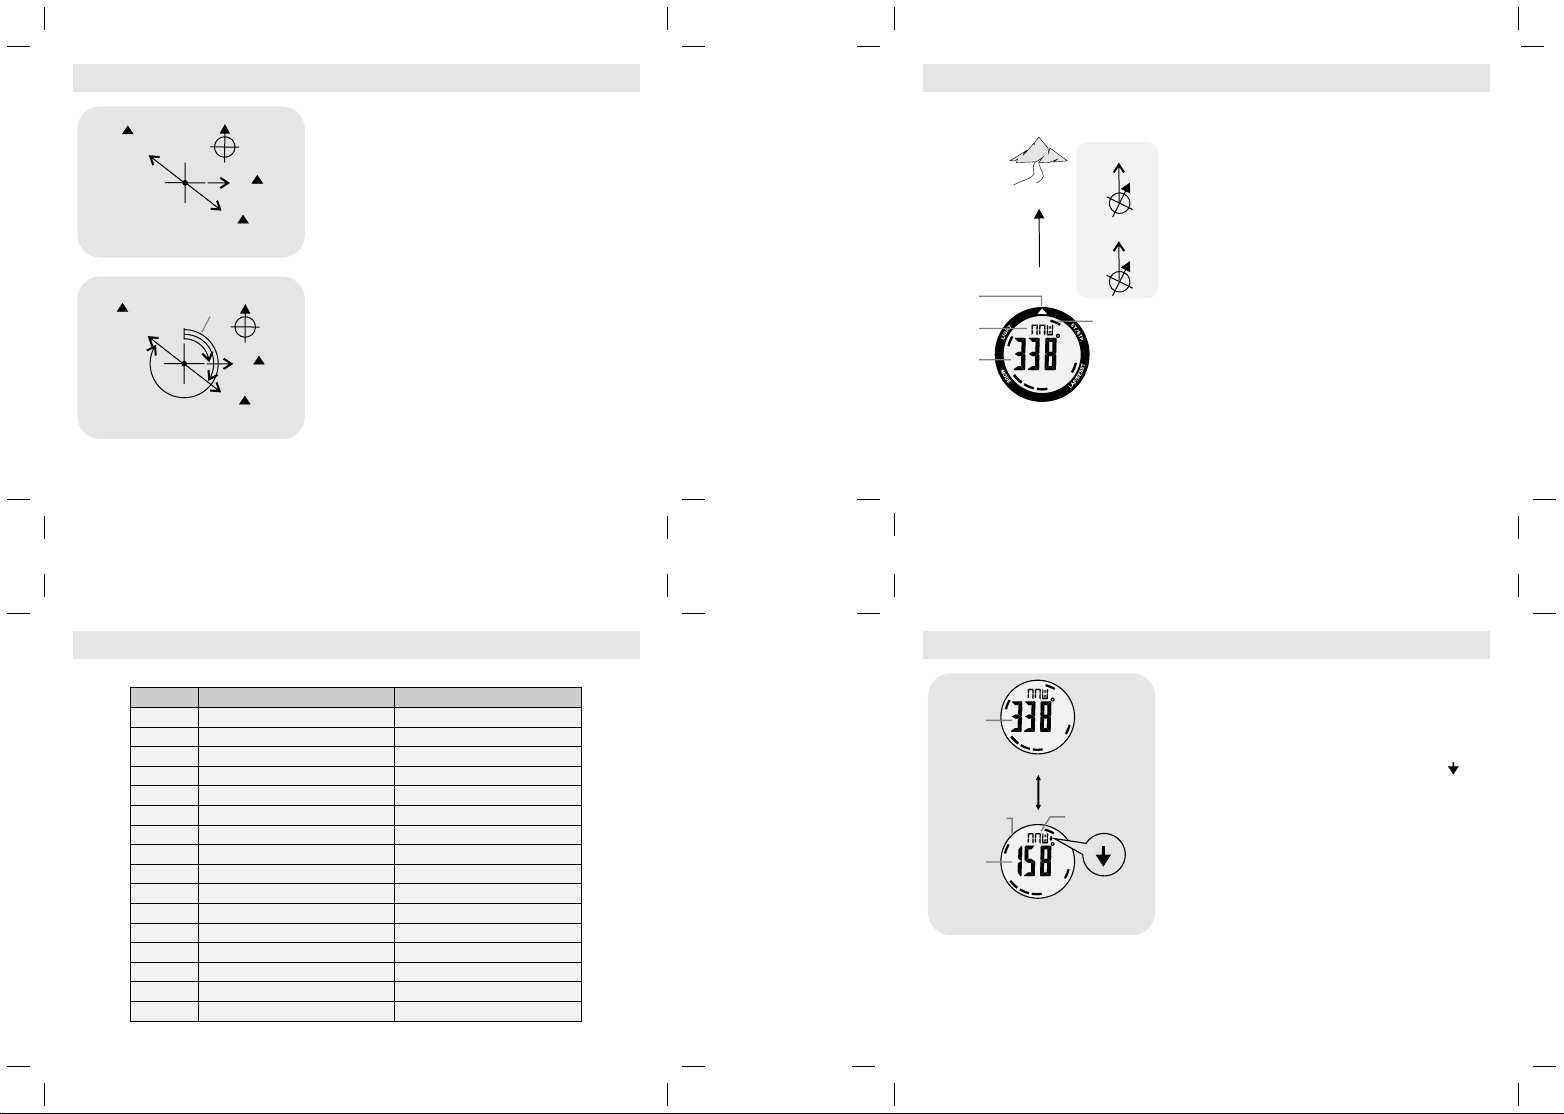
11.7 Compass Mode - Compass Direction and Bearing
To def ine t he Di rec tion of a n Obj ect
!
The d irecti on of an obj ect ( from a point ) can be
specified in ter m of ei ther c ompass directio n o r
compass beari ng.
!
This Watch provid es bo th co mpass direc tion a nd
compass beari ng.
The C ompas s Poi nts
! The compass direct ions are N orth, Northea st, East.
Southeast, South , Southw est, West and Northw est,
and etc.
! For the ex amples in the adja cent di agram, the
compass directio n of object B from point A is East.
The compass direct ion of objec t C from point A is
Southeast.
The C ompas s Bea rin g
! The di gital be aring di rectio n of an object is defin ed as
the ang ular d iffe renc e b etwe en Nor th and t he
obj ect. ( Assu ming that 0 fo r N orth , a nd the
measuring ran ge is from 0 to 359 )
! For the ex amples in the adja cent di agram, the
compass bear ing of obj ect B from point A is 90 . Th e
compass bearing of object C from point A is 135 .
The co mpass be aring o f object D f rom poin t A is
315 .
8
obj ect D
NW
Com pass Di recti on
obj ect D
315 8
Com pass Be aring
poi nt A
poi nt
A
N
ang ular
dif feren ce
08
N
E
SE
obj ect C
908
135 8
obj ect C
obj ect B
08
obj ect B
8
8 8
11.9 Compass Mode - Measure Compass Directions
To Take a c omp ass m eas ure men t
! When ta king a compas s measure ment, mak e sure
338 8
targ et obj ect
nav igati on dire ction
(th e direc tion th at
the d igits a re
poi nting )
Nav igati on
arr ow
com pass
dir ectio n
com pass
bea ring
8
8
Mea sure Co mpass D irectio ns
08
Nor th Nort hwest
Nor th
mag netic
nor th poin ter
that the Watch is parall el to the horizon.
IMP ORTANT: I f the w atc h do es no t par allel t o the
horiz on wh en ta kin g a m eas ure men t, th e r esult
may be in acc ura te.
! Turn the Watch until the naviga tion arrow is p ointing
to the direction of the way whi ch intends to go or
pointing to the target o bject's d irecti on. Then, press
the [L AP/RES ET] butt on to sel ect the C ompass
Mode.
! The compass d irecti on and the compass bearin g o f
the target o bject w ill be exhibi ted on t he 1st and 2 nd
row of the di splay re specti vely. The bar gra ph point er
will point to the dire ction of mag netic nor th.
11.8 Compass Mode - Compass Direction versus Compass Bearing
Mar ks
N
NNE
NE
ENE
E
ESE
SE
SSE
S
SSW
SW
WSW
W
WNW
NW
NNW
Com pass Di recti on
Nor th
Nor th Nort heast
Nor theas t
Eas t North east
Eas t
Eas t South east
Sou theas t
Sou th Sout heast
Sou th
Sou th Sout hwest
Sou thwes t
Wes t Sou thw est
Wes t
Wes t Nor thw est
Nor thwes t
Nor th Nort hwest
Com pass Be aring
348 .758 to 11 .25 8
11.2 58 to 3 3.7 58
33. 758 to 56 .258
56. 258 to 78 .758
78. 758 to 10 1.258
101 .258 to 1 23.75 8
123 .758 to 1 46.25 8
146 .258 to 1 68.75 8
168 .758 to 1 91.25 8
191 .258 to 2 13.75 8
213 .758 to 2 36.25 8
236 .258 to 2 58.75 8
258 .758 to 2 81.25 8
281 .258 to 3 03.75 8
303 .758 to 3 26.25 8
326 .258 to 3 48.75 8
11.10 Compass Mode - Backward Bearing Direction
Backw ard Be ari ng Di rec tio ns
! Th e Watch provi des
nor mal
be ar in g
Norm al Bea ring Dis play
mag netic
nor th poin ter
wil l not aff ect
bac kward
bea ring
Bac kward B earin g Displa y
[MOD E]
com pass di recti on
wil l not aff ect
bac kward
bea ring
ind icato r
object.
!
The ba ckwa rd b eari ng dire ctio n is th e b earin g
direction that on the opposi te direction from normal
bearing direc tion.
!
When the 'Bac kward Bearing' indi cator is
appe ared , th e Watch wil l ex hibit th e backwa rd
be ar in g di rec ti on o f th e d ir ec tion w hi ch t he
watch is now pointi ng.
NOT E: In Ba ckw ard Bear ing Co mpa ss Mode, th e
magne tic n ort h poi nte r and t he co mpa ss di recti on wi ll
keep exh ibi t the no rma l bea rin g rea dou ts.
To Sel ect No rma l Bea rin g and Ba ckw ard B ear ing
! Pr ess the [mo de] butt on to select betwee n normal
and backwa rd bear ing di rectio ns, in the Co mpass
Mode.
! Th e bac kward beari ng wi ll be returned t o nor mal
bearing automatically when the follow ing conditions
is fulfilled:
1) th e Watc h changi ng to st and by Mod e.
2) th e Watc h chan gin g to Cur rent Time M ode .
backward b earing direction of an
Page 9
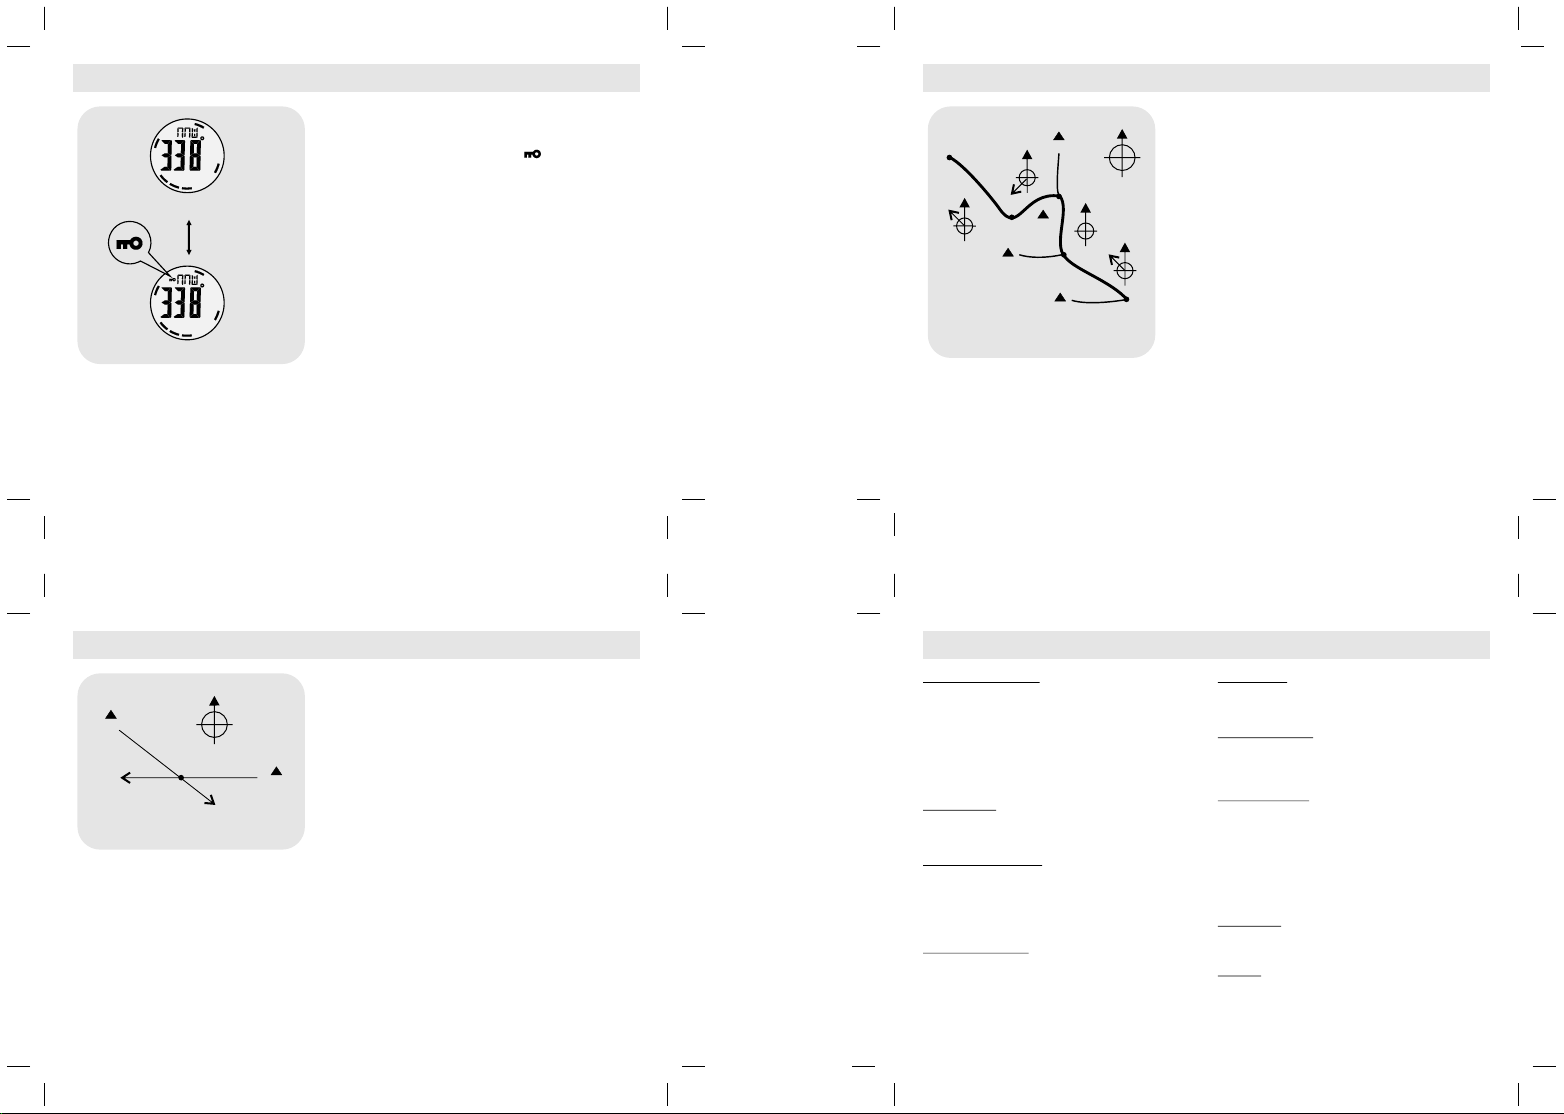
11.11 Compass Mode - Compass Lock
Com pass Lo ck
! This Watch provi des a c ompass lock functi on to s ecure
impor tant comp ass readi ng.
! When th e compas s lock indic ator ' ' is exhibit ed, the
the compas s read ing w ill no t be change d eve n the watch
is poi nting to anot her objec t.
Bea ring un locke d Displa y
[ST./ STP.]
Bea ring Lo cked Dis play
com pass lo ck
ind icato r
To Lock /Unlo ck the Com pass Lo ck
! Pres s the [ST./ST P.] button to lock/ unlock the comp ass
readi ngs in the Comp ass Mode.
! The comp ass lock will be unlo cked autom atical ly when
the foll owing con dition s is fulfille d:
.
1) The Wat ch is chan ging to st andby m ode .
2) T he Watc h is ch ang ing to C urre nt Time Mod e.
11.13 Compass Mode - Application of the Compass II
To Chec k th e Track Co urse Co rre ct
08
poi nt E
(fi nish po int)
315 8
A Samp le Trail O n A Map
225 8
poi nt D
1110 m
312 0 m
4110 m
poi nt B
212 0 m
poi nt C
08
315 8
poi nt A
(st artin g point )
! When hi king on a trai l, this Watch ca n keep the trail cou rse
corre ct.
! For th e exampl e in the adj acent di agram, t he corr ect tra il
is runni ng from poin t A to point E.
Bef ore the Hi king
! Befo re the hikin g, mark the tu rning poi nts of the trai l on the
map suc h as the po int A, B, C, D an d E. Using a p rotractor
to check out the compass bearings of thes e ma rkings as
follo ws:
1) P oint B fro m poi nt A (315 ),
2) P oint C fro m poi nt B (0 ) ,
3) P oint D fro m poi nt C (225 ) , and
4) P oint E fro m poi nt D (315 ) .
Dur ing the Hi king
! Usin g the Watch to take the naviga tion direct ion at the
turni ng points .
IMP ORTANT : If you dou bt o f the condi tions and d irec tions
of t he tr ail , con sult t he pa rk of fic e bef ore s tar ting y our
hik ing.
8
8
8
8
11.12 Compass Mode - Application of the Compass I
Che ck the Cur rent Po sit ion by Ba ckwar d Be arin g
! This Watch can be used to ch eck the curren t p osition in
outdo or by using bac kward bea ring:
1. Lo cat e two di sta nt and i den tifi able la ndm ark s from t he
cur rent pos iti on, for the exa mple in t he a dja cen t
dia gram, t he two l and mark s are m oun tai n A and B.
2. Cons ult a ma p to fi nd out t he mo unta in A a nd B's
loc ation s on th e map.
3. Us ing th e Wat ch to c heck out the back war d b ear ing s
of mou ntai n A an d B from th e cur rent po sit ion , such a s
135 8 for m oun tai n A and 270 8 fo r moun tai n B.
4. Use pro trac tor and rul er to draw the li ne 1358 and
lin es 27 08 o n th e ma p wh ich s tar ting fro m th e
mou ntain A and B res pecti vely.
5. The curre nt p osi tio n w ill be at t he i nte rse ctio n po int
(po int A) of the li nes 135 8 and 27 08.
mou ntain A
270 8
08
poi nt A
Che ck One' s Posit ion
By Ba ckwar d Beari ng
135 8
mou ntain B
12.0 Specifications
Cur rent Ti me Mod e
! Time Sy stem: AM, PM, Hour, mi nute, se cond,
and displ ay with bar graph animati on at the
rate of 1 s econd
! Time For mat: 12-h our or 24-hour forma t
! Cale ndar: M onth, da te and da y of week
display (Auto- Calend ar f unctio n fo r le ap year
and day of week)
Ala rm Mode
! Dail y alarm and hourly chim e
! Alar m sound: 30 seconds
Chr onogr aph Mode
! Reso lution: 1/100 sec ond
! Meas uring Range: 99 hour s 59 min utes 59.99
seconds
! Lap mem ory: 1 lap memory
Countdown Time r
! Reso lution: 1 second
! Meas uring Range: 99 hours 59 min utes 59
seconds
! Timer S oun ds: b eep o nc e a t 5, 4,3 ,2,1
second(s). Lo ng beep when re ach zero.
Pacer Mode
! Sett ing Range: 40 bpm to 180 bpm
! Sett ing step: 5 bpm
Dual Time Mode
! Time Sys tem: AM, P M, Hour, minute, se cond,
and display with bar gr aph anim ation at t he
rate of 1 second
Compass Mode
Compass beari ng Resolu tion: 18
!
Magnetic Nort h Pole Point er: 16 point ers
!
Compass direc tion: 16 dir ection s
!
Compass beari ng Displa y Range: 08 to 359 8
!
Others: Di gital bear ing re ading Lock and
!
Digital backw ard beari ng
Back Light
! Back Li ght Type: Elec tr o-L um ine sc ent ( EL)
back light
Battery
! Batt ery Type: 3V lith ium
! Batt ery model: CR2032
! Batt ery in use: 1 piece
 Loading...