

Page 1
User’s Manual
240W Watt Amplified Five Speaker
iPod Sound System W/FM Radio
and Wireless Remote
PSBM60I
www.pyleaudio.com
iPhone Docking System
Page 2
This “bolt of lightning” indicates uninsulated material
within your unit may cause an electrical shock. For the
safety of everyone in your household, please do not remove
product covering.
The “exclamation point” calls attention to features for
which you should read the enclosed literature closely
to prevent operating and maintenance problems.
CAUTION: TO REDUCE THE RISK OF ELECTRIC SHOCK, DO NOT
REMOVE COVER (OR BACK). NO USER-SERVICEABLE
PARTS INSIDE. REFER SERVICING TO QUALIFIED
SERVICE PERSONNEL.
CAUTION
RISK OF ELECTRIC SHOCK
DO NOT OPEN
KNOW THESE SAFETY SYMBOLS
1.Read these instructions.
2.Keep these instructions.
3.Heed all warnings.
4.Follow all instructions.
5.Do not use this apparatus near water.
6.Clean only with dry cloth.
7.Do not block any ventilation openings.Install
in accordance with the manufacturer’s
instructions.
8.Do not install near any heat sources such as
radiators, heat registers, stoves,or other
apparatus (including amplifiers)that produce
heat.
9.Protect the power cord from beingwalked on
or pinched, particularly atplugs, convenience
receptacles, and the point where they exit from
the apparatus.
10.Only use attachments/accessories specified
by the manufacturer.
11.Use only with the cart, stand, tripod,bracket,
or table specified by the manufacturer or sold
with the apparatus.When a cart
is used, use caution when moving
the cart/apparatus combination
to avoid injury from tip-over.
12.Unplug this apparatus during lightningstorms
or when unused for long periods of time.
WARNING: To reduce the risk of fire or electric shock, this apparatus should not be exposed to rain or moisture
and objects filled with liquids, such as vases, should notbe placed on this apparatus.
Important Safety Instructions
13.Refer all servicing to qualified service personnel.
Servicing is required when the apparatus has been
damaged in anyway, such as power-supply cord
or plugis damaged, liquid has been spilled orobjects
have fallen into the apparatus, the apparatus has
been exposed to rain or moisture, does not operate
normally,or has been dropped.
14.Battery usage CAUTION – To prevent battery
leakage which may result inbodily injury, property
damage, or damage to the apparatus:
œInstall all batteries correctly, + and -as marked
on the apparatus.
œDo not mix batteries (old and new or carbon and
alkaline, etc).
œRemove batteries when the unit is not used for
a long time.
œBatteries (battery pack or batteries installed)
shall not be exposed to excessive heat such as
sunshine, fire or the like.
15.Apparatus shall not be exposed to dripping or
splashing.
16.Do not place any sources of danger on the
apparatus (e.g. liquid filled objects,lighted
candles).
17.Where the MAINS plug or an appliance coupler
is used as the disconnect device,the disconnect
device shall remain readily operable.
Page 3
Hearing safety
Listen at a moderate volume.
● Sound can be deceiving. Over time your hearing ‘comfort level’ adapts to higher volumes of sound.
So after prolonged listening, what sounds ‘normal’ can actually be loud and harmful to your hearing.
To guard against this,set your volume to a safe level before your hearing adapts and leave it there.
● Prolonged exposure to sound, evenat normally ‘safe’ levels, can also cause hearing loss.
● Be sure to use your equipment reasonably and take appropriate breaks.
To establish a safe volume level:
● Set your volume control at a low setting.
● Slowly increase the sound until you can hear it comfortably and clearly, without distortion.
Listen for reasonable periods of time:
Warning
● Never remove the casing of this apparatus.
● Never lubricate any part of this apparatus.
● Never place this apparatus on other electrical equipment.
● Keep this apparatus away from direct sunlight, naked flames or heat.
● Ensure that you always have easy access to the power cord, plug or adaptor to disconnect the
apparatus from the power.
“Made for iPod,” “Made for iPhone,” and “Made for iPad” mean that an electronic accessory has
been designed to connect specifically to iPod, iPhone, or iPad, respectively,and has been certified
by the developer to meet Apple performance standards. Apple is not responsible for he operation of
this device or its compliance with safety and regulatory standards. Please note that the use of
this accessory with iPod, iPhone, or iPad may affect wireless performance.
iPad, iPhone, iPod, iPod classic, iPod nano, iPod shuffle, and iPod touch are trademarks of
Apple Inc., registered in the U.S. and other countries.
● iPod touch (4th generation)
● iPod touch (3rd generation)
● iPod touch (2nd generation)
● iPod touch (1st generation)
● iPod classic
● iPod with video
● iPod nano(6th generation)
● iPod nano (5th generation)
● iPod nano (4th generation)
Compatible iPod/iPhone/iPad
● iPod nano (3rd generation)
● iPod nano (2nd generation)
● iPod nano (1st generation)
● iPhone 4
● iPhone 3GS
● iPhone 3G
● iPhone
● iPad
● iPad 2
Page 4

Break-in
Break-in refers to the aging period for the speakers to where they perform best acoustically. Upon purchase the
speakers are not broken-in. A period ranging from 48-100 hours of usage is recommended before both the main
unit and the subwoofer behave optimally.
Break-in can be realized at the same time of normal music listening as the course you listen to music with the
medium volume itself is a course of break-in of the speakers.
With time on, the break-in course may come to its end about one month later if you listen to music with the
speakers for two to three hours each day.
Please mainly use symphonic music or pop music for the break-in as the frequency range of these two kinds of
music is wide, and can therefore realize good break-in for each frequency range of the speakers. Never make the
volume too large during the break-in or else the speakers will be quite easy to get damaged due to long-time
overloading run and disturb your families and neighbors.
◆ Entire wooden case, piano style painted front panel with blue backlight LCD display.
◆ FM stereo radio with automatic search and can store 20 station.
◆ iPod docking station suitable for most iPod/iPhone/iPad models.
◆ iPod charging function and can output iPod video to TV.
◆ INPUT, MUTE, STANDBY, VOL + and VOL - buttons.
◆ CD, AUX1, AUX2, PC/MP3 inputs.
◆ 1x 5.25" woofer, 2x3" full range speaker and 2x1" tweeter.
◆ With remote control.
Features
Page 5
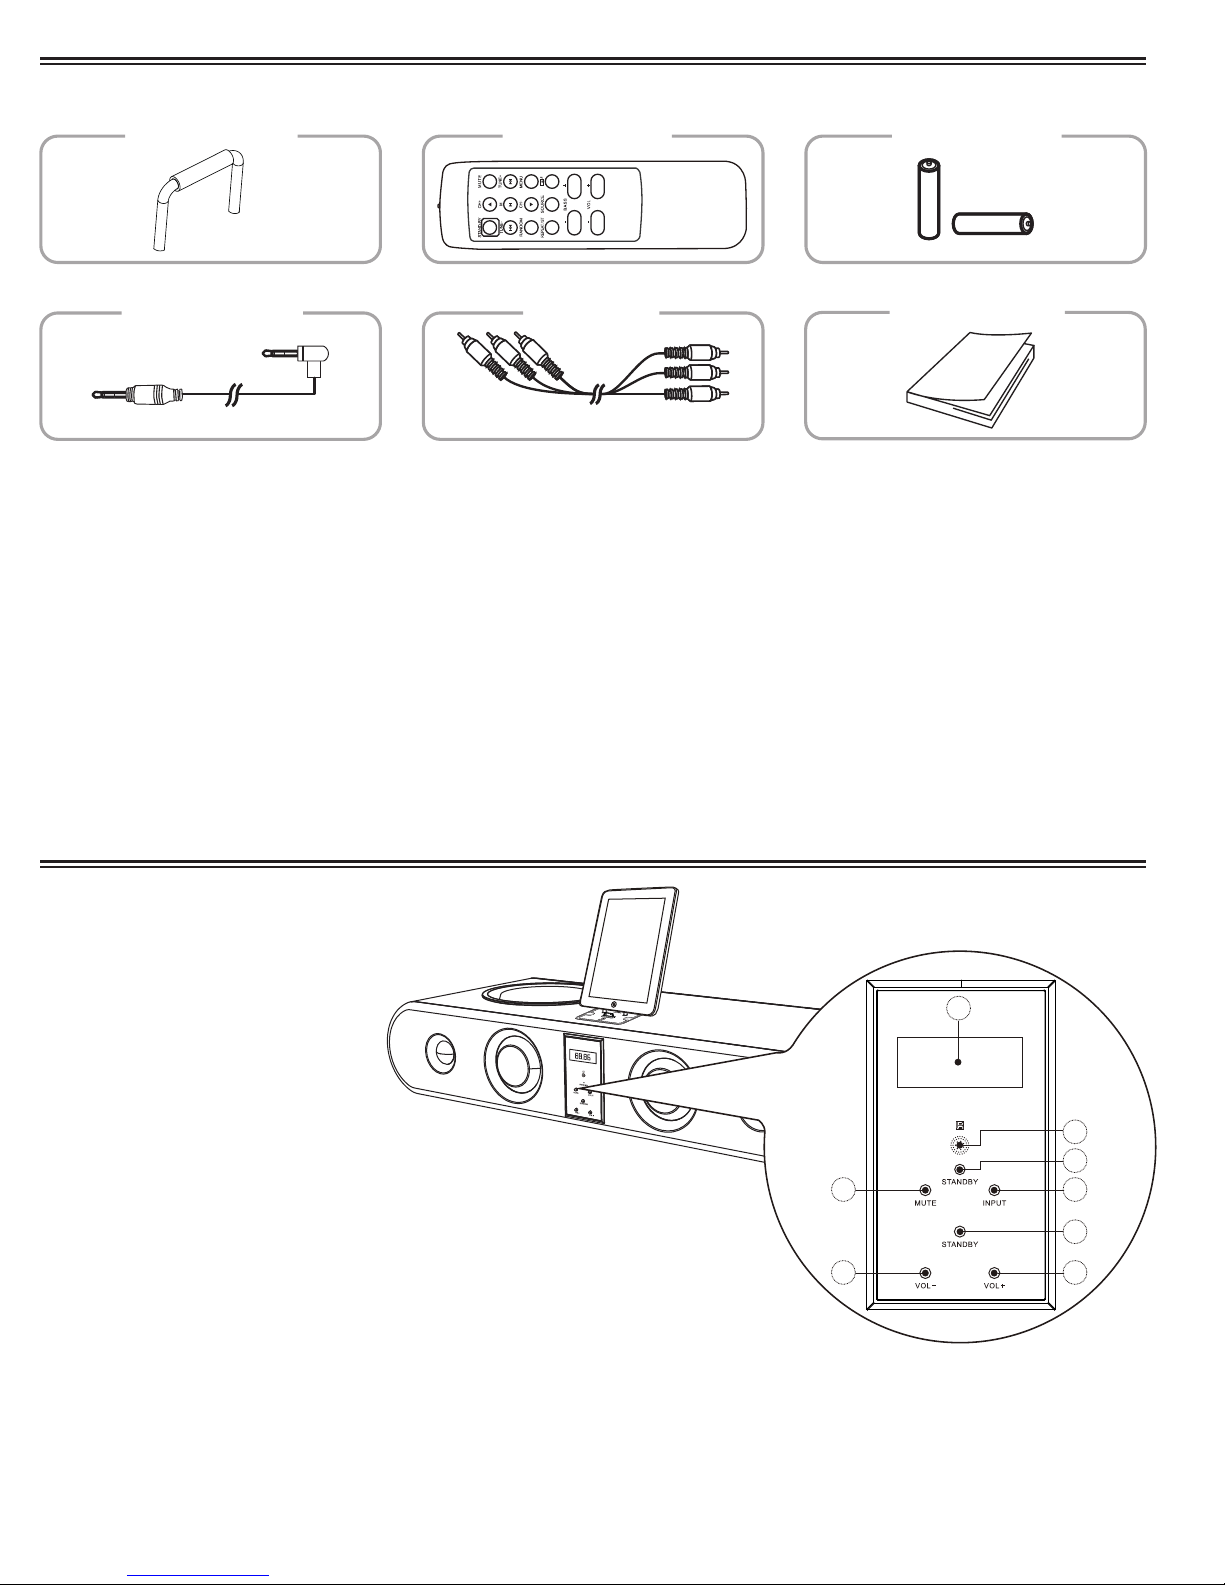
ACCESSORIES
3.5mm mini plug
connection cable
Remote ControlStand for iPad
3 RCA cable
AAA Batteries
Owner`s Manual
Owner`s Manual
FRONT PANEL FUNCTIONS
STANDBY
1.
standby mode. Press again to turn the unit
off(standby).
2.
INPUT
source as desire.
3.
MUTE
Press again to turn the sound back.
4.
VOL-
: Press to reduce the sound level.
: Press to turn on the unit from
: Press repeatedly to select the input
: Press to turn off the sound temporary.
6
7
8
3
4
2
1
5
5.
VOL+
: Press to increase the sound level.
6. LCD display.
7. Remote Sensor.
8. Power indicator.
Page 6

TOP PANEL FUNCTIONS
1. 3.5mm audio jack
2. Dock for iPod/iPhone/iPad
1
2
BACK PANEL FUNCTIONS
1
7
1.Power ON/OFF Switch.
2.CD L+R Input jacks.
3.AUX 1 L+R input jacks.
2
4
3
6
5
4.AUX 2 L+R input jacks.
5.Video input jack.
6.FM ANT(Antenna).
7.AC Power Cord.
Page 7
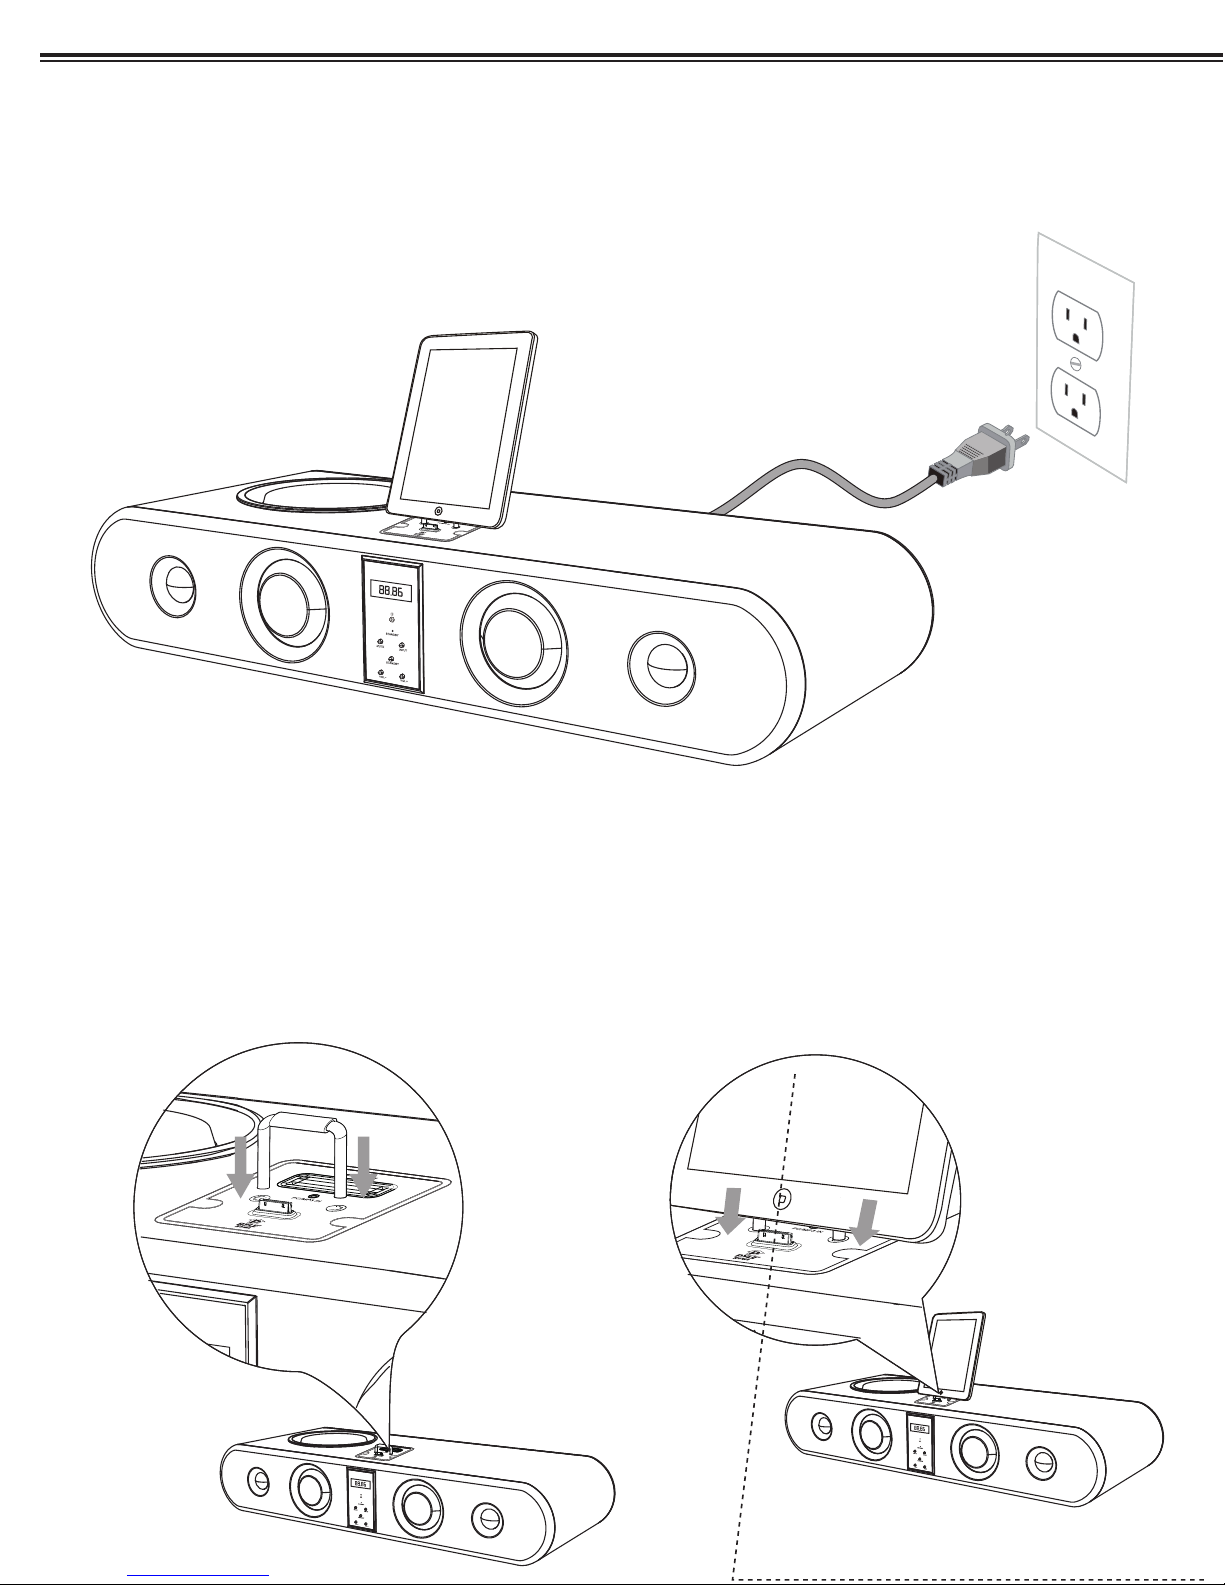
SYSTEM CONNECTIONS
1. CONNECT POWER SUPPLY
Insert the power plug into a wall socket. Make sure
the voltage marked at the rear panel is same as
your AC power. Do not operate with wet hands to
avoid electric shock.
Socket
Power plug
2. CONNECT WITH iPad
1. Plug the stand for
iPad into the holes.
2. Make sure the home button
on iPad is directed at the middle
of the dock.
Page 8
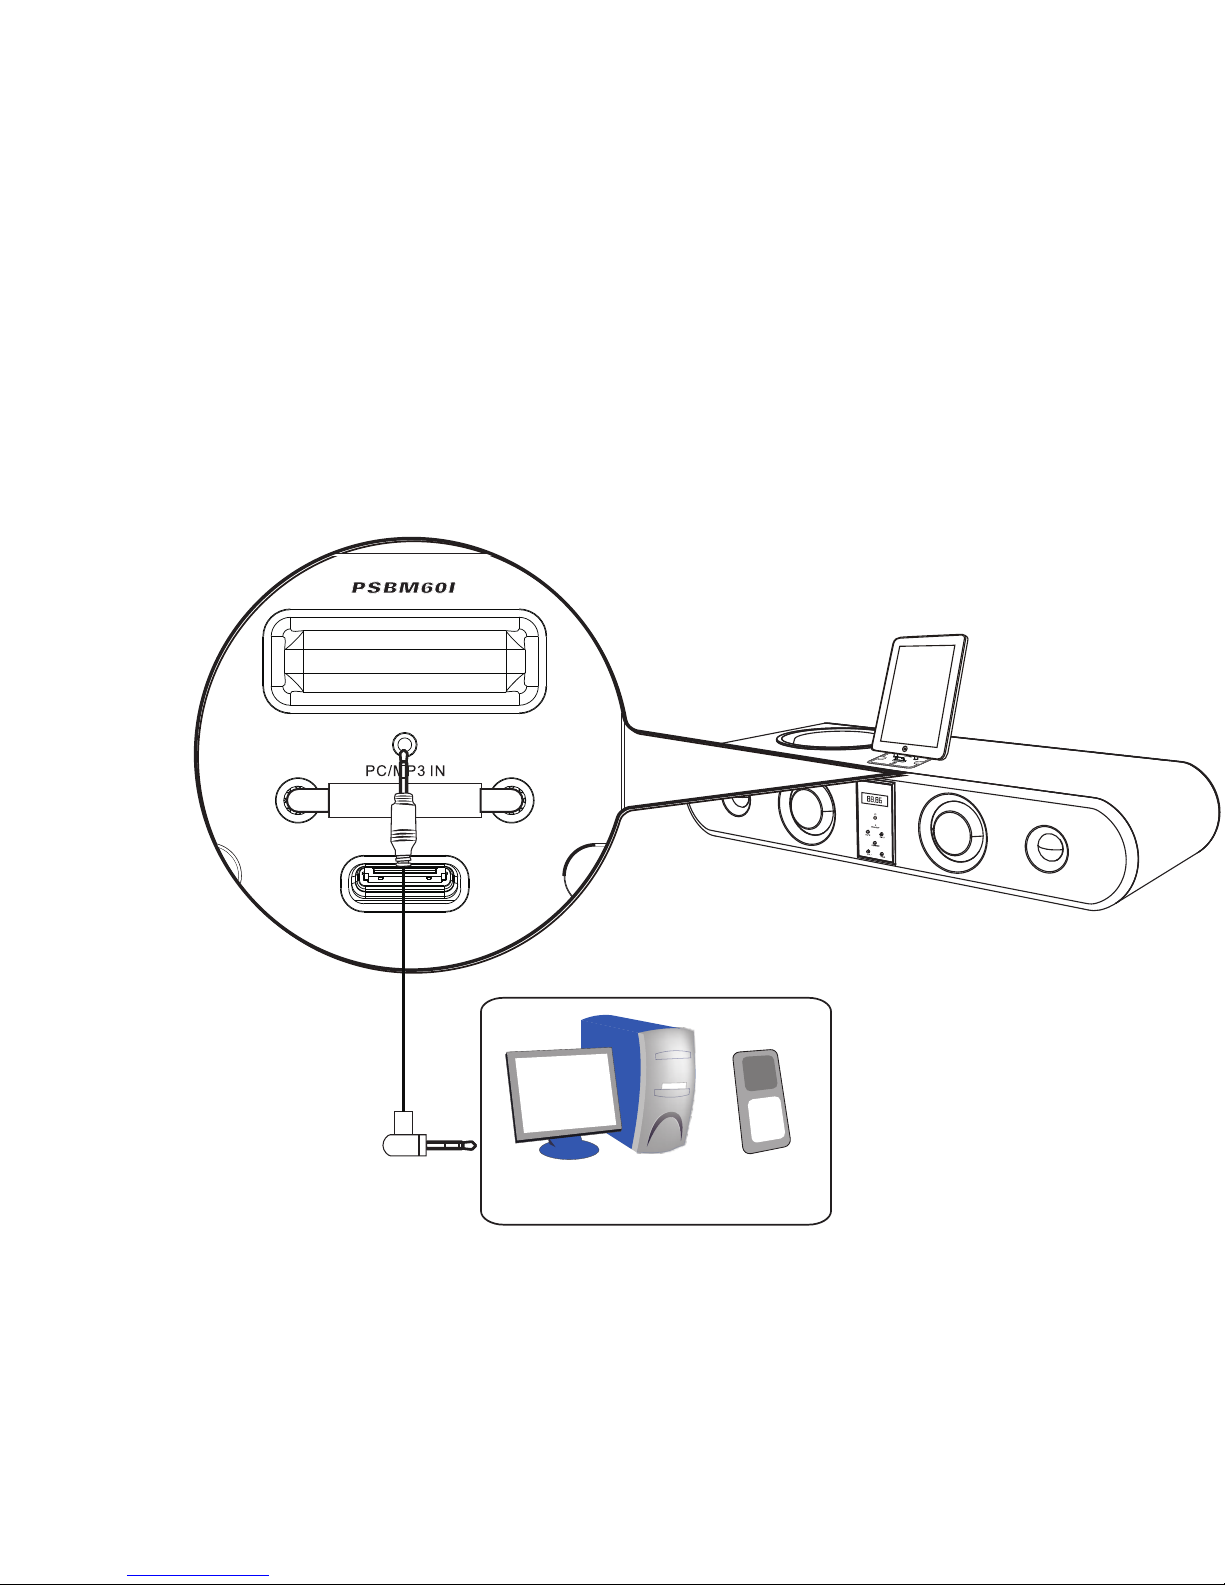
3. CONNECT WITH PC/MP3
To listen the sound source from PC (Computer) or MP3 Players,
connect the unit with the external device as below:
3.5mm mini plug
connection cable
MP3
PC
Page 9
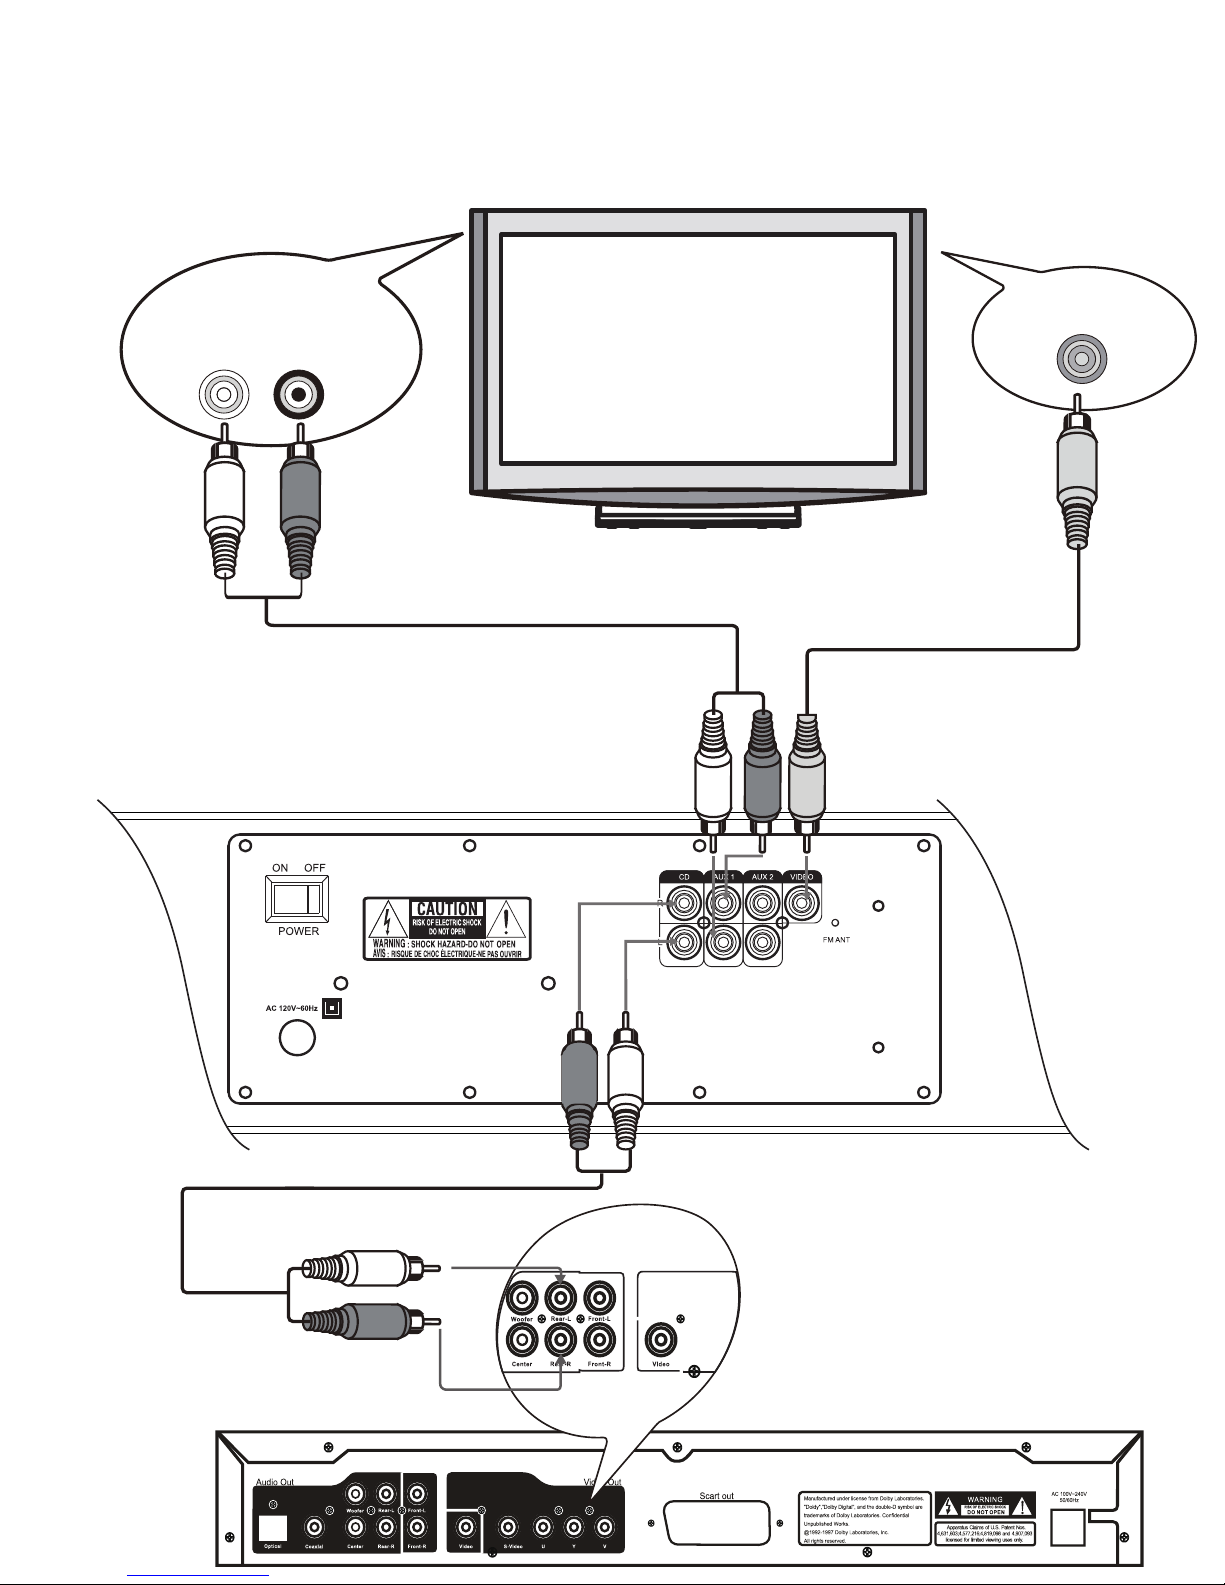
4. CONNECT WITH TV/DVD
To listen the sound source from Television and/or DVD players,
connect the unit with the external device as below:
TV Audio Out
L R
TV
TV Video In
Audio In
Video Out
DVD Audio Out
DVD
Page 10
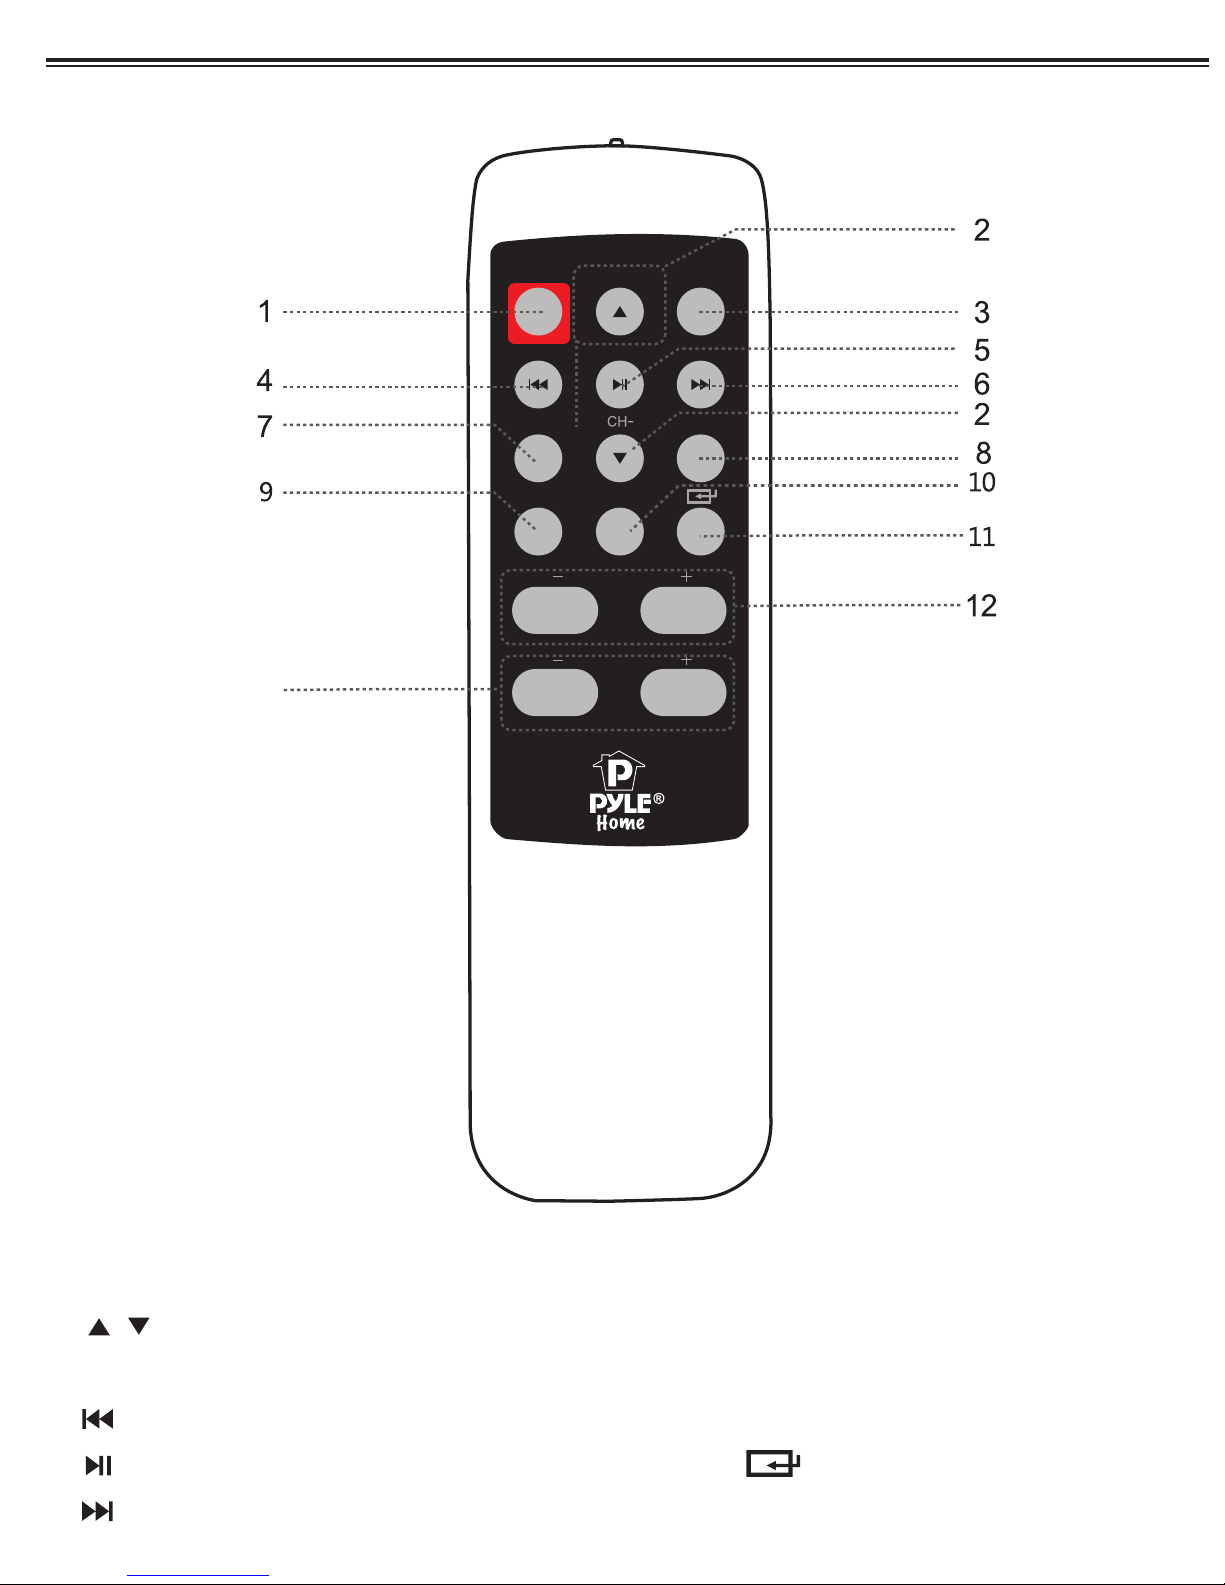
REMOTE CONTROL FUNCTION
13
STAND-BY
TUNE-
RANDOM
REPEAT/ ST
CH+
M
SOURCE
BASS
VOL
MUTE
TUNE+
MENU
1. STANDBY Button
2. / (CH+/CH-) Button
3. MUTE Button
4. /TUNE - Button
5. / M (Play/Pause/Memory) Button
6. /TUNE + Button
7. RANDOM Button
8. MENU Button
9. REPEAT/ST (Stereo) Button
10. SOURCE Button
11. Enter Button
12. BASS +/- Buttons
13. VOL (Volume) +/- Buttons
Page 11
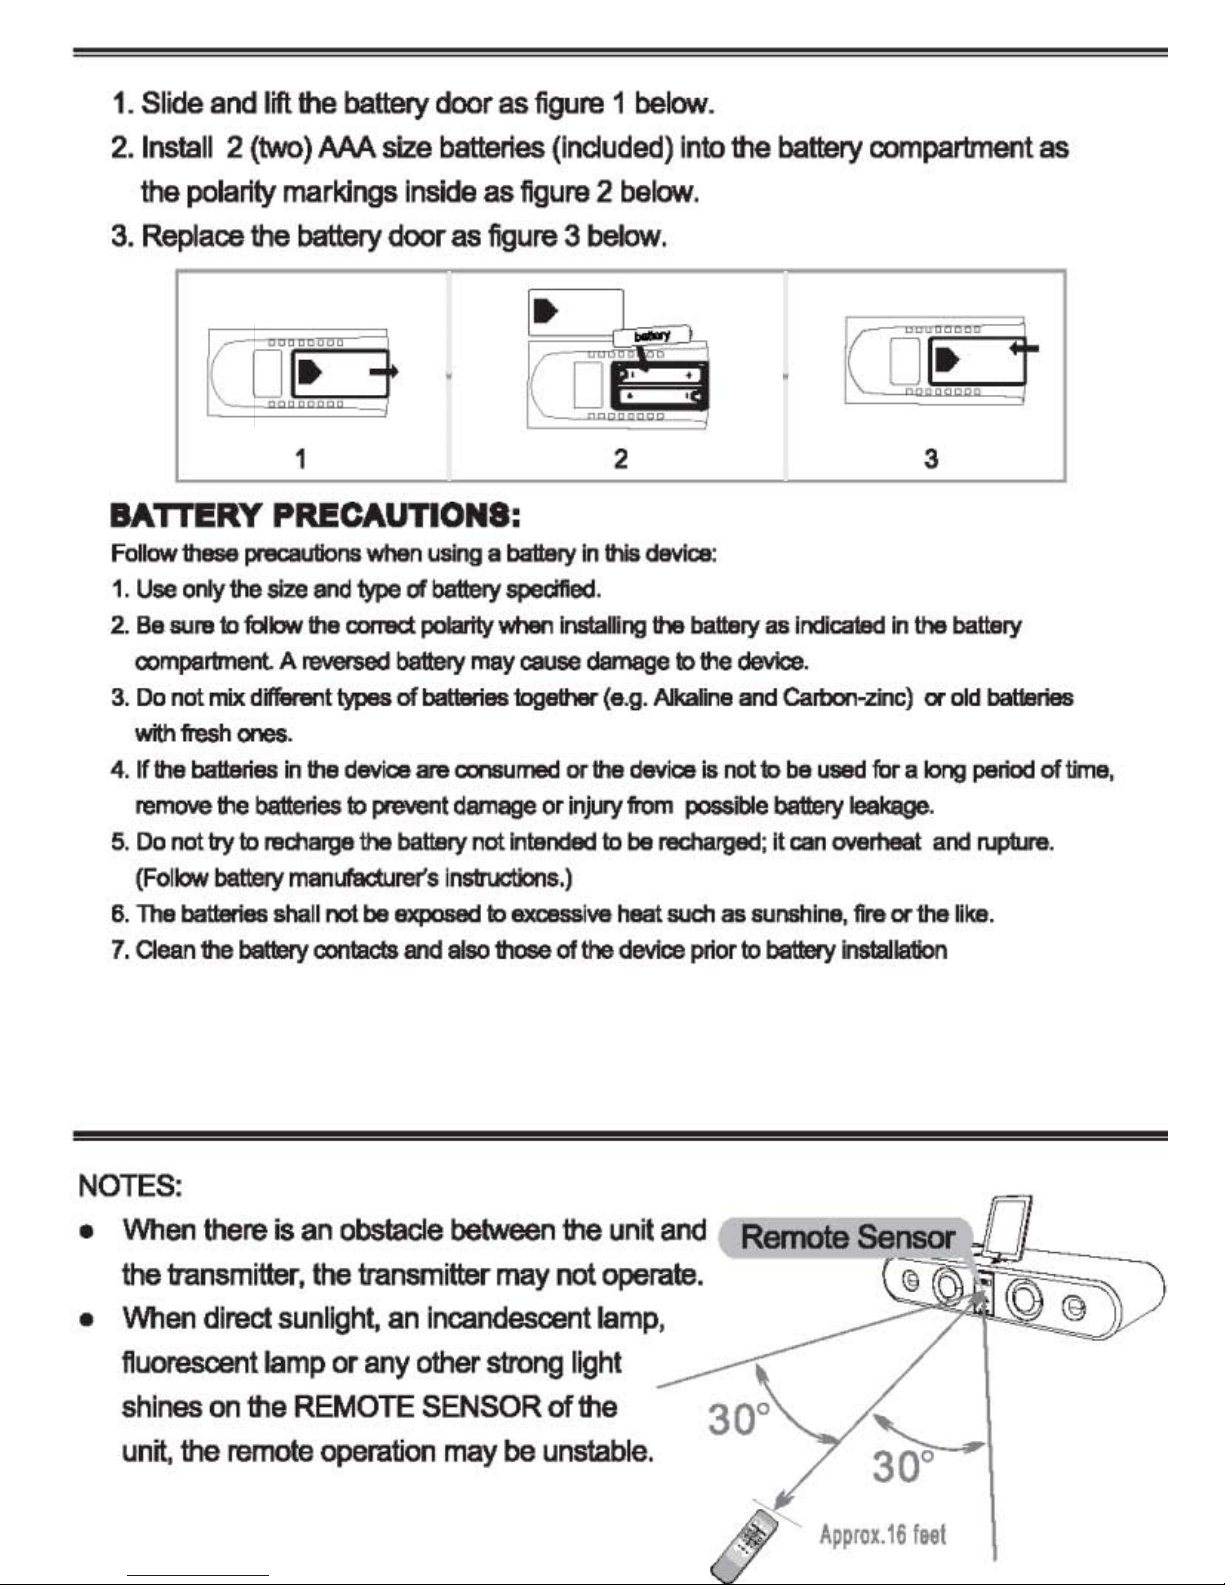
BATTERIES INSTALLATION (REMOTE CONTROL)
1.
Slide
2.
Install
the
3.
Replace
BATTERY PRECAUTIONS:
and
lift
the
battery door
2
(two)
AAA
size
polarity markings
the
battery
door
batteries
inside
as
as
figure 1 below.
(included)
as
figure 2 below.
figure 3 below.
2 3
into
the
battery
Ie
compartment
O
J!
::
t
as
Follow
1.
2.
3.
4.
5.
6.
7.
these
Use
only
Be
sure
oompartment. A reversed
Do
not
with
fresh
If
the
remove
Do
not
(FollaN
The
batteries
Clean
precautions
the
size
to
follow
mix
different
ones.
batteries
the
batteries
by
to
recharge
battery
the
battery
when
and
type
the
correct
types
in
the
device
to
prevent
the
manufacturer's
shall
not
be
ooniacts
using a battery
of
battery
polarity
battery
of
batteries
are
battery
exposed
and
when
may
consumed
damage
not
instructions.)
to
also
those
in
specified.
installing
cause
together
intended
excessive
or
or
injury
of
damage
the
the
this
(e.g.
device
from
to
be
heat
device
device:
the
battery
Ie
the
device.
Alkaline
recharged;
such
and
is
not
possible
as
prior
Ie battery
as
indicated
Carbon-zinc)
to
be
used
battery
it
can
overheat
sunshine,
inslallation
in
the
for
a
leakage.
fire
or
the
battery
or
old
long
and
like.
batteries
period
rupbJre.
of
time,
EFFCTIVE DISTANCE OF REMOTE TRANSMITTER
NOTES:
•
When
the
•
When
fluorescent
shines
unit,
there
is
tJansmitter,
direct
sunlight,
lamp
on
the
REMOTE
the
remote
an
obstacle
the
transmitter
an
or
any
operation
between
may
not
incandescent
other
SENSOR
strong
may
of
be
unstable.
the
unit
operate.
lamp,
light
the
and
co;
:__--:-~:__-
<!
Approx.16
...
feet
Page 12

GENERAL OPERATION
1. Press the POWER Switch on the rear of unit to ON position to power on the
unit. The STANDBY Indicator will turn on.
2. Press the STANDBY Button on the unit or Remote Control to turn on the
unit from standby mode. The STANDBY Indicator will turn off but the LCD
Display will turn on.
3. Press the SOURCE Button on the unit or Remote Control repeatedly to select
the input source as the connections to iPod/iPhone/iPad (LCD shows “IPOD”);
AUX 1 (LCD shows “AUX1”); AUX 2 (LCD shows “AUX2”); PC/MP3 (LCD
shows “PC”) or Radio FM mode (LCD shows current FM station's frequency).
4. Press the VOL (Volume) +/- Buttons to adjust volume level.
5. Press the BASS +/- Buttons on the Remote Control to increase/decrease the
bass level.
6. Press the MUTE Button on the Remote Control to turn off the sound temporary,
press again to turn the sound back on.
7. When finished, press the STANDBY Button on the unit or Remote Control to
turn the unit off (standby mode).
8. If the unit is not used for a long period of time, turn off the unit by press the
Power ON/OFF Switch on the rear of unit to OFF position.
LISTEN TO iPod/iPhone/iPad
1.When iPod/iPhone/iPad is connected,it will recharge automatically.
2. Power on the unit as specified previously, press the SOURCE Button on the
unit or Remote Control repeatedly until "IPOD" appear on the display.The unit
will start playback automatically.
3.During playback the music/video files from iPod/iPhone/iPad;
A.Press the Skip/Fast Search or Buttons repeatedly to skip the tracks
forward/backward.
B.Press and hold the Skip/Fast Search or to fast search the specific section
of the track forward/backward.
Page 13
C.Press the REPEAT Button on the Remote Control to set repeat modes,
corresponding icons will appear on the display of connected iPod/iPhone/iPad.
D.Press the RANDOM Button on the Remote Control to turm the random playback
mode on or off, corresponding icons will appear on the display of connected
iPod/iPhone/iPad.
E.Press the MENU Button on the Remote Control,the setting menu will appear on
the display of connected iPod/iPhone/iPad.Using the Direction / ; Skip/Fast
Search , Buttons to move the cursor within the display press the ENTER
Button to confirm the selections.
LISTEN TO FM RADIO
Extend the FM antenna wire on the rear of the unit and adjust it to get the best
reception.
1) Power ON the unit as previously indicated.
2) Press the SOURCE button on the unit or remote control repeatedly until
FM frequency appears on the display.
3) Press or button on remote control repeatedly to search the specific radio
station. (Or, press and hold the or button 1 second then release the button.
The unit will auto search the next or previous available radio station then stop).
4) To store the current received radio station into the memory. Press the /M
button on the Remote Control, CH XX will appear on the display. Press the
CH+/CH- Buttons on the Remote Control repeatedly to select channel number
as desire. Press the M button again to store the current radio station into the
selected channel (Total 20 FM stations can be preset into the memory).
5) To listen the preset channels, press the CH+/CH- buttons on the Remote Control
or the Button on the unit repeatedly to the desired channel.
6) Press the REPEAT/ST Button on the remote control repeatedly to set the radio
to stereo or mono mode. STEREO or MONO will appear on the display.
Page 14
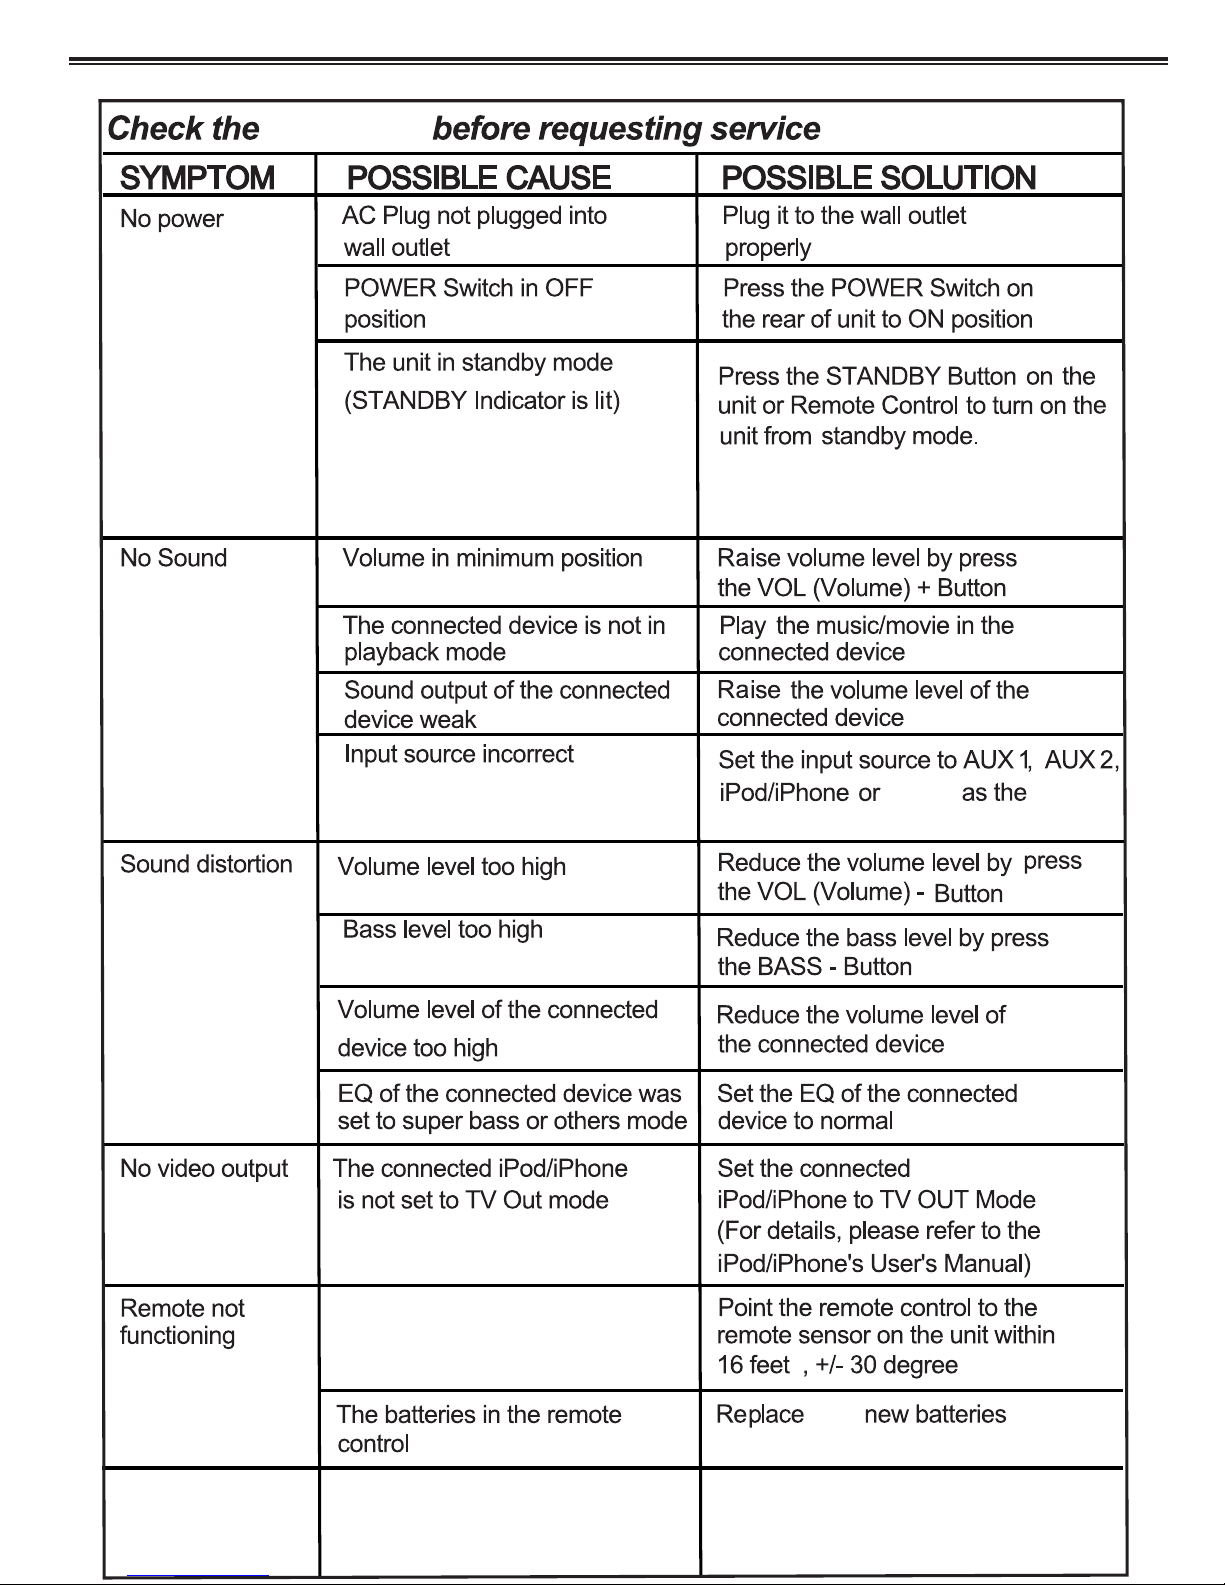
TROUBLESHOOTING GUIDE
following
The
STANDBY Indicator will turn off and
the Display will turn ON.
ing
Radio
corresponding to connected device
ing
ing
Radio reception
weak
with
are consumed.
Extend the FM antenna wire on the
rear of the unit and adjust it to get
better reception.
Page 15

SPECIFICATIONS
Power Supply------------------------------------------------------------AC~120V, 60Hz
Power Output------------------------------------------------------------------300W
NOTE: Specifications are subject to change for improvement without
prior notice.
Page 16

IMPORTANT: Pack carefully in original package if possible.We are not
responsible for damage incurred in returning items for repair, A letter
stating your exact street addres,daytime phone number,and the problem
you are experiencing should be included. You must also enclose a copy
of the original receipt a sproof of date of purchase
www.pyleaudio.com
 Loading...