

Page 1
Questions? Issues?
We are here to help!
Phone: (1) 718-535-1800
Email: [email protected]
PPHP842B - PPHP1042B - PPHP1242B - PPHP1542B
Wireless BT Portable PA Speaker
Portable PA & Karaoke Party Audio Speaker
with Built-in Rechargeable Battery, Flashing
Party Lights, MP3/USB/ /FM Radio
Page 2
WARNING
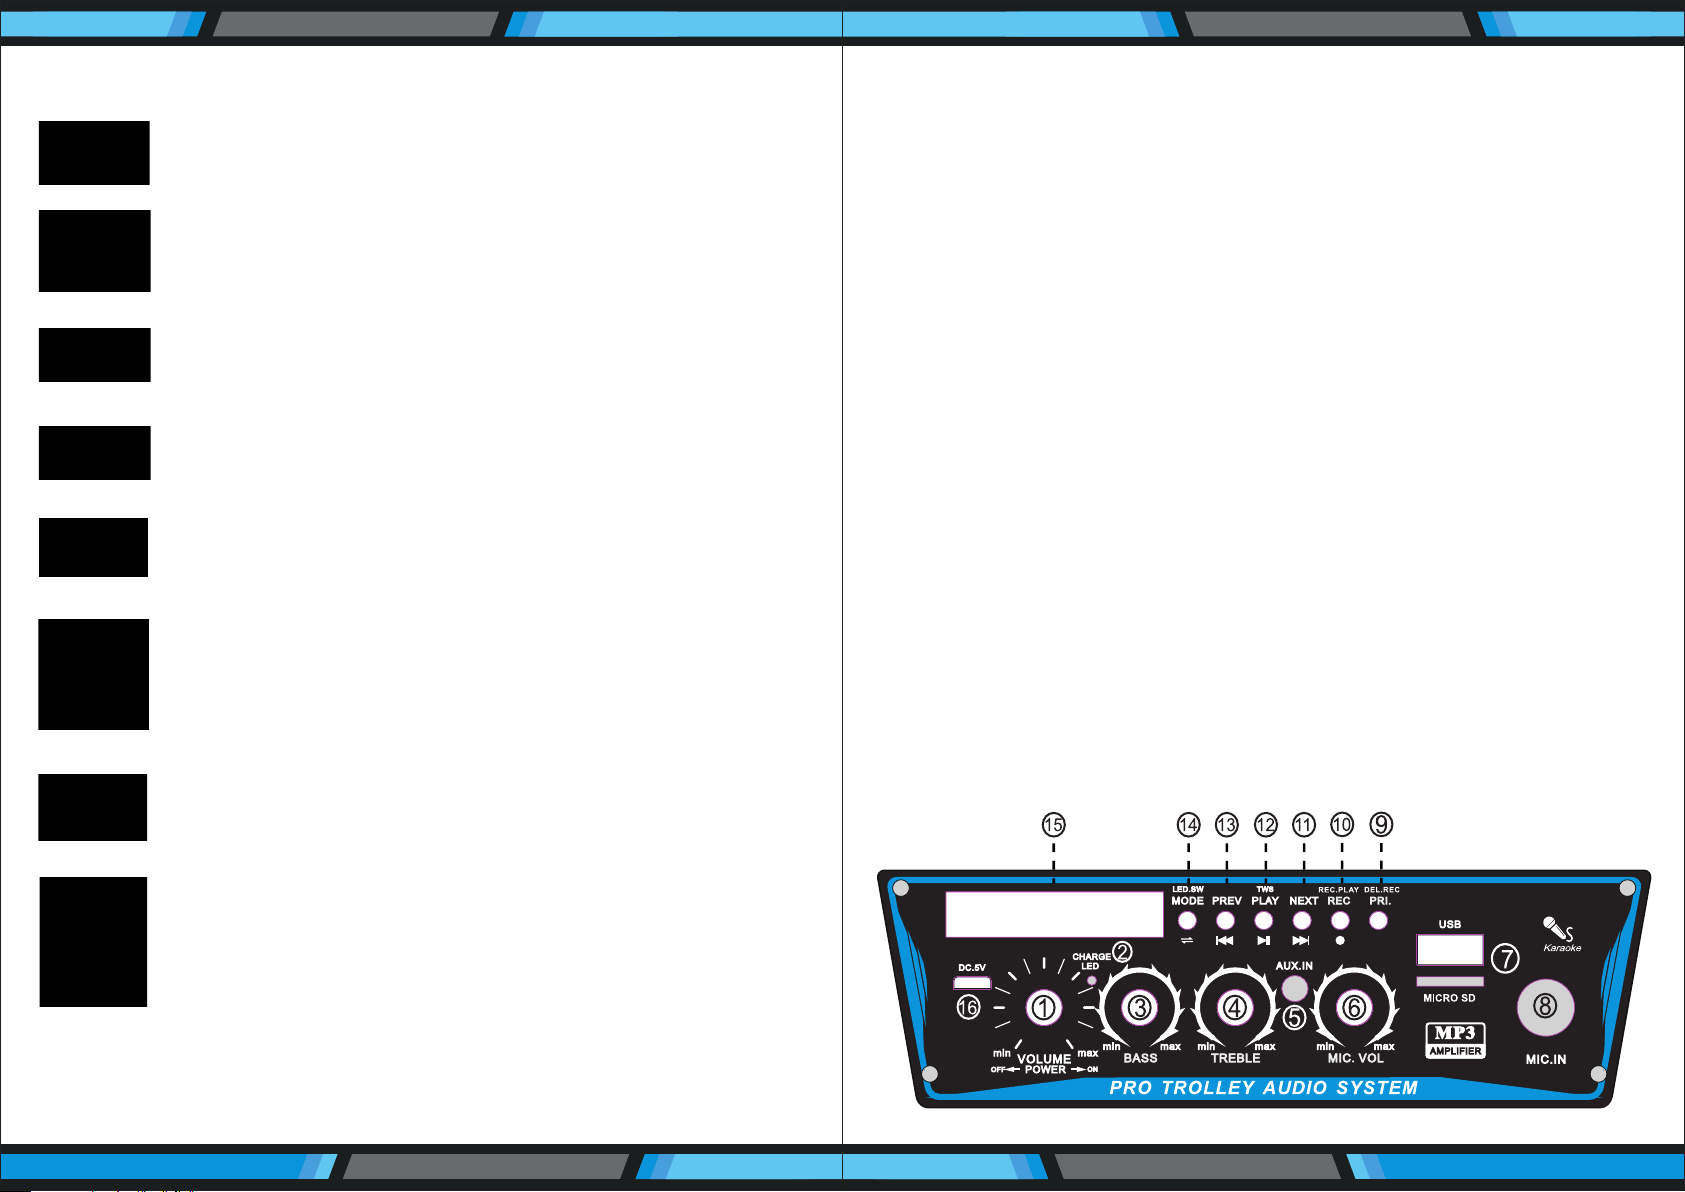
PPHP842B CONTROL BOARD FUNCTIONS
1. DO NOT place objects on top of the device, as objects may
scratch the device.
2. DO NOT expose the device to dirty or dusty environments.
3. DO NOT insert any foreign objects into the device.
4. DO NOT expose the device to strong magnetic or electrical eld.
5. DO NOT use the device in the rain
6. Please check with your Local Authority or retailer for proper
disposaI of electronic products.
1. Master volume control/Power swich
2. Charge LED indicator, red color is on charge mode, light o is full charge mode
3. Bass volume control knob
4. Treble volume control knob
5. 3.5MM AUX input jack
6. Microphone volume control knob
7. USB and Micro SD Memory Card Slot
8. 6.5MM microphone input jack
9. Microphone priority button
When playing the recorded le, press and hold to delete current recording.
10. Short press to start recording, and short press again to save and play recording
Press and hold press to play recording les, and press and hold again to quit
recording
11. Next
12. Play/Pause/press and hold for TWS function
13. Previous
14. Short press to choose mode/Press and hold to turn ON/OFF light
7. DO NOT disassemble the device. Only a certied service
technician should perform repair.
8. The device has apertures to disperse heat. DO NOT block the
device ventilation, the device may become hot and malfunction
as a result.
Illegal operation may cause personal injury, which could be fatal and may cause
damage to property.
www.PyleUSA.com
2
15. Display screen
16. DC 5V input jack
www.PyleUSA.com
3
Page 3
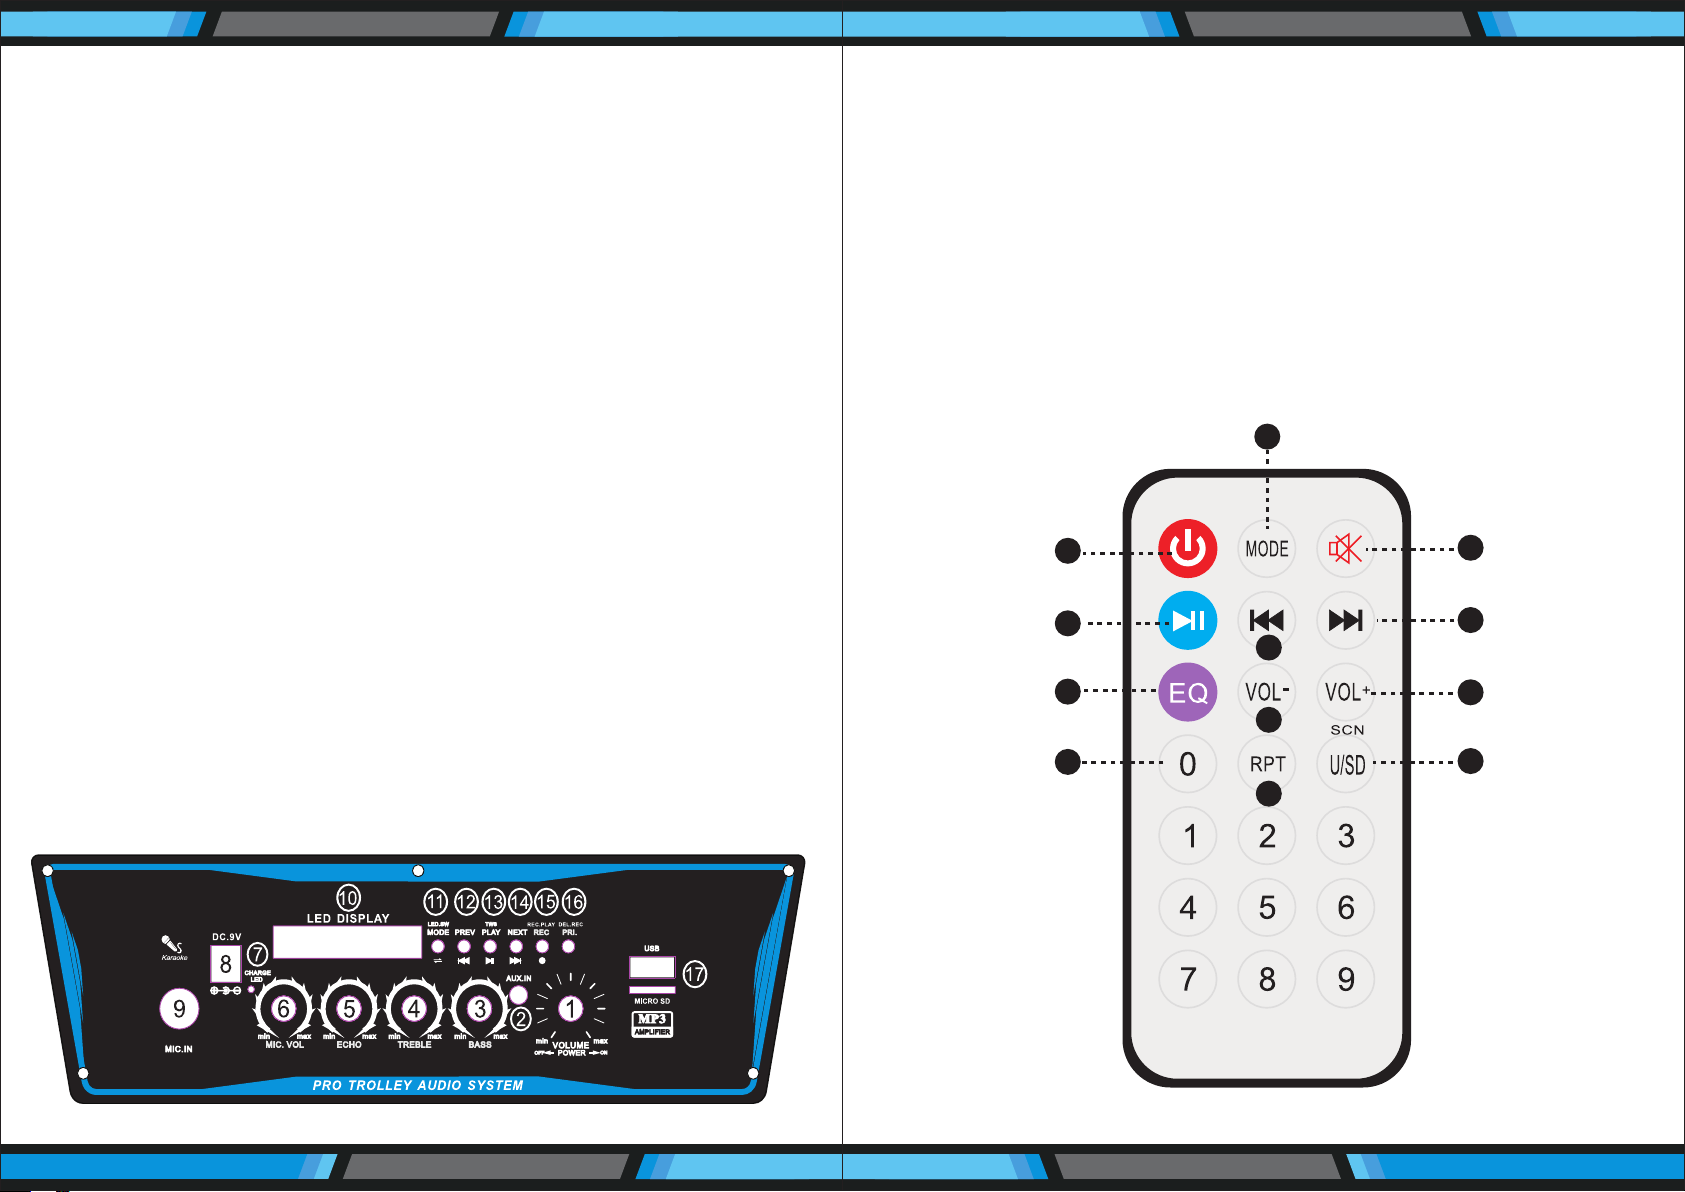
PPHP1042B - PPHP1242B - PPHP1542B CONTROL BOARD FUNCTIONS
1. Master volume control/Power swich
2. 3.5MM AUX input jack
3. Bass volume control knob
4. Treble volume control knob
5. Echo control knob
6. Microphone volume control knob
7. Charge LED indicator, red color is on charge mode, light o is full charge mode
8. DC 9V input jack
9. 6.5MM microphone input jack
10. Display screen
11. Short press to choose mode/Press and hold to turn ON/OFF light
12. Previous
13. Play/Pause/press and hold for TWS function
14. Next
15. Short press to start recording, and short press again to save and play recording
Press and hold press to play recording les, and press and hold again to quit
recording
16. Microphone priority button
When playing the recorded le, press and hold to delete current recording.
17. USB and Micro SD Memory Card Slot
REMOTE CONTROL FUNCTIONS
1. Power: Used to turn on and o
the MP3 player power
2. MODE: Used to switch the AUX/
USB/Wireless BT/Radio
3. Mute button
4. Play/Stop button
5. Next song on USB
1
1
4
7
9
6. Previous song on USB
7. EQ solution
8. Increase volume
9. Choose song number directly
10. Choose USB signal directly
11. Decrease volume
12. Repeat song
2
3
5
6
8
11
10
12
www.PyleUSA.com
4
www.PyleUSA.com
5
Page 4

TWS FUNCTION
For increase sound eect, our unit provides TWS function as follows:
Wireless BT Streaming:
• Built-in BT for Wireless Music Streaming
Step-1: Turn ON BT mode on your device and connect the machine.
Step-2: Press and hold each control board “TWS” button more than 3's, and you will
see "ON" on display, unit will start to connect the other unit automatically,
now you can enjoy stereo sound, and adjusting one unit volume will aect
the other unit.
Remark:
1. After connection, press and hold again one of control board "TWS" button more
than 3's, you will see "OFF" on display, unit's TWS disconnection.
TROUBLESHOOTING
Fault
No sound
Distortion
of sound
1. No input sound source.
2. Volume is too low.
1. Volume too high.
2. Speaker may be damaged
Possible Cause
Solution
1. Use a better music signal.
2. Adjust volume.
1. Turn down the volume.
2. If speaker is damaged, repair
or replace it.
• Simple & Hassle-Free Pairing
• Works with All of Today’s Latest Devices
Smartphones, Tablets, Laptops, Computers, etc.
• Wireless BT Version: 4.2
• Wireless BT Network Name: ‘PYLEUSA’
• Wireless Range: Up to 32’ ft.
What's in the Box:
• PA Speaker System
• Remote Control
• Power Adapter
• Wired microphone
Karaoke
does not
work
MP3
does not
play
www.PyleUSA.com
6
1. Microphone plug is not fully
inserted.
2. Microphone switch is not on.
3. Microphone volume knob is at
the lowest position.
1. The audio format in the U disc
is incorrect.
2. Improper operation has caused
a process disorder.
3. USB disc is disconnected.
1. Plug microphone properly into
the socket.
2. Turn on microphone switch.
3. Adjust microphone volume
properly.
1. Convert audio format into Mp3
format.
2. Reboot the machine.
3. Insert USB disc properly.
This product can expose you to a chemical or group of chemicals, which may include
“Lead and lead compounds” which is known in the state of California to cause cancer, birth
defects, or other reproductive harm. For more info, go to https://www.p65warnings.ca.gov/.
www.PyleUSA.com
7
Page 5

PPHP842B
Features:
True Wireless Stereo System
•
• Portable Speaker System
• High-Powered PA Loudspeaker Style
• Wireless BT Music Streaming Ability
• Multi-Color Flashing LED Party Lights
• Built-in Rechargeable Battery
• FM Radio with Digital LED Display
• Connect & Stream Audio from External Devices
• Aux (3.5mm) Input Connector Jack
• USB Flash Memory Reader
• Micro SD Card Reader
• 6.5mm Microphone input
• Battery Level LED Indicator Lights
• Recording Function
• Microphone Priority Function
• Bass & Treble Adjust Knobs
• Rugged & Durable Molded Cabinet Design
• Convenient Trolley & Wheels
• For Indoor / Outdoor Use
Technical Specs:
Construction Material: Polypropylene (PP)
•
• Max Power Output: 400 Watt Max
• Sound System: 8’’ -inch Subwoofer + 1” Tweeter
• Impedance: 3.6 Ohm
• Frequency Response: 40Hz-16KHz
• USB Interface Type: 2.0
• Digital Audio File Support: MP3
• Maximum USB Flash Support: 32GB
• Remote Control Battery Operated, 1 Piece Button Cell Battery CR-2025 (Included)
• Battery Life: Up to 3 Hours (Charge Time: Approx. 5Hours)
• Rechargeable Battery: 3.7V, 3600mAh – 13.32Wh
• Power Supply: 120/240V, Switchable (5V/2A Power Adapter)
• Product Dimensions (L x W x H): 9.3’’ x 7.8’’ x 14.3’’ -inches
PPHP1042B
Features:
True Wireless Stereo System
•
• Portable Speaker System
• High-Powered PA Loudspeaker Style
• Wireless BT Music Streaming Ability
• Multi-Color Flashing LED Party Lights
• Built-in Rechargeable Battery
• FM Radio with Digital LED Display
• Connect & Stream Audio from External Devices
• Aux (3.5mm) Input Connector Jack
• USB Flash Memory Reader
• Micro SD Card Reader
• 6.5mm Microphone input
• Battery Level LED Indicator Lights
• Recording Function
• Microphone Priority Function
• Microphone Echo Adjust Knob
• Bass & Treble Adjust Knobs
• Rugged & Durable Molded Cabinet Design
• Convenient Trolley & Wheels
• For Indoor / Outdoor Use
Technical Specs:
Construction Material: Polypropylene (PP)
•
• Max Power Output: 600 Watt Max
• Sound System: 10’’ -inch Subwoofer + 1” Tweeter
• Impedance: 3.6 Ohm
• Frequency Response: 40Hz-16KHz
• USB Interface Type: 2.0
• Digital Audio File Support: MP3
• Maximum USB Flash Support: 32GB
• Remote Control Battery Operated, 1 Piece Button Cell Battery CR-2025 (Included)
• Battery Life: Up to 3.5 Hours (Charge Time: Approx. 5 Hours)
• Rechargeable Battery:7.4V, 3600mAh – 26.64 Wh
• Power Supply: 120/240V, Switchable (9V/1.5A Power Adapter)
• Product Dimensions (L x W x H): 11.6’’ x 8.4’’ x 17.9’’ -inches
www.PyleUSA.com
8
www.PyleUSA.com
9
Page 6

PPHP1242B
PPHP1542B
Features:
True Wireless Stereo System
•
• Portable Speaker System
• High-Powered PA Loudspeaker Style
• Wireless BT Music Streaming Ability
• Multi-Color Flashing LED Party Lights
• Built-in Rechargeable Battery
• FM Radio with Digital LED Display
• Connect & Stream Audio from External Devices
• Aux (3.5mm) Input Connector Jack
• USB Flash Memory Reader
• Micro SD Card Reader
• 6.5mm Microphone input
• Battery Level LED Indicator Lights
• Recording Function
• Microphone Priority Function
• Microphone Echo Adjust Knob
• Bass & Treble Adjust Knobs
• Rugged & Durable Molded Cabinet Design
• Convenient Trolley & Wheels
• For Indoor / Outdoor Use
Features:
True Wireless Stereo System
•
• Portable Speaker System
• High-Powered PA Loudspeaker Style
• Wireless BT Music Streaming Ability
• Multi-Color Flashing LED Party Lights
• Built-in Rechargeable Battery
• FM Radio with Digital LED Display
• Connect & Stream Audio from External Devices
• Aux (3.5mm) Input Connector Jack
• USB Flash Memory Reader
• Micro SD Card Reader
• 6.5mm Microphone input
• Battery Level LED Indicator Lights
• Recording Function
• Microphone Priority Function
• Microphone Echo Adjust Knob
• Bass & Treble Adjust Knobs
• Rugged & Durable Molded Cabinet Design
• Convenient Trolley & Wheels
• For Indoor / Outdoor Use
Technical Specs:
Construction Material: Polypropylene (PP)
•
• Max Power Output: 800 Watt Max
• Sound System: 12’’ -inch Subwoofer + 1” Tweeter
• Impedance: 3.6 Ohm
• Frequency Response: 40Hz-16KHz
• USB Interface Type: 2.0
• Digital Audio File Support: MP3
• Maximum USB Flash Support: 32GB
• Remote Control Battery Operated, 1 Piece Button Cell Battery CR-2025 (Included)
• Battery Life: Up to 3 Hours (Charge Time: Approx. 5 Hours)
• Rechargeable Battery:7.4V, 3600mAh – 26.64 Wh
• Power Supply: 120/240V, Switchable (9V/1.5A Power Adapter)
• Product Dimensions (L x W x H): 13.6’’ x 9.9’’ x 20.7’’ -inches
www.PyleUSA.com
10
Technical Specs:
Construction Material: Polypropylene (PP)
•
• Max Power Output: 1200 Watt Max
• Sound System: 15’’ -inch Subwoofer + 1” Tweeter
• Impedance: 3.6 Ohm
• Frequency Response: 40Hz-16KHz
• USB Interface Type: 2.0
• Digital Audio File Support: MP3
• Maximum USB Flash Support: 32GB
• Remote Control Battery Operated, 1 Piece Button Cell Battery CR-2025 (Included)
• Battery Life: Up to 2.5 Hours (Charge Time: Approx. 5 Hours)
• Rechargeable Battery:7.4V, 3600mAh – 26.64 Wh
• Power Supply: 120/240V, Switchable (9V/1.5A Power Adapter)
• Product Dimensions (L x W x H): 17.8’’ x13.3’’ x 27.4’’ -inches
www.PyleUSA.com
11
 Loading...