

Page 1
PMX6BU
Wireless DJ Sound FX Audio Mixer
Wireless BT Streaming Stage & Studio Mixer System
with Karaoke Style Mic-Talkover, MP3/USB/SD Readers, FM Radio
Page 2

PMX6BU Wireless DJ Sound FX Audio Mixer
Wireless BT Streaming Stage & Studio Mixer System with
Karaoke Style Mic-Talkover, MP3/USB/SD Readers, FM Radio
• System Pairing - Connection Setup:
1. Be sure that the DJ Sound FX Audio Mixer POWER switch is set to OFF
position.
2. Turn each channel LEVEL and MASTER volume controls to “0” position.
3. Next, turn ON the unit and receiver. Ensure both units are fully charged
(if the battery LED indicator is red, then it requires charging).
4. Use an Aux (3.5mm) audio cable to connect the wireless audio receiver's
into a compatible speaker audio input jack -- and ensure if the 'Aux'
mode on the connected speaker is activated.
5. Pair your wireless receiver with the audio mixer.
*See the included 'Quick Start Guide':
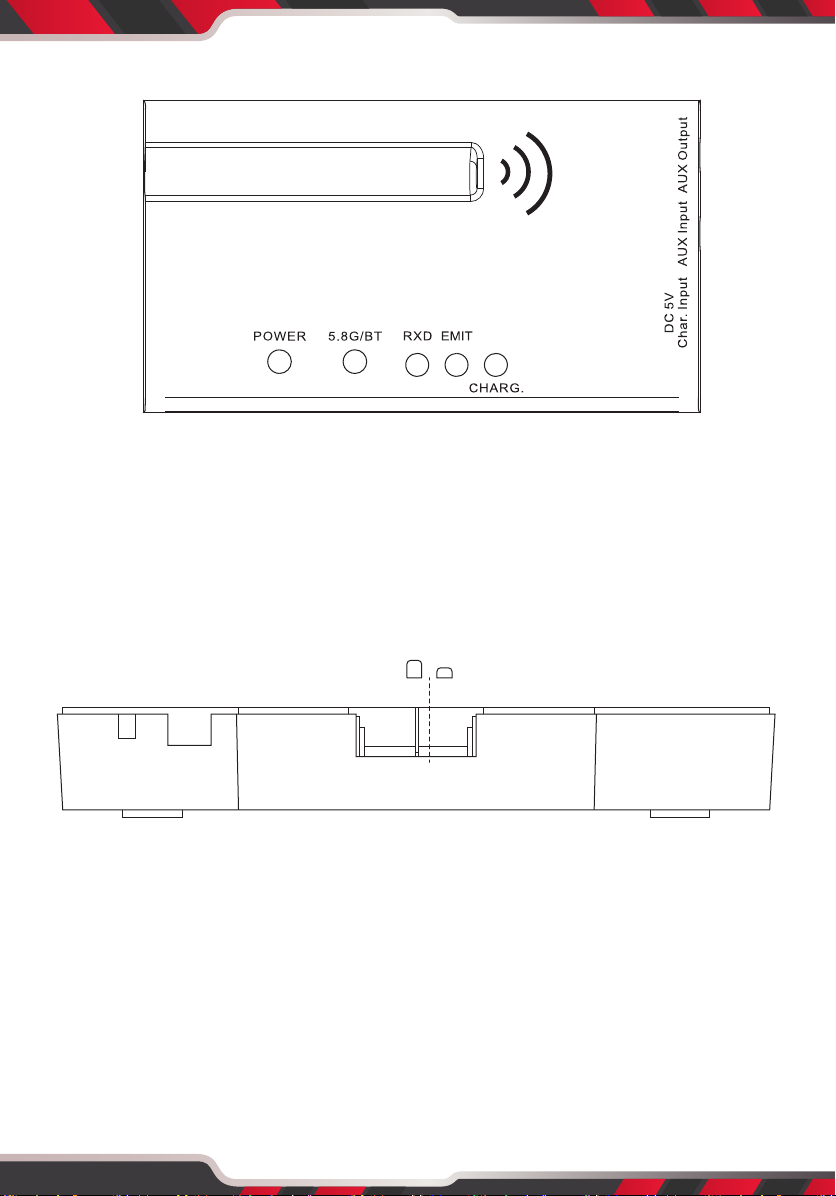
a. Press the ‘POWER’ button on the wireless receiver (the ‘EMIT’ indicator
light will blink).
b. While the ‘EMIT’ indicator is blinking, press the ‘5.8G/BT’ button (the
‘RXD’ indicator light will remain solid).
c. While the ‘RXD’ indicator light remains solid, press and hold the
‘5.8G/BT’ button for ~ 5 seconds (or until the ‘RXD’ indicator blinks red).
d. While the ‘RXD’ indicator light blinks red, hit the switch and power ON
the mixer unit.
e. Press the ‘Lock Code’ button on the rear of the mixer unit. Then press
and hold the ‘Match Code’ button for about ~5 seconds or until the
‘Work LED’ indicator blinks. The system is pairing while the ‘RXD’
indicator on the receiver blinks -- and the ‘Work LED’ indicator on the
mixer blinks. Wait until the ‘Work LED’ indicator on the mixer remains
solid to proceed to the next step.
f. While the ‘Work LED’ indicator light on the mixer remains solid, press
the ‘Lock Code’ button to secure the wireless pairing connection
(if a successful wireless pairing connection is made, the ‘RXD’ indicator
on the receiver will stop blinking red).
g. Stream some sound! You can now connect the wireless receiver to a
compatible speaker system via Aux-Input connection cable.
www.PyleUSA.com
2
Page 3

6. Adjust and set the volume control levels accordingly. Begin playing
audio through channel 1 while slowly adjusting the LEVEL control to the
desired setting. Proceed to adjust the settings accordingly for each audio
channel in use.
Limitless Speaker Connection
… … + N
1
5.8GHz receiver
132
N
N+1
3
www.PyleUSA.com
Page 4

• Mixer Parts and their Function
1
12
13 14 15 16 17 18 19 20
2
3
4
5
6
7
8
9
10
21
22
23
24
25
26
27
28
33
34
35
36
29
43
31
30
32
41
42
37
38
39
11
40
1. Channel -1 USB/SD Input Jacks
USB/SD input jack: Supports WAV/MP3 format.
16G ash drive compatible
2. 6.35mm Microphone input jack
3. DJ Set: Press this button to play music and the color will change from
red to blue. Play using DJ performance eect and adjust USB1/DJ sound
volume
4. USB1/DJ volume: Control channel-1 with 10 DJ eect volume
5. KEY CHANGE: Press this button will let your music modied tone
6. Reverb: Make music reverberant
7. Delay: Make music slowly down
8. Voice Chanc: Crop vocal music
www.PyleUSA.com
4
Page 5

9. Channel -1 USB/SD previous music for USB/SD mode and last channel
for FM mode
10. Channel -1 USB/SD choose input signal
11. Repeat Channel -1 USB/SD song
12. Phone/Pad stand
13. 6.35mm Guitar Input jack
14. Microphone Volume knob
15. Guitar Volume knob
16. Microphone Delay Eect knob
17. Microphone Echo Eect knob
18. Music bass Volume knob
19. Music Treble Volume knob
20. Master Volume Control
21. Flange Eect
22. Filter Eect
23. WAH Voice Eect
24. Scratch-1 Eect
25. Scratch-2 Eect
26. Channel -1 USB/SD: Play/Stop on Mp3 mode, scan FM CH on FM mode
27. Channel -1 USB/SD Next Music for USB/SD mode, next channel for
FM mode
28. Microphone Priority: Mute the music and adjust microphone volume
29. Channel -2 USB/SD
30. 3.5MM AUX/PHONE out
31. 3.5MM AUX input-1
32. 3.5MM AUX input-2
33. CLUB eect
34. Drum Eect: Press for more than 4 sec. and the number 1 to 10 will
change into blue color and use 10 types of drum eect
35. Channel -2 USB/SD Last music for USB/SD mode, last CH for FM mode
36. Channel -2 USB/SD Input Signal select
37. Channel -2 USB/SD: Play/Stop on Mp3 mode:
Scan FM CH on FM mode
38. Channel -2 USB/SD Next Music for USB/SD mode:
Next CH for FM mode
5
www.PyleUSA.com
Page 6

39. Channel -2 USB/SD Record and Replay button
40. Repeat Channel -2 USB/SD song
41. Sound Eects selection
42. USB2 volume control
43. Power Switch and DC 13.5V 2A input: Use adapter for charging.
Important Note:
Use the 'Match Code' function button (located at the back of the
mixer unit) upon your rst time connecting / pairing any wireless
audio receiver units.
The Match Code function will prevent the interference of any
outside/external audio signals.
Multi-Receiver Connection:
If you have purchased additional PRTPMX6BURC receiver units, follow the
below steps to connect additional speakers to your audio setup:
Connecting Additional Receivers / Speakers to the PMX6BU - DJ Sound FX
Audio Mixer System…
1. Designate one receiver to act as the ‘MAIN RECEIVER’ -- and place it to
the side.
2. Press the ‘POWER’ button on all additional receiver units you are
attempting to connect (the ‘EMIT’ indicator lights will blink).
3. While the ‘EMIT’ indicator is blinking, press the ‘5.8G/BT’ button (the
‘EMIT’ indicator light will stop blinking and the ‘RXD’ indicator light will
remain solid).
4. While the ‘RXD’ indicator light remains solid, press and hold the ‘5.8G/BT’
button for ~ 5 seconds (or until the ‘EMIT’ indicator blinks red).
5. While the ‘EMIT’ indicators blink red on all additional receiver units, press
the ‘POWER’ button on the designated ‘MAIN RECEIVER’
(the ‘EMIT’ indicator will blink).
www.PyleUSA.com
6
Page 7

6. While the ‘EMIT’ indicator blinks on the ‘MAIN RECEIVER’, press and hold
the ‘5.8G/BT’ button for ~ 5 seconds (or until the ‘EMIT’ indicator blinks red).
7. Wait for the indicator lights on the additional receiver units to stop
blinking -- this ensures they are successfully paired (however, the ‘MAIN
RECEIVER’ indicator lights will continue to blink).
8. While only the indicator light on the ‘MAIN RECEIVER’ is blinking, it’s
time to connect via Bluetooth. Goto your device’s Bluetooth network list
and get connected (upon successful Bluetooth connection, the ‘MAIN
RECEIVER’ indicator light will remain lit).
9. Stream some sound! The ‘MAIN RECEIVER’ will deliver the wireless audio
to any paired additional receiver units. Ensure all receiver units are
connected to a compatible speaker with the audio connection cables via
the ‘AUX OUTPUT’.
Notes:
* Pyle Model: PMX6BU - DJ Sound FX Audio Mixer, sold separately.
* When pairing the system, ensure both the mixer and wireless receiver(s)
are within range to initiate a successful wireless pairing sequence.
* Ensure you are using a compatible speaker system with Aux audio line-in
mode is activated on the connected speaker.
• Battery Charging:
When the battery is low, power indicator will ash on the receiver. Charge
the DJ Sound FX Mixer or receiver immediately. For DJ Sound FX Mixer,
use the 13.5V 2A adapter to charge the unit. Red LED indicator will be ON,
when fully charged it will turn to green.
For the Mixer, use our adapter to charge the unit.
Red LED indicator will be ON, when fully charged it will turn to blue.
For the receiver, use our cable and your smartphone adapter for
charging. Red LED will be ON, after fully charged it will turn to blue.
7
www.PyleUSA.com
Page 8
INPUT
DC12V-15V
PRTPMX6BURC
Wireless Audio DJ Sound Receiver
O On
ON
OFF
Power LED
Work LED
Lock Code
Match Code
PMX6BU
Rear Panel of Mixer Console
www.PyleUSA.com
8
Page 9

PMX6BU
Wireless DJ Sound FX Audio Mixer
Wireless BT Streaming Stage & Studio Mixer System
with Karaoke Style Mic-Talkover, MP3/USB/SD Readers, FM Radio
Features:
• DJ Mixer Audio Streaming System Kit
• Wirelessly Stream Your Sound to Connected Speakers
• Bluetooth Audio Ability & Included Wireless Receiver
• Multi-Channel Mixing: Mix, Scratch & Blend Your Beats
• Built-in Rechargeable Battery: Compact & Portable Style
• Simple Plug-and-Play Operation
• FM Radio with Digital LCD Display
• Start a Party with Karaoke Style Control
• Create Your Own Music with Recording Mode
• Mic Talkover Control: Microphone Priority Function
• (2) 1/4’’ Microphone / Guitar Inputs, 6.35mm
• MP3 Digital Audio File Playback
• Dual USB Flash Drive Readers
• Dual SD Memory Card Readers
• Headphone Jack, 3.5mm
• LED Backlit Illuminated Mixer Console
• Independent Channel Controls and Cross Fader
• Preset Button DJ Sound FX with Jog Wheel
• Sound Adjustment Conguration: Mic Volume, Delay, Echo, Bass, Treble
• Works with PA Speakers, Home Theater Systems, Bookshelf Speakers, etc.
9
www.PyleUSA.com
Page 10

Wireless Audio Receiver:
• Streams DJ Mixer Audio to External Speaker Systems
• USB Power / Charge Port
• Aux (3.5mm) Connectors
• Connection LED Indicator Lights
• Speaker Audio Transmission Distance: Up to 165’+ ft.
• *Connect Additional Speakers with Additional Receivers (Not Included)
• *Additional Wireless Audio Receivers Sold Separately,
Pyle Model: ‘PRTPMX6BURC’
Bluetooth Connectivity:
• Bluetooth Music Streaming Ability
• Transfers Wireless Audio to Connected Receivers
• Simple & Hassle-Free Pairing
• Works with All of Today’s Latest Devices
• Smartphones, Tablets, Laptops, Computers
• Bluetooth Version: 4.0
• WIFI solution: 5.8G
• Bluetooth Network Name: ‘PyleUSA’
• Wireless Device Range: 30’+ ft.
www.PyleUSA.com
10
Page 11

What’s in the Box:
• Bluetooth DJ Mixer
• Wireless Audio Receiver
• Receiver USB Charge Cable
• Aux (3.5mm) Audio Cable
• Power Adapter
Technical Specs:
• SS/N Ratio: 90dB
• Wireless Support Match: 1:1 /1:N
• Receiver Sensitivity: 86dBm
• Digital Audio File Support: MP3, WMA
• Maximum USB/SD Memory Support: 16GB
• Receiver Rechargeable Battery: 3.7V Li-iOn, 1800Mah
• Mixer Rechargeable Battery: 11.1V Li-iOn, 2000Mah
• Power Cord Length: 3.3’ ft.
• Mixer Power Supply: 110/240V (13.5V Adapter)
• Dimensions (L x W x H): 11.7’’ x 10.3’’ x 3.5’’ -inches
11
www.PyleUSA.com
Page 12
 Loading...