

Page 1
PLMRVW155
15” Splash Proof Monitor with TV Tuner
* Specifications
1. Supply voltage DC 12V +/-10%
5. Monitor screen size 15" ( 4:3)
6. Operating system TFT active matrix.
7. Resolution 1024 x 768 dots.
8. System NTSC / PAL Dual System View Area
2. Power consumption:
3. Operating temperature: 0 C ~+ 60 C
4. Storage temperature: -25 C ~ +70 C
1A 10%
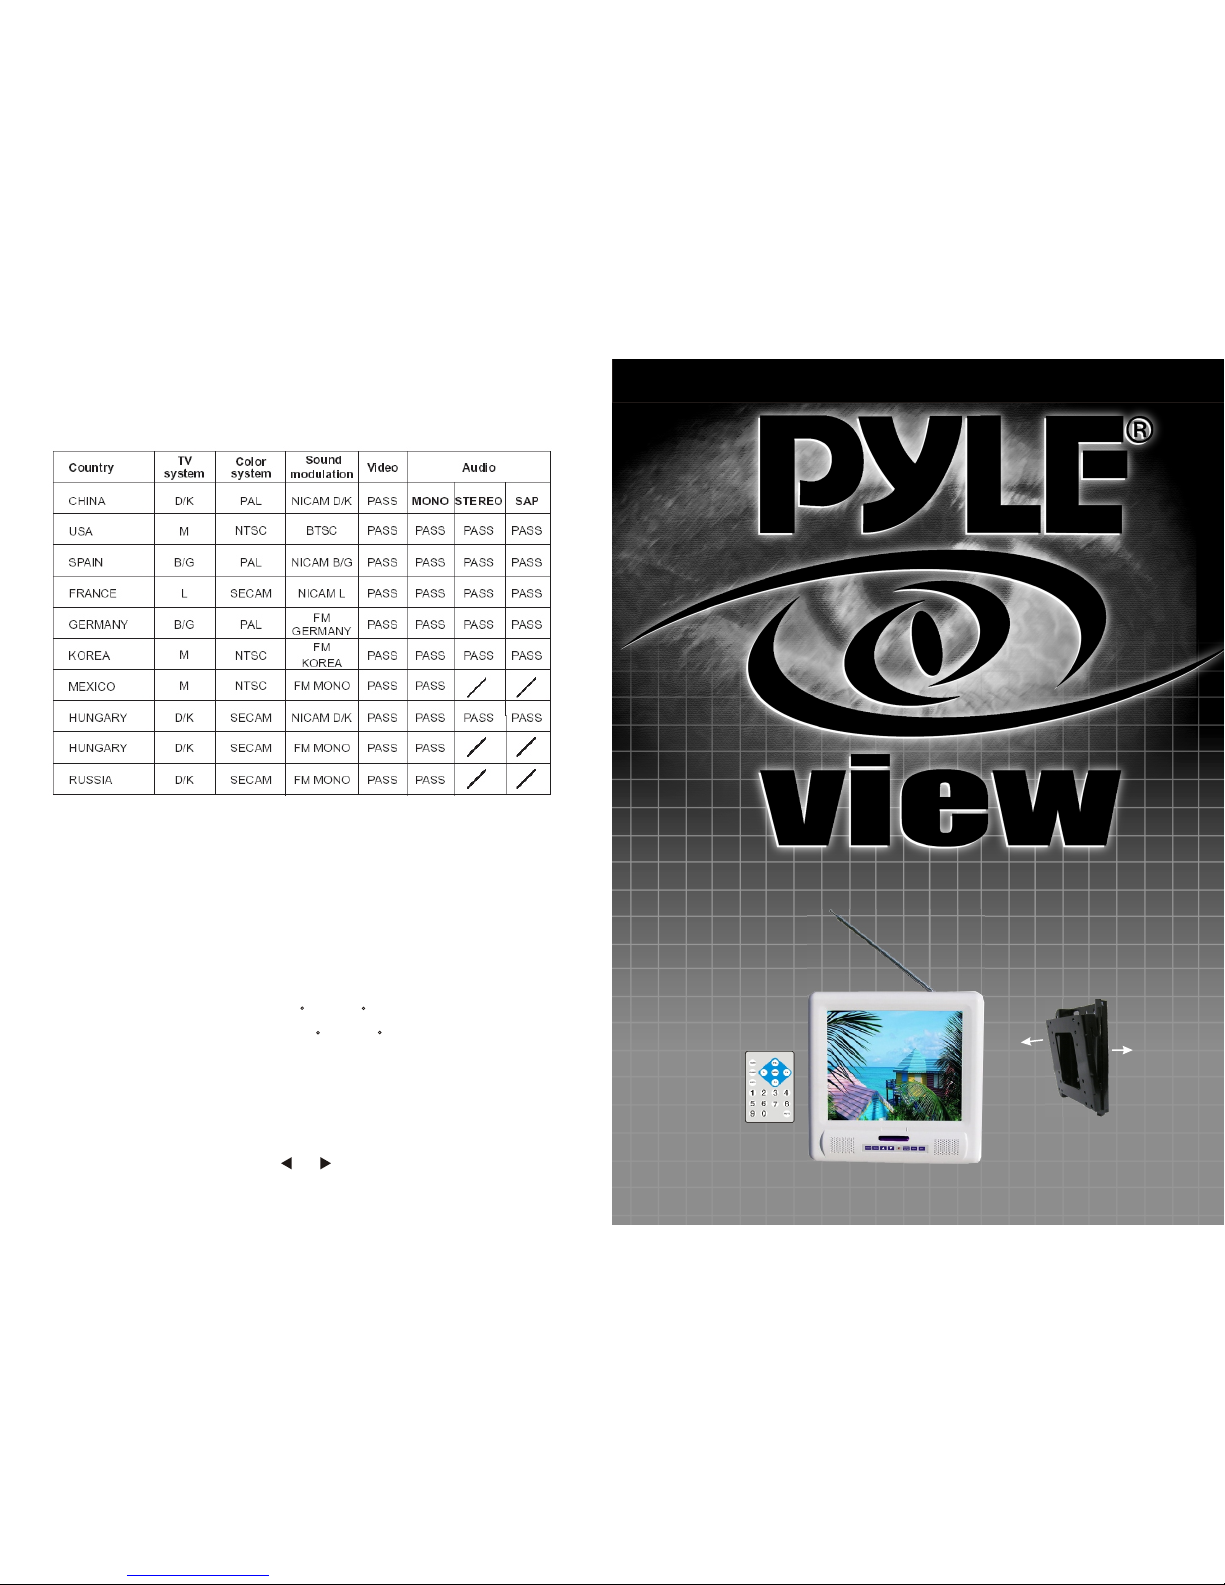
" /": Sho w th is coun try has n o so und to ou tput th e sy stem
Other h av e not lis ted the c ou ntry an d above cat alogs s ystem sam e also in
this ma ch ine sup port sc op e.
TV SYSTEM AND AUDIO MODE OF PRIMARY
11
TO THE
WALL
TO THE
MON ITOR
Page 2

4.AUTO SEARCH
When the indicator is on the AUTO SEARCH, press
ENTER on the unit/remote to display this picture and
auto full scan channels by pressing ENTER.
5.SEARCH
When the indicator is on the SEARCH, press ENTER on
the unit/remote to display this picture and auto scan
channels by pressing ENTER.
6.FINE TUNE
When the indicator is on the FINE TUNE, press ENTER
on the unit/remote to display this picture and fine tune by
“ / OR V+/V- ” bu tton.
7.PROGRAM
When the indicator is on the PROGRAM, press ENTER
on the unit/remote to display and select the item you
want to change by “ / OR V+/V- ” bu tton.
8.SKIP
When the indicator is on the SKIP, press ENTER on the
unit/remote to display and select the item you want to
change by “ / OR V +/ V-” b ut to n. P re ss “ en te r” b ut to n
to select “ON / OFF’.
.
9.FREQ:Show the TV channel’s Frequency.
When you feel that there are some repeated TV program
or image and audio founded not good .You need to skip
some program and quick to select.
Remark: Skip function is available only going on
choosing the program in sequence by using the program
selection of CH-/CH+
10
1. Table of C ont ents---- --- --- ----- --- --- -------- --- -------- --- --- ----- --- 1
2. Warning --- --- -------- --- --- ----- --- --- -------- --- -------- --- --- ----- --- 1
5.Connec tio n Diagram
14.TV SY STEM AND AUDIO M ODE O F PRI MARY
3. Package - --- -------- --- --- ----- --- --- -------- --- -------- --- --- ----- --- -- 1
4.Instal lat ion y our Mon ito r
-------- --- -------- --- --- ----- --- --- -------- --- ----3
6.Remote C ont rol - ----- --- --- ----- - --- --- -------- --- -------- --- --- ----- --3
7.Append ix- -------- --- --- - ----- --- --- -------- --- -------- --- --- ----- --- --- 4
8.Using th e Rem ote Contro l-- --- ----- --- --- - -------- --- --- ----- --- --- ---4
9.Monito r Sec tion---- --- --- ----- --- --- ------- -- --- -------- --- --- ----- --- -5
10. OSD Menu s in A/V Sour ce -- -------- --- --- ----- --- --- -------- --- ------6
TV SE CTI ON
11. OSD Me nus i n TV Sourc e --- -------- --- --- ----- --- --- -------- --- ------7
12. OPERATIONS- --- -------- --- --- ----- --- --- -------- --- -------- --- --- ----8
13.DISPL AY-------- --- --- ----- --- --- -------- --- -------- --- --- ----- --- --9 ~10
-------- --- -------11
15.Speci fic ati ons-- --- --- ----- --- --- -------- --- -------- --- --- ----- --- --- --- 11
-------- --- -------- --- --- ----- --- --- -------- --2
Table of Contents
WARNING
Thi s unit is n ot inte nded fo r insta llati on in the f ront Dr iver / Pa sseng er Compa rtmen t
whe re it may b e seen by t he Driv er. Inst allat ion of th is unit i n any por tion of t he vehi cle
whi ch coul d impai r or dist ract th e Drive r is impr ope r and da ngero us and
ass umes No l i ab il i ty
wha t
so
eve r for fai lure to f ollow t he prop er inst allat ion of
thi s produ ct.
To red uce th e risk of e lectr ic shoc k, plea se do not e xpose t his uni t to rain , moist ure or
ope n the uni t. Dang erous h igh vol tages a re pres ent ins ide the u nit.
Our wa rran ty coul d be void ed i f you mak e chang es or mod ifica tions n ot expr essly
app roved b y
1
Package
This LC D mo nitor c omes wi th a ll the it ems below. C heck to
make su re y our uni t compl et e. Cont act your de aler im mediate ly
if anyt hi ng is mis sing.
* 15" TV Monitor
* AC Adapter
* Wall Bracket X 1
* Operation manual
X 1
X 1
Page 3
2
DISPLAY
1.MAIN MENU
Press MENU on the unit/remote to display this picture
and adjust the item by “ / OR V+/ V-” b utton .
2.ANT SOURCE
<ANT SO UR CE>
AIR
CABLE
When the indicator is on the ANT SOURCE, press ENTER
on the unit/remote to display this picture and select AIR or
CABLE by “ / OR V+/ V-” b utton . When ANT SOURCE is on
AIR, this will affect the frequency list in the AUTO
SEARCH.
3.TV SYSTEM
<TV SETUP>
ANT SOURCE
TV SYSTEM
AUTO SEARCH
SEARCH
FINE TUNE
PROGRAM
SKIP
FREQ
<TV SYS TE M>
NTSC
FM RADI O
SECAM -D K
PAL-I
PAL-BG
When the indicator is on the TV SYSTEM, press ENTER
on the unit/remote to display this picture and select
NTSC, FM RADIO, SECAM-DK, PAL-I and PAL -B G by “ /
OR V+/V- ” bu tton.
9
MO NI TO R
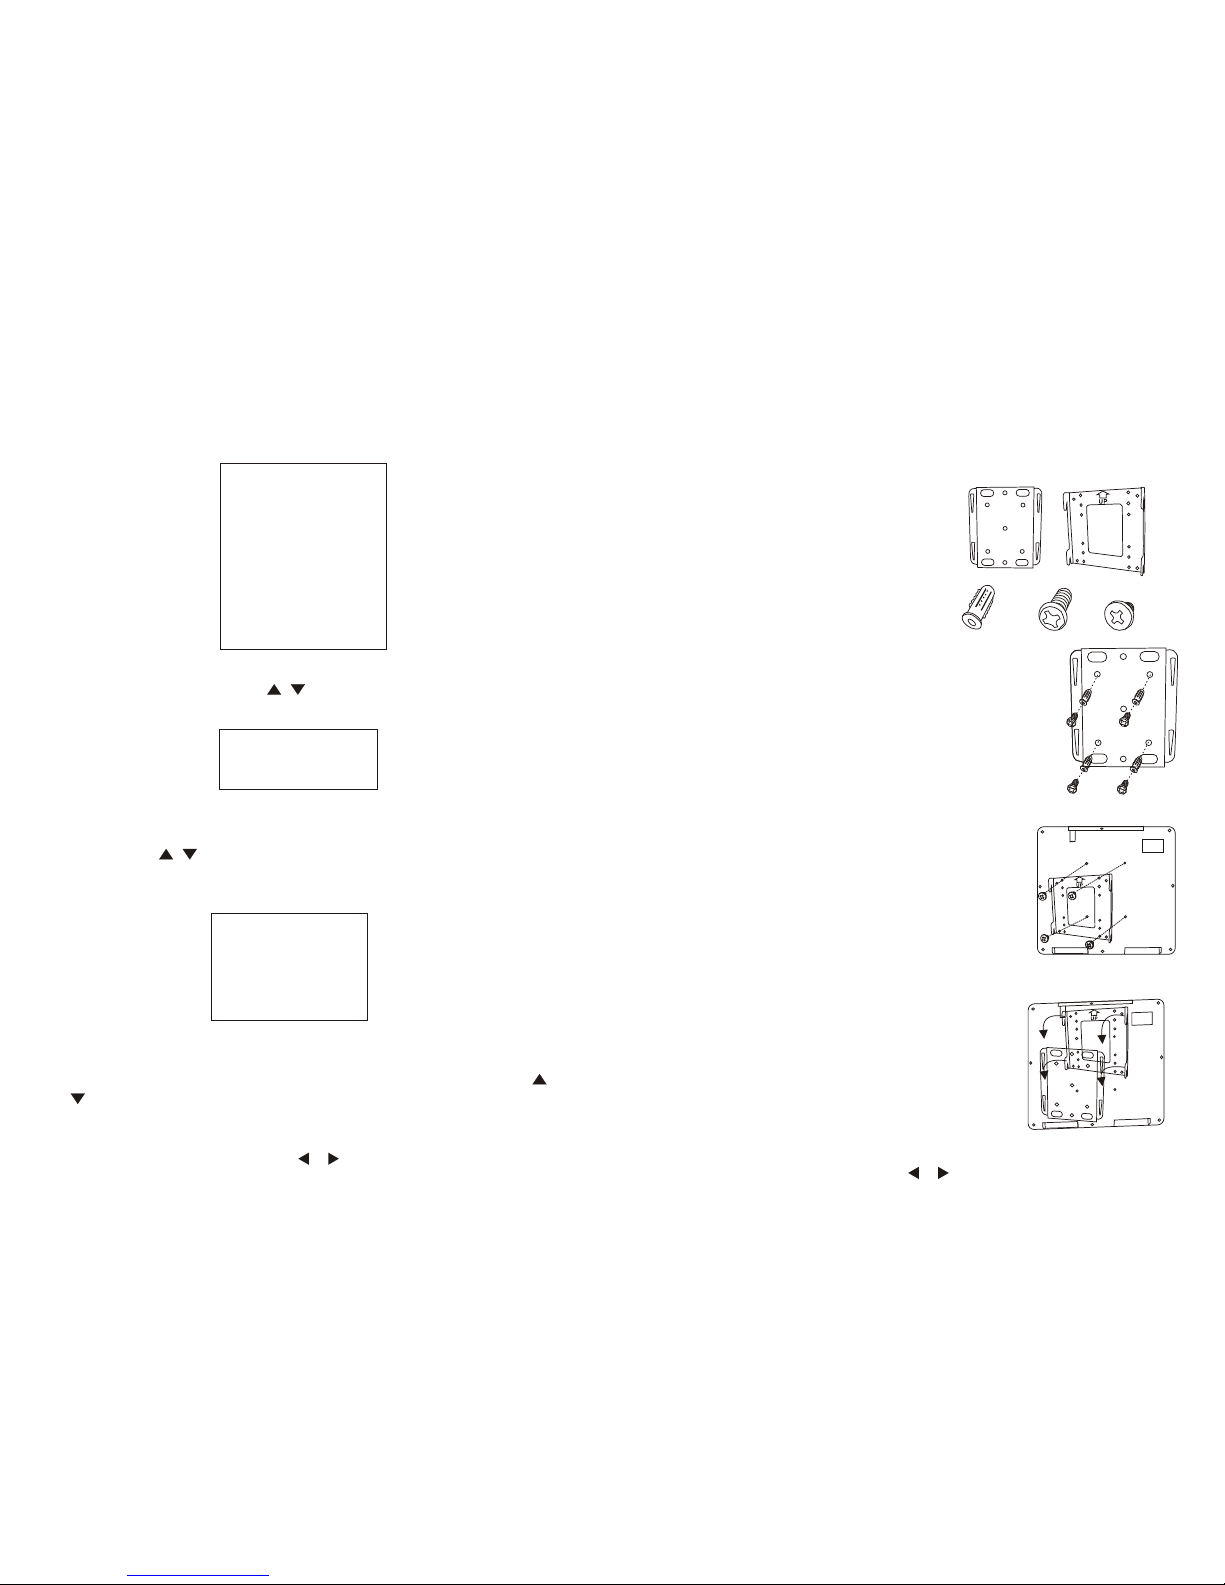
A. Wa ll -m ou nt ed m et al X 1 pc s
B. Fixed metal X 1pcs
C. Plastic screw X 4pcs
D. 5.5X38 wooden screw X 4pcs
E. M4X5 screw X4pcs
Packing
BA
Install you r Monitor
1. Choose the stable wall
* Choose the thickness of above 2 inches wall.
*Make sure if the material of wall is
suitable for installation.
*Please use 5.5 X 38 wooden screw * 4pcs
in case of the applied wall is wood.
*Please use plastic screw*4pcs in case of
the applied wall is concrete and cinder
blocks.
C
D
E
2. Connection of the wall-mounted metal
* The monitor should be held by more
than two people when installed.
* Pull out the power plug of the
monitor when installed.
* Connect the wall-mounted metal
with the back of monitor by using
M4X5 screw(F) *4pcs.
3. Settling of the wall-mounted metal
* The monitor should be held by more
than two people when installed.
* Connect the wall-mounted metal
with the fixed metal
(the fixed metal has to be inserted
into the wall-mounted metal
necessarily)
INSTALLATION YOUR MONITOR
Page 4
OPERATIONS
when us e TV syst em in differen t co untri es, you m us t first s et the
syste m, t hen set t he sign al a s anten na or the coa xial of t he CATV,
AUTO SE ARCH. W hen it is OK, p ress ME NU to retur n or auto r et urn by
tuner t o TV pict ure, then y ou may en jo y the TV progr am .
SETUP 1 AN T SO URCE
First ly p ress ME NU to ent er M ain Men u. Move cur sor to “A NT
SOURC E” b y “ / OR V+/V- ” butto n, a nd then p ress EN TE R to
enter t he M enu.
The ite ms ( AIR/C ABLE) c an b e chang ed by “ / OR V+/V- ” butto n.
The upd at ed para meter w il l be set up w hen items c hange d. And the
resul t be s hown im media te ly.
Press M EN U back to M ain Men u. P ress ME NU again, y ou can ca ncel
Main Me nu , or Main M enu wil l be c ancel ed automa tical ly 3 0 secon ds
later.
SETUP 2 T V Syste m
First p re ss MENU t o enter M ai n Menu. M ove curso r to “TV SY STEM”
by “ / OR V+/ V-” butt on a nd then p ress EN TE R to ente r the Menu.
The ite ms ( NTSC/ FM RADI O/ SECAM -DK/PA L-I/PA L-BG) c an be
chang ed b y “ / OR V+/V- ” butto n. The up da ted par amete r wi ll be
set up wh en i tems ch anged . And t he resu lt be shown i mmedi ately.
Press M EN U back to M ain Men u. P ress ME NU again, y ou can ca ncel
Main Me nu , or Main M enu wil l be c ancel ed automa tical ly 3 0 secon ds
later.
SETUP 3 AU TO SEAR CH
Press M EN U to ente r the Mai n Me nu; and m ove the cur sor to “A UTO
SEARC H” b y “ / OR V+/V- ” butto n, a nd pres s ENTER ; th en you ca n
enter S ub -Menu a nd pres s EN TER acc ording to t he cue. D uring the
Chann el S can, th e Sched ul e will di splayed i n the OSD . If press En ter,
the Cha nn el Scan w ill be stop ped. On t he right an gle dem onstrat ed
final ly s eeks th e chann el ,4 seco nds later, i t will go b ack to the TV
mode, a nd t he prog ram wil l st ay from t he first ch annel i n the guide
progr am s earch ing. Pr es s MENU ag ain, you ca n cance l Main Menu , or
Main Me nu w ill be ca nceled au tomat ically 30 s econd s la ter.
SETUP 4
After r et urns to t he tele vi sion pi cture the n to depe nd on the com mon
telev is ion ope ratin g mo de, enj oys the var ious co untries b rilli an t
telev is ion pro gram.
8
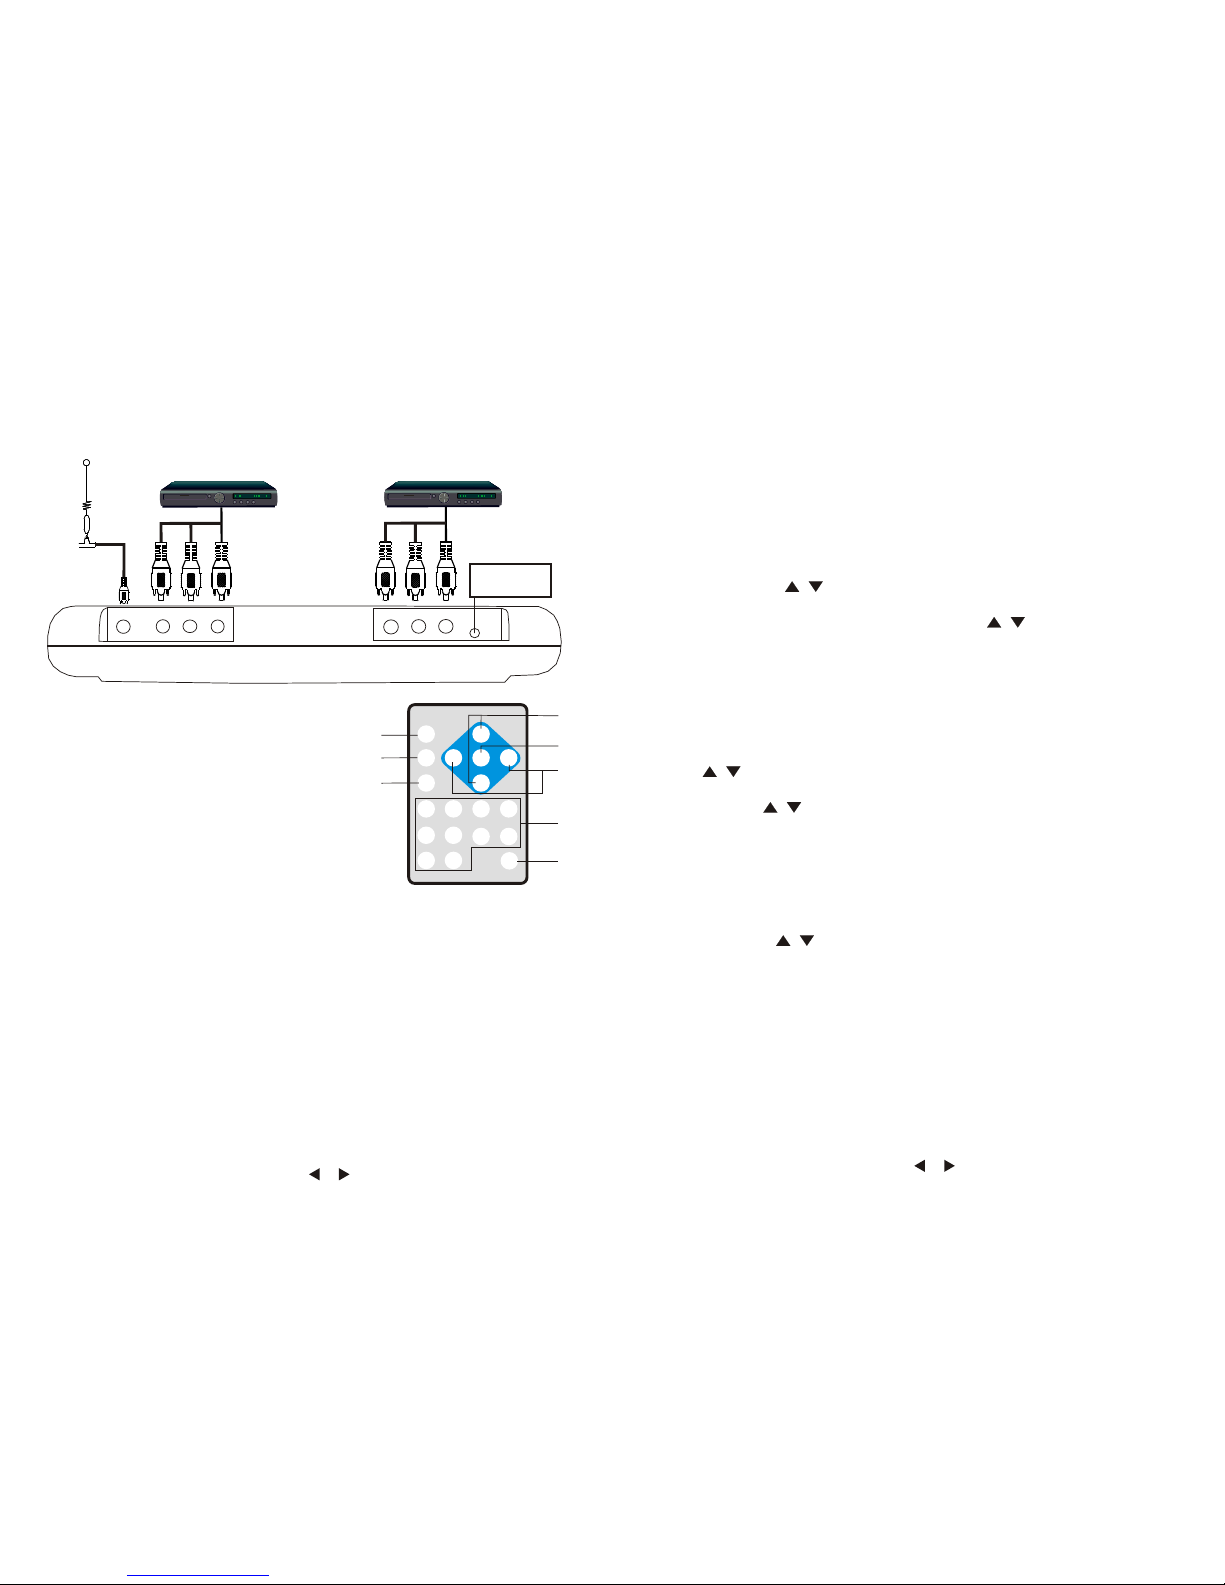
1. POWER: Power for ON or OFF
2. SOURCE: Switch input source button.
(TV, AV input)
3. ENTER: Confirm the selection.
4. CH+/CH-: Adjust channel up / down(For TV only).
5. MENU: A. When source input is TV. Press “MENU”
button to enter TV OSD Menu.
B. When source input is AV. Press “MENU”
button to enter monitor OSD Menu.
6. V+/V-: A. When the OSD menu function is turned off,
press the " V+/V- " buttons directly from the
remote control to adjust volume.
B. Make item selection in OSD menus to increase
or decrease parameters as well.
7.0-9:Choose number key
8.MUTE:Press the key to close the sound, press it
again to resume the sound.
1
2
3
4
5
6
7
8
9 0
POWER
MUTE
SOURCE
ENTER
MENU
CH+
CH-
V - V+
1
2
3
4
5
6
7
8
Remote Control
3
Connection Diagram
+12 V
AC AD APTE R
Ant enna
(Op tion)
DVD P layer
(Op tion)
DVD P layer
(Op tion)
AV/I N 1
AV/I N 2
“F”
CON NECTOR
Page 5
+- 30 Degree
Appendix
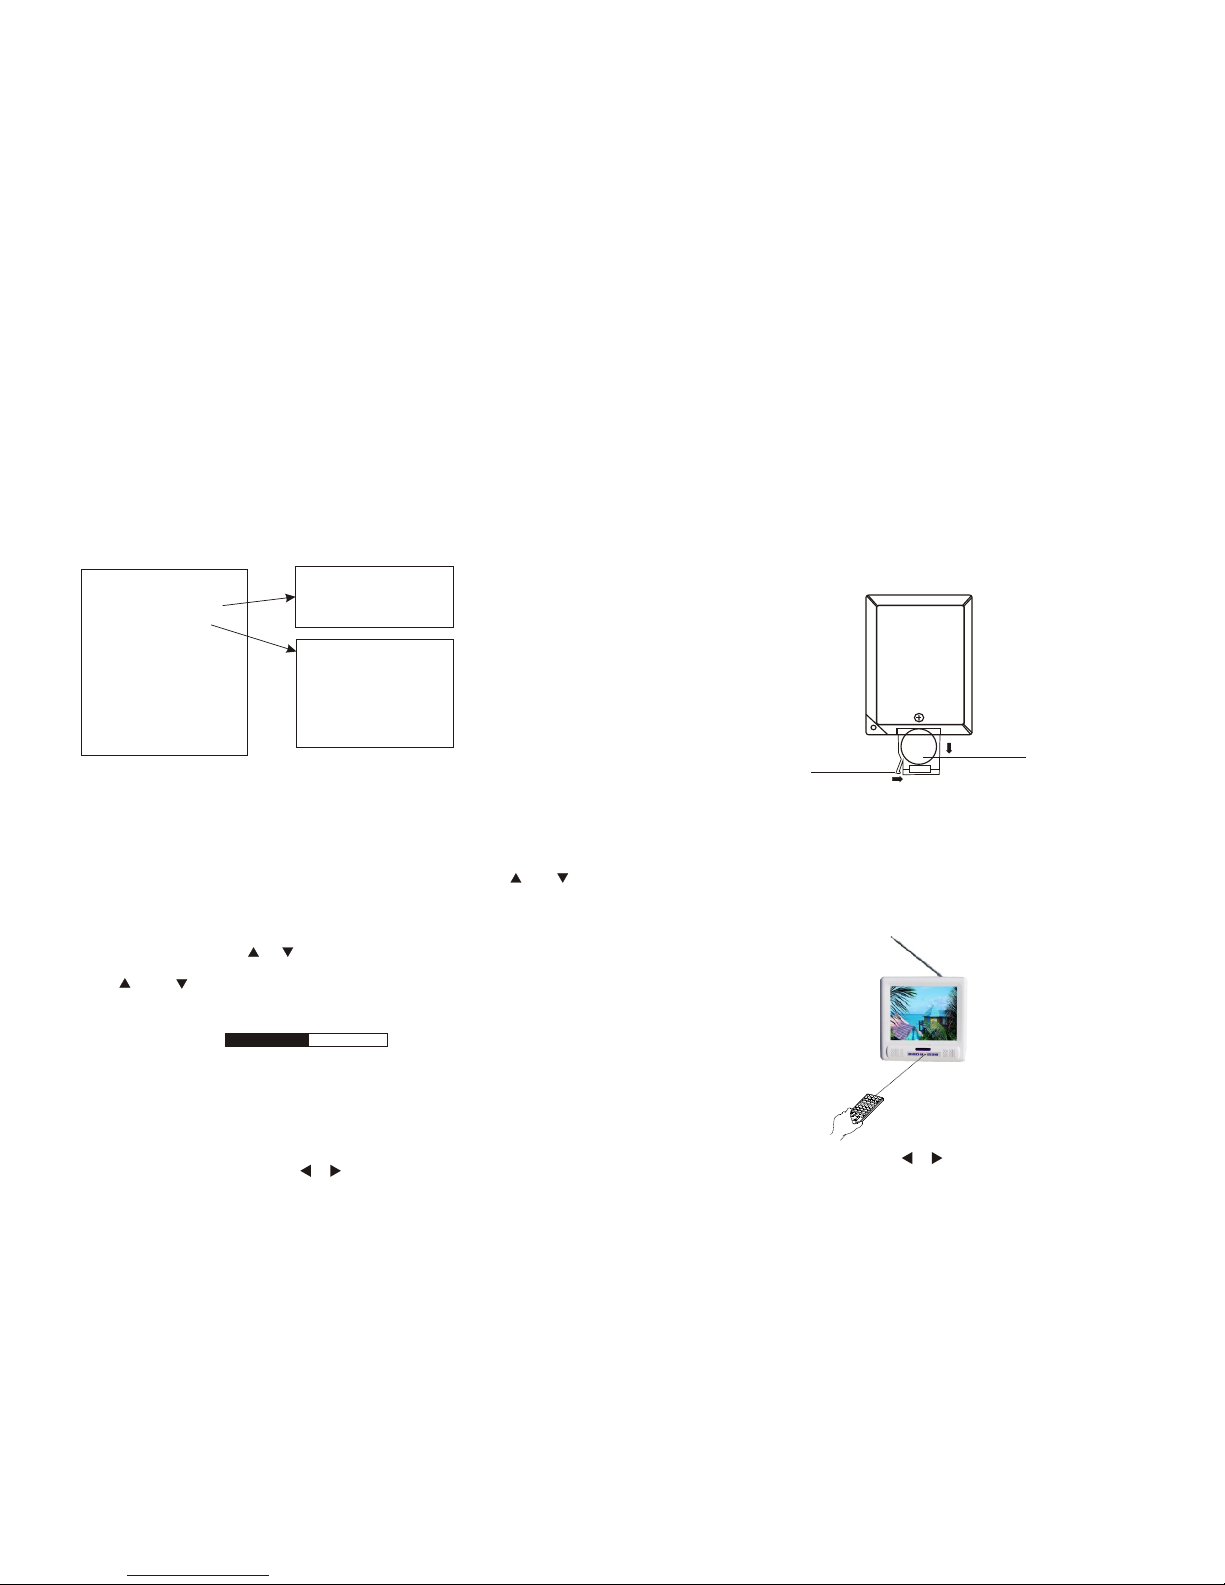
Changing the New Battery in Remote Control
1. Push the battery case button to wards the right.
(As shown # 1 in below
figure)
2. Pull the battery case away from the remote control.(As shown # 2
in below figure) Change a new battery.
Casse tt e Butto n
1
2
Batte ry
Using the Remote Control
1.Point the remote control towards the IR sensor in front of
the monitor housing.
2.Operation angle: IR remote control will work about 30
degree in each direction from the IR sensor of the monitor
housing.
4
* TV SECTION
<TV SETUP>
ANT SOURCE
TV SYSTEM
AUTO SEARCH
SEARCH
FINE TUNE
PROGRAM
SKIP
FREQ
<ANT SO UR CE>
AIR
CABLE
<TV SYS TE M>
NTSC
FM RADI O
SECAM -D K
PAL-I
PAL-BG
VOLUME
* Quick Adjustment OSD Menus
1. By pressing "MENU" button, you may open the MAIN MENU, using " " or " "
buttons to pick out OSD functions.
2. In order to select desire options, it is necessary to press "MENU" again to
enter each mode, than using " "/ " " to increase or decrease parameters as well.
3. Press " " or " " b utton dir ectly to ad just spea ker volum e.
4. Pres s the " EXIT" m ode to st ore you r selecte d param eter an d
leave t he OSD Menu s.
50
* OSD Menus in TV S ource
7
Page 6
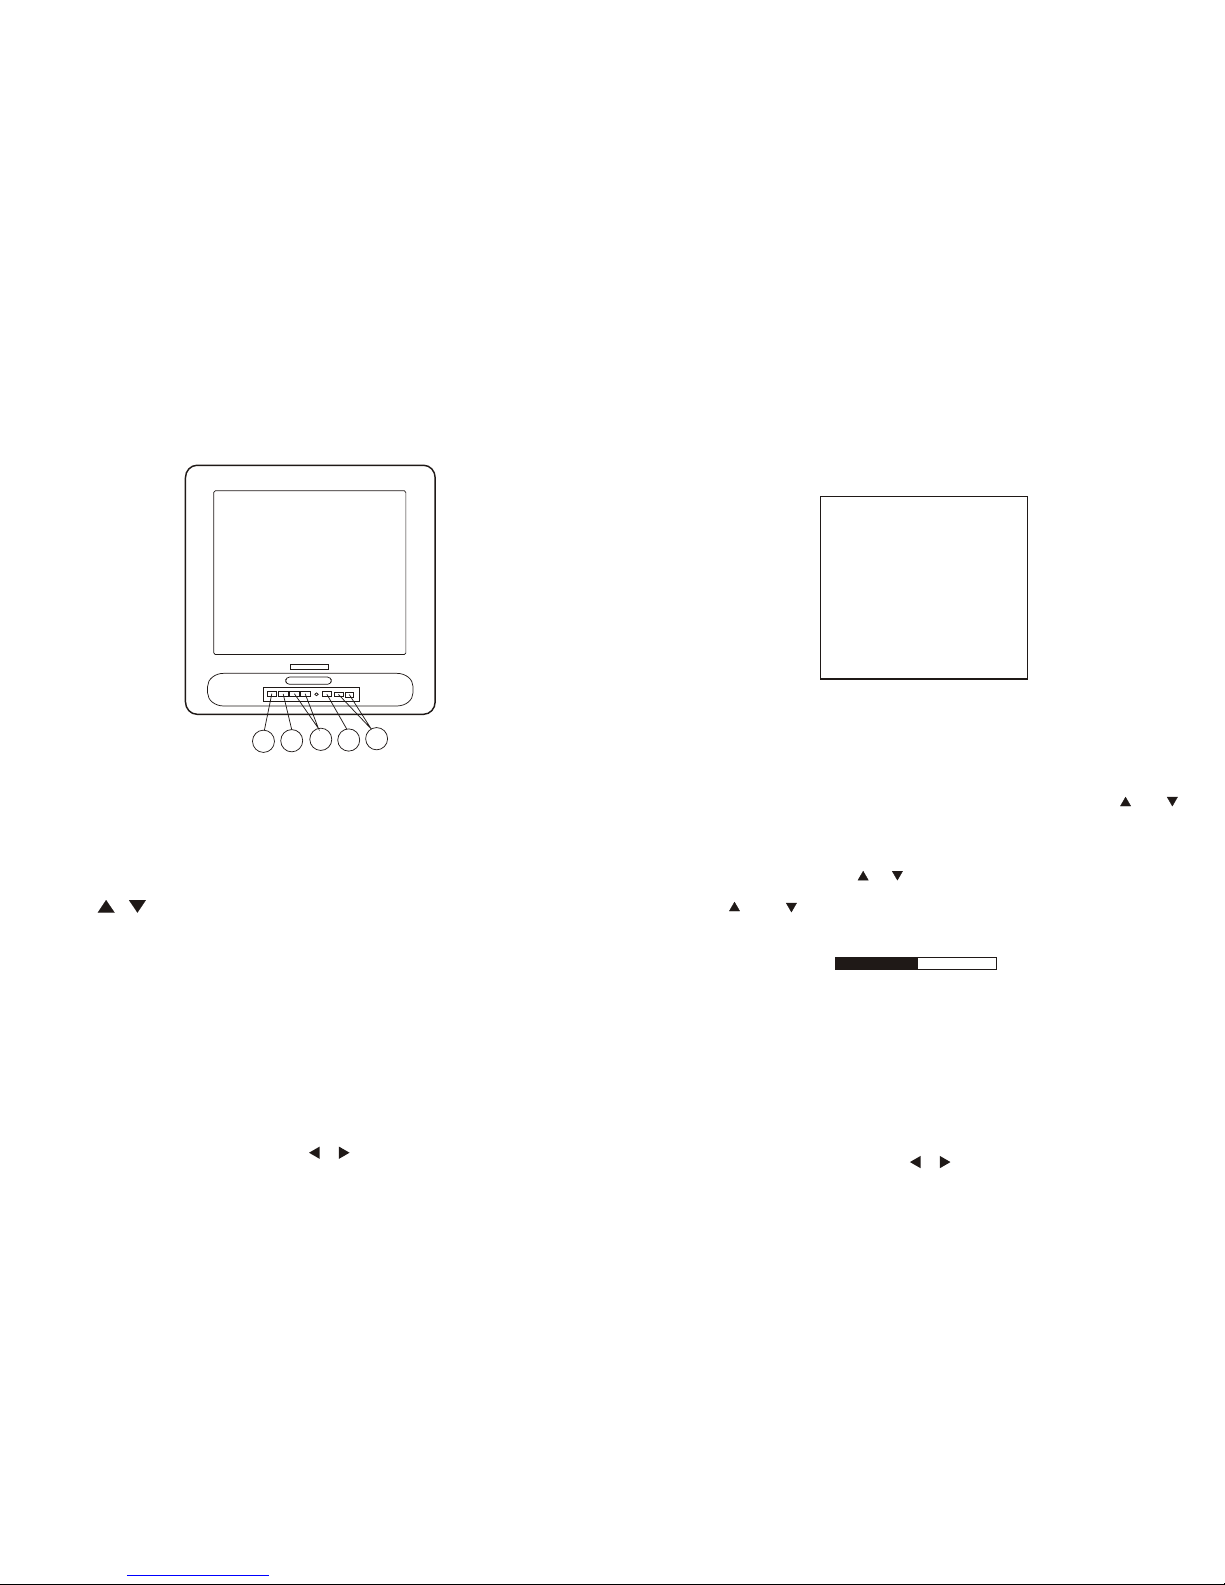
4
3
1
2
1.POWER:
2.
3. / :
4.
5.
Power for ON or OFF
MENU: A. When source input is TV. Press “MENU”
button to enter TV OSD Menu.
B.When source input is AV. Press “MENU”
button to enter monitor OSD Menu.
A. When the OSD menu function is turned off,
press the " V+/V- " buttons directly from the
remote control to adjust volume.
B. Make item selection in OSD menus to increase
or decrease parametersas well
SOURCE/ENTER:
A. Switch input source button (TV, AV input)
B. Confirm the OSD selection.
CH+/CH-: Adjust channel up / down(For TV only).
5
Monitor Selection
5
* OSD Menus in A/V Source
VOLUME
* Quick Adjustment OSD Menus
1. By pressing "MENU" button, you may open the MAIN MENU, using " " or " "
buttons to pick out OSD functions.
2. In order to select desire options, it is necessary to press "MENU" again to
enter each mode, than using " "/ " " to increase or decrease parameters as well.
3. Press " " or " " b utton dir ectly to ad just spea ker volum e.
4. Pres s the " EXIT" m ode to st ore you r selecte d param eter an d
leave t he OSD Menu s.
< MAIN ME NU >
CONTRAS T
BRIGHTN ESS
COLOR
SHARPNE SS
VIDEO SOU RCE
AUDIO
RESET
RETURN
50
6
 Loading...