

Page 1
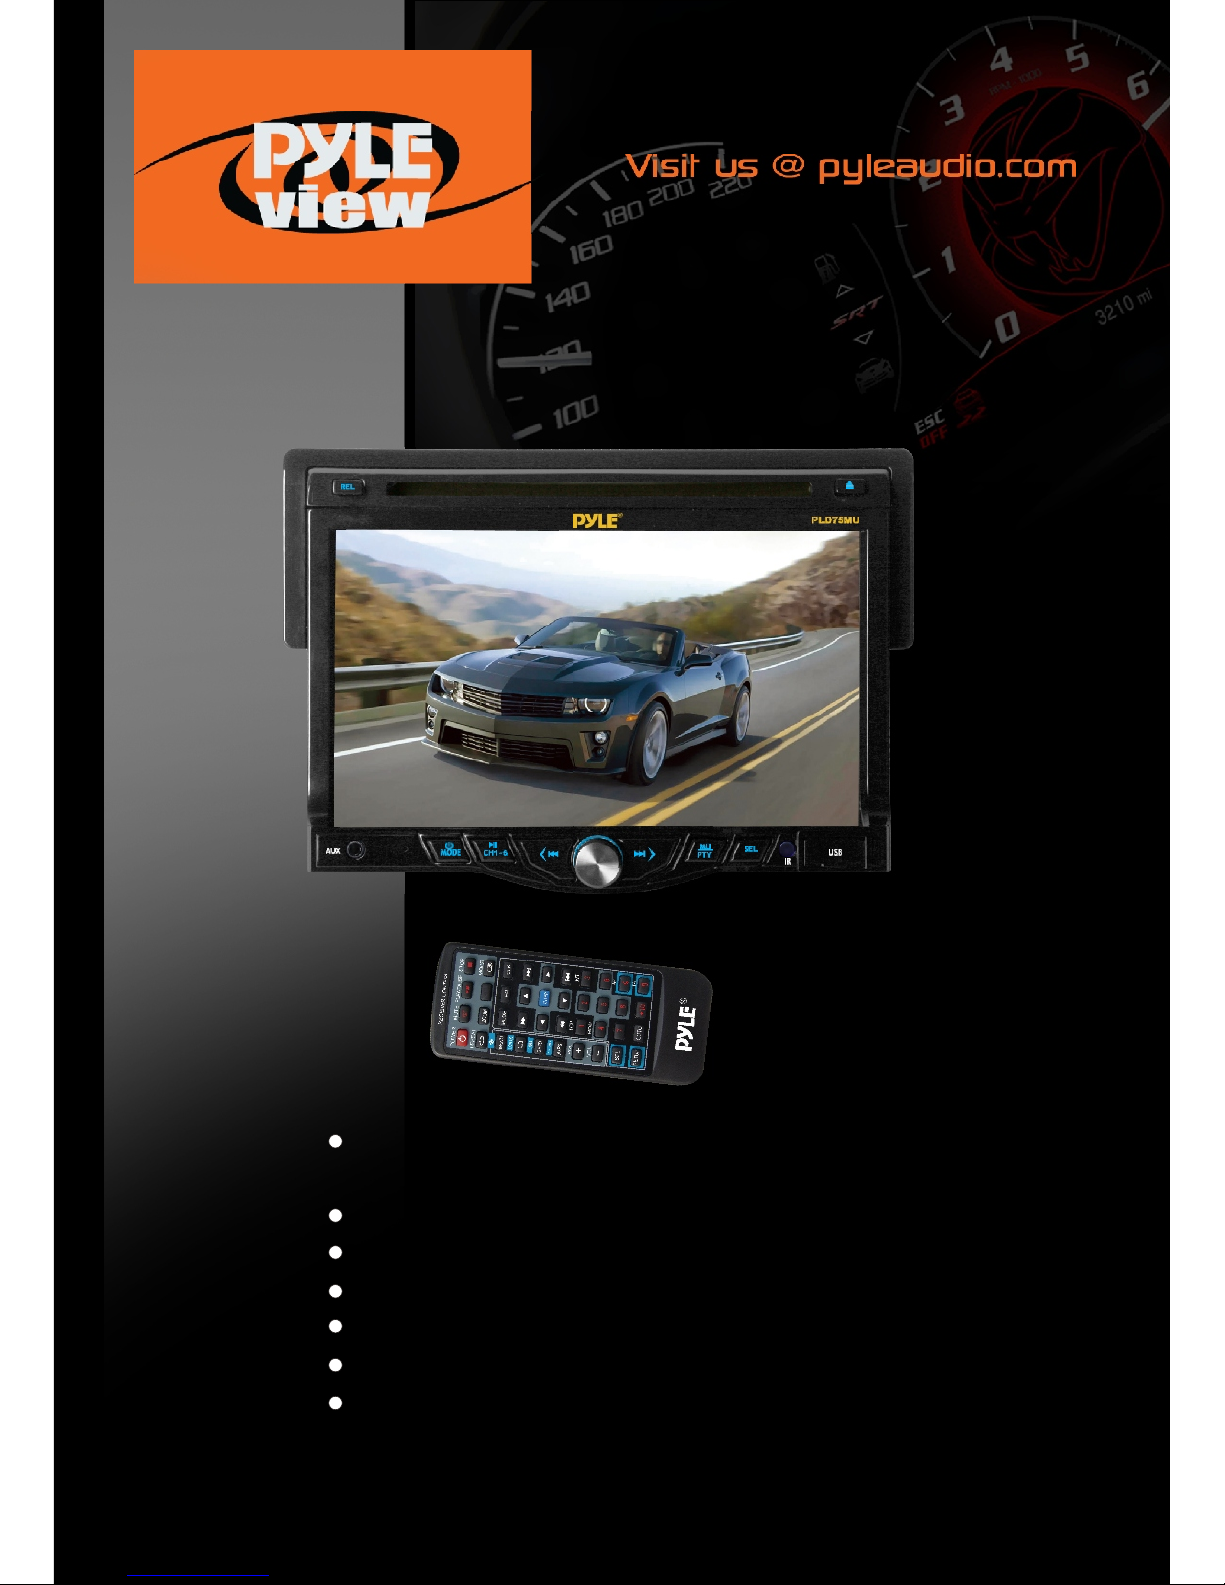
PLD75MU
USER MANUAL
7 Inch Million Multi-color Illumination
TFT Touch Screen
Detachable Control Panel
Remote Control
Digital Video Disc Player
Control Panel USB Port and AUX Input
SD/MMC Card Slot
AM/FM-RDS Digital PLL Tuning Radio
Page 2

To ensure safety while driving
and to comply with laws,
drivers should not watch video or
operate the video device while driving.
Page 3

-1-
Content
Precaution......................................
Safety Information.........................
Disc Note.......................................
Installation ....................................
Electric Connection ......................
Remote Control ............................
Basic Operation ............................
Main Menu Operation......................
Setting animation...........................
Setting disc....................................
Setting radio...................................
Setting wallpaper............ ................
Version about..................................
Setting time.......... .........................
Setting audio mode.........................
Setting video mode.........................
Setting OSD language....................
Setting illumination color.................
TFT display calibration. ..................
Reset Factory Settings ...................
Rear View Camera ........................
Alternate Audio Source....................
Control Panel ................................
Unit keys ........................................
Radio Operation............................
Listening to the radio ......................
Storing and Listening to a memory
station ........................................
20
20
22
23
23
24
25
25
25
25
26
27
28
28
29
30
31
2
3
4
5
8
9
12
12
12
12
13
13
13
13
14
14
14
14
15
15
15
15
16
16
19
19
19
Automatic Memory Storing &
Program Scanning.......................
RDS function..................................
Media Operation.............................
Basic Operation ..............................
Selecting Play Mode ........................
On-Screen Display Function .............
Digital Video Special Function........
Multi-Subtitle Language function.......
Multi-audio language Function..........
Title menu function ..........................
AUX Operation ...............................
AV Operation..................................
USB Operation ...............................
Card Operation ..............................
SWC Operation..............................
Specification .................................
Troubleshooting.............................
Page 4
-2-
Precaution
THANK YOU FOR PURCHASING PLAYER .
Before operating the unit, read this manual thoroughly and keep it handy
for future reference .
To avoid injury or accident , read the following precautions before
installing and operating the unit .
A SOUNDSTORM MULTIMEDIA
ABOUT THE LIQUID CRYSTAL DISPLAY (LCD) PANEL
Do not press on the LCD panel on the unit as doing so can distort the
picture or cause a malfunction . The picture may become unclear , or the
LCD panel may be damaged .
NOTES ON CLEANING
-Clean the LCD panel with a slightly damp soft cloth.
-Do not use solvents such as benzine, thinner, commercially available
cleaners or antistatic spray .
- Do not use alcohol to clean the screen .
If your car was parked in a cold or hot place, the picture may not be clear .
The monitor is not damaged . The picture will become clear the temper ature in your car becomes normal .
DO NOT install any receiver in locations where;
- it may obstruct the steering wheel and gearshift lever operations, as this
may result in a traffic accident.
- it may obstruct the operation of safety devices such as air bags, as this
may result in a fatal accident.
- it may obstruct visibility.
DO NOT operate any receiver while manipulating the steering wheel, as
this may result in a traffic accident.
The driver must not watch the monitor while driving.
IF THE DRIVER watches the monitor while driving, it may lead to
carelessness and cause an accident.
IF YOU NEED to operate the receive while driving, be sure to look ahead
carefully or you may be involved in a traffic accident.
IF THE PARKING BRAKE is not engaged.“ ParkingBrake” flashes on the
monitor, and no playback picture will be shown.
- This warning appears only when the parking brake wire is connected to
the parking brake system built in the car ( refer to the electric connection)
ON INSTALLATION
Page 5

-3-
Safety Information
CAUTION:
THIS DIGITAL VIDEO PLAYER IS A CLASS I LASER PRODUCT. HOWEVER
THIS DIGITAL VIDEO PLAYER USES A VISIBLE/INVISIBLE LASER BEAM
WHICH COULD CAUSE .
HAZARDOUS RADIATION EXPOSURE IF DIRECTED. BE SURE TO OPERATE
THE DIGITAL VIDEO PLAYER CORRECTLY AS INSTRUCTED.
USE OF CONTROLS OR ADJUSTMENTS OR PERFORMANCE OF
PROCEDURES OTHER THAN THOSE SPECIFIED HEREIN MAY RESULT IN
HAZARDOUS RADIATION EXPOSURE.DO NOT OPEN COVERS AND DO NOT
REPAIR YOURSELF. REFER SERVICING TO QUALIFIED PERSONNEL.
WARNING:
TO REDUCE THE RISK OF FIRE OR ELECTRIC SHOCK, DO NOT EXPOSE THIS
EQUIPMENT TO RAIN OR MOISTURE.
TO REDUCE THE RISK OF FIRE OR ELECTRIC SHOCK, AND ANNOYING
INTERFERENCE, USE ONLY THE RECOMMENDED ACCESSORIES.
THIS DEVICE IS INTENDED FOR CONTINUOUS OPERATION.
This product incorporates copyright protection technology that is protected
by method claims of certain U.S. Patents and other intellectual property rights
owned by Macrovision Corporation and other rights owners.Use of this
copyright protection technology must be authorized by Macro vision Corporation,
and is intended for home and other limited viewing uses only unless
otherwise authorized by Macrovision Corporation. Reverse engineering or
disassembly is prohibited.
REGION MANAGEMENT INFORMATION:
This Digital Video Player is designed and manufactured to respond to the Region
Management Information that is recorded on a Digital Video disc. If the Region
number described on the Digital Video disc does not correspond to the Region
number of this Digital Video Player, this Digital Video Player cannot play this disc.
Page 6
-4-
Disc Note
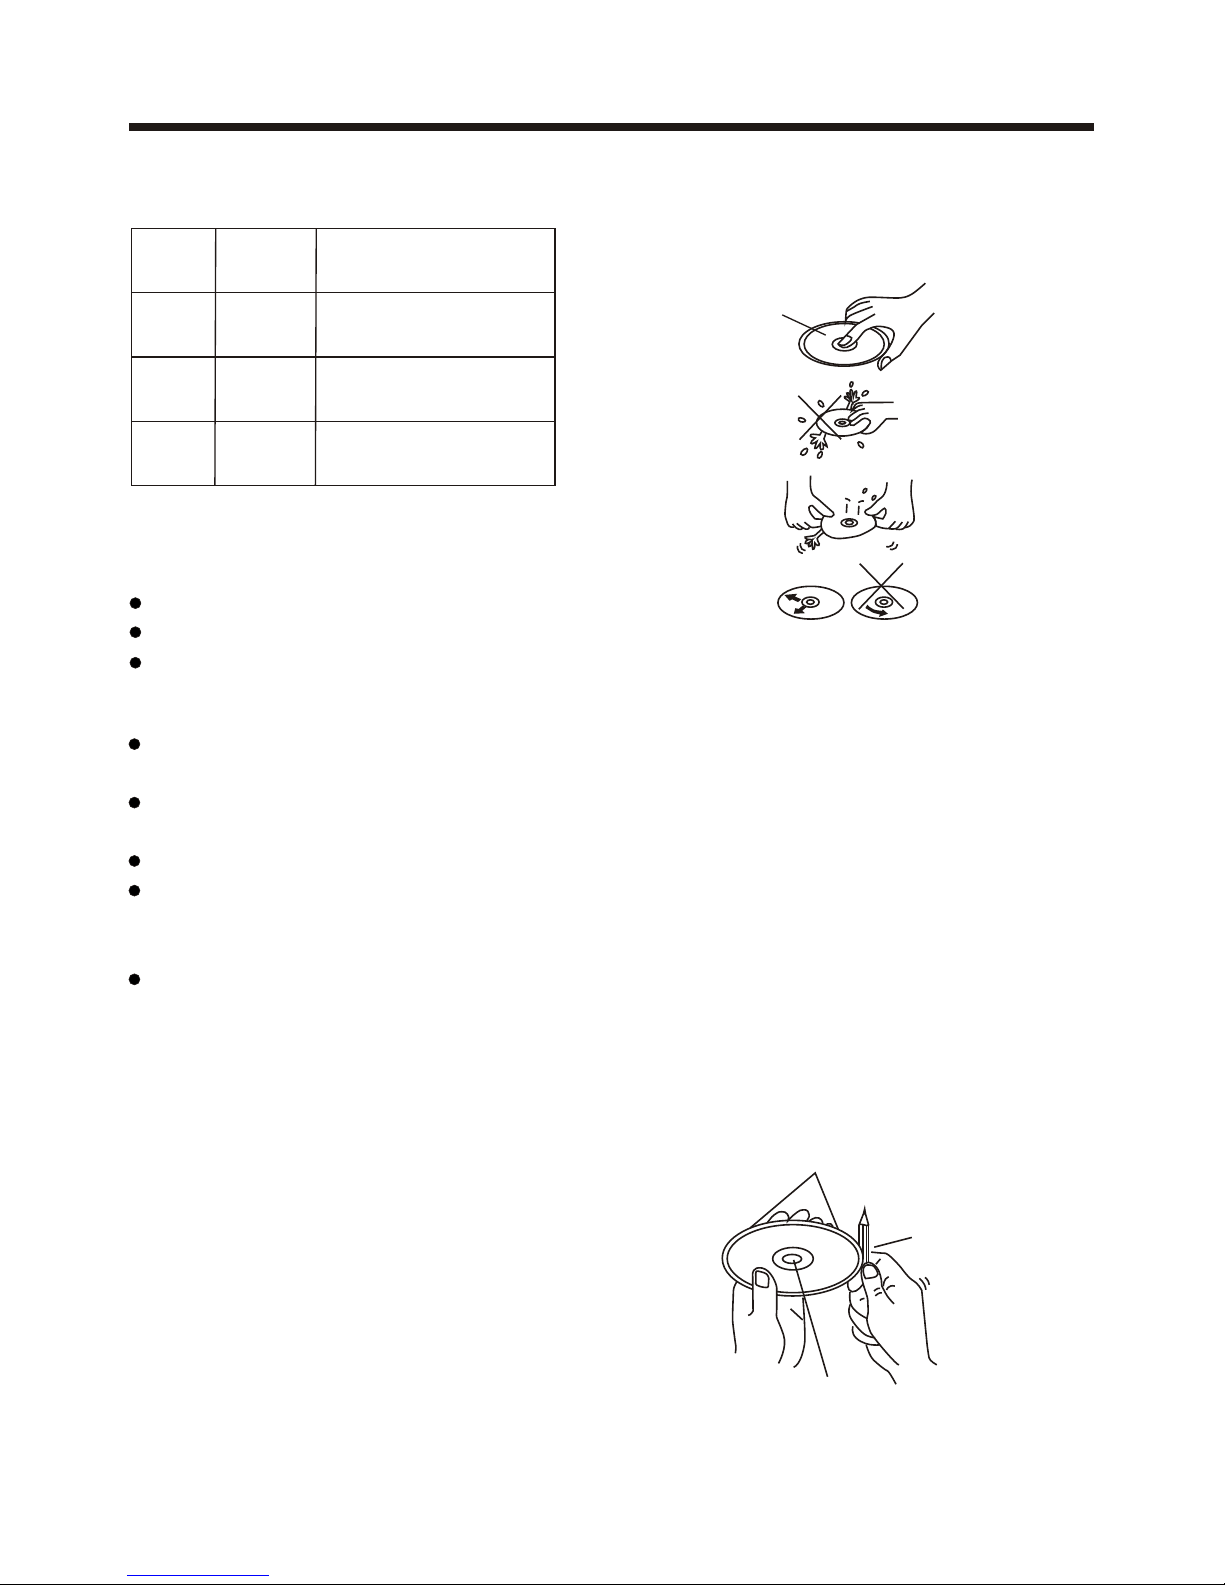
Preparing New Discs with Rough
Spots
A new d is c ma y ha ve r ou gh e dg es o n
its i ns id e an d ou ts id e ed ge s. I f a di sc
with r ou gh e dg es i s us ed , th e pr op er
setting w il l no t be p er fo rm ed a nd t he
player will n ot p lay the disc . Therefore,
remove the r o u gh e dg e s i n ad v a nc e
by using a ball point pen or pencil as
shown on the right. To r e m ov e th e
rough edges, press the s i d e o f t h e pen
or pencil against the inside and outside
edges of the disc.
Rough spot s
on
outside ed ge
Ball point p en
or pencil
Rough spot s
on inside
edge
Do not t ouc h
the
unde rsi de
of the d isc
Do not
bend
Wipe t he di sc fr om
cent er
towa rd th e out sid e
edge
Labe l sid e
up
Disc Cleaning
Use a dry soft cloth to wipe the surface.
If the disc is quite dirty, use a soft cloth
slightly moistured with isopropyl (rubbing)
alcohol. Never use solvents such as
benzine, thinner or conventional record
cleaners as they may mar the surface of
the disc.
Handling and Cleaning
Dirt, dust, scratches and warping disc
will cause misoperation.
Do not place stickers or make
scratches on discs.
Do not warp discs.
A disc should always be kept in its
case when not in use to prevent from
damaging.
Do not place discs in the following
places:
1.Direct sunlight
2.Dirty, dusty and damp areas
3.Near car heaters
4.On the seats or dashboard
Discs which cannot be played
with this player
Digital Video-RAM
CDV
CDG
Note:
A disc may become somewhat scratched
(although not enough to make it
unusable) depending on your handle it
and conditions in the usage environment.
Note these scratches are not an
indication of any problem with the player.
Disc formats supported by this
player
Digital
Video
VCD
CD
MP3
Audio and Video
Disc size 12 cm
Audio and Video
Disc size 12 cm
Audio
Disc size 12 cm
Audio
Disc size 12 cm
Digital
Video
VCD
CD
MP3
Page 7

Installation
-5-
NOTES:
1. Choose the mounting location where the unit will not interfere with the normal
driving function of the driver.
2. Before finally installing the unit, connect the wiring temporarily and make sure
it is all connected up properly and the unit and the system work properly.
3. Use only the parts included with the unit to ensure proper installation. The use
of unauthorized parts can cause malfunctions.
4. Consult with your nearest dealer if installation requires the drilling of holes or
other modifications of the vehicle.
5. Install the unit where it does not get in the driver s way and cannot injure the
passenger if there is a sudden stop, like an emergency stop.
. Avoid installing the unit where it would be subject to high temperature, such
as from direct sunlight, or from hot air, from the heater, or where it would be
subject to dust, dirt or excessive vibration.
7. If installation angle exceeds 30 from horizontal, the unit might not give its
optimum performance.
'
6
DIN FRONT/REAR-MOUNT
This unit can be properly installed either from "Front"(conventional DIN
Front-mount) or "Rear"(DIN Rear-mount installation, utilizing threaded
screw holes at the sides of the unit chassis). For details, refer to the following
illustrated installation methods.
Removing the unit
1. Press the REL button to release the front panel .
2. Remove the control panel .
30
Page 8
Installation
-6-
Installation the unit
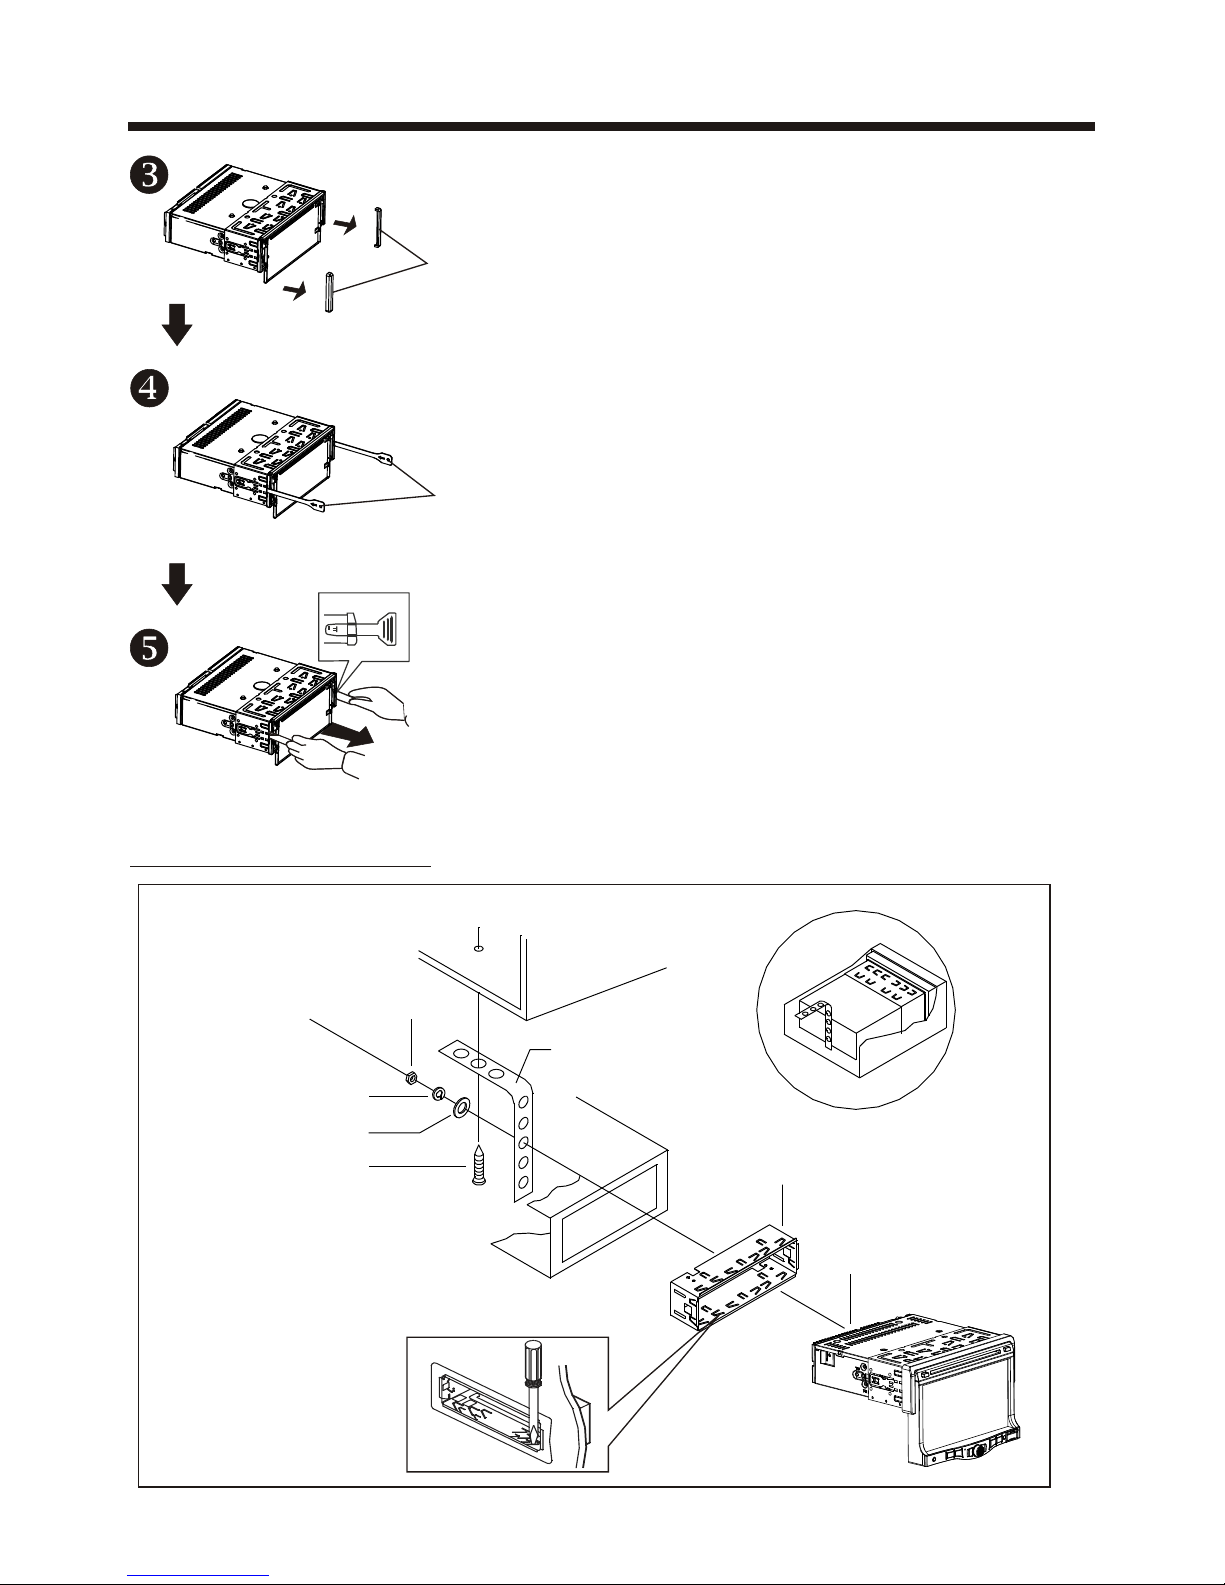
3. Remove the PLASTIC COVER of the both sides away
4. Insert the two KEY PLAT into the grooves at both sides
of the unit as shown in figure until they click .
PLASTIC COVER
KEY PLATE
5. Pulling the levers makes it possible to remove
the unit from the dashboard .
DASH BOARD
METAL MOUNTI NG
STRAP
HEX NUT
SPRING WASHER
PLAIN WASHER
TAPPING SCREW
CONSOLE
SLIDE BRACKET
HOUSING
HEX BOLT
Page 9
-7-
Installation
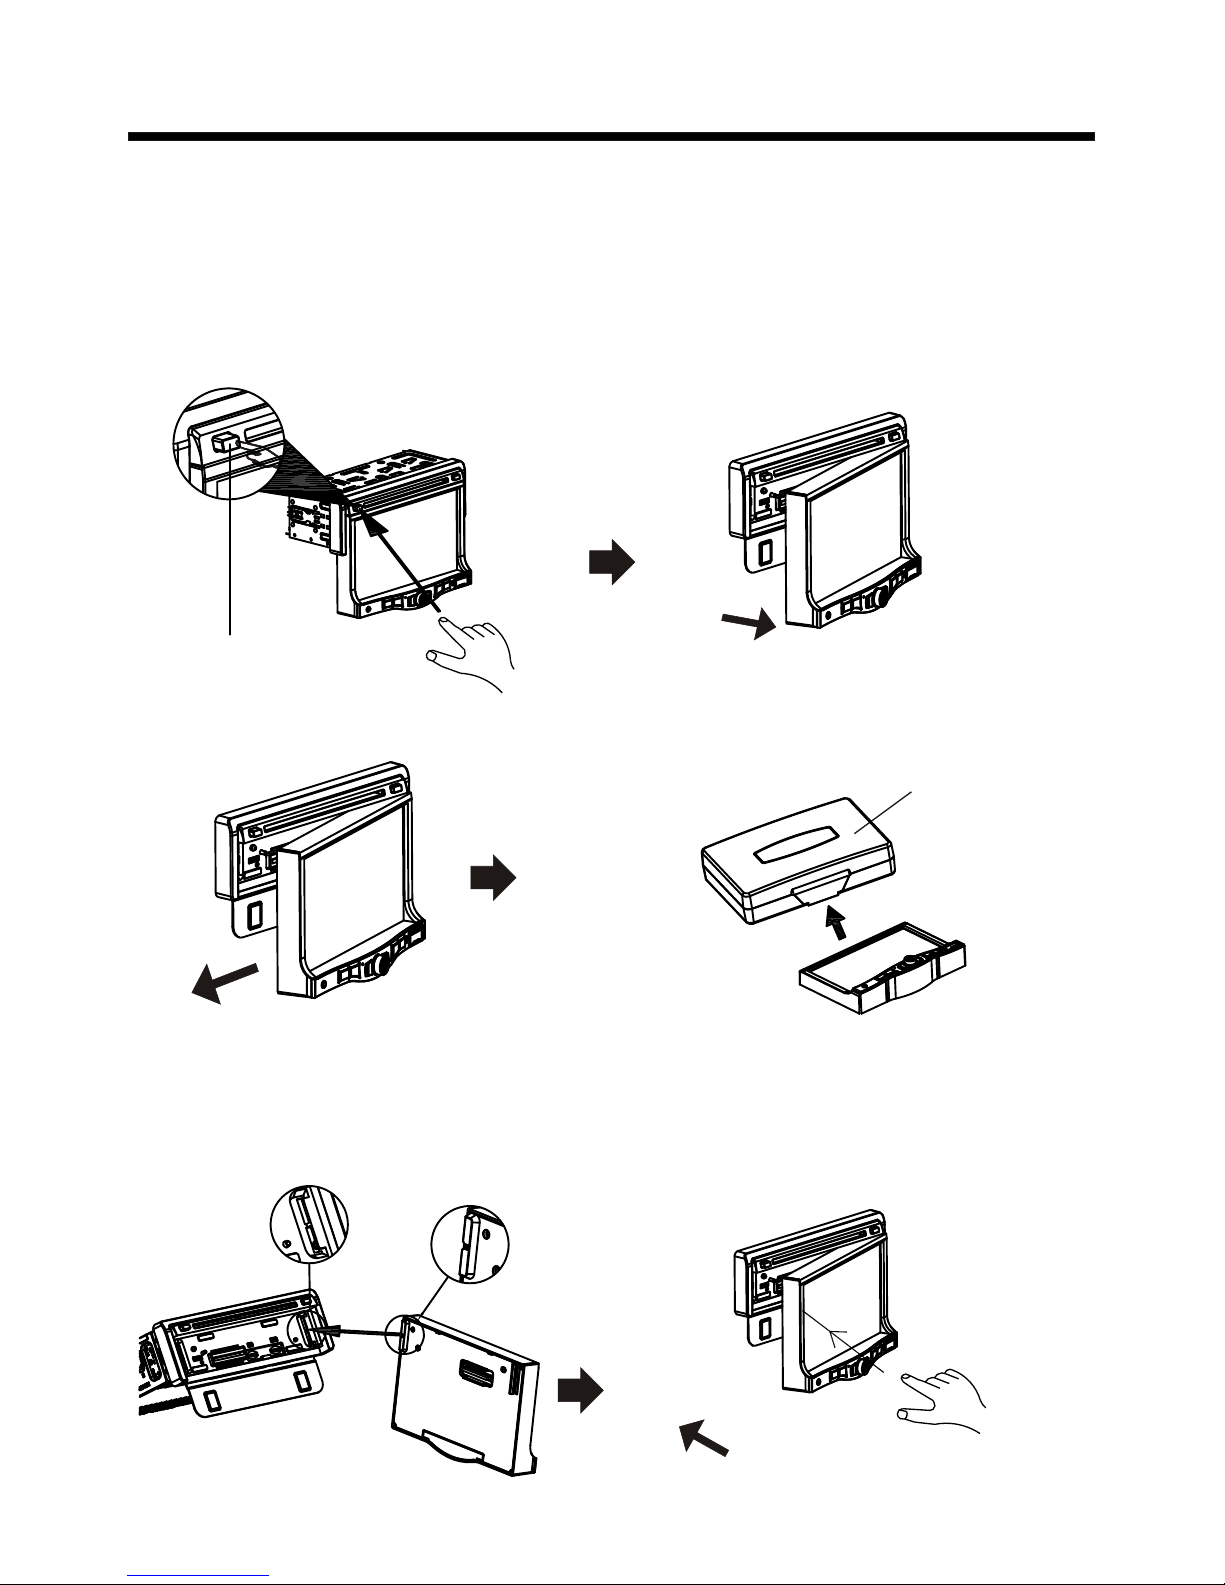
How To Remove And Install The Front Panel
When detaching or attaching the control panel, be careful not to damage the
connectors on the back of the control panel and on the panel holder.
2). Pull-off the front panel and keep the front panel into the case .
Detaching Control Panel
Before detaching the control panel, be sure to turn off the power.
1). Press the “REL” release button and the left hand side of front panel will release.
Attaching Control Panel
1). First insert the right hand side of the front panel into the hollow of the unit .
(NOTE : the “bulge” point on the panel must be attached into the hollow of the unit .)
2). Gently push the left hand side of the front panel until you feel a “ Click” .
PROTECTIVE CASE
RELEASE BUTTON
Hollow
Bulge
Page 10
Electric Connection
-8-
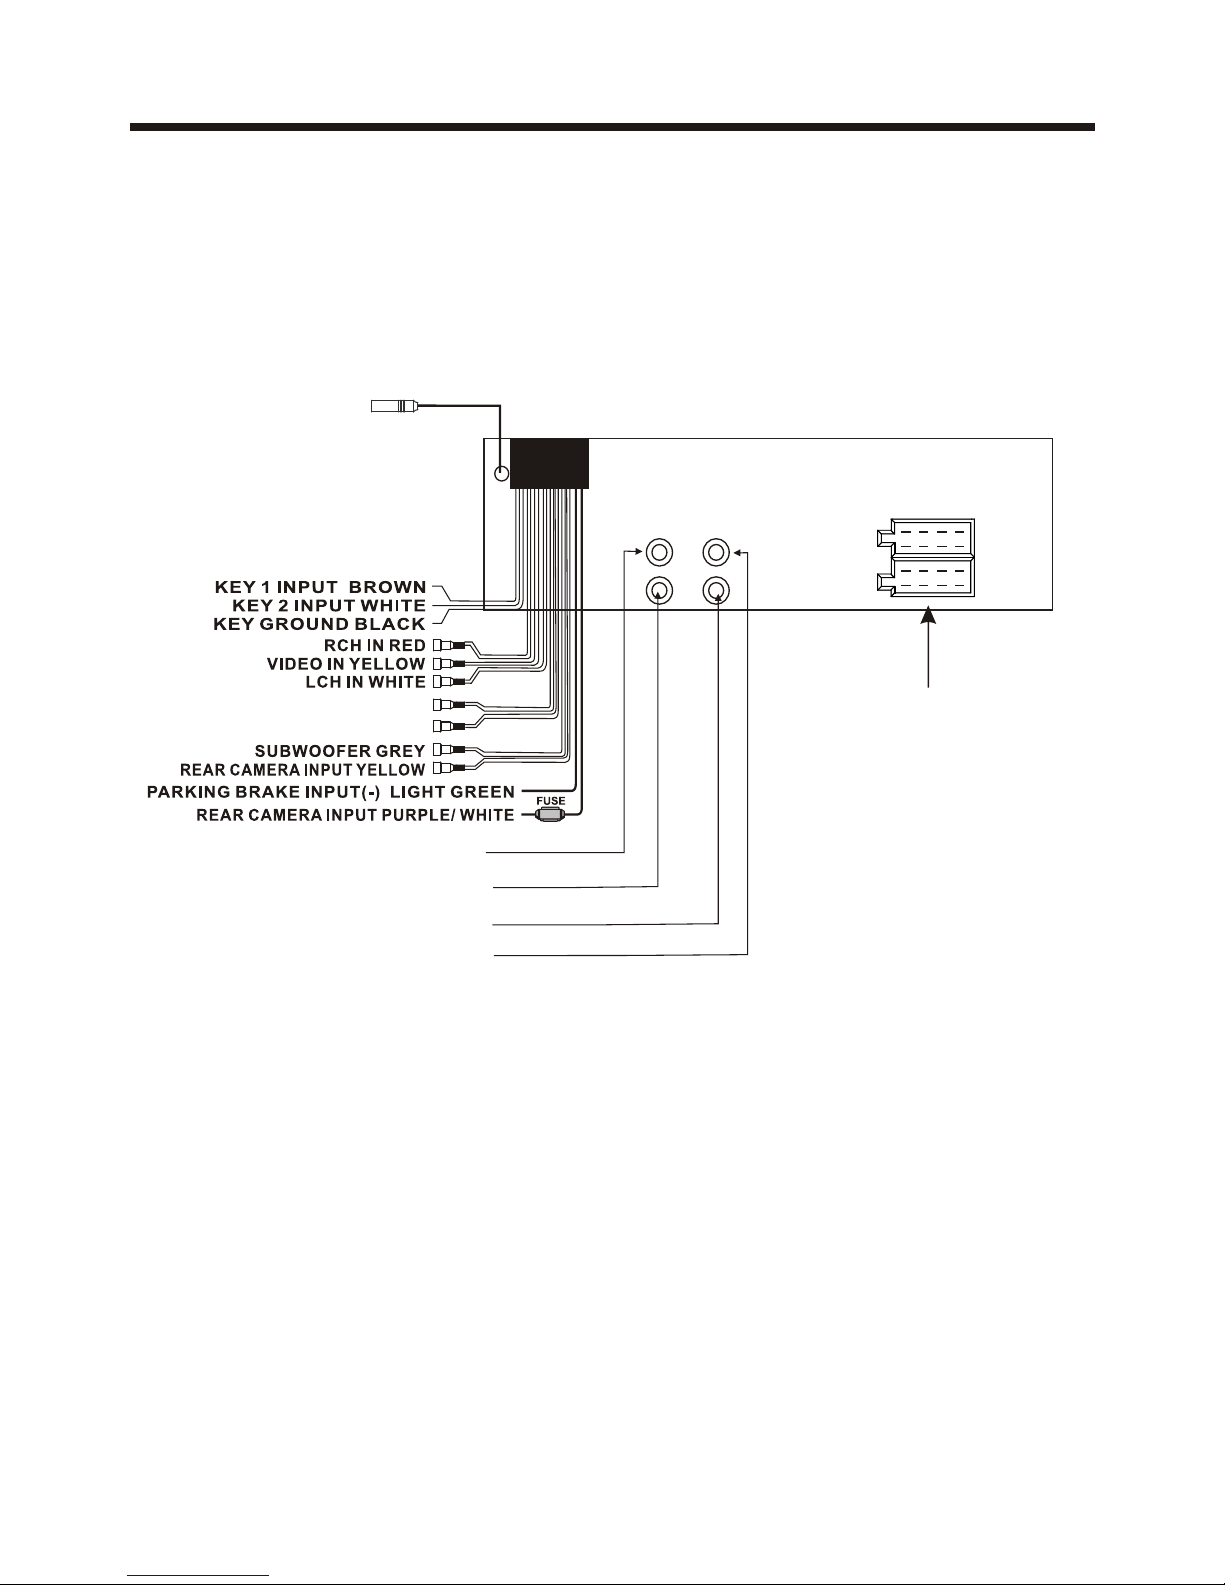
WIRI NG CO NNE CTI ON
Note:
the ground connection cable (parking brake B-) must be connected in order for
pictures to be played back to the monitor. If the cable has not been correctly
connected, the message “PARKING BRAKE” appears on the monitor.
RADIO AN TENNA JACK
FRONT RCA AUDIO OUT SOCKET
FRONT RCA AUDIO OUT SOCKET
VIDEO OUTPUT SOCKET
VIDEO OUTPUT SOCKET
Whi te Yell ow
Yell ow
Red
ISO CONN ECTO R
REAR RCA AUD IO OU TPUT RED
REAR RCA AUD IO OU TPUT WHITE
AV IN
Page 11
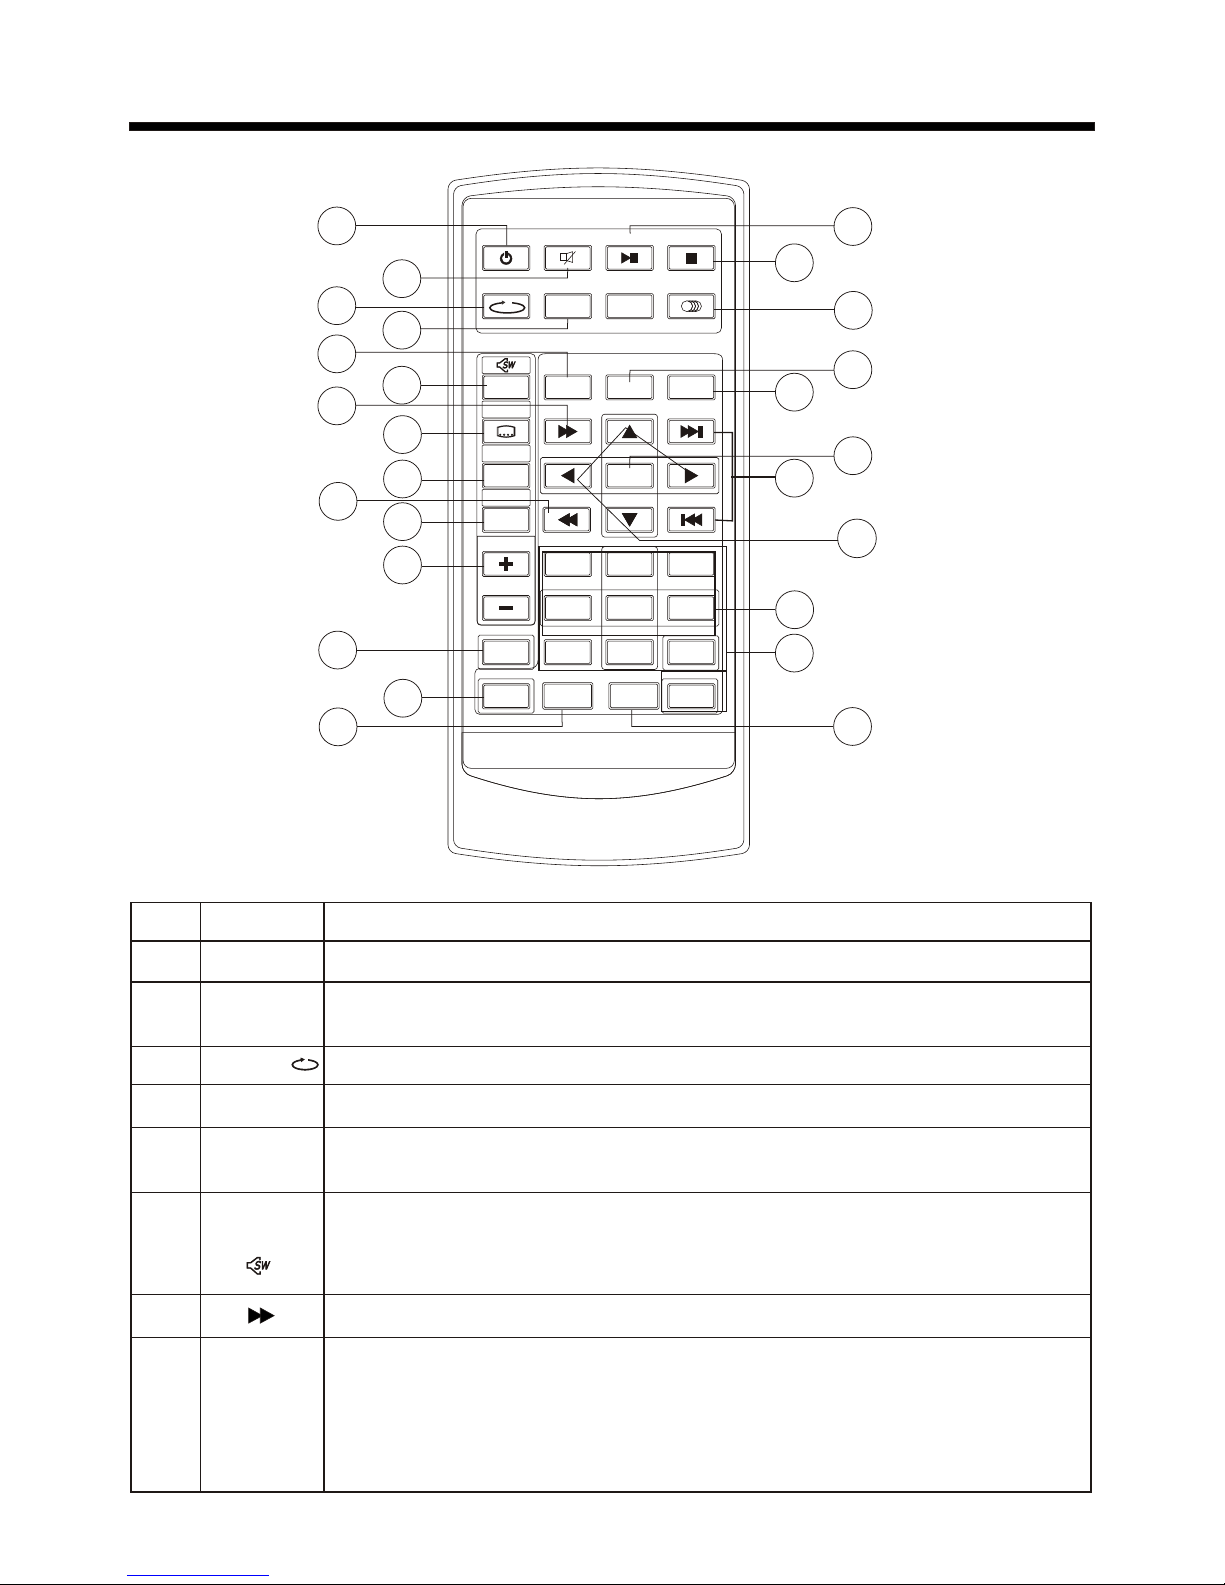
MUTE
Press this button to turn off the audio. Press again to restore the
sound to its prior volume level.
-9-
Remote Control
6
5
Button
Ref #
Function
1
2
CLK
Press it briefly to view the clock time .
3
4
7
8
1
2
6
10
11
3
17
18
24
9
12
14
26
4
5
7
8
13
15
16
19
20
21
22
23
25
MEN UMEN U
SET UP SET UP
ENT ERENT ER
11
22
33
44
55 66
77
88
99
00
VOLVOL
SELS EL
A/P SA/P S
MUT EM UTE
STO PSTO P
MO/ STMO/ ST
POW ERPOW ER
CLKCL K
PLAY /PA US EPLAY /PA US E
EQEQ
BAN DBAN D
VOLVOL
OSDOSD
TIT LE/PB CTIT LE/PB C
LO/ DXLO/D X
GOTOGOT O
+1 0+ 1 0
TOP
INT
RDM
REPEAT
MOD E
TA
AF
ZOOM
REPEAT/
Switch the Repeat mode of Digital Video/VCD/CD/MP3 disc.
ZOOM
Shortly press it button to increase the picture in size .
MODE
Press this button to turn the unit ON , press and hold to turn the
unit OFF. Press it briefly to select a desired work source.
Press this button briefly to display the root level directory of a
Digital Video disc. Press and hold this button to
.
switch SWF FREQ
between 80HZ, 120HZ and 160HZ
Menu
SubWoofer
( )
In Disc Playback mode, press for fast forward playback.
SUBTITLE
LOCAL/
DISTANT
In Digital Video Disc Playback mode, pressing this button will
allow you to change the subtitle language on discs which have
this as an option.
In Radio mode, press this button to change the radio reception
sensitivity in stations are near or far.
Page 12
Remote Control
-10-
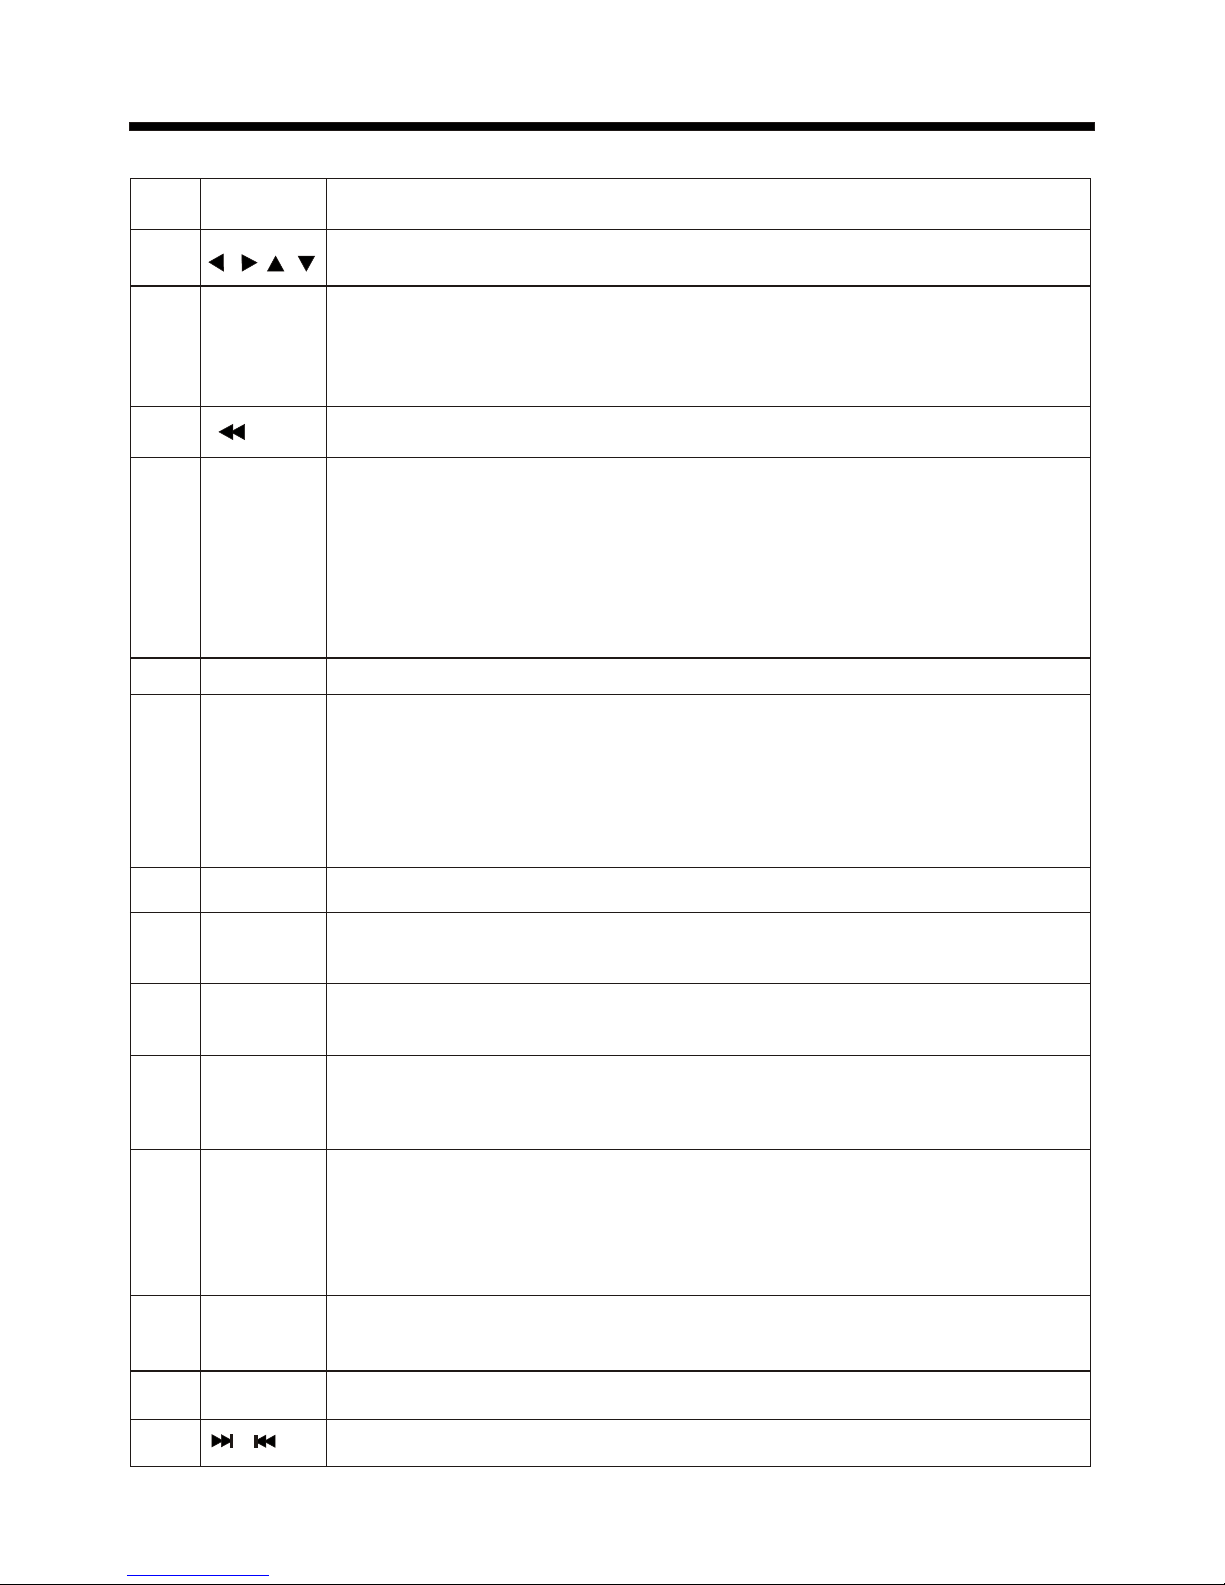
MO/ST
(AUDIO)
In Radio mode, press this button to change between Mono and
Stereo reception modes (when a station is weak, sometimes
switching to Mono will improve sound quality). In Disc Playback
mode, pressing this button opens the AUDIO setup menu for
making changes to the way the soundtrack is reproduced.
Button
Ref #
Function
9
11
12
13
10
BAND
(OSD)
In Radio mode, press this button repeatedly to switch between
the five radio bands: FM1 > FM2 > FM3 > AM1(MW1) > AM2 (MW2).
In Disc Playback modes, Press this button to see information
about the disc currently in play.
15
16
17
TITLE/
PBC(A/P)
18
When playing a Digital Video, pressing this button will open the
TITLE menu which is recorded on the media. When playing a VCD
disc, press this button to create a PBC (Playback Control) menu
for the disc to assist in making playback selections. In Radio
mode, press and hold this button to start the Auto-Program mode,
during which the tuner will scan for all strong stations and assign
them to the radio preset buttons.
19
20
EQ
21
22
Press repeatedly to cycle through the different equalizer curve
presets you may wish to use for enhanced listening.
/ / /
Press to navigate the various menus present in the product.
In DISC mode, press it to reverse rapidly
VOL+/-
Use these controls to adjust the volume level.
14
SEL
Press the SELswitch between BASS,TREBLE,BALANCE, FADE,
COLOR, RIGHTNESS, CONTRAST, TINT, press and hold the
button to display REG(in radio mode), PI(in radio mode),
TA(in radio mode), AF(in radio mode), LOUD, SWF, EQ,
TIME 12H/24H, CLOCK, BEEP,EUR/USA FREQ, ANIMATION.
After switching on the desired mode above, rotate VOL knob to set it.
SETUP
Press this button to open the SETUP menu.
GOTO
Press it button to begin playback at a moment in the program you
designate. Use number buttons to enter the data that is needed.
PLAY/
PAUSE
In Disc Playback mode, press to pause playback. Press again to
start where playback stopped.
STOP
Press once to pause playback. Press PLAY/PAUSE to resume
playback. Please note: if you press STOP twice, playback will
start at the beginning of the disc.
CLK
Press it briefly to view the clock time .
/
Press these buttons to skip ahead or back one track.
Page 13
-11-
Remote Control
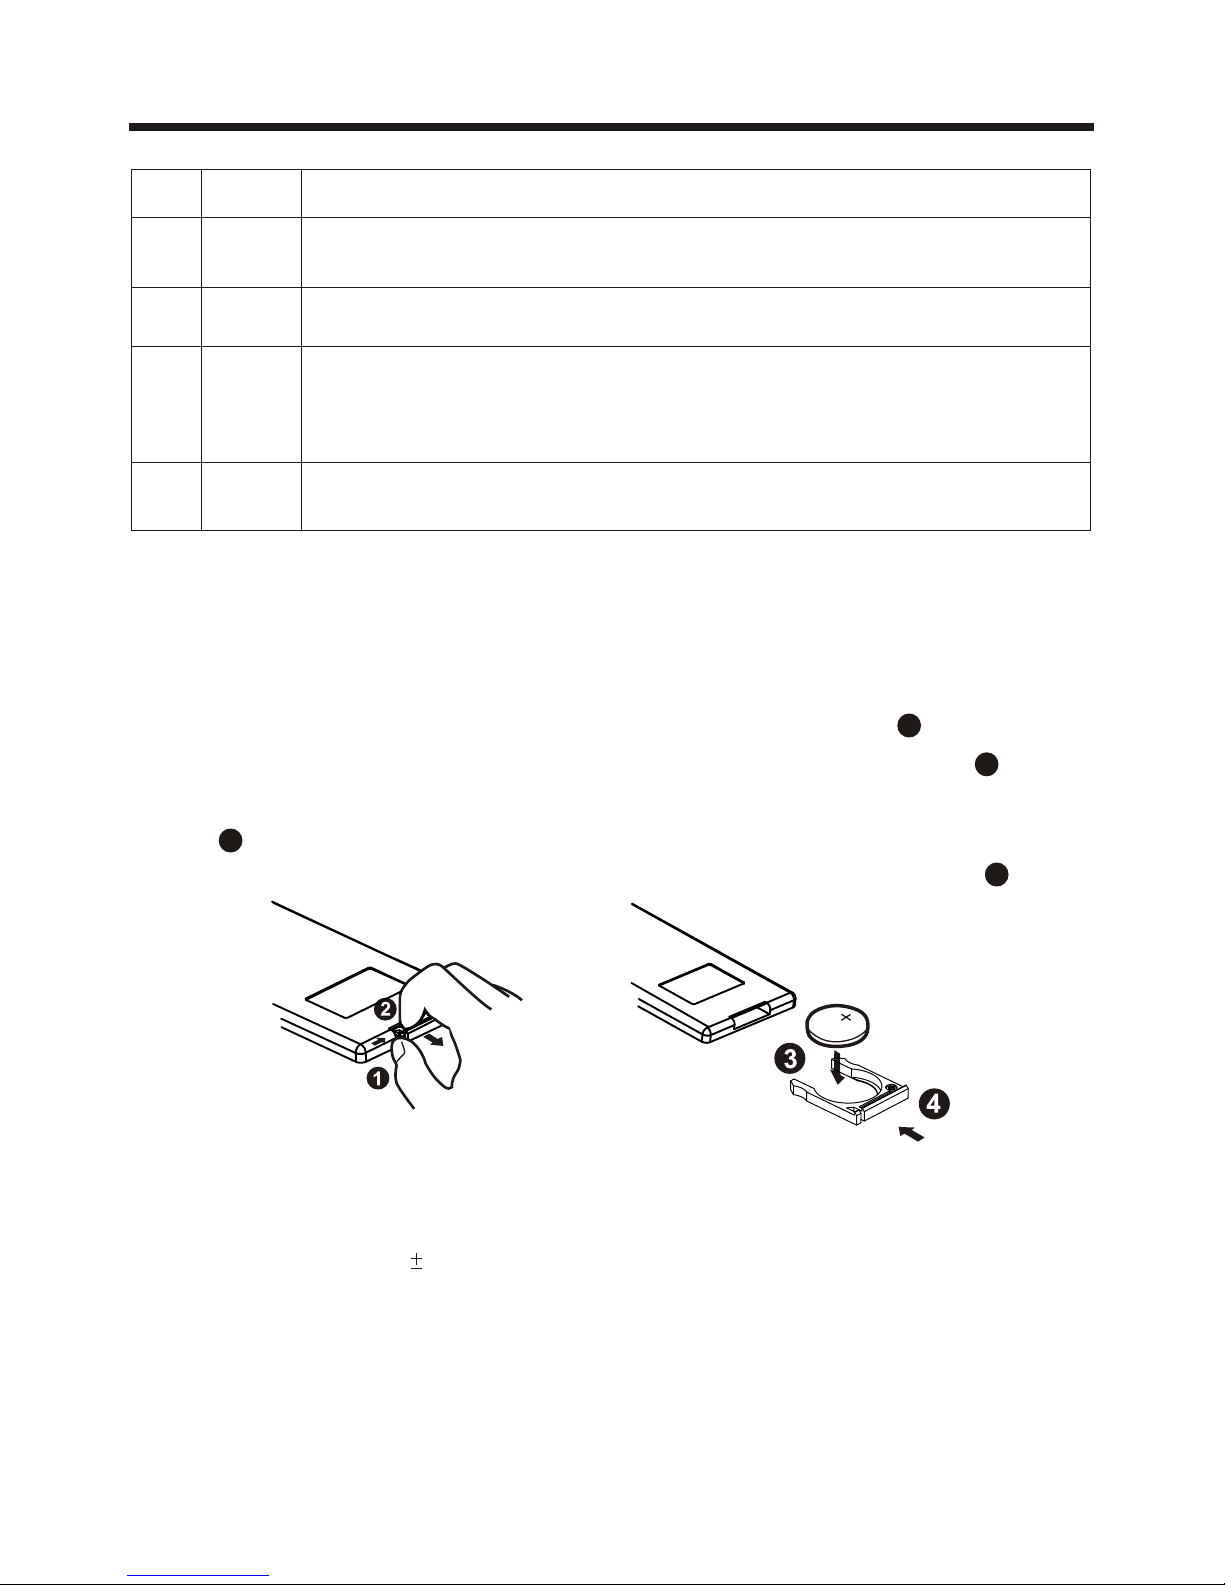
Using the Remote Control
Face the remote control towards the player front face IR mark (remote control signal
receiver).
Operation angle: About 30 degree in each the direction of the front of the IR mark.
Preparing the Remote Control
1.First push to inside as the direction indicated by the arrow (See )And then
Remove the battery holder as the direction indicated by the arrow (See ).
2.Replace the battery Set a new battery property with (+)side up as illustrated
(See ).
3.Insert the battery holder. Push in the holder to the original position(See ).
1
2
3
4
Inserting the Battery
Note :
The lithium cell in the battery compartment of remote control has been secured for
transport with a . Before initial use please remove this plastic so that the
remote control is ready for operation .
plastic
Button
Ref #
Function
0-9
25
+10 26
1-6
24
Six numbered preset buttons store and recall stations for each band
This button is used with the other number buttons for use with
two-digit number entries.
23
ENTER
This button is used to confirm selections and settings within many
of the menus in the OSD system.
Use to input numerical values during programming, with the GOTO
button, or to directly select a track to play .
In Radio mode, (when the RDS engaged,), 0 serves as TA function,
9 serves as the AF function .
0/TA
9/AF
Page 14
Basic Operation
-12-
ADJUSTABLE ITEMS:
ANIMATION
In RADIO mode, you can change the
playing time of animation among of
“OFF, 10S, 30S, 1M,90S, 2M, 3M and 4M ”.
Note:
Please set the playing time of the
animation to “ 10S ” for the first, when
you turn the unit on .
KEY BEEP : ON or OFF.
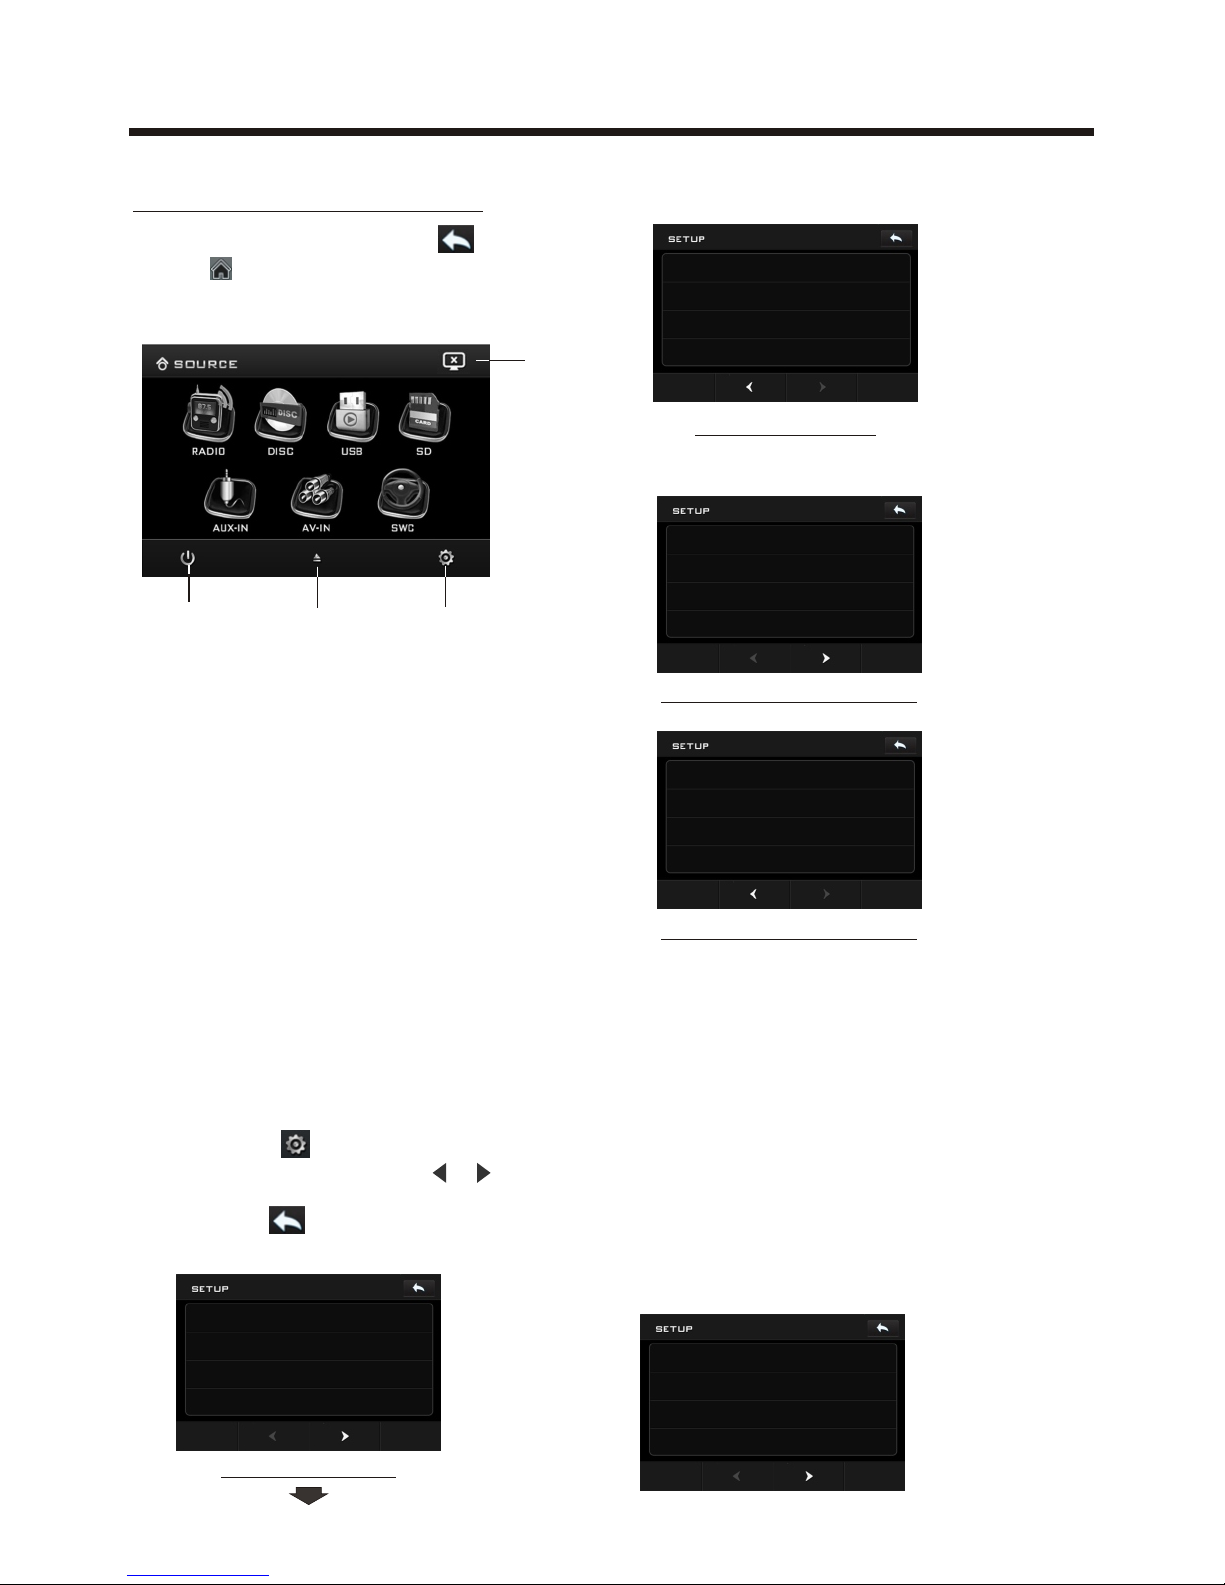
Main Menu Operation
In many modes, touch the icon
or the range to enter the main
menu, the message like following
as below.
1. POWER icon
In any modes, touch the POWER icon
to switch the unit off . The monitor will
draw in automatically .
2. EJECT icon
Touch to allow for inserting or ejecting
disc.
3. When the unit is power on, tap to turn
off the display and the unit still work,
tap anywhere of the display to turn on
the display again.
4. SETUP icon
Touch to enter the SETTING mode,
the message will display as follow :
Touch the “ ” section on the
setting menu, touch the “ / ”
ranges to select the adjustment item,
Touch the “ ” icon to return to the
previous playback .
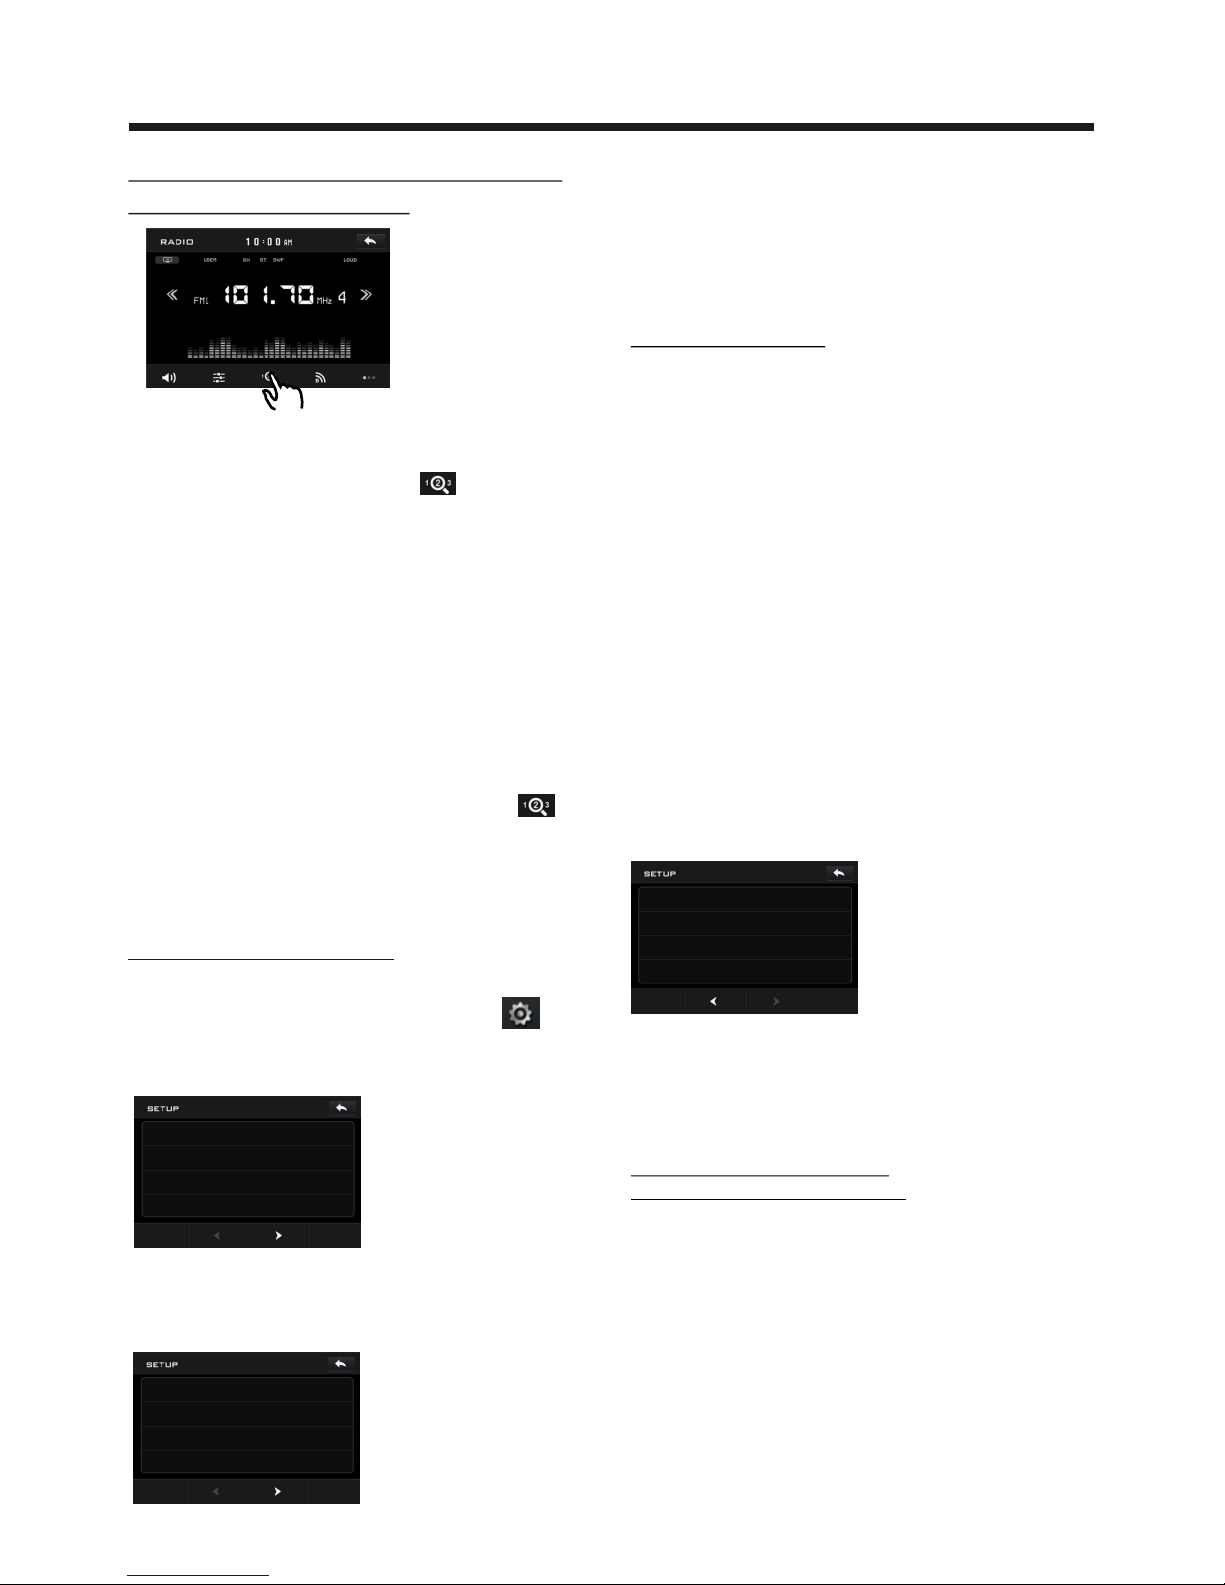
Setup interface 1
GEN ERAL
CLO CK
AUD IO
VID EO
Setup interface 2
LAN GUAGE
CAL IBRATI ON
ILL UMINAT IO N COL OR
General setup interface1
GEN ERAL
ANI MATION 2 M INU TE
KEY B EEP ON
DIS C ...
RAD IO ...
General setup interface2
WALL PAPER .. .
ABO UT ...
GEN ERAL
Disc setup as follow:
DIS C
FOR MAT NTSC
TV TY PE 4:3P S
RATI NG ADULT
10:0 0AM
(4)
(1)
(2)
(3)
Page 15
-13-
Basic Operation
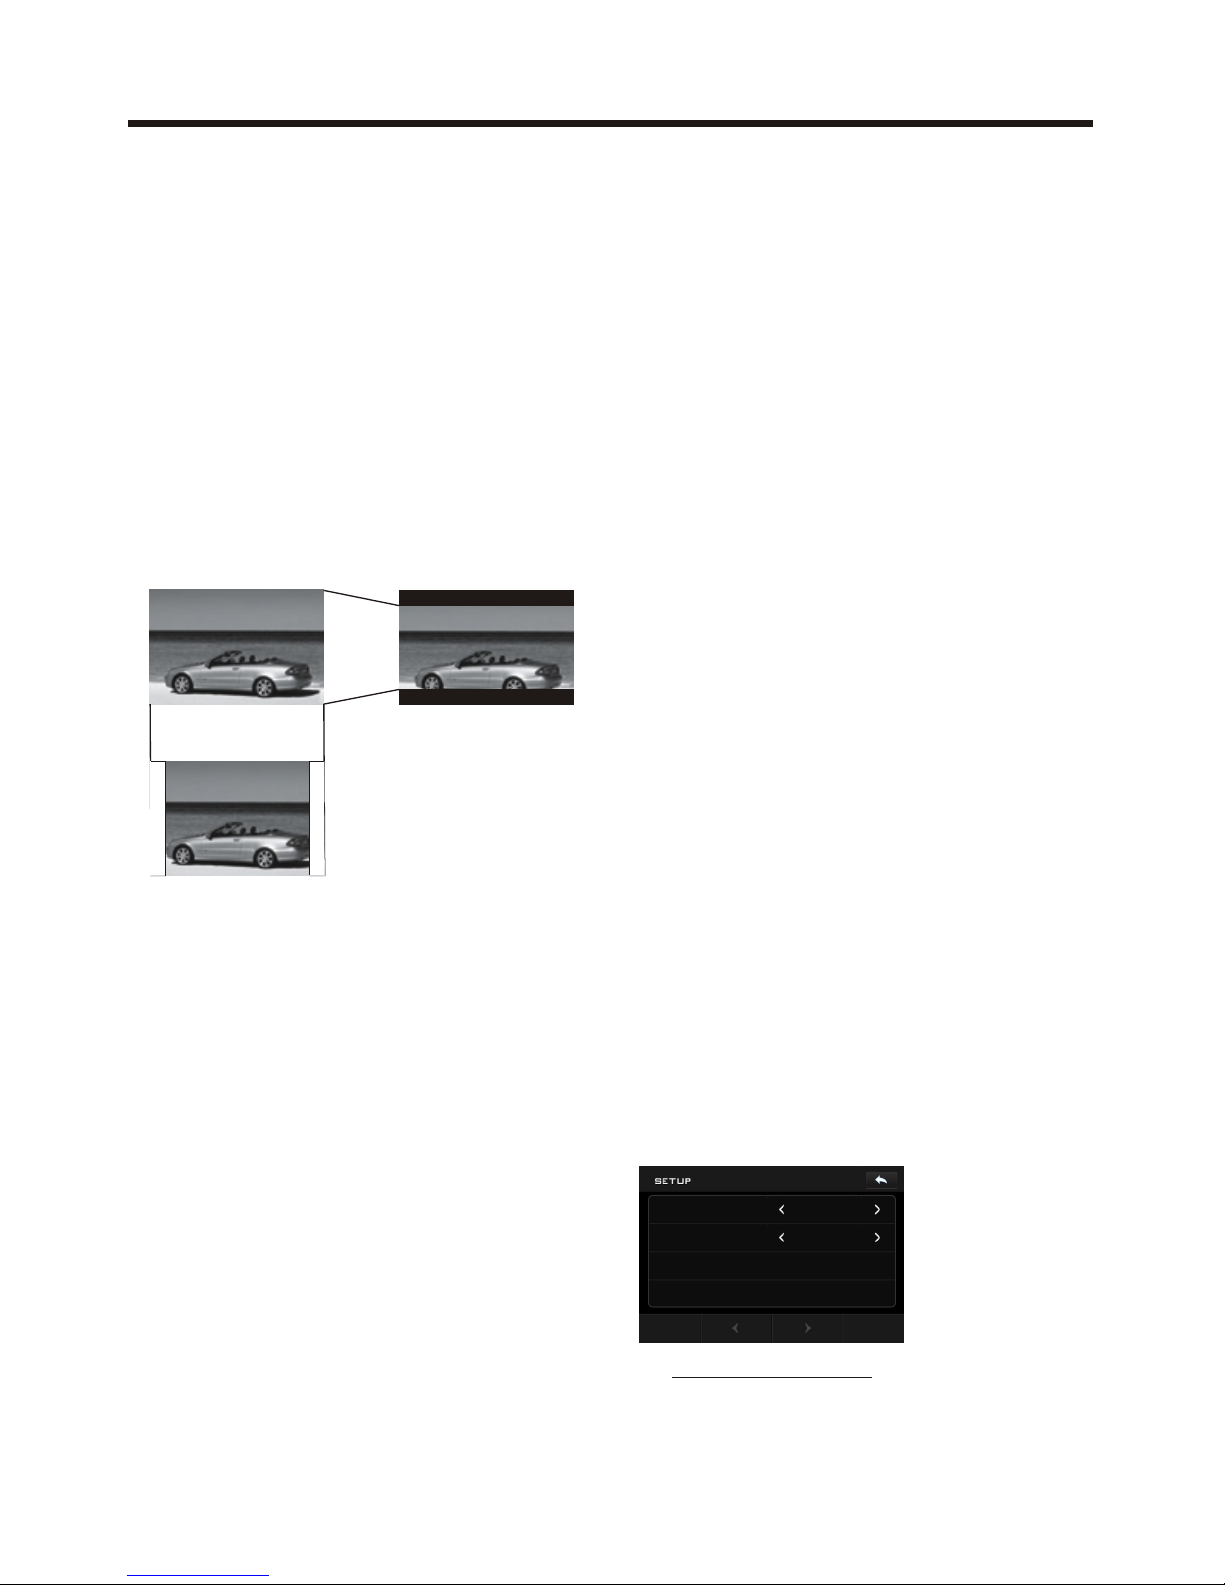
FORMAT
TV TYPE
This is to select the appropriate TV
aspect (4:3 or 16:9) according to the
connected TV set.
Normal/PS (For 4:3 TV)
Played back in the PAN & SCAN style.
(If connected to wide-screen TV, the
left and right edges are cut off.)
Normal/LB (For 4:3 TV)
Played back in LETTER BOX style.
(If connected to wide-screen TV, black
bands appear at top and bottom of the
screen.)
Wide (For 16:9 TV)
Select when a wide-screen TV set is
connected.
This player is capable of playing discs
recorded in either PAL or NTSC formats.
Make the selection based on whether
you are connecting the unit to a PAL TV
or an NTSC TV. You can also set the unit
to AUTO (auto select). The disadvantage
to autoselect is that each time you turn
the unit on it checks to see what kind of
monitor is connected, which causes a
small delay and some flickering of the
display image which you may find
unpleasant.
16:9
4:3 Letter Box
4:3 Pan Scan
RATING
Select to turn Parental Control on or off.
changes to the Parental Control
menu below .)
Key in “0000” and then turn to rating
then you can setting as follow:
KID SAFE -> G -> PG -> PG-13
-> PG R -> R ->NC-17 -> ADULT
RADIO
DUAL: touch to select stereo or mono.
LOCAL: touch to select local or distant.
AREA: touch to select radio frequency
as USA or EUROPE.
WALLPAPER
Touch to select wallpaper .
ABOUT
Touch to show the version information.
CLOCK SETUP
Touch the CLOCK to adjust the time and
time format.
The factory default password is 0000.
(The password must be used to make
clock set up inter face
CLO CK
HOU R 12
MIN UTE 36
FOR MAT 12HR
AM PM
Page 16
-14-
Basic Operation
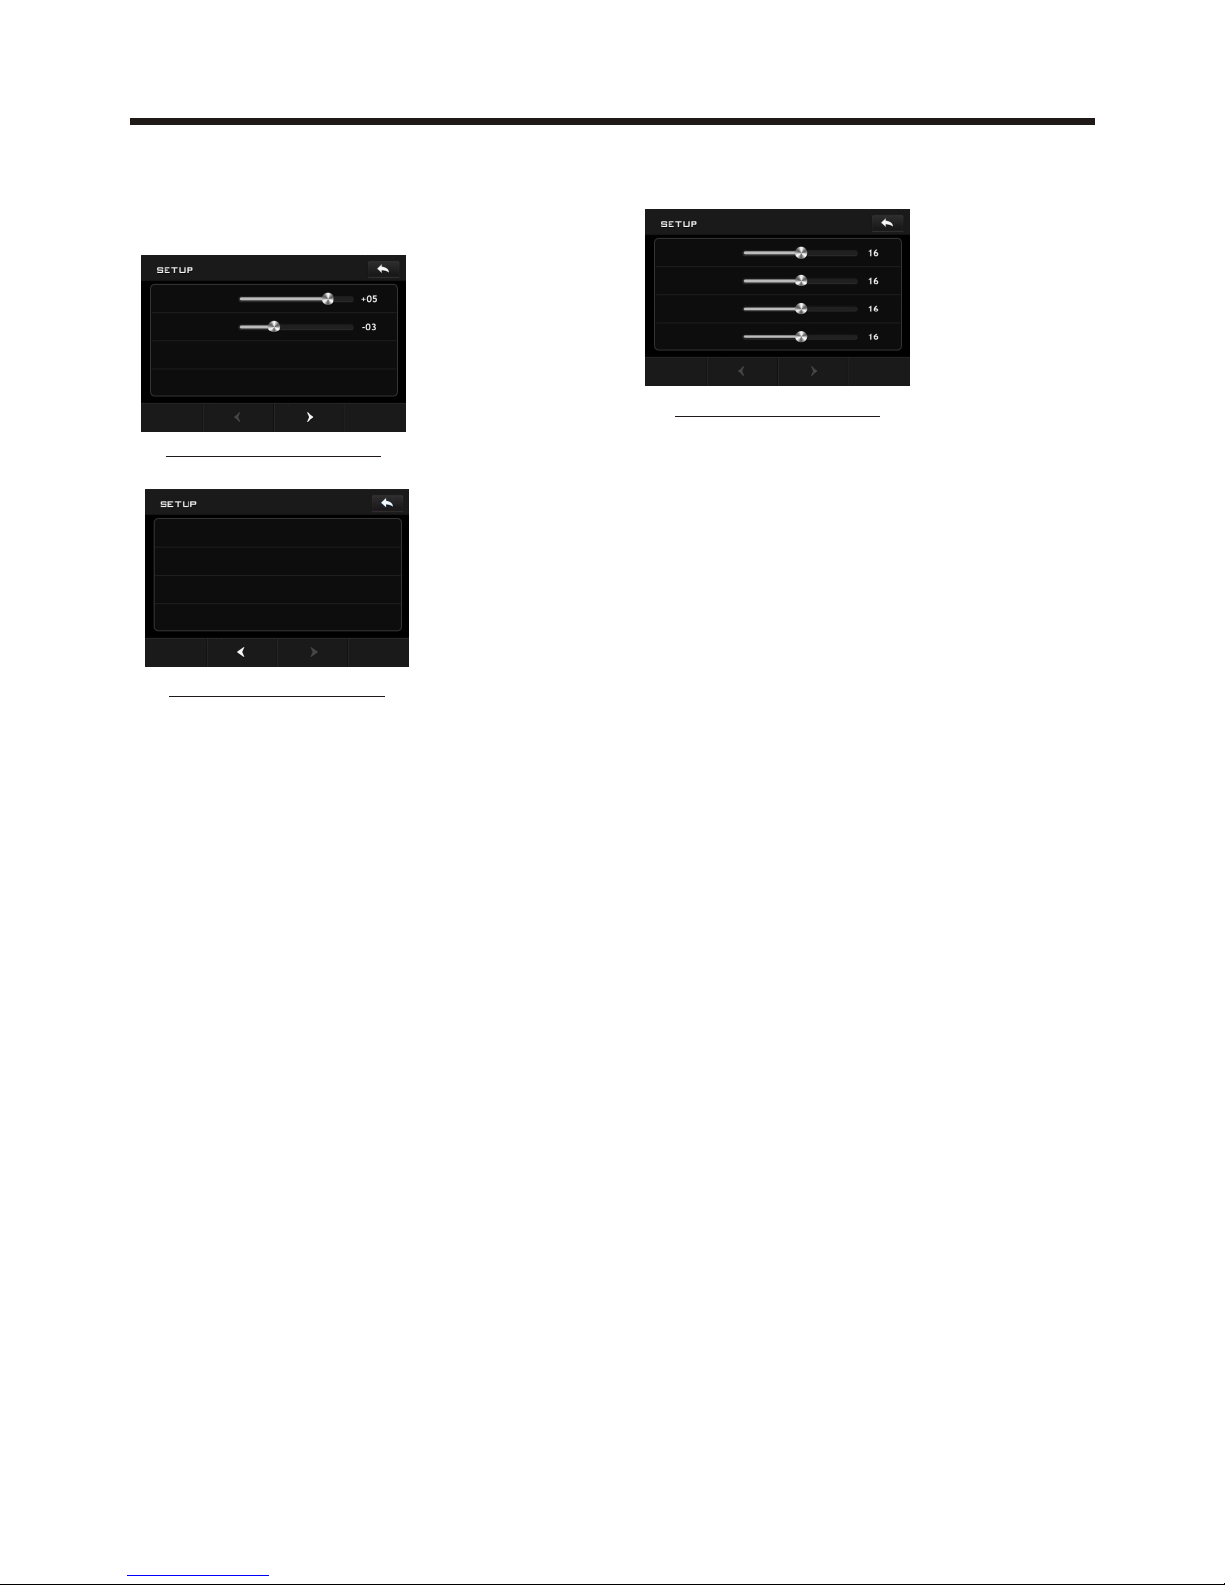
AUDIO SETUP
Touch the audio to turn to audio quality
adjustment.
TREBLE: -7 to +7
Adjust treble level .
BASS: -7 to +7
Adjust bass level .
SUBWOOFER: touch to adjust
subwoofer volume and frequency.
EQ: touch to select audio mode as follow:
USER -> JAZZ -> CLASSIC -> POP -> ROCK
LOUDNESS: touch to select loudness
effect as :OFF -> LOW -> MID -> HIGH
FADER/BALANCE:
BALANCE: R 0-10 to L 0-10
Adjust sound balance between left
and right speakers .
FADE: F 0-10 to R 0-10
Adjust sound balance between front
and rear speakers .
VIDEO SETUP
COLOR: 0 to 32
Adjust the color for the picture-lighter
or darker.
BRIGHTNESS: 0 to 32
Adjust if the picture is too bright or
too dark.
CONTRAST: 0 to 32
Adjust the contrast of the bright and
dark portion.
TINT: 0 to 32
Adjust the tint if the human skin color
is unnatural.
-Adjustable when “NTSC “ is selected
for “NTSC/PAL “ .
LANGUAGE
Touch to select OSD language.
ILLUMINATION COLOR
Touch to select the backlight for all
buttons. Tap auto icon the backlight
change automatically.
Video setup interface
VID EO
COL OR
BRI GHTNE SS
CON TRAST
TIN T
audio set up inter face1
AUD IO
BAS S
TRE BLE
SUB WOOFE R ...
EQ USE R
audio set up inter face2
LOU DNESS O FF
FADE R/BLA NCE ...
AUD IO
Page 17
-15-
Basic Operation
CALIBRATION
Touch the arrow as show to calibration
the display.
NOTE:
If RESET is selected, all memory data
will deleted, please re-adjust .
Rear View Camera
When connecting the rear view camera
the mirror image of the rear view is automatically displayed on the monitor
when you change the gear to the back
position.
(Note: additional monitor can not display
the image.)
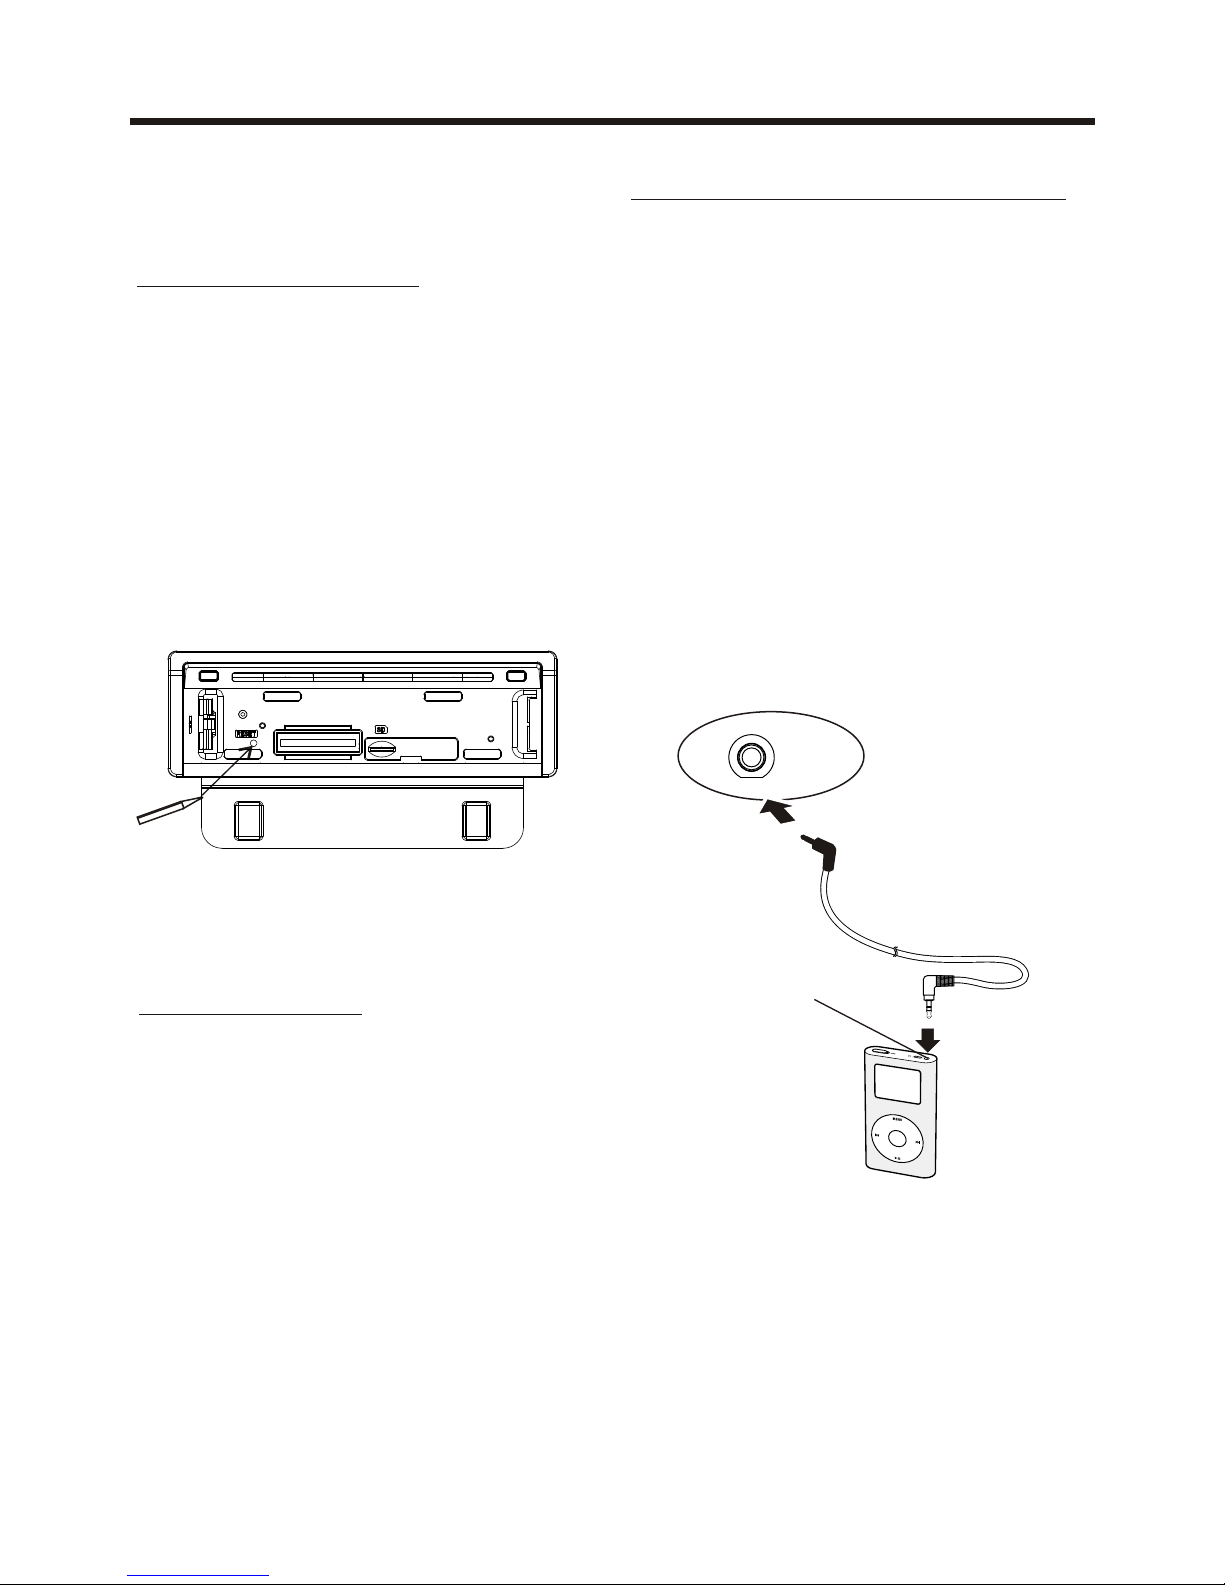
Reset Factory Settings
RESET button is placed on the housing
and must be activated with either a
ballpoint pen or thin metal object.
The RESET button is to be activated for
the following reasons:
A. Initial installation of the unit when
all wiring is completed.
B. All the function buttons do not operate.
C. Error symbol on the display.
ALTERNATE AUDIO SOURCE
On the front panel of the unit , there is an
AUX IN jack, to connect analogue replay
devices. Use this jack to replay sound of
other replay equipment such as
media players, computers, etc.
Via the loudspeakers.
1). Please f
connect the external device with stereo
jack plug the AUX IN socket .
2). Press the MOD button to select the
AUX IN connection.
3). Use the buttons on the external
device itself to operate it .
ollowing the diagram below,
AUX IN
H
e
a p
ho
n s p
or
td e
A X I
N
U
Page 18
-16-
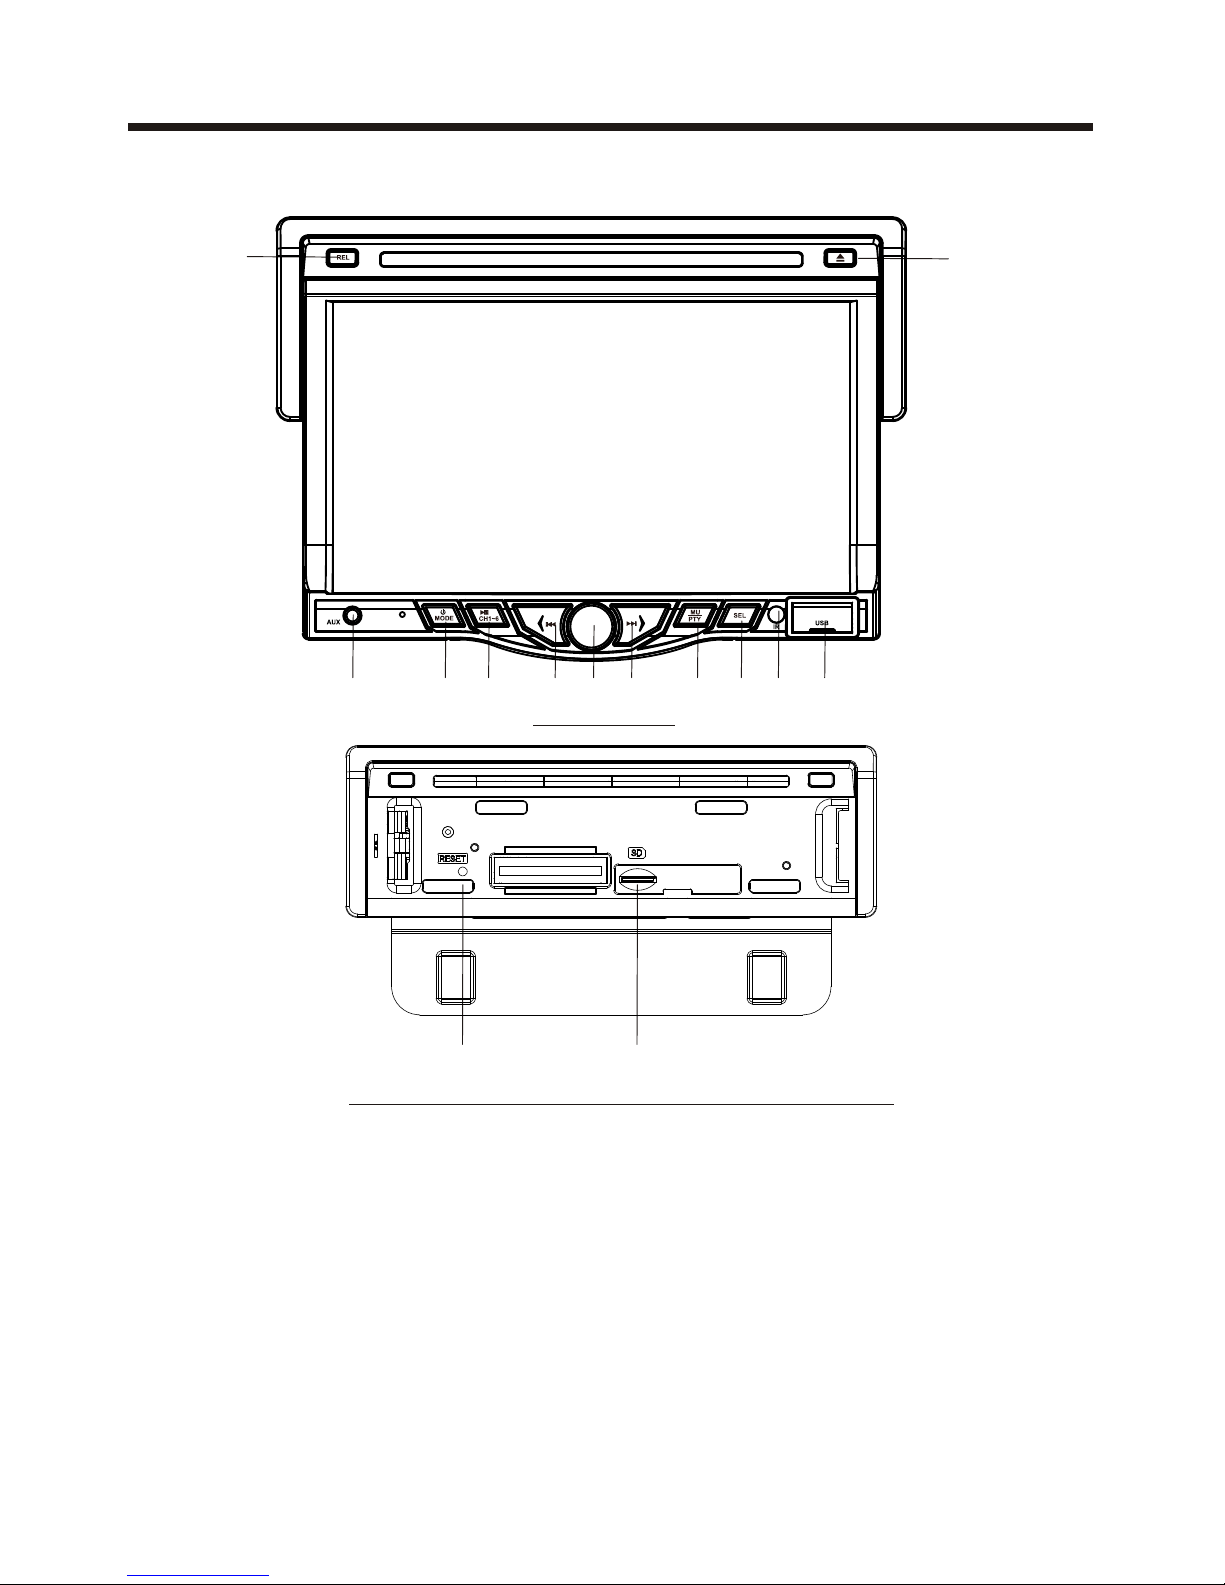
UNIT KEYS
Control Panel
2 12
1314
8 36
5 7
941
10
11
Control Panel
Sliding Plate diagram after removing Control Panel
1. AUXILIARY INPUT JACK
Insert an external device to this AUX jack in order to have audio output of the
device through the unit.
2. SEL BUTTON
switch between BASS,TREBLE,BALANCE, FADE,COLOR,
RIGHTNESS, CONTRAST, TINT, press and hold the button to display REG
(in radio mode), PI(in radio mode), TA(in radio mode), AF(in radio mode),
LOUD, SWF, EQ, TIME 12H/24H, CLOCK, BEEP,EUR/USA FREQ, ANIMATION.
After switching on the desired mode above, rotate VOL knob to set it.
Press the SEL
Page 19

Control Panel
-17-
4. /MODE BUTTON
In power off mode, press it to turn on the unit.
In power on mode, short press it repeatedly to select one mode of the RADIO,
DISC, USB, CARD, AUX and AV; long p to turn off the unit.
3. VOL KNOB
In normal mode, knob is used to increase or decrease the volume.
ress it
the VOL
5/6. >>| and |<< BUTTONS
In radio mode,
7
In Radio Mode, press this button and hold for a bout 2 seconds to select the
PTY of the grogram type (examples of such types of program are : NEWS,
POP.....)
long pressing |<< or >>| button can automatically search down
or up for an available station beginning from the current frequency; Briefly
pressing |<< or >>| button can manually search down or up for a your desired
station beginning from the current frequency.
In media mode, pressing |<< or >>| button can play the previous or next track;
continuously and long pressing |<< or >>| button can fast backwards or
forwards at the following multiple of normal speed: x2, x4, x8, x20.
. MUTE/PTY BUTTON
Press it button to switch of the loudspeakers for a short period. The word MUTE
flashes in the display. Press it again to cancel the mute function. This function
can also be cancelled by rotating the VOL multifunction button.
8. (PLAY/PAUSE) /CH 1-6 (RADIO PRESET)
A) In Disc Playback Mode
Touch this button to pause playback, touch again to resume playback.
B) In Radio Mode
Touch repeatedly to preset station. With this system a total of 30
stations can be stored in the memory. Each band store up to six preset
stations. The stations might be FM1, FM2, FM3, AM1 (MW1) and AM2
(MW2) band.
The operation as below:
-Store in Memory
> Select the frequency band.
> Touch repeatedly this range to select the desired memory key.
> Select the station.
> Keep the desired memory key touched in until the station is heard again
after a brief interruption.
-Retrieve a preset station
Touch repeatedly to retrieve a station which had been stored in the
memory in advance the chose number is shown on display.
Page 20

9. IR sensor
10. REL BUTTON
Press it to detachable the front panel.
11.
USB PORT
13.
14.
(EJECT) BUTTON
Insert the disc, label side facing up, until the mechanism senses its presence
and draws the disc in. Press it to eject the disc.
12.
For information about connecting a USB device, please see USB operation.
SD CARD SLOT
RESET BUTTON
Press this button to return to factory settings.
Control Panel
-18-
Page 21
Touch Screen Operation
-19-
Briefly touch “ ” to decrease frequency
by one step of channel spacing.
Automatic Search
During Radio mode, touch and hold
(for more than 2 seconds ) either “ / ”
ICONS to start search for a radio station
automatically.
To tune in strong-signal FM
Station only (LO/DX function)
Press button on the
remote control to select
mode of Local and
Long-distance traffic news.
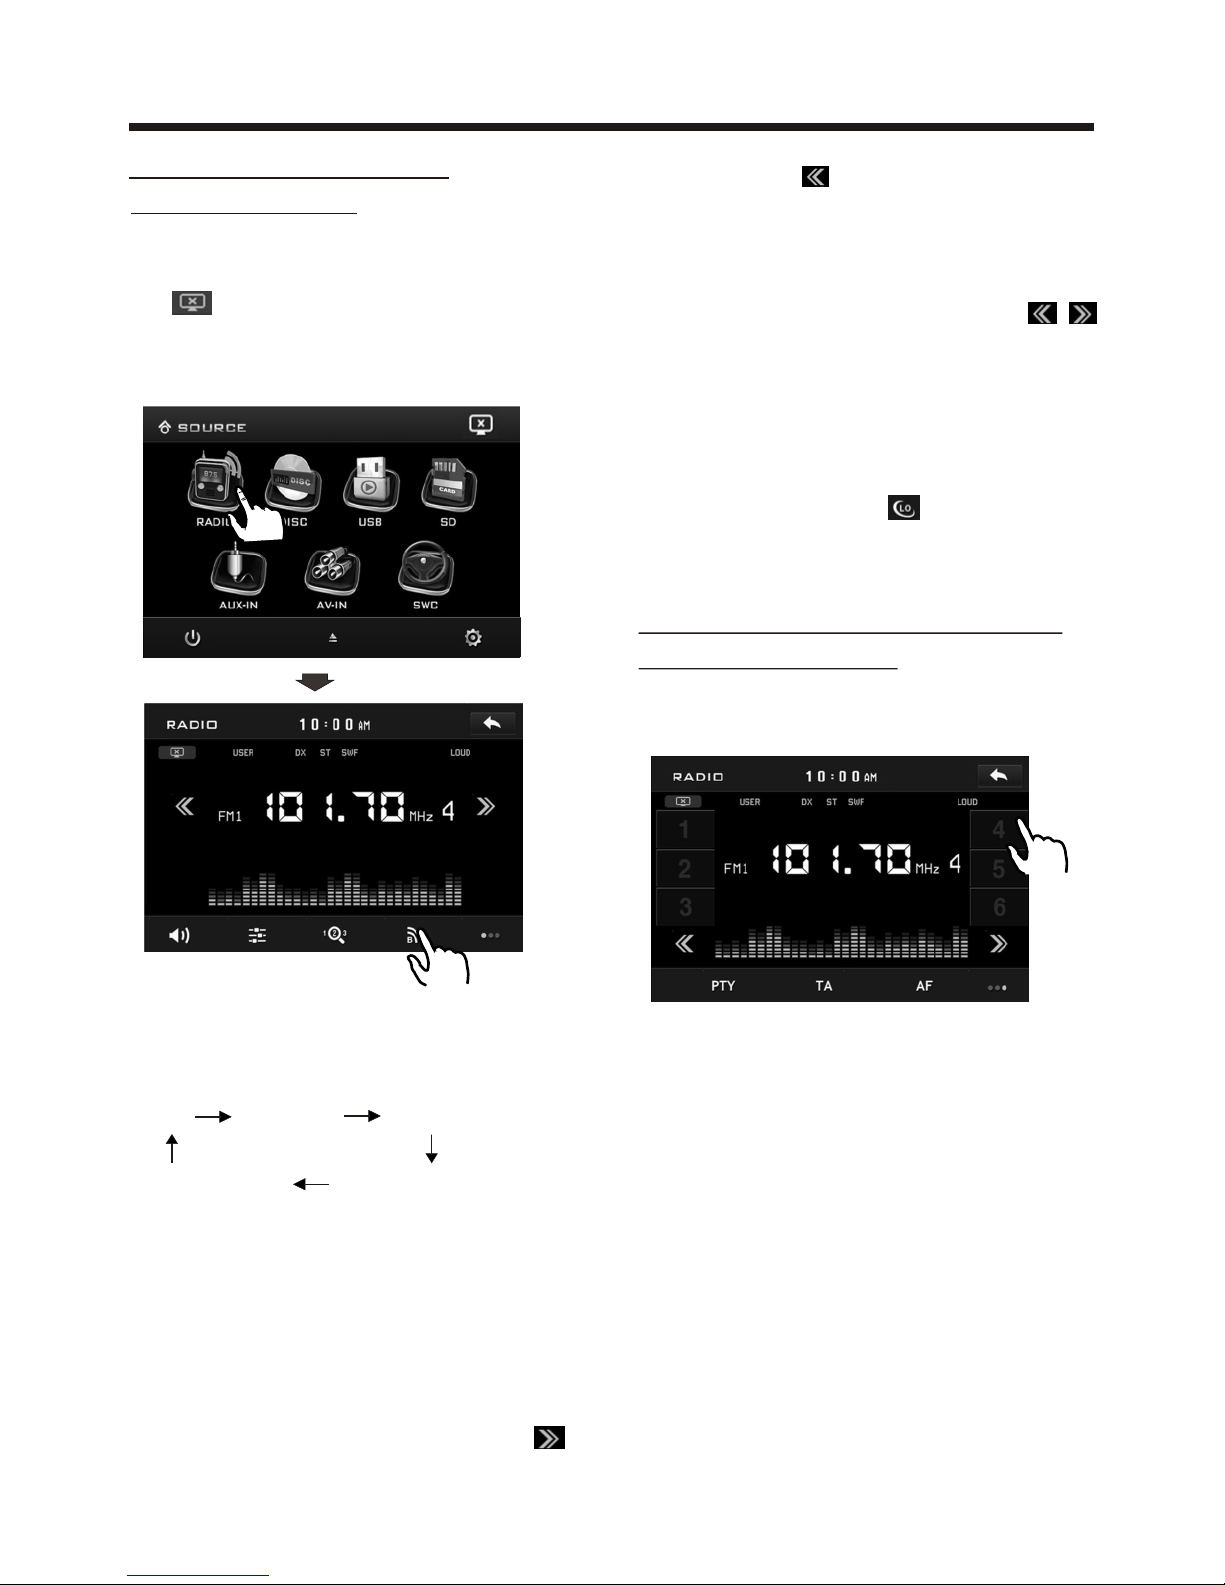
Storing and Listening to a
Memory Station
Setting Memory
With this system, a total of 30 stations
can be stored in the memory of six
buttons. Each band stores up to six
preset stations. The stations might be
FM1, FM2, FM3, AM1(MW1), and
AM2(MW2) band.
The operation is as below :
- Store in Memory
>Select the frequency band
>Select the station
>Press and the station until it show
the frequency band your select.
- Retrieve a preset station
Touch the 1-6 ranges briefly to retrieve
a station which had been stored in the
memory in advance the chose number
is shown on display .
In radio mode, LOC
or tap icon
select LOC/DX
Selecting The Frequency Band
Touch the screen of “ BAND ” section
repeatedly to select the band , the
message will show in turn :
When an FM stereo broadcast
is hard to receive
Press ST/MO button on the remote
control to select the MONO or STEREO
mode .
Start Searching For a Station
Manual Search
During Radio mode, briefly touch “ ”
to increase frequency by one step of
channel spacing.
FM1 FM2 FM3
AM2(MW2)
AM1(MW1)
RADIO OPERATION
Touch the RADIO ICON in home menu
to enter the RADIO mode. In radio mode,
tap icon that the display turn dark,
tap twice turn dark more, tap thrice to
turn off the display, and tap anywhere
of the display to turn it on again.
Listening to Radio
10:0 0 AM10:0 0 AM
87.50
90.10
98.10
107.9
101.7 0
100.8
10:00 AM
Page 22
10: 00 AM10 :00 AM
-20-
Touch Screen Operation
RAD IO
RDS P I MUTE
RDS TA OF F
RDS AF O FF
Automatic Memory Storing &
Program Scanning
3
RDS FUNCTION
Automatic Preset Setup
In Radio Mode, touch and keep (for more
than 2 ’ S) the screen of “ ” range to
active automatic station storage.
The radio searches within the current
frequency band, e.g. FM , for the
stronger signal level until the search
cycle has finished . The six strongest
stations are then allocated to the
corresponding storage locations .
Then the station of the first storage
location is set .
Scan Function
In Radio mode, briefly touch the “ ”
section on the touch screen , the radio
briefly plays all the preset stations of the
frequency band .
In home menu, then touch the “ ”
ICON to enter the set mode, the
message in the display :
ST/ MONO STE REO
LOC AL DX
REG ION EURO PE
RAD IO
ADJUSTABLE ITEMS:
REGION SET
Touch to switch the REGION function
ON and OFF.
PI SET
Touch to change between PI MUTE and
PI SOUND .
I
I
REG FUNCTION
at certain times some stations divide up
their programs into regional programs
with varying content .
REG ON : the message “REG ON” will
appears in the display for a few seconds .
Note :
- the display capacity is limited . It is
possible that in the double display mode
some segments of the display are deleted .
- the function REG ON prevents the
radio from switching to alternative
frequency which have a different regional
program content .
REG OFF : the program identification(PI)
of the regional program is ignored during
the search for an alternative frequency
(AF) or a program identification (PI) .
PI MUTE / PI SOUND
(only for radio operation)
f you are in an area where two program
identifications (PI) overlap, you can
select the option PI SOUND and
PI MUTE for playback of the sound.
Alternate switching of the program
identification should be avoided .
PI SOUND :
f switching nevertheless occurs the
sound of another station is heard for
less than one second .
Select EUROPE then power off this
unit then power on again to turn on
RDS function.
ST/ MONO STE REO
LOC AL DX
REG ION EURO PE
RDS R EGION AL ON
RAD IO
RAD IO
RDS P I MUTE
RDS TA OFF
RDS AF O FF
Page 23

Touch Screen Operation
-21-
TA Traffic Announcement
(Priority For Traffic Information)
When the TA function is activated, the
TA symbol appears in the display .
During radio operation in one FM
frequency band the search for a traffic
announcement station is started
automatically (TA SEEK) .
If an FM station is being received which
transmits the latest traffic announcements from time to time, the TP display
lights up.
When the TA function is switched on ,
the FM traffic automatically interrupt
CD operation (the word TRAFFIC
appears in the display).
The volume level is increased to the
minimum value for the transmission of
traffic announcements.
After the traffic announcements has
finished, the program that was
previously running is resumed.
Interruption of the TA Function:
If you would like to interrupt the current
traffic announcement, touch the TA
section on screen briefly . This does
switch off the TA mode .
AF FUNCTION
(Alternative Frequencies)
AF is a function that works with the help
of RDS (Radio Data System) and can
only be used with FM stations. The radio
searches in the background for the best
frequency reception of the station that
has been tuned into .
PI MUTE :
the sound of another station is
suppressed .
In Radio mode, touch the cursor button
to switch the TA function ON and OFF .
In Radio mode, touch the cursor button
to switch the AF function ON and OFF .
Touch the AF section on touch screen or
swing and keep the SEL knob in the
TA/AF direction for about 2 seconds ,
the AF function is activated. The AF
symbol appears in the display .
When the AF function has been switched
on, the radio continuously tests the
signal strength of the AF frequency .
The test interval for each AF frequency
depends on the signal strength of the
current station and varies from a few
minutes in the case of weak signals.
Whenever the new AF frequency is
stronger than the station that is currently
tuned in , the radio switched to this
frequency for a short time for a short
time and the message
“NEW FREQUENCY “ is displayed for
one or two seconds.
PTY FUNCTION
In Radio mode, touch screen of “PTY”
range to select the Program type .
PTY Selection of the program type
besides the stations name, some FM
stations also transmit information on the
type of program. This information can
be displayed by your car radio .
Examples of such types of program are :
SPORT NEWS POP WEATHER ......
With PTY function you can specifically
select stations transmitting a particular
type of program. Touch the PTY on screen
repeatedly to call up the PTY selection
menu. The message “PTY SEEK” then
appears briefly in the display .
When PTY has been selected the radio
start searching for corresponding PTY
information and stops when the PTY
information has been found, “NO PTY”
appears in the display. If the PTY
information being searched for no longer
exists, the PTY function automatically
switches to normal mode .
Page 24
-22-
Touch Screen Operation
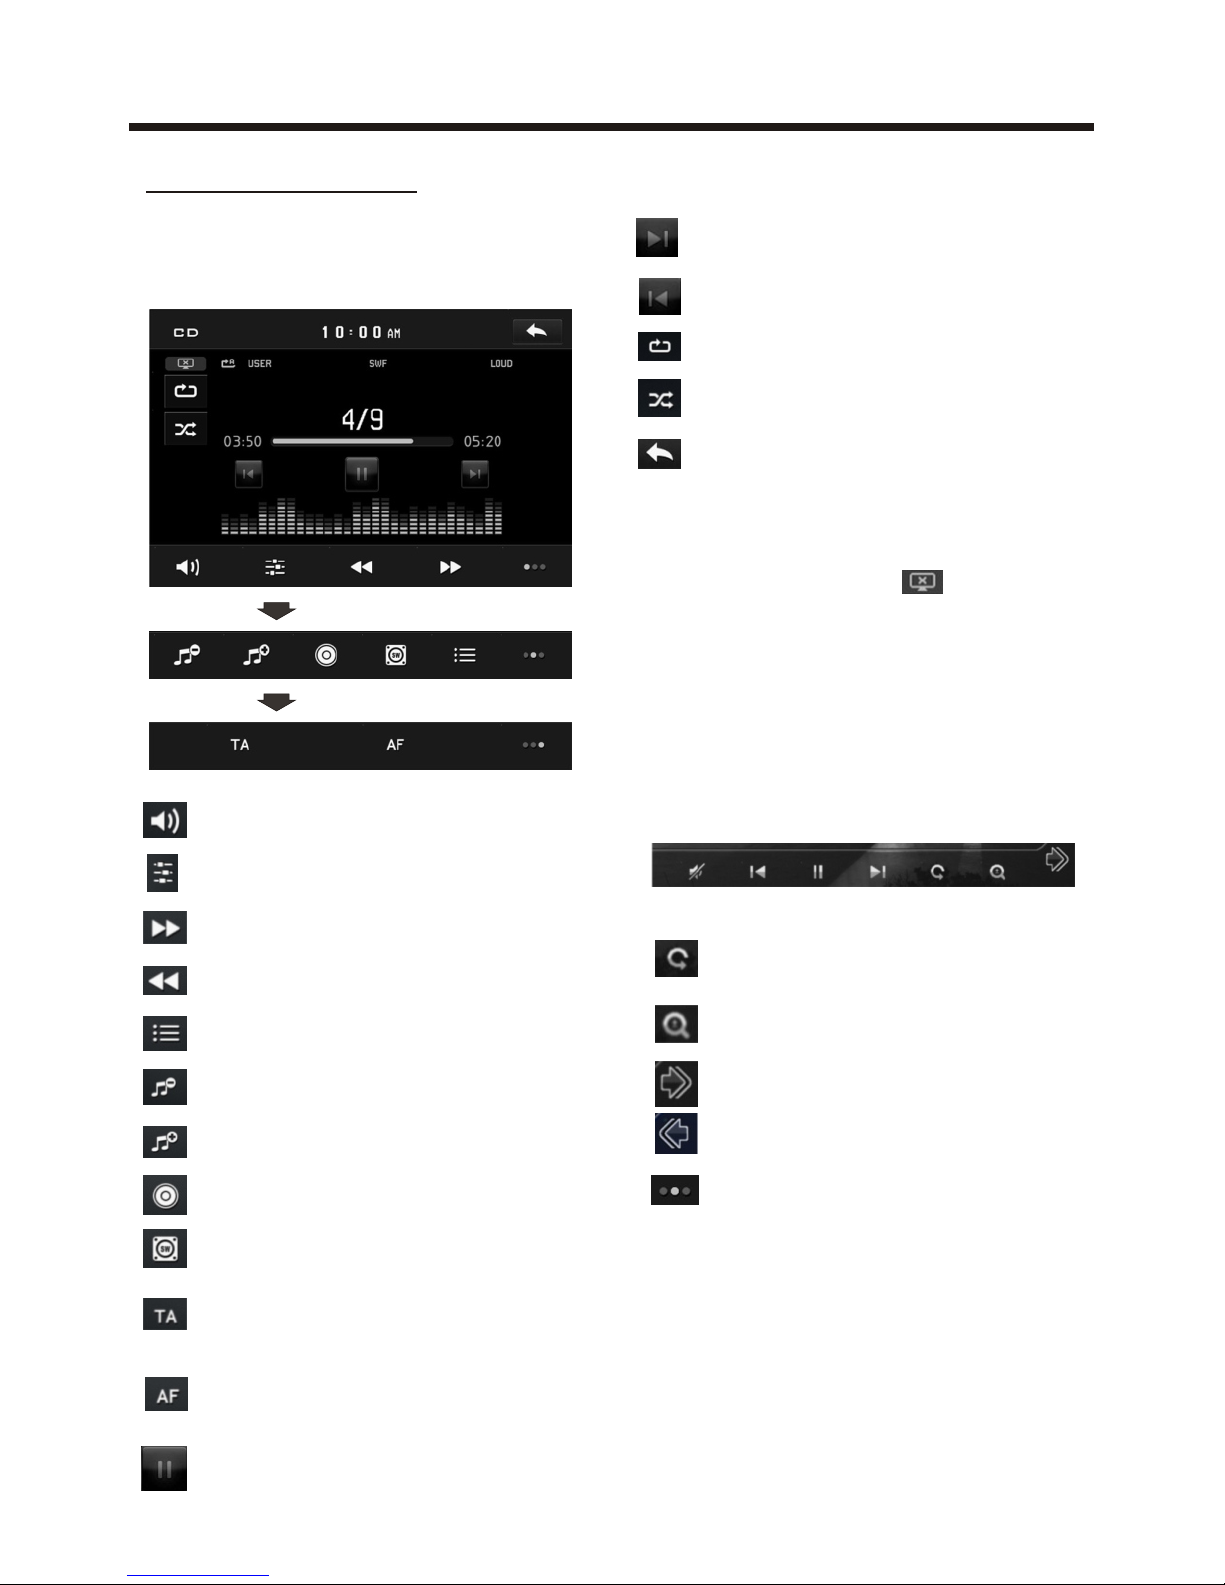
Media Operation
In audio play mode, the message will
display as below :
(When Parking Brake is applied .)
Mute function
To select the Equalizer mode
To search fast forward
To search fast backward
Intro Function
To decrease the volume level
To increase the volume level
Loudness Function
Subwoofer Function
Turning pre-switching for traffic
announcements on and off
Switching on and off an
Alternative frequency
Play/Pause the playing
To skip the next track
To skip the previous track
Repeat Function
Random Function
Previous menu
The icons for other mode
(The same icon have the same function
in each mode)
In PHOTO playing ,tap to change
the photo direction.
ZOOM IN and OUT.
For page turning.
For page turning.
For page turning.
In audio play mode, tap icon that
the display turn dark,tap twice turn dark
more, tap thrice to turn off the display,
and tap anywhere of the display to turn
it on again.
Page 25
Touch Screen Operation
-23-
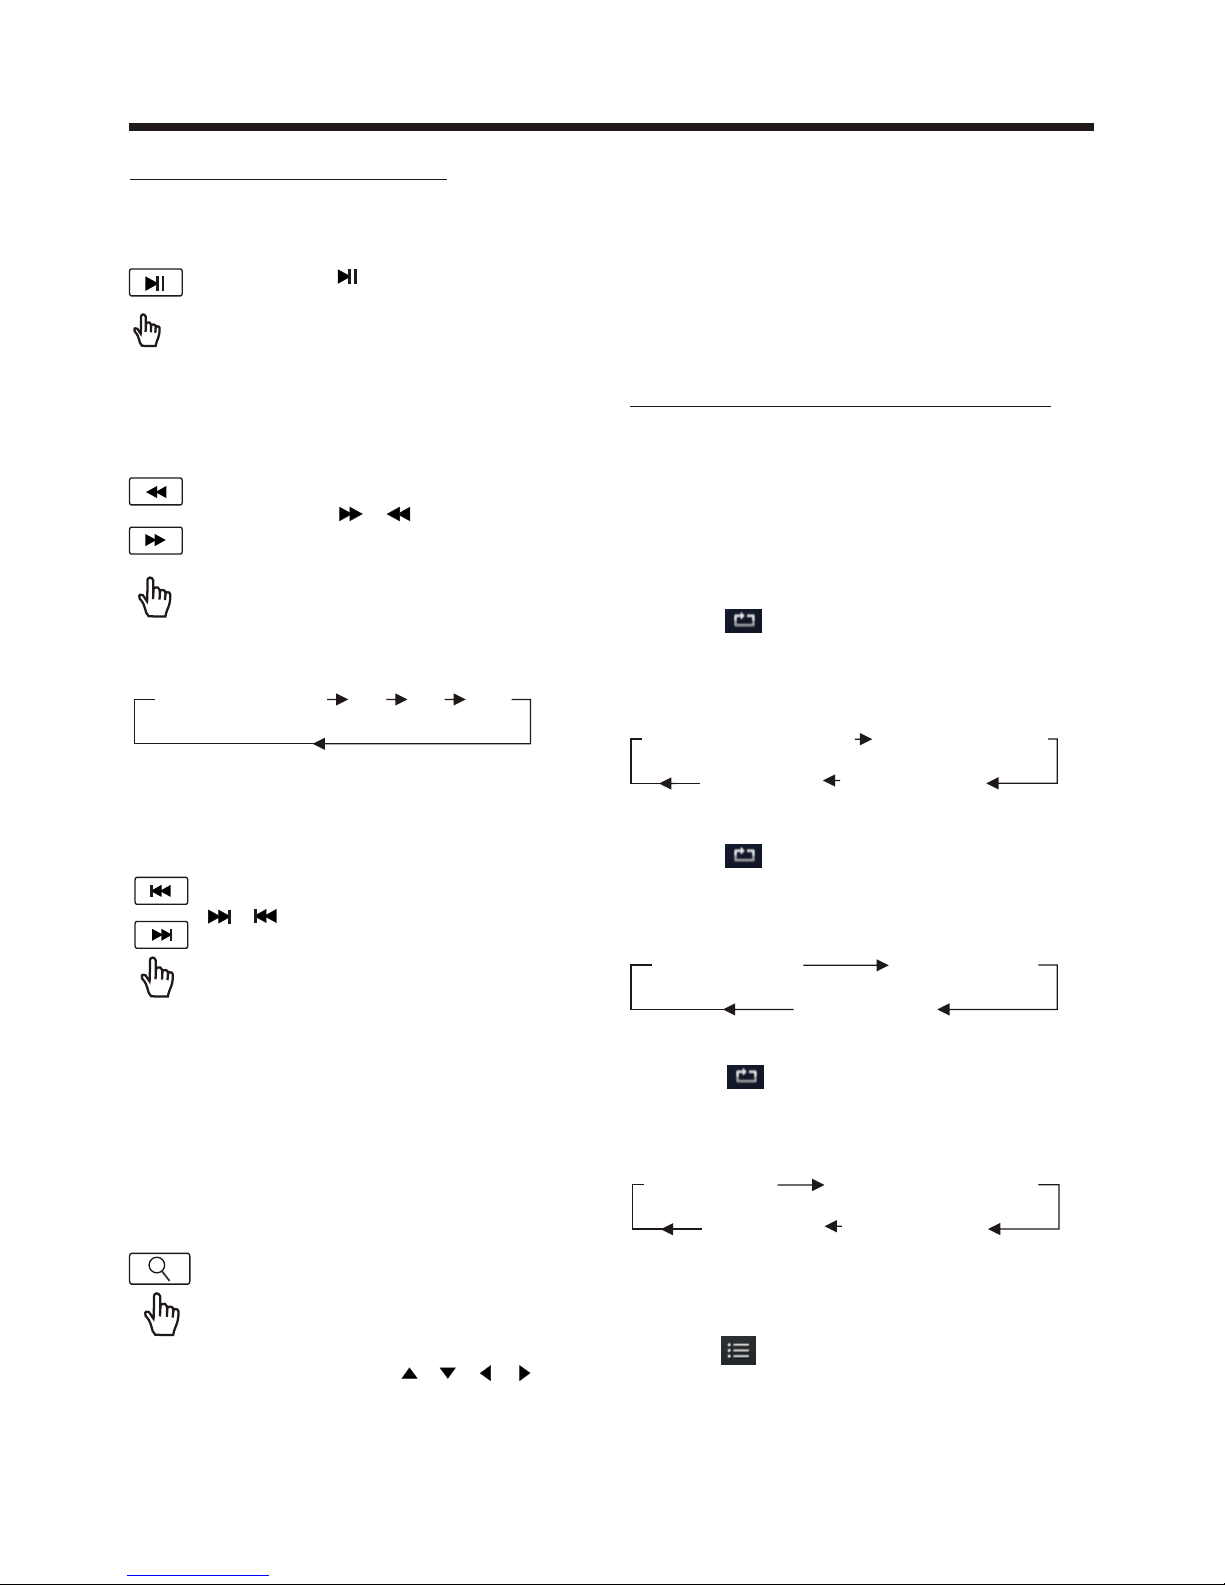
FOR Digital Video :
Tap the icon or press the RPT button
on the remote control to select REPEAT
mode as follows :
REP EA T ALL
CHAPT ER R EP EA T ON TITL E REP EAT ON
REP EA T OFF
Note:
when the JPEG disc playback, in normal
mode, you can use the cursor buttons to
rotate the picture .
Press UP to invert an image .
Press DOWN to mirror an image .
Press LEFT to rotate an image to left .
Press RIGHT to rotate an image to right .
FOR VCD/CD :
Tap the icon or press the RPT button
on the remote control to select REPEAT
mode as follows :
FOR MP3 :
Tap the icon or press the RPT button
on the remote control) to select REPEAT
mode as follows :
FOR CD :
Tap the icon or press the INT button
on the remote control to play the previous
10 seconds part of each track/chapter
on disc.
(Touch it again to cancel this mode)
REPEAT OFF
REPEAT ONE REP EAT ALL
REP EA T ALL
REP EA T ONE REP EAT FO LD ER (or DIR )
REP EA T OFF
SELECTING PLAY MODES
During the Disc playback, select the
“RPT, RDM, INT ” to select your favour
play mode.
1). REPEAT FUNCTION
2). INTRO FUNCTION
Note :
For some VCD2.0 disc (PBC-playback
control), above these buttons may be
unavailable .
Skipping Track
During DISC playback, Touch the
/ section on the touch screen
to skip to next/back one track.
Digital Video/VCD/CD/MP3:
Norma l Play back 2x 4x 8x 2 0x
Rapid Forward/Rapid Reverse
During DISC playback, touch the
screen of “ / ” range the
speed of rapid forward/reverse
changes according to the disc as
follow:
Use the direction keys ( / / / on
remote control to move the enlarged
picture .
Zoom Function
Touch the button repeatedly,
the displayshow as “zoom 2,
zoom 3, zoom 4 , zoom ½,
zoom 1/3, zoom 1/4 , zoom off . ”
Pause (still picture)
Touch the “ ” section on touch
screen during playback will stop
play temporary, touch it again to
return the normal playback .
BASIC OPERATION
Page 26
Touch Screen Operation
-24-
Note: when select the INTRO Mode,
this player to start to play the previous
15 seconds part of each track/chapter
on disc. (Touch it again to cancel
this mode .)
3). RDM(RANDOM) FUNCTION
During DISC playback, touch screen
of “ ” section ( press the
RDM button on the remote control to
play in random. Each play mode the
order is different . (Depend on the
disc used for VCD).
Touch it again to cancel this function .
Note : in random mode, the button
is not available .
FOR VCD :
Press the INT button on the remote
control. It display will following
menu as below :
FOR Digital Video/MP3 :
For Digital Video/MP3 , press the INT
button is not available .
SEQ PL AY IN TR O 1
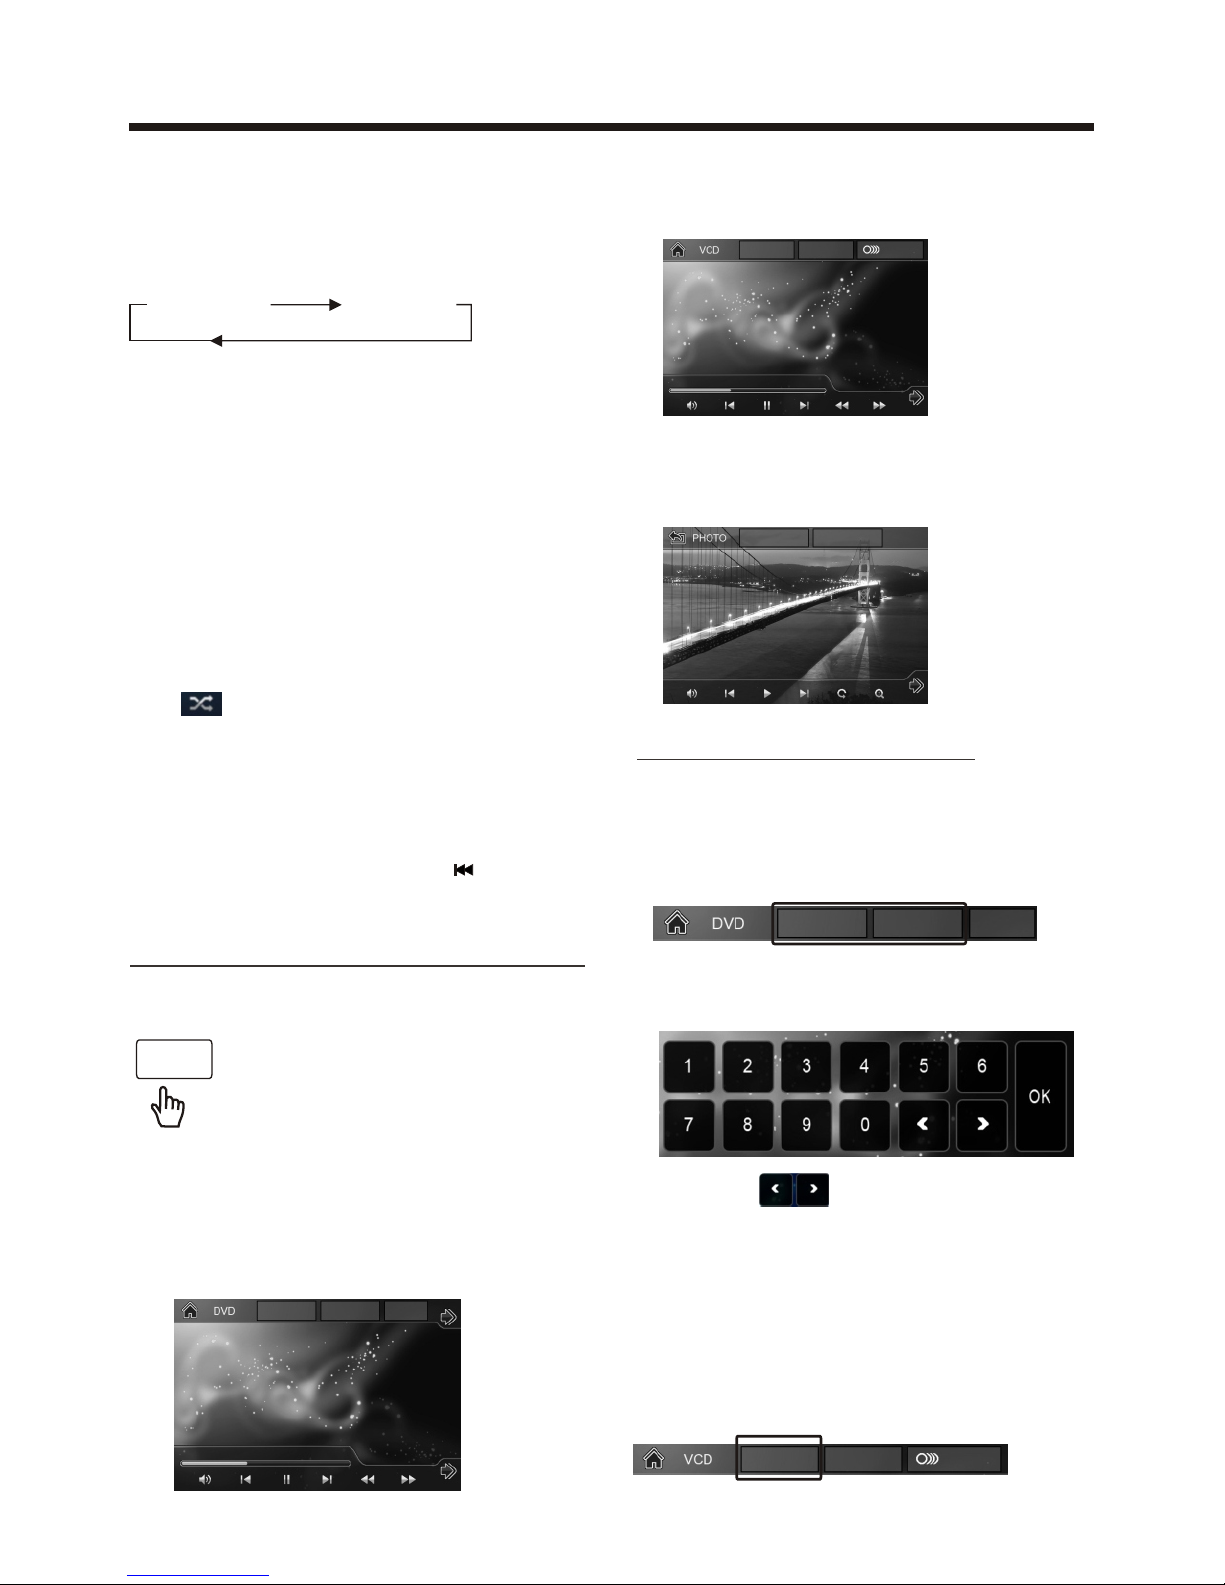
OSD
2. Example for VCD/SVCD, when it is on,
it will display the information such as:
3. Example for Movie or PHOTO .
When it is on, it will display the
information such as:
DISC Search (GOTO)
FOR Digital Video :
Touch the screen as show or press the
GOTO button on remote control;
the screen will display the following
message :
Touch the to select the your
adjustment item, then select the item
your favour by touching the numberic
buttons , then touch the OK button
to confirm .
During playback, touch the
screen or press the OSD on the
remote control, it will display
the following as below :
Note: touch the screen or press the OSD
on the remote control again to cancel
the OSD information.
ON-SCREEN DISPLAY FUNCTION
FOR VCD (With PBC OFF) :
Touch the screen as show or press the
GOTO button on remote control;
1. Digital Video , when it is on, it will
display the information such as:
T 001 /004
00: 25:08 0 1:03: 02
C 001 /001 ME NU
T 001 /004 PB C MIX
00: 25:08 0 1:03: 02
F 001 /003 T 00 1/001
T 001/ 00 4 PBC MIX
T 001/ 004 C 001/ 001 M ENU
Page 27
-25-
Touch Screen Operation
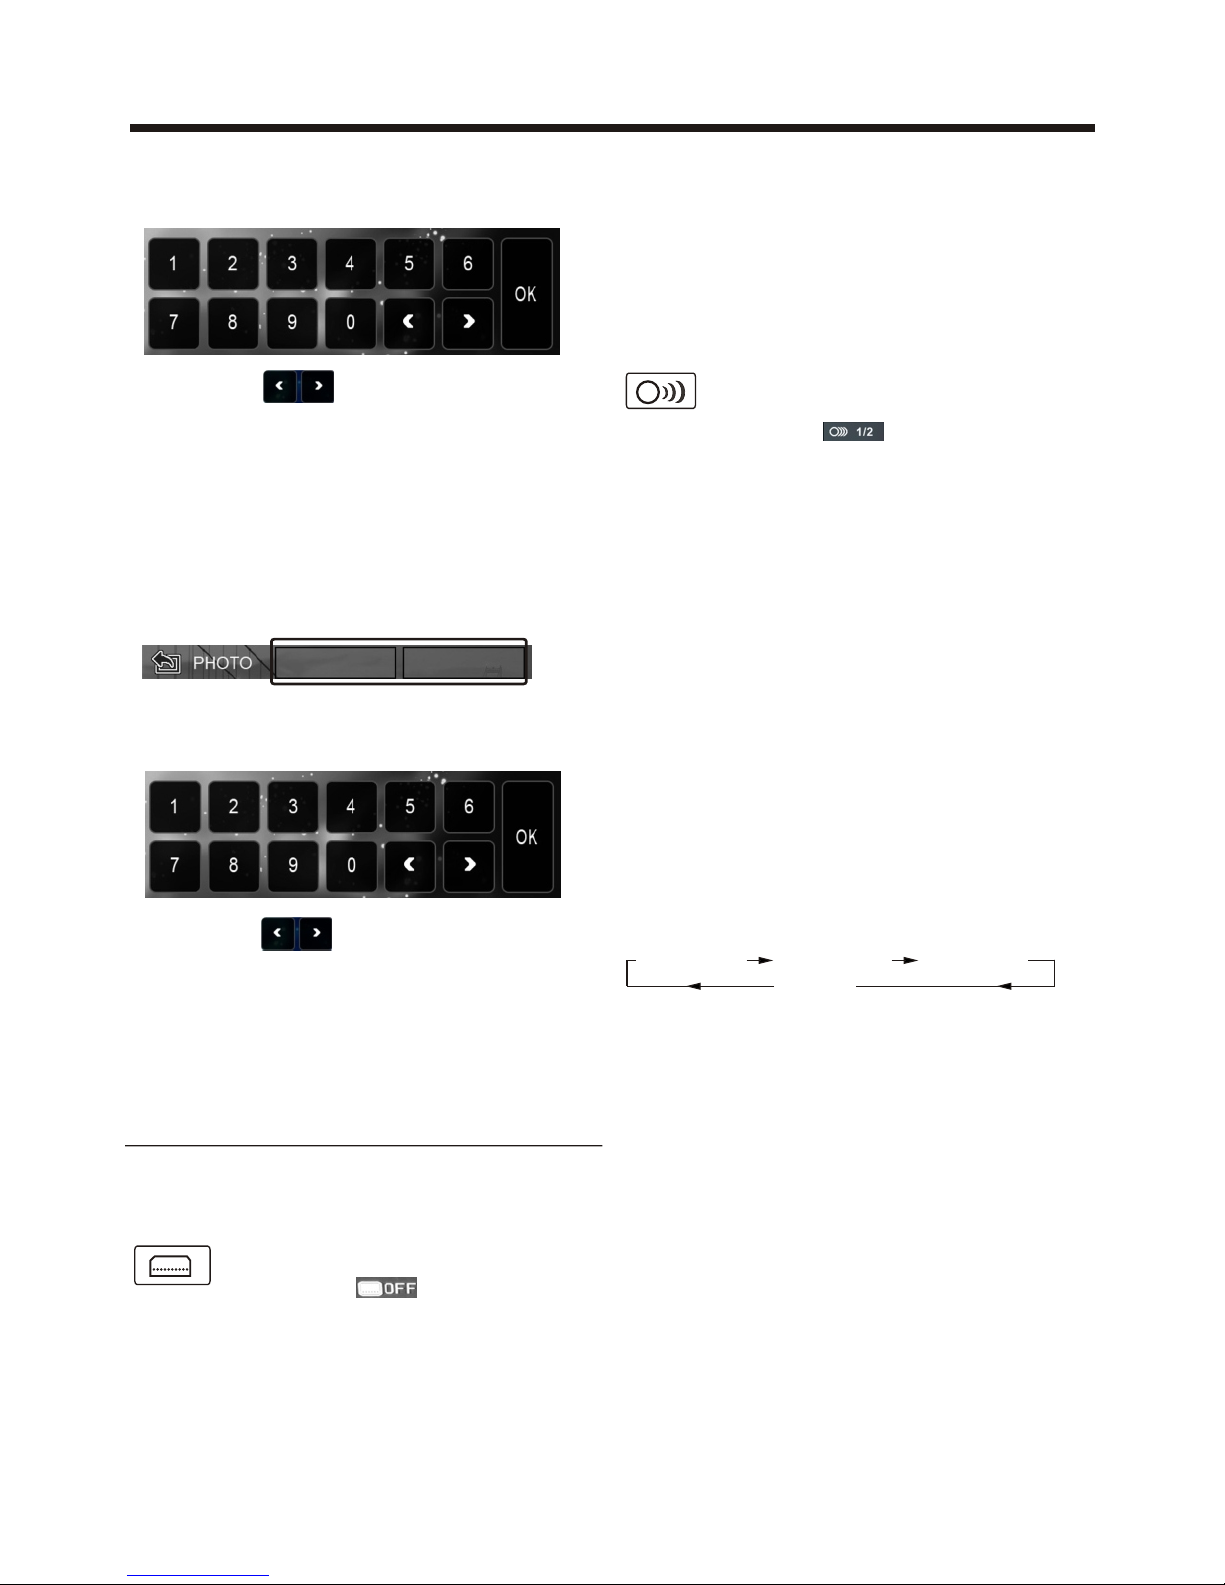
the screen will display the following
message :
Touch the to select the your
adjustment item, then select the item
your favour by touching the numberic
buttons , then touch the OK button
to confirm .
For Movie/Photo:
Touch the screen as show or press the
GOTO button on remote control;
the screen will display the following
message :
Touch the to select the your
adjustment item, then select the item
your favour by touching the numberic
buttons , then touch the OK button
to confirm .
Digital Video Special Function
During Digital Video playback.
Touch the icon on touch
screen(or press the SUBT on
the remote) .
1. Multi-subtitle Language
Function (for Digital Video Only)
Each time the button is pressed or touch,
number of the subtitle language changes
in sequential order.
Notes:
- The language number is different
according to the disc.
MONO L EFT M ONO R IGH T
STER EO
MIX- MON O
For VCD/CD:
during playback, touch the AUDIO
section of the touch screen or Press
AUDIO on the remote . It is possible to
switch the sound between monaural
and stereo sound.
2. Multi-Audio Language Function
For Digital Video:
During Digital Video playback ,
touch the icon on touch
screen (or press the LANG
on the remote .) Each time the button is
pressed or touch , number of the audio
soundtrack language changes on
sequential order.
Notes:
- The language number is different
according to the disc.
- Some disc only contain one language
soundtrack
- When no different language soundtra ck are recorded will be
display at screen left top corner.
“ INVALID KEY ”
- Some discs only contain one subtitle
language.
- When no different subtitle language
are recorded, “ INVALID KEY ” will be
displayed at screen left top corner.
3. Title Menu Function
For Digital Video:
If the Digital Video has multiple titles
recorded on the disc. It can select
preferred title from the title menu to start
playback.
- During Digital Video playback, press
TITLE button on the remote .The title
menu is display.
- Select preferred title by the cursor
button and confirmed by press the
ENTER button .
For VCD:
Press TITLE/PBC button on the remote
control while the disc is playing, you can
switch between "PBC ON"and "PBC off"
mode.
F 001/0 03 T 001 /001
Page 28
-26-
Touch Screen Operation
AUX Operation
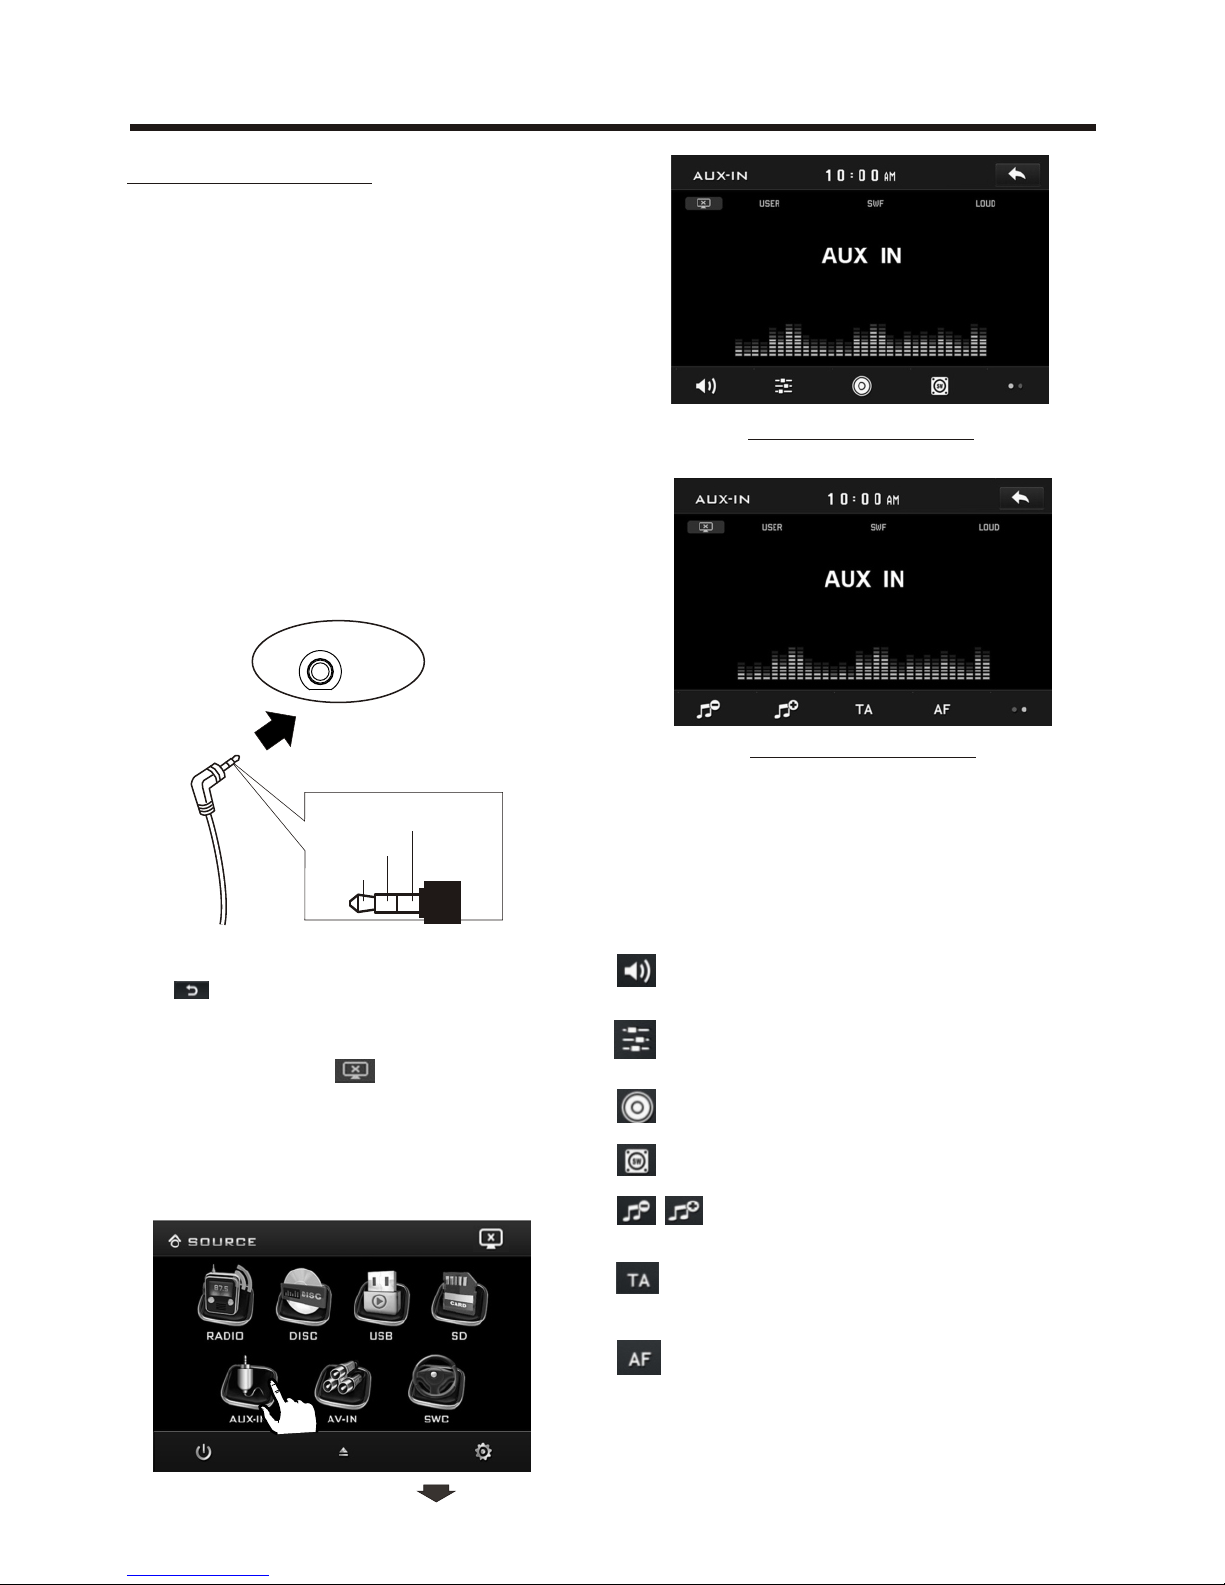
On the front panel of this unit, there is an
AUX IN jack, follow the diagram below to
connect analogue replay devices(only
for the Audio connect, if you want to
connect the Video, please plug the
<Video input > on the back of the unit .) .
Use this jack to replay sound of other
replay equipment such as Digital Video
players, computers, etc. Via the loudspeakers.
1). Please connect the external device
with stereo jack (3.5mm)plug the Aux in
socket .
AUX INTERFACE 1
AUX INTERFACE 2
3). You now hear the sound from the
external device played back through
the loudspeakers .
The function of the icons as follow:
Tap to mute the sound.
Tap to select EQ as the same on the
remote control.
Loudness Function.
Subwoofer Function.
Tap to adjust audio volume.
Turning pre-switching for traffic
announcements on and off.
Switching on and off an
Alternative frequency.
AUX IN JACK FRONT PANEL
AUX IN
Gro un d
Right
Lef t
AUX IN
2). In radio mode, touch the screen
of “ ” ICON to enter the main menu,
touch the “ AUX ” ICON to enter the
AUX IN mode.
In AUX mode, tap icon that the
display turn dark,tap twice turn dark
more, tap thrice to turn off the display,
and tap anywhere of the display to turn
it on again.
10:00 AM
Page 29
Touch Screen Operation
-27-
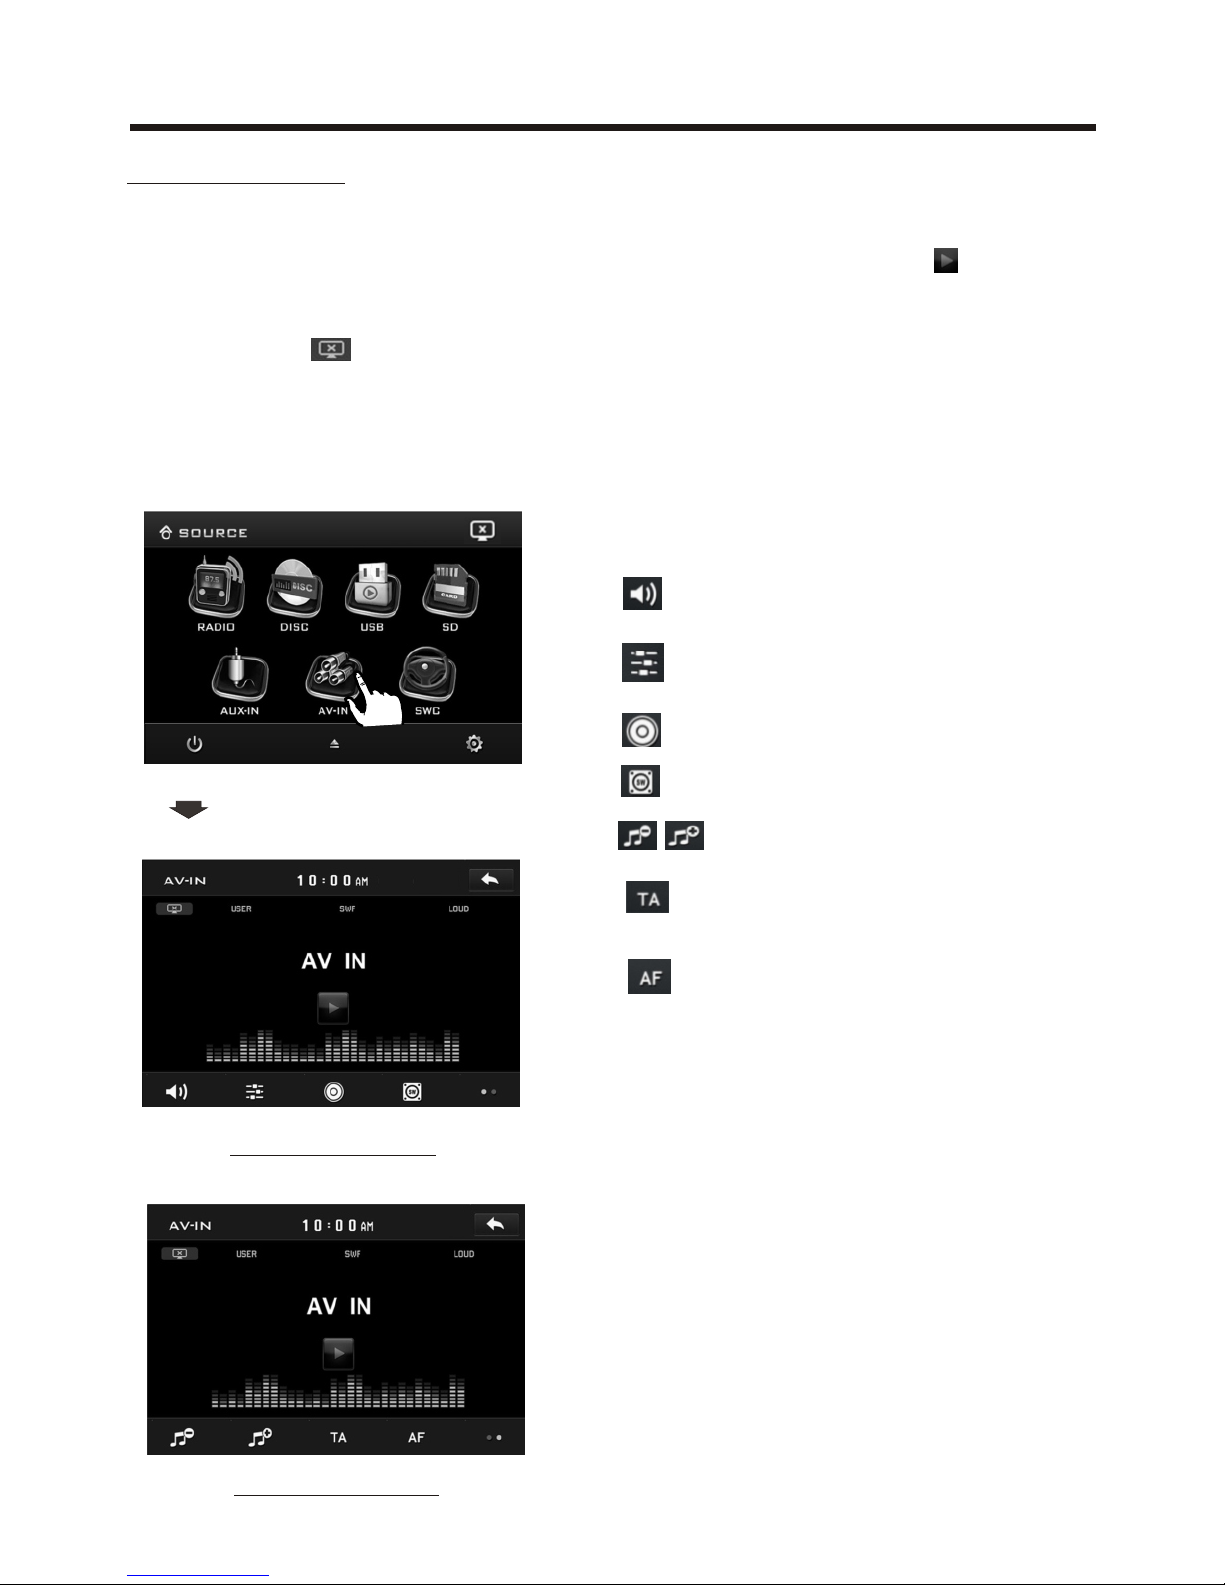
The function of the icons as follow:
Tap to mute the sound.
Tap to select EQ as the same on the
remote control.
Loudness Function.
Subwoofer Function.
Tap to adjust audio volume.
Turning pre-switching for traffic
announcements on and off.
Switching on and off an
Alternative frequency.
Note: To ensure safety while driving and
to comply with lows, drivers should
not watch video or operate the
video device while driving.
As the interface show, here is only the
audio output, now tap the icon,
the picture of the auxiliary input video
show on the display and tap the display
again to turn to audio mode.
Now you can watch the video from your
External video equipment such as
Digital Video players, computers, etc.
AV Operation
Please plug the <Video input >
on the back of the unit .
Touch the AV IN icon to enter the AV IN
mode.
In AV mode, tap icon that the
display turn dark,tap twice turn dark
more, tap thrice to turn off the display,
and tap anywhere of the display to turn
it on again.
AV INTERFACE 1
AV INTERFACE 2
10:00 AM
Page 30
-28-
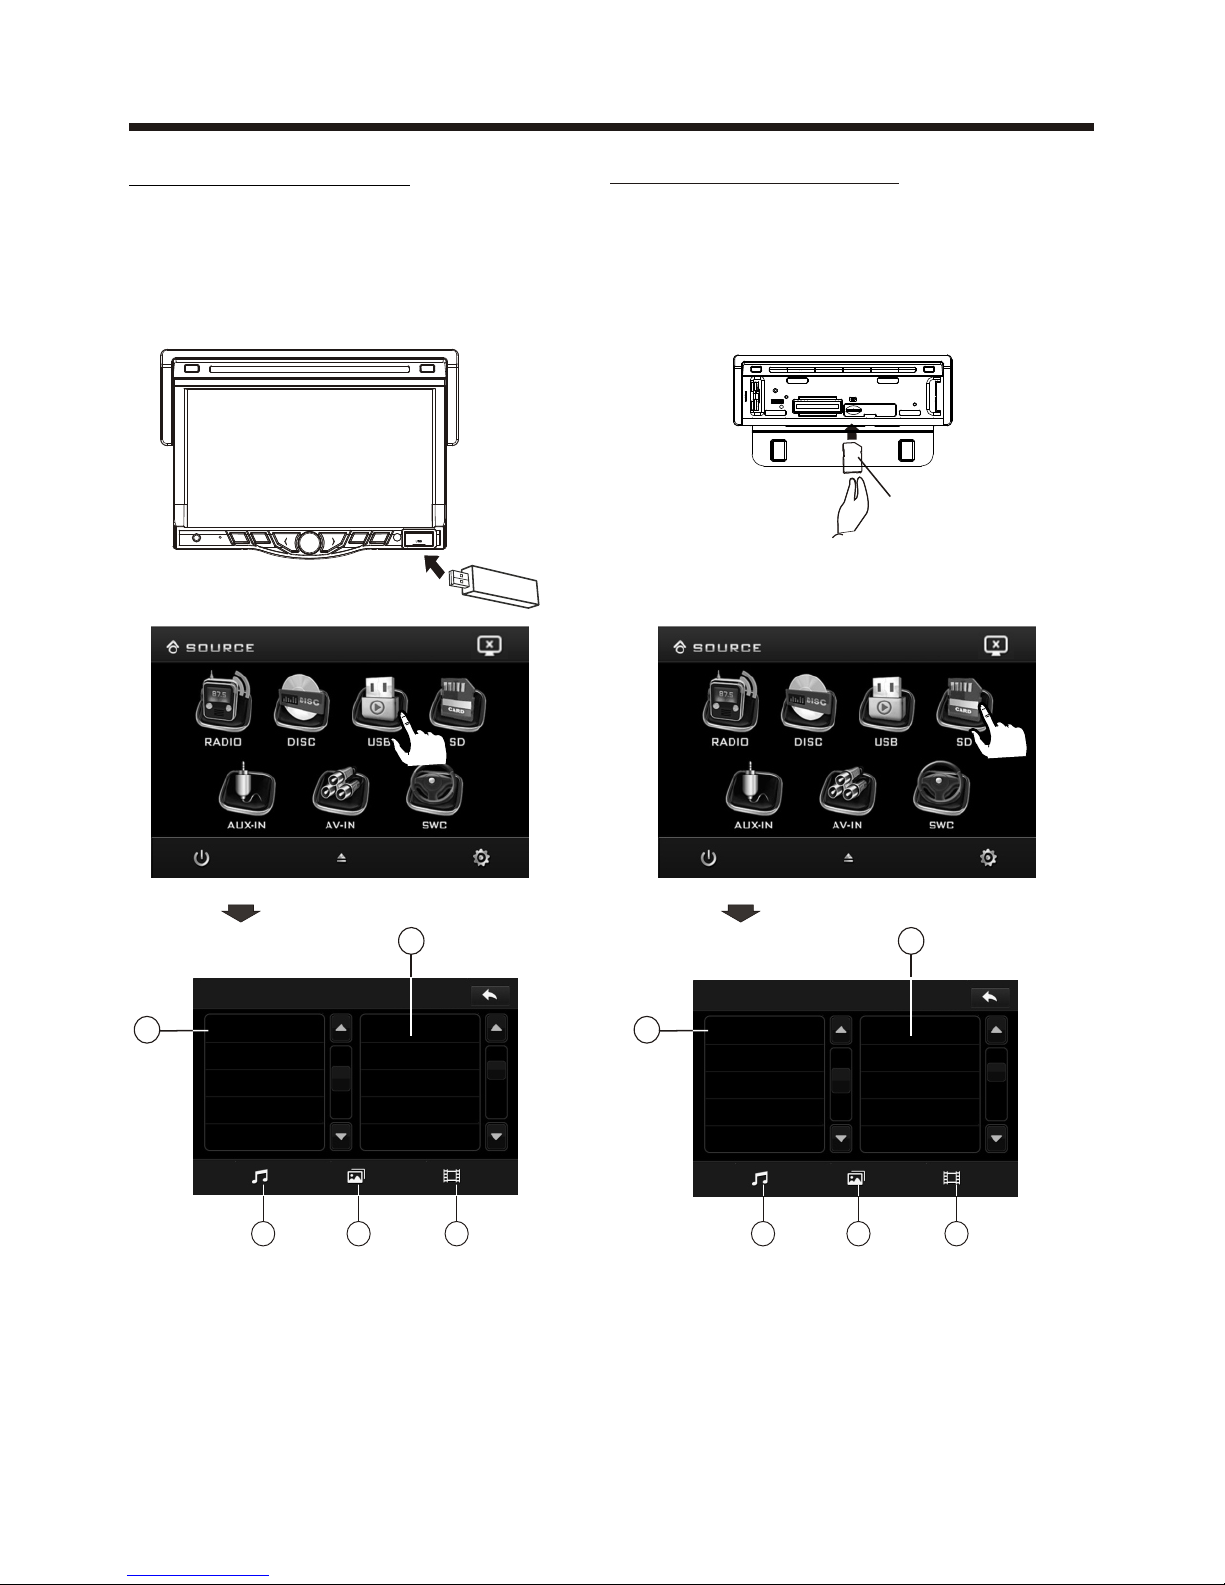
Following the diagram below, connect
your USB device to the front panel
USB port . If it is properly connected,
the device will be mounted and start
playing automatically.
USB OPERATION
Touch Screen Operation
1 Current type (highlighted bar) .
2 Audio play mode select.
3 Picture play mode select.
4 Movie play mode select,
5 Current play track .
1 Current type (highlighted bar) .
2 Audio play mode select.
3 Picture play mode select.
4 Movie play mode select,
5 Current play track .
Card OPERATION
The unit can support playback MP3/WMA/
JPEG/MP4 and Divx format which are
stored on SD memory cards .
Please read the following instructions
before you start using a memory card .
Inserting the card as follow:
Following the diagram below, connect
your USB device to the front panel
USB port . If it is properly connected,
the device will be mounted and start
playing automatically.
USB OPERATION
Card OPERATION
The unit can support playback MP3/WMA/
JPEG/MP4 and Divx format which are
stored on SD memory cards .
Please read the following instructions
before you start using a memory card .
Inserting the card as follow:
SON GS ON G
USB
001
002002
003
004
005
5
2 3 4
1
MOV E
SD
MOV 03247 .MPG
CIM G3080 .MOV
5
2 3 4
1
Insert a card, push in till heard
a “CLICK”, then attach the
control panel again to play.
Labe l si de
faci ng u pw ar d
U
S
B
10:00 AM 10:00 AM
Page 31
Touch Screen Operation
-29-
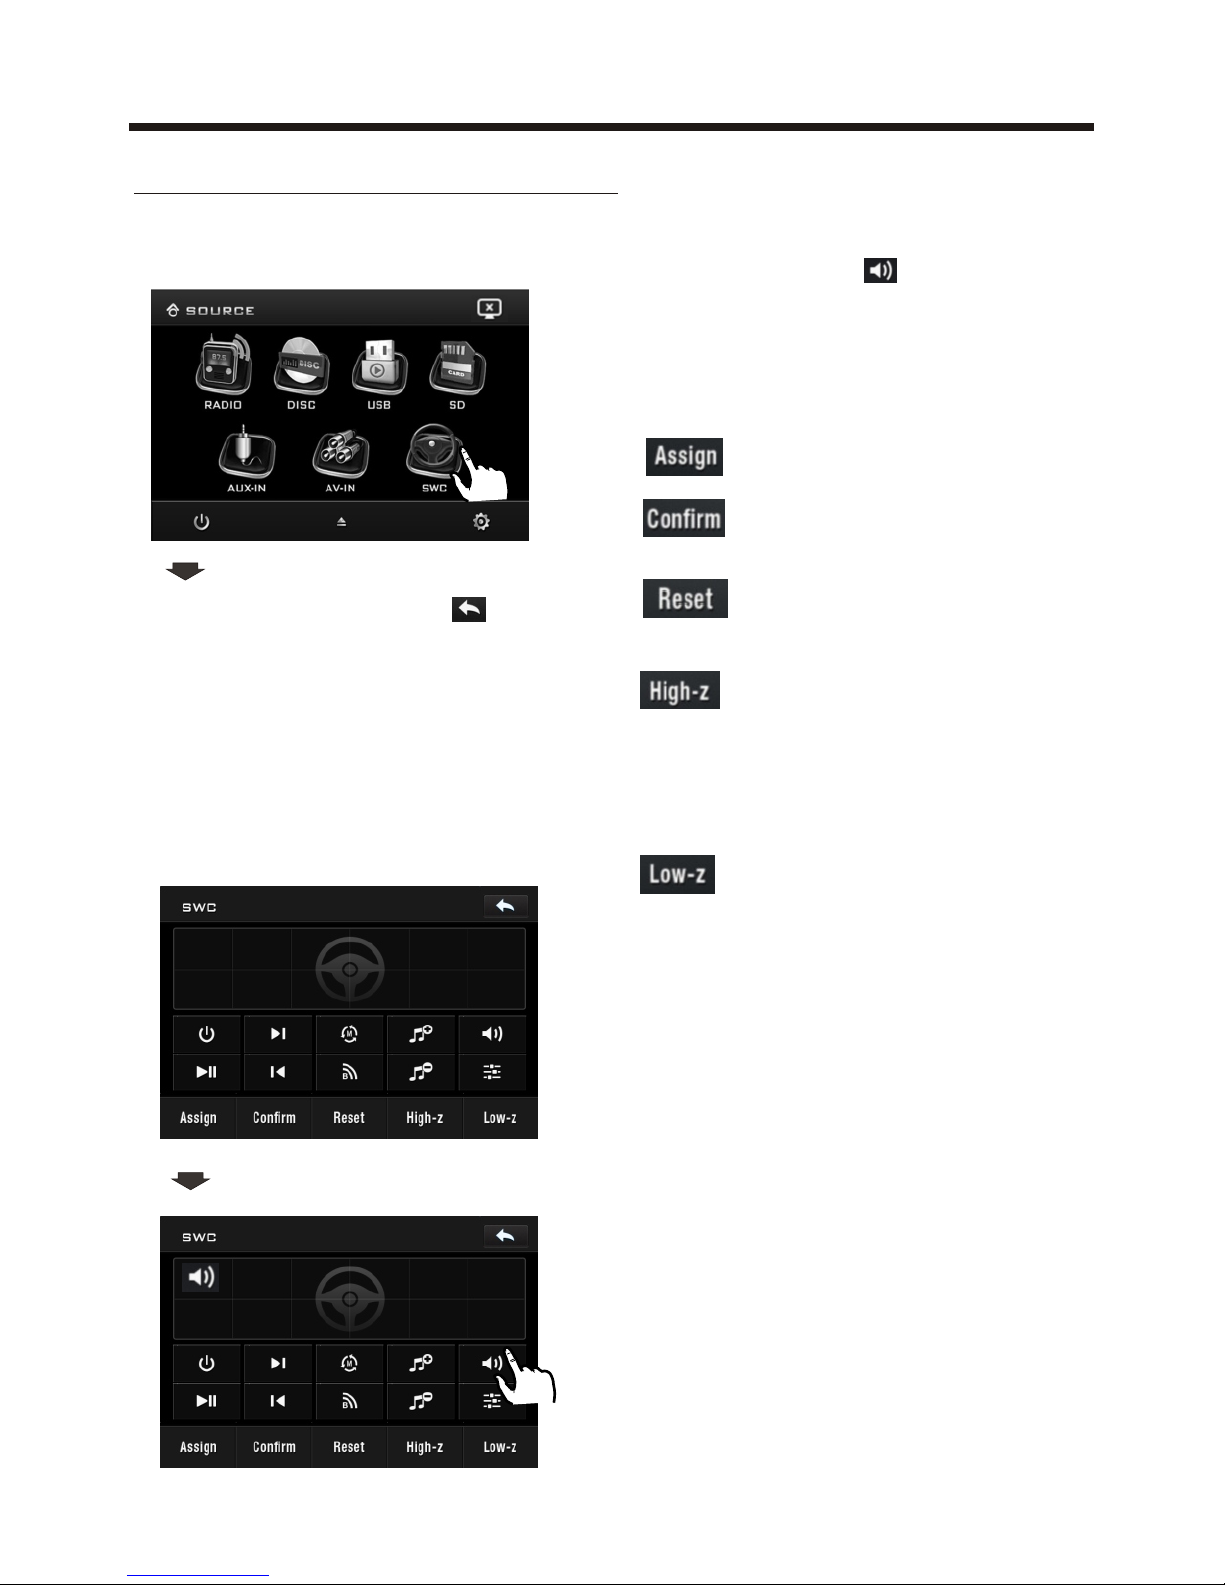
STEERING WHEEL CONTROL
Touch the SWC icon as follow to turn to
steering wheel control .
High-z means high-impedance.
Tap to reduce the magnitude
of voltage. This key for avoid
that voltage is too high that the
car system can not differentiate
the input key set for some car.
Low-z means low-impedance.
Tap to increase the magnitude
of voltage. This key for avoid
that voltage is too low that the
car system can not differentiate
the input key set for some car.
During setting, touch the icon to
turn to home menu.
There are 2 KEY for no more than 12
buttons to select.
For first time use this function, input a
key (such as 0.38,0.38 is a magnitude
of voltage, according to your car )
through the steering remote and
show in button 1 position.
Then tap Assign and tap the button 1
and then select the icon as the picture
show, the icon show in button 1 position.
After selection tap confirm and back to
home menu that means select finish.
The function of the icons as follow:
Touch to begin function save.
After selection touch to confirm
operation.
Touch this icon to cancel the
input and resume load.
0.38
10:00 AM
Page 32

Specification
-30-
TFT Monitor:
Monitor Screen Size: 7 Inch Wide
Color System: NTSC/PAL
NOTE:
Specifications and design are subject to modification, without notice, due to
improvements in technology.
RADIO Section:
For 2 Bands For 2 Bands
(Europe) (U.S.A.)
FM FM
Frequency Coverage: 87.5 to108 Mhz 87.5 to107.9 Mhz
IF: 10.7 MHz 10.7 MHz
Sensitivity (S/N = 30 dB): 15 dBu 15dBu
MW AM
Frequency Coverage: 522 to1620 KHz 530 to1710 KHz
IF: 450 KHz 450 KHz
Sensitivity (S/N = 20 dB): 40 dBu 40 dBu
Audio Signal Output: 2ch&4ch line out
Characteristics: (1)Frequency Response 20 Hz - 20 KHz
(2)S/N Ratio 90 dB (JIS)
(3)Wow and Flutter Below measurable limits
General :
Supply Voltage: 12V DC (11V-15V)
Current Consumption: Less than10 A
Signal System: Compositive video 1.0Vp-p 75
Discs Played: (1)DIGITAL-VIDEO Disc
5"(12 cm) single-sided, single-layer
5"(12 cm) single-sided, double-layer
(2)Compact Disc (CD-DA, VIDEO CD)
5"(12cm) disc
Page 33
-31-
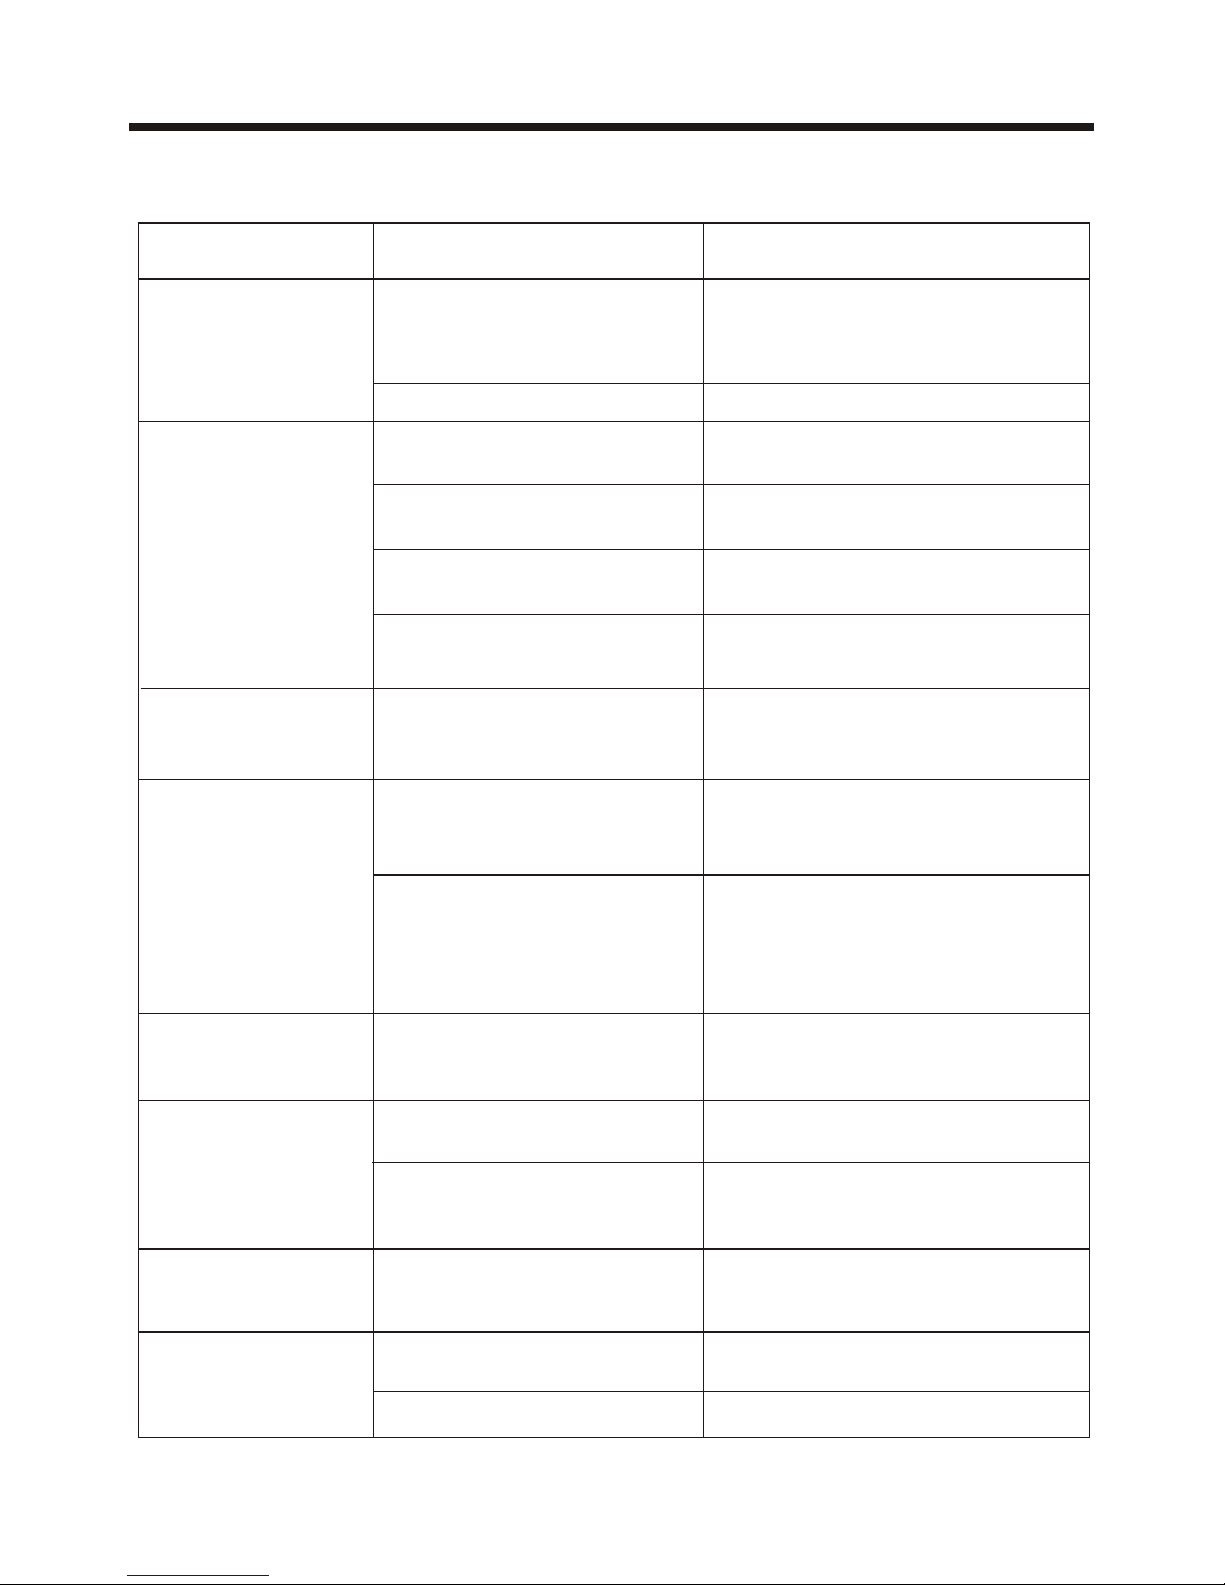
Before going through the check list, check wiring connection. If any of the problems
persist after check list has been made, consult your nearest service dealer.
Troubleshooting
Inserting the disc in reverse
direction
Press the RESET button.
Front panel is not properly fixed
into its place
The car ignition switch is
not on
If the power supply is properly
connected to the car accessory
terminal,switch the ignition key
to "ACC"
The fuse is blown
Replace the fuse
Presence of disc inside the
player.
Remove the disc in the player,
then put a new one
Insert the compact disc with
the label facing upward
The disc is extremely dirty
or defective
Clean the disc or try to play a
new one
Temperature inside the car
is too high
Cool off or until the ambient
temperature return to normal
The built-in microcomputer
is not operating properly
due to noise
The antenna cable is not
connected
Insert the antenna cable firmly
The signals are too weak
Select a station manually
SYMPTOM CAUSE SOLUTION
Video/image
appears
black-white
The color system is
set incorrectly
Please switch to correct color
system from menu
No video/image
appears
The unit is not connected
to the parking brake
detection switch
Make proper connection
according to wire connection “ ”
The parking brake is not
engaged
For safety reasons no video/
images are displayed while the
vehicle is moving.
Engaging the parking brake will
cause images to be displayed.
The operation keys
do not work
The radio does not
work
Disc can not be
loaded or ejected
No power
No color in picture
The disc format is not
according to the TV-set
used (PAL/NTSC)
Please choose a proper color
system.
JPEG disc can
not be played
back
No JPEG files are recorded
on the disc.
JPEG files are not recorded
in a compliant format
Change the disc Record JPEG
files using a compliant
application
Change the disc
88-J7502-00
Made in China
Page 34

 Loading...