

Page 1
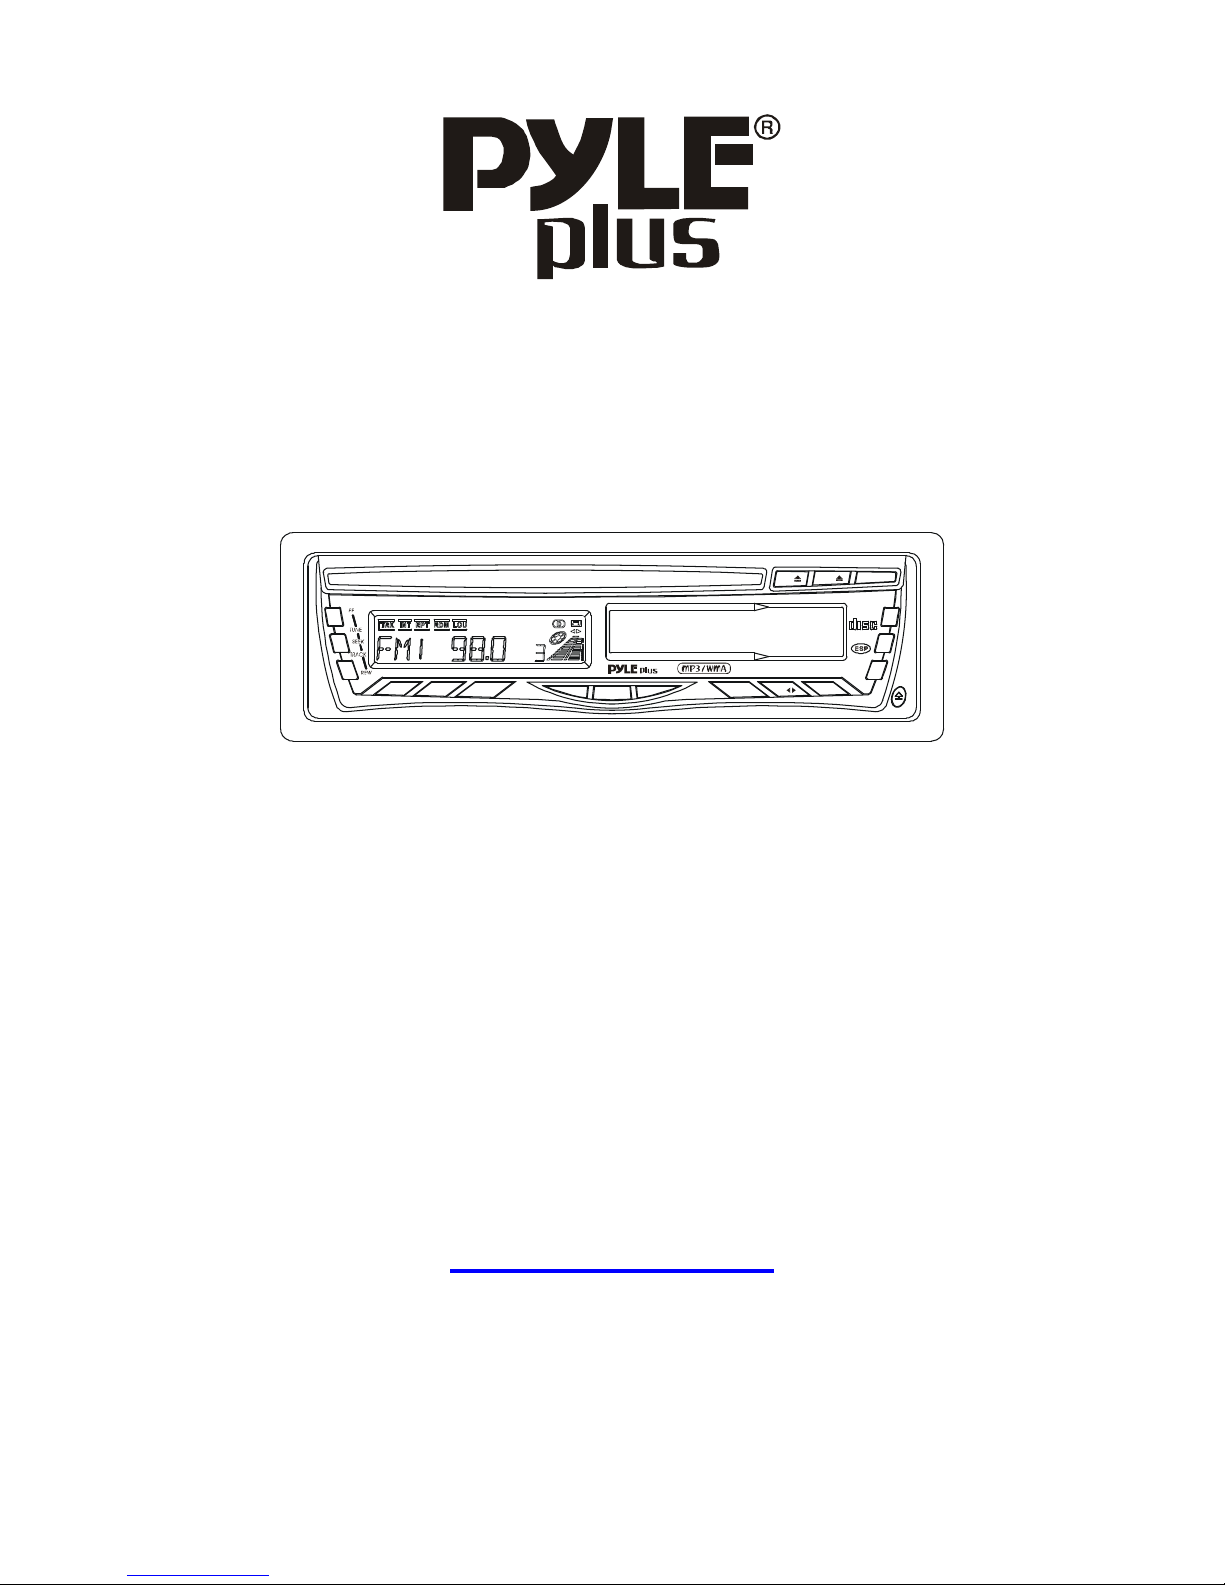
PLCDCS90M
OWNER'S MANUAL
FU LL LOGIC CASSETTE/RECEI VER/C D- R/ W PLAYBACK C D-C H CO NTROL
BD
+
-
+
-
SEL
A
UDIO
CONTROL
CD
PWR
TAP
COMPACT
DIGITA L AUD IO
1
PUS
LOU
2
INT
3
RPT
MT L
MODE
ST
4
RDM
5
6
A
MS
- +
DISC
DISC-
PLCDC S90 M
200WATTS
THEFT DETERRENT DETACHABLE SYSTEM
CAR AUDIO CASSETTE, CD, MP3, WMA PLAYER
WITH ELECTRONIC ANTI-SHOCK FUNCTION
AND CD CHANGER CONTROL
AM/FM-STEREO DIGITAL PLL TUNING RADIO
www.pyleaudio.com
Page 2

1
Congratulation!
Congratulations on your purchase of this CASSETTE/ CD/ MP3/WMA car stereo Receiver.
Selecting fine audio equipment is only the start of your musical enjoyment.
Now it is time to consider how to maximize the enjoyment you will get from knowing how to
work your new car stereo receiver.
We hope you enjoy using this product and encourage you to always listen at a moderate, safe
sound level to avoid any possible hearing damage or loss.
If you listen to excessively loud sound over time, your hearing can adapt to higher volumes
and what sounds "normal" to you may be quite harmful and can cause you to have permanent
hearing loss. So please practice "safe sound" and always listen at moderate sound levels
only.
Start with your volume control at the lowest setting, and slowly increase the level
until you can hear it comfortably and clearly, free from distortion.
Once you have established this comfortable sound level, leave it there.
ABOUT THIS MANUAL
Please read this manual thoroughly and save it for future reference.
This CD receiver incorporates manual sophisticated functions which may enhance your
listening experience. Without reading the manual, you might miss a few, so please take the
time to read and understand all the product's capabilities.
A NOTE ABOUT CD-R/CD-R/W DISCS
In addition to commercially-recorded audio CD's, this unit can play CD-R and CD-R/W discs.
In come cases, particularly when recorded on older CD burners, some CD-R and CD-R/W
discs may not play. Also, whenever you are recording a CD for playback in this receiver, it is
recommended that you record at 24x or slower speed for CD-R and 4x or slower for CD-R/W
to achieve higher signal quality and better playback performance.
Page 3
2
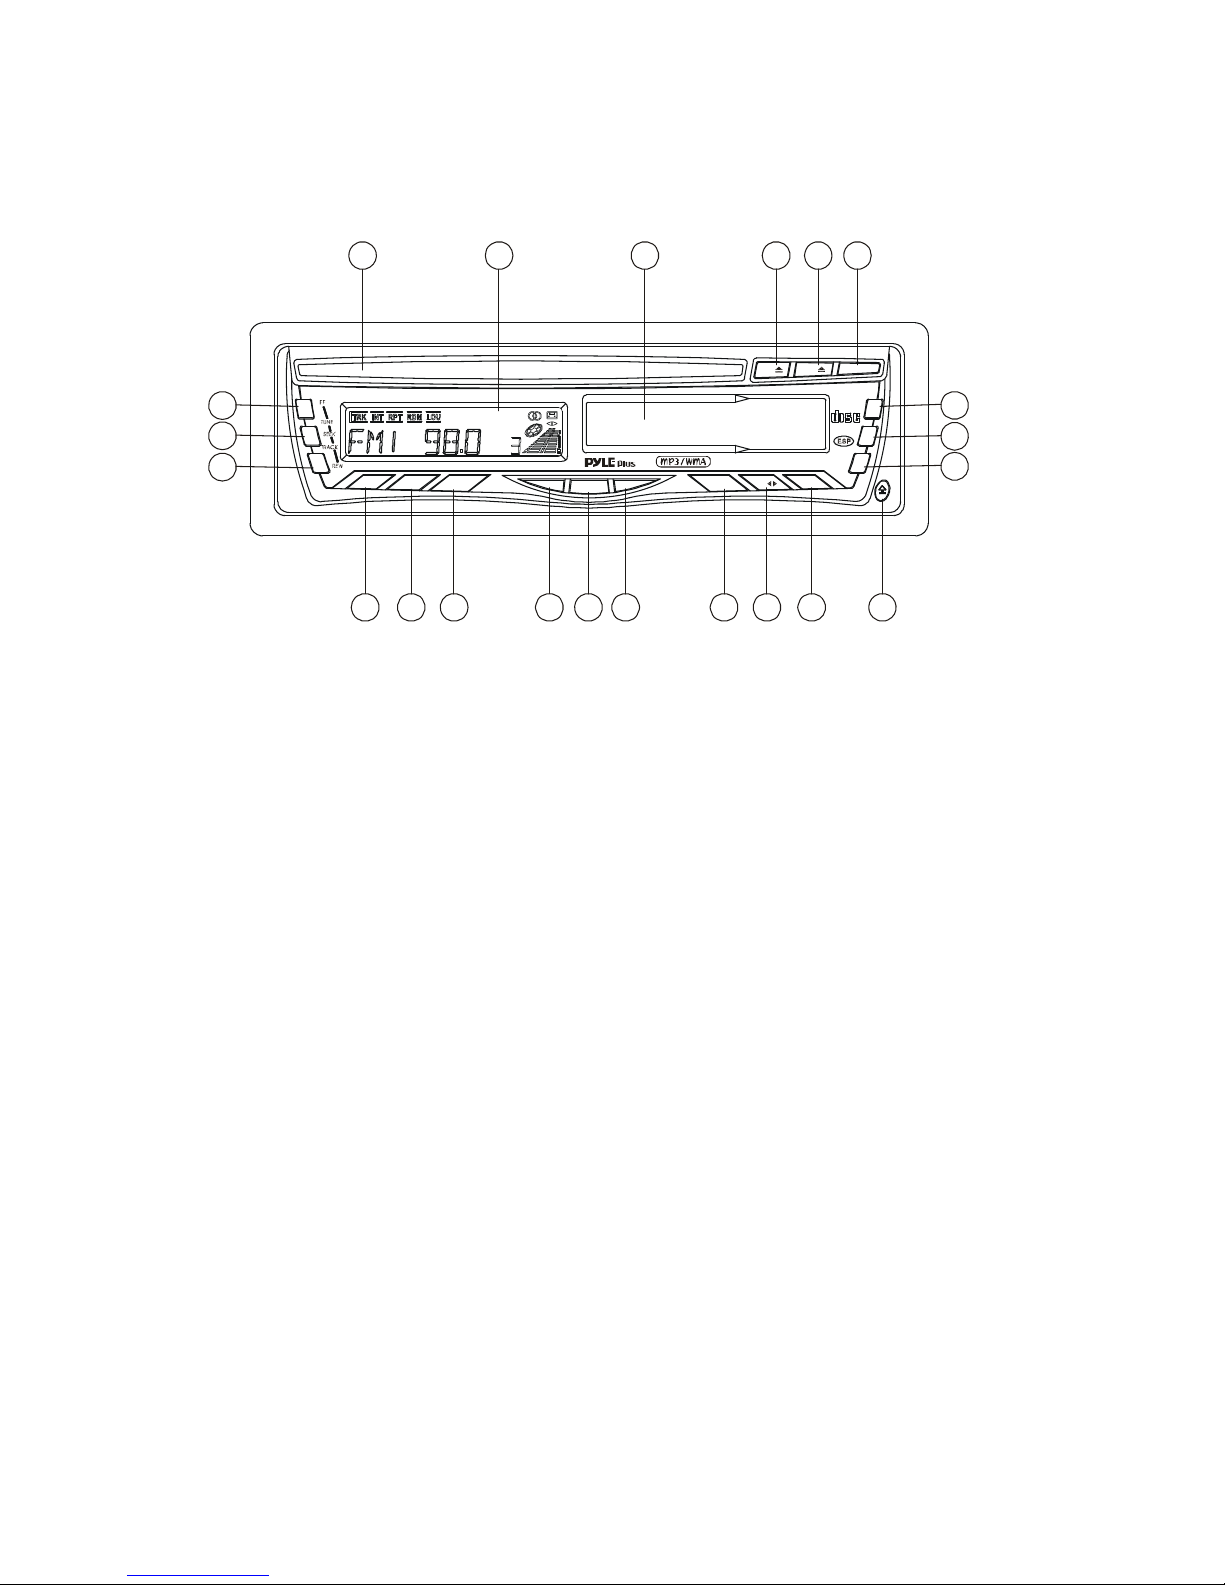
LOCATION AND FUNCTION OF CONTROLS
1 2 3 4 5 6
7
8
9
10
11
12
13
14
15
16
17
18 19 20
2122
FULL LOG IC C ASSETTE/RECEIV ER/C D- R/W PLAYBAC K CD -CH CO NTROL
BD
+
-
+
-
SEL
A
UDIO
CONTROL
CD
PWR
TAP
COMPACT
DIGITAL AUDIO
1
PUS
LOU
2
INT
3
RPT
MTL
MODE
ST
4
RDM
5
6
A
MS
- +
DISC
DISC-
PLCDCS90M
1. Power On/Off Button
2. CD SLOT
3. LCD DISPLAY
4. CASSETTE TAPE DOOR
5. CD EJECT KEY
6. TAPE EJECT KEY
7. Volume/Menu UP(+) Button
8. Volume/Menu DOWN(-) Button
9. MODE Button
10. Loudness(LOU) Button
11. Audio mode/menu selector
12.RELEASE Button
13. BAND(BD) Button
14. Tune/Seek UP(+) & Track UP(+),
Fast Forward Button
15. Tune/Seek Down(-) & Track
Down(-),Rewind Button
16-21. Preset Station Memory Button
16. Track&Tape Play/Pause Button
17. Track Preview(INT) Button
18. Track Repeat(RPT) / Tape MTL Button
19. Track Random Playback (RDM) Button
20. Next folder Selector / Disc Down(-)
/Direction of tape playback Selector
21. Previous folder Selector / Disc Up(+)
/AMS Button
22. STEREO/MONO(ST) Button
Page 4

3
General Controls:
1. Power On/Off
You can turn this unit ON by pressing any button on the front panel (except the RELEASE
button, EJECT key), or inserting a disc into disc slot; you can see the WELCOME on the
LCD will display at the same time.
Press the power(PWR) button to turn power off; simultaneity, the GOOD BYEwill also
be visible on the LCD display.
2.To adjust the volume level
Press the volume UP(+) or DOWN(-) button shortly or hold to raise or lower the volume
level during playback. The both buttons are also used to adjust the settings for Bass,Treble,
Balance when you are in those audio modes.
3. To Select Playback Mode
Press the MODE button repeatedly to select the different modes as the following sequence
RADIO, TAPE, CDP, CDC mode.
4. Loudness ON/OFF
Press the LOU button to enhance bass sound when volume level is low. Press again to
cancel.
5. Audio Mode and Menu Select/adjustment
1)Audio mode select and adjustment:
Press the SEL button repeatedly to toggle cyclically through audio modes:
-> VOLUME ->BASS ->TREBLE -> BALANCE -> FA DER ->
After selecting a certain audio mode, you can adjust the setting for Bass, Treble
Balance and fader by pressing the volume UP(+) or DOWN(-) button.
Note: Adjustments to Bass and Treble will override any preset EQ( Preset Equalizer
Curves).
In each mode, the waiting time is about 5 seconds, and the waiting time is over,it returns
to the last display mode of tuner(Radio), TAPE, CDP or CDC mode.
The control mode of E.VOL is operated with following numeric display.
- VOL: (MIN)00, 01,......45, 46(MAX).
- BASS/TREB: -6, -5,...,0,...+5,+6
- BAL: 12L, 11L,...,02L, 01L,L=R,01R, 02R...11R,12R
- FAD: 12R, 11R,...,02R, 01R,R=F,01F, 02F...11F,12F
2) Menu mode select and adjustment:
Press the SEL button for about 2 seconds to access the MENU mode,and the LCD will
display MENU for 2 seconds, and then go to the first menu item which is EQ. Within 5
seconds, press the SEL or UP button shortly to select next menu item, or press the DN
button shortly to select the previous menu item in sequence and circulation as follows:
EQ: FLAT--- EQ: EQ OFF will be displayed by default. Press the volume UP(+) or
Page 5

4
DOWN(-) button to adjust the EQ mode as follows:
<-->EQ OFF <--> POP <-->ROCK<-->CLAS<-->FLAT<-->.
CLK FORMAT--- 24H will be displayed by default if the frequency area switches to EUROPE.
12H will be display by default if the frequency area switches to america. The symbol AM
means ante meridiem and PM means post meridiem.
Press the volume UP(+) or DOWN(-) button to select the 12 H or 24 H clock format mode.
CT--- 24:00 will be displayed by default if the frequency area switches to EUROPE. 12:00
will be display by default if the frequency area switches to america. Press the volume UP(+)
button to adjust the minutes and press the volume DOWN(-) button to adjust the hours.
SUBW ON/OFF---SUBW ON will be displayed by default. Press the volume UP(+) or
DOWN(-) button to select SUBW ON or SUBW OFF mode.
LOC/DX---DX will be displayed by default. Press the volume UP(+) or DOWN(-) button to
select LOC mode (local station reception) or DX mode (distant station reception).
AREA--- AREA will be displayed by default. The default area is selected by hardware
jumper. Press the volume UP(+) or DOWN(-) button to select your current area, such as:
<-->EUROPE<-->U.S.A.<-->ASIA<-->AUST<-->OIRT<-->LATIN<-->.
VOL PGM--- VOL PGM 12 will be displayed by default. Press the volume UP(+) or DOWN(-)
button to adjust the VOL PGM value. When power on the receiver, if the VOL PGM value is
less than current volume value, change the current volume value equal to VOL PGM value.
Otherwise, the current volume value will reserved.
BEEP ON/OFF--- BEEP ON will be displayed by default. Press the volume UP(+) or DOWN
(-) button to select the BEEP ON or BEEP OFF mode.
- Beep on mode:
The beep is generated when any key is pressed.
- Beep off mode:
No beep sound generated when you press any key.
CLK ON/OFF--- ON will be displayed by default. Press the volume UP(+) or DOWN (-)
button to select the clock display ON or OFF mode.
- CLK ON means clock will always show on display when power off.
- CLK OFF means clock will disappear on display when power off.
6. RESET
The reset button should be pushed after the installation process, before initial operation.
After removing the front panel, use a paper clip, ballpoint pen or similar object to press this
button. Doing so will erase settings and reset to defaults.
7. To Remove the Front Panel
To remove the front panel from the main body, press the RELEASE key. And the anti-theft
Page 6

5
LED indicator will be flashing all the time till the front panel be refixed into the main body.
Tuner Controls:
1. To select a radio band
In radio mode, Press the BAND button repeatedly to select a radio broadcasting band you
would like to hear. The AM/FM band is toggled cyclically through the tuning bands:
->FM 1-> FM 2 -> FM 3 -> AM 1->AM 2 ->.
2. To select the radio station manually or automatically
During AUTO search mode:
Press the SEEK + or - button short to automatically search up or down for the strong signal
radio station within the current band.
Press the SEEK + or - button hold for about 1 seconds until MANUAL SEEK appears on
LCD display, it will change into MANUAL search mode.
During MANUAL search mode:
Press the TUNE + or - button shortly and repeatedly to manually search up or down for the
desired radio station within the current band. In MANUAL SEEK process, after 5 seconds
without any operation, it will change into AUTO SEEK mode automatically.
3. To store stations or listen to the present station
1) After achieving a desired station by searching, if any one of the six numbered buttons is
pressed for more than 2 seconds, until the second beep output, the station currently
being listened to will be memorized into the selected preset memory bank within the
current band. It can be stored 6 stations in FM 1, FM 2,FM 3, AM 1 and AM 2 apiece, so
you can store 30 (18 FM and 12 AM) preset stations in all.
2) When any one of the six numbered buttons is pressed shortly, you can select a preset
station directly within the current band.
4. To select Stereo or Mono mode (Only for FM reception)
In radio mode, press the ST briefly to select stereo or mono sound mode.
Disc Playback Controls
1. To Load or Unload Disc
Insert a disc into the disc slot with label surface up, and then it will automatically play the
first track in the disc.
The loaded disc can be ejected by pressing the CD EJECT key.
2. To Select the Next or Previous Track
In disc playback mode, press the TRACK + button and release to play the next track.
Press the TRACK - button briefly, the system will replay the current track from the beginning
of it. Press the - button twice to play the previous track.
Page 7

6
3. To Fast Forward or Review
In disc playback mode, press and hold the FF + or REW - button to access your desired
location on the disc. Releasing them starts playback at the location.
4 .To Select the Next or P revious Folder
In playback of disc with MP3 or WMA format, press the 5 or 6 button to move the next and
previous folder.
5. To Play/Pause, TOP Playback
In disc playback process, press the PUS button to suspend the playback,press again to
resume normal playback.
First song will be played when the PUS button is pressed for long during disc playback.
6. To Preview Track
In disc playback mode, press the INT button to play the first 10 seconds of each track.
Press it again to stop preview and play the current track being previewed.
In playback of disc with MP3 or WMA format, press the INT button long to play the first 10
seconds part of the tracks in the current folder, press it again to stop preview and play the
current track being previewed.
7. To Repeat Playback
In disc playback mode, press the RPT button shortly to play the current track repeatedly.
Press it again to cancel the RPT mode.
In playback of disc with MP3 or WMA format, press the RPT button long to play the tracks
repeatedly in the current folder, press it again to cancel the RPT mode.
8. To Play Tracks In Random
In disc playback mode, press the RDM button shortly to play all tracks in random order.
Press it again to cancel the RDM mode.
In playback of disc with MP3 or WMA format, Press the RDM button long to play the tracks
in random order in the current folder. Press it again to cancel the RDM mode.
9. To Select the Track for Playback in MP3 or WMA Format
1).Serial number of track search mode:
In playback of discs with MP3 or WMA format, long press the BAND button, the
"TRACK
"icon will appear on the LCD display . Then press the SEL button or press the
volume UP(+) or DOWN(-) button to access the Number Search mode. And then press the
volume UP(+) or DOWN(-) button to select the number of your favorite track with high
speed. Finally press the SEL button to confirm and play the selected track.
You can also select a track by entering the serial number of it directly.
In playback of discs with MP3 or WMA format, long press the BAND button, the"TRK "
icon will appear on the LCD display. Then press SEL button to access the Number Search
Page 8

7
mode.
Press the volume UP(+) or DOWN(-) button to select and enter any number from 0 to 9 on
the units place digit. Press SEL button confirm the entered number and the character on the
tens digit will be flashing.
Press the volume UP(+) or DOWN(-) button to select and enter any number from 0 to 9 on
the tens digit. Press the SEL button to confirm the entered number and the character on the
hundreds digit will be flashing.
press the volume UP(+) or DOWN(-) button to select and enter any number from 0 to 9 on
the hundreds digit. After finishing enter all the number of the song serial number on flashing
digit, press the SEL button to play the corresponding track.
2).Folders/files Navigate search mode:
In playback of discs with MP3 or WMA format, long press the BAND button twice, the
"NAVIGATE
"icon will appear on the LCD display. Then press the SEL button or press
the volume UP(+) or DOWN(-) button to enter the Navigate search mode. And then press
the volume UP(+) or DOWN(-) button to navigate through all the folders on the disc. If the
selected name is directory, press theSEL button to go into the selected directory and then
press the volume UP(+) or DOWN(-) button to select the favorite file in the directory. Finally
press the SEL button to play the selected file.
10.To Display ID3 Information of MP3/WMA File
In Mp3/WMA mode, if you press the BAND button repeatedly, the folder name,file name,
title, artist and album information will be scrolling on the LCD display.
As long as the current playing Mp3/wma music contains relevant Id3 tag information in
version 1.0/2.0 format, the 3 items underlined above will be scrolling on the LCD display;
otherwise, they will not.
CD Changer Controls
1. To Select the Next or Previous Disc
After connecting the CD changer properly, select CDC mode by pressing the MODE button
short. Then you can select and play the next or previous disc of CDC by pressing the Disc
UP(+) button and Disc Down (-) button.
2. To Fast Forward or Review
Pressing and holding the FF+ or REW- button to access your desired location on the
current disc in the CD changer. Releasing them starts playback at the location.
3. To Play/Pause
In CDC playback mode, press the PUS button to suspend the playback,press again to
resume normal playback.
Page 9

8
4. To Preview Track
In CDC playback mode, press the INT button to play the first 10 seconds of each track.
Press it again to stop preview and play the current track being previewed.
5. To Repeat Playback
In CDC playback mode, press the RPT button short to play the current track repeatedly.
Press it again to cancel the RPT mode.
6. To Play Tracks In Random
In CDC playback mode, press the RDM button short to play the tracks in the current disc
in random order. Press it again to cancel the RDM mode.
Ta pe Playback Controls
1. LOAD / EJECT TAPE
Insert a tape into the tape slot, the tape playback starts automatically.
In playback of tape mode, press the TAPE eject button to stop tape playback and release
cassette tape.
2. FAST FORWARD / REWIND (FF/REW)
In playback of tape mode, press the + button for fast forward, press again to resume normal
tape playback; and press the - button for fast rewind, press again to resume normal tape
playback.
3. To Play/Pause Playback of Tape
In tape playback process, press the PUS button to suspend the playback,press again to
resume normal playback.
4. To Select the Next or Previous Song
In tape playback process, press the AMS button to access the automatic music select
mode.Then press the + or - button, the unit will skip forwards or backwards to the beginning
of a particular selection. Press the AMS button again to exit the AMS mode.
5. Switch the Direction of Tape Playback
In tape playback process, press the < > button to change the side and direction of the
current tape.
6. To Select the metal tape mode
When a metal or chrome tape was being played, press the MTL button to boost the treble
effect. Press again to cancel the metal audio effect.
Page 10
9
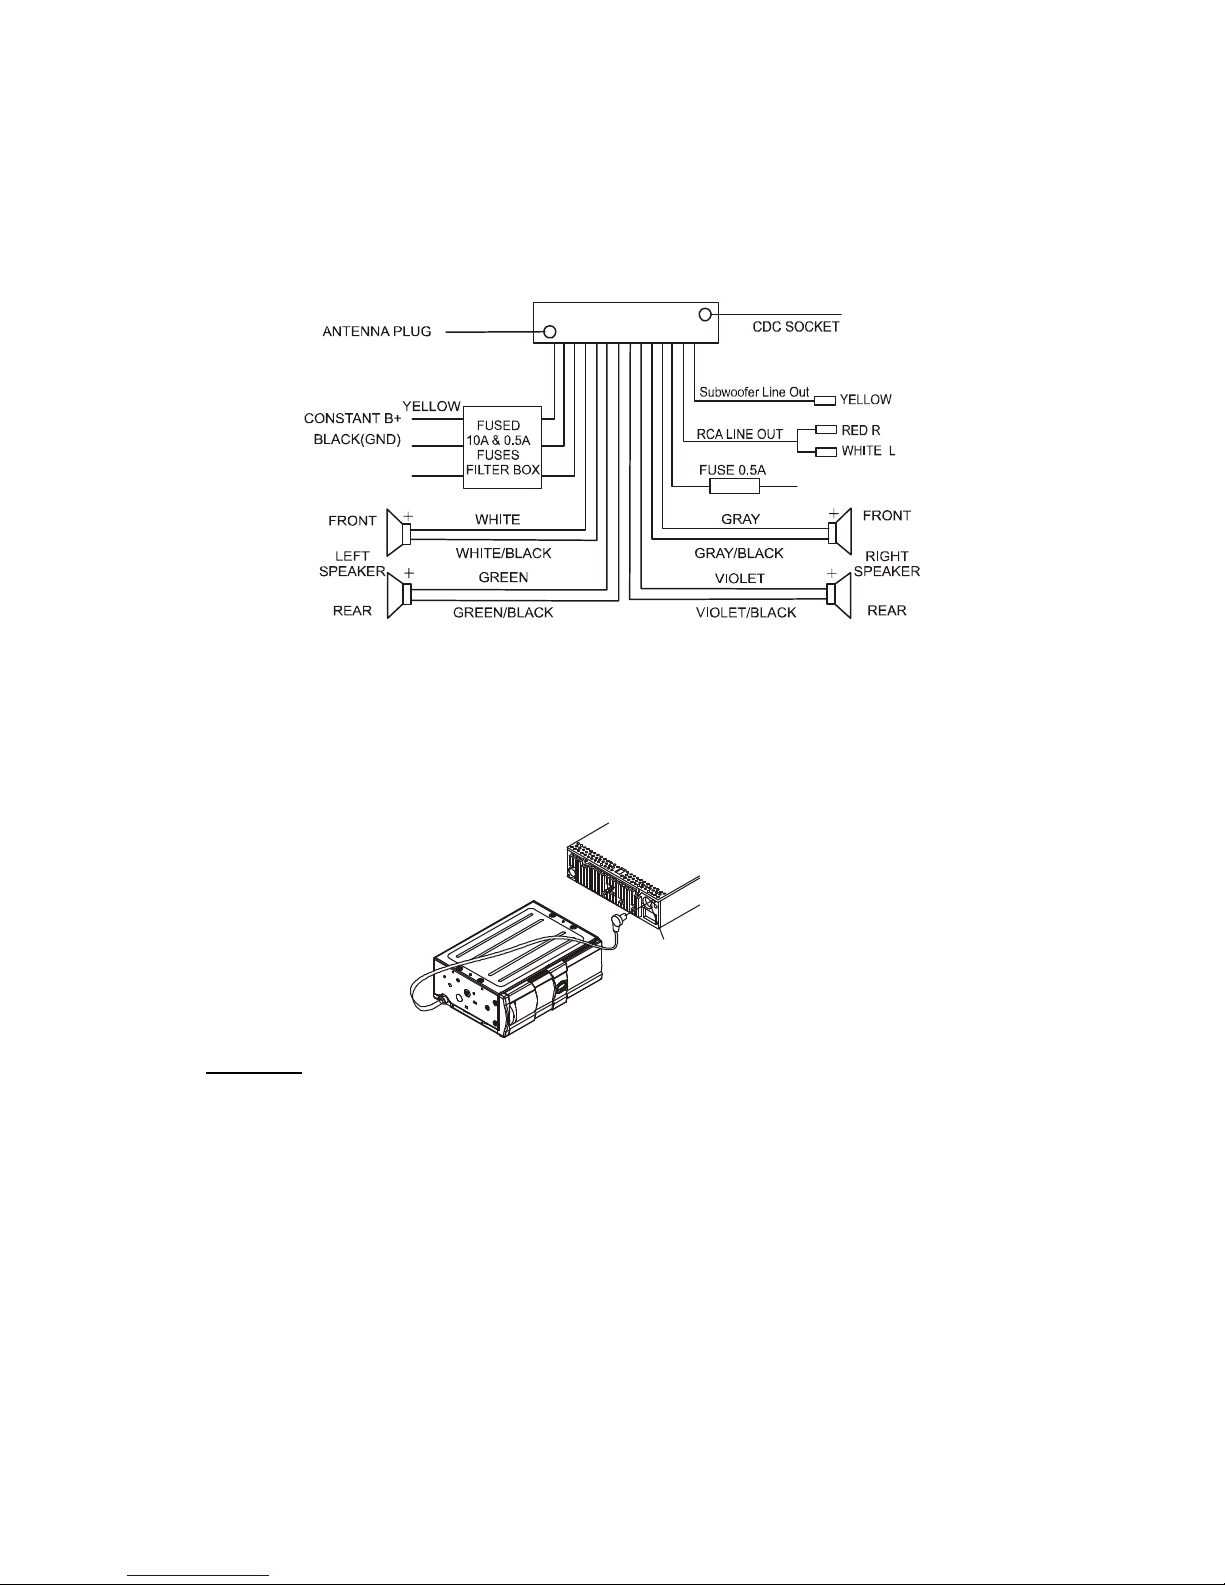
WIRING DIAGRAM
-
-
-
-
BLUE AUT O ANT
Note:
1.Make sure use a speaker with 4 ohm load impedance.
2.Do not make the auto antenna wire and ground touch each other.
When you want to play the CD changer, plug the CD changer DIN into
the socket of the back of the car audio unit.
CD CHANGER DIN SOCKET
CAUTION:
In order to protect the power IC from being burnt out during installation
of the car stereo, it is necessary to follow the steps below to connect the wires
during installation:
Step 1: Connect the ground wire (Black);
Step 2: Connect all speaker wires and power antenna wire (Blue):
Left speaker
Right speaker
Front speaker: White (+) White/Black (-) Gray (+) Gray/Black (-)
Rear speaker: Green (+) Green/Black (-) Violet (+) Violet/Black (-)
Page 11
10
Step 3: Connect SUBWOOFER Line out (Yellow) and RCA Line Out (R- Red/ L-White).
Step 4: Connect Back up (Yellow) and Acc wire (Red)
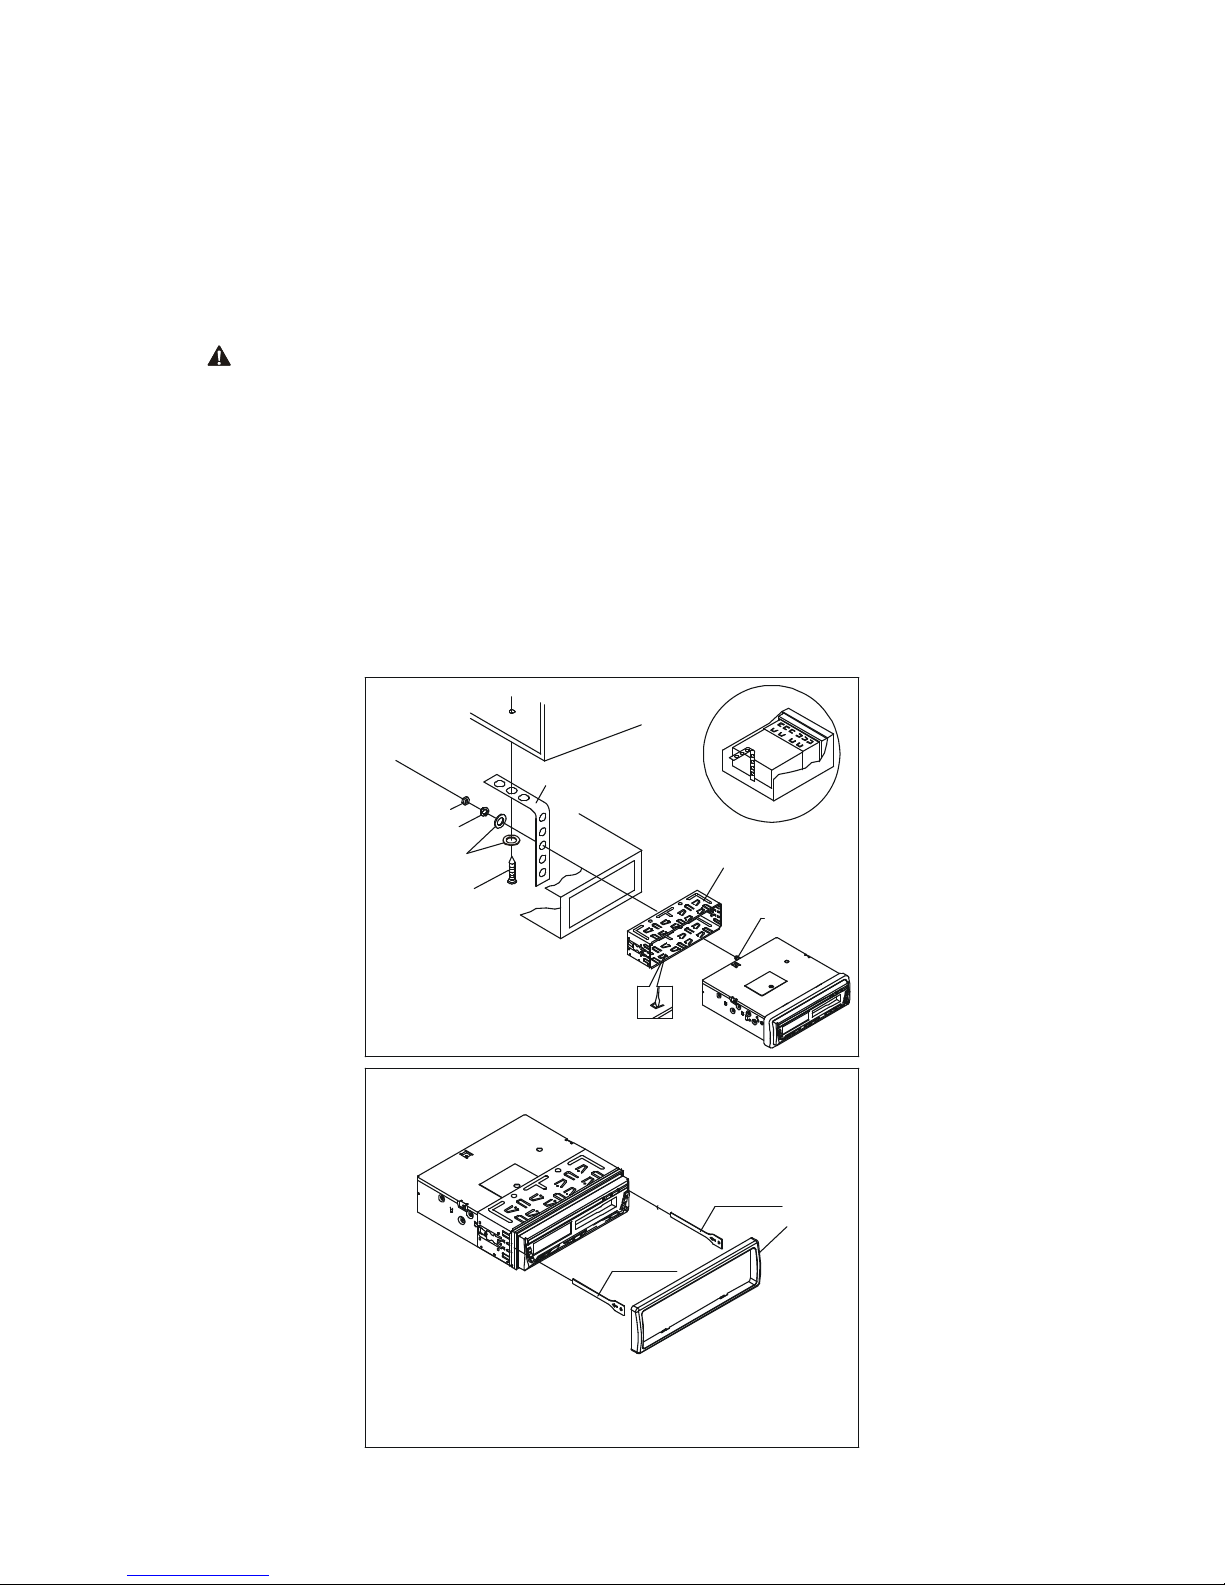
INSTALLATION
CAUTION:
Any changes or modifications in construction of this device which are not expressly approved
by the party responsible for compliance could void the user's authority to operate the
equipment.
1. Choose the mounting location where will not interfere the normal driving function of the
driver.
2. Avoid installing the unit in a place where would be subject to dirt, dust,damp, high
temperature and excessive vibration.
3. Please install appendixes provided by the manufacturer.
4. Installation of this unit requires specialized skills and experience.
Installation of this unit should be entrusted to a dealer from whom you purchased this unit.
HEX NUT
SPRING WASHER
TAPP ING SCREW
PLAIN WASHER
DASH BOARD
M ETAL SUPPORT STRAP
CONSOLE
HEX BOLT
METAL CAGE
PLA STI C TRIM
KEY PLATE
KEY PLATE
To remove the unit from the metal cage, insert the two supplied KEYS into
the left and right side slots of the chassis at the same time.
Then pull the chassis out o f the m etal cage as shown in the illustration.
Page 12
11
PRECAUTIONS AND MAINTENANCE
1.This unit is designed for negative ground oper ation only.
2.Do not use speakers of impedance less than 4 ohms. Do not allow the speaker wires to be
shorted together when the unit is switched on as this may overload or burn out the power
output IC.
3.If the car interior is extremely hot, as after being parked in the sun, do not use the player
until the car has been driven for a while to cool off the interior.
4.Take care of your t ape cassette to preserve the quality of the r ecordings.Do not allow them
to be exposed to direct sunlight. Store them in a place protected from dirt and dust and
avoid handing with greasy or oily hands.Also, keep them away from magnets.
5.It is not advisable to use cassette tapes longer than C-60(30 minutes per side) in
automobile players, since the tape is too thin and tends to become easily entangled.
Always remove tapes from the unit as soon as play is finished.
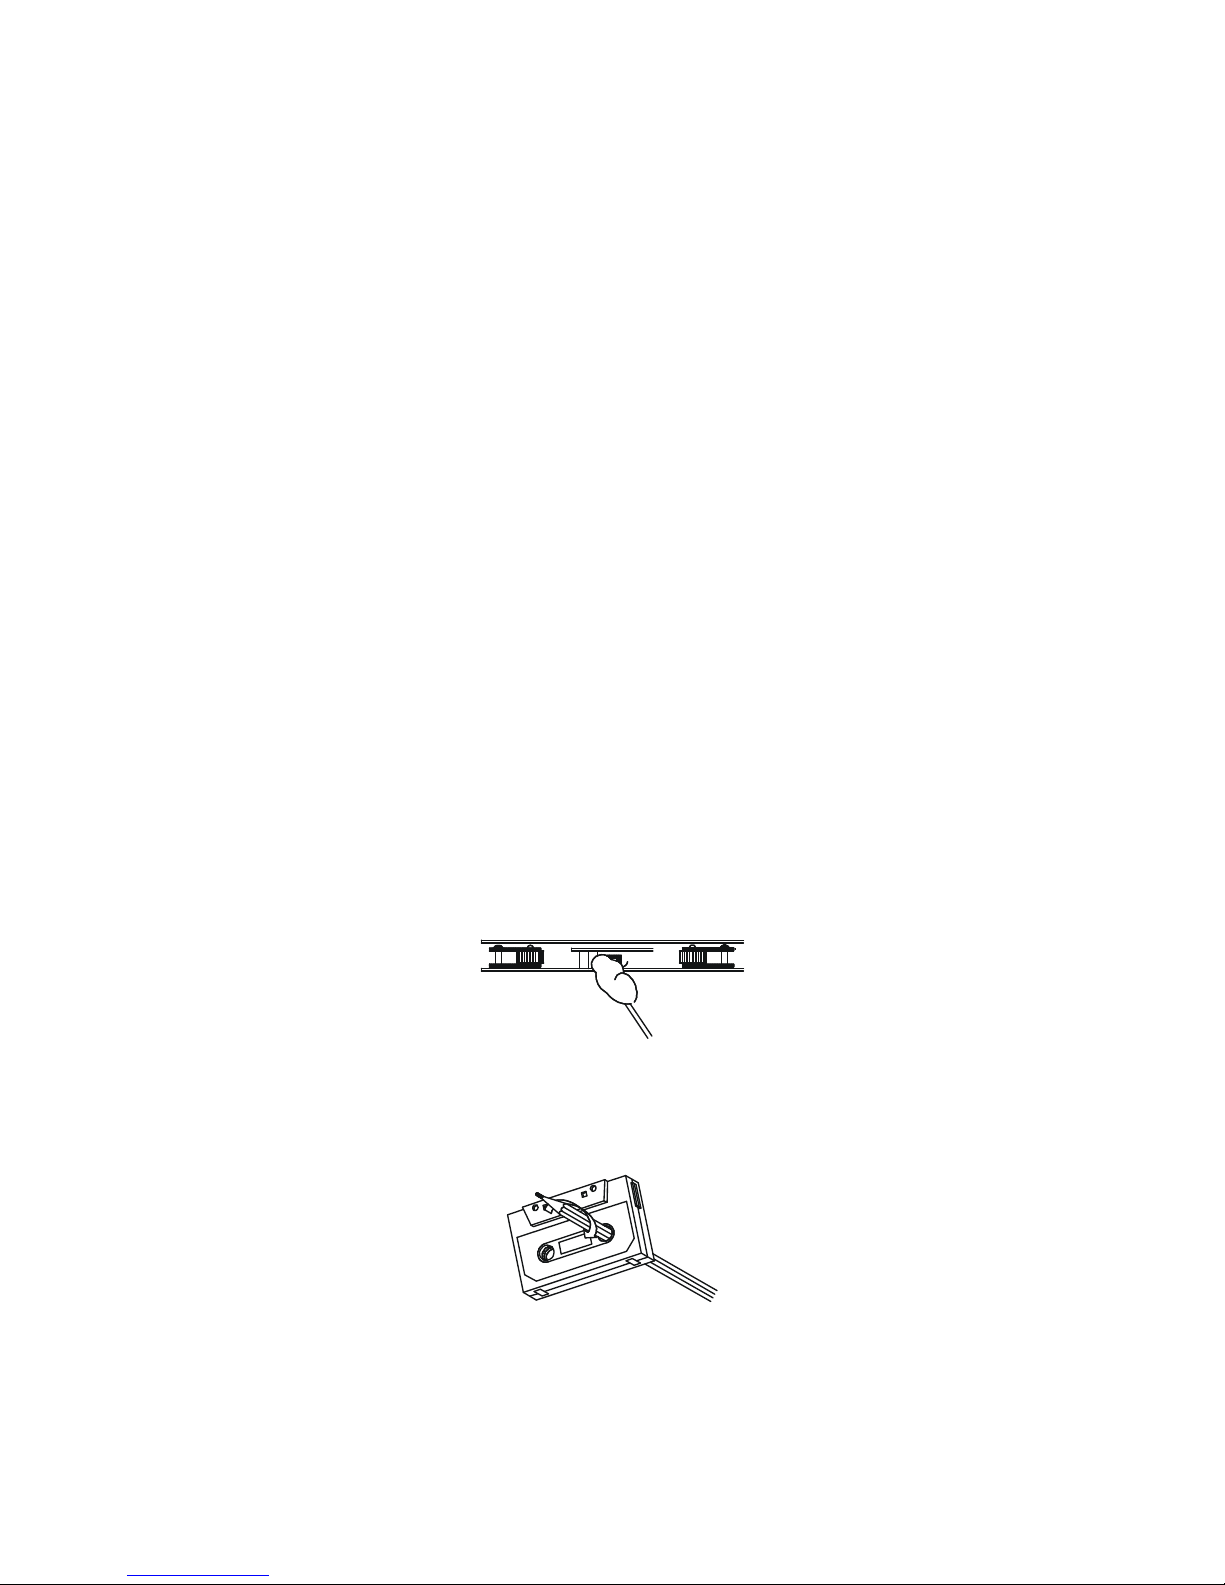
6.The capstan and tape head should be cleaned about once every six months with a soft
cloth or cotton-wool swab, moistened with alcohol.
This will serve to maintain the richness and clarity of sound, and prevent loss of volume.
Do not use a screwdriver, or ferrous metal rod , in carrying out the above cleaning. See
Illustration.
7.A loosely wound cassette tape will get damaged. Prior to using such tape,tighten it as
illustrated below. A carelessly would cassette tape will cause unnecessary pressure on the
tape which may result in the cassette being ejected while the tape is running. To prevent
this from happening, rewind the tape completely.
Page 13

12
CARE FOR USING CD'S:
About CD-R/CD-R/W discs:
In addition to commercially-recorded audio CD's, this unit can play CD-R and CD-R/W discs.
In come cases, particularly when recorded on older CD burners, some CD-R and CD-R/W
discs may not play. Also, whenever you are recording a CD for playback in this receiver, it is
recommended that you record at 24x or slower speed for CD-R and 4x or slower for CD-R/W
to achieve higher signal quality and better playback performance.
1. To keep the disc clean:
Do not attach any sticker or adhesive tape on the disc.
Handle the disc by its edge to keep the disc clean and do not touch the surface.Before
playing a disc, wipe it off with a clean, dust-free cleaning cloth.Wipe the disc outwards from
the disc center.
2. When one has already been inserted. Doing so may damage the unit. Inset a disc with
labeled surface up, or it will damage the unit.
3. Do not expose the disc to direct sunlight or nearby heat sources such as heating vents,
caliduct which can cause the disc to warp.
Do not leave disc in a car if it is parked in direct sunlight as that will lead to a considerable
rise in the temperature inside the car.
4. Do not use any secondhand or rented disc, usually, there is glue on the surface of
those discs, it will stop the unit working and damage it.
5. Always store the disc in its case for protection. Scratched up discs will produce
poor sound performance and cause CD player to skip.
6. In raining day or wet area, the moisture may form on the disc or the optical parts,
The playback may not be possible. If moisture forms on the disc, wipe it off with a
soft cloth.
If moisture forms on the optical parts of the unit, allow the unit to sit for about one
hour with power on.
7. Do not use solvents such as benzine or thinners. Commercially available cleaners
or anti-static spray will damage the unit.
Page 14
13
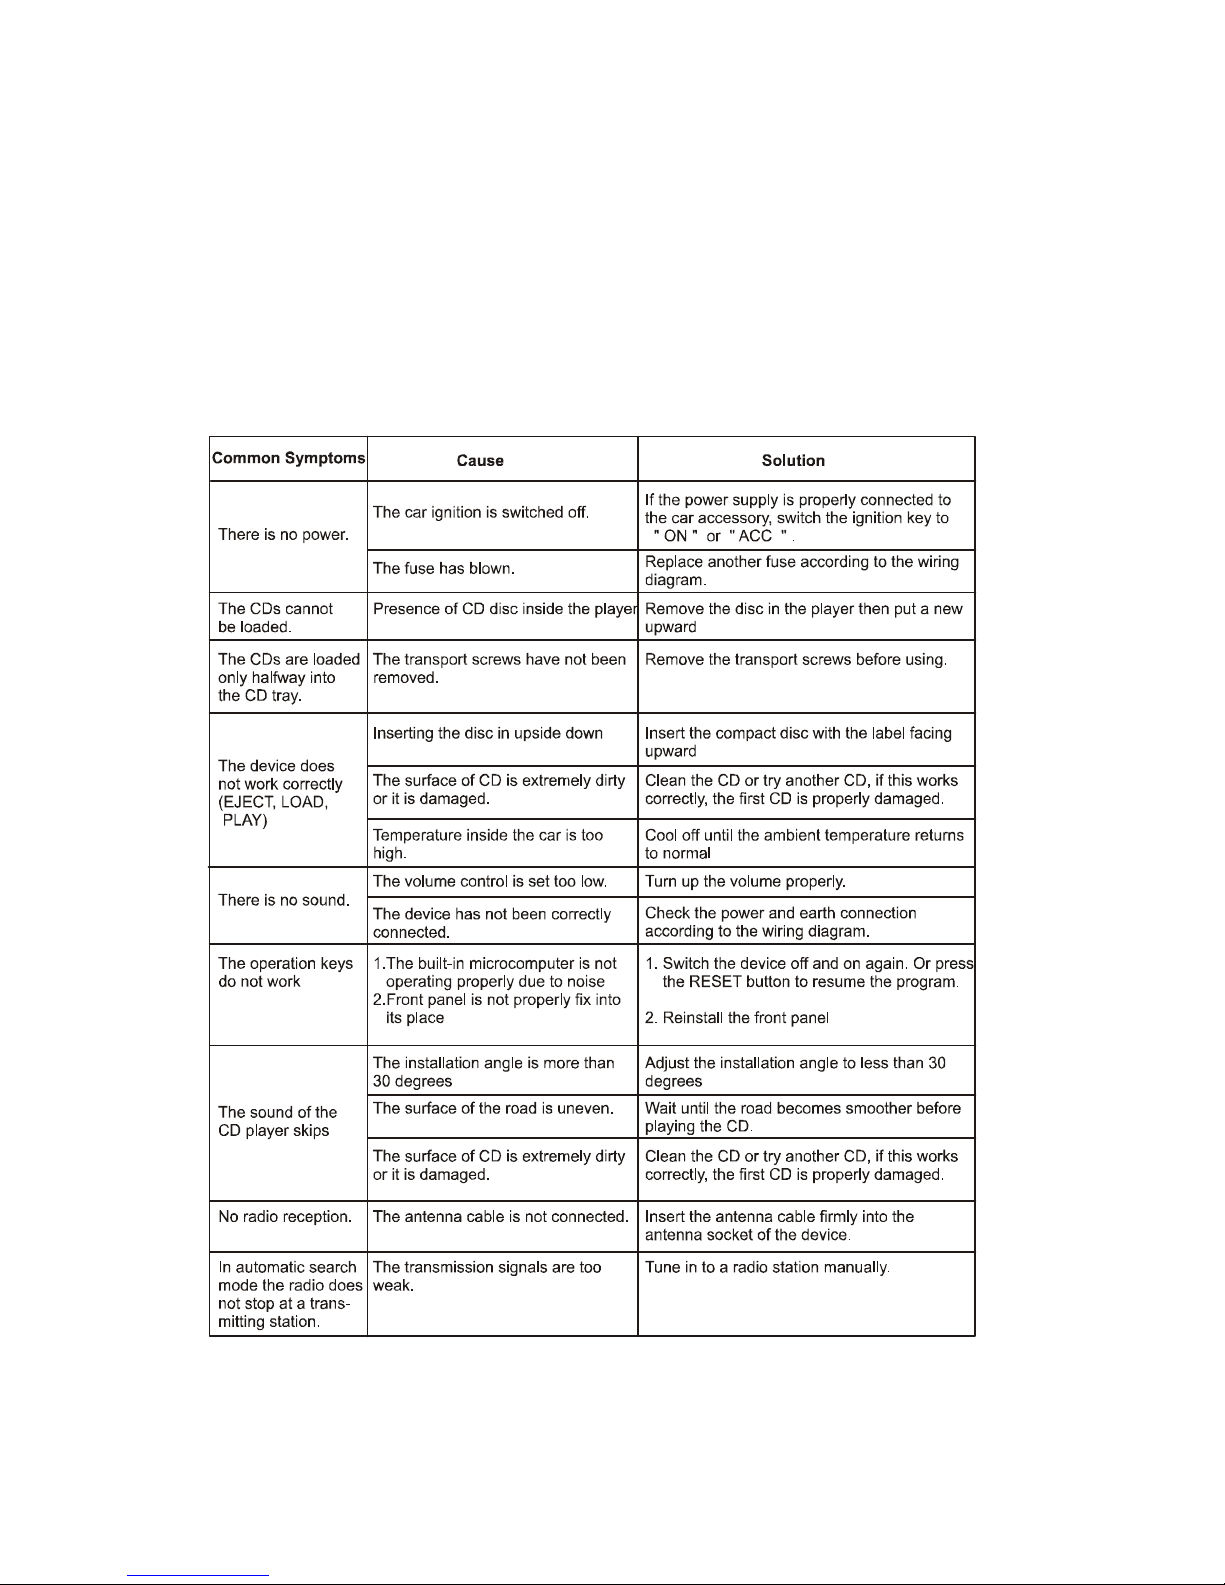
TROUBLE SHOOTING
Before using the check list please make all the connections first.
If you still have questions after going through the checklist, please consult your local customer
service representative.
Page 15

14
SPECIFICATION
GENERAL
Power Supply the Main Unit: DC 12 Volts. Negative Ground
Maximum Output Power: 4 x 50W ( Measure at DC 14.4 V )
Current Consumption: 10 A MAX.
Unit Dimension: 178(W) X 167(D) X 50(H) mm
FM TUNER SECTION
Frequency Range:87.5MHz - 107.9MHz
Usable Sensitivity: 10dB
Frequency Response(+/- 3dB): 50Hz - 12.5KHz
I.F. Rejection: 70dB
Image Rejection: 60dB
Signal-to-Noise Ratio: 50dB
Stereo Separation: 30dB
Antenna Impedance: 75
AM TUNER SECTION
Frequency Range: 530KHz - 1710KHz
Usable Sensitivity(S/N 20dB): 40uV
I.F. Rejection: 50dB
Image Rejection: 50dB
Antenna Impedance: 75
TAPE SECTION
Wow&Flutter: 0.2%
S/N Ratio(Normal): 50dB
Separation: 40dB
Frequency response: 50Hz - 12KHz
CD SECTION
Disc size :5 "(dia.)
Channels: 2-channel stereo
Sampling frequency: 44.1KHz
D/A converter: Twin. 1- bit
Pickup: Optical 3-beam semiconductor laser
Output filter: Active
Frequency response: 5Hz - 20KHz
Total harmonic distortion: 0.2% (1 KHz)
Signal-to-noise ratio: 60dB
Page 16

15
Wow and flutter: Under measurable limits
Channel separation(1 KHz): 50dB
Design and Specifications are subject to change without notification.
 Loading...