

Page 1

PLBT72G
7'' Single DIN In- Dash Mo torized Touch Sc reen TFT/ LCD Digital Monit or
w/DVD/CD/MP4 /USB/ SD-Slot Card AM/FM /RDS/ Bluetooth Compa tible
Dial Pad Built-I n GPS/T TS w/USA/Canada & M exico M aps
USER MANUAL
Page 2

PRECAUTION
Class 1 laser product
This car multi-media player is a class 1 laser product. However
This car multi-media player uses a visible/invisible laser beam
which could cause . Hazardous radiation exposure if directed.
Be sure to operate the car multi-media player correctly as
instructed. Use of controls or adjustments or performance of
procedures other than those specified herein may result in
hazardous radiation exposure. Do not open covers and do not
repair yourself. Refer servicing to qualified personnel.
Page 3

INSTALLATIO N STE PS
1. Remove the chas sis fro m Slide Bracket Hou sing;
1) Press the REL bu tton to r eleas e the contro l panel ;
REL button
2) Hold the right si de of the c ontrol panel to pul l it upwa rds a little and then t o you
for removing it ;
1
3) Remove the PLAS TIC FRA ME from the chassis ( see the I nstal lation dia gram) ;
4) Insert the 2 KEY PLATES in to the gr ooves at the b oth sid es of the c hassis till
they click(see t he Inst allation diagra m);
5) Pulling the two K EY PLATES to rem ove the chas sis fro m the Sli de Bracket
Housing ;
2. Mount the Slidi ng Brac ket Housing in the po sitio n of car multi-medi a syste m and
bend some tabs of Sl iding B racket Housing to f ix it.
3. Connecting al l wires :
1) Connecting al l wires a ccording ot the wir ing dia gram on next page;
2
Page 4

RCH RED
LCH WHITE
RADIO ANTENN A JAC K
GPS ANTENNA BOLT
REA R AUDIO O UTPUT
CAB LE
ISO CO NNECT OR
REAR CAMERA IN PU T YE LL OW
SUBWOOFER G RE Y
FRO NT AUDI O AND V IDEO OU TPUT
CAB LE
RCH RED
VIDEO OUT YEL LO W
LCH WHITE
IGN IT ION SWI TC H(B +)
MEM OR Y BAC K-U P( B+)
GRO UN D(B-)
FRONT
LCH SPK.
LCH SPK.
NOTE :
1. Mus t us e 4 oh ms impedanc e of s peakers.
2. Aft er c on necting par ki ng Line, vide o on s creen of cont ro l pa nel
will b e di sp layed onl y af te r
3. Bef or e fi nishing w ir in g, do not attac h co ntrol panel o nt o chassis.
REAR
RED
YEL LOW
BLA CK
CHO KE
BOX
WHI TE
WHI TE/BL ACK
GRE EN
GRE EN/BL ACK
VIO LET/B LACK
WIRING DIAGRAM
appl yi ng p arking br ak e.
PIN K
BROWN
BLUE
GRE Y
GRE Y/BLA CK
VIO LET
(B+)12V
REAR CAMERA SW IT CH
(B-)PARK IN G BR AK E
AUTO AN TE NN A
FRONT
RCH SPK.
REAR
RCH SPK.
Page 5

2) Attaching the co ntrol p anel onto the chass is;
(1) Insert the lef t side of t he control panel in to the ho llow of the chassis .
(NOTE : the “bulge ” point o n the con trol panel m ust be at tache d into the hol low
of the chassis .)
(2) Gently push th e right s ide of the control pa nel til l you feel a “ Click” .
Holl ow
Bulg e
3) Testing it for m aking s ure tha t it can work properl y .
4. Installing ch assis a ccording to the ins talla tion diagram on nex t page:
1) Insert the chas sis of th e car multi-media s ystem i nto the S liding Bra cket Ho using.
2) Use the metal str ap to fix t he rear part of chass is.
* Uninstalling t he chas sis:
1) Remove the meta l strap f rom the chassis ;
2) Remove the cont rol pan el from the chassis ;
3) Remove the plas tic fra me from the chassis ;
1
2
4) Insert 2 key plat es into t he left and right sid es of the c hassis and draw the c hassi s
out of the sliding b racke t housing.
Page 6

Installation Diagram
DASH BO AR D
HEX NUT
SPRIN G WAS HE R
PLAIN WA SH ER
TAPP IN G SC REW
SCREW DR IV ER
METAL MOUNT IN G
STRAP
TABS
CONSO LE
KEY PLATE
SLIDE B RA CK ET
HOUSI NG
HEX BOLT
PLAST IC T RI M OUT
KEY PLATE
If you want to take CHASSIS out of the SLIDE BRACKET HOUSING, first remove
the PLASTIC TRIM OUT of the both sides away, then insert the two KEY PLATE into
left and right side of chassis as above illustration.
Page 7

GENERAL KNOWL EDGE ABOUT REMOTE CONTROL
1. Removing insu latin g sheet
using remote con trol fo r the first time, you
If
can see an insulat ing she et at the bottom
side of remote con trol as r ight.
you must remove th e insul ating sheet as righ t.
Otherwise, the r emote c ontrol is disable d.
2. Replace lithi um cell
If the electric en ergy of l ithium cell is weak ,
replace it.
1 Press and hold the m ovabl e block as directio n
)
indicated by arr ow 1 as rig ht, at one time pull
cell holder out of r emote c ontrol as directi on
indicated by arr ow 2 as rig ht.
2 Replace the old ce ll by a new o ne with (+)
)
polarity side up ward as r ight.
3 Insert the cell ho lder in to remote control a gain
)
as right.
3 Note about using r emote c ontro l
.
1 You should fa ce the em ittin g window of re mote co ntrol t owards the sensor
)
window of the unit .
2 Operation angl e for fro nt panel: About 30 deg ree
)
3 The distanc e betwe en the em itting win dow of re mote co ntrol and th e senso r
)
window of the unit : < 5 M .
4 War ning for lithium ce lls of re mote control
.
leakage may caus e damag e to remote control .1 Cell
)
2 Do not throw cells i nto fir e, it may cause explo sion.
)
.
3.To avoid risk of acc ident , keep cells out of rea ch of chi ldren.
Page 8

Locations and N ames of Controls on Main Unit
17
13
8
10
1
11
14
12
3
Main Unit Face after remo ving Control Panel
1. AUX IN JACK(A/V)
2. USB PORT
3. SEL BU TTON and V OL KN OB
4. REL BU TTON
5. IR SENSOR WIN DO W
6. RESET BUTTON
7. EJECT BUTTON
8. POWER or MODE B UT TON
9. TA or AF BU TTON
9
Control Panel
15 19
4
16
5
2
7
18
6
10. MUTE or PTY BUTTO N
11. BAND or PAI R BU TT ON
12. >|| or CH1-6 B UT TON
13. >>| or HANG UP BUTTON
14. |<< or CALL BUT TO N
15. SD/MMC CAR D SL OT
16. LCD SREEN
17. OPEN/MON ITOR-ANGLE BUTTON
18. MICROPHO NE
19. GPS CARD SLO T
Page 9

Locations and N ame s of Controls on Remote Control
1
2
MOD EMODE
RED IAL
MUT EM UTE
3
4
5
7
9
11
13
15
17
6
8
10
12
14
16
18
MEN UMEN U
LO/ DXL O/D X
OSDOSD
BAN DBA ND
TIT LE/PB CTIT LE/PB C
A/P SA/P S
VOLVOL
VOLVOL
SELSEL
SET UP SET UP
PAIR
TOP
11
RDM
44
77
GOT OGOT O
19
16. VOL- BUTTON
17. SEL BUT TON
18. SETUP BUTTON
19. GOTO or * BUTTO N
20. >|| BUTTON
21. STOP BUTTON
22. AUDIO or MO/ ST B UT TON
23. ZOOM BUTTON
24. EQ or LOUD BUT TON
25. CLK BUTTON
26. ^ BUTTON
PLA Y/PAU SEPLA Y/PAU SE
ZOO MZO OM
LOU D
EQEQ
ENT ERENT ER
RPT
22
55 66
88
+1 0+10
STO PSTO P
MO/ STMO/ ST
CLKC LK
INT
33
AF
99
TA
00
21
23
25
27
29
31
32
33
35
36
20
22
24
26
28
30
37
34
1. POWER/MOD E BU TTON
2. MUTE BUTTON
3. HANG UP or REDIAL BUTTON
4. MONITOR-ANGLE BUTTON
5. CALL or PAIR BUTTON
6. MENU or SW BUTTON
7. >> BUTTON
8. SUBTITLE or L O/ DX B UT TON
9. < BUTTON
10. BUTTON
BAND or OSD
11.
<< BUTTON
12. A/PS or TITLE/PBC BUTTON
13. TOP BUTTO N
14. VOL+ BUTTON
15. RDM BUTTON
27. >>| BUTTON
28. ENTER BUTTON
29. > BUTTON
30. V BUTTON
31. |<< BUTTON
32. INT BUTTON
33. NUMBER (0 ~9 ) BU TTON
34. +10 or # BUTTON
35. AF BUTTON
36. TA BUTTON
37. RPT BUTTO N
Page 10

Same functio ns in any work source mo de
1. POWER button
In power off mo de , pr es si ng POWER button on remo te c on tr ol o r pr es si ng P OWER button on
control panel pow er s on m ai n un it .
In power on mode, lon g pr es si ng P OW ER b ut ton on control panel or o n re mo te c on tr ol p ow er s off
main unit.
2. VOL kn ob & V OL+/VOL- buttons
To ad ju st v ol um e le ve l, r otate VOL kno b on c ontrol panel or press o r ho ld V OL + or V OL - bu tt on
on remote control .
3. SEL bu tt on
To swit ch b et we en TREBLE,BASS, BAL AN CE , FAD ER ,C OL OR ,BRIGHT,CONTRAST, TIN T
and VOLUME, brief ly a nd r ep ea te dl y pr ess SEL but to n.
After switching on t he d es ir ed m od e ab ov e, rotate VOL kno b or press VOL+/VOL- bu tt on s to s et i t.
To swit ch b et we en B T, REG IO N, P I, TA, AF, LO UD , SW F VO L, S WF FREQ,EQ, DX/LO CA L( in r ad io
mode), STEREO/M ON O( in r ad io m od e) , CLOCK FORMAT, CL OC K, B UZ ZE R,FREQ AREA and LED
COLOR, long press S EL button to sw it ch o n BT, th en b ri ef ly a nd r epeatedly press SEL button.
After switching on t he d es ir ed m od e ab ov e, rotate VOL kno b or press VOL+/VOL- bu tt on s to s et i t.
4. MUTE button
To swit ch M UT E mo de o n or o ff, press MUTE bu tt on o n re mo te c on tr ol or press MUTE button o n
control panel.
5. EQ button
To sele ct a d es ir ed p re se t EQ m od e from JAZZ, CLASSI C, P OP, RO CK a nd USER, press EQ
button on remote co nt ro l co nt in uo us ly.
6. To switch LOUD mode
To swit ch L OU D mo de b et we en L OW, M IDDLE, HIGH and OFF , lo ng p re ss L OU D bu tt on .
7. SW button
To swit ch S WF F RE Q be tw ee n 80 HZ, 120HZ and 160HZ, lo ng p re ss S W bu tt on o n re mo te control.
8. CLK button
Press CLK button on r em ot e co nt ro l to d is play clock time .
9. OPEN or and butt on s
To slid e th e mo ni to r ou t an d st an d it up or into the monitor s lo t, p re ss O PE N bu tt on on control panel
or press button on re mo te c on tr ol ;
To adjust the angle of th e mo ni to r, lo ng p re ss b utton on remote contr ol o r on c on tr ol p an el .
10. MODE button and s ou rc e me nu
To swit ch w or k so ur ce b et we en R ADIO, DISC(afte r in se rt in g a di sc ), U SB (after inserting a US B
storage), CARD( af te r in se rt in g a ca rd), AUX and BT MU SI C, p re ss M OD E button on remote
control or press MO DE b ut to n on c on tr ol p anel continuously.
During disc(non -C D) /U SB /c ar d pl ayback, touch scree n to p op u p Fu nc ti on I co ns -board and then
touch the icon in t he F un ct io n Ic on s- bo ard to enter the displa y st at us o f th e so ur ce m enu before
entering Disc/U SB /C ar d mo de (r ef er to Disc/USB/Card O pe ra ti on ) .
During AUX playbac k, t ou ch s cr ee n to p op u p AUX interface and the n to uc h AU X ic on t o en te r the
display status of t he s ou rc e me nu b ef or e entering AUX mode(re fe r to AU X op er at io n) .
In radio,B T mu sic or CD mode, touch RAD IO , BT o r DI SC icon to enter the disp la y st at us o f th e
source menu befor e en te ri ng r ad io ,BT mu si c or C D mo de (r ef er to Radio Operation , BT O pe ra tion
and Disc/USB/Ca rd O pe ra ti on ).
Page 11

The home pag e of t he s ou rc e me nu d is pl ay s as f ollows:
In the middle co lu mn , cl oc k ti me d is pl ay s in the top of it; the SN. And name of each page of
the source men u di sp la y in t he m id dl e an d bo ttom of it.
Touch any place on the screen and hold a nd t he n sl id e le ft wa rd s or r ig htwards to turn pages
of the source me nu . There are 4 pages in a ll a s fo ll ow s:
1) Home page
2) Tools page
3) Games pag e
4) Setup pag e
Touch one icon in the home page of the sou rc e me nu t o en te r on e wo rk s ou rc e of RADIO, DISC,
USB, CARD, AU X, B T and others.
Page 12

11.SYSTEM icon
In the setup pag e of t he s ou rc e me nu , to uc h SY ST EM icon to display page1 of SETTINGS
MENU as foll ow s:
Page1 of SETT IN GS M EN U
Page2 of SETT IN GS M EN U
In the SETTING S ME NU , th e ic on s on t he m
descript a s fo ll ow s:
: to next page.
: to previous pa ge .
: to source menu .
Setting Item s : to e nt er t he s et ti ng i te m.
Page3 of SETT IN GS M EN U
In the SETTING S ME NU , th er e ar e 10 s et ti ng i te ms in all. Touch o ne s et ti ng item to enter the
setting item p ag e. The icons on the se tt in g it em p ag e de sc ri pt a s fo llows:
: to next page.
: to previous pa ge .
: to the page that the s et ti ng i te m be lo ng s to .
Setting Item s : to s et t he s ub -i te m.
: to increase the va lu e.
: to decrease the va lu e.
1) SYSTEM SE TT IN G
Page1 of SYST EM Page2 of SYST EM
(1) LED COLO R
It is for settin g th e co lo r of t he b ut to ns i ll um ination and the LCD backlight.
(2) BT
It is for switch in g BT mode ON or OFF.
(3) RESET SYSTEM
It is for restor in g al l us er s et ti ng t o ze ro .
Page 13

(4) BRIGHT
It is for settin g br ig ht ne ss .
(5) CONTRA ST
It is for settin g co nt ra st .
(6) COLOR
It is for settin g co lo r.
(7) TINT
It is for settin g ti nt .
2) SOUND SET TI NG
Page1 of SOUN D
(1) RADIO L/ D
It is for switch in g be tw ee n LO C an d DX .
(2) STEREO
It is for switch in g be tw ee n MO NO a nd S TE RE O.
(3) SWF VOL
It is for settin g SW F vo lu me .
(4) SWF FREQ
It is for settin g SW F fr eq ue nc y.
(5) LOUDNE SS
It is for settin g LO UD NE SS m od e.
(6) SOUND EF FE CT
It is for settin g EQ m od e.
(7) TREBLE
It is for settin g th e va lu e of t re bl e .
(8) BASS
It is for settin g th e va lu e of b as s.
(9) FADE/BA L
After enterin g th e su b- it em , it d is pl ay s as right:
Touching any place in the rectangl e ex ce pt t he
middle col um n se ts t he v al ue o f th e ba la nc e;
touching a ny p la ce i n th e mi dd le c ol um n se ts
the value of fad e.
(10) TO UC H BE EP
It is for switch in g to uc h be ep O N or O FF.
Page2 of SOUN D
Page3 of SOUN D
FADE/BALAN CE
Page 14

3) BACKGRO UN D SE TT IN G
BACKGROUN D
It is for settin g th e ba ck gr ou nd o f th e No V id eo i nt er fa ce f or R AD IO , CD, non-CD DISC/USB
/CARD, AUX an d BT MUSIC .
4) RDS SETTI NG
RDS
(1) REG SET
It is for settin g RE G on o r off.
(2) PI SET
It is for switch in g be tw ee n PI S OU ND a nd P I MU TE .
(3) AF SET
It is for settin g AF on o r off.
(4) TA SET
It is for settin g TA on or of f.
5) GPS PATH S ET TI NG
GPS PATH
It is for settin g GP S pa th t o en te r GP S na vi ga ti on mode. Please refer to the part of GPS
navigati on f or d et ai le d GP S pa th s et ti ng operatoin.
Page 15

6) TIME SETTING
TIM E
(1) HOUR SET
It is for settin g th e ho ur o f th e cl oc k ti me .
(2) MINUTE S ET
It is for settin g th e mi nu te o f th e cl oc k ti me .
(3) TIME FORMAT
It is for settin g th e ti me f or ma t of t he c lo ck t im e.
7) TO UC H SE TT IN G
TOU CH S CR EEN CALIBRATIO N
It is for cali br at in g to uc h sc re en . Pr ec isely and repeatedly tap the center o f th e cr os s cu so r ti ll
it exit calibr at io n in te rf ac e.
8) INFO SETTIN G
SYSTEM INFO
It is for view in g th e sy st em i nf or ma ti on s uch as: name, version, memory size an d fr ee m om er y.
Page 16

9) SKIN SETTIN G
SKIN
(1) It is for sett in g th e sk in c ol or o f th os e im ma nent interfaces.
(2) It is for se tt in g th e ti me o f ac ti va ti ng S CR EEN SAVE af te r no o pe ra tion.
10) ANGLE SET TI NG
It is for settin g th e an gl e of t he c on tr ol p an el .
12.RESET button
When LCD dis pl ay s wr on gl y or s om e bu tt on s are not available or sound is disto rt ed , pr es s RE L
button to deta ch t he c on tr ol p an el a nd r em ove it, then use the sharp end of a pointed o bj ec t to
press RESE T button on chassis face t o re se t th e pr og ra m to z er o.
13.REL bu tt on
To detach control panel, press REL bu tt on o n co ntrol panel.
After detac hi ng c on tr ol p an el , ho ld t he r ight part of the control panel and pull i t up wa rd s a li tt le
and then to yo u ca n re mo ve i t fr om c ha ss is .
Page 17
Radio Operation
1. To enter RADI O mo de(MODE b ut ton or RADIO ic on )
When y ou u se MODE butto n or source men u (t apping RA DI O icon) to ente r RA DIO
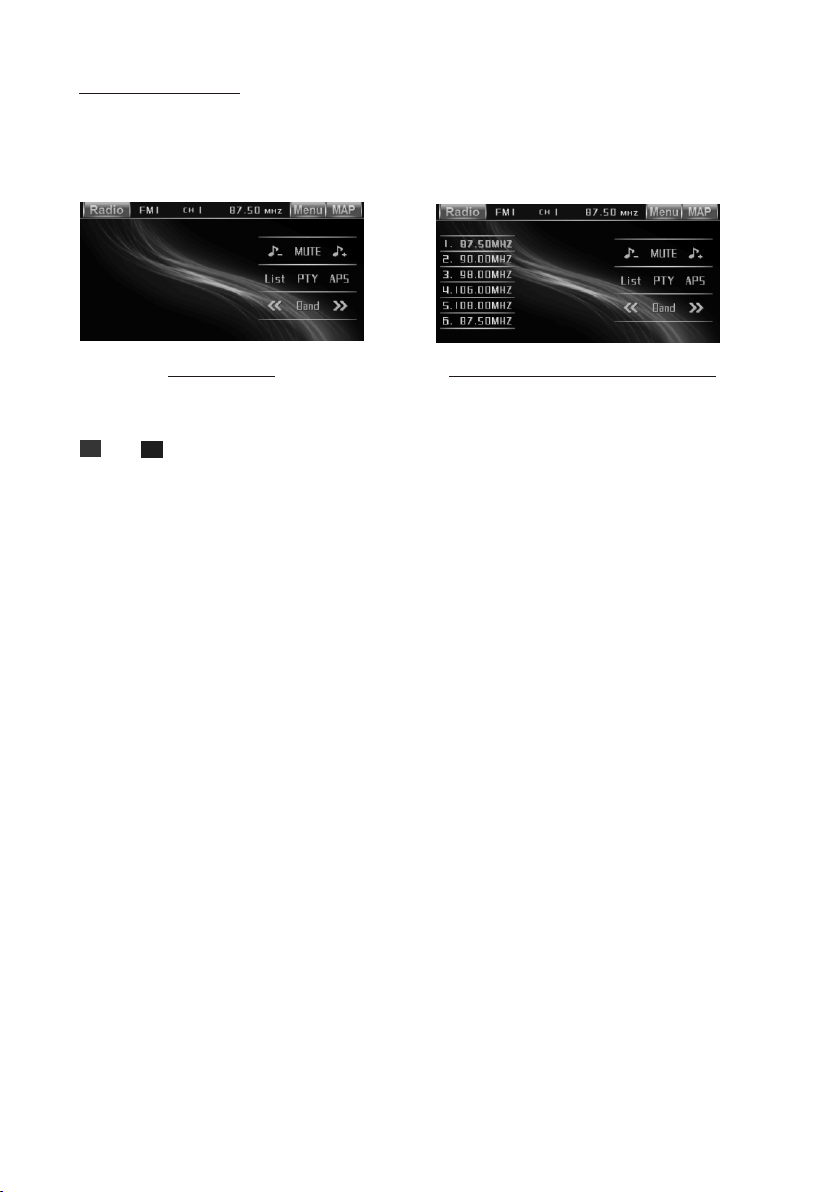
mode , it w ill displ ay r adio interf ac e as follow s:
Radio inter fa ce Radio inter fa ce w it h 1~ 6 ic ons interface
* Some i co ns on radio i nt erface corr es pond with t he b uttons on r em ote control o r co ntrol
pane l as f ollows:
and ic on s = VOL- and VOL+ b ut tons = VOL knob
MUTE i co n = MUTE button
List i co n : to display 1~ 6 icons inter fa ce in the lef t si de of the radio i nt erface.
RADI O ic on: to enter so ur ce menu
MENU i con : To pop up the p age1 of S ETTINGS M ENU
MAP icon : To en ter GPS mod e but not exi t radio m od e
2. To switch bet we en bands (B AN D)
The BAND ico n or b utton can s wi tch between b ands of FM1, FM 2, F M3, AM1(MW 1) a nd
AM2(M W2 ), and the wo rd F M1,FM2,FM 3, AM1(MW1 ) or A M2(MW2) wil l be d isplaye d on
scre en .
3. To search for a s ta tion (<< an d >> i cons or v and ^ or |< < an d >>| butto ns )
1) Lon g to uching << o r >> i con or long pre ss ing v or ^ butt on o n remote co nt rol or long
pres si ng |<< or >>| but to n on contro l pa nel can aut om atically se arch down or up f or a n
avai la ble stati on b eginning fr om t he curren t fr equency.
2) Bri ef ly touchi ng < < or >> icon or bri ef ly pressi ng v /^ or |<</>>| b ut ton can man ua lly
sear ch d own or up for a you r desired sta ti on beginn in g from the curr ent frequen cy.
4. To preset and s ca n all memor y st ations (APS i co n or A/PS butt on )
1) Whe n lo ng touchi ng AP S icon or long pr es sing A/PS bu tt on, the rad io s earches fro m
the lo we st frequenc y and checks th e si gnal stre ng th level un ti l 1 cycle searc h is
fini sh ed, and the 6 str ongest stat io ns are pres et t o correspon ding preset n um ber
memo ry b ank for the cur rent band.
The pr es etting func ti on can be imp le mented in s el ected FM or AM ban d. (It can pres et s
3x6 st at ions for FM and 2 x6 s tations f or AM (MW) in all )
2) Whe n br iefly tou ch ing APS icon or br ie fly press in g A/PS butto n, t he radio scan s fo r
each p re set station i n FM or AM(MW) ban d fr om NO.1 ban k, e ach preset st at ion broad cast s fo r 5 seconds. Aft er f inishin g a ci rcle of sca nn ing, it will re sume broadc as ting the
stat io n in NO.1 bank.
NOTE : In F M band, FM1,F M2 a nd FM3 are pr es et and scan ed a s one band at a tim e;
In AM(M W) b and, AM1(MW 1) a nd AM2(MW2 ) ar e preset an d sc aned as one ban d at a time.
Page 18

5. To preset a nd listen t o a memory st ation (1 ~6 icon s or 1~6 butt ons or CH1- 6 butto n )
1) Lon g touchin g one of 6 nu mber(1~ 6) icons or l ong press ing one o f 6 number( 1~6)
butt ons can pre set the c ur rent br oadcast ing stati on of the c ur rent ba nd in the num ber
memo ry bank; .
2) Bri efly touc hing on e of 6 n umber (1~6) ico ns or brief ly pres si ng one of 6 n umber(1 ~6)
butt ons can lis ten to th e me mory st ation in th e current b and pre se t in the nu mber
memo ry bank.
* CH1- 6 button:
1)To pre set a stati on in a mem or y bank wi th CH1-6 bu tton, fir st sele ct a d esire d
band ; then pres s CH1-6 b ut ton to se lect a desi red memor y bank; a nd t hen sea rch
for a de sired sta tion; fin ally lo ng press CH 1-6 butto n to stor e th e stati on in the
memo ry bank.
2)To l isten to a pr eset st at ion wit h CH1-6 but ton, firs t switch on a d esire d band, the n
cont inuousl y press C H1 -6 butt on highli ght and lis ten to it .
6. To switch o n between s tereo and m ono mod e (MO/ST bu tton)
Pres s MO/ST butto n on remote c ontrol to s elect S TEREO or MO NO mode for F M band.
When t he STEREO m ode is acti vated , it can get be tter audi o effect; whe n the
MONO m ode is acti vated, it c an get cl earer aud io signal .
7. To switch o n between l ocal and di stanc e mode (LO/ DX button )
Pres s LO/DX but ton to turn L OC on to tu ne for loca l station s with weak i nterf erence;
Pres s LO/DX but ton to turn D X on to tun e for dista nce stati ons with st ronge r signal.
8. To search f or a RDS stat ion that is b roadc as ting a ty ped progr am (PTY)
Cont inuousl y touch in g PTY icon on t ouch scre en or conti nuously l ong pre ssing PTY
butt on on contr ol pane l sw itche s between t he progra m types s uc h as: NEW S ...and
so on.
After s electin g a desir ed p rogra m type, no op eration f or a whil e, i t displ ays PTY
SEEK a nd automa tical ly s earch es for a RDS st ation tha t is broa dc astin g the selec ted
type o f program .
If the s tation th at is broad casti ng the sele cted type o f program d oes not e xist, it wi ll
disp lay NO PTY and re turn back t o the pre vi ous nor mal stati on.
9. To automa tically a lternat e a stron ger signa l of freque ncy for the c urren t RDS stati on(AF)
Duri ng broadc astin g a program t yped stat ion, use th e RDS int er face of t he SET-
TING S MENU or SEL and VOL buttons t o set AF mode on o r long pr ess TA/AF b utton
on con trol pane l or AF butt on o n remot e control t o switch on AF m ode, th en AF i con
flas hes on scre en.
After s witchin g on AF mode , th e radio c hecks the s ignal str ength o f AF( alter nate
freq uency) al l the tim e. W henev er a new AF is str onger tha n the cur re nt freq uency,
Page 19

It switches over t o the AF for a s hort ti me, and the AF ic on is lig ht on scr een(not
flash).
* In FM mode, when swi tchin g on AF mode, the radio au to sear ches for or preset
only those RDS sta tions .
* In FM mode, when swi tchin g on AF and TA modes, the rad io auto s earches for
only those RDS sta tions b roadcasting tra ff ic anno uncement.
10. REGION mode
use the RDS interf ace of th e SETTI NGS MENU or th e SEL an d VOL bu ttons to set
REGION mode on or off.
In REGION on mode, w hen swi tching on AF mode, the r adio ca n’t switch over to
those AF stations w hich ha ve a different region al prog ram conten t.
In REGION off mode, wh en swit ching on AF mode, the ra dio can s witch over to
those AF stations w hich ha ve a different region al prog ram conten t.
11. PI mode
use the RDS interf ace of th e SETTI NGS MENU or th e SEL an d VOL bu ttons to set
PI SOUND or PI MUTE mo de.
In PI SOUND mode, wh en swit ching on AF mode, if a car c ruise s that cr itical are a
back and forth, an o scill ation phenomeno n can be oc curred, because t he differ ent
PI code can be recei ve from a s ame AF. when the different P I sound ( DIP) is heard
once in a while, the d ifferen t PI sound wil l be hear d for les s than 1 secon d.
In PI MUTE mode, whe n switc hing on AF mode and unde r above s ame situation,
a mute sound will be h eard fo r less than 1 second.
12. To aut omati cally sea rch for traffi c annou ncements (TA)
In any mode, use the RDS i nterf ac e of the SE TTINGS ME NU or SEL an d VOL bu ttons
to set TA mod e on or press TA/AF butt on on con trol pane l or long pre ss TA button on
remo te contro l to switch o n TA mode, t hen TA: ON wi ll disp la y on scre en for a whil e
and be gin to sear ch for th os e RDS rad io statio ns transm ittin g tr affic ann ou nceme nt.
When an RDS radio st ation t ransmits traffic an nounc ement and is receiv ed by the
radio, tempora rily sw itch the current wo rk sour ce to an RDS radio stat ion bro ad casting traffic an nounc ement, and TRAFFI C will be d isplayed on scree n.
When the traffic ann ounce ment is over, it will re turn ba ck to previous work s ource .
Page 20

BT Operation
1. Pairing and Con necti ng
Prior to using the B T de vice na med BC_HF_V03 as a ha ndfre e system for a BT-
enabled mobile p hone fo r the first time, you m ust as follows:
* Prior to pairing a nd conn ecting, when disp layin g No Video inter face of r adio, C D,
video disc, AUX or BT mus ic, log o flashes in the top le ft corn er of touch
screen.
* During using the B T de vice na med BC_HF_ V03 as a ha ndfre e system for a B T enabled mobile p hone, p lace the BT-enable d mobil e phone 3 mete rs from t he Car
A/V System;
1) Touch icon on BT PHO NE inte rface i n the BT PHONE par t or long p ress PAIR
button on remote c ontro l or on control panel t o displ ay logo ;
BT
pair and connect t hem
BT
2).Switch on the B T mo de of you r mobile pho ne; the n s BT
device and enter i t; device car
BC_HF_V03 , select it and ente r it; the n it will show an inter face
that asks you to inp ut a pass word, input 8888 an d enter i t; then i
connect
with the BT dev ice BC_ HF_V0 3 of the car A/V system, C onfir m it, then
logo d isplays al l the tim e.
BT
* finishing pair ing and ing
When connect , the audio of the mob ile pho ne transfers
or the mobile phon e
to the car audio sys tem whe never a call is made or r eceiv ed
plays music
2. BT PHONE
1) Make a call
(1) Dial with mobi le phon e directly;
(2)Dial with the c ontro ls on BT PHONE int erfac e or on rem ote control or on con trol
panel
a. Touch the BT PHONE i con on so urce menu or long pre ss butt on on rem ote
control to pop up BT PHO NE inte rface as follows:
will be displaye d
.
When it finds the BT of the A/V system, the na me
: to str engthen th e pairi ng sign al.
elect the item to fi nd a
t will pair and
: to exi t BT PHONE inter face.
Page 21
b. Use the number ic ons or bu ttons to input your d esire d phone number;
* When inputting a w rong di git, use icon or < butt on to del ete it.
c. After finishi ng inpu tting, touch icon o r press b utton o n control pa nel or pr ess
butt on on remote c ontro l to dial o ut.
2) Redial last dia led pho ne numb er
Touch icon or long pre ss butt on on rem ote contro l to dial o ut the la st dialed
phone number.
3) Answer a call
During ringing , the inc oming telephone n umber d isplays in the midd le of the t op
column of the BT PHONE i nterf ace. If you want to rec eive it , touch icon or press
butt on on contro l panel o r press b utton on rem ote con trol; i f you want to
reject it, touch i con or pr ess but ton on control pane l or pres s button on
remote control .
4) End phone talki ng
When you want to end p hone ta lking, touch icon o r press o r butto n.
5) Switch audio be tween c ar A/V s ystem and mobile ph one
During phone BT handfree s ystem o f the car A/ V system,
if you want to chang e the pho ne audio to your mobi le phon e, touch icon or
press button on co ntrol p anel or p ress butto n on remo te cont rol.
During phone tal king us ing the mobile phon e, if you w ant to change the pho ne
audio to the the car A/ V syste m again, touch iocn o r press o r butto n.
talking using th e
Adj ust volume l evel du ring talki ng
6) phone
talking, use VOL knob or VOL+ an d VOL- bu ttons
During phone and ic on or
to adjust volume l evel.
* * / # icons and button s
they perform as * / # bu ttons o n mobile phone.
.
3 BT MUSIC
)
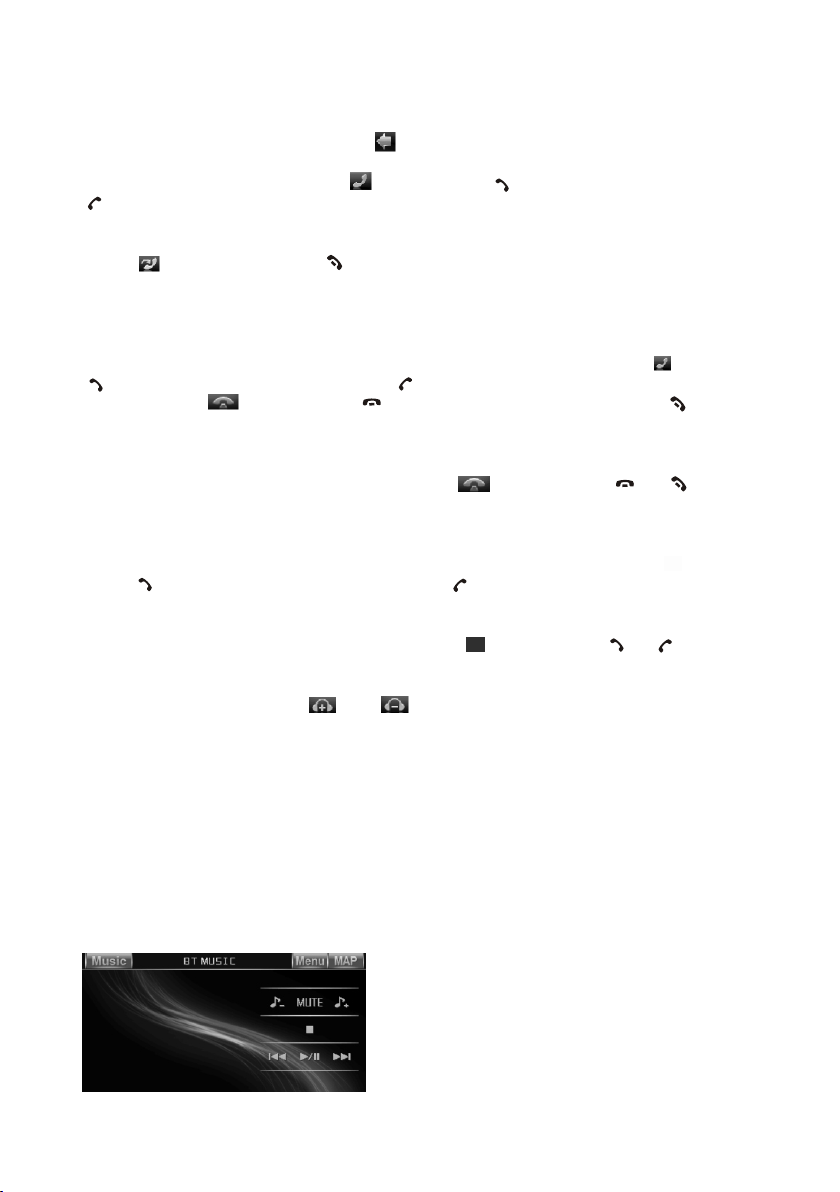
1 Touching BT MUSIC o n sourc e menu or pressing MO DE butt on can pop up BT
MUSIC interfac e as foll ows:
Page 22

and ic ons = VOL- an d VOL+ butt ons = VOL knob
MUTE i con = MUTE bu tton
icon = b utton
icon = b utton
and ic ons = and but ton
MUSIC icon: To enter source menu.
MENU i con : To pop up the p age1 of S ETTINGS M ENU
MAP icon : To en ter GPS mod e but not exi t BT music mode
) using your mobil e phone w ith BT functio n to audio/video if i t
2 When play , is pa ired
with the audio of the mob ile
and connected the BT device o f the car A/ V syste m,
phone will chang e into .
the car A/V system
The BT device of th e car A/V sy stem su pport A2DP, if your m obile p hone with BT
function suppo rt A2DP, the car A/ V system can output s tereo a udio from your
mobile phone.
) T the car A/V system so these i cons on t he BT
3 he BT device of supports AVRC P,
MUSIC interfac e excep t MUSIC/ /MAP and their buttons on
MENU correspond ing
control panel or o n remot e control are avail able fo r audio/video pla yback o f your
mobile phone dur ing pla yback. But n for |<</>>|
o fast forward/b ackwa rd functions
icon and buttons , and the f unction of resume p layba ck after pausing or s toppi ng
is available onl y for som e mobile phone
.
* If you don’t want to u se the BT fun ction of the car A/V sys tem , lon g press SEL
to display BT, to BT
button then use VOL knob o r VOL+ an d VOL- bu ttons swit ch
off .
Page 23

Disc/USB/Car d Opera tion
1. Loading or unlo ading a d isc, US B or card
1.1 Loading a disc , USB or ca rd
To play fi les in a disc, insert a d isc wit h label surface up in to disc s lot. it will
automaticall y play.
* CAUTION OF USING D ISC
Label
surface up
1) Handle a disc by it s edge, d o not touch the surfa ce of pla y side.
2) Before insert ing dis c, wipe the disc outw ards fr om the disc
center with a clea n, soft , dry, lint-free cloth . Do not us e solvents
/thinner such as p etrol /benzine, clean er.
3) After taking a dis c out of di sc slot, put the disc i nside d isc case to
keep it clean.
4) Do not stick pape r or tape o n the disc surface of p lay sid e. If
there is glue (or an alog) o n the disc surface, m ust wip e it up
before using.
To play fi les in a USB, firstly o pen USB p ort cover, then inse rt USB st orage into
USB port, and then i t will pl ay files in the USB aut omati cally.
To play fi les in a card, firstl y press R EL but ton to detac h contr ol pane l, then hold
the right part of th e contr ol panel and pull upw ards a li ttle and to you to remo ve it,
and then insert th e card wi th label side upwar d and con tact end frontwar d into ca rd
slot as the follow ing fig ., and then attach co ntrol p anel onto chassis a gain, b y now
it will play files i n the car d automatically .
Labe l si de
faci ng u pw ard
Press in till hear d a “CLICK”
Page 24
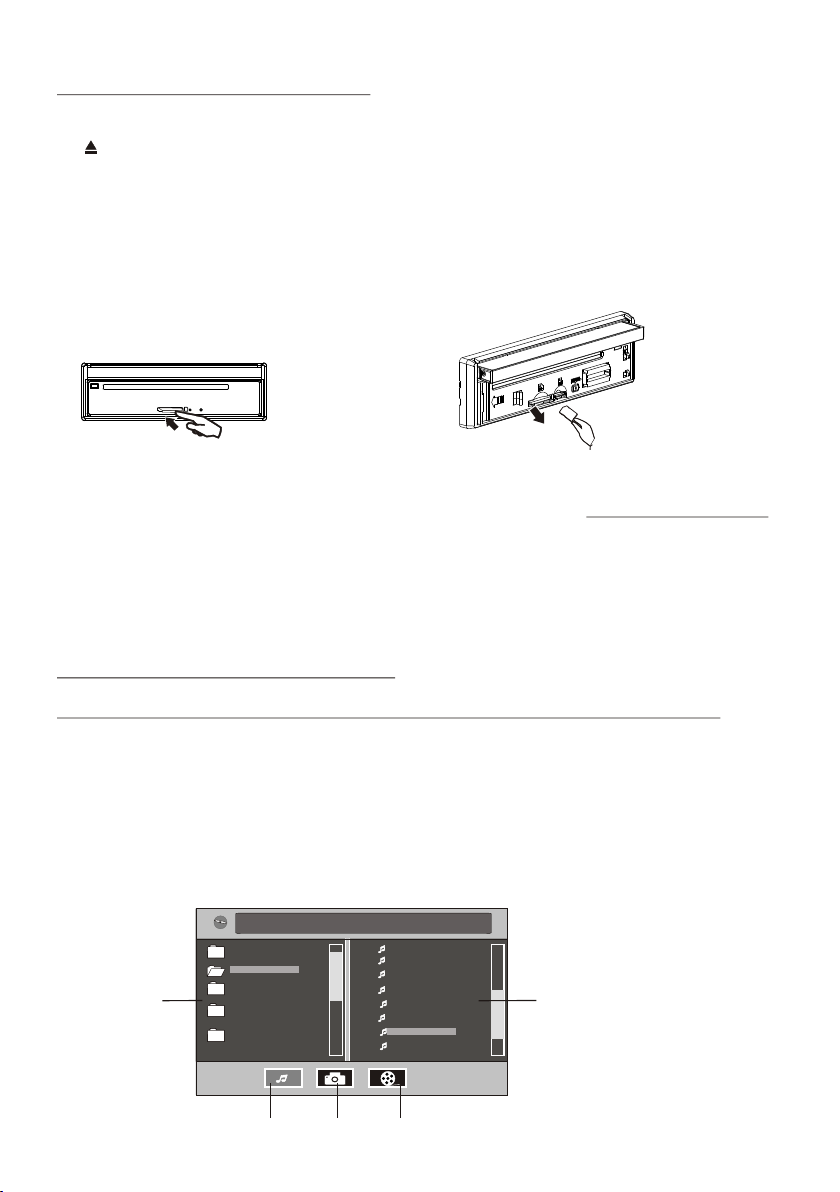
1.2 Unloading a di sc, USB o r card
To unloa d the disc in disc slot , use STOP butt on to stop pla yback a nd then p ress
butt on to eject di sc, the n remov e it.
To pull aw ay the USB storage, u se STOP butto n to stop play back, t hen you c an
remove the USB sto rage.
To unloa d the card in card slot , use STOP button to stop pla yback , then pr ess
REL button to det ach con trol pa nel and then h old the r ight pa rt of the cont rol pan el
and pull upwards a l ittle a nd then to you to remov e it, and t hen you can push the
card for release i t and the n pull it out of card slo t.
Remove the memor y card Press in till hear d a “CLICK”
* During MP3/WMA pl aybac k, the informatio n of file , folder, title, art ist and a lbum
will be scrollin g on LCD di splay. As l ong as the current pl aying M P3/WMA music
contains relev ant ID3 t ag information in v ersio n 1.0/2.0 format, t he 3 item s
underlined abo ve will b e scrolling on LCD di splay ; otherwis e, they w ill not .
* There is ESP func tion fo r all for mats of disc s.
2. Popping up Func tion Ic ons-b oard
2.1 Function Ico ns-bo ard of Di gital Video/ VCD/M PEG4/ Image/MP 3/WMA
During Digital Vid eo/VC D/MPEG4/ Image p layba ck, tappin g any pla ce on tou ch
screen can pop up Fu nctio n Icons-board 1 as ne xt page , then tap icon to pop
up Function Icon s-boa rd 2 as next page.
During MP3/WMA pl aybac k, tapping any plac e excep t folder area, trac k area an d
MP3/WMA&Imag e&MPE G4 icon s can pop up Fun ction I cons- board 1 same a s one
of Digital Vi deo/V CD/MP EG4/Image, then t ap icon t o pop up Function Ico ns board 2 same as one of D igita l Vi deo/VCD/ MPEG4 /Imag e.
[M P3 ][M P3 ]
ITL E / SONG: T RACK 03 / ITL E / SONG: T RACK 03 /
WMAWMA
Mp3Mp3
Folder area Tra ck a re a
001001
002002
003003
001001
002002
003003
004004
005005
006006
007007
007007
008008
MP3/WMA icon Image icon M PE G4 icon
Page 25
The Function Icons -boar ds display a s follo ws:
Func ti on I cons-boar d 1 Funct io n Ic ons-board 2
* Some icons on the Fu nctio n Icons-boards de scrip t as follows:
: Same a s MUTE butto n.
: Same a s VOL- butto n or rota ting
VOL knob with anti-clo ck wise .
: Same a s VOL+ butto n or rota ting
VOL knob with clo ck wise .
: Popi ng up source M enu.
: Popi ng up Functi on Icon s-board 2.
: Redialing the la st phon e number.
: Same as EQ button.
: Same a s CLK button .
: Same a s long press ing EQ bu tton.
: Same a s SW button.
: Switching AF mode o n or off.
: Switching TA mode on or off.
: Popi ng up Functi on Icon s-board 1.
: Popi ng up BT PHONE int erfac e.
2.2 CD interface
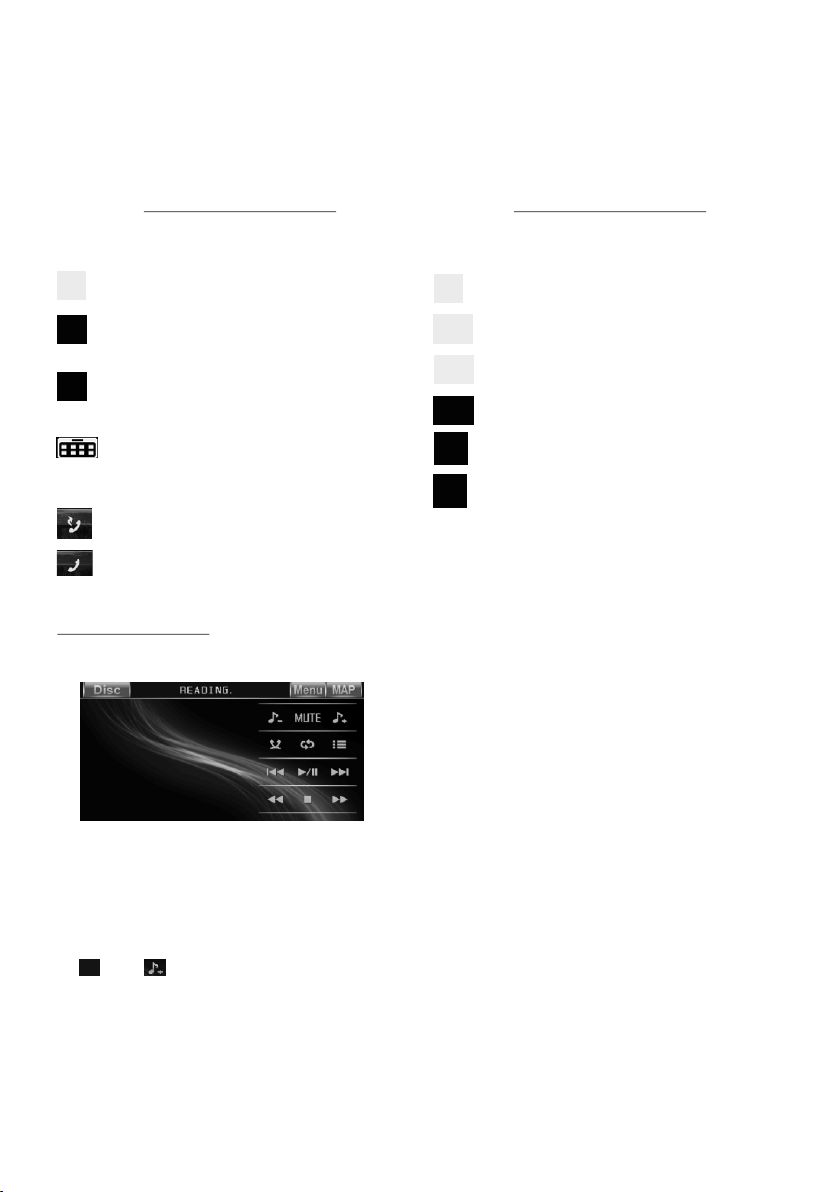
During CD playba ck, the C D interface displ ays as fo llows:
* For Digital Video/ VCD/M PEG4/Image/MP 3/WMA , after loading dis c/USB /card,
the screen will al so disp lay this interfac e above . After a while, it will d isapp ear
and display vide o or imag e or root menu.
* Some icons on the CD i nterf ace descript as fol lows:
and ic ons = VOL- an d VOL+ butt ons = VOL knob
MUTE i con = MUTE bu tton
Disc i con: To enter sou rce menu
MENU i con : To pop up the p age1 of S ETTINGS M ENU
MAP icon : To en ter GPS mod e but not exi t disc mo de
Page 26

3. Function of con trols o n the tou ch screen/main un it/re mote control
1. icon or button
During playbac k, use it t o pause playback; i n pause m ode, use it to resume p lay back.
In CD interface , th e icon di splays as .
2. icon or button
During Digital Vid eo/VC D/CD/MP3 /WMA pl aybac k, tapping o r press ing it pr e-stop
or pause playbac k; in pre -stop or pause mode , use ico n or butt on to resume
playback.
During playbac k, tapp ing or pressing it tw ice to fu lly stop playback ; in full y stop
mode, use icon or bu tton to s tart pl ayback fro m the beg innin g of the media .
During MPEG4/i mage pl ayback, use icon or b utton t o displ ay root menu a s
follows:
[M P3 ][M P3 ]
ITL E / SONG: T RACK 03 / ITL E / SONG: T RACK 03 /
WMAWMA
Mp3Mp3
Folder area Tra ck a re a
001001
002002
003003
MP3/WMA icon Image icon M PE G4 icon
001001
002002
003003
004004
005005
006006
007007
007007
008008
During MP3/WMA pl aybac k, the root menu abov e displ ays all the time.
When displayin g root me nu, use < or > button to hi ghlig ht the current chap ter/
track, the curre nt fold er or the k ind icons.
* If there are no trac k for a kind icon, you c an’t hi ghlight the kind ic on.
/chapter
When highlight ing a kin d icon, press ENTER b utton t o enter it.
When highlight ing the c urrent folder, use v o r ^ butto n to highlight othe r folde rs
and then press ENT ER butt on to enter it.
When highlight ing the c urrent track, use v o r ^butt on to highlight oth er trac ks and
then press ENTER b utton t o play it.
* For image, after h ighli ghting a track, pre ss ENTE R butto n to display o nly the h igh lighted track; p ress >| | butto n to display a ll trac ks step b y step from th e highl ighte d
track.
* Tapping folde r icon, t rack ic on or kind ico n can exe cute th e operatio n above .
3. / ico ns or button s
During playbac k, cont inuously tappin g or icon o r conti nuously pr essin g
or button on remot e contr ol or continuousl y and lon g pressing or butto n
Page 27

on control panel c an fast b ackwards or forwa rds at th e following multi ple of no rmal
speed: x2, x4, x8, x 20, x1.
During fast play back, u se icon o r button to re sume no rmal pl ayback.
For image files, n o this fu nction.
4. / ico ns or button s
During playbac k, use on e of them to play previ ous or ne xt chapter/trac k.
5. Number button s
During Digital Vid eo/VC D(PBC OFF) /MPEG 4/Ima ge/CD/MP3/WMA pl aybac k,
use number butto ns to inp ut chapter/trac k SN. , the n it will p lay or displ ay it.
To input a chapter/t rack wi th an SN that is equal to o r bigge r than 10, use the +10
button to input th e ten and then use 0-9 but ton to in put the
in
units order.
I.e. +10 ~ 1 = 11 (number 11 chapt er/tr ack will be di splay ed/pl ayed.)
During VCD playb ack, wh en it is in PBC ON mode, th e numbe r buttons are disab led.
6. icon and MENU but ton
During Digital Vid eo play back, use ME NU icon o r butto n to display t he curr ent
chapter list, th en use di rection buttons t o selec t your de sired chap ter and t hen
press ENTER butt on to pla y it.
For VCD, MENU butt on is dis abled, track list i s displ ayed on the monitor s creen
by pressing TITLE/ PBC but ton or tapping icon .
For MPEG4/imag e, MENU b utton a nd icon are di sable d, root m enu is displ ayed
on the monitor scr een by pr essing button or tappin g icon.
digit in s place digit
For MP3/WMA, MEN U butto n and ico n are disabl ed, roo t menu di splays on
the monitor scree n all the t ime. Root menu of MP3 /WMA is sa me as the o ne of
MPEG4/image.
For CD, MENU button disab led.
7. icon and TITLE/ PBC but ton
During Digital Vid eo play back, use TITL E/PBC b utton o r icon to disp lay tit le
list; then use dir ectio n buttons to select y our des ired title and then p ress EN TER
button to open the c hapte r list of the title; th en use di recti on buttons t o selec t your
desired chapte r and the n press ENTER butto n to play.
* You can also tap a desir ed titl e and then chapter to p lay.
During VCD playb ack, us e icon or TITLE/PBC b utton t o switc h PBC mode on
or off. When PBC mode is s witch ed on, it will play fro m the beg inning of media til l
it displays a trac k list. W hen a tra ck list is dis playe d, use th e number but tons to
select your desi red tra ck to play.
For MP3/WMA/MP EG4/i mage, icon and TITL E/PBC b utton a re disable d.
For CD, the TITLE/PB C butto n is disabled
the is
Page 28
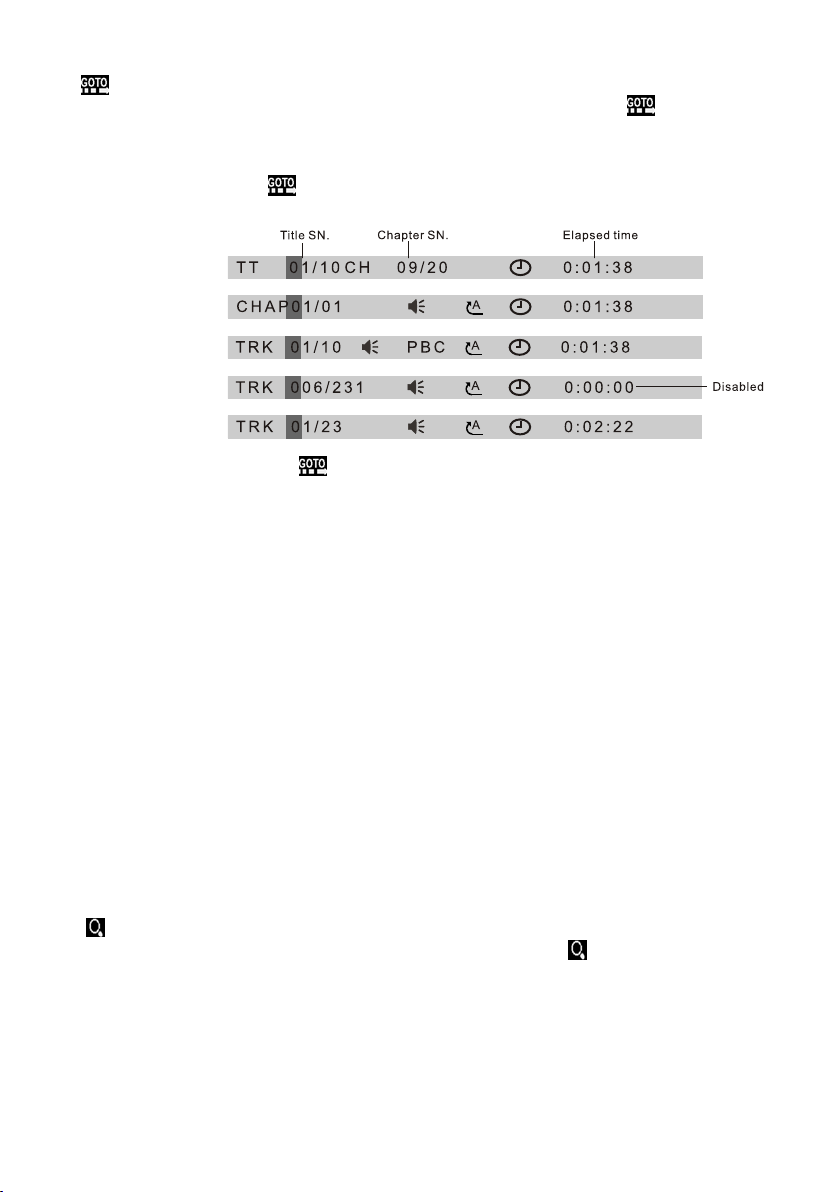
8. icon and GOTO butto n
For Digital Video/ MPEG4 /VCD/image/MP 3/WMA , you can use , , ,number
and ENTER icons or G OTO, <, >, nu mber and ENTER butt ons to se lect a chapter
/track or from a pla yback t ime point to play.
During playbac k, tap ic on or press GOTO button t o displ ay changeable
playback infor matio n bar as follows:
Digital Vid eo:
MPEG4:
VCD:
Image:
MP3/WMA:
* During playbac k, tapp ing icon can also dis play th e Goto Function ico ns-bo ard
as follows:
When displayin g the cha ngeable playbac k infor mation bar, use / icon o r
< or > button to highl ight ti tle SN.(only for Di gital Vid eo) , chapter/tra ck SN. or
elapsed time of cu rrent c hapter/track( disab led for image).
When highlight ing tit le SN. or chapter/t rack SN . , use number icons or b utton s to
input desired SN . of titl e or chapter/trac k, then u se ENTE R icon or butt on to pla y
the selected cha pter/ track.
When highlight ing ela psed time of curren t chapt er/track(disa bled fo r image), use
number icons or bu ttons t o input desired pla yback t ime point for the pla yback t ime
of the whole media f or Digi tal Video/VC D and of th e curre nt chapter /trac k for
MPEG4/MP3/WM A, then u se ENTE R icon or butt on to pla y from th e playback t ime
point.
For CD, GOTO button is d isabl ed.
9. icon or ZOOM butt on
During Digital Vid eo/VC D/MPEG4/ image p layba ck, use icon or ZOOM bu tton
to switch zoom mod e betwe en ZOOM 2, ZOOM 3, ZOOM 4 , ZOOM ½, Z OOM 1/3 ,
ZOOM 1/4 and ZOOM OF F.
When zooming in vi deo/i mage, use directi on butt ons to move video/i mage
upwards, downw ards, r ightwards or left wards .
When not zooming i n image , direction butto ns can sw itch on 4 fixed rotat ed
angles between > =90 deg c w, <=90 deg ccw, ^=UP-D OWN and L EFT-RIGHT.
Page 29

For MP3/WMA, ZOOM button disable d.
icon and are
For CD, the ZOOM but ton is di sable d.
10. OSD icon or butt on
During Digital Vid eo /MP EG4/I mage/MP3 /WMA pl aybac k, use OSD ico n or
/VCD
button to displa y playb ack information b ar as bel lows:
Digital Vid eo :
MPEG4:
VCD:
Image:
MP3/WMA:
For CD , OSD button is d isabl ed.
11. icon or REPEAT button
During Digital Vid eo play back, touc h icon or l ong pre ss RPT button to s witch
repeat mode betw een REP CHA PTER, REP TITLE, R EP ALL an d REP OFF.
During VCD(PBC O FF)/C D playback, RPT button
touch icon or long p ress to
switch repeat mo de betw een R P , REP ALL or REP OFF.
E 1
Page 30
During MP3/WMA /MPEG 4/image playbac k, touc h icon or long press RP T bu tton
to switch repeat m ode bet ween REP1,REP FOLDE R(or DI R),REP ALL or REP OF F.
During VCD(PBC O N) play back, icon and RPT butt on are di sabled.
2
1 . ic on or RDM b utton
During Digital Vid eo/VC D(PBC OFF) /CD/M P3/WM A playback, tappin g icon or
long pressing RD M butto n switches random m ode on or o ff .
For MPEG4/imag e/VCD (PBC ON) playback , RDM button disab led.
13. icon or INT button
During VCD/CD pl aybac k, tapping icon or lo ng pres sing INT butto n switc hes
intro mode on or off.
For Digital Video/ MP3/W MA/MPEG4/imag e, icon a nd INT button ar e disab led.
. icon or button
14
During Digital Vid eo play back, use icon or but ton to sw itch between audi o track s
(depending on th e curre nt playing media) .
/ CD icon or
During VCD playback , use button to switch a udio ch annels between
MONO L, MONO R, MIX MO NO and ST EREO.
For MPEG4/MP3/ WMA ima ge, b utton di sable d.
15. icon or button
During Digital Vid eo play back, use ic on or but ton to sw itch subtitle lan guage s
on or off(dependin g on the cu rrent play ing med ia).
icon and are
For VCD/MP3/WM A/MPE G4/image, button disable d.
For CD, the button i s disab led.
/ icon and are
icon and are
Page 31

16. icon or SETUP butt on
Use ic on or SETUP butt on to ent er Media Setup Menu f or sett ing up all media
parameter valu es.
Use ic on or SETUP butt on to dis play Media Setup Me nu(th e default page is
SYSTEM SETUP);
Media Setup Menu h as 4 page s in all. When highli ghtin g a page, tap the aim pag e
icon or press > or < but ton to hi ghlight another p age;
After selecting a p age, ta pping the aim item ic on or pre ss ^ or v button to highl ight
a setup item in the se lecte d page;
After selecting a s etup it em, tap ping the aim v alue; o r press > button to ent er the
setup item, then p ress v or ^ b utton t o select a des ired va lue, fi nally pres s ENTER
button to confir m it.
After finishing s ettin g, tapping EXIT icon or p ress SE TUP button to ex it Medi a
Setup Menu to resu me norm al playback.
Description of t he 4 page s:
1) SYSTEM SETUP
SYS TE M SE TU P
TV S YS TE M
SC RE E N SAV ER
TV T YP E
PAS SW OR D
RAT IN G
DE FAUL T
E X I T
TV SYS TEM
This setup item is for s ettin g up video system in NT SC, PAL or AUTO .
If you set a non-mat ched vi deo sys tem for play ing a vid eo, the p laying vid eo will
display white- black o r flash.
SCREEN SAVER
This setup item is for s witch ing screen saver on o r off.
TV TYP E
This setup item is for s ettin g up video display si ze.
Page 32

(1) 4:3 PS: Choose t his ite m when connecting a m onito r with 4:3 screen. Wh en
playing video wi th 16:9 s ize, the left and rig ht part o f video will be cut out , and
video will displ ay in ful l screen.
(2) 4:3 LB: Choose t his ite m when connecting a m onito r with 4:3 screen. Wh en
playing video wi th 16:9 s ize, the top and bott om part o f the mon itor scree n will
be turned into a bla ck squa re .
(3) 16:9: Choose t his ite m when connecting a m onito r with 16:9 wide scre en.
PASSWORD
This setup item is for l ockin g or unlocking pare ntal co ntrol. The def ault mo de
is locked. The defau lt unlo cking password is 0 000.
To lock or u nlock parental co ntrol :
(1) Highlight PASSW ORD ite m and then pre ss > or ENT ER butt on to enter it;
(2) Input passwo rd 0000 ;
(3) Press ENTER bu tton to c onfirm, then it wil l unloc k or lock parental co ntrol .
* e of the PASSWORD
Remove th se ction o f the User Manual to ke ep this s ensitive
information co nfide ntial.
RATING
This setup item is for s ettin g a new rating level of p arent al control.
(1) First highli ght PASSWO RD item to see whethe r paren tal control is lock ed or not .
If it is i n locked mod e, unlo ck parental contr ol refe rring to PASSWORD abov e.
(2) Highlight RATIN G item an d press > or ENTER butt on to ent er it, then use ^ or v
button to select y our des ired rating level , and the n press ENTER butto n to
confirm.
(3) Highlight PASSW ORD ite m again and th en pres s > or ENTE R button to enter it,
then input passw ord 000 0, and press ENTER bu tton to l ock parental cont rol
again.
DEFAULT
This setup item is to ch ange al l parameter back to t he defa ult factory value s.
2) LANGUAGE SETU P
LA NG UAG E SE TU P
OS D LA N GUA GE
AU DI O LA NG
SU BT I TL E LA NG
ME NU L A NG
E X I T
Page 33

OSD LANGUAGE
This item is for sel ectin g the typ e of languag e displ ayed on the screen ex cept fo r
subtitle langu age and m enu language(de pendi ng on curren t playi ng medi a).
AUDIO LANG
This item is for sel ectin g the type of audio lan guage (depending on cur rent pl aying
media).
SUBTITLE LANG
This item is for sel ectin g the typ e of subtitl e langu age(d epending o n curre nt
playing media) .
MENU LANG
This item is for sel ectin g the typ e of menu lang uage( depending on curr ent pla ying
media).
3) VIDEO SETUP
VI DE O SE TU P
BR IG H TN ES S
CO NT R AS T
HU E
SAT UR ATI O N
SH AR P NE SS
E X I T
BRIGHTNESS
For adjusting br ightn ess of video output .
CONTRAST
For adjusting co ntras t of video output.
HUE
For adjusting hu e of vide o output.
SATURATION
For adjusting sa turat ion of video output .
SHARPNESS
For adjusting sh arpne ss of video output.
Page 34

4) DIGITAL SETUP
DI GI TAL S ET UP
DY NA MI C RA NG E
E X I T
DYNAMIC RANGE
This item is for adjus ting li near compressio n ratio . If you set it to FULL,
Peak-to-Peak v alue of a udio signal is mini mum; if y ou set it to OFF, Peak-to
-Peak value is max imum.
Page 35

* Regi on Code
If you insert a disc i nto the d isc slot and REGION E RROR is d isplayed, the car
multi-media sy stem ca n not play the disc. The re ason is t hat the region code s
of the car multi-m edia sy stem and the used dis c do not ma tch eac h other.
Appe ndix: Reg ion code of D
Moti on Pictur e Associ at ion of Ame rica (MPAA) di vided the w orld into 6 r egion s, and
gave e very regi on a regi on c ode for l ocking an d unlocki ng D play back.
Basi cally, a coded D p layer c an play onl y the discs i f its reg io n code is t he
same D pla yer. Other wise, it ca nnot pl ay t he disc .
as the code of the igital Vid eo
Plea se
impo se this res trict io n. igit al
Video igital Video -
The prob lems caus ed by area co de inco nsisten cy prod uction of
unlo cked vers ion D pla yers and re codab le D play ers .
Regi on codes an d the cou nt ries or a reas repr esented b y regio n codes are a s follows :
Regi on 1: Americ a, Cana da , East- Pacific I nlands;
Regi on 2: Japan , We st Europe , North E ur ope, Eg ypt, Sout h Africa, Mi ddle Ea st ;
Regi on 3: Taiwan , Hong Kong , South K orea,
Thaila nd , indon esia, etc .;
Regi on 4: Austra lia, Ne w Ze aland , Central S outh Ameri ca, Sou th P acifi c Inlands ;
Regi on 5: Russi a, Mong ol ia, Ind ian Penin sula, Mid dle Asia , East Euro pe, North
Kore a, North Afr ica, Nort h-wes t Asi a etc.;
Regi on 6: China m ainla nd .
The 8 bigg est film m aking com panie s of America a re as follo ws:
note t hat only th e D discs a nd D play ers produ ced by
the 8 bi ggest fil m-mak in g compa nies of Amer ica The D
disc s and D pla yers not pr oduced by t he 8 bigg es t film m aking
comp anies of Ame rica ar e not restr icted by th e rule of reg ion cod e. Genera lly, th ey
are ca lled Free R egion C ode or Full R egion Cod e.
Sout h-east Asi an coun tries inc lude
igital Vide o
igital Vide o igital Vide o
-
igital Vide o
igital Vide o
igital Vide o igit al Video
has mo tivated t he
1. Wa rnerBro s;
2. Col umbia;
3. 20t hCentur yFOX;
4. Par amount;
5. Uni versal;
6. UA( UnitedA rtist);
7. MGM (MetroD ogwynMa yer);
8. Wa ltDisne y
Page 36

* Parental Contr ol
Q: After insertin g a Digit al Video disc in to the di sc slot ,
and asks you to inpu t a passw ord, what sh ould yo u do
?
A: The playin g disc is l ocked b y a rating lev el of par ental control. If t he curr ent
rating level of pa renta l control of the Digi tal Vi deo p layer is low er than t he one
of current disc, y ou must i nput the correct pa sswor d of parenta l contr ol to
unlock the paren tal con trol and enter a rati ng leve l one
of the current dis c in orde r to play the disc.
* For factory pres et pass word of parental co ntrol o f Digital Video playe r,
see the .
part of Media Setu p Menu
Appendix: Pare ntal Co ntrol
Parental Contr ol func tion of a Digital Vi deo p layer c an control p layba ck of
movie ratings on a d isc. You ca n set the Digital Vi deo p layer t o be a certain
rating level of pa renta l control using the M edia Se tup Menu. If the rati ng leve l
of parental cont rol of a di sc is higher than the o ne of the D igital Vi deo p layer,
the Digital Video pl ayer ca nnot play th e disc.
The Digital Vi d eo movi e can be designed so th at the Di gital Video pl ayer ca n
play differ ent ver sions o f content of a p artic ular movie accord ing to th e different
rating levels of p arent al control. Depen ding on ig ital Video , the
scenes that are no t suita ble for children wi ll be cle ared or repl aced by s uitab le
scenes automat icall y.
if a dialogue box po ps up
equal to or higher t han
please
the D featu res
The rating le vels of P arent al Control a re as fol lows:
1 Kid Safe
2 G
3 PG
4 PG 13
5 PG R
6 R
7 NC 17
8 Adult
Page 37

AUX IN operatio n
An external AV system can use t he car AV syste m as monitor and ampl ifier.
1. Use an AV cable to m ake the c ar AV syste m and the e xternal AV syste m conne cted
through the AUX IN ja ck on con trol panel of the car AV syst em and th e AV Out j acks
of the external AV syste m.
AUX IN J ACK
MOD
VIDEO IN (yellow)
RCH IN (red)
LCH IN (white)
2. Play the extern al AV syste m, then u se MODE button or Sou rce Men u to ente r AUX
IN mode for the car AV syste m. By now, t he program played b y the ext ernal AV
system can be outp ut thro ugh the monitor of th e car AV system a nd the speakers
connected to the c ar AV syste m.
* The icons on th e AUX inte rface d escript as f ollow s:
and ic ons = VOL- an d VOL+ butt ons = VOL knob
MUTE i con = MUTE bu tton
EQ ico n = EQ button
LOUD i con = long pr essin g LO UD butt on
SWF ic on = long pre ssing S W bu tton
AUX ico n: To enter sou rce menu
MENU i con : To pop up the p age1 of S ETTINGS M ENU
MAP icon : To en ter GPS mod e but not exi t AUX mode
3. In AUX IN mode, you ca n use SEL , +, -, VOL , MUTE, EQ , SW an d LOUD bu ttons
or icons to adjust a udio an d video.
Page 38

External iPod op era tion
An external iPod c an use th e car AV system as a monitor an d ampli fier.
1. Use the iPod cabl e to make t he car AV system and the exte rnal iP od connected
through the AUX IN ja ck on con trol panel of the car AV syst em and th e headphone
port of the extern al iPod .
p n oHead ho e p r t
2. Play the extern al iPod , then use MODE butto n to ente r AUX IN mode for the car AV
system. By now, the p rogra m played by the exter nal iPo d can be output throu gh the
monitor of the car AV syst em and th e speakers connec ted to th e car AV system.
* The icons on th e AUX inte rface d escript as f ollow s:
and ic ons = VOL- an d VOL+ butt ons = VOL knob
MUTE i con = MUTE bu tton
EQ ico n = EQ button
LOUD i con = long pr essin g LO UD butt on
SWF ic on = long pre ssing S W bu tton
AUX ico n: To enter sou rce menu
MENU i con : To pop up the p age1 of S ETTINGS M ENU
MAP icon : To en ter GPS mod e but not exi t iPod mo de
3. In AUX IN mode, you ca n use SEL , +, -, VOL , MUTE, EQ , SW an d LOUD bu ttons
or icons to adjust a udio an d video.
Page 39

REAR VIEW CAMERA
The car AV system can m ake you l ook at th e actual sta tus beh ind you r car when
you change the gea r level t o the back position .
1. Use an video cabl e to make t he car AV system and the rear v iew cam era con nected through t he REAR C AMERA INPUT jack in the re ar cabi net of the car AV
system and the VID EO OUTP UT jack of the rear view ca mera.
Make the REAR CAME RA SWITC H line in the rear cabi net of th e car AV system
connected to (B+ )12V po wer supply.
2. When you change t he gear l evel to the back posi tion, t he screen of the car AV
system will disp lay the a ctual status behi nd your c ar.
* Note : the externa l monit or can not display th e actua l status behind you r car.
Page 40
Operation of GPS module
1. GPS Navigation
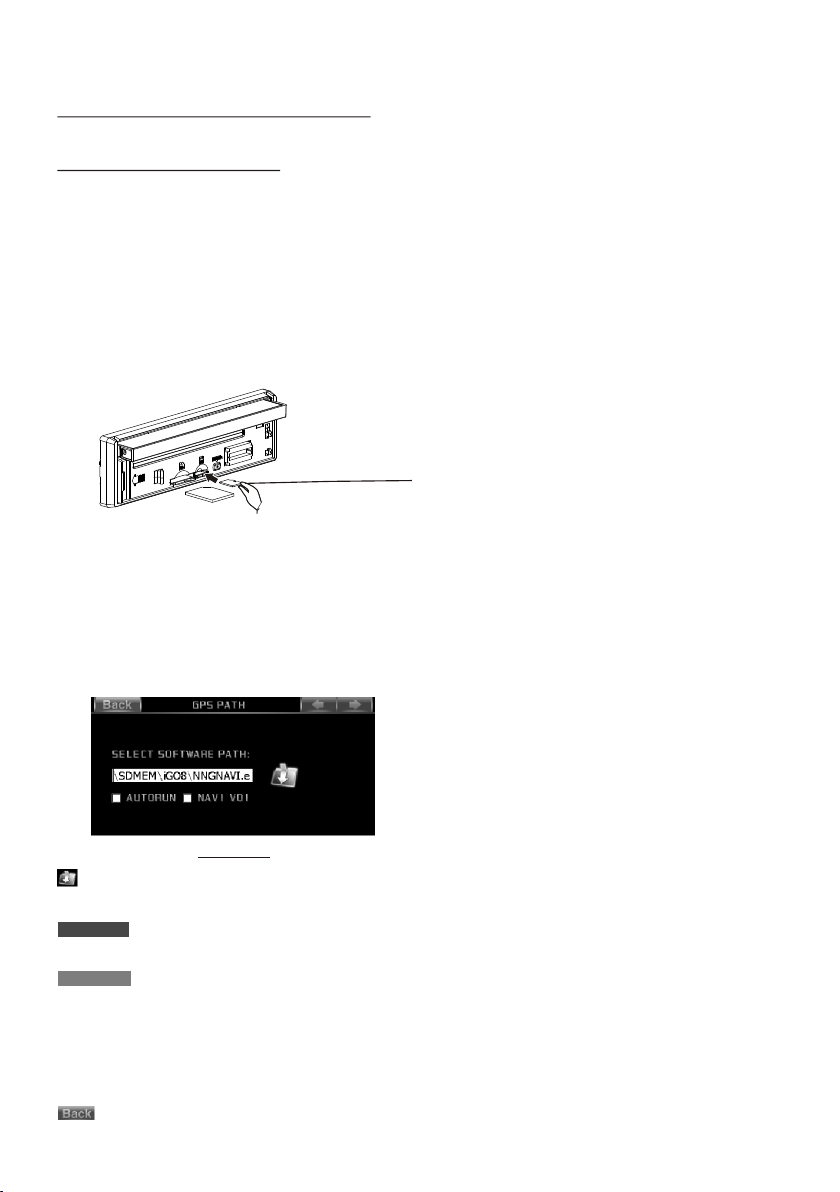
1. Loading GPS car d
Before setting G PS path a nd entering GPS nav igati on mode, must load a GP S
card with naviga tion ma p program file into t he GPS ca rd slot.
firstly press RE L butt on to det ach contro l panel , then ho ld the right p art of th e
control panel an d pull up wards a little and to y ou to rem ove it, and then inse rt
the GPS card with la bel sid e upward and contac t end fro ntward into the GPS
card slot as the fol lowin g fig., and then atta ch cont rol panel onto chas sis aga in.
Labe l si de
faci ng u pw ard
2. Setting GPS pat h
After loading GPS c ard and b efore entering GP S navig ation mode, must se t
the GPS path to an exe cutal e navigation map pr ogram f ile.
Touch SY STEM icon on the setu p page of t he source menu to pop u p page1 o f
SETTINGS MENU, t hen tou ch the it em of GPS PATH SETTING t o pop up GP S
PATH in terface as f ollow s:
GPS PATH
: to enter the car d in t he G PS c ar d sl ot a nd s el ec t a de sired executable navigation map p ro gr am
file(gener al ly t he e xt en si on n am e of a n executable navigation map progr am f il e is e xe ) .
: If touching the wh it e re ct an gl e fo r ti ck in g it , it will enter GPS mode automaticall y af te r
resetting the un it o r sw it ch in g th e ig ni ti on o ff a nd t he n po we r on t he u nit again.
: If touching the wh it e re ct an gl e fo r ti ck in g it , when GPS and another work source of
radio, disc, USB , ca rd , AUX o r BT are worki ng a t th e sa me t im e, t he a ud io o f ra di o,
disc, USB, card, AU X or B T music and the navi ga ti on v oi ce a re a va il ab le . When out putting naviga ti on v oi ce , th e au di o of r ad io, disc, USB, card, AUX or BT music is mute;
when no outputti ng n av ig at io n vo ic e, t he a udio of radio, disc, USB, card, AUX or BT
music is availab le . If n o ti ck in g it , th e na vi ga tion voice is mute when GPS and another
work source are wo rk in g at t he s am e ti me .
: to exit to the pag e1 o f SE TT IN GS M EN U.
Page 41

3. Entering GPS na vigat ion mode.
After loading a GPS c ard wit h an executable nav igati on map program file a nd set
the GPS path to the ex ecuta ble navigation ma p progr am file, touch the GP S icon
in the home page of th e sourc e menu or touch the MAP ico n in the to p right corner
of the No Video i nterf ace of ra dio, CD, video disc , AUX or BT musi c to enter GPS
navigation mod e.
* If using the GPS ico n in the ho me page to enter GPS mo de, it wi ll exit the working
source; if using t he MAP icon i n the top right corne r of the No Vid eo interfa ce of
radio, CD, video d isc, AUX o r BT music to enter GPS mod e, it wil l not exit the
working source . In GPS mo de, use MODE button t o enter r adio, d isc, USB, ca rd,
AUX or BT music mode, it wi ll not ex it the working GPS mo de.
About navigatio n opera tion for details, p lease r efer to the User Manu al of the
navigation map .
2. MEDIA/PHOTO/VIEWER
Media Operation
After loading a GPS c ard wit h MP3/WMA/MPEG4 f iles, t ouch ME DIA icon in the
tools page of the so urce me nu to enter media mod e and pop u p the media inter face as follows:
Media int er fa ce
Fil e
Pro gress t ape
Tra ck/ cha pter li st of cur ren t MP3/W MA/MP EG4
Sli de bar
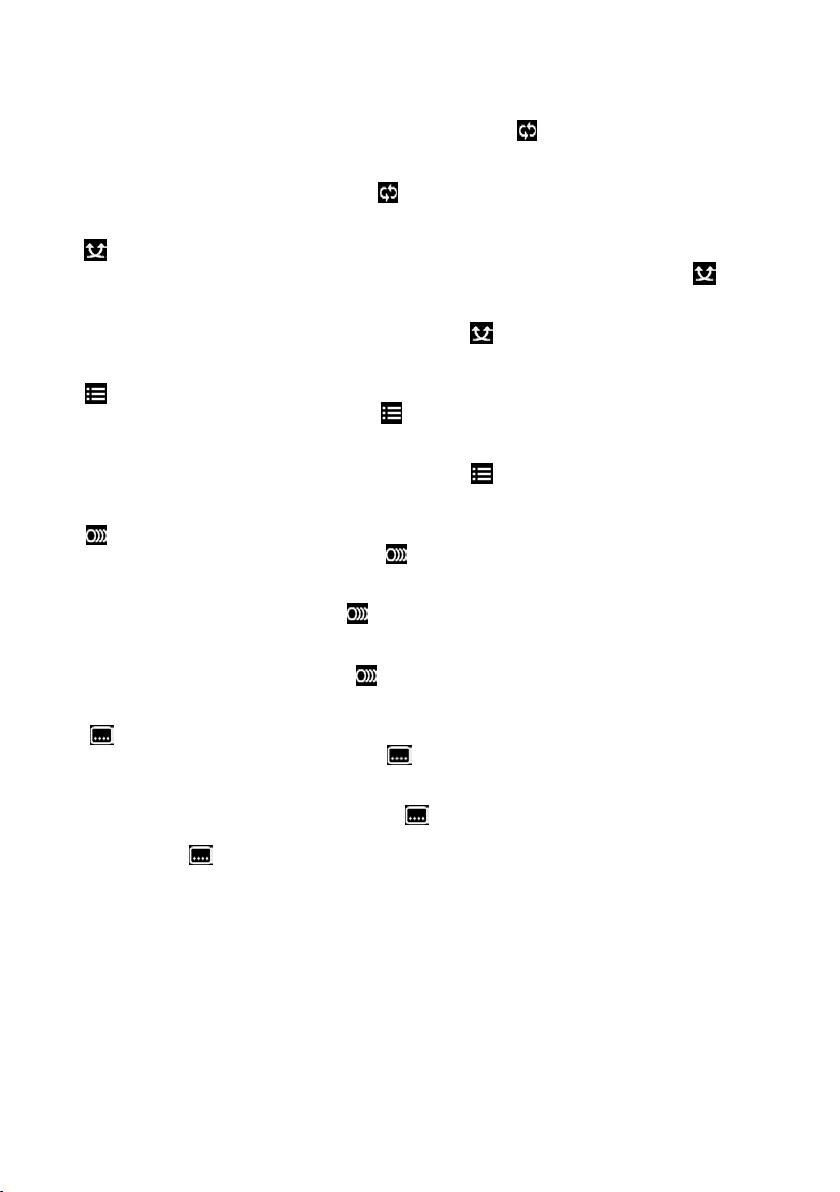
: to pause or resume p layba ck.
and : to p lay next or pr eviou s track /chapter a fter se lecti ng more than 2 t racks .
: to mute or resume so und.
: to enter full-sc reen mo de for MP EG4 or to paus e or resu me play back for aud io.
and : to i ncrease or d ecrea se volu me level.
: to enter the track /chap ter lis t of current M P3/WM A/MPE G4.
: to exit to source me nu.
Sreen except key b oard: p ause or resume play back.
progress tape: t ouch it i n progress tape to sk ip forw ard or backward to th is poin t.
: to open the folder l ist of th e GPS car d.
File : touch a or some f iles to s elect it or them.
: to select all trac ks/ch apter i n the curren t MP3/W MA/MP EG4 folder.
: to play the select ed trac k(s)/ chapter( s).
: to exit the track/ chapt er list t o media inte rface .
: to reo rder the tra cks/c hapte rs in the curr ent fol der by fi le name.
: to reo rder the tra cks/c hapte rs in the curr ent fol der by fi le type.
: to reo rder the tra cks/c hapte rs in the curr ent fol der by fi le size.
: to reo rder the tra cks/c hapte rs in the curr ent fol der by fi le date.
Slide bar: slide i t to slid e the track/chapt er list d own or up.
Page 42

Photo Operation
After loading a GPS c ard wit h photo files, touc h PHOTO ico n in the photo page of
the source menu to e nter ph oto mode and pop up the p hoto in terface as follow s:
Photo inter fa ce
Pho to list
GPS c ard pat h inter face
: to enter the GPS car d path in terfa ce.
: to enter.
: to exit to photo int erfac e.
SDMEM : to enter the d ata fol ders list step by ste p and fin ally enter photo li st.
[..]: To return back to pr eviou s interface.
Slide bar: to slid e the pho to list downward/ upwar d or rightward/le ftwar d.
File : to enter phot o inter face again and disp lay the p hoto of this file.
: to zoom out the curr ent pho to.
: to display the cur rent ph oto with the scale of 1 :1.
: to zoom in the curre nt phot o.
: to display previ ous pho to with the scale of 1: 1.
: to display next ph oto wit h the scale of 1:1.
: to enter full-sc reem mo de.
: to exi t the photo in terfa ce to the t ools page of t he sour ce menu .
Reader Operation
After loading a GPS c ard wit h e-book files its ex tenti on name are txt, touc h
READER icon in the t ools pa ge of the source menu t o enter R eader mode and
pop up the reader in terfa ce as follows:
Reader inte rf ac e
E-book list
Page 43
: to enter the GPS car d path in terfa ce.
SDMEM : to enter the d ata fol ders list step by ste p and fin ally enter e-book l ist.
File : to enter Read er inte rface again and dis play th e e-book of this file .
: to the home page.
: to automatical ly slid e page upward or stop s lidin g.
: to the end page.
: to previous page .
: to next page.
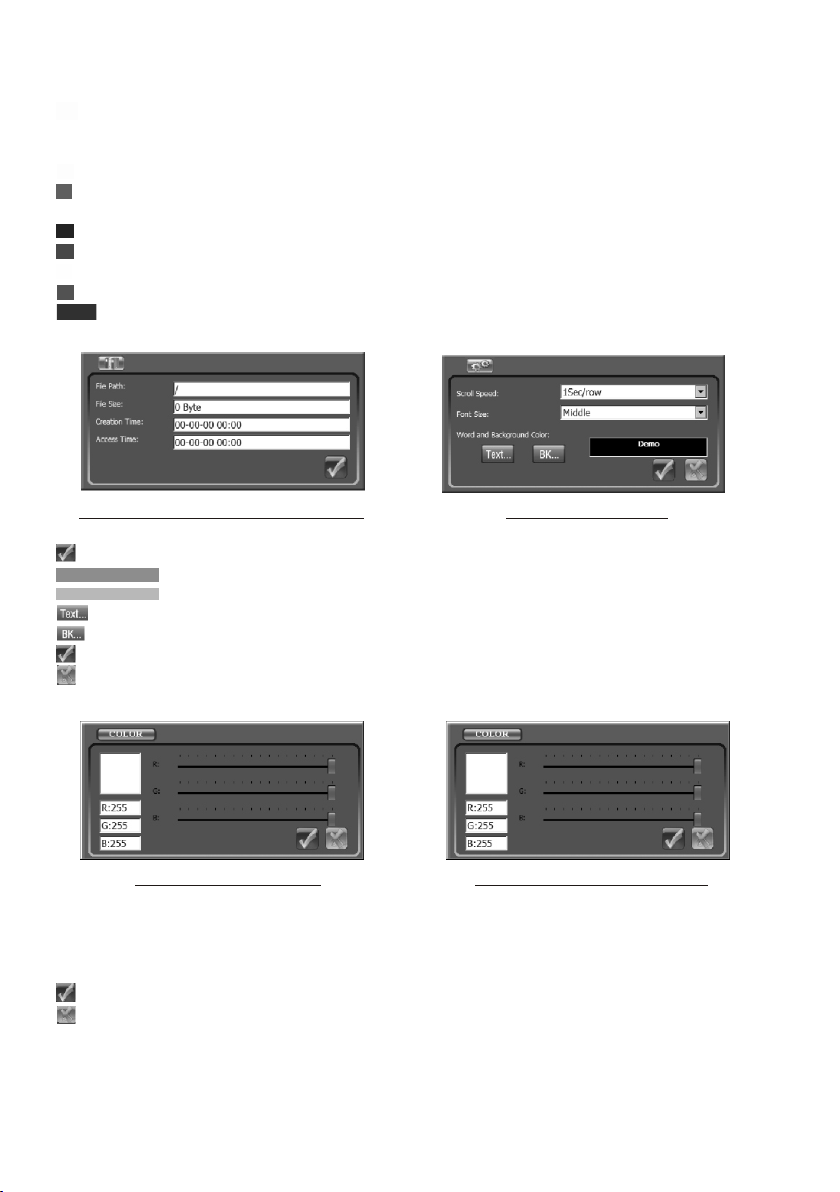
: to pop up the inform ation i nterface of the cur rent e- book.
: to pop up the e-book s ettin g interface.
: to exi t Reader int erfac e to the to ols page of th e sourc e menu.
informati on i nt er fa ce o f the current e-b oo k
E-book sett in g in te rf ac e
: to exit the inform ation i nterface of the cur rent e- book to R eader inte rface .
: touc h it to open the scroll s peed li st and then touch one o f them to s et it.
: touc h it to open the font siz e list an d then touch one of the m to set it .
: to pop up the word col or sett ing interface.
: to pop up the backgr ound co lor setting inter face.
: to con firm the set ting an d exit to R eader inte rface .
: to exi t to Reader in terfa ce.
Wor d co lo r se tt in g interface Background col or s et ti ng i nt erface
R slide bar : to set tin t of red co lor.
G slide bar : to set tin t of gree n color.
B slide bar : to set tin t of blue c olor.
: to confirm setti ng and ex it to the e -book sett ing int erfac e.
: to exit to the e-boo k setti ng inte rface.
Page 44

Calculator and Calendar
1. Calculator
Touch CA L icon i n the tools pa ge of the s ource m enu to pop up ca lcula tor int er face as follows:
Calculato r in te rf ac e
: to cle ar the numbe r in the me mory.
: to dis play the num ber in th e memor y as inputti ng a numb er duri ng arithme tic
oper ation.
: to sto re the curre nt disp layin g number in th e memor y and dis play M in the le ft
side o f the displa y frame .
: to mak e the curren t displ aying n umber and th e numbe r in the me mory pluse d
and st ore it in the me mory.
: to cha nge the curr ent dis playi ng number in to posi tive or n egative on e.
: to cle ar the curre nt disp layin g number.
: to res et the calcu lator t o zero.
: to cle ar the last in put dig it.
: to exi t to the tools p age of th e sourc e menu.
* The memory ca n store o nly the l ast number.
2. Calendar
Touch DAY icon in the tools pag e of the so urce me nu to pop up cal endar i nterface
as follows:
Calendar in te rf ac e
: to sel ect the desi red dat e.
: to sel ect the desired mon th.
: to sel ect the desired yea r.
: to exi t to the tools p age of th e sourc e menu.
Page 45

GAME
1. MINE
Touch MINE i con in th e games p age of th e source menu to pop u p MINE ga me
inte rface a s follo ws:
MINE game i nt er fa ce L IN K game inte rf ac e
2. LINK
Touch LINK i con in th e games p age of th e source menu to pop up LINK ga me
inte rface a s above .
3. FIVE CHESS
Touch FIVE C HESS ic on in the g ames pa ge of the source men u to pop up F IVE
CHES S game in terfa ce as fol lows:
FIVE CHES S ga me i nt erface BW C HE SS g ame inter fa ce
4. BW CHESS
Touch BW CHE SS icon i n the gam es page o f the source menu to p op up BW
CHES S game in terfa ce as abo ve.
5. MOLE
Touch MOLE i con in th e games p age of th e source menu to pop u p MOLE ga me
inte rface a s follo ws:
MOLE game i nt er fa ce
Page 46

Troubleshoot ing
Plea se r ea d the user manu al c arefully be fo re using the ca r A/V s ys tem. If you hav e an y
difficul ty u si ng this car A/V sy st em, . If you s till
unab le t o re solve the p ro bl em your d ea le r
afte r us in g all the sugge st ions, pleas e co ntact
or an au th or ised serv ic e ce ntre .
NO PIC TU RE , SOUND
* Ensu re t ha t the power swi tc h is on.
* Ensu re t ha t the power cor d is n ot damaged or t he f use is not blow n.
NO SOU ND B UT H AVE PICTU RE
* Ensu re t ha t the player’s audio out pu t spea ke r ’s aud io
inpu t.
* Chec k wh et her the audio c on nector is dam ag ed.
* Chec k wh et her you have tu rn ed down the vol um e.
* Ensu re t ha t the audio is no t in M UTE mode.
BLAC K AND W HI TE PICTURE OR S CR EEN ROLLING
* Ensu re t ha t you have set ri gh t mode of video s ys tem (e.g. PAL, NTSC).
FLAWS O F PICTURE OR SO UN D
* Chec k wh et her disc is scr at ched or stain ed .
* Chec k wh et her AV con nector and ou tp ut terminal i s st ained.
* Chec k wh et her there is co nd ensation in si de the lens. If s o, p ow er on the pla ye r an d do
not wo rk f or a n hour or so, the n tr y again.
DISP LAYS: NO DI SC O R BAD DISC
* Ensu re t ha t you have inse rt ed a disc into th e di sc slot.
* Chec k wh et her disc is ins er ted with labe l si de upwards.
* Chec k wh et her disc is ben t.
* Chec k wh et her disc is sta in ed or scratch ed b adly.
* Ensu re t ha t disc format i s co mpatible to t he p layer.
* Ensu re t ha t temperatu re i nside the car i s no t too high. If so , co ol o ff u nt il the ambien t
temp er at ure returns t o no rmal.
* Inse rt a no ther disc int o th e disc slot.
refe r to t he t roublesho ot ing guide are
is pro pe rl y connect ed t o th e
REMO TE C ON TROL IS IN SE NSITIVE OR DO ES N OT W OR K
* Chec k wh et her the lithi um c ell of the remo te c ontrol is pow er fu l and worki ng p ro perly.
* Dire ct t he I R emitting wi nd ow of the remot e co ntrol to the IR s en so r of main unit.
* Chec k wh et her there are s om e obstacles b et ween remote c on tr ol and main u ni t.
SOME F UN CT ION BUTTONS DO NOT WORK
* Tur n of f ACC p ow er, then turn on a ga in.
* Rese t un it t o zero, then tu rn o n again.
* Remo ve c on trol panel fr om c hassis, rea tt ach it onto the c ha ss is and then tur n it o n again.
RADI O DO ES N OT WOR K
* Chec k wh et her antenna c ab le is connect ed f irmly.
* Manu al ly t une for a stati on .
Page 47

Specification
General
Power Supply Req uirem ent.......... ..... ..... ............. ..... ..... .......DC 12V
Current consum ption ............. ..... ..... ............. ..... ..... ..........10A MA X.
Audio
Signal Output. ....... ....... ....... ..... ....... ....... ....... ....... .....2ch&4ch line o ut
Frequency Resp onse.. ....... ....... ..... ....... ....... ....... ....... ..20 Hz - 2 0 KHz
S/N Ratio....... ....... ....... ..... .. ..... ....... ....... ....... ....... ....... ..... .. 90 dB (JIS)
Wow and Flutt er... ....... ....... ....... ....... ....... ..... .B elow measu rable l imits
TFT Monitor
Monitor Screen S ize.. ....... ....... ..... .. ..... ....... ....... ....... ....... .7 Inch W ide
Color System.. ....... ....... ....... ....... ..... .. ..... ....... ....... ....... ......N TSC/PAL
Disc/USB/Car d
Compatible For mat.. ..Dig ital Video/ MPEG4 /V CD/IM AGE/MP3 /WMA/CD
Radio
FM
Frequency rang e.... ............. ..... ..... ..... ............. 87.5M Hz - 107. 9MHz
Usable sensiti vity.... ............. ..... ..... ............. ..... ..... ............. ...15 dBu
I.F Frequency.... ..... ..... ............. ..... ..... ............. ..... ..... .......10.7MH z
AM(M W)
Frequency...... ..... ..... ............. ..... ..... ............. ..... .530K Hz - 1710 KHz
Usable sensiti vity.... ............. ..... ..... ............. ..... ..... ............. ...40 dBu
I.F Frequency.... ..... ..... ............. ..... ..... ............. ..... ..... .........450K Hz
BT:
BT specificati on... ....... ....... ....... ..... .. ..... ....... ....... ....... .....V1 .2 Class 2
BT profile suppo rte.. ....... ....... ..... .. ..... ....... ....... ....... ....... ..... .. ..... ....... ..
.... ....... ....... ....... ..... ..Headset, Handsf ree and A2 DP & AVR CP profiles
Range of frequen cy... ....... ....... ....... ..... .. ..... ....... ......2 .4GHz S pectrum
BRAND CAR STEREOS
CAR AUDIO SYSTEMS
 Loading...