

Page 1

Page 2

2
ANDROID STEREO RECEIVER
Please read this manual carefully before you use the unit and save it for future reference.
Installation Precaution:
1. This unit is designed for using a 12V negative ground system only. Make sure that your vehicle is NOT on
positive ground system before installation. Connecting this unit to a positive ground system is extremely
hazardous and may result in a fire.
2. In order to avoid short circuit, disconnect the vehicle’s battery before attempting the installation.
3. Only connect the power cord after other connections have been completed.
4. Insulate all exposed wires to avoid short circuit terminal (+) of the battery.
5. Please note that the yellow wire is connected to the anode terminal (+) of the battery.
6. If a fuse replacement is required, always ensure the specifications of the fuse for both the automobile and
the unit are the same.
7. Be sure to connect the unit in exact accordance with the supplied diagram from in order to avoid
installation damage which is specifically excluded from the warranty which covers the factory defect only.
8. Grounding or incorrectly connecting the power line (yellow) may blow the unit and/or the vehicles fuse.
Basic operation--Gestures
The machine can recognize gestures divided into short press, long press, drag, slide and other types. The
results of the same function in dierent manifestations are not the same gestures, the user machine operated
by touch screen.
Main interface – Main Menu
After the default machine starts to jump to the main menu page. This page is part of the main display
arrangement shortcuts to frequently used functions, and press the space button to pop up the wallpaper
settings, the user can make adjustments to the layout of the page according to personal preference.
Page 3

3
Application Interface
Click the Menu button to access to the application list screen. Machine mounted on the car all applications are
shown here, you can nd shortcuts to frequently used functions onto the page in the main menu, so easy to
operate.
App Layout - Deleting Application Icons
In the main menu, long press an app icon or widget you wanted to delete, the Delete button will pop up on
the screen. If you hold down the length of the user’s icon or widget into the Delete button, a pop-up will
appear asking if you are sure about deleting that icon or widget, click delete.
Radio – Radio Interface
Radio broadcasts can accept dierent signal, the user can add your own favorite radio channel included to
p1-p6, supports up to six radio stations included stored. This user-friendly than through search, you can
quickly listen to their favorite programs.
Page 4

4
Radio – Prole of function icons
Radio – Add Stations Remark
Click the radio edit button to bring up the edit box. Click the edit cursor station information; this cannot be
empty, press the keyboard after you nish editing the done button. If you want to change the radio frequency
into FM button when nished click the Save button. Then pull to the left on the radio right page, you can pop
up a list of the information stored station.
Radio - radio edit, and delete information
Pull out the list of hidden station information, select the list that you want to modify the radio option
left drag operation button appears. Click the Edit button to open the radio message editor, where the
user can modify the frequency of the station and the name of the previously saved.
When you click the Delete button in the list, the user station information will be stored in the database
cleanup.
Frequency-plus-function
Band switching function
Local radio features
Stereo function
Quick search function
Save radio features
Save frequency function
RDS PTY
RDS FM
RDS TA
Radio Edit function
Radio Setting Function
Page 5

5
Radio- Save Radio
Radio Total points ve bands, each band can store 6 stations for information. Users simply press the
p1-p6 either a button, you can save the current frequency band under the button. You can also click on
the Save button, rst click on the address you want to save then FM, after that click the Save button.
Radio-Band Switch
Click the button to switch the band, the radio band in the FM1, FM2, FM3, AM1 and AM2 cycle
between the switch and save the current six-band radio information button will follow the change.
As a result of inconsistent regional broadcasting band, the user can manually switch according to
local conditions.
Radio-Band Switch
Radio- Radio Search
Click the search button automatic station to search operation. After the button is pressed, the radio
station will search out all the bands.
Press upward search, press frequency was reduced.
Press downward search, press frequency was added.
Page 6

6
Radio - Radio settings
Click the radio button set to enter the setting interface. In the radio setup interface, there are AM and
FM sensitivity adjustment, of course, the premise is under the automatic stoppage. RDS switch and
Radio Area for your selection.
Radio -a key to restore
After setting the radio interface to set up AM, FM sensitivity, or RDS switch or area change, if you nd it very
messy and not conducive to our conditioning radio, we can click a Restore button to restore the default
settings.
Page 7

7
Car Settings- Sound Settings
In the sound Setting screen, you can equalize, amplify switching output sound eects and other
options on the machine setting, users can experience the eect of the actual operation.
Car Settings- General Settings
In General Setting, you can set up some basic properties of the machine, the user can congure the
function according to personal habits.
Car Settings- General Settings
1. Any key to booth: click on any button to power on the touch screen
2. Brake settings: video displayed by the handbrake state control
3. Automatically enter the navigation: boot automatically into the navigation function
4. Reversing Mirror: Reverse mirror image to display
5. Reversing Silent: block reversing other sound output
6. Default volume switch: control power-on default volume setting is valid
7. The power-on default volume: set the default boot volume value
8. GPS mixing: control navigation message tone background sound output
9. The mixing ratio: control the size of the navigation message tone background sound
10. Reversing sound reduction: reversing the background sound volume control
11. Navigation Application: navigation map set called
12. The position of driver’s door: according to actual conditions, set driving position
Page 8

8
Car Setting- GPS information
GPS positioning information display basic information about the machine also supports Beidou and
GPS dual display module. Auto Sync switch can control the car engine positioning, machine time is
synchronized with positioning of the satellite time.
Car settings-Factory Settings (Password:3368)
Factory settings can be congured for machine functions into the need to enter the correct password
pair, to ensure the normal operation of the machine non-special circumstances; we do not recom
mend users to change the settings.
Bluetooth - Bluetooth phone pad
Bluetooth phone and car machine needs to use the Bluetooth phone function when connected.
1. Respectively, open the phone, Bluetooth car machine device and use the phone visible to everyone.
2. Search for Bluetooth devices in the phone, then nd selected for the connection, then you want to enter a
pass code, generally: 0000 enter the pairing can show a successful connection.
Page 9
9
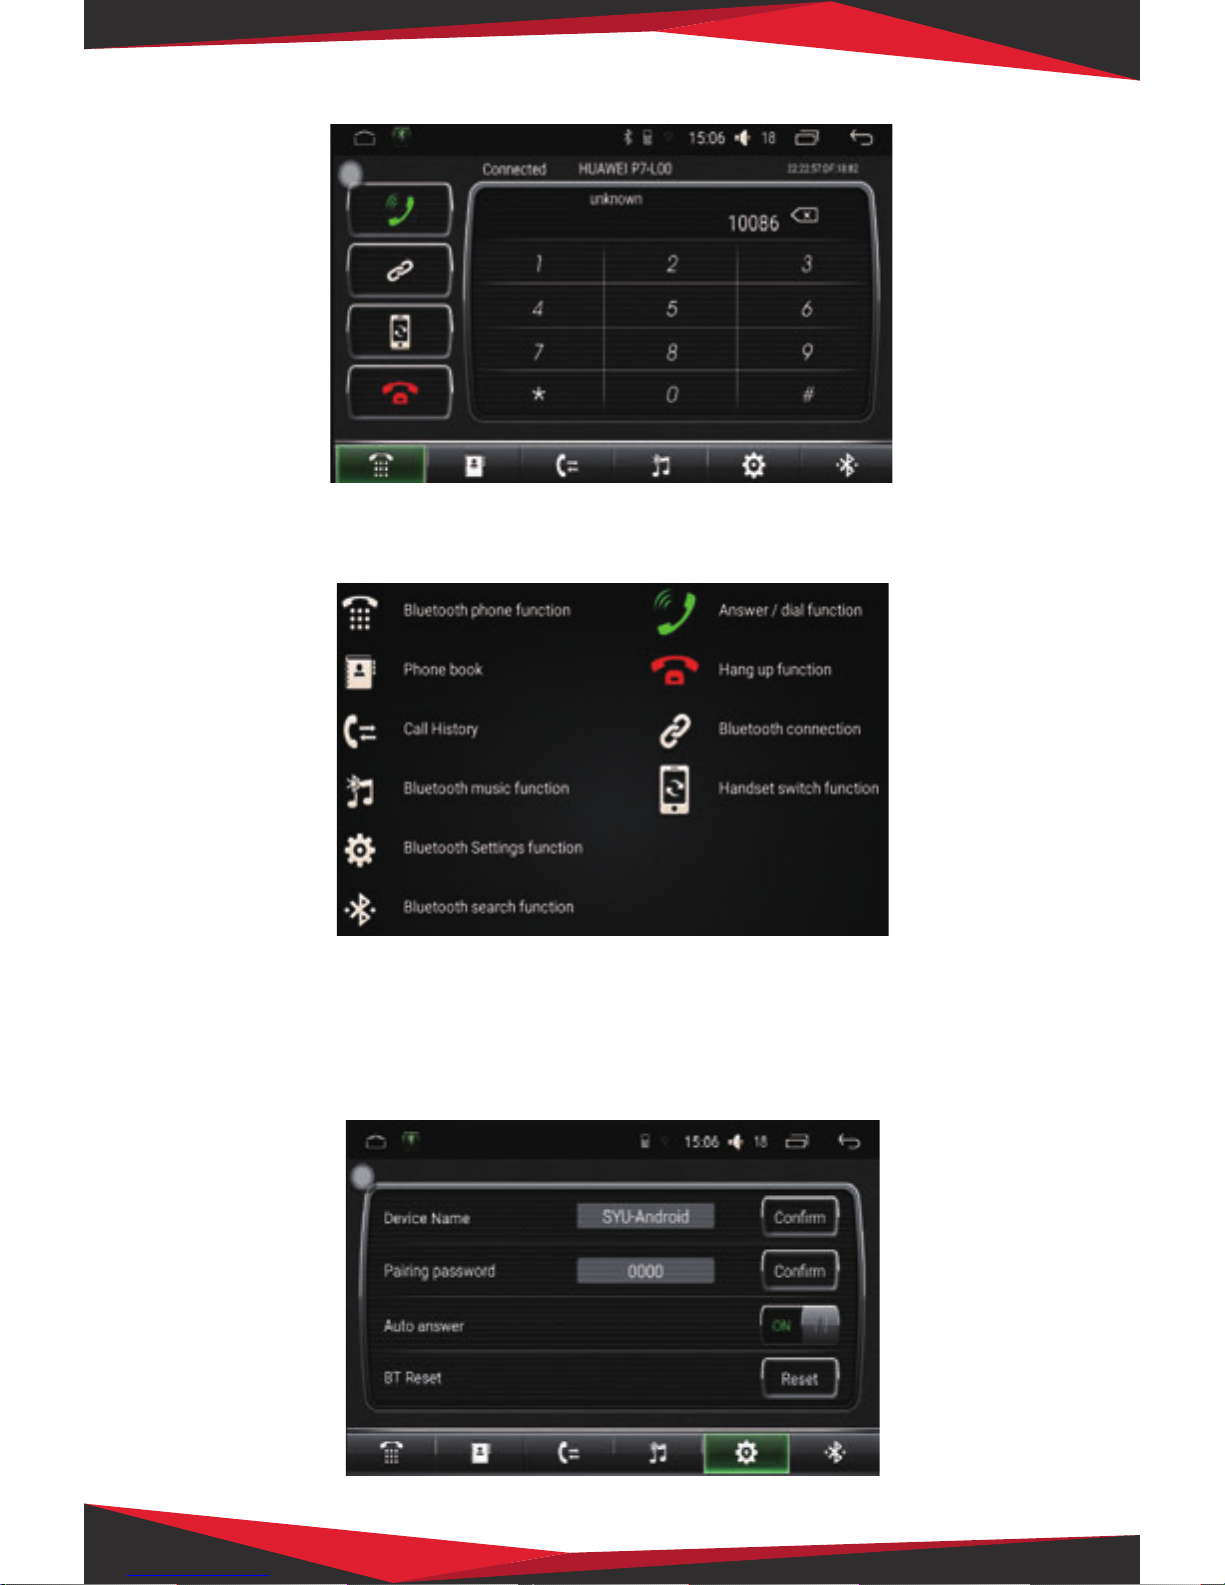
Bluetooth- Bluetooth button control
Bluetooth- Set interface (Bluetooth Name: Pyle USA Password:0000)
Bluetooth settings page displays the name of the car as well as the local Bluetooth pairing password, the user
can manually change the information, automatic answer function is when there is an incoming call, the car
will automatically answer. Bluetooth reset button can press all the information set by the user will return to
the factory settings.
Page 10
10
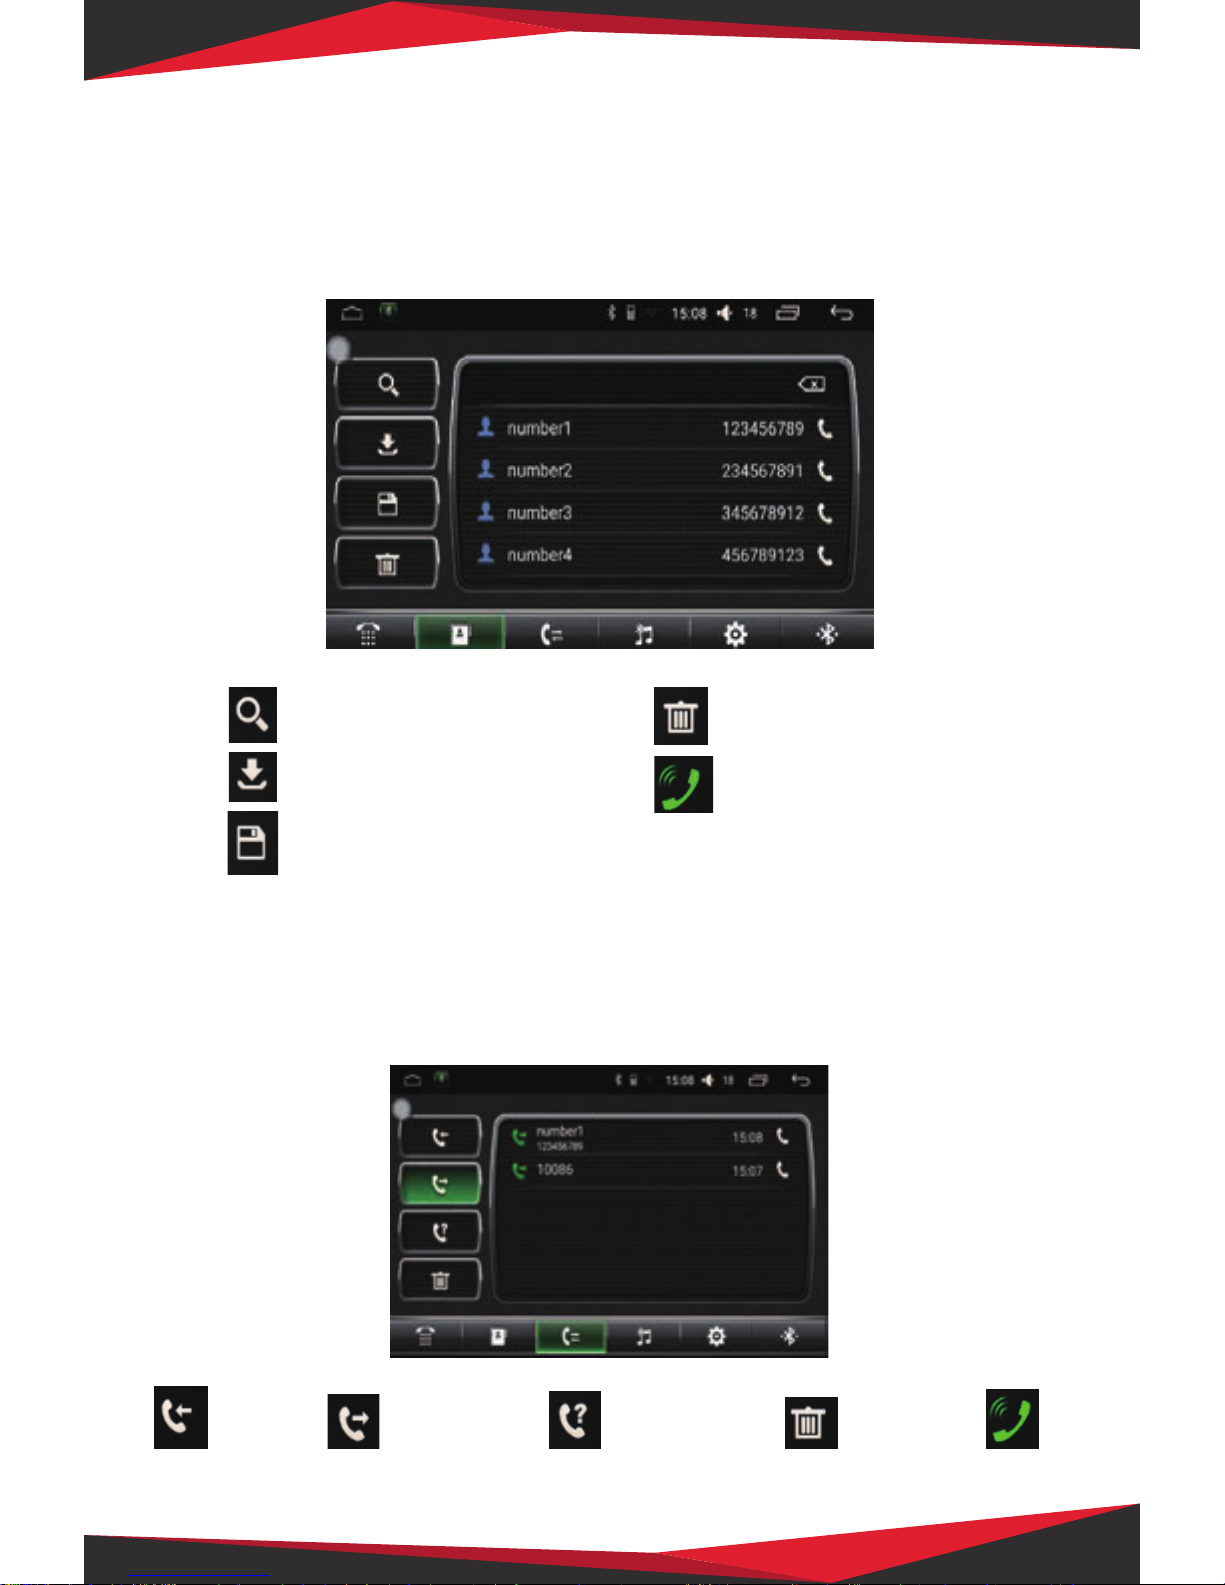
Bluetooth- synchronize your phone contacts
On synchronized phone contacts, rst ensure that the phone and the Bluetooth car machine is connected,
the following is a method of synchronizing:
1. Click on the button to download the phone book, on the phone, allow pop-up prompt box and select to
access the phone o the car contacts.
2. Wait for the car’s notication that download is completed and then click the Save button.
Bluetooth- Call records
All phone calls during a Bluetooth connection with the car engine which will be recorded in this page is
displayed, according to the arrangement by the time dial down recently and according to incoming,
outgoing, missed calls are Pyle
classified display.
Contact look up function
Download phone book function
Save Phone book
Clear phone book function
Call function
Call Log Outgoing records Missed calls record Delete all records Call function
Page 11
11
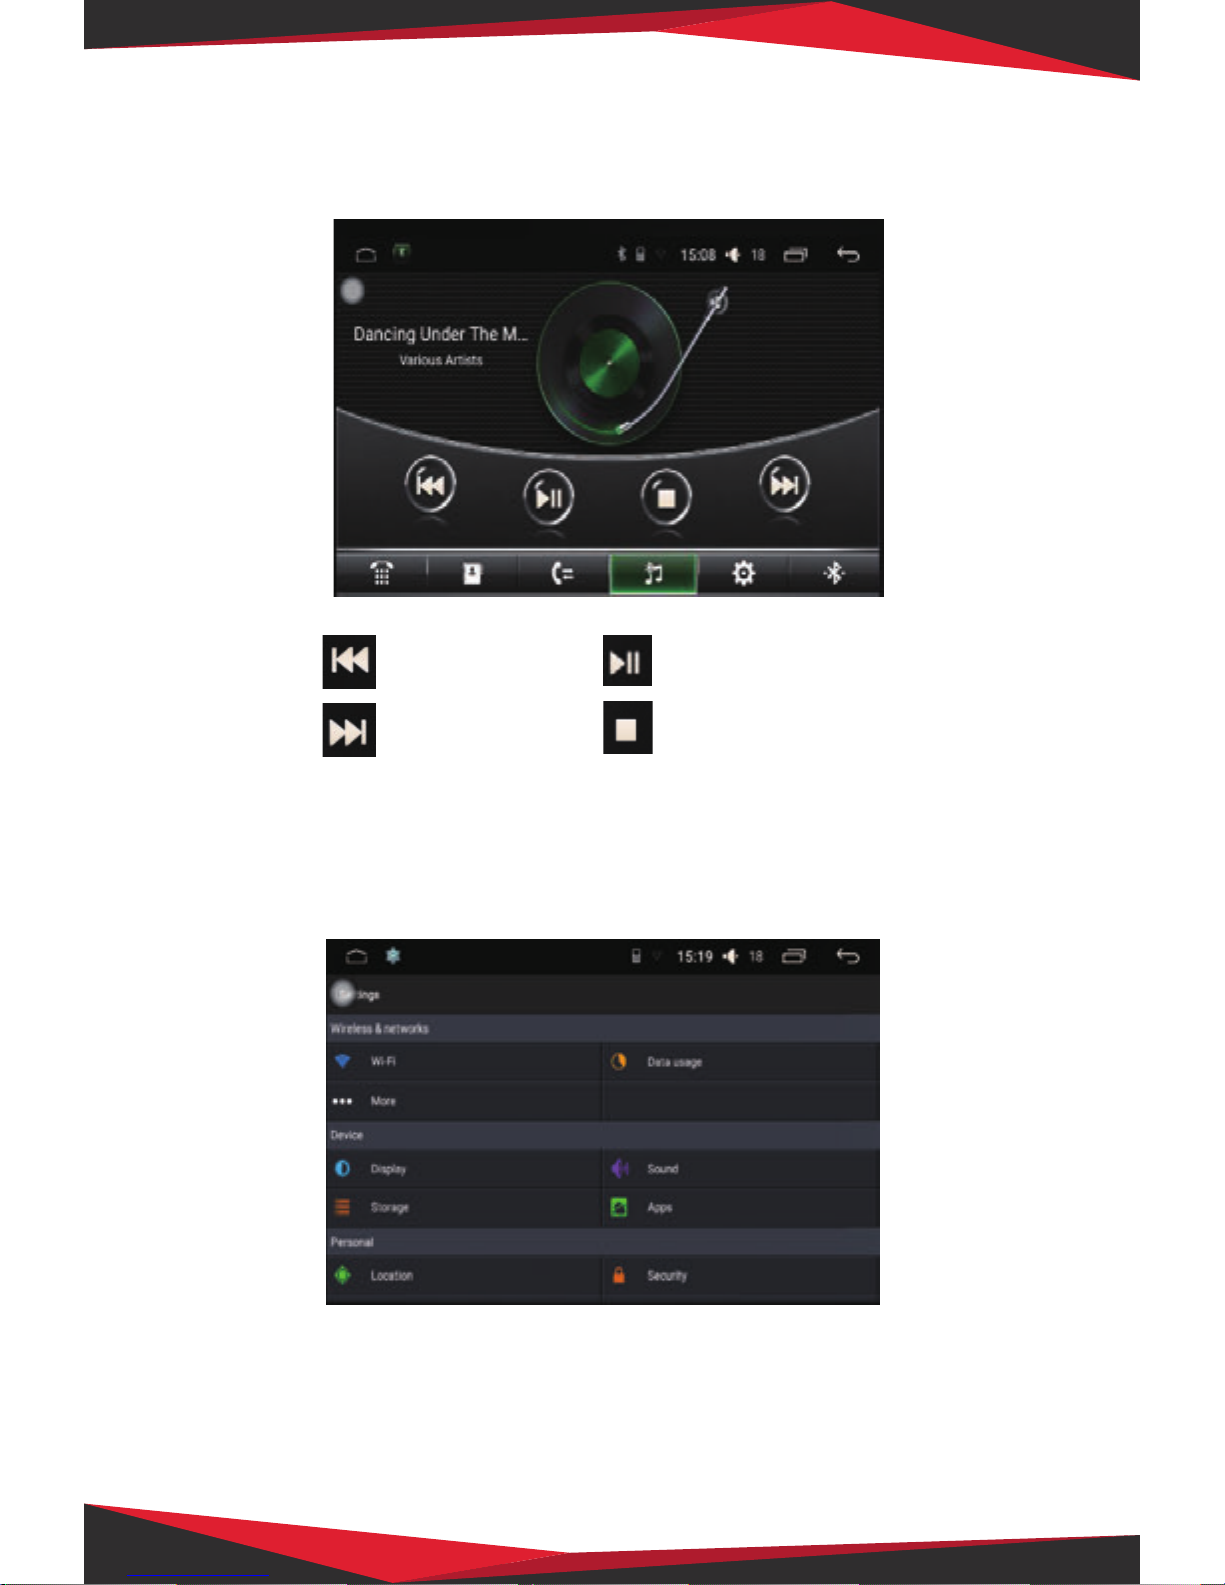
Bluetooth- Bluetooth music
When the machine and the car phone Bluetooth connection is normal, you can play music through a car
phone Bluetooth machine and control by switching songs.
Settings – System Settings
Time modifying machine displays language related to changes in the system. The user can click the icon to
enter the settings change. To ensure the normal use, non-special circumstances do not recommend users
without permission to change the setup options.
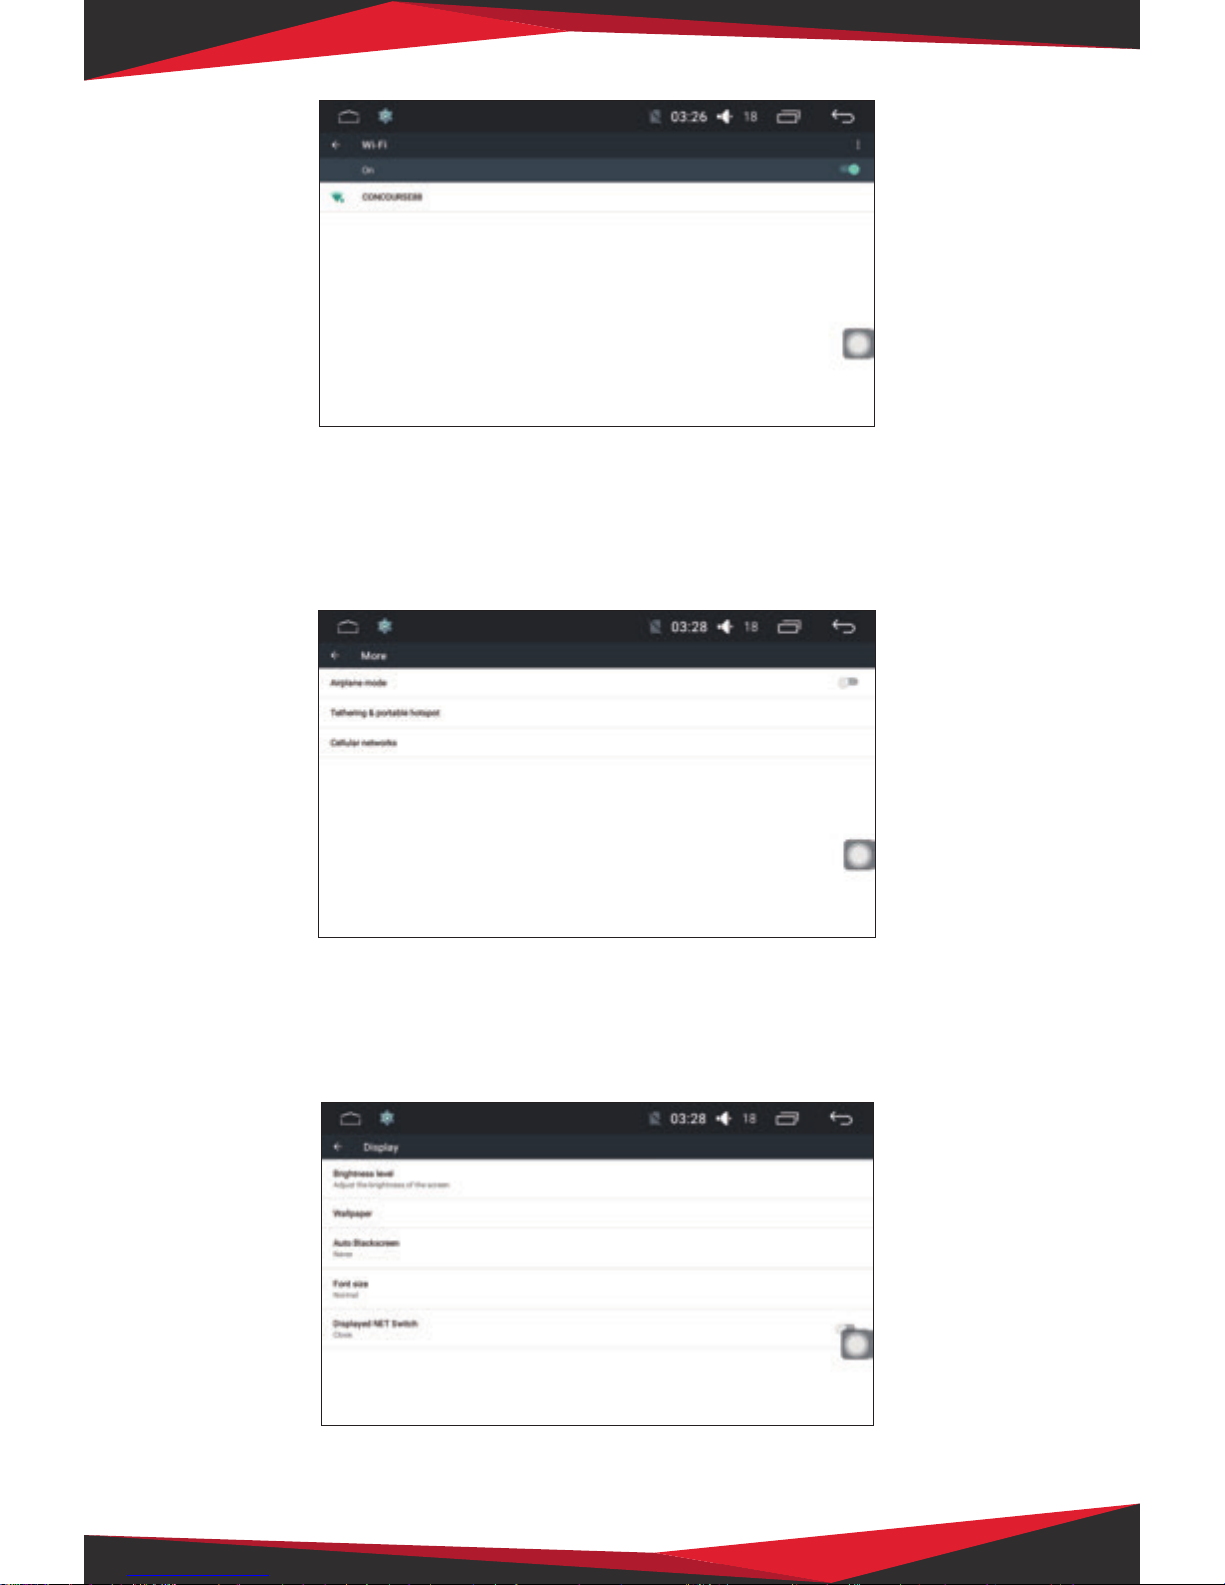
Settings – Wireless Network
WI-FI: Click WI-FI control switch button to activate the WIFI function. It will appear to the right of the search to
nearby resources available Wi-Fi point, click the selected name of the available Wi-Fi connection.
PREV function
NEXT function
Playback Pause function
Stop function
Page 12
12
Settings- Wireless Network
In More options, there are VPN and Tethering and portable hot spot function. Users can connect or set Wi-Fi
hot spot via this page.
Settings- equipment
Display: The user can set the screen brightness, wallpaper, font size, display options and automatically enter
a back screen function.
Page 13
13
Settings- Equipment
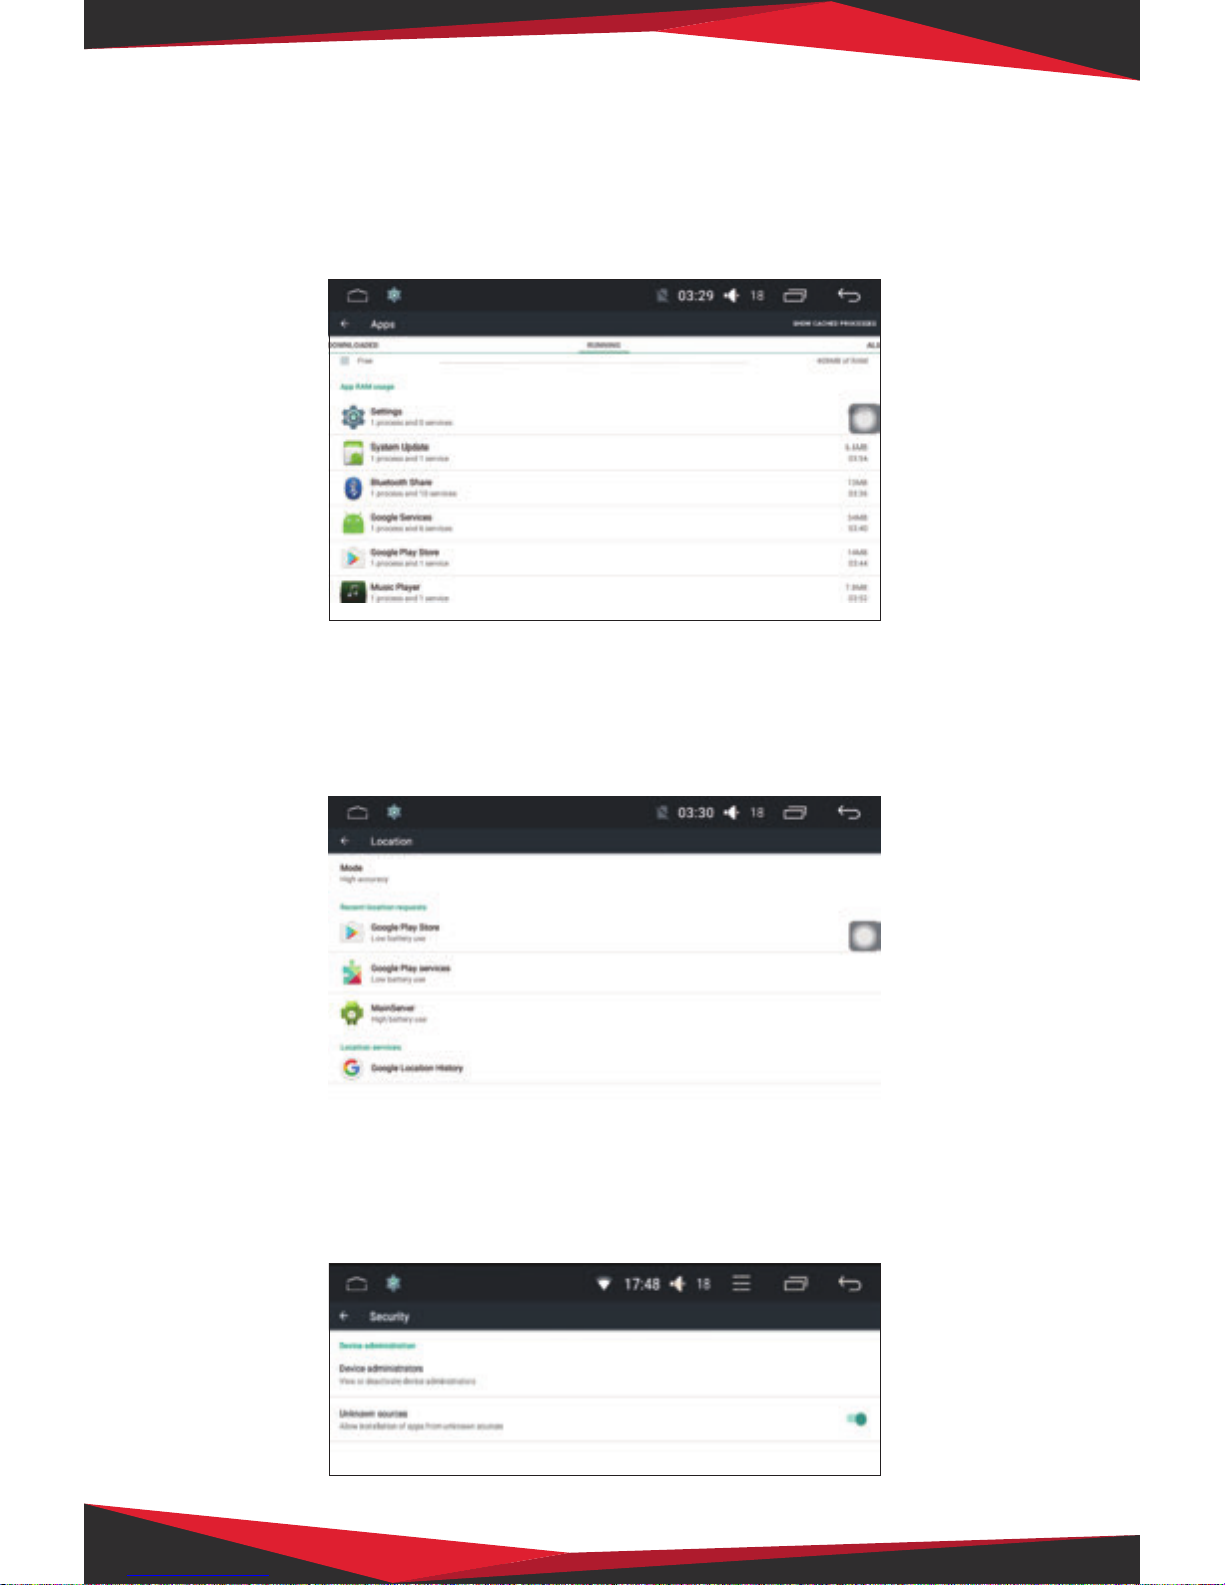
Application: In Application option, users can view and manage the use of the vehicle computer memory and
internal storage space. Users need to uninstall or stop the external program which has been installed, simply
click on the downloaded list and nd the program icon, the pop-up interface will appear then click function
button.
Setting – Personal
Location access: In location access option, you can set the GPS satellite positioning to get to your current
location. GPS satellite positioning function requires normally open, in order to ensure the normal use of the
navigation function.
Setting – Personal
Security: You can set limits when external program is installed, if you install a third-party program, you should
rst set the unknown source of the state before the installation.
Page 14
14
Settings – System
Date and time: To set the system time, under normal circumstances to provide time mode to automatically
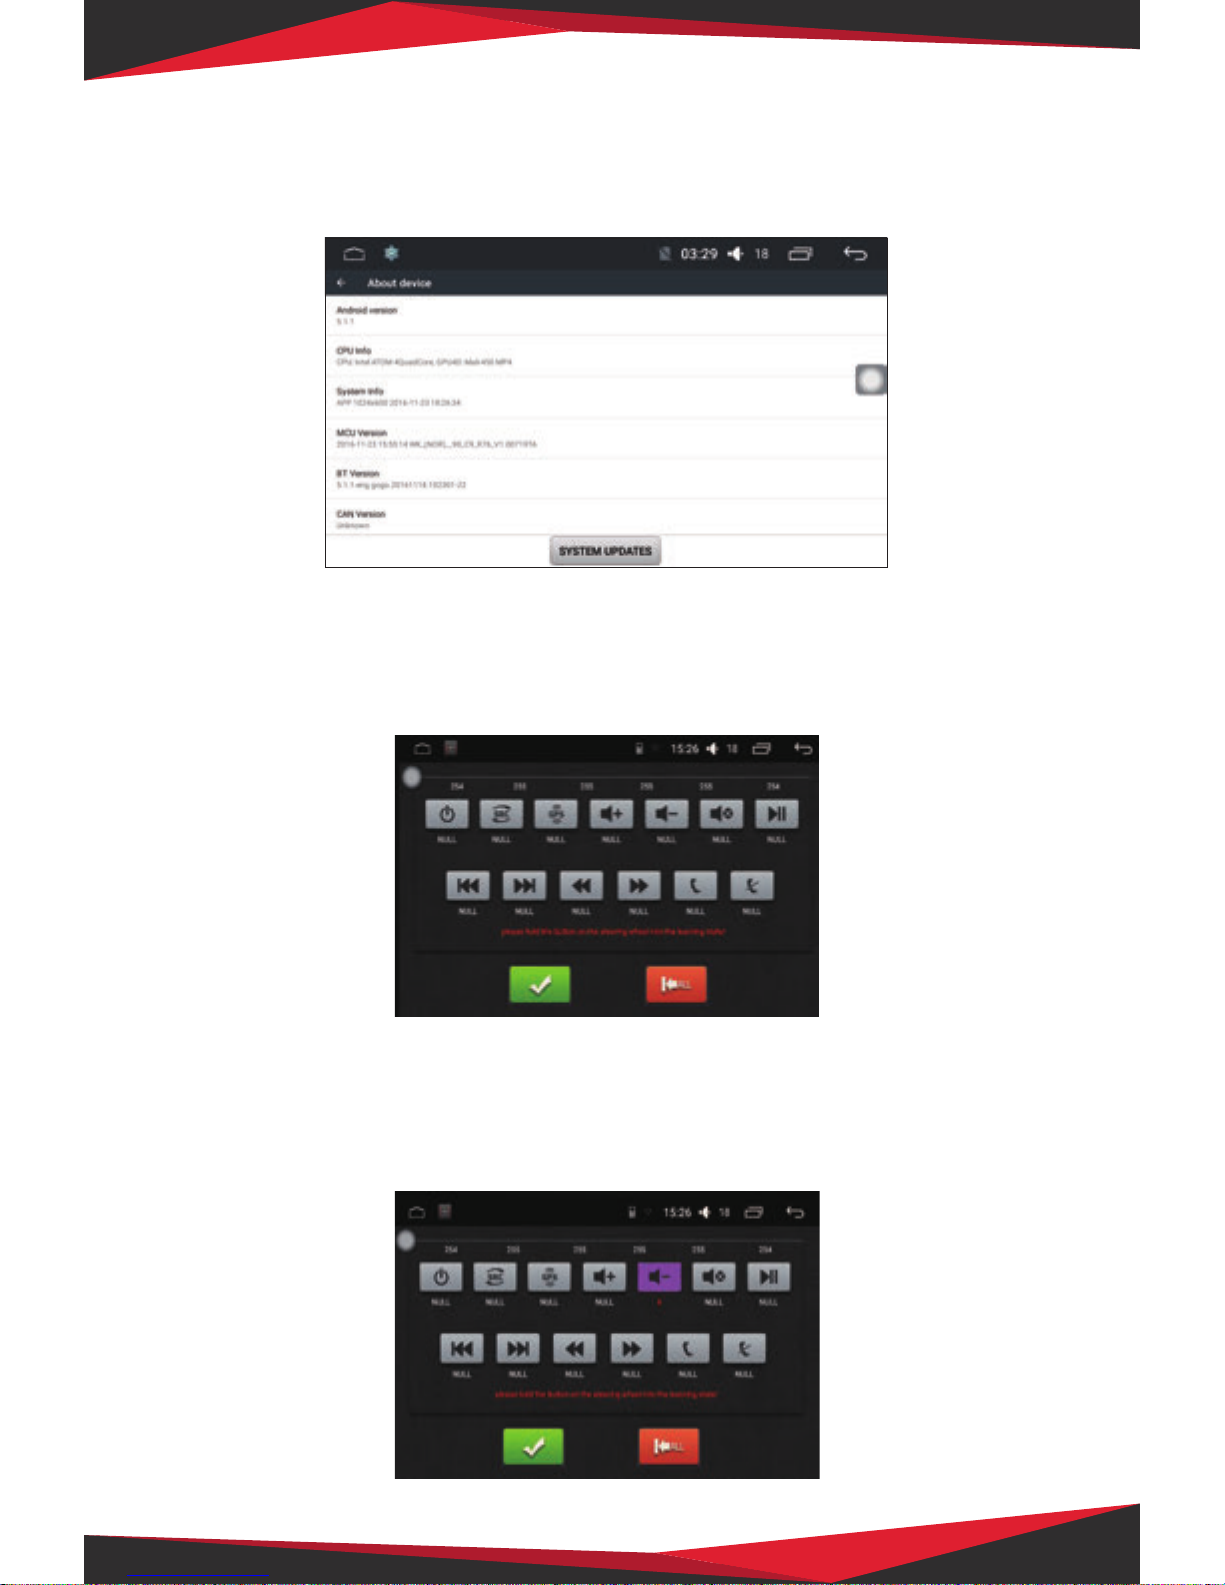
obtain network. About car machine: Mainly display basic information about the machine application, the
system has additional software.
Steering wheel – Learning steering wheel buttons
For the steering wheel with the car keys, if the keys can support learning through the steering wheel custom
function, follow these steps: The rst step, hold the steering wheel buttons to learn.
Steering wheel – Learning steering wheel buttons
The second step, select the machine you want to learn the function button is pressed, the button appears to
be available to let go following a signicant digits ( numbers indicate that the key resistance value ).
Page 15
15
Steering wheel – Learning steering wheel buttons
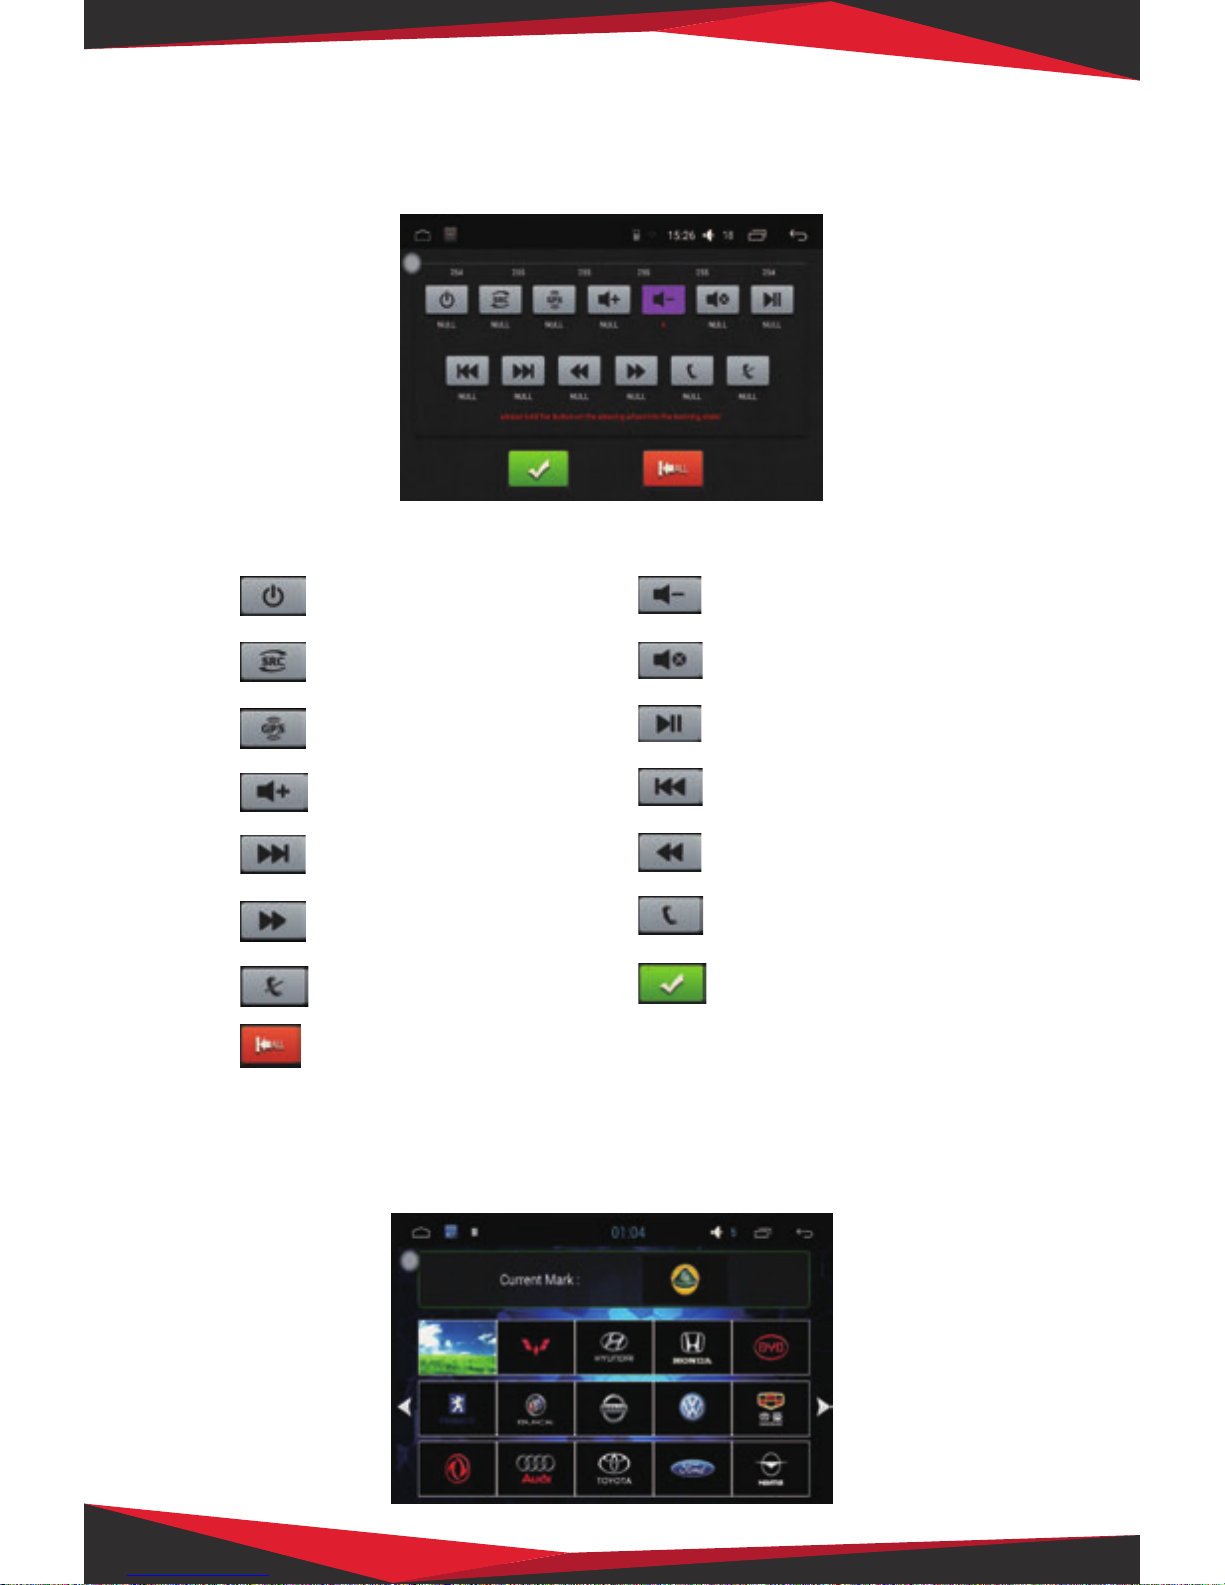
The third step, in the preceding two steps in sequence to learn other buttons, click the Save button after the
completion of learning (the same key can only learn a function).
Steering wheel—Function steering wheel buttons
Car standard setting - Car standard setting
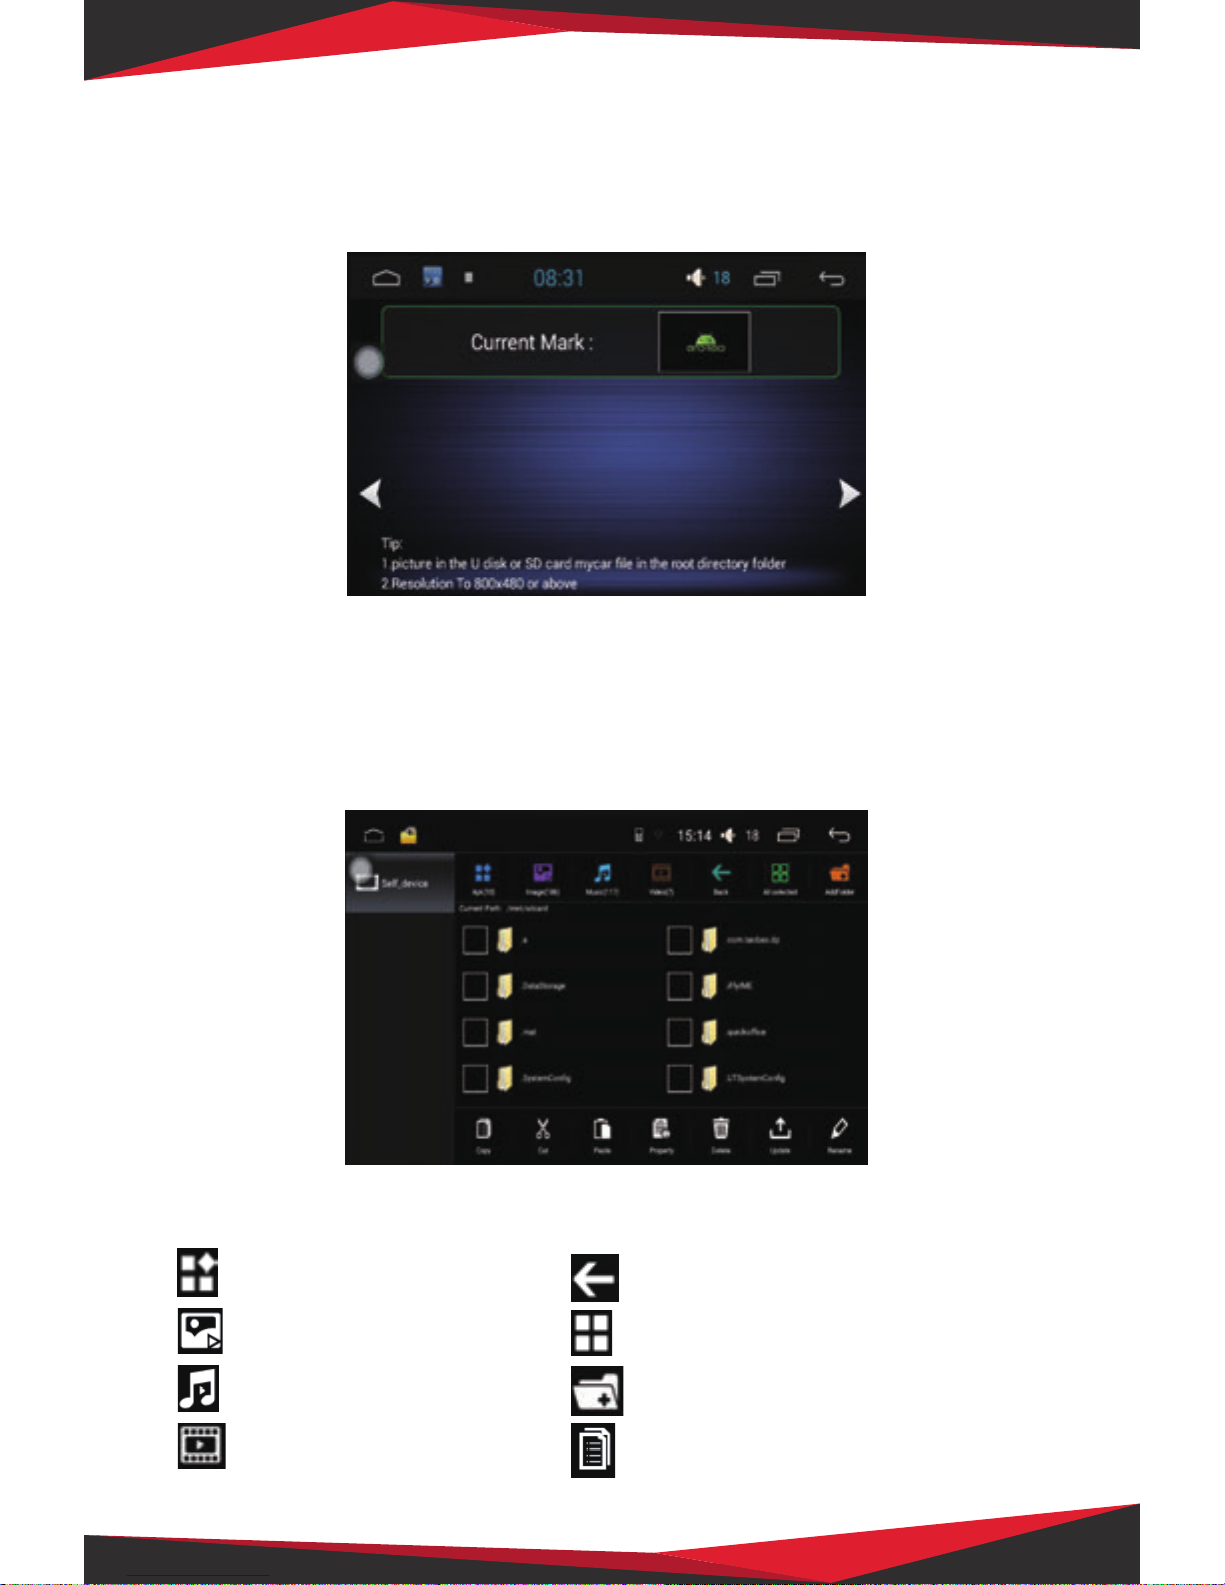
Click the Settings button to enter the car standard page, select the logo you want to specify a pattern, you can
click Setting success. Custom Boot Logo support function.
Power Switch Function
Page Jump Function
Navigation
Increase the volume function
NEXT function
Fast forward function
Hang up the phone function
Clearance
Decrease the volume function
Mute function
Playback Pause function
PREV function
Rewind function
Answer Feature
Save function
Page 16
16
Car standard setting-- Car standard setting
Custom boot Logo, rst set a picture resolution requires greater than or equal 800x480, SD card or USB in the
root directory of the new my car folder, the picture in a folder, inserted into the machines slipped into the car
standard set last page to display to export.
File Manager-- File Manager interface
In the File Manager, you can view and operate the machine all the les, there is left of the page allows you to
select the le directory. If you need to copy or move a le, simply select the le you want to operate, it will
appear at the bottom of a row of buttons then select the desired le storage directory and click the
corresponding button on the operation.
File Manager – each operation Prole
Application installation les
Image les
Music les
Video les
Back to previous
Select All
New folder
Copying Files
Page 17
17
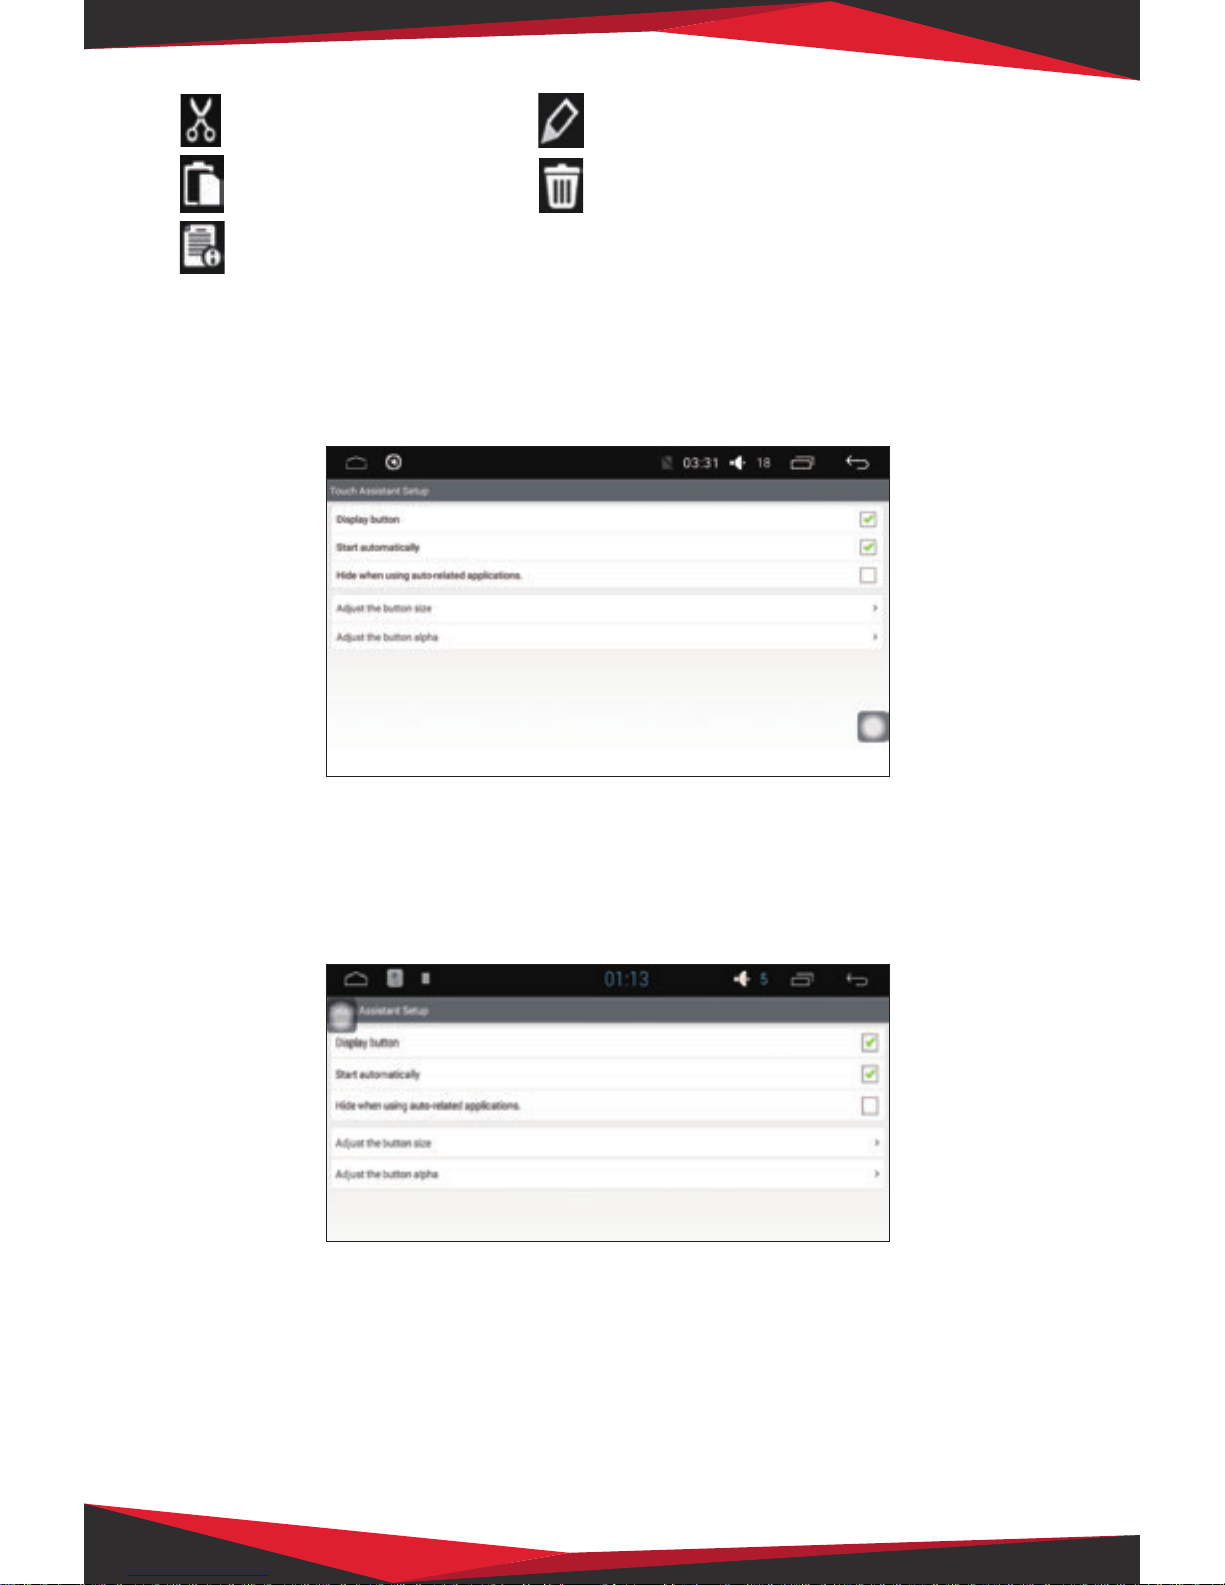
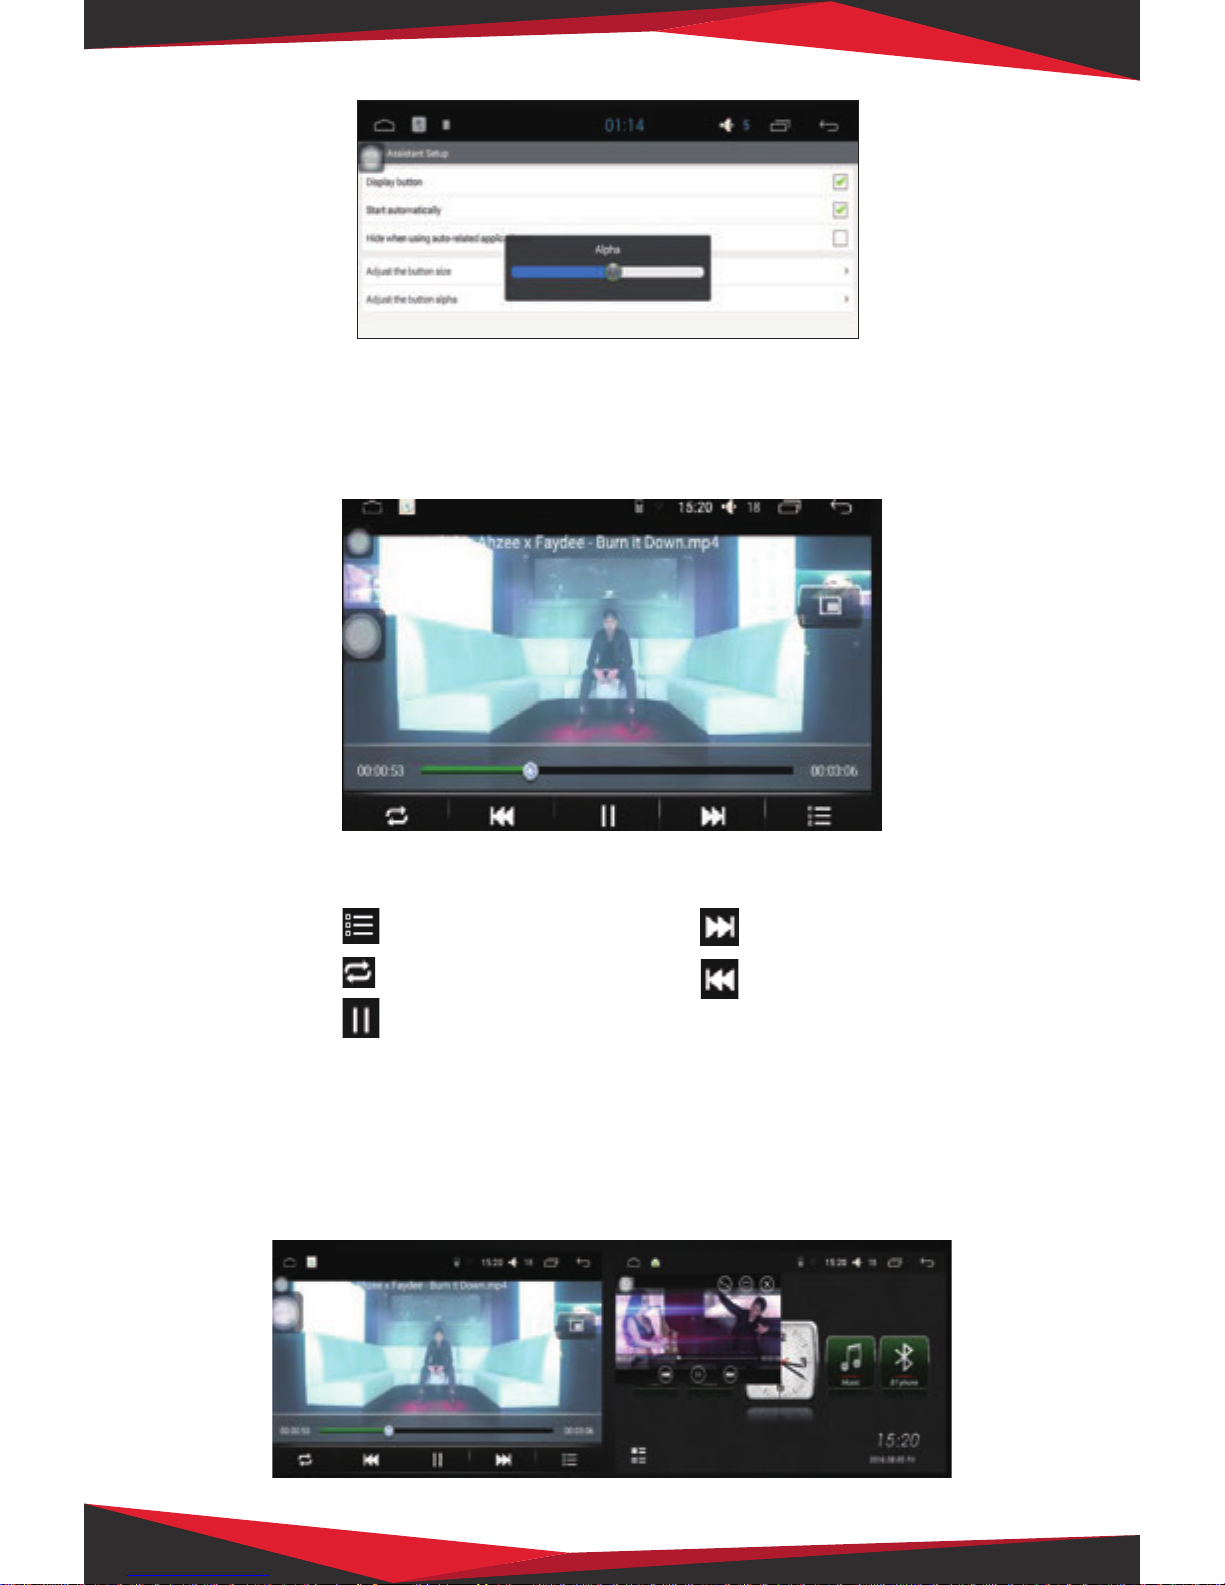
Assistant touch – Display Button
Assistant oating touch buttons with many shortcuts to the operations, it can be easily carried by a jump
function. If you need to display a oating button, click on the touch screen assistant to enter the page, set
display button options.
Touch Helper – Boot
Floating button after setting display by setting the boot options so that ever y time you boot the oating
button will automatically show up, you do not always need to go to the touch-screen assistant set. For
automotive-related applications hidden features.
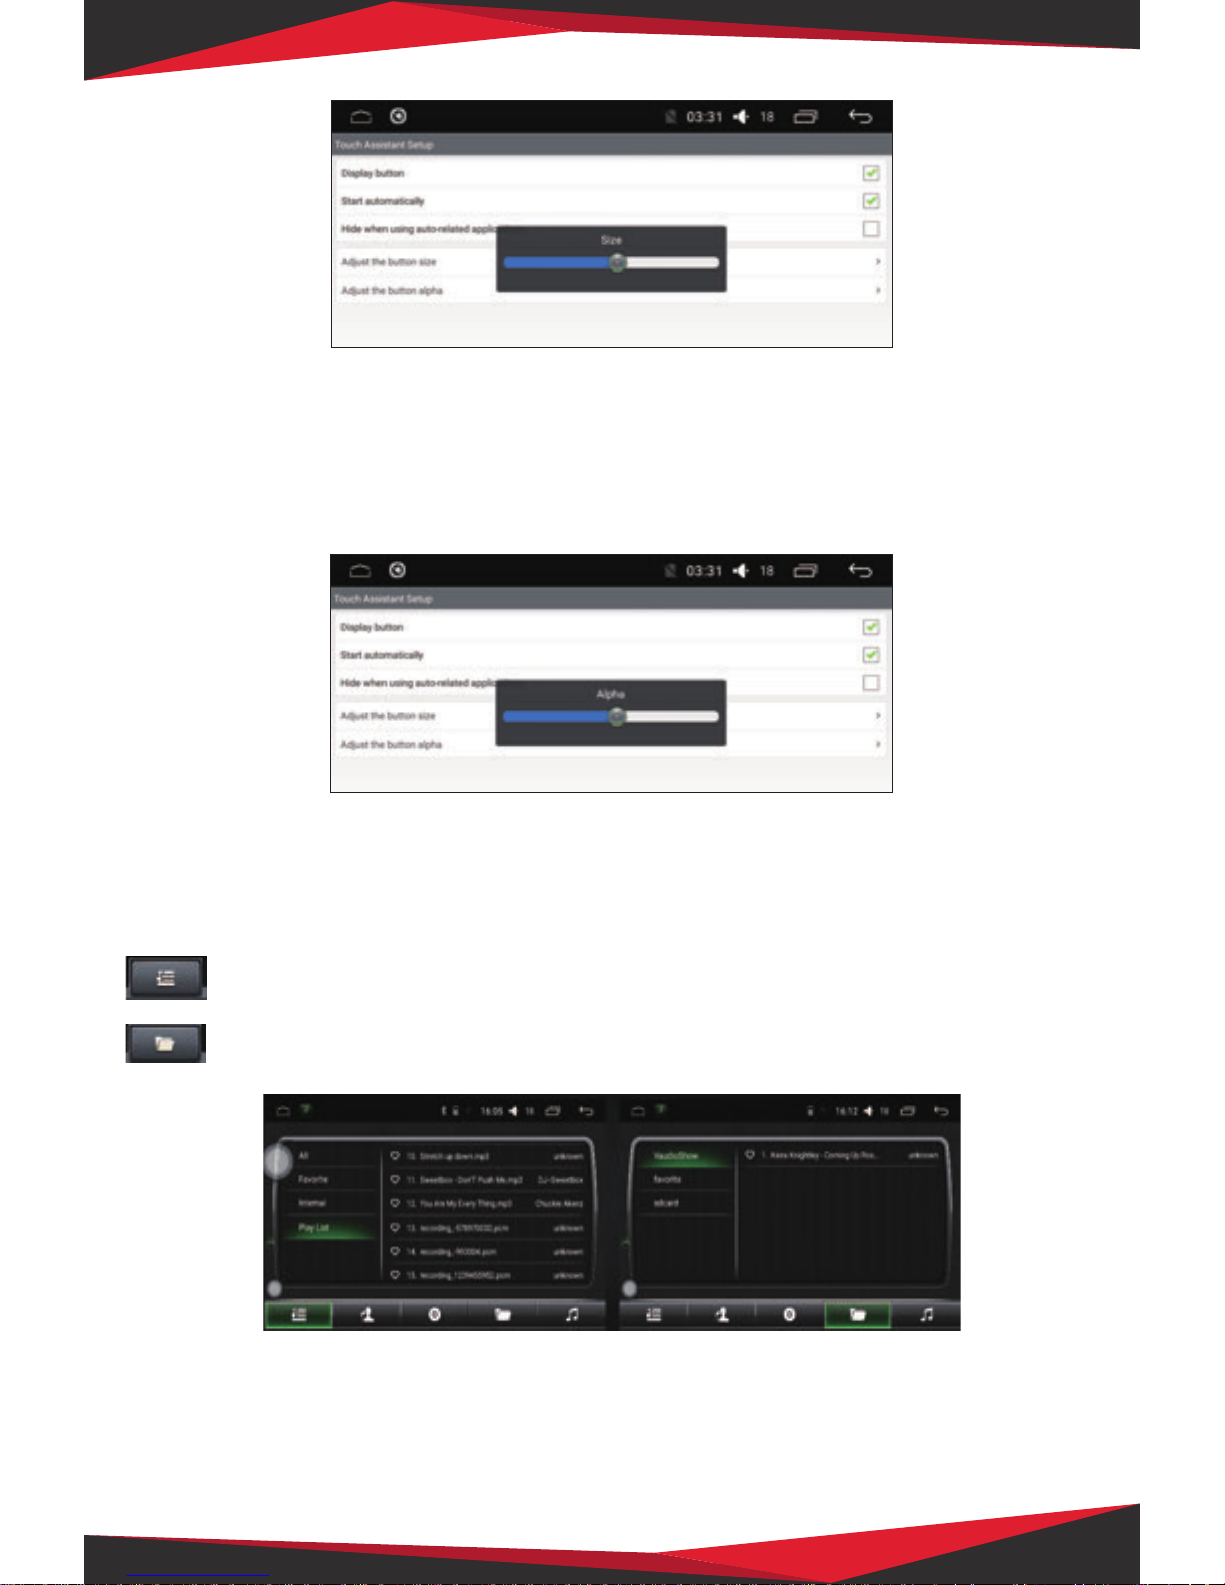
Assistant touch – Buttons to Adjust the Size
Use assistant touch during use, you can change the size of the Settings button to adjust the size of the
oating button, the user can set it according to the desired preference.
Cut Files
Paste Files
View le properties
Delete Files
Renaming les
Page 18
18
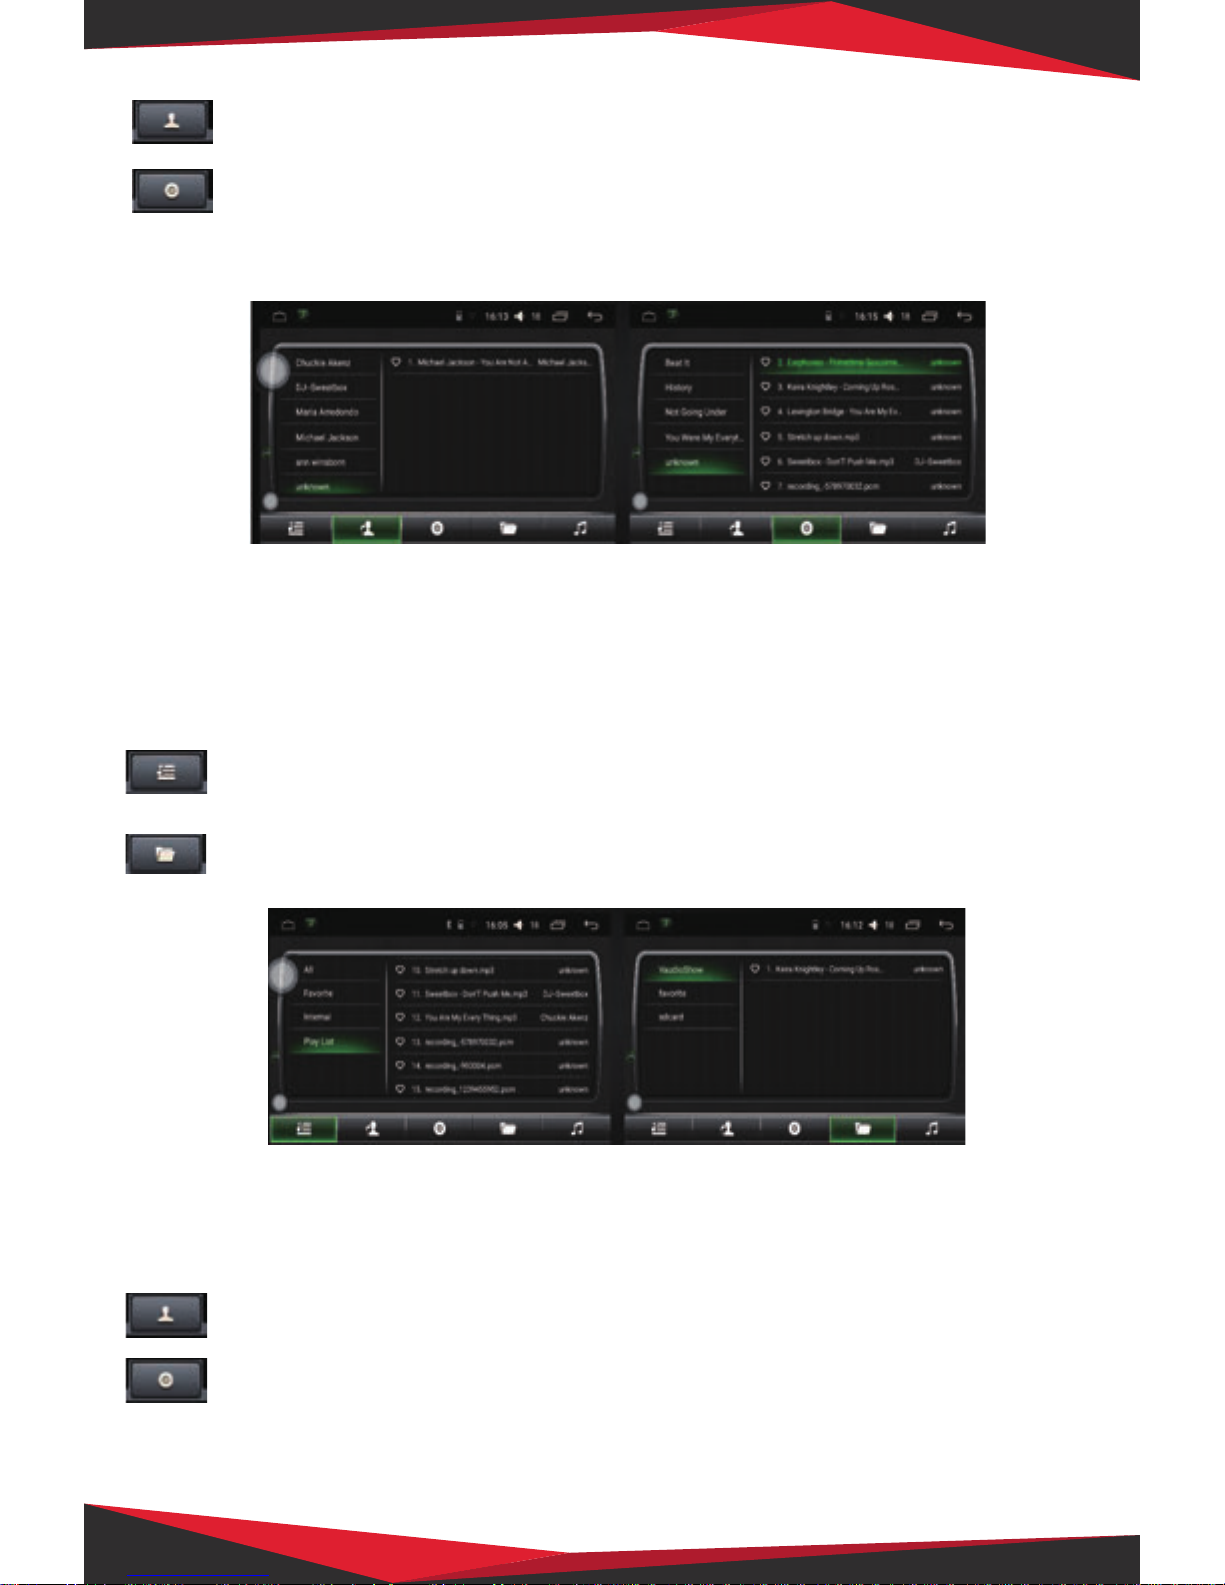
Assistant touch – Buttons to Adjust Transparency
In the File Manager, you can view and operate the machine all the les, there is left of the page allows you to
select the le directory. If you need to copy or move a le, simply select the le you want to operate, it will
appear at the bottom of a row of buttons then select the desired le storage directory and click the
corresponding button on the operation.
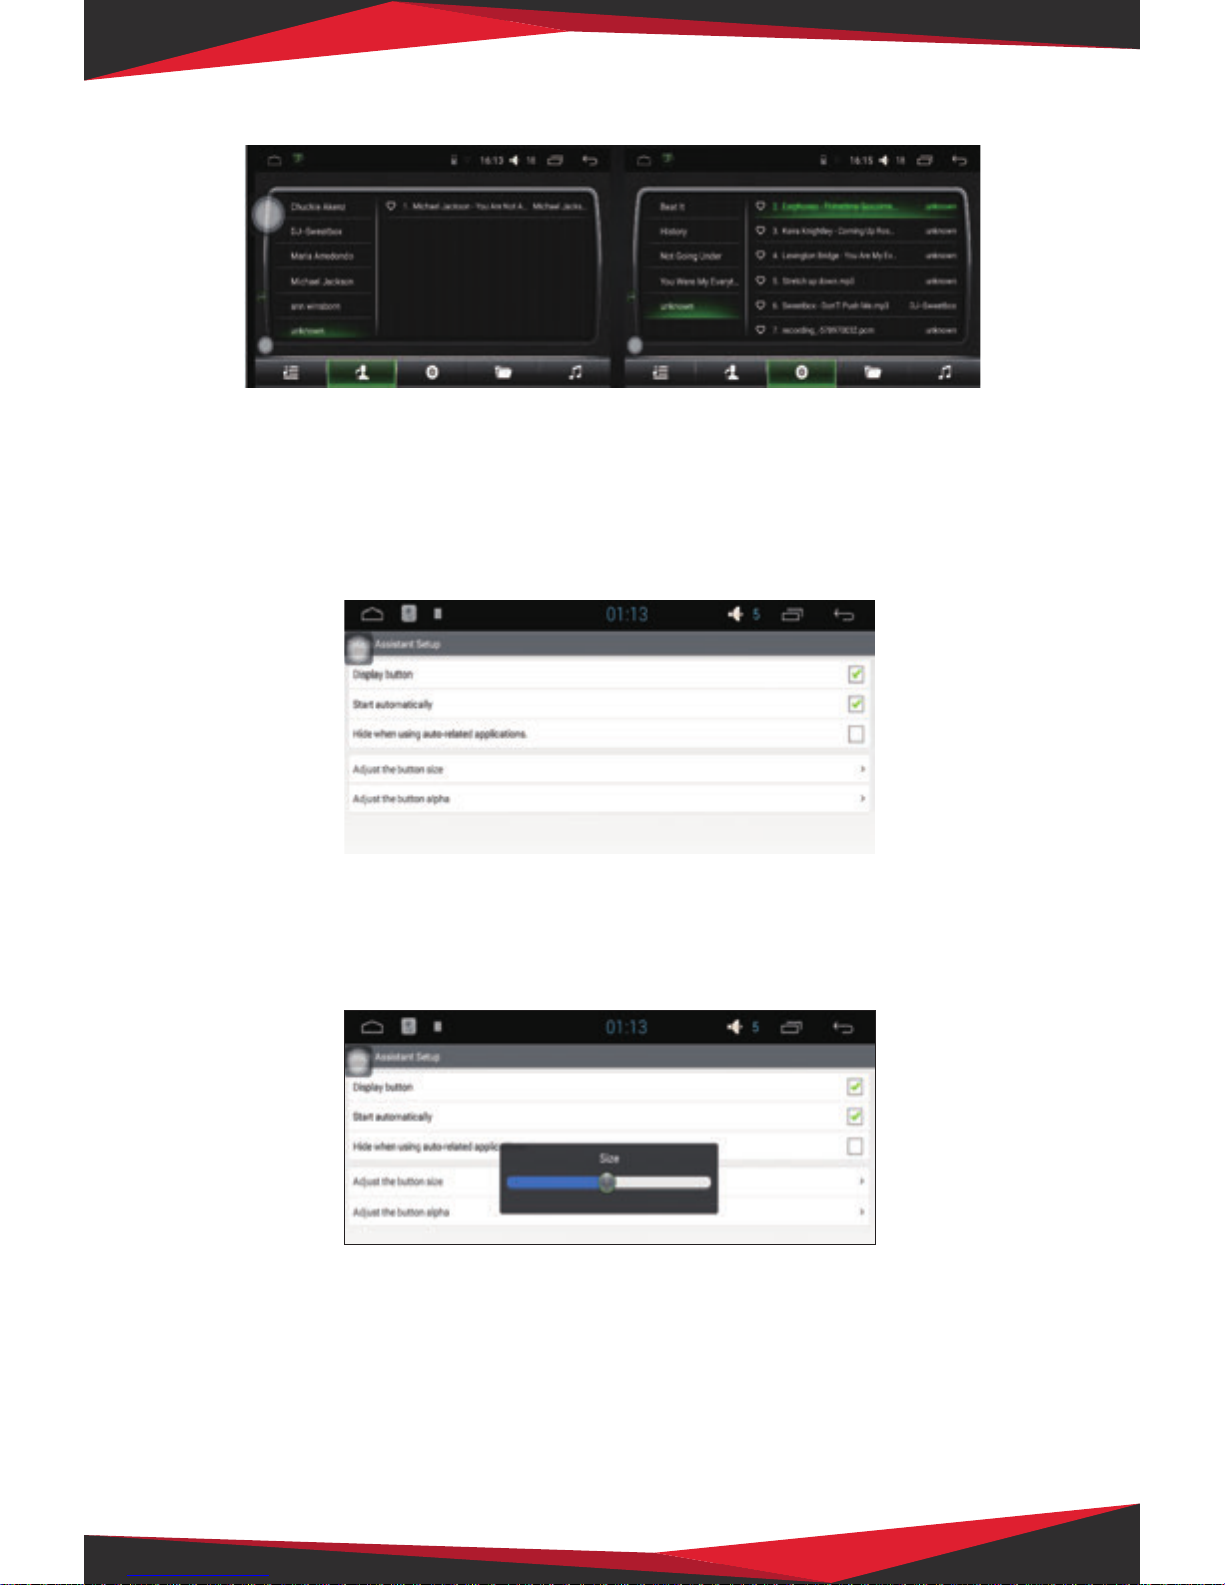
Music player—Music Player List
Through the main interface or application interface of an application icon, enter the music player interface. If
you do not play records, it jumps to the default list screen.
Music player—Music player list
Through the main interface or application interface of an application icon to enter the music player interface.
If you do not play records, it jumps to the default list screen.
Full list button, click this button to display inside the vehicle computer memory and external
storage devices all songs.
Folder List button, click this button to display the le inside the vehicle computer memory and an
external storage device that contains all the songs folder information.
Page 19
19
Music player—Music player list
Music player—Play Interface Features
List interface selected songs you want to play, click to jump to the playback interface. The screen will display
the currently playing song some basic information and the common control buttons. Users can set the
corresponding button to achieve the corresponding eect, but can also play a song by dragging progress bar
to achieve fast forward and rewind functions.
Music player—Music player list
Through the main interface or application interface of an application icon to enter the music player interface.
If you do not play records, it jumps to the default list screen.
Singer List button, click this button if you want to know the singer of the song.
The album list button Click this button to know song album information’s’ inside the vehicle
classied display.
Full list button, click this button to display inside the vehicle computer memory and external
storage devices all songs.
Folder List button, click this button to display the le inside the vehicle computer memory and an
external storage device that contains all the songs folder information.
Singer List button, click this button if you want to know the singer of the song.
The album list button Click this button to know song album information’s’ inside the vehicle
classied display.
Page 20
20
Music player—Music Player List
Music player—Play Interface Features
List interface selected songs you want to play, click to jump to the playback interface. The screen will display
the currently playing song some basic information and the common control buttons. Users can set the
corresponding button to achieve the corresponding eect, but can also play a song by dragging progress bar
to achieve fast forward and rewind functions.
Assistant touch – Buttons to Adjust the Size
Use assistant touch during use, you can change the size of the Settings button to adjust the size of the
oating button, the user can set it according to the desired preference.
Assistant touch – Buttons to Adjust Transparency
USE assistant touch during use; due to the dierences in background color it can sometimes lead to unclear
oating button. The user can adjust the transparency settings button to change the display of a oating
button.
Page 21
21
Music player—Music Player List
Through the main interface or application interface of an application icon, enter the music player interface. If
you do not play records, it jumps to the default list screen.
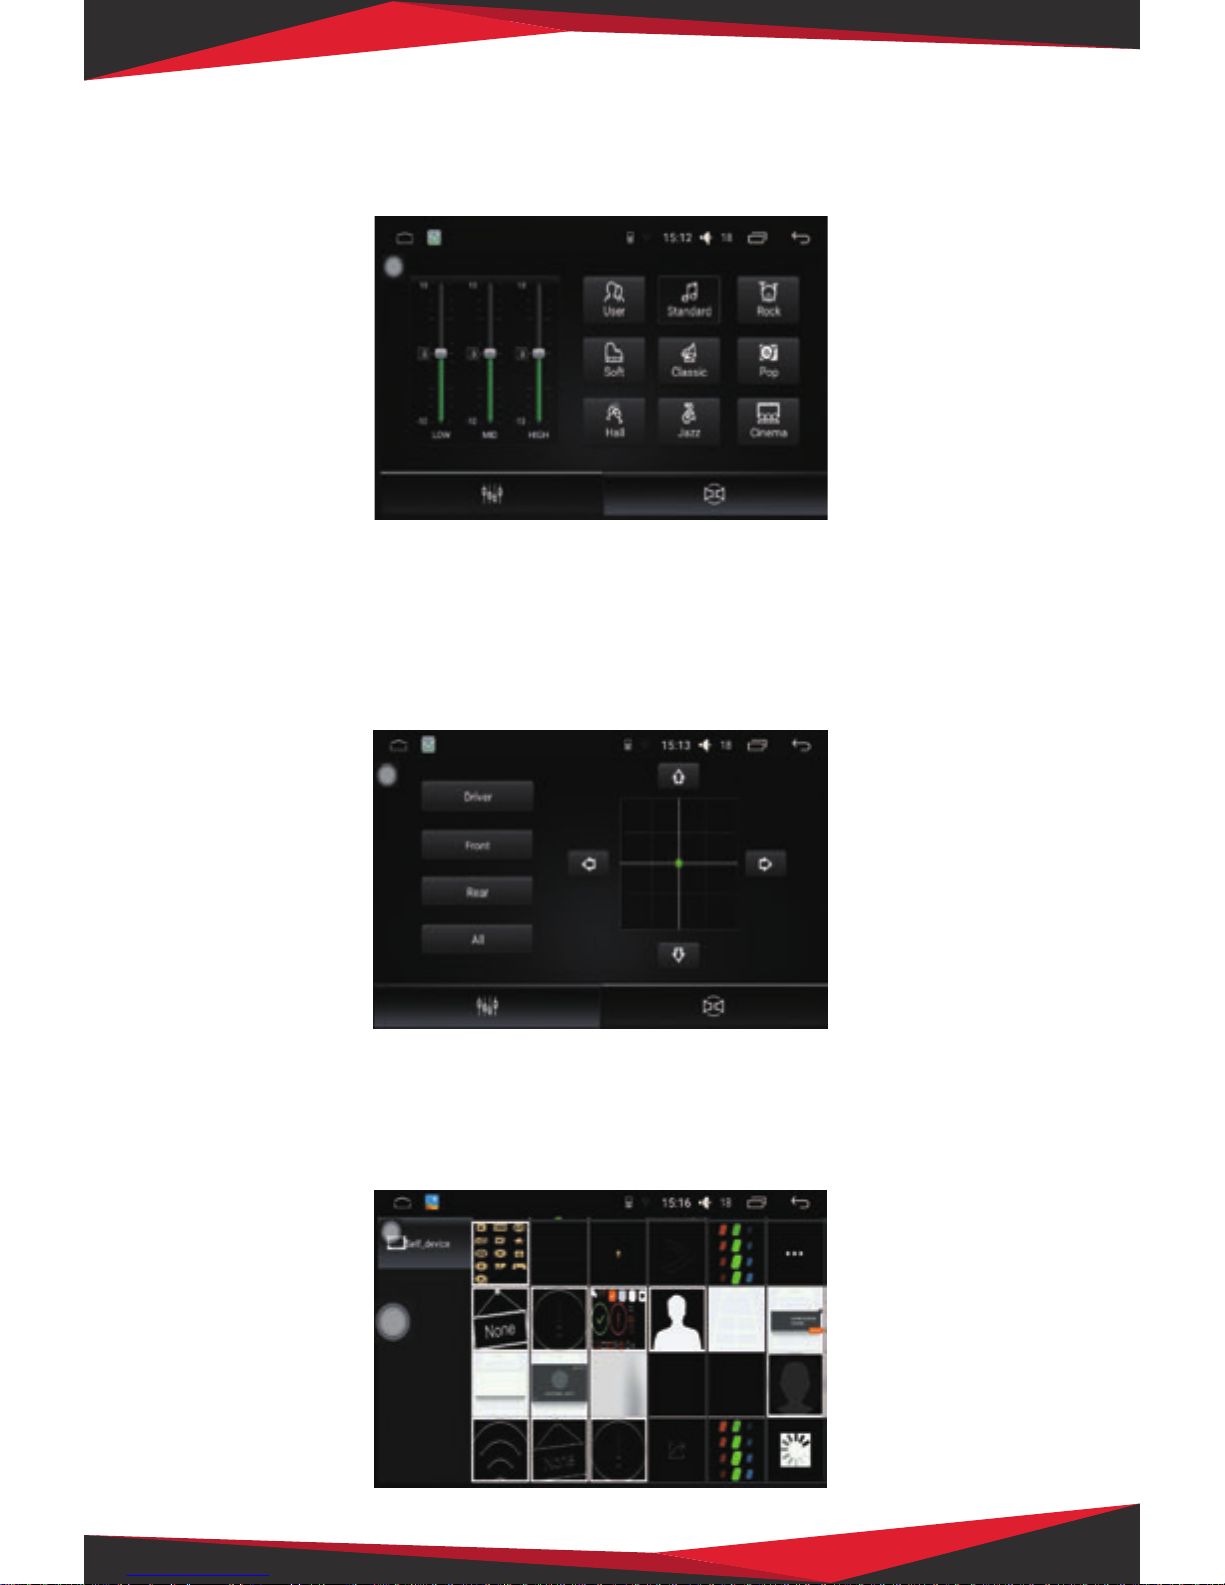
In the bottom of the player interface, we will see some of the Apply button, the button functions are:
Video Player-PIP
Click the Picture in Picture function button, video player interface as a whole will shrink and then
superimposed on the other application interface. And click on the upper right corner of the PIP zoom,
full-screen button to select the video size. Picture in Picture function allows the user can watch the video,
while operating other applications.
List Function
Repeat / Random Function
Pause / Play Function
NEXT Function
PREV Function
Page 22
22
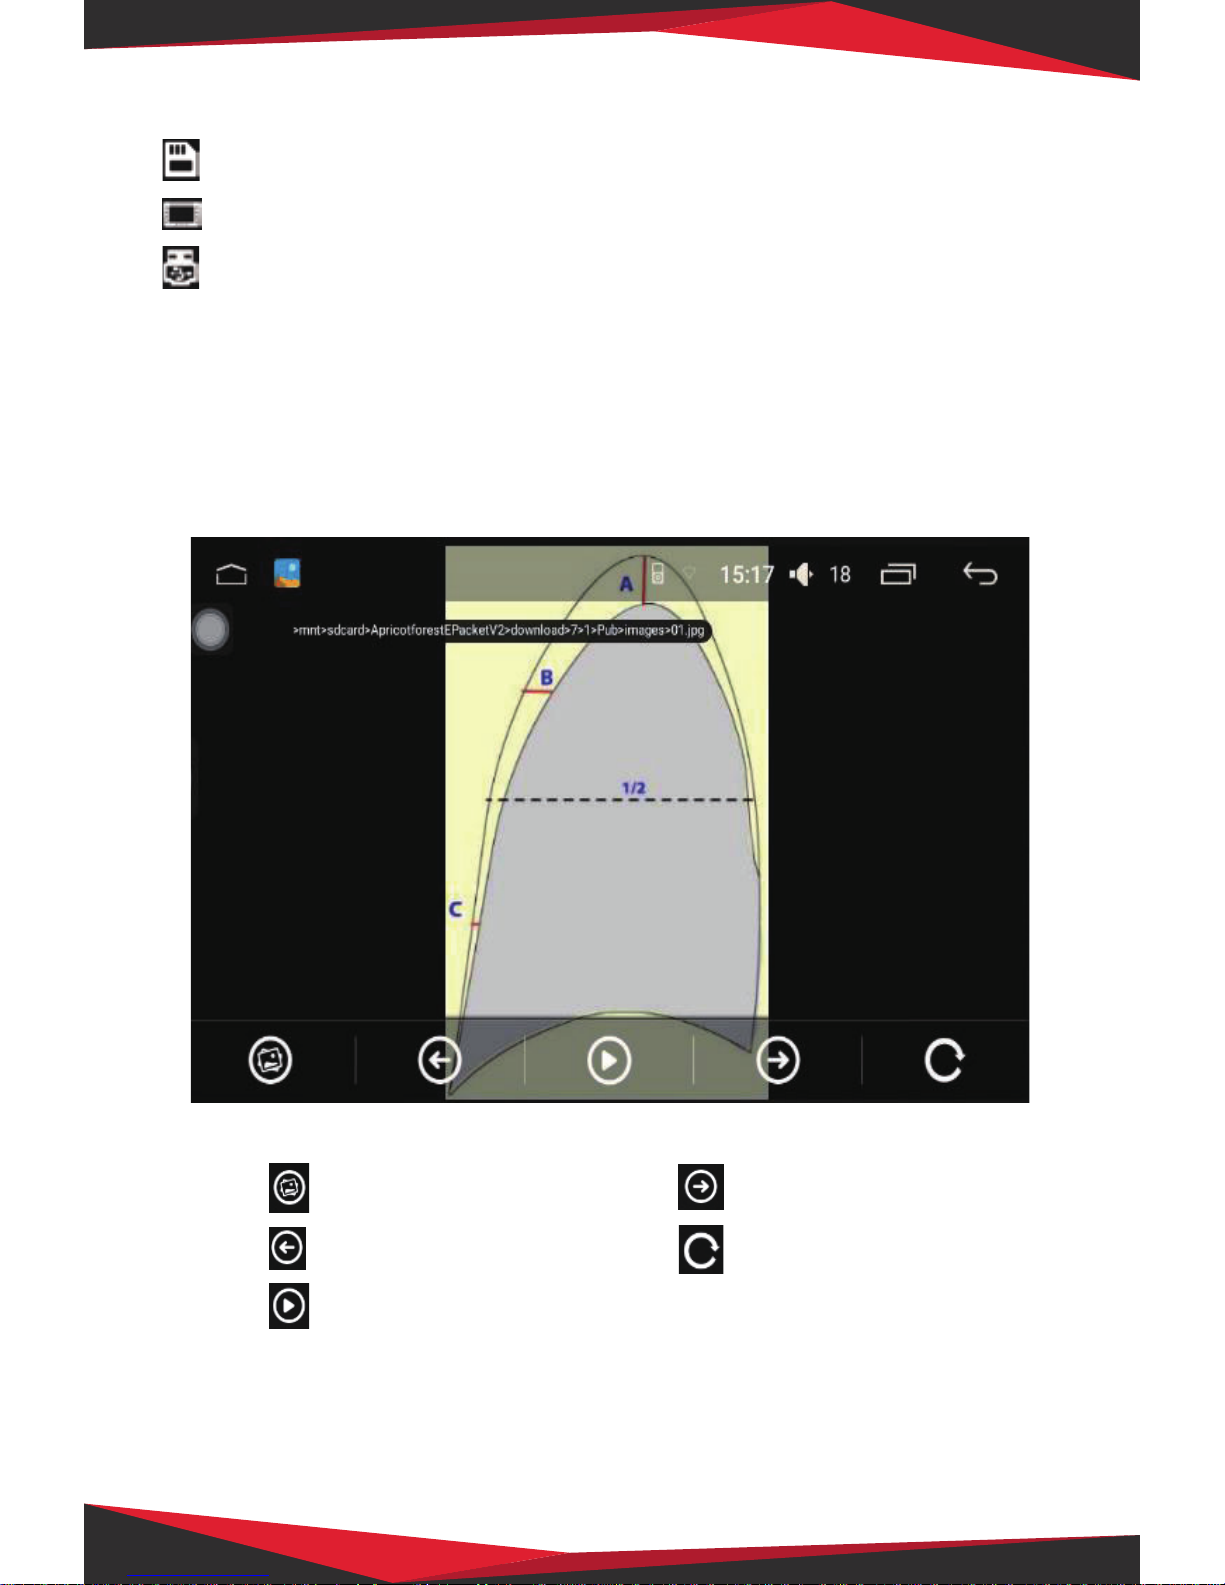
Car Settings-Equalizer Settings
Click the button to enter the sound adjust sound mode page, the user can set a preset sound eect or by
manually adjusting the slider to set the value of sound eects.
Car Settings- Equalizer Settings
Click the button to enter the sound eld to adjust the sound eld mode page. The user can drag the ball to set
the position of the vehicle to adjust the sound output preset sound eld mode or manually. For example, the
current position of the ball deection driving position, the driving position is sound eects other than the
vehicle position is much stronger.
Gallery —The main interface gallery
Picture browsing can browse internal storage and external storage format for all pictures in the vehicle unit
and can customize the wallpaper.
Page 23
23
Gallery —The main interface gallery
Gallery—Picture Operation
Click on any picture to enter the browsing mode as shown below. In this mode, double-click the screen, it can
zoom the picture, long press the function button on the screen may appear to hide the operation. Supports
picture with nger movement, as well as up and down gesture function cutting plans.
This icon shows that the current directory is in the external memory SD card
This icon shows that the current directory is stored internally
This icon shows that the current directory is in the external USB storage
Wallpaper function keys
Previous image
Play/Pause key
Next image
Rotation function keys
Page 24

24
Help--Frequency Asked Questions
1. Bluetooth and the Bluetooth car phone paired machine cannot connect?
Bluetooth connection is not on, you can turn o the Bluetooth mobile phone, then open and search again
before connecting again if not, you can click Rest Bluetooth settings, and after a few seconds, and then
pairing connections.
2. Bluetooth music no sound?
Determine the paired phone has volume output.
3. The phone did not respond to the click to download?
After the Bluetooth connection, click to download the phone book, the phone will receive a request to
download a contact, and allows the download request conrmation before downloading.
4. Bluetooth name is not updated after setting?
After the Bluetooth name set, if not updated immediately, disconnect and then click on the Bluetooth
pairing connection.
5. Music player plug in SD card or USB rst time there is no data to update?
Users plug in a storage device, music player to detect and scan data, if the data is stored relatively large, it
may take a little time to update (a few seconds to 1 minute or so), if you still do not have no update, make
sure the storage device is linked to upload (View le browser to see if there is a corresponding storage
directory, if no directory, please re-plug the card, or check the hardware.)
6. Song le name garbled?
Not the le name of the song name is displayed, if encoding song itself is neither a common format, nor is it
in line with the national language encoding, it will display and error occurs encoding problem.
Page 25
25
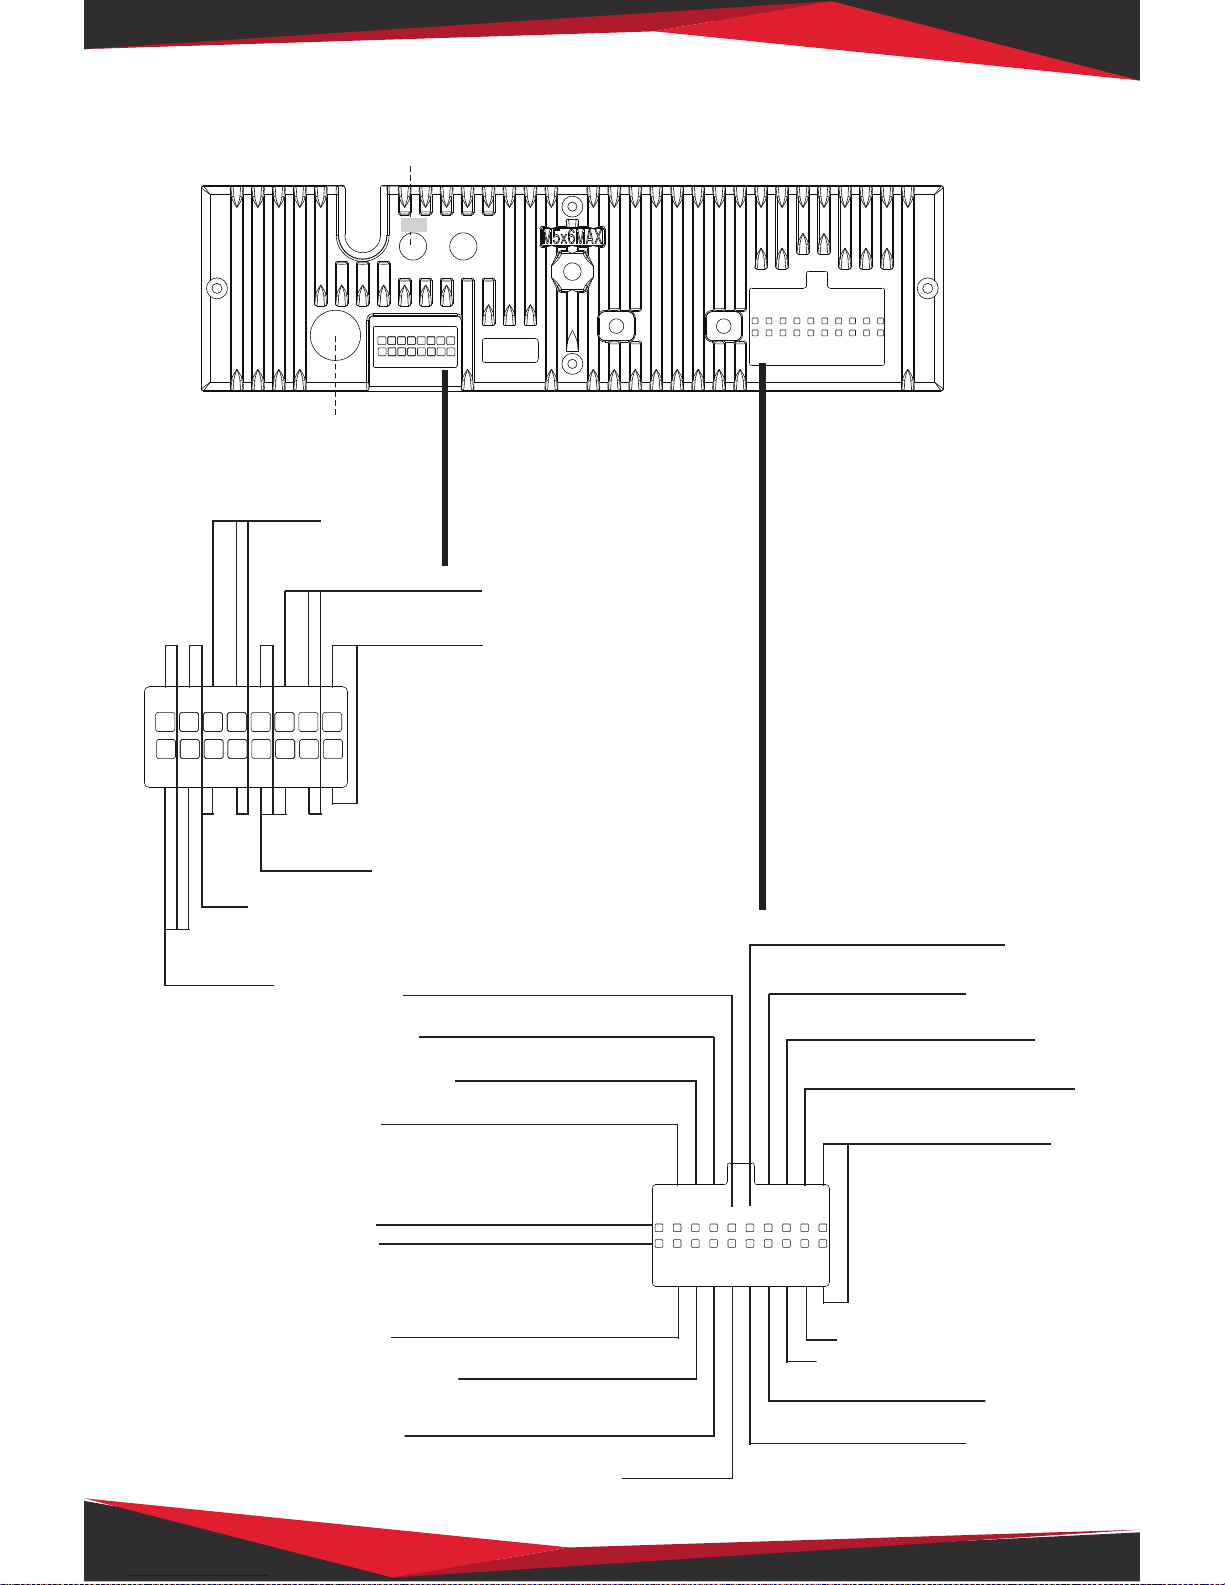
Wiring - Back Panel:
1
15
2
16
35791113
4681014 12
R CA R ear L eft(White)
R CA R ear R ight(R ed)
N/A
Video Input(YE LLO W)
R earview Input(Black)
R CA F ront Left (W hite)
R CA F ront R ight(R ed)
AU X Left(R ed)
AU X Right(White)
S UB WOO F E R O UTP UT (Bla ck)
1
2
7
8
3
4
9
10
5
6
11
12
17
18
13
14
15
16
19
20
B
S tee ring Wheel K ey ( Pink)
Battery Memory 12V+ (Y ellow)
R ear L eft S peake r-(G reen/Black)
Front Left S peaker-(
White/B lack)
NA
NA
G ND ( Black)
R ear L eft S peake r+ (G reen)
Ignition Acces sory ( Red)
Front Left S peaker+(White)
R evers e C amera(G reen/White)
Amplifier R emote T rigger (B lue/White)
R ear R ight S peaker+(
Purple)
Parking B rake ( B rown)
Front R ight Speaker+(G ray)
Illumination C ontrol(Ora nge)
Front R ight Speaker -(G ray/Black)
Power Antenna T rigger (B lue)
R ear R ight S peaker-(P urple/Bla c k)
1
1
2
7
8
3
4
9
15
A
2
16
10
5
6
11
12
17
18
13
14
15
16
19
20
B
35791113
468101412
RA D IO ANT
GP S AN T
G PS
Discover other stereos on our website.
 Loading...