

Page 1

Py le Au di o. co m
71 8. 535.1800 718.23 6. 2400(fax)
16 00 6 3rd Street, Brookly n NY 112 04
OP PE RATING IN ST RU CTIONS
PKR K10
ww w.pyleaudio.com
400 Wat t Bluet ooth Ka raoke V ibe Por table P A Speak er
w/10" Woofe r, 7"TF T Scree n, DVD Pl ayer
and VHF W irele ss Micr ophon e
Page 2
2
USB
1 2 3 4 5 6 7
8
9
21
10 11 13 14 15 16 17 18 19
20 22 23 24
12
INPU T DC12V
POWER
GUITAR. VOL
GUITAR
POWERLOWBATT
RECHA RGE
MIC1
MIC.V OL ECHO
BASS
TREBL E
VOLUM E
MIC
PRIOR ITY
ON
OFF
ON O FF
OUTPU T
AUX-IN
VIDEO
INPUT
INPUT
AUDIO
OUTPU T
INPUT
NEXT P REV PLAY
PRO AUD IO PA SYSTE M
REPEAT
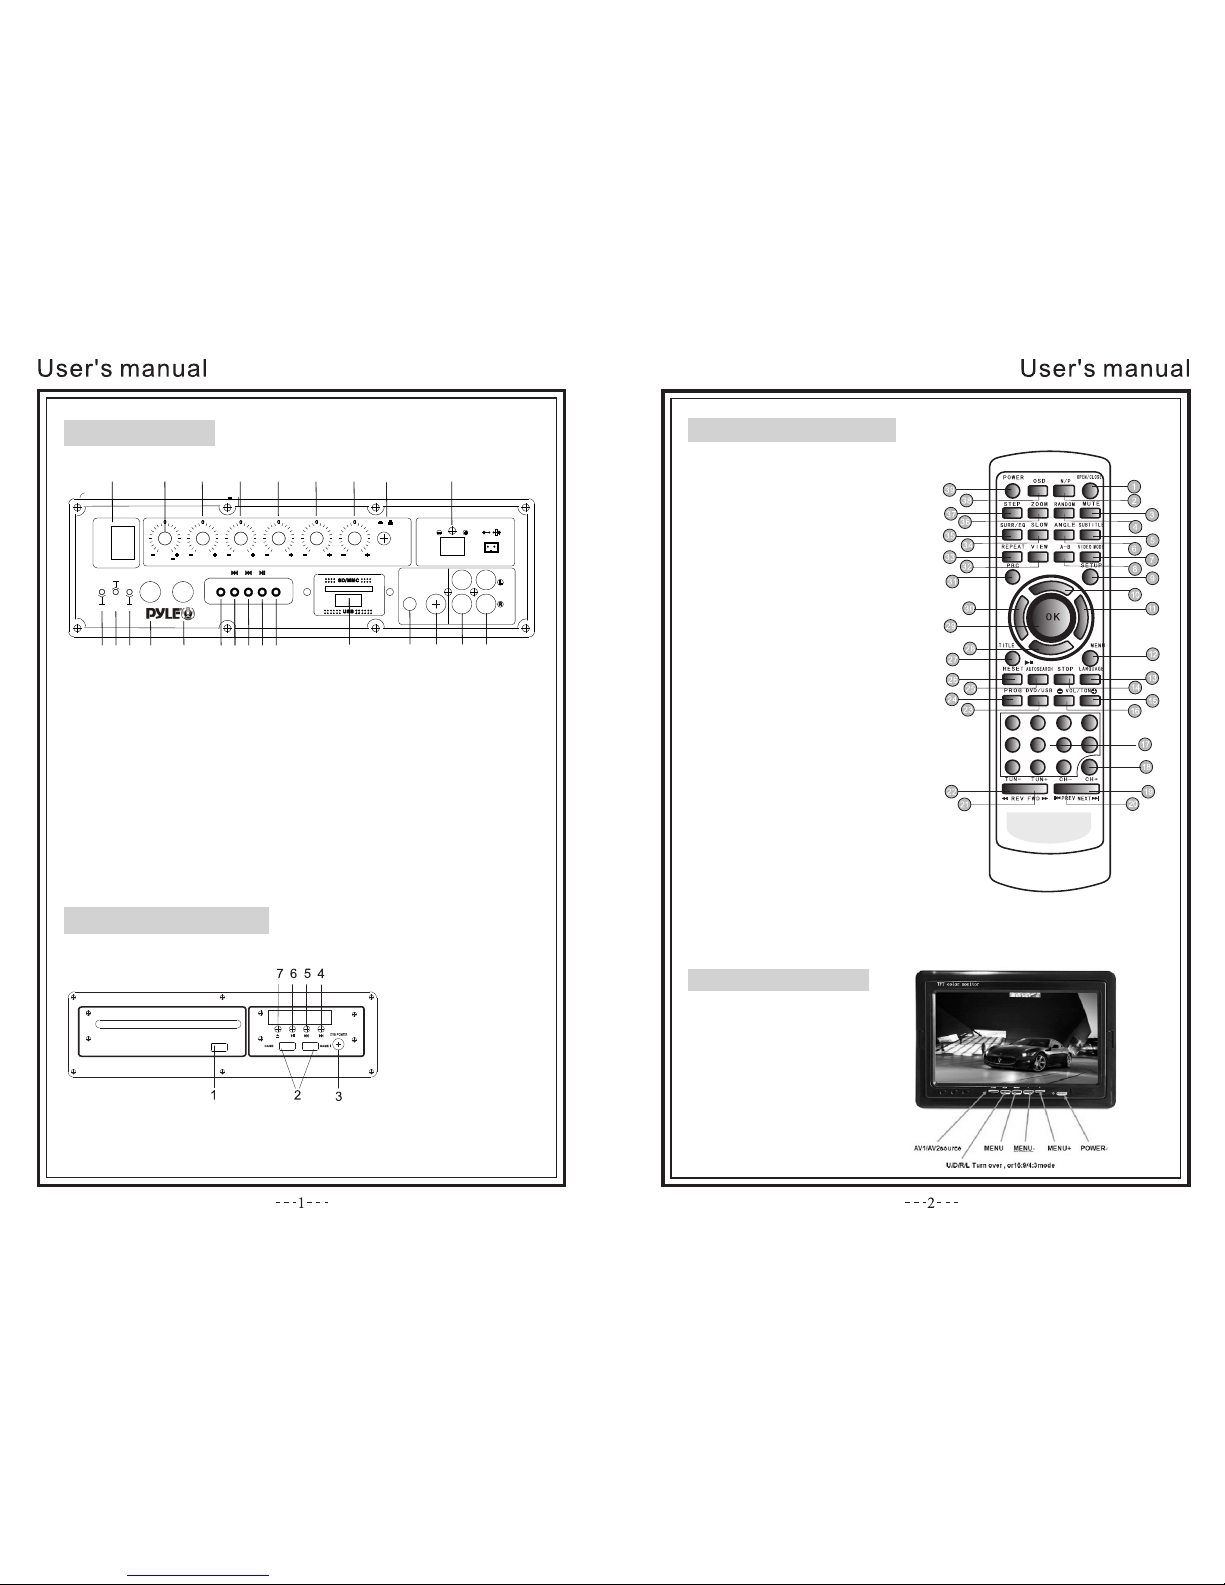
13. Guita r Input s lot
14. MIC i nput sl ot
15. Inp ut sele ctors
16. Nex t song se lecto r
17. Pre vious s ong sel ector
18. Pla y for Mp3 o r other a udio so urces
19. Rep eat fun ction f or USB/ SD
20. Mp3 p layer
21. Aux -In
22. Vide o out put
23. Aud io Inpu t
24. Aud io Outp ut
1. Powe r ON/OF F switc h
2. Guit ar Volu me cont rolle r
3. Mic vo lume
4. Echo f or micr ophon es
5. Bass c ontro ller fo r main ch annel
6. Treb le con troll er for ma in chan nel
7. Mast er volu me cont rolle r
8. Mic Pr iorit y ON/OF F
9. DC 12V I npu t
10. Low b atter y indic ator li ghts
11. Chargin g indicat or li ghts 1
12. Pow er ON/M P3 Workin g indic ator li ghts
1.U SB slot
2.G ame Slo t
3.P ower ON /OFF
4.N ext
5.P revio us
6.P lay/P ause
7.O pen/C lose
Panel design
DVD Panel design
1
5
9
2
6
0
3
7
10 +
4
8
TI ME
1.O pen/C lose fo r DVD
2. PAL/NTS C/A UTO sw itch
3.M ute for s peake rs
4.R adom pl ay
5.S ubtit le sele ctor
6.A ngle: c hoose d iffer ent angle s for v isua l
7.Vi doe M ode se lecto r
8.A -B: Rep eat fro m A to B
9.S et up: se t up for ma ny func tions
10. 11.28.30. F our dir ect ions c ontro llers
12. Menu fo r DVD pla yer
13. Langu age: Ch oose to d iffer ent opera tio n
lan guage
14. STOP: stop the di sc pl ayin g
15. Volu me +: in creas e the Volume
16. VOLUM E-:de creas e the vol ume lev el
17. 1-10. 10+: Nu mbers f or choo se disc s or
son gs
18. Time: s elec t the tim e you w ant to p lay
19. Next fo r song or o ther pl aying
20. P revio us for so ng or oth er play ing
21. Forwa rd
22. Backw ard for d iscs
23. DVD/U SB swit ch
24. Progr amme: m ake pro gramm er for yo ur
pla ying
25. Play/ Pause c ontro llers
26. Reset : reset f or all pl aying b ack to Me nu
27. Title: pres s this wi ll play ing fro m tit le
29. Confi rm: con firm fo r your op erati on
31. PBC: op en all me nu for di scs
32. Vie w
33. Repea t: repe at for di sc or son gs
34. Slow: w ill slo w down yo ur play ing
35. Eq, cho ose dif ferent so und e ffec t
36. ZOOM: e nlarg e what you pl ayi ng
37. STEP: s tep pla ying th e prese nt vide os or
pic tures
38. OSD:o perat ion sit uatio n displ ay
39. P ower: p ower in o r stand by your D VD play er
DVD Remote contol
7"display screen
400 W
PKR K10
10"Porta ble PA Spea ker w/ DVD P layer /7"TF T Screen /
One VHF Wirele ss Micrp hone and Blu etoot h System
Page 3
4
3
Instr uctio ns
Tur ning ON/OFF
The PA speaker can be powe red whe n conne cted to m ain power
or usin g the int ernal 12V ba ttery.
1. Conne ct the po wer cable to the top of t he unit .
2. Conne ct the ot her end of power cable to main p ower.
3. Tur n on the switch for the m ain pow er.
4. The uni t will au tomatically pow er on whe n conne cted to
main po wer.
Notes : If you wi sh to use t he internal batte ry powe r of the un it, just
simpl y turn on t he Battery switch locate d on the to p of unit t o ON.
Charging
Befor e using t he PA speake r for the first time, c harge the un it at
least 8 h ours.
1. Conne ct the po wer cable to the top of t he pane l.
2. Tur n off t he batt ery switch on the top o f the pan el.
3. Recha rge i ndica tor lig ht will be on when unit i s charging .
Notes : Notes : The i ntern al battery will cha rge while th e unit is
being o perat ed and the power switch is on. I t is bett er to cha rge
the uni t while t he power switch is off.
Instr uctio ns
Using t he Wireless Microp hone
The PA s peake r comes w ith wireless micr ophon es to get y ou
start ed stra ight out of the box.
1. Tun e on the unit.
2. Unscr ew the bo ttom of the microphone to ac cess th e batte ry
enclo sure. I nsert 2XAA ba tteries into the mi croph one. Take note
the bat tery po larity when inserting th e batte ries.
3. Repla ce the bo ttom microphone c over.
4. The wir eless m icrophone will flash onc e and aut omati cally pair
with th e PA speaker, i t is ready to use. If it do es not fl ash, ch eck tha t
you hav e inser ted the batteries c orrec tly or re place o ld batteries.
5. Adjus t the volume of the mic ropho ne by tur ning th e MIC VOL
knob lo cated o n top control panel
Notes : Pleas e do not operate the microph one dir ectly i n front
of the PA spea ker, please set t he MIC VOL/E CHO at a lo wer lev el
befor e turni ng on the wireless microph one. Op erati ng the
micro phone i ncorrectly will c ause a lo ud sque aling n oise.
Pleas e turn off the p ower sw itch when the wireless mic ropho ne
is not in u se. This wil l save th e battery.
Instr uctio ns:
Using t he Wired Microphon e
You can con nect th e wired microphone to this u nit usi ng the MI C
INPUT loca ted on th e top of co ntrol panel.
1. Tur n off t he unit .
2. Conne ct your w ired microphone to the MIC I NPUT locat ed on
top of th e contr ol panel.
3. Adjus t the mic rophone volume by tuning t he MIC VOL/E CHO
knobs l ocate d on top control panel.
NOTES : You c an use th e wired microphone and wir eless
micro phone a t the same time.
Conne cting a G uitar
You can con nect yo ur Guitar to unit using the 1/ 4” GUITAR
INPUT plug .
1. Tur n on the unit.
2. Conne ct your g uitar cable to GUITAR INP UT po rt on top
contr ol pane l.
3. Adjus t the vol ume by turning the GUITAR VOL on top co ntrol
panel .
Instr uctio ns
USB/S D Card Pl aybac k
You can pla y music f rom USB stick or SD Card using t he USB/ SD
slot on t he PA speake r.
1. Tur n on the unit.
Page 4
5
6
2. Inse rt your U SB or SD ca rd into the slot.
3. Once i nsert ed the USB or SD card unit will au tomat icall y play.
4. You can use the PRE/NEXT/ PLAY/PAUSE to control and p lay mus ic.
NOTES : The s peake r syste m can play the following aud io file f ormat s:
MP3,M P4,WM A.The U SB/SD Card no more th an 32GB . Opera tion ma y
be slow er when s earching large memory files. It will n eed sev eral
secon ds to res pond wh en your USB/SD Card f ull of co ntent s.
You can con nect yo ur Bluetooth phone or othe r devic e to the PA
speak er.
1. Turn on th e unit.
2. Press t he INPU T but ton whi ch is loc ated on top control p anel, n ext
to the US B/SD sl ot.
3. The Blueto oth is on w hen you h ear two “tone” indicator s ound.
4. Use you r Bluet ooth phone or other device t o searc h for the PA spe aker.
It will d ispla yed as PKRK10.
5. Conne ct your d evice by selectin g PKRK1 0, it wil l requi re you
to ente r a four di git code, the code is 0 000.
6. Enter t he code a nd connect with uni t.
7. Play mu sic on yo ur phone or device, sound wi ll come f rom the
speak er thro ugh the BLUETOOTH w ireless connect ion.
8. You can use t he VO LUME/ BASS/ TREBL E to adjust the sound l evel fo r
BLUETOOT H, also y ou can ad just the Bluetooth music s ound th rough
your ow n phone o r other d evice.
NOTES : If ther e is no sound through the PA speaker durin g Bluet ooth,
Check t he volu me controller bot h on the un it and on y our pho ne or
other d evice .
Using t he Radi o
1. Tur n on the unit.
2. Press I NPUT once, t o selec t FM Radi o.
BLUETOOTH play back
3. Press P RE/NE XT to s elect y our des ired radio statio n.
Ensur e that yo u have the extended t he ante nna loc ated on t he rear
of the sp eaker. It will ensure the bes t possi ble rad io quality and
signa l stren gth.
4. When yo u first u se the radio, press NEXT button twice, i t will
auto se arch an d store the radio stations w ith the s trong est signal.
Use of th e Exter nal Battery Optio n
To use t he PA speake r longe r than th e inter nal battery life, y ou
can con nect th e PA speak er to a ext ernal 1 2V Ba ttery S ource .
1. Find th e INPUT DC 12V on the t op cont rol pan el.
2. Use the c orrec t cable connect the I NPUT DC 12V.
NOTES : The PA speaker wi ll cons ume the i nternal battery f irst,
when it i s low, the LOW BATTERY ind icato r light l ocated on
the con trol pa nel will turn on, you can use th e exter nal 12V
batte ry to pow er on the unit. The external 12V battery will
also ch arg e the int ernal b attery while in use .
Instru ctions
Py le Audio
16 00 63rd St
Br ooklyn, N Y
11 204
ww w.pylea udio.com
 Loading...