

Page 1
Page 2

PLEASE READ CAREFULLY BEFORE PROCEEDING
Please keep this manual in a safe and handy place for future reference
WARNING!
• Use the specied power adapter, and immediately replace damaged adapter if any.
• Do not disassemble the instrument, nor modify internal parts. If it malfunctions,
discontinue the use immediately and have it repaired by professional serviceman.
• Before connecting the instrument to other devices, turn o all the power supplies.
• Do not play the instrument at the maximum volume or to an uncomfortable extent
for a long time.
• Keep the parts of the instrument o heat source, for overheat may cause damage.
• Prevent liquid, dust, particles and other foreign matters from entering the instrument
to cause corrosion of the instrument or short-circuit of its components.
• Pull the plug before cleaning the instrument.
Do not insert or pull the plug with wet hands.
• Use dry and soft cloth to clean the instrument. Do not use paint, alcohol or other
chemical solvents to wipe the instrument so as to avoid damage to the instrument
surface.
• Turn o the power supply and pull the plug after playing or in no-service condition
for a long time.
• To reduce the risk of re or electric shock, do not expose this apparatus to rain or
moisture. The apparatus shall not be exposed to dripping or splashing and that no
objects lled with liquids, such as vases, shall be placed on the apparatus.
• Maximum Operating Tamperature: 40°C / 104°F
• Direct plug-in adaptor is used as disconnect device, the disconnect device shall
remain readily operable.
• Do not install this equipment in a conned space such as a book case or similar unit,
and remain a well ventilation conditions. The ventilation should not be impeded
by covering the ventilation openings with items such as newspaper, table-cloths,
curtains etc.
• Warning: Excessive sound pressure from earphones and headphones can cause
hearing loss.
• The label location is on the bottom of the apparatus.
• The apparatus shall not be exposed to dripping or splashing and that no objects
lled with liquids, such as vases, shall not be placed on apparatus.
• The direct plug-in adapter is used as disconnect device, the disconnect device
shall remain readily operable.
www.PyleUSA.com
2
Page 3
• This marking indicates that this product should not be disposed with other
household wastes throughout the EU.
To prevent possible harm to the environment or human health from
uncontrolled waste disposal, recycle it responsibly to promote the sustainable
reuse of material resources. To return your used device, please use the return
and collection systems or contact the retailer where the product was purchased.
They can take this product for environmental safe recycling.
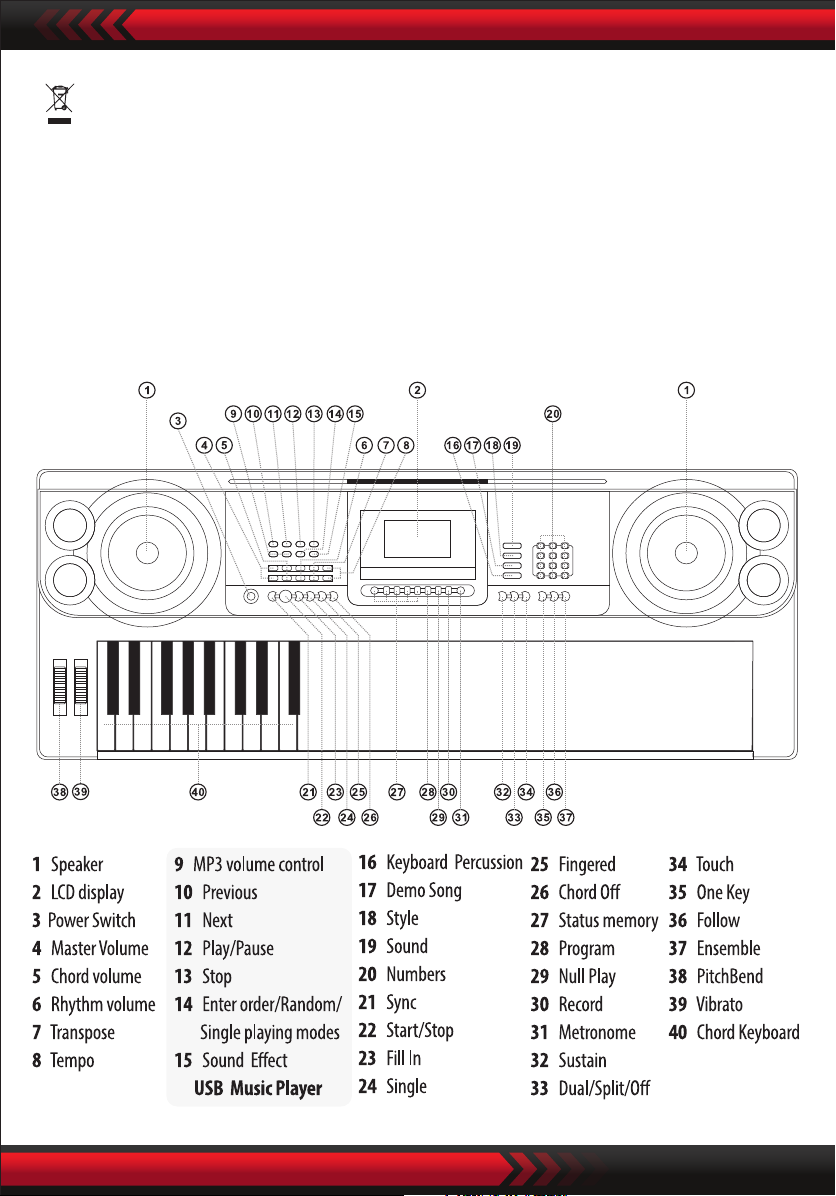
I. Control Panel and Extension Ports
FRONT CONTROL PANEL
www.PyleUSA.com
3
Page 4
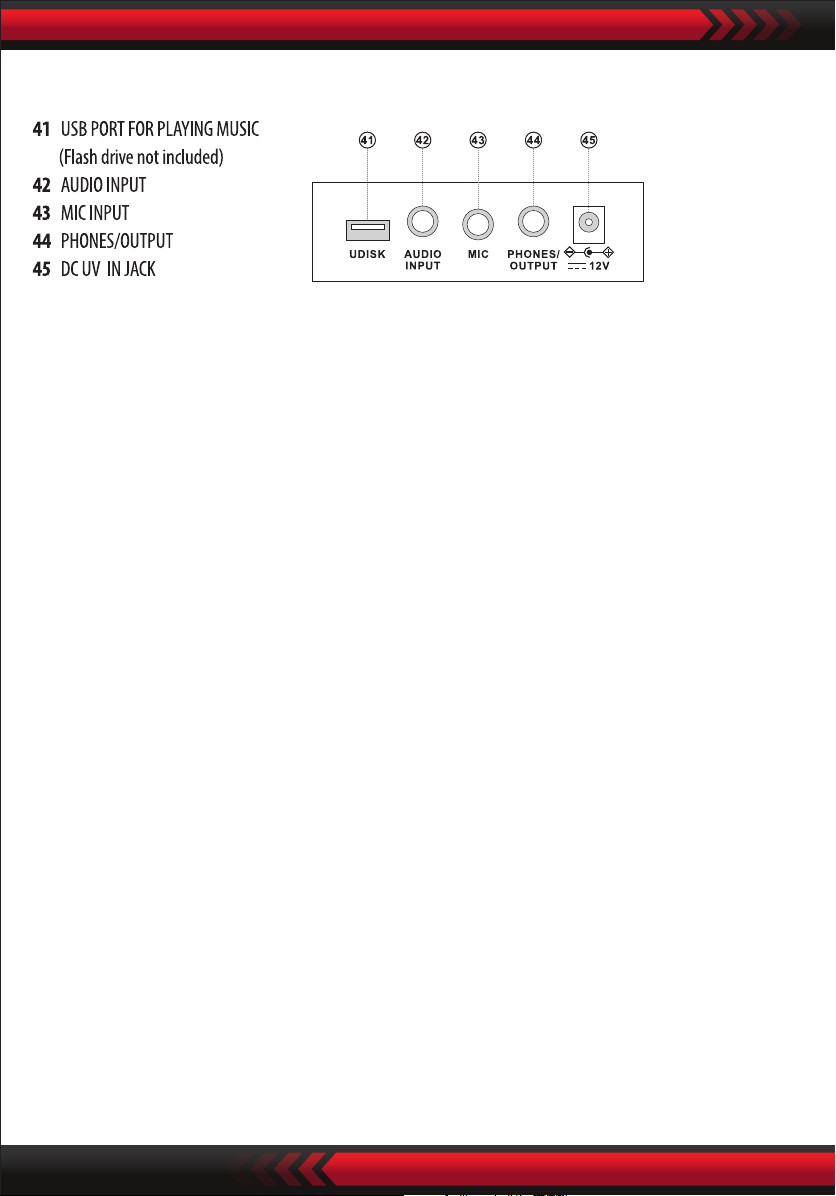
REAR PANEL
II. Preparations before Playing
USING AC/DC POWER SUPPLY ADAPTOR
The AC/DC power supply adaptor must be the one designated for the instrument.
Please connect one side to the power supply socket on the back-panel and the
other to the city-power network. (Please notice the input voltage should be the
same as that of the power network.)
AUDIO OUTPUT HEADPHONE CONNECTION
• Audio Output: Turn o the power supply of the electronic keyboard and external
sound equipment, then insert one end of the audio cable into the PHONES/OUTPUT
interface for audio output on the back of the electronic keyboard and insert the
other end into the audio input interface of the sound equipment.
• Headphone Connection: Insert the headphone plug into the PHONES/OUTPUT
interface on the back of the electronic keyboard, then the speaker of the electronic
keyboard will be disconnected automatically, and the inuence on others can be
avoided during playing.
Attention! Do not keep the highest volume in a long time when the headphone is
used, so as to avoid hearing losses.
AUDIO INPUT
The electronic keyboard has the stereo audio input function, and audio signals of
mobile phones, MP3 players, computers and the like can be input into the electronic
keyboard system to be played. At rst, turn o the power supply of the electronic
keyboard, insert one end of the audio cable into the output port of an audio device,
insert the other end into the AUDIO INPUT interface on the back of the electronic
keyboard, and then turn on the power supply of the electronic keyboard.
www.PyleUSA.com
4
Page 5
MICROPHONE INPUT (not included)
Insert the plug of the microphone into the microphone jack of the keyboard and
you can enjoy playing and singing.
III. Basic Method of Performance
Press the [Power] button with the back light on, the LCD display shows some
information of the present timbre, tempo, etc.
MASTER VOLUME ADJUSTMENT
Press the key "Master Volume " or "Master Volume " to increase or decrease the
master volume. When the "Master Volume " and "Master Volume " are pressed at
the same time, the master volume is recovered to the default preset value.
The style volume and chord volume can be controlled simultaneously by the master
volume.
SOUND SELECTION
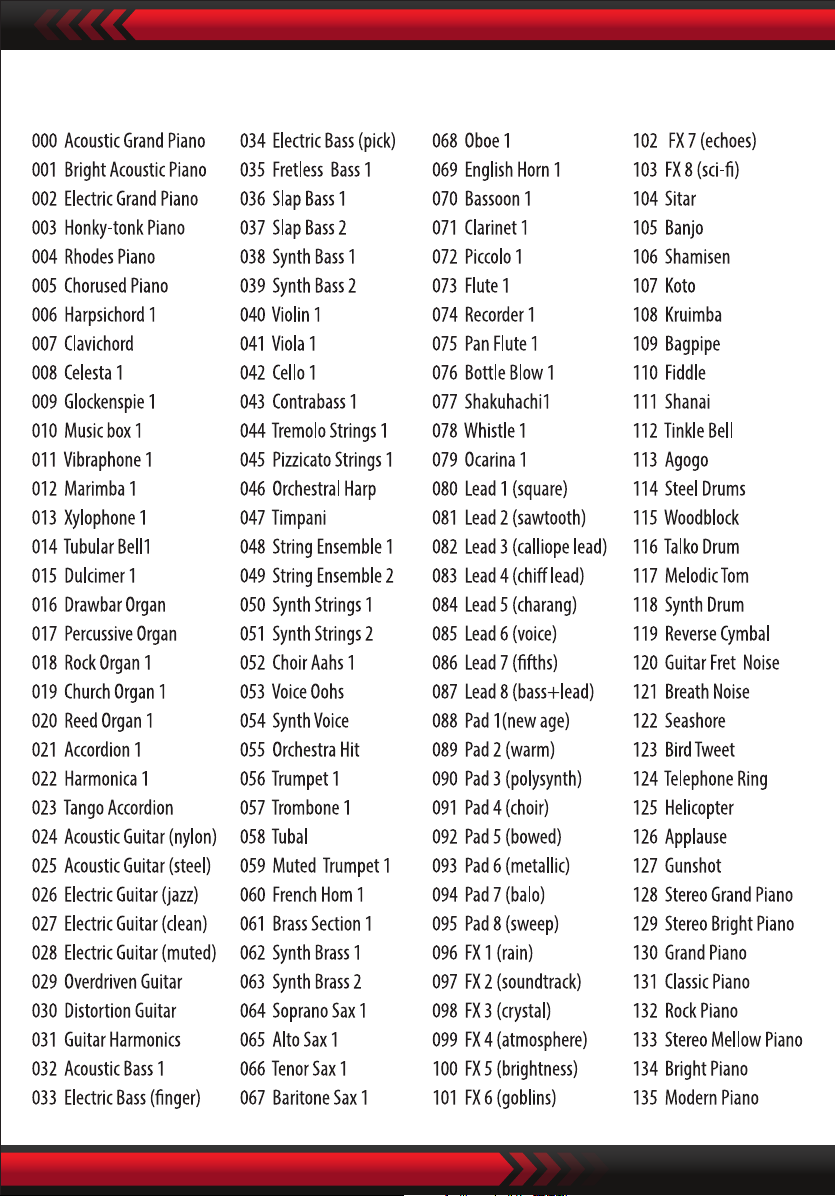
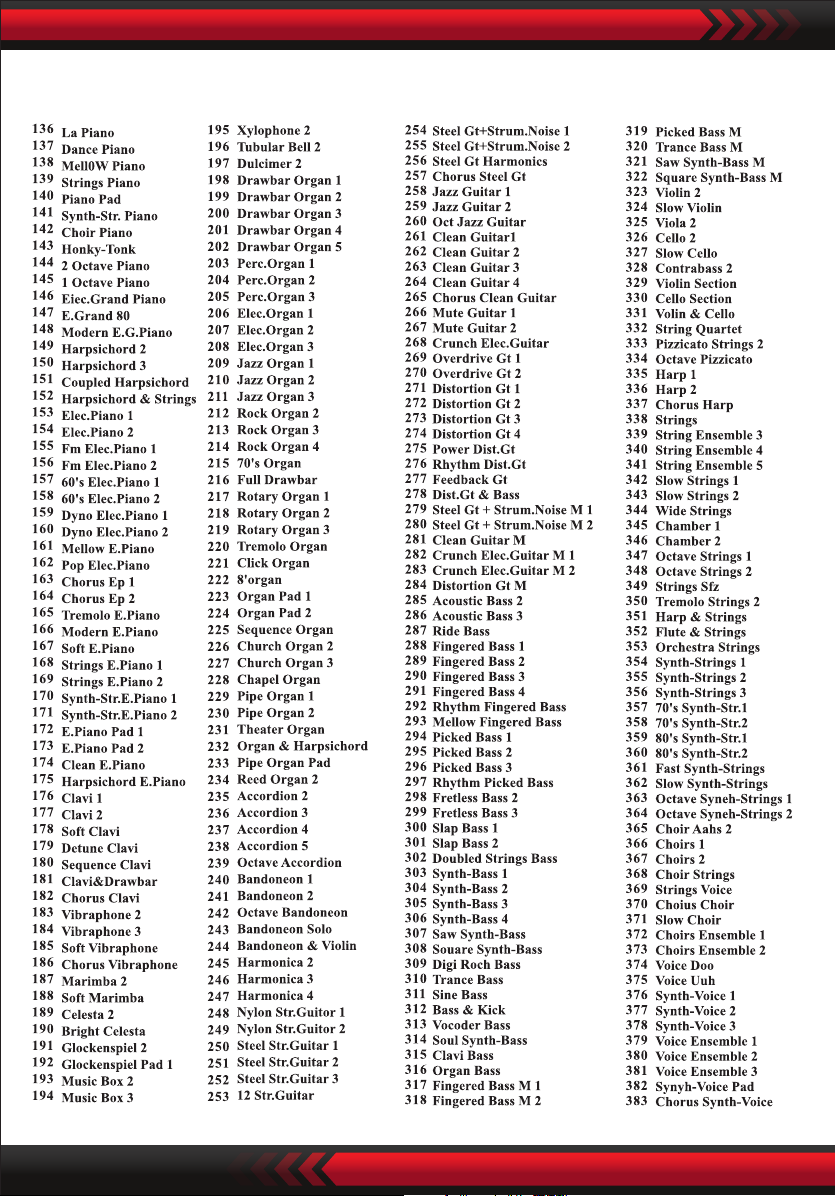
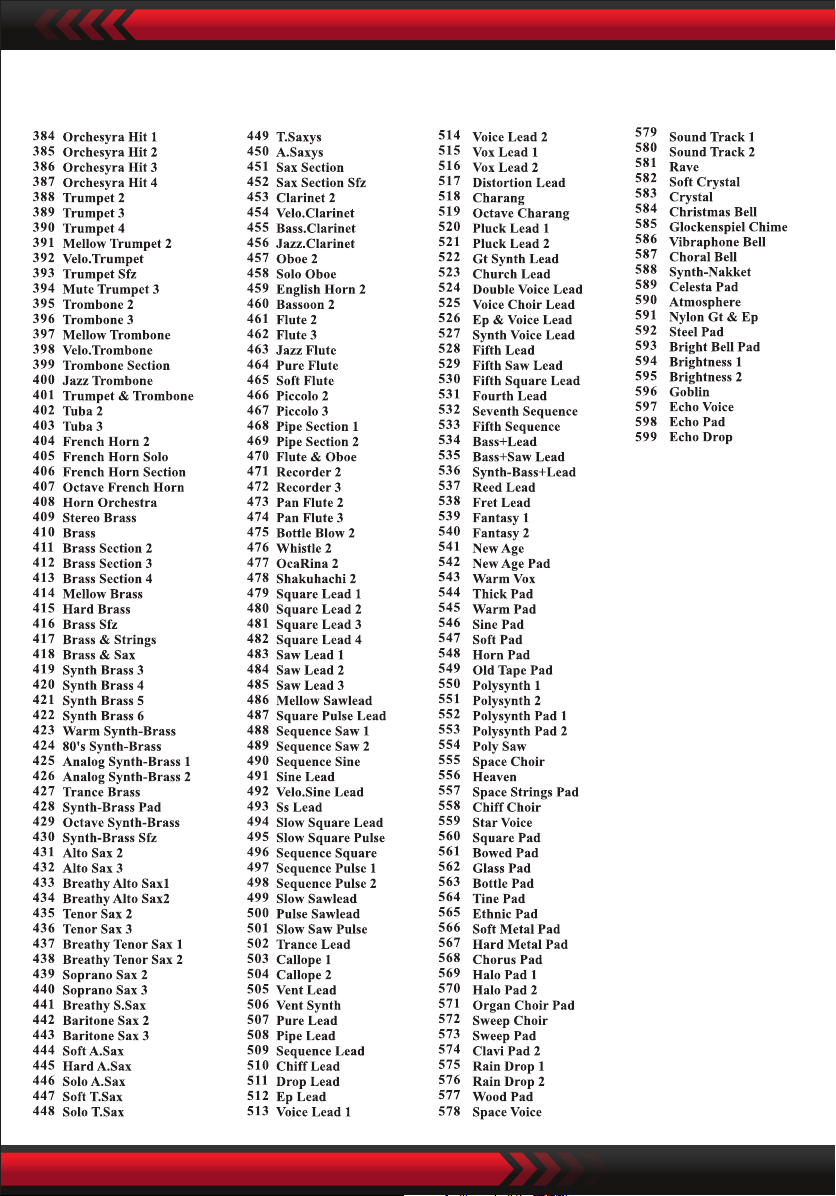
The electronic keyboard contains 600 sounds, from "000" to "599". When the power
supply is turned on, the sound selection function is enabled automatically, and the
screen displays "SOUND"; otherwise, the sound selection function can be enabled
by pressing the key "SOUND". The startup default "000" refers to the piano sound,
other sound can be selected by pressing the corresponding sound numbers via
number keys or pressing "+" or "-".
KEYBOARD PERCUSSIONS
Press the key "Keyboard Percussion" to enable the keyboard percussion function.
Then the corresponding percussion sound can be uttered when the keyboard is
played. Press the "Keyboard Percussion" again to disable the keyboard percussion
function.
DEMO SONGS
The electronic keyboard contains 40 demo songs for teaching, from "000" to "039".
When the key "Demonstration Song" is pressed, all demonstration songs will be
played sequentially.
During playback, another demo song can be selected by pressing the corresponding
number via number keys or pressing "+" or "-" and then the selected demo song will
be played cyclically.
www.PyleUSA.com
5
Page 6
IV. Auto-Style
STYLE SELECTION
The electronic keyboard contains 300 styles, from "000" to "299". The startup
default is "000". Press the key "Style" to enable the rhythm selection function, and
then the screen displays "STYL''. Another style can be selected by pressing the
"STYLE". Another style can be selected by pressing the corresponding style number
in number keys or pressing "+" or "-".
STYLE CONTROL
1. Start Style
Press the [Start/Stop] button to start the accompaniment style.
When the style has not yet started, press the key "Syn", and then the metronome
on the screen ashes. When any key in the chord keyboard zone (Key 1-19 from
the left) is played, the style accompaniment will start synchronously.
2. Fill In
In the state of style, press the [Fill in] button, a piece of intermezzo can be lled in
automatically.
3. Stop the Accompaniment
Press the [Start/Stop] button, the accompaniment style quits at once.
METRONOME
The metronome contains four tempos, 114, 2/4, 3/4 and 4/4, respectively. When the
key "Metronome" is pressed continuously, four tempos can be selected in sequence.
Playing of any tempo can be stopped when the key "Metronome" is pressed again.
TEMPO ADJUSTMENT
Press the [Tempo ] / [Tempo ] button, the tempo of the style can be quickened or
slowed. Apply the both at the same time, the tempo turns back to the present one.
ADJUSTMENT OF RHYTHM VOLUME
Press the key "Style Volume " or "Style Volume " to increase or decrease the
style volume. When the two keys are pressed simultaneously, the style volume can
be recovered to the default preset value.
www.PyleUSA.com
6
Page 7
V. Auto-Bass Chord
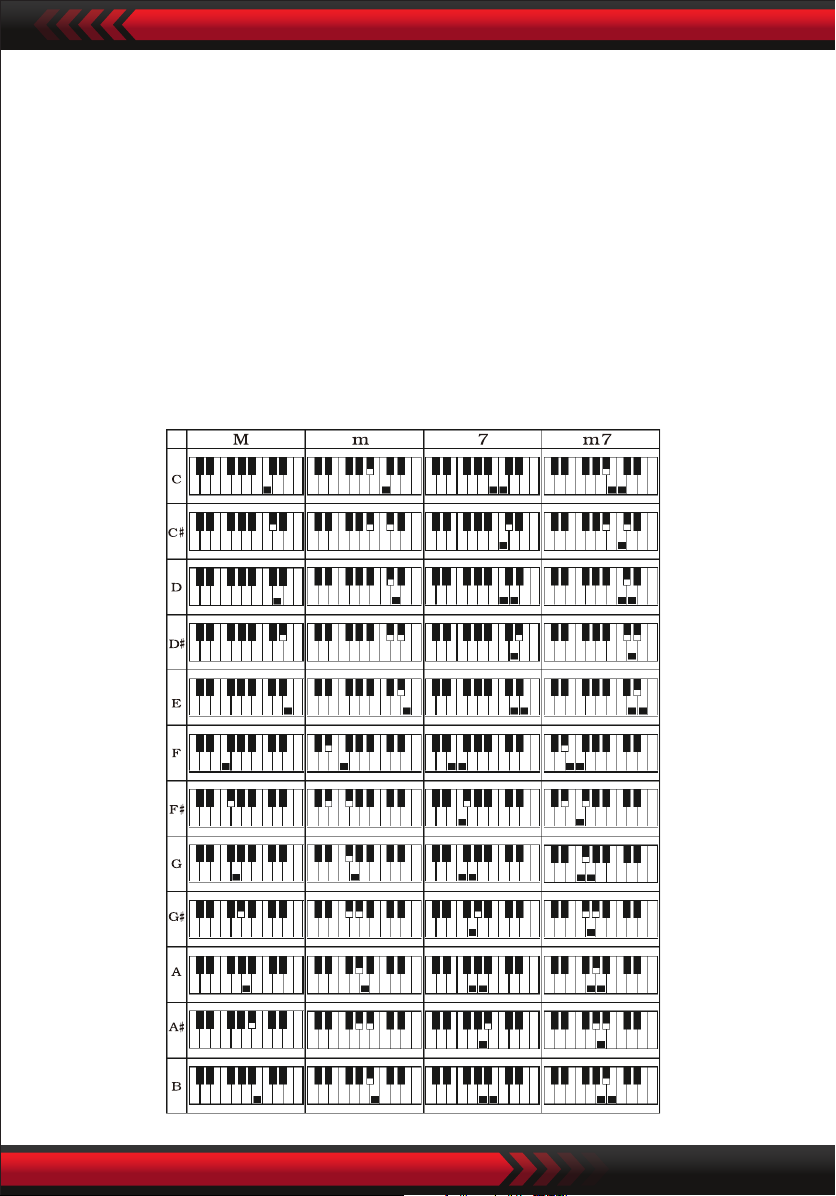
SINGLE FINGER CHORD
Press the key "Single Finger Chord" to enable the chord function, and the screen
displays "Single". When the style starts, automatic chord accompaniment can be
performed in the chord keyboard zone (Key 1-19 from the left) according to the
ngering method of single nger chord. When the style has not yet started, chord
accompaniment can be performed manually.
Press the key "Single Finger Chord" or "Chord OFF" to disable the chord function,
and the "Single" on the screen disappears.
Single-nger Chord Scales
www.PyleUSA.com
7
Page 8
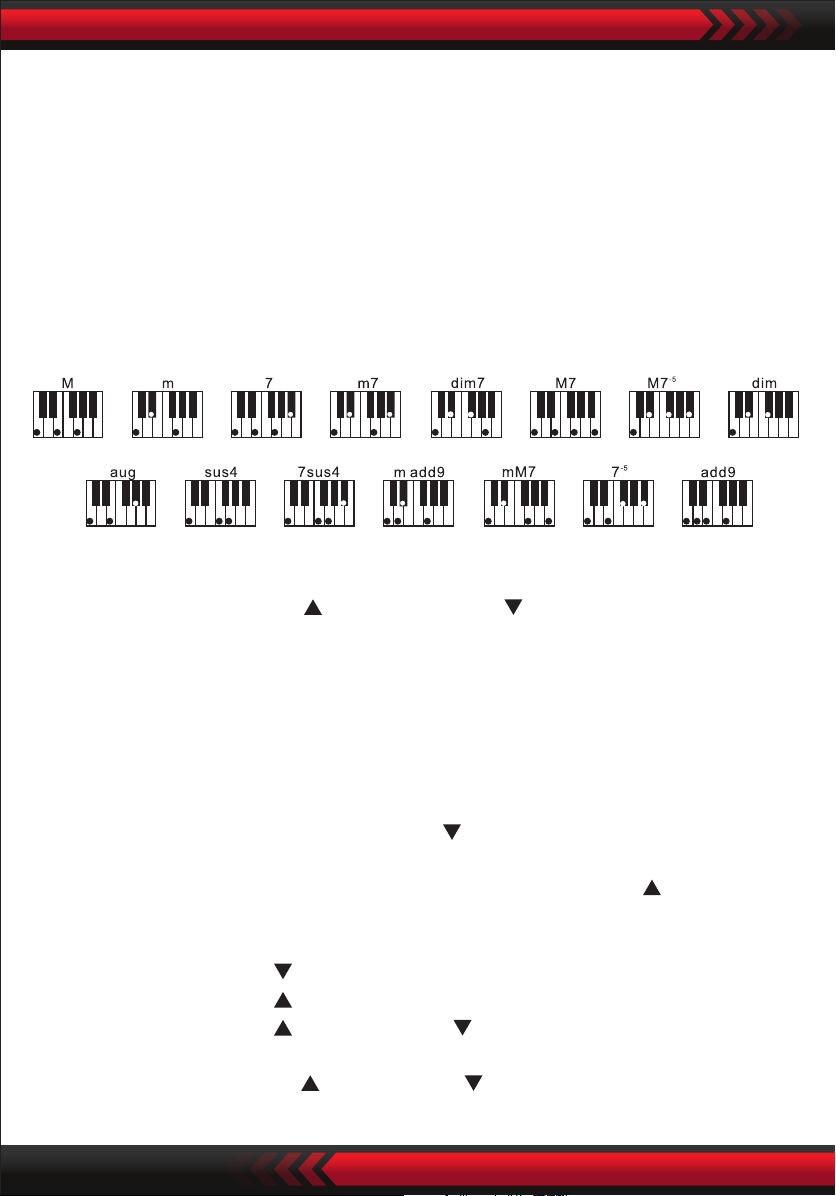
FINGERED CHORD
Press the key "Fingered Chord" to enable the chord function, and the screen displays
"Finger''. When the style starts, automatic chord accompaniment can be performed
in the chord keyboard zone (Key 1-19 from the left) according to the ngering
method of ngered chord. When the style has not yet started, chord accompaniment
can be performed manually.
Press the key ''Fingered Chord" or "Chord OFF" to disable the chord function, and
the "Finger''on the screen disappears.
Fingered Chord Scales
ADJUSTMENT OF CHORD VOLUME
Press the key "Chord Volume " or "Chord Volume " to increase or decrease the
chord volume. When the two keys are pressed simultaneously, the chord volume can
be recovered to the default preset value.
VI. Eect Control
TRANSPOSING FUNCTION
The transposing function can help you to play music of other tunes in the C-tune
ngering method. When the key "Transpose " is pressed, the sound of the whole
keyboard will decrease by half-tone (minor second), and the C-tune sound of the
keyboard is changed into B-tune sound. When the key ''Transpose " is pressed, the
sound of the whole keyboard will increase by half-tone (minor second), and the
C-tune sound of the keyboard is changed into #C-tune sound or bD-tune sound.
When the key ''Transpose " is pressed twice, Tune C is changed into Tune bB.
When the key ''Transpose " is pressed ve times, Tune C is changed into Tune F.
When the key ''Transpose " and ''Transpose " are pressed at the same time, the
sound is recovered to Tune C "00". The level can be adjusted from "-6" to "+6" by
pressing the key ''Transpose " or ''Transpose ".
www.PyleUSA.com
8
Page 9

SUSTAIN
Press the [Sustain] button with "SUS" appearing on the display, the sound of the
keystrokes takes on a sustain eect. Press the button again with "SUS" disappearing,
the function quits.
PITCH BEND
The pitch bend can add smooth pitch changes to notes played by the keyboard.
The pitch can be increased by rolling up the pitch bend and decreased by rolling
down the pitch bend. After being released, the pitch bend will automatically return
to the center, and the pitch of the keyboard will recover the standard status.
VIBRATO
When "Vibrato" is in the downward lowest position, the vibrato function will be
disabled. When "Vibrato" is rolled up, the vibrato function will be enabled, and the
screen will display "VIB". Using the vibrato function, vibrato eects can be added to
the playing tone. The vibrato can be increased or decreased to be disabled by rolling
the "Vibrato" up or down.
DOUBLE SOUNDS & KEYBOARD SPLITTING FUNCTION
Press the "Dual/Split/O" key to turn on or turn o.
Double Tones keyboard splitting function in turn.
DOUBLE SOUNDS
When the "DUAL" is on, the screen displays "double", and the overlapping eects of
two sounds can be produced during playing of the electonic keyboard.
After the double-sound function is enabled, sound 1 and sound 2 can be switched
by pressing the key "Sound" so as to select the required sound, and the screen will
correspondingly display "SOUND1" or "SOUND2".
KEYBOARD SPLITTING FUNCTION
When the "Keyboard Split" function is on, and the upper part of the screen displays
"Split". Then the 24 keys on the left of the electronic keyboard are separated from
the original keyboard, and the pitch of the left keyboard zone is increased by zone
www.PyleUSA.com
9
Page 10

is decreased by octave to be identical to the pitch of the left keyboard zone.
The tone of the right keyboard zone can be selected as needed, and dierent sounds
can be played by the left keyboard zone and right keboard zone. When the key
"Keyboard Split" is pressed again, the screen displays "O" and the keyboard
splitting function is disabled.
TOUCH
Press the [Touch] button to turn on or o the touch function. The default at the time
of startup is ON. The screen will display "Touch". This function can help to enrich
musical expression and correctly reect the force you apply on each note. The larger
the force is during performance, the louder the sound is. When this function is turned
o, the same sound can be uttered regardless of your force in the performance.
VII Recording Function
RECORDING
When the key "Record" is pressed, the recording function is enabled, the screen
displays "Record", and then the played notes will be saved.
The recorded notes will be cleared automatically when recording is performed again
or the electronic keyboard is turned o.
STOP RECORDING
When the memory is full of notes, and the word "Record" on the screen disappears,
recording will stop automatically. During the recording process, the key "Play" can
be pressed to stop recording and play the recorded notes.
When the key "Recording" is pressed again, the recording function will be disabled,
and the recorded notes will be cleared automatically.
PLAYBACK OF RECORDED NOTES
The recorded notes can be played by directly pressing the key "Play" during the
recording process. Playback of the recorded notes can be stopped by pressing the
key "Play" again during the playing process.
www.PyleUSA.com
10
Page 11

VIII. Style Programming
STYLE PROGRAMMING
When the key "Program" is pressed, the style programming function is enabled, the
screen displays "Program" and a set of style melody can be programmed by playing
the corresponding percussion of the keyboard.
* The programmed style will be automatically cleared when programming is
performed again or the electronic keyboard is turned o.
STOP PROGRAMMING
When 32 percussions are recorded and the word "Program" on the screen disappears,
programming will stop automatically. During the programming process, the key "Play"
can be pressed to stop programming and play the programmed style.
When the key "Program" is pressed again, the programming function will be disabled,
and the programmed data will be cleared automatically.
PROGRAMMED STYLE PLAYBACK
During style programming, the programmed style can be played by directly pressing
the key "Play". Playback of the programmed style can be stopped by pressing the
key "Play" again during the playing process.
IX. Status Memory Function
Using the status memory function, the sound, style, tempo and other parameters to
be set during playing can be saved. The electronic keyboard is equipped with four
status memories, which can be exibly called at any time during playing.
STORAGE OF STATUS MEMORY
Set the sound, style, and tempo according to playing needs, and then press the key
"Status Memory" and one of "M1" to "M4" to save the current working status.
www.PyleUSA.com
11
Page 12

CALLING OF STATUS MEMORY
When one of "M1" to "M4" is pressed during playing, data in the memory key can be
called to replace the current status.
No power failure protection is provided for the saved contents. When the electronic
keyboard is turned on again after power failure, the saved contents will disappear.
X. Intelligent Teaching Function
The intelligent teaching function is divided into three steps to guide the Ieamer to
gradually learn to play the electronic keyboard. The Ieamer should exercise in the rst
step "One Key" to get familiar with the melody and style of the song, followed by
the second step "Follow" for correct playing of the song and then the third step
"Ensemble" to freely ensemble with others at last via ensemble exercise.
TEACHING 1: ONE KEY
When the key "One Key" is pressed, the one-key teaching function is enabled, and
the screen displays "Step 1". You can select the song to be learned by pressing the
number key or pressing "+" or "-". One-key teaching is applied for the song duration
exercise, with no requirements for the pitch and correctness. Improper playing of
keys is allowed. The electronic keyboard plays correct notes in case of errors, but the
cursor in the keyboard zone of the screen shows the key corresponding to the
correct note. The one-key teaching function can be disabled by pressing the key
"One Key" again.
TEACHING 2: FOLLOW
When the key "Follow" is pressed, the Follow teaching function is enabled, and the
screen displays "Step 2".
You can select the song to be learned by pressing the number key or pressing "+" or
"-". In this mode, you can play the demonstration song, and the cursor in the
keyboard zone of the screen will guide you to play correctly.
When an error is made during playing, the melody of the song will be stopped until
you correct the error.
The Follow teaching function can be disabled by pressing the key "Follow" again.
www.PyleUSA.com
12
Page 13
TEACHING 3: ENSEMBLE
When the key "Ensemble" is pressed, the Ensemble teaching function is enabled, and
the screen displays "Step 3". You can select the song to be learned by pressing the
number key or pressing "+" or "-".
The Ensemble teaching is applied for correct and comprehensive learning of the
song duration and notes.
The keynote will be shielded by the electronic keyboard for ensemble.
You should play the correct notes within the song duration.
If you fail to play within 3 seconds, the electronic keyboard will automatically play
the keynote, and the keyboard zone of the screen will display the correct note and
tempo.
The Ensemble teaching function can be disabled by pressing the key "Ensemble" again.
XI. USB Music Player
Insert the USB, and the electronic keyboard supports the maximum 32G memory and
common MP3-forrnat les.
Press the key "MP3 " to adjust the volume.
Press to play the previous, to play the next, to play/suspend, to stop,
and to enter order, random and smgle playmg modes.
Press [Sound Eect] button to adjust the sound eect modes.
What’s in the Box:
• Digital Musical Karaoke Keyboard
• Book Rack
• Adapter
• Power Plug
• Keyboard Stand
• Keyboard Stool
• Waterproof Bag
www.PyleUSA.com
13
Page 14
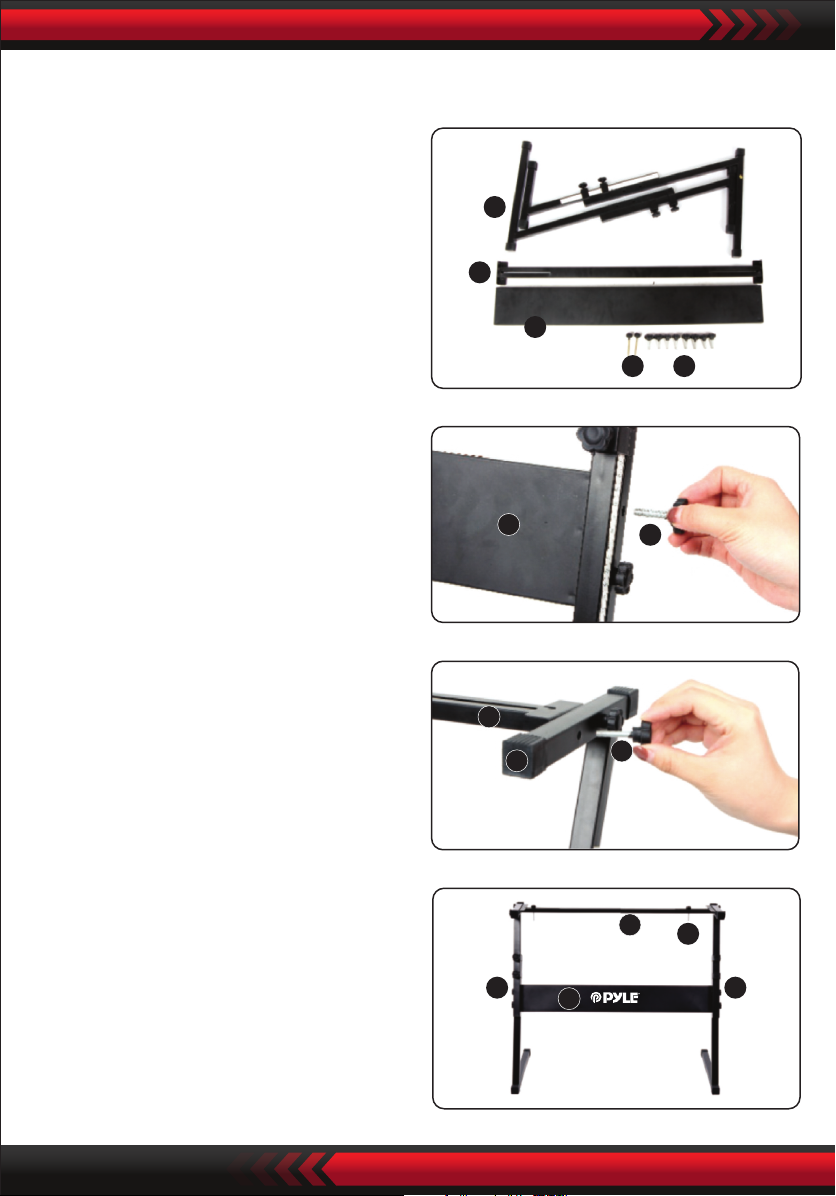
Keyboard Stand Assembly
3
2
4
5
2
1. First, prepare all the assembly parts
2. Second, take the No. 2 screw and the
No. 3 support plate, x them to the
two support brackets of No. 5 and
tighten them separately.
5
4
3
1 2
3. Take the No. 2 screw and the No. 4
stand to the top of the No. 5 stand
and tighten.
4. The installation is complete, the
longest No. 1 screw is used to x the
keyboard on the stand.
www.PyleUSA.com
14
4
1
5 5
3
Page 15
Appendix
www.PyleUSA.com
15
Page 16
Sounds
www.PyleUSA.com
16
Page 17
Style
www.PyleUSA.com
17
Page 18
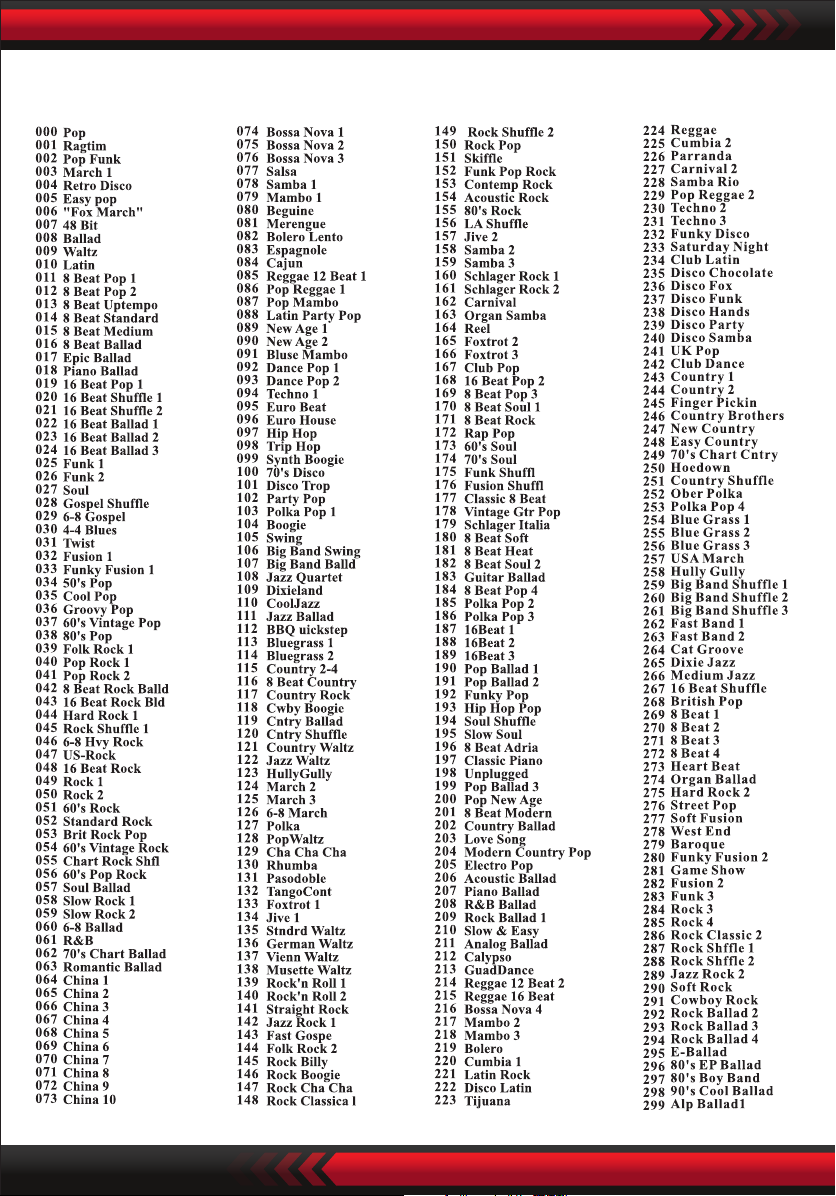
Style
www.PyleUSA.com
18
Page 19

Features:
• 2-in-1 Karaoke Keyboard: Play & Sing-Along!
• Compact & Portable Musical Piano
• Simple Electronic Plug-in Operation
• Portable Piano
• Built-in Full Range Stereo Speakers
• Connect & Stream Audio from External Devices
• Can Connect to Speaker and Play Sound
• Multiple Preset Selectable Keyboard Sound, Tone & Rhythm Styles
• Digital LCD Display
• Adjustable Volume Control
• Record & Playback Mode
• 61 Keys Keyboard Percussion Function
• Basic control: Master Volume / Accom Volume /Chord Volume/ Tempo Control
• Rhythm Programming Function / Record & Playback
• Auto Chord Function: Single Chord / Fingered Chord
• Pitch Bend / Vibrato / Sustain / Touch Sensing Function
• Teaching Functions: One-key/Follow/Assemble
• USB Jack / Mic Jack
• Perfect for Home Theater Living Room Performances
• Fun for Kids of All Ages: Children & Adults
www.PyleUSA.com
19
Page 20

Keyboard Stand Specs:
• Baked Varnish
• Detachable Function
• Construction Material: Iron + ABS
• Length: 31.5'' -inches
• Width: 8.3'' -inches
• Height: 57.5~67.5 cm
• Weight: 1.75 kg
• Bearing: 15 kg
Keyboard Stool Specs:
• Construction Material: PU Leather, Iron, Sponge
• Baked Varnish
• Folding Function
• Length: 15.75'' -inches
• Width: 11.81'' -inches
• Height: 17.32'' / 18.9'' / 20.1'' -inches
• Weight: 2.2 kg
www.PyleUSA.com
20
Page 21
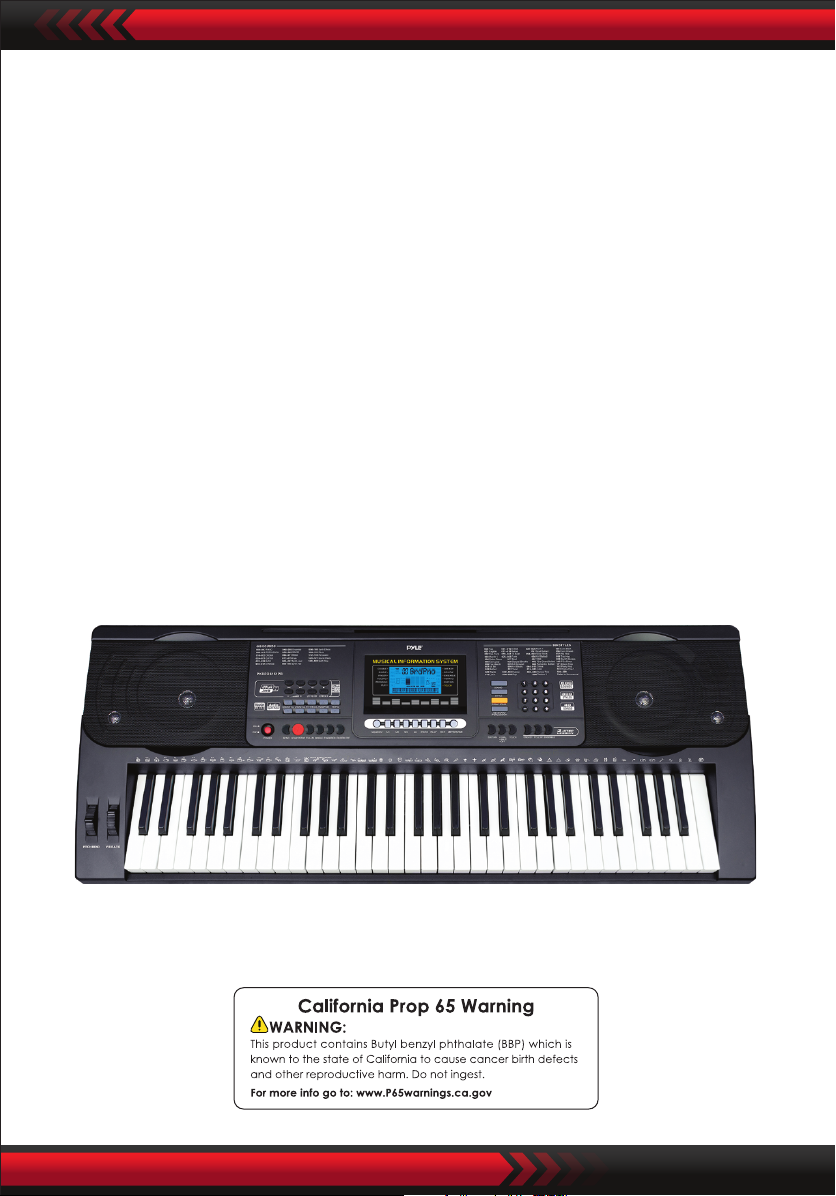
Technical Specs:
• 61 Keyboard Keys
• 200 Sounds / 128 Styles
• 10 Demonstration Songs: One/All
• Audio Interface: Aux (3.5mm) Input Jack / Mic Input / USB input
• Max Sound Level: Up to 110 dB
• USB/Power Cable Length: 3.9’ ft.
• Construction Material: Engineered ABS
• Power Supply: DC 12V / AC adaptor
• Piano Dimensions (L x W x H): 36.6’’ x 11.97’’ x 3.7’’ -inches
www.PyleUSA.com
21
Page 22

 Loading...