

Page 1
Page 2
PLEASE READ CAREFULLY BEFORE PROCEEDING
Please keep this manual in a safe and handy place for future reference
NOTICE
• Dedicated power adapter shall be used, and in case of adaptor damage, replace it
immediately
• The keyboard can only be disassembled by professionals, and no change can be
made to the internal structure. In case of any functional abnormality during
performance, stop performing immediately and send the keyboard to professionals
for maintenance.
• When connecting the keyboard to other device, ensure both the keyboard and the
device to be connected are powered o before connection.
• Do not turn and keep the volume to the maximum or to an uncomfortable degree
for a long time when performing.
• Keep the keyboard away from heat source to protect its parts from damage.
• Prevent liquid, dust, small particle and other foreign matters from entering the case
of the keyboard, for which may result in element short circuit.
• Pull out the plug before cleaning the keyboard, and do not pull out the plug with
wet hand.
• Use dry and soft cloth to clean the keyboard. Paint, alcohol or other chemical solvents
shall not be used for cleaning, for which may damage the keyboard surface.
• Pull out the plug after performing or when the keyboard is left unused for a long time.
• WARNING: The direct plug-in adapter is used as disconnect device, the disconnect
device shall remain readily operable.
• Correct Disposal of this product. This marking indicates that this product should
not be disposed with other household wastes throughout the EU.
To prevent possible harm to the environment or human health from uncontrolled
waste disposal, recycle it responsibly to promote the sustainable reuse of material
resources.
To return your used device, please use the return and collection systems or contact
the retailer where the product was purchased.
They can take this product for environmental safe recycling.
www.PyleUSA.com
2
Page 3
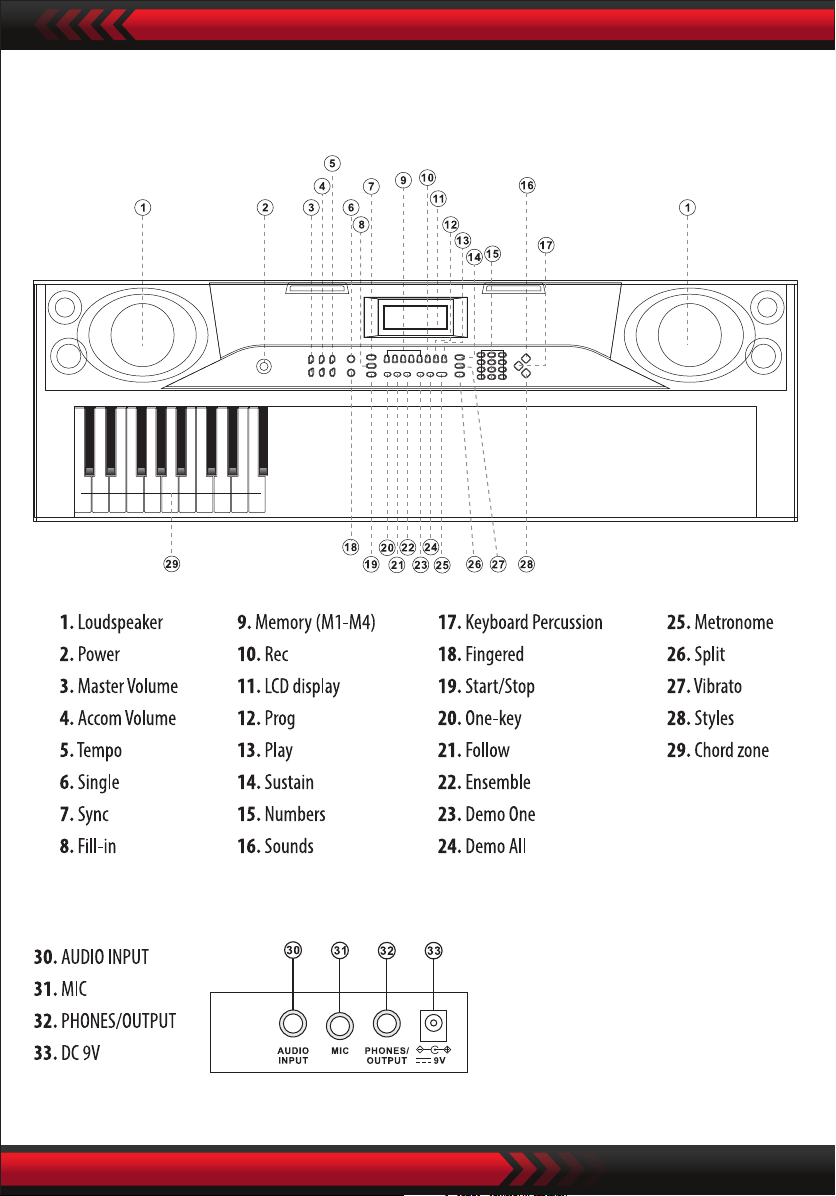
I. Control Panel and External Ports
TOP CONTROL PANEL
REAR PANEL PORT
www.PyleUSA.com
3
Page 4

II. Preparations before Playing
POWER ADAPTOR
A dedicated power adapter shall be used. Connect the output end of the adaptor to
the power port on the rear panel of the keyboard, and then the other end to the
power socket. (Note: the input voltage of the adaptor shall be compatible with the
power supply voltage)
AUDIO OUTPUT/EXTERNAL HEADPHONE
Audio Output: Firstly, turn o the keyboard and the external audio devices, secondly,
connect one end of the audio cable to the PHONES/OUTPUT port on the rear panel
of the keyboard, and then connect the other end to the audio input port of the audio
devices.
Headphone Connection: When connecting a headphone to the PHONES/OUTPUT
port on the rear panel of the keyboard, the loudspeaker will be disabled automatically.
In this way, you can play the keyboard without disturbing others.
Note: Do NOT use the headphones at a high volume for any extended period.
To avoid hearing damage, use your headphones at a comfortable, moderate volume
level.
MIC INPUT AND AUDIO INPUT
Mic input: Connect the microphone to the MIC port to start singing and playing.
The Keyboard has the stereo input function. Sound signals from mobile phone,
computer and other audio devices can be input into the keyboard system for playing.
Firstly turn o the Keyboard, then connect one end of audio cable to the output port
of an audio device, and the other end to the AUDIO INPUT port on the rear panel of
the Keyboard, nally turn on the keyboard.
WIRELESS BT CONNECTION
Turn ON the default BT connection, in the BT standby search state, can be any BT
device search matching and connect at this time, turn ON the BT function of your
phone or BT device to search. The local BT name is "piano", when the connection is
successful, mobile phone or BT device back to the music player interface to play music.
www.PyleUSA.com
4
Page 5

III. Basic Playing Method
When [Power ON/OFF] is pressed, LCD screen will turn ON and shows the current
tone, tempo and other status. Then you may operate the Keyboard as required.
MASTER VOLUME ADJUSTMENT
Press [Master Vol +/-] to turn up or turn down the master volume.
“VOLUME” and the current volume level will be shown on the display.
Press [Master Vol +/-] simultaneously to reset to the default value.
The master volume can also control the accompaniment volume.
ACCOMPANIMENT VOLUME ADJUSTMENT
Press [Accom Vol +/-] to turn up or turn down the master volume.
"RC-VOLUME" and the current volume level will show on the display.
Press [Accom Vol +/-] simultaneously to reset to the default value.
SOUNDS SELECTION
The Keyboard provides 255 Sounds, from "000" to "254", for your selection.
When turning on the keyboard, the Sounds selection function will be enabled
automatically, and "SOUNDS" current Sound number will show on the display.
When under other states, press [Sounds] to enable the Sounds selection function.
The Sounds default is "000" and it can be adjusted by pressing the corresponding
number buttons or pressing the "+" / “-” button.
PLAYING DEMO SONGS
50 demo songs have been stored in the keyboard, from “000” t o “ 049”, for your
selection. Press the [Demo one] button, the system is in the state of playing, the
present demo song plays repeatedly. For another one, press the button to stop the
present song, and again to play the next one.
Press the [Demo all] button, the system is in the stage of playing all demo song.
In the course of playing demo songs, the Sounds of the songs can be changed.
During the playing process, you can press the number buttons or the "+" / “-” buttons
to select other demonstration song.
When pressing [Sounds] during the demonstration song playing process, "SOUND"
will show on the display, press the number buttons or the "+" / “-” button within 3
seconds to select other Sound for playing the demonstration song.
www.PyleUSA.com
5
Page 6

IV. Auto Style
STYLES SELECTION
This Keyboard provides 255 Styles, from "000" to "254", for your selection, and the
Style default is "000". Press [Styles] to enable the Style selection function. "STYLE"
and current Style number will show on the display. Then you can press the number
buttons or the "+" / “-” buttons to select other Styles.
STYLES CONTROL
1. Styles Enabling
• Press [start/stop] to start accompaniment Style.
• Press [Sync], “SYN” will show on the display and the four beat points will ash
simultaneously, then play any key in the chord key zone (the 1st-19th key, from
left), the accompaniment Style will be enabled.
2. Interlude
After the accompaniment Style is activated, press [Fill-in] to have a temporary
Style play during the accompaniment Style.
Pressing and hold [Fill-in], the temporary Style will be continuous.
3. Stop Style
During the accompaniment Style, press [Start/Stop] to stop the accompaniment
Style.
METRONOME
The metronome contains four tempos, 1/4, 2/4, 3/4 and 4/4, respectively.
Press the [Metronome] continuously to select the four tempos.
Press the [Metronome] bottom again to stop the tempo.
TEMPO ADJUSTMENT
Press [Tempo +/-] to increase or decrease the Style speed.
Press the two buttons simultaneously to reset to the default value.
www.PyleUSA.com
6
Page 7
V. Auto Bass Chord
SINGLE CHORD
Under the state that the Style is enabled, press [Single Chord], and “SIN” will show
on the display, and then you can play a single chord on the keys in the chord zone
of the keyboard.
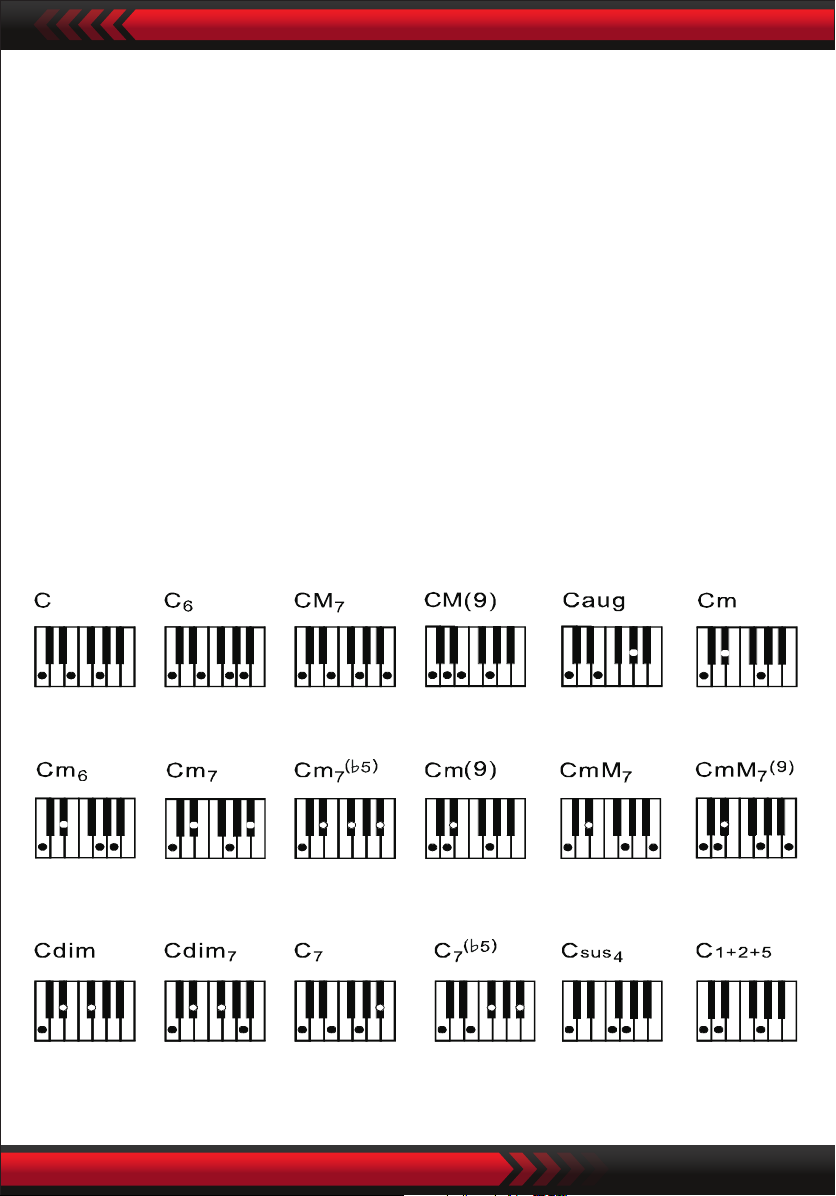
FINGERED CHORD
Under the state that the Style is enabled, press the [Fingered Chord] button.
“FIN” will show on the display, and then you can play a ngered chord on the keys in
the chord zone of the keyboard.
Fingered Chord Fingering (C Key)
(The C key ngered chord ngering is as shown in the following gure, and the
rest can be obtained by analogy)
www.PyleUSA.com
7
Page 8
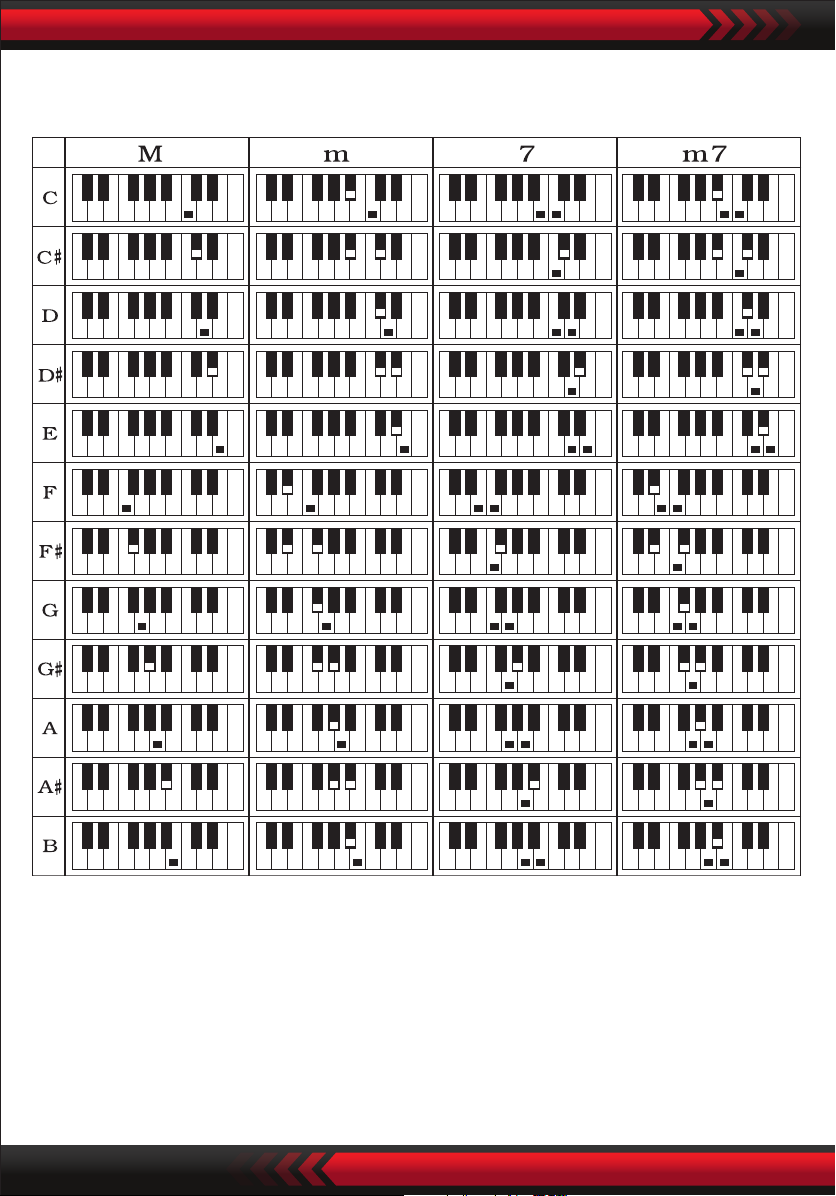
Single Chord Fingering
VI. Status Memory Function
With the status memory function, you can save the Sound, Style, Tempo and other
parameters to be changed during playing for fast shifting. This keyboard is equipped
with 4 status memories, which can be exibly called at any time during playing.
www.PyleUSA.com
8
Page 9

STORAGE OF STATUS MEMORY
Set the Sound, Style, Tempo and Chord as required, and then press the [Status Memory]
botton and one of [Memory 1] to [Memory 4] to save the current status.
CALLING OF STATUS MEMORY
Press any one of [Memory 1] to [Memory 4] to call the setting parameters saved
under this memory to replace the current status.
No power failure protection is provided for the saved contents, and the saved
contents will loss after the electronic keyboard is restarted after power cut.
VII. Eect Control
SUSTAIN FUNCTION
Press [Sustain], “SUS” will show on the display, and the sustain eect will be activated.
Press this button again to disenable the sustain eect.
VIBRATO FUNCTION
Press [Vibrato], “VIB” will show on the display, and the vibrato eect will be activated.
Press this button again to disenable the vibrato eect.
PLAYING PERCUSSION
This Keyboard provides 61 kinds of keyboard percussions.
Press [Keyboard Percussion] to convert the key to percussion key.
Each key corresponds to one percussion instrument.
Press this button again to disenable the keyboard percussion function.
KEYBOARD SPLITTING FUNCTION
Press [SPLIT] to enable the keyboard splitting function, “SPLIT” will show on the
display. 24 keys on the left of the keyboard will split with the remaining keyboard.
While the left keyboard zone will increase by one octave and maintain the original
tone, the right keyboard zone will decrease by one octave to maintain the same
pitch with the left keyboard zone. The tone of the right keyboard zone can be set as
needed so dierent tones can be played by the left and right keyboard zones at the
same time. Press [SPLIT] again to disenable this function.
www.PyleUSA.com
9
Page 10

VIII. Recording and Style Programming
RECORDING
Press [REC] to enable the recording function, “REC” will show on the display.
Under this mode all playing notes will be recorded.
When the storage is full, “REC” will show on the display, and recording will stop
automatically.
• Press [PLAY] to playback the recorded notes, and “P LAY ” will show on the display.
On completion of playback, it will enter to the recording mode and “REC” will show
on the display. You can record a new Style, or you can press [PLAY] to playback the
recorded Style.
• Press [Start/Stop] or press [REC] again to disenable the recording function, and all
recorded Style will be removed.
STYLE PROGRAMMING
Press [PROG] to enable the Style programming function, “PRG” will show on the
display, and the keyboard percussion will be activated. Under this mode, you can
create custom Styles by playing the corresponding percussion key.
• 32 percussions can be recorded at maximum, after that "PRG" will ash on the
display, and programming will stop automatically.
• Press [PLAY] to playback the programmed Style.
Press [PLAY] again to stop playback, "PRG" will show on the display and programming
function will be enabled. You can re-program Styles or you can press [PLAY] again
to playback.
• Press [Start/Stop] or press [PROG] again to disenable the programming function,
and all recorded Style will be removed.
www.PyleUSA.com
10
Page 11

IX. Three-step Intelligent Training
TRAINING I: ONE KEY
Press [One Key] to enable the One Key training function, "LEARN", " SONG" and the
song number will show on the display, and then press "+” / “ -" button to select the
song to be learned. Single Key training aims at duration learning, and there is no
requirement for pitch or correctness. This mode allows mistakes when playing the
keys, but the keyboards still plays correct notes, while the key zone in the display will
also show the correct notes. After one song is nished, repeat the current song to be
learned. Press [Start/Stop] or press [One Key] to disenable the training function.
TRAINING II: FOLLOW
Press [Follow] to enable the follow function, "LEARN", " SONG" and the song number
will show on the display, and then press "+” / “ -" button to select the song to be
learned. With [Follow] function, you can learn by following the correctly playing notes.
You can play according to the demonstration song, you can play correctly by following
the guidance. You can also learn how to play by following the indicators in the key
zone of the display. It will wait for you to play the correct note before it moves to the
next one.
Notes:
Under this state, the Keyboard plays only the correct notes, and gives no response
to the wrong notes.
Press [Start/Stop] or press [Follow] to disenable the training function.
TRAINING III ENSEMBLE
Press [Ensemble] to enable the Ensemble training function, "LEARN", " SONG" and
the song number will show on the display, and then press "+” / “ -" button to select
the song to be learned. The Ensemble training aims at the correct and comprehensive
learning of the song duration and notes. The keynote will be shielded for ensemble.
you can perform by following the guidance of the lighted key. You need to play the
correct note according the correct duration of the song. If you fail to play within 3
seconds, the keyboard will automatically play the keynote, and the keyboard zone
in the screen will display the correct note and tempo. After one song is nished,
repeat the current song to be learned. Press [Start/Stop] or press [Ensemble] to
disenable the training function.
www.PyleUSA.com
11
Page 12
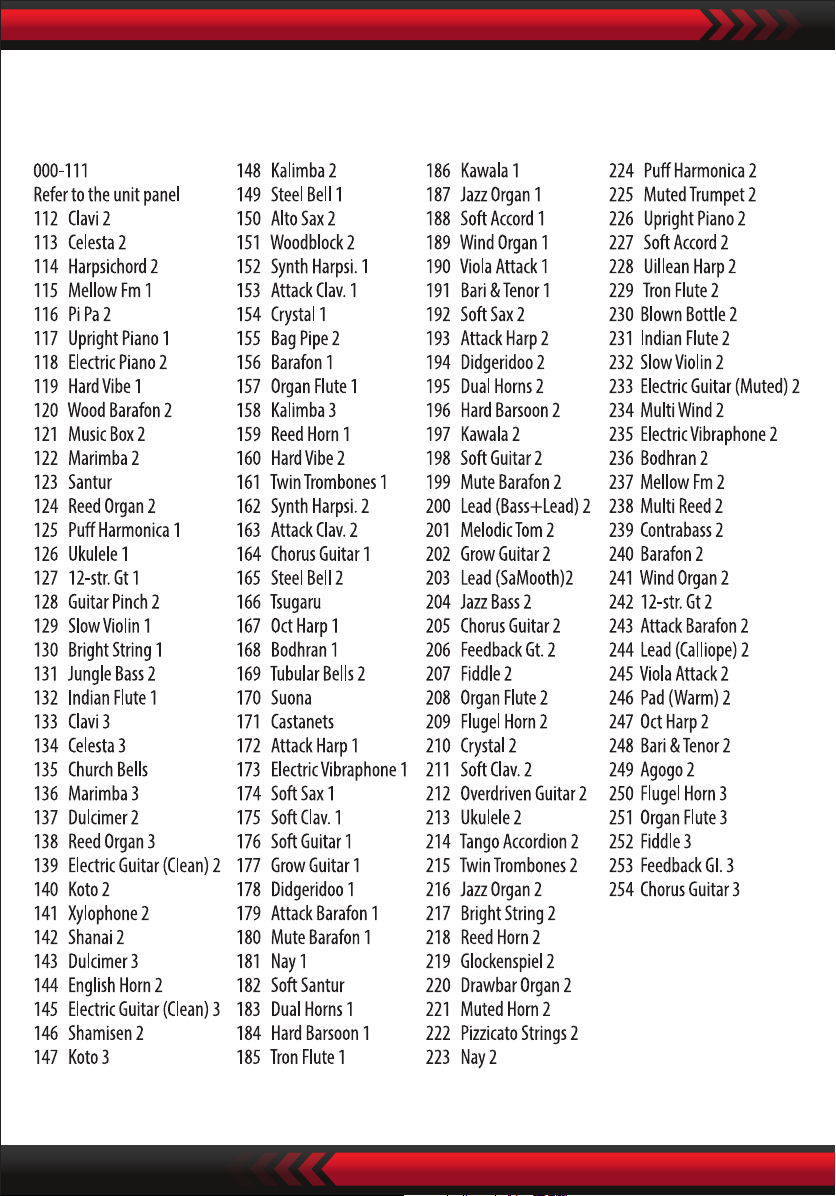
Appendix
I. SOUNDS TABLE
www.PyleUSA.com
12
Page 13
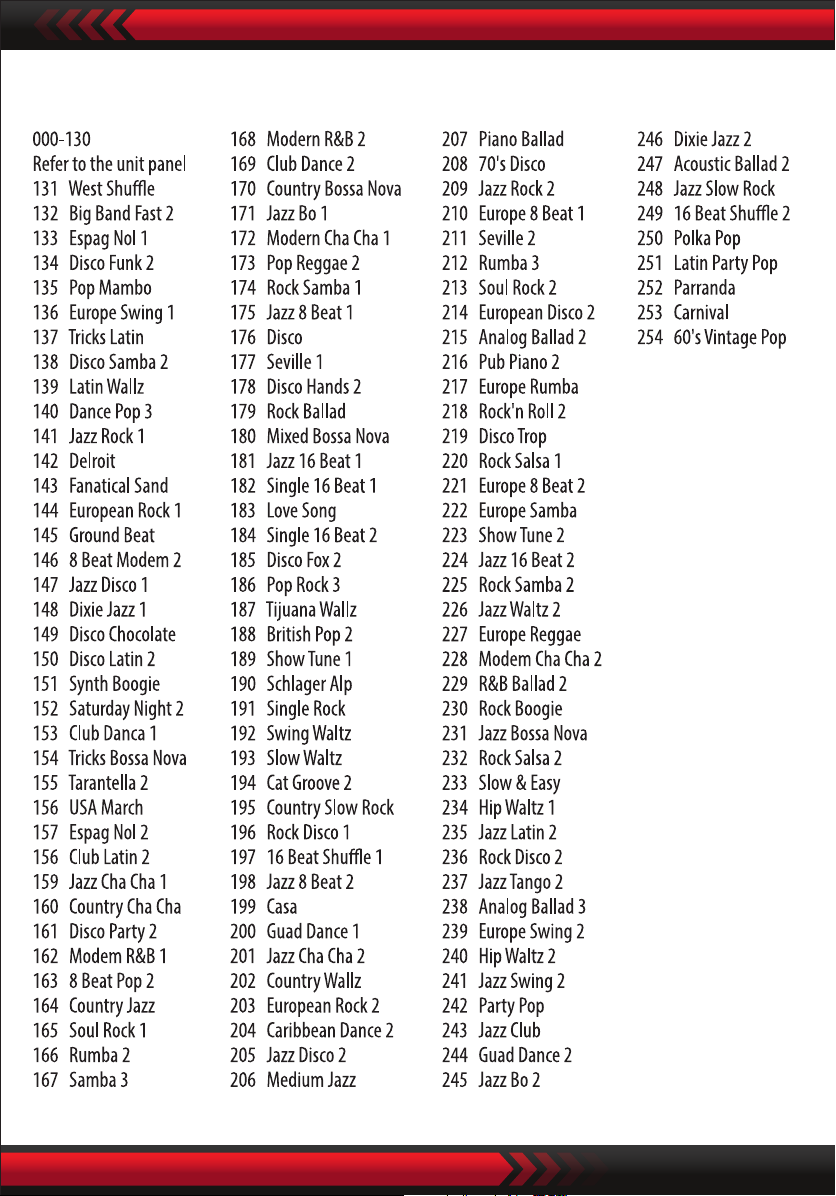
II. STYLE TABLE
www.PyleUSA.com
13
Page 14
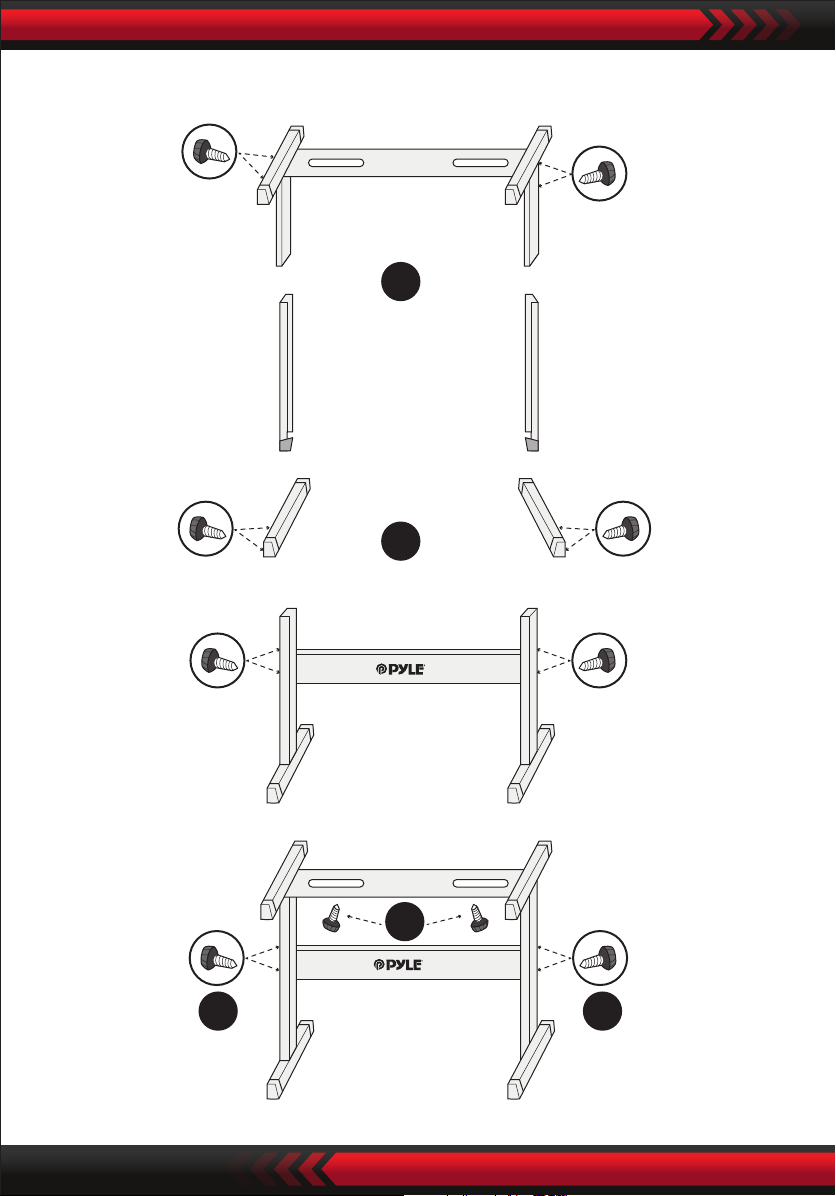
Keyboard Stand Assembly
1
2
www.PyleUSA.com
14
4
3 3
Page 15

Features:
• 2-in-1 Karaoke Keyboard: Play & Sing-Along!
• Compact & Portable Musical Piano
• Simple Electronic Plug-in Operation
• Portable Piano
• Built-in Full Range Stereo Speakers
• Connect & Stream Audio from External Devices
• Can Connect to Speaker and Play Sound
• Multiple Preset Selectable Keyboard Sound, Tone & Rhythm Styles
• Digital LCD Display
• Adjustable Volume Control
• Record & Playback Mode
• Mic Input Jack
• 61 Keys Keyboard Percussion Function
• Basic Control: Master Volume / Accom Volume / Tempo Control
• Auto Chord Function: Single Chord / Fingered Chord
• Sustain Functions, Vibrato Function, Keyboard Split Function
• Teaching Functions: One-key/Follow/Assemble
• Fill-in Function, Metronome Function
• Perfect for Home Theater Living Room Performances
• Fun for Kids of All Ages: Children & Adults
What’s in the Box:
• Digital Musical Karaoke Keyboard
• Book Rack
• Adapter
• Power Plug
• Keyboard Stand
• Keyboard Stool
• Headset
www.PyleUSA.com
15
Page 16

Headset Specs:
• Construction Material: ABS + Laser decorative sheet
• Wire Material: PVC at wire
• Wire Length: 1.1M
• Plug Diameter: 3.5mm 1/8
• Weight: 0.14 kg
Keyboard Stand Features:
• Baked Varnish
• Detachable Function
• Height Adjusting Function
• Keyboard Locking Function
• Construction Material: Iron + ABS
• Length: 31.5'' -inches
• Width: 8.3'' -inches
• Height: 57.5~67.5 cm
• Weight: 1.75 kg
• Bearing: 15 kg
Keyboard Stool Features:
• Baked Varnish
• Folding Function
• Height Adjusting Function
• Construction Material: PU Leather, Iron, Sponge, Wood
• Length: 15.75'' -inches
• Width: 11.81'' -inches
• Height: 17.32'' / 18.9'' / 20.1'' -inches
• Weight: 2.2 kg
www.PyleUSA.com
16
Page 17

Technical Specs:
• (61) Keyboard Keys
• 255 Styles/ 255 Sounds
• 50 Demonstration Songs: One/All
• Audio Interface: Aux (3.5mm) Output Jack / Mic Input
• Max Sound Level: Up to 110 dB
• USB/Power Cable Length: 3.9’ ft.
• Construction Material: Engineered ABS
• Power Supply: DC 9V / AC Adapter, 6” AA” Batteries (Not Included in the Set)
• Piano Dimensions (L x W x H): 36.6’’ x 11.97’’ x 3.7’’ -inches
www.PyleUSA.com
17
Page 18

 Loading...