

Page 1

TV HEARING AID
USER MANUAL
19
TV hearing aid
Manual
JH-8013A/B
JH-8014A/B
H. Safety instructions
1. Please read this instruction manual carefully and completely before using the
products. Make this manul easily accessible at all times.
2. Always keep the product dry, and do not expose them to extreme temperatures.
3. The volume of the receiver must always be turned to the lowest before
switching the unit on. High volume may cause hearing damage in persons
with healthy hearing, especially in children.
4. Keep all liquids far away from the devices. Before cleaning the product and
its accessories, disconnect the transmitter from the mains adapter, and use
only a slightly damp cloth to clean the devices.
5. Use only the supplied mains adapter.
6. Use the products with care and set them up on a stable surface of a clean,
dust-free environment.
7. The unit may get warm when being used. Ensure the unit has adequate
ventilation.
8. Please put the product far away from microwave oven, mobile phones, etc.
to avoid unnecessary electronic wave interference.
9. Please switch off the transmitter and receiver after use, and pull out the mains
adapter from the wall socket when not using for a long time.
10. Please refer all servicing to qualified personal only! Do not attempt to open
the unit!
Model: PHPHA78
Page 2

01
Contents
A
B. Product part s
C. Part f unc tion
D. Blue too th Pairing
E. Set up a nd us er in str uctions
F. Te chnology p ara meters
G. Problems and s olu tions
. Pro duct instr uct ion
1. What is a TV hearing aid
. Brief introductions
3. Main functions
4. Main technologies
5. Features
1. Wireless TV hearing aid function
2. Regular hearing aid function
3. Wired headphone with hearing aid function
4. Use the regular hearing aid function
to listen to telephone
5. Use the regular hearing aid function
to listen to mobile phone
6. Computer chatting instruction
7. Charging instruction
2
H. Safe ty in structio ns
18
G. Prob lems an d solutio ns
Phenomena Causes Solutions
Receiver
doesn’ t
work, no
sound
received
The transmitter is not
connected well.
Make sure the mains adapter and
the audio cable of the transmitter
be plugged well. Or pair again.
The connection between the
transmitter and the sound
source is wrong.
Make sure the connection correct
between the transmitter and the
sound source.
The sound source isn’t turned
on or its volume is too low.
Turn on the sound source, and adjust
its volume to a sufficient level.
The battery is not inserted
properly in the receiver or
the battery is run out.
Insert the battery properly, or
charge the battery fully.
Sound is
poor or
some noise
is occurred
The receiver is out of the
transmitting range.
Move the receiver closer to the
transmitter.
The battery’s power is too low. Charge the battery fully.
Receiver
or battery
not being
charged
The receiver or the battery is
not inserted correctly.
Make sure the receiver inserted to
the charging bay correctly or the
battery inserted to the charging
compartment at the side of the
transmitter correctly.
The transmitter is placed too
close to metalworks or other
electromagnetic wave objects.
Put the transmitter in a different place
or move away the objects affect the
signal.
Adjust the balance control by the
screwdriver properly.
Switch the transmitter to MONO
status.
The balance is not adjusted
properly.
The audio out signal of the
audio source is mono, but the
transmitter is switched in
STEREO status.
The sound
is heard
only with
one ear
The audio source’s volume is
set too low.
Adjust its volume properly.
4. Stor age condit ion
Te
mperature: -30 90~ ℃ (Don't let it be shocked, pre sse d, an d wet ted .)
Page 3

17
3. Wor king en vironment
Working temperature: -10 60 Working humidity: 10% 90%~ ℃ ~
2 Recei ver、
Working voltage ~3.7V (3.3 4.2V)
Dynamic 14~27mAworking current
Wired earphone input working current 5~12mA
Wired earphone signal input 0.1 1.0V~
Working current of MIC input 4~8mA
Max. Gain of MIC signal input 50 2dB (at 1KHz)±
Receiv frequency 2.4GHz ISM
ing
Distortion 1%≤
S
/
N ratio 75dB≥
Maximum output power 30~35mW
Li-ion battery charging time 3.5~4 hours
Modulation method GFSK
BluetoothV4.0 Class II
Auto power-off current 20 Aµ≤
Auto power-off time
Sensitivity of built-in MIC 34.5 1.5dB- ±
Sensitivity of external MIC 50 2dB- ±
Frequency response 20Hz~20KHz
Max. output sound pressure level 123 3dB SPL±
Receiving range m (without obstacles)15
15 hours for TV hearing aid
function, 36 hours for regular
hearing aid function.
5mins (after the receiver is in the
standby status.)
Working time when Li-ion battery
is full
02
2. Brie f introductio n
3. Main f unctions
1. Wh at is a TV hearing ai d
TheTV hearing aid is specially designed for hearing disable people to listen to
TV, mobile phone (or other audio devices).
It can help to listen to TV, sound clearly
while other hearing aids can't do it. In the market, hearing disable people can
only find some normal wireless headphones for watching TV or listening to
, the worst thing is that it will make the hearing ability worse and
worse by only adjust the volume louder for a long time. Our TV hearing aid can
solve above problems.
Besides the strong wireless TV listening function, it is a perfect hearing aid and
a wired hearing improving headphone. You can use it with a normal telephone,
a mobile phone, and even listen to music, listen to radio, etc.
Not only TV hea ring aid, but also
mobile phone call aid . mobile phone
mobile phone
A. Prod uct ins tructio n
(1) Wirel ess T V hearing aid: (r
efer to article 1 of P9 )
With the product, the hearing impaired person can enjoy TV programs
comfortably and clearly, by his/her special tone, right & left volume.
(2). One button switc hin g bet wee n TV hearing aid and call hearing aid:
(please refer toArticle 1(4) of P10 )
Press the CH/MIC button on the receiver, the TV signal received wirelessly will
be cut off. The user will answer the phone by bluetooth. When the talk is over,
JH-8013A/B & apply bluetooth technology. Ensure the high
quality stereo signal being transmitted and received. Bluetooth CSR V2.1+EDR
A2DP for the transmitter, CSR V4.0 for the receiver.
It's convenient for the
user watching TV while don’t worry missing phone call. Stereo/mono switch
function brings people with different hearing satisfaction.
One transmitter can w ork
with two rece ive rs, o ne receiver ca n wor k wit h the t ran smi tte r and a m obile
phone with the blueto oth f unc tio n at th e sam e tim e.
JH-8014A/B
Page 4

0103
(1) Vo ice c lar ify ing t ech nol ogy (VC T):
(2) Noise cancellin g tec hno log y(N CT) :
(3) Aut oma tic s ign al co ntr ol( ASC ):
Reduce background sound of TV, increase the sound of dialogues, so that hard to
hear words can easily stand out, making television dialogues easier to understand.
Reduce the environmental noise to help the users to focus on listening to the
dialogues of TV.
Hearing disable people's adaptive faculty for volume change is weak (can't hear
loud sound, and can't hear low volume sound), our circuit will adjust the sudden
change volume and make the output volume stable. It will avoid strong signal
hurting the users' listening.
Specially designed for hearing loss people whose right and left hearing levels
are different. Users can adjust the right & left volume to best fit themselves by
theVOLume and BALance.
(4) Balance control :
4. Main t echnolog ies
press the button again to listen to TV wirelessly.
(refer to article 2 of P12 )
(refer to article 4 & 5 of P13 )
(refer to article 6 of P14 )
With this function, t
(refer to article 3 of P12 )
(3) Regular and ex ten sio nal h ear ing a id:
4) Hearing aid functi on fo r pho ne ca ll:
(5) Computer cha tti ng he adp hon e wit h hea rin g aid f unc tio n:
6) Wi red he adp hon e wit h hea rin g aid f unc tio n:
The receiver can be used as a regular hearing aid. It's very convenient to use in
noisy environment, such as group party, dinner together and in the car, etc.
The external microphone works with the receiver. That amplifies the voice from
phone call. Or match a mobilephone with the receiver by the bluetooth.
he hearing impaired people can hear and talk on the internet
very clearly.
Connect a MP3/iPhone/PC, etc. to the headphone's line-in jack with the wired
headphone cable, the hearing impaired people can listen to the music enjoyably.
(
(
16
F. Technol ogy parameters
1 Tran smitt er、
Working voltage 5.0 V, 1000mA0.3±
Working current 25~45mA
Trans power 3.5dBmmitting
GFSK
BluetoothV2.1+EDR
Class II A2DP
Modulation method
Automatic power off voltage
≤1
5mV
T
ransmitting frequency
Si
gnal input limiting volt
Max. gain of MIC signal input 40 2dB± (at 1KHz)
Signal input range 0.1~1.0V
Input protecting vol. 6.0 0.2V≥ ±
Li-ion battery charging current 140 10mA±
Transmission distance 15M (without obstacles)≥
Time of getting into the standby
status
6 minutes (after no signal put in)
2.4GHz ISM
350mV
It will be limited to 350mV to
prevent too high voice when the
signal input volt is over 350mV.
Page 5
15
The indicator will light up on the transmitter in different status as below:
Left lit orange for charging the receiver in the charging
bay and the Li-ion battery in the compartment at the same time.
Left lit for only charging the Li-ion battery in the compartment.
c) For B model:
Left lit for only charging the receiver in the front charging bay.
Left lit red for only charging the receiver in the rear charging bay.
Left lit orange for charging two receivers in two
charging bays at the same time.
Left lit for only charging the Li-ion battery in the compartment.
a) The right indicator is lit blinking red for the model A& B when the transmitter
is switched on.
b) For A model:
Left lit red for only charging the receiver in the charging bay.
(green & red together)
green
green
(green & red together)
green
Note: charging is mon ito red a uto mat ica lly a nd ch arg ing w ill s top w hen t he
battery is full. Plea se al low t he ba tte ry to r un do wn pr ior t o the f irs t 3
charges.
Remark:
Left lit Right lit Both lit
Note: w
Once charging is comp let e, th e lig ht wi ll go o ut.
hen insert the rec eiv er or th e bat ter y cor rec tly, t he indicator on the
transmitter li ght s up.
7. (1)
7. (2)
0204
5. Feat ure s
(1)Two audio input: a standard 3.5mm audio jack and an equipped MIC standard
3.5mm input jack. ( )
Three audio input: a standard 3.5mm audio jack and an equipped MIC standard
3.5mm input jack, a digital optical fiber input jack . ( )
(2)
(4)Two charging solutions: put the receiver directly into the charging bay or put
the battery into the spare battery charging compartment.
(6) Power input: DC 5V, 1000mA
High voltage input automatic protection function: when the power input
exceeds the transmitter capacity, the circuit inside will be cut off to protect
the transmitter from being destroyed.
1) Volume, tone and balance adjustable functions: adjust them to the best sound.
(2)Audio a
a mono
4)
(6) Powered by a removable 3.7V Li-ion battery.
Tran smi tte r part:
For JH-8 013 A/B
For JH-8 014 A/B
input function: standard Φ3.5mm stereo jack.
(3) Equipped MIC input hearing aid function: standard Φ3.5mm jack.
(
Stereo/mono selectable function.
(3)
(5)Automatically power off function:
When no signal input, it will be powered off in 5 minutes.
(
(5)Automatically mute and power off function:
When no signal received, it will be muted in 1 minute and then powered off
in 5 minutes.
One transmitter can w ork w ith t wo receivers at the same time.
Receiver pa rt:
One rece ive r can work with the transmitter an d a mob ile p hon e wit h the
bluetooth functio n at th e sam e tim e.
Specially designed for hearing impaired people who have different sound
frequency sensitiveness. They can adjust the “TONE” button to find the best
feature, and hear the target audio source clearly.
(5) To ne co ntr ol:
Page 6
05
JH-8013/JH8014 Manual
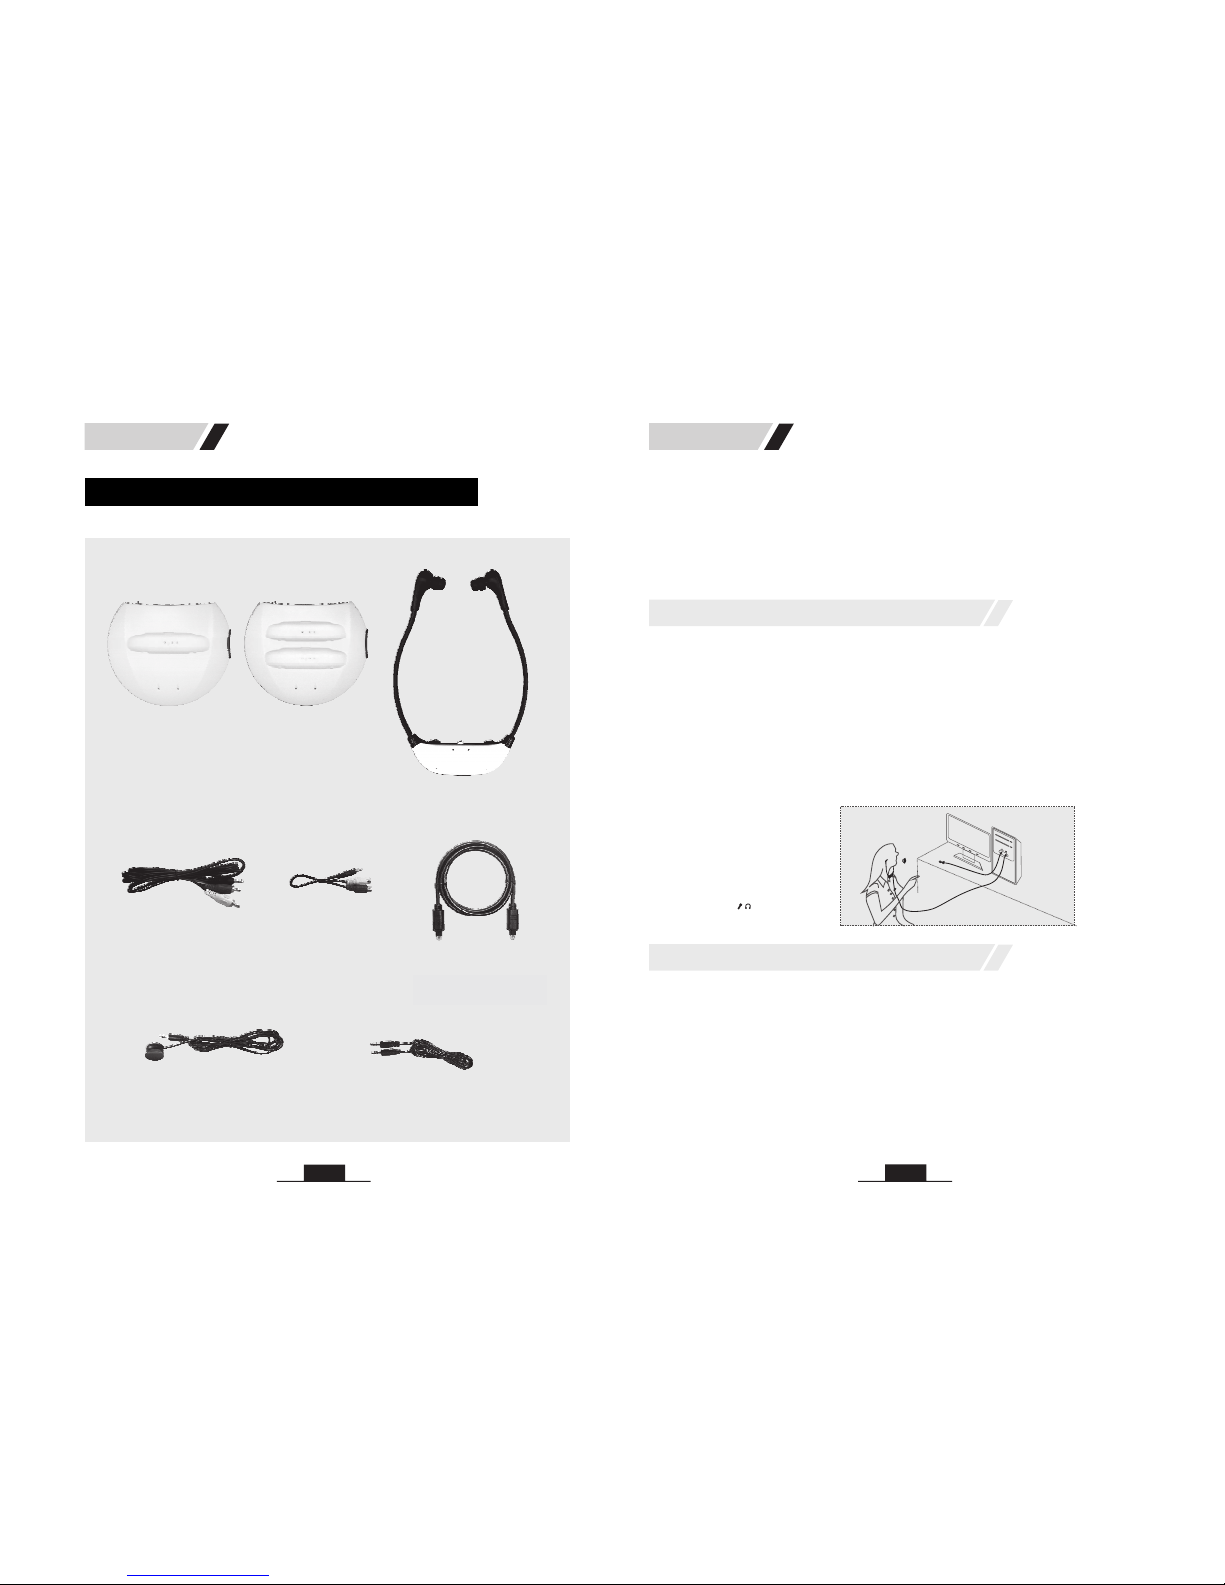
1 Transmitter、
2 Receiver、
3 Audio cable1、
6 Microphone、 cable
Model A
(for one receiver)
Model B
(for two receivers)
B. Product parts
JH-8013/JH8014 Manual
4 Audio cable2、
7 Wired headphone cable、
5 Optical fiber cable、
(for JH-8014A/B)
14
6. Computer chatting instruction
7. Charging instruction
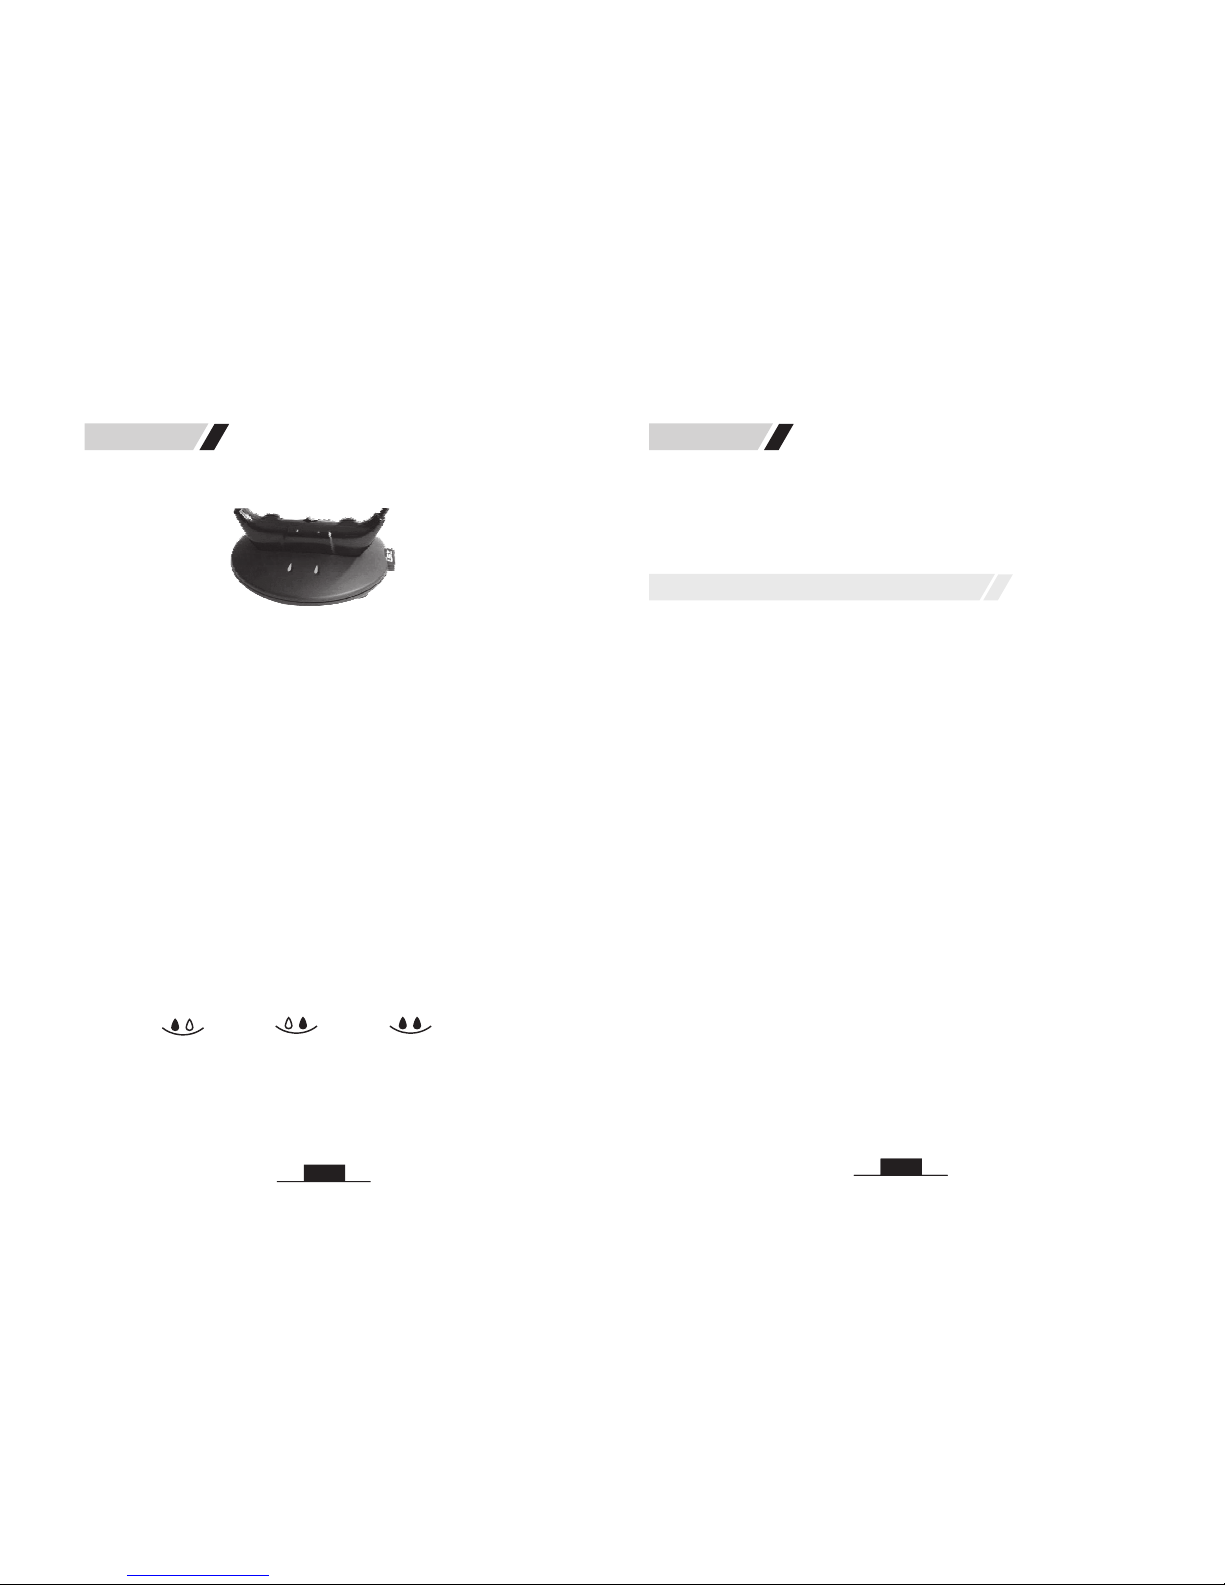
There are two charging ways.
(1) Charging the receiver:
(2) Charging the battery in the charging compartment:
Place the receiver into the charging bay of the transmitter. The receiver can
only fit into the bay if its indicator faces the indicator of the transmitter.
Open the battery case of the receiver, pull out the Li-ion battery. Insert it into
the charging compartment at the side of the transmitter as shown below.
Switch off the receiver, and remain the transmitter on during charging.
(1) Plug the external microphone cable into the MIC socket of a computer and
clip the microphone on to your lapel close to your mouth.
(2) Connect one end of the wired headphone cable into the LINE-IN socket of the
receiver, and the other end into the headphone socket of the computer.
, then switch it on, adjust the
VOLume, TONE, BALance to your required levels.
Ensure
the volume on the receiver is set to the lowest
6.
It’s better that connect your
mobile phone to LINE-IN socket of the receiver by the wired headphone cable.
please face to the microphone of your mobile phone.
This function will only be suitable for the mobile phone that its network is
more than 2G.
Or use the receiver as a bluetooth earphone of your mobile phone.
Note: the speaker volume of the computer may need to be adjusted properly.
Page 7
13
LINE IN
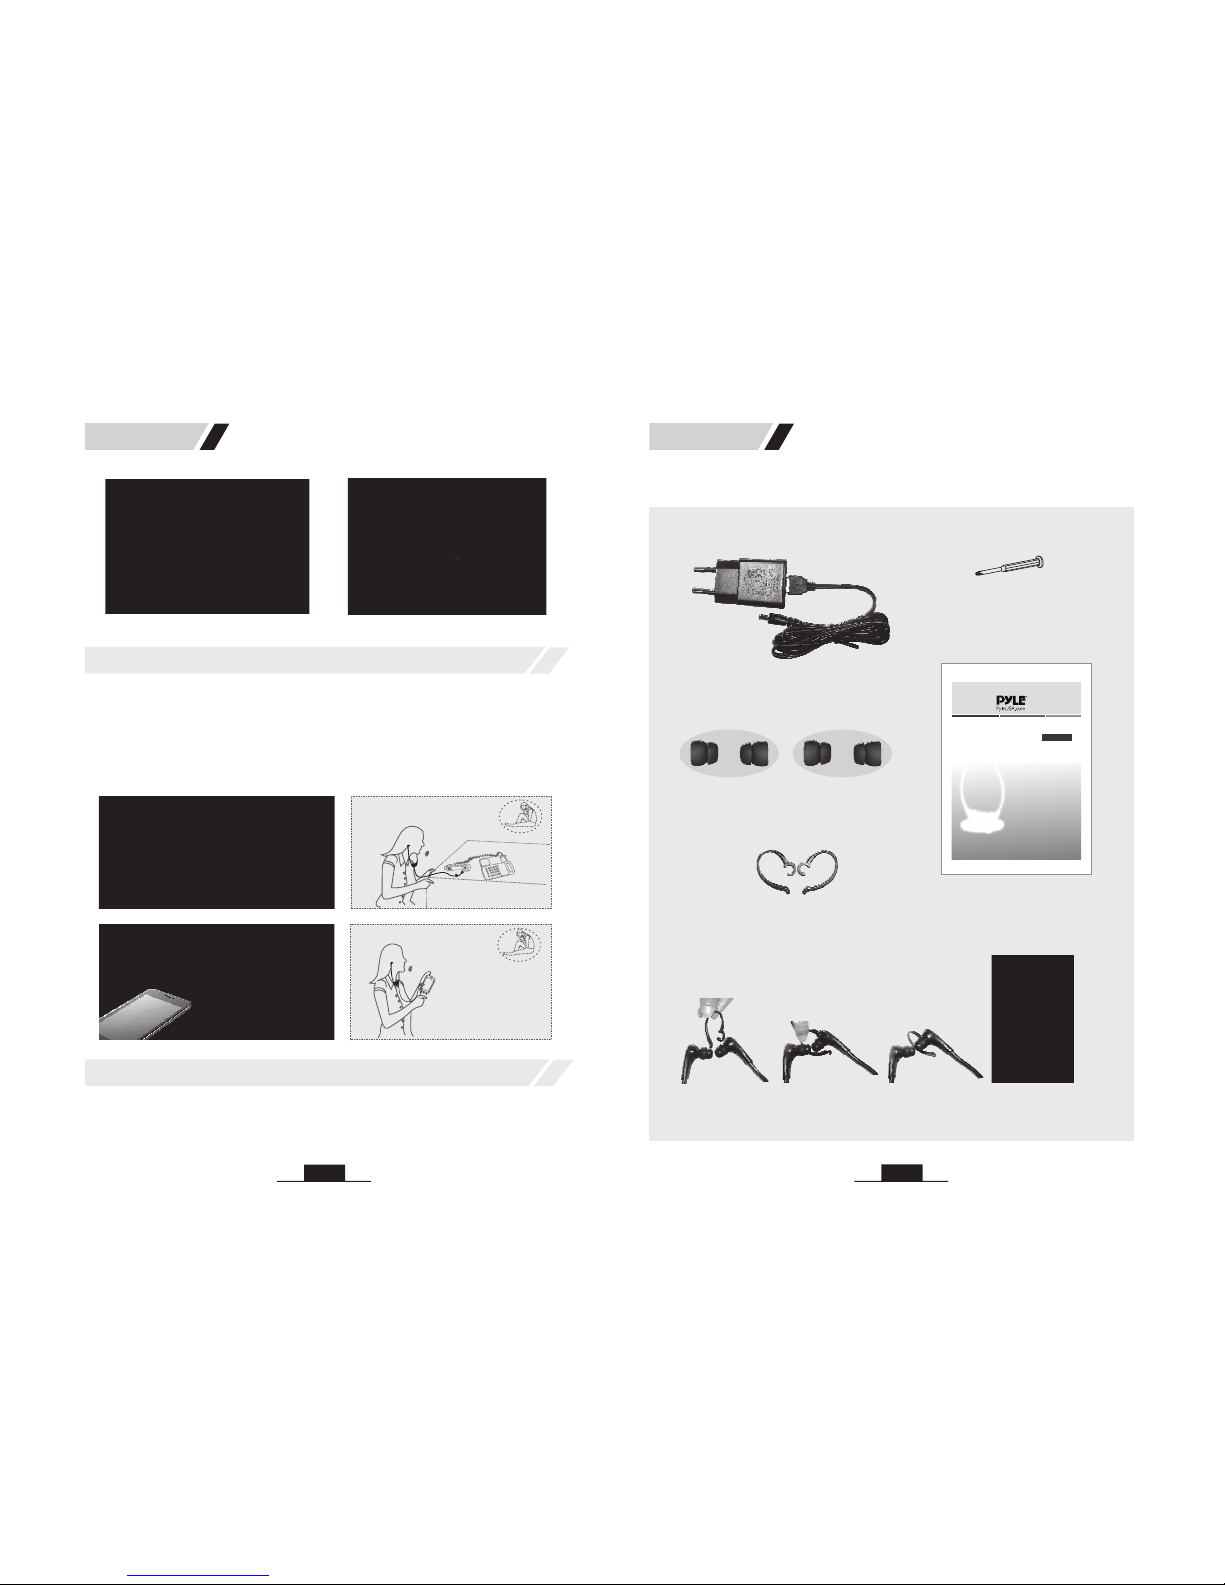
4. Use the regular hearing aid function to listen to telephone
5. Use the regular hearing aid function to listen to mobile phone
JH-8013/JH8014 Manual
Put the external microphone near the speaker of a mobile phone. Don't be too
close to your mobile phone, otherwise there is some interference. While talking,
The external microphone works with the receiver that amplifies the people’s
voice from the telephone speaker. Connect the microphone to the receiver an d
hold it against the speaker as shown, adjust the VOLume, etc. to your required
levels. And adjust the distance between the microphone and the telephone's
speaker to get the best sound performance.
MIC IN
4. Telephone
5. Mobile phone
For mobile phone call
For landline phone call
JH-8013/JH8014 Manual
MIC IN
06
11 Manual、
Mounting the hanger loop:
12 Hanger loop、
8 Mains adapter、
9 Balance adjusting driver、
(1)
(2)
(3)
10 Ear pads、
TV hearing aid
Manual
JH-8013A/B
JH-8014A/B
TV HEARING AID
USER MANUAL
Model: PHPHA78
Page 8
07
JH-8013/JH8014 Manual
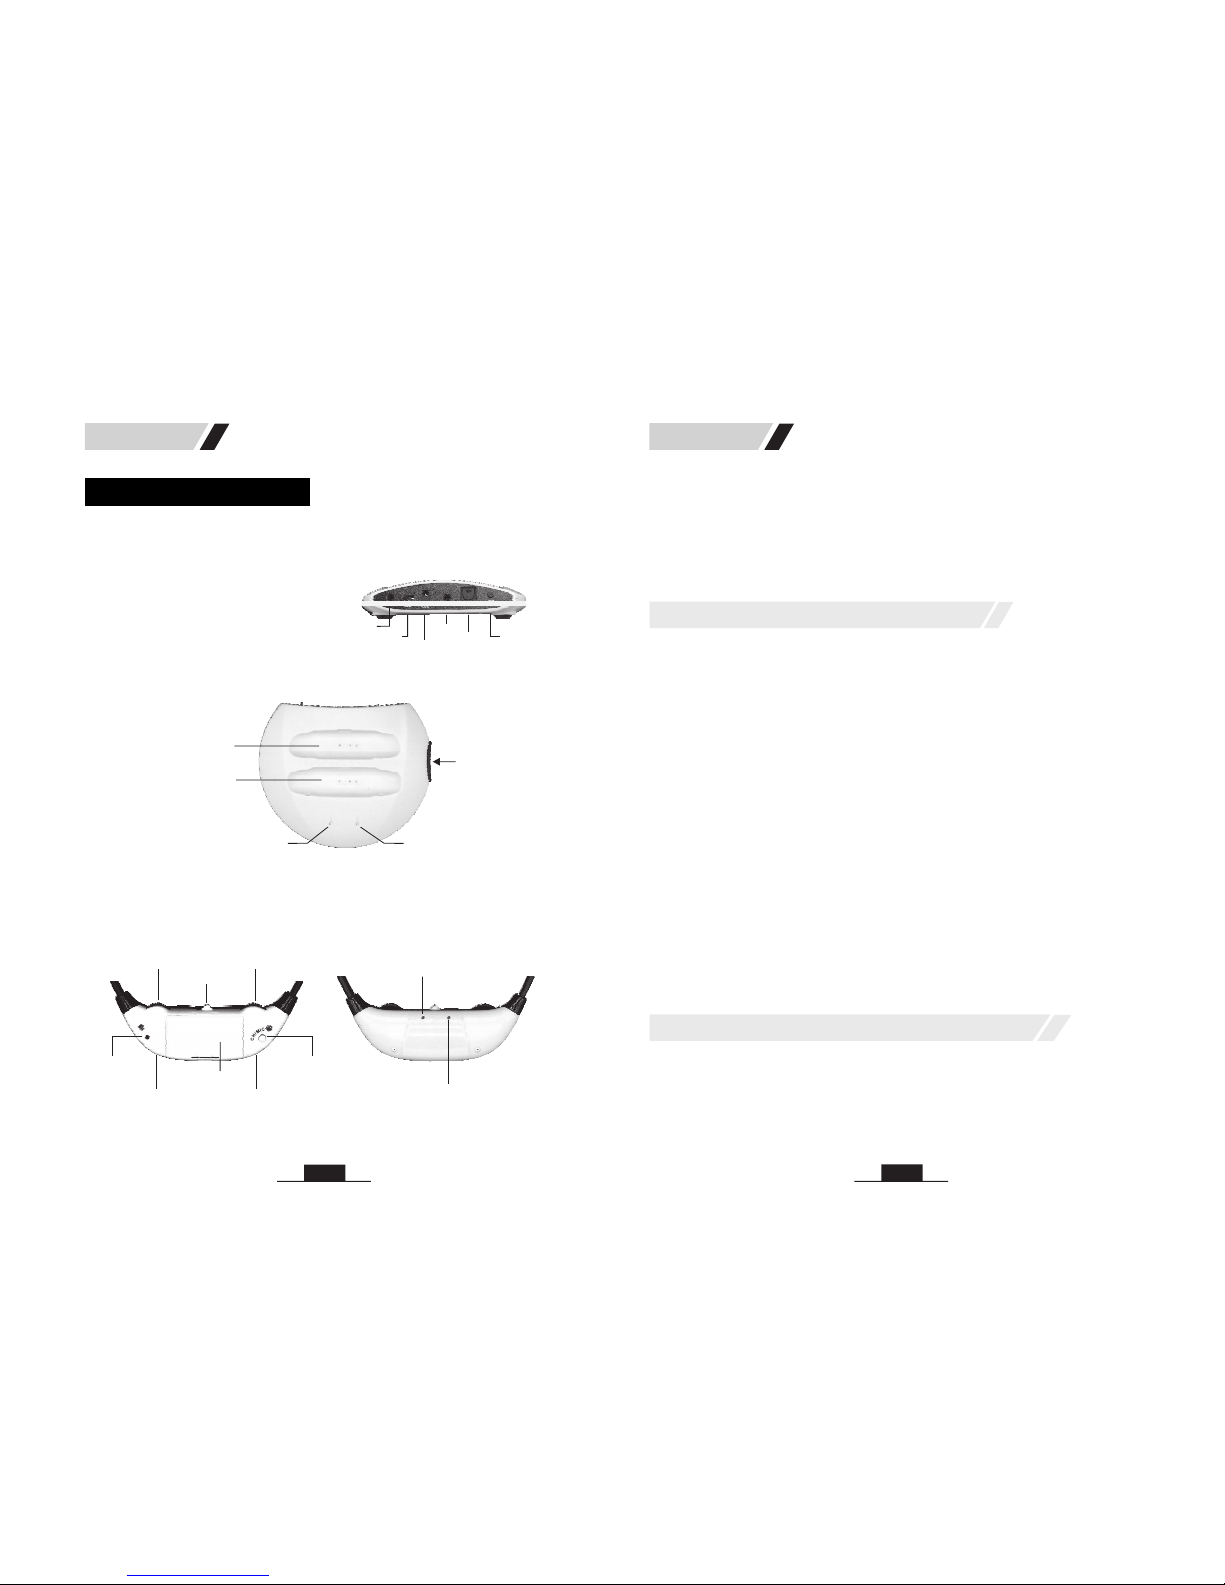
C. Part function
1 Transmitter、
2 Receiver、
Rear charging bay of B
Charging indicator Working indicator
Charging compartment
Wired state indicator
(Red light)
Wireless signal indicator
(Blue light)
(Bluetooth function button)
CH/MIC
Front charging bay of B
(only one charging bay for )A
()
LINE IN
Wired cable jack
(Balance)
BAL
VOL
ON OF F
TONE
MIC IN
Battery case
JH-8013/JH8014 Manual
Power DC 5V
AUDIO IN
OFF/MONO/STEREO
MIC IN
JH-8013A/B
OPTICAL
PAIR
PAIR
JH-8014A/B
Power DC 5V
AUDIO IN
OFF/MONO/STEREO
MIC IN
VOL
TONE
ON
OFF
LINE IN
BAL
MIC IN
12
(7) In order not to disturb others, you can reduce the TV volume or change it to
mute.
MIC IN
2. Regular hearing aid function
BL-8008
3. Wired headphone with hearing aid function
Note: the transmitter will be in standby status if there is no signal input in
1 minute and then power off automatically in 5 minutes, and its working
indicator will be off. When you turn the audio source on, the transmitter will
work again. Please turn off the transmitter if you don't use it for a long time.
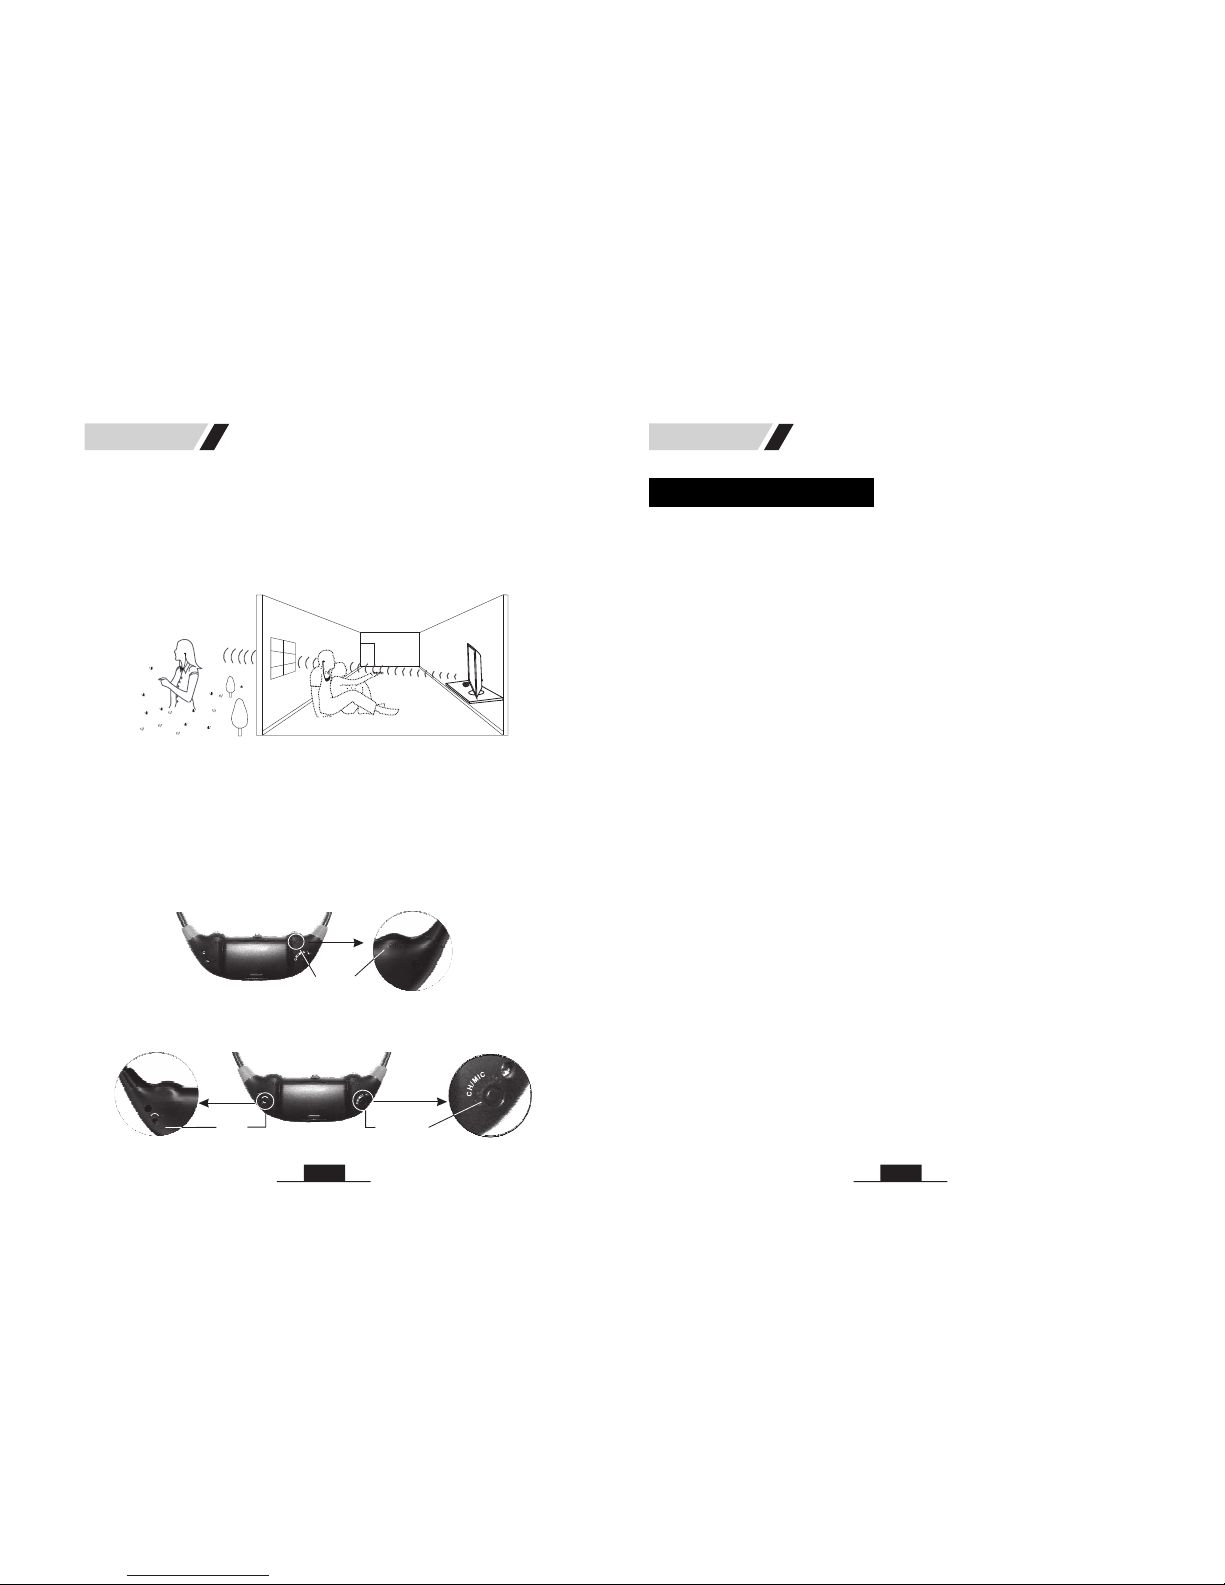
Note: when th microphone cable is plugged in, the built-in
microphone will be cut off automatically.
e external
(1) Plug the microphone cable into the MIC IN socket on the receiver.
Place the microphone near the sound source you want to amplify.
then switch it on and adjust the
VOLume, TONE, and BALance to your required levels.
external
(2) The external microphone can be also clipped on a pocket as shown for
general conversation use.
Ensure the
volume on the receiver is set to the lowest,
Plug one end of the wired headphone cable into the LINE IN socket of the
receiver, and connect the other end to the audio source such as a PC, iPAD,
MP3, mobile phone, etc.
, then switch it on and adjust the VOLume, TONE, BALance to your
required levels.
Ensure the volume on the receiveris set to the
lowest
Page 9
11
(5) Frequency response:
Rotate the “TONE” wheel to adjust the sound for personal preference.
(6) Balance adjustment:
If the hearing ability differs in each ear, the balance of left and right can be
adjusted by the screwdriver provided.
!"
!"
Note: when no signal is r ece ive d by th e receiver, (e.g., it o ut of t he
transmitting rang e or th e the blue
LED will be blinking qu ick ly. And t he re cei ver wi ll be m ute u nti l it
rec eiv es th e sig nal othe rwi se it w ill b e pow ered off auto-
matically in 5 minute s. Us ing i t aga in, y ou ne ed to s wit ch it o ff, t hen o n.
is
transmitter is i n the m ute s tat us, )
transmitted,
LINE IN
BAL
VOL
TONE
ON
OFF
MIC IN
TONE
BAL
VOL
BAL
L
R
L
LINE IN
BAL
VOL
TONE
ON
OFF
MIC IN
R
TON E
CH/MIC
If you hear the sound only at one ear, maybe the sound source’s audio out signal is
mono. Thus switch the transmitter to MONO. The bluetooth signal can go through
walls of the room, you can move around freely at home or outside. While listening
wirelessly, press the button of the receiver, it will be in the calling status.
Press again, it will come back to wireless listening.
CH/MIC
08
Power on the
tr
ansmitter, press and hold the button until the red & blue LED light
on alternatively. Then power on the receiver, press and hold the
(bluetooth function) button until the red & blue LED light on alternatively.
After a few seconds, the transmitter’s light becomes blue, and the receiver’s
light (blue) blinks slowly, the pairing is completed.
When you use them again,
1. Pair th e rec eiv er wi th th e tra nsm itter
PAIR
MIC/CH
2.(Pair the r ece ive r wit h a mob ile p hon e
(
MIC/CH
Pair the r ece ive r wit h the t ran smi tter and a m obile phone
Firstly instruct ion 2
Secondly instruct ion 1
Then
Note: when y ou us e the m aga in, p ower on th e tra nsmitter fi rst. Second,
power on t he re cei ver, wait until it’s l igh t(blue) blink s slo wly.
Then turn on t he bl uet oot h fun ction of your mobile phone.
Otherwis e, th e pai rin g may be not going smoo thl y.
First turn off the bluetooth function of your mobile phone. )
the receiver’s light (blue) blinks twice quickly
first (means the transmitter is searching the receiver ), then slowly (mean
searched).
First switch off the transmitter. ) Power on the receiver, press and hold the
(bluetooth function) button until the red & blue LED lights on
alternatively. Turn on the bluetooth function of your mobile phone to search
for the receiver (JH-8013). When found it on the phone, pair it and wait for
OK on the phone. The receiver’s light (blue) blinks slowly, the pairing is
completed.
When you use them again, the receiver’s light (blue) blinks twice quickly
first (means the mobile phone is searching the receiver ), then slowly (means
searched).
3.
, pair the receiver with a mobile phone as above .
, pair the receiver with the transmitter as above .
turn on the bluetooth function of your mobile phone again. The
receiver’s light (blue) blinks slowly, the transmitter’s light has changed to
bright blue from blinking red. That means the all pairs is completed.
If the transmitter, receiver and mobile phone are not connected successfully,
when you use them again, please operate the pairing process again.
D. Bluetooth Pai ring
Page 10
09
10
Power input
Audio in
L
R
ANT
E. Set up and user instructions
(1) Connect the power adapter with the transmitter's power jack.
(2) Connect the 3.5mm plug of to the transmitter's audio-in jack,
connect the lotiform plugs to AUDIO OUT jack ofTV, DVD, STB, etc. ( if it is a
computer, you need to connect lotiform plugs with Audio cable2, then connect
the 3.5mm plug of to the speaker jack of the computer.) If the TV is
used with a STB, DVD, etc., please prior to connect the transmitter with the
STB, DVD, don't connect to the TV set directly. (
because manufacturers of
TVs are different .)
Audio cable2
Audio cable1
Maybe there isn't audio out
signal for some TVs when connect to them directly
Audio out
Connect to audio out of TV
Connect to audio out of STB
TV
L
R
MIC IN
Audio out
Connect to audio out of DVD
Connect to audio out of PC
JH-8013/JH8014 Manual
1. Wireless TV hearing aid function
Power input
Audio in
JH-8014
JH-8013
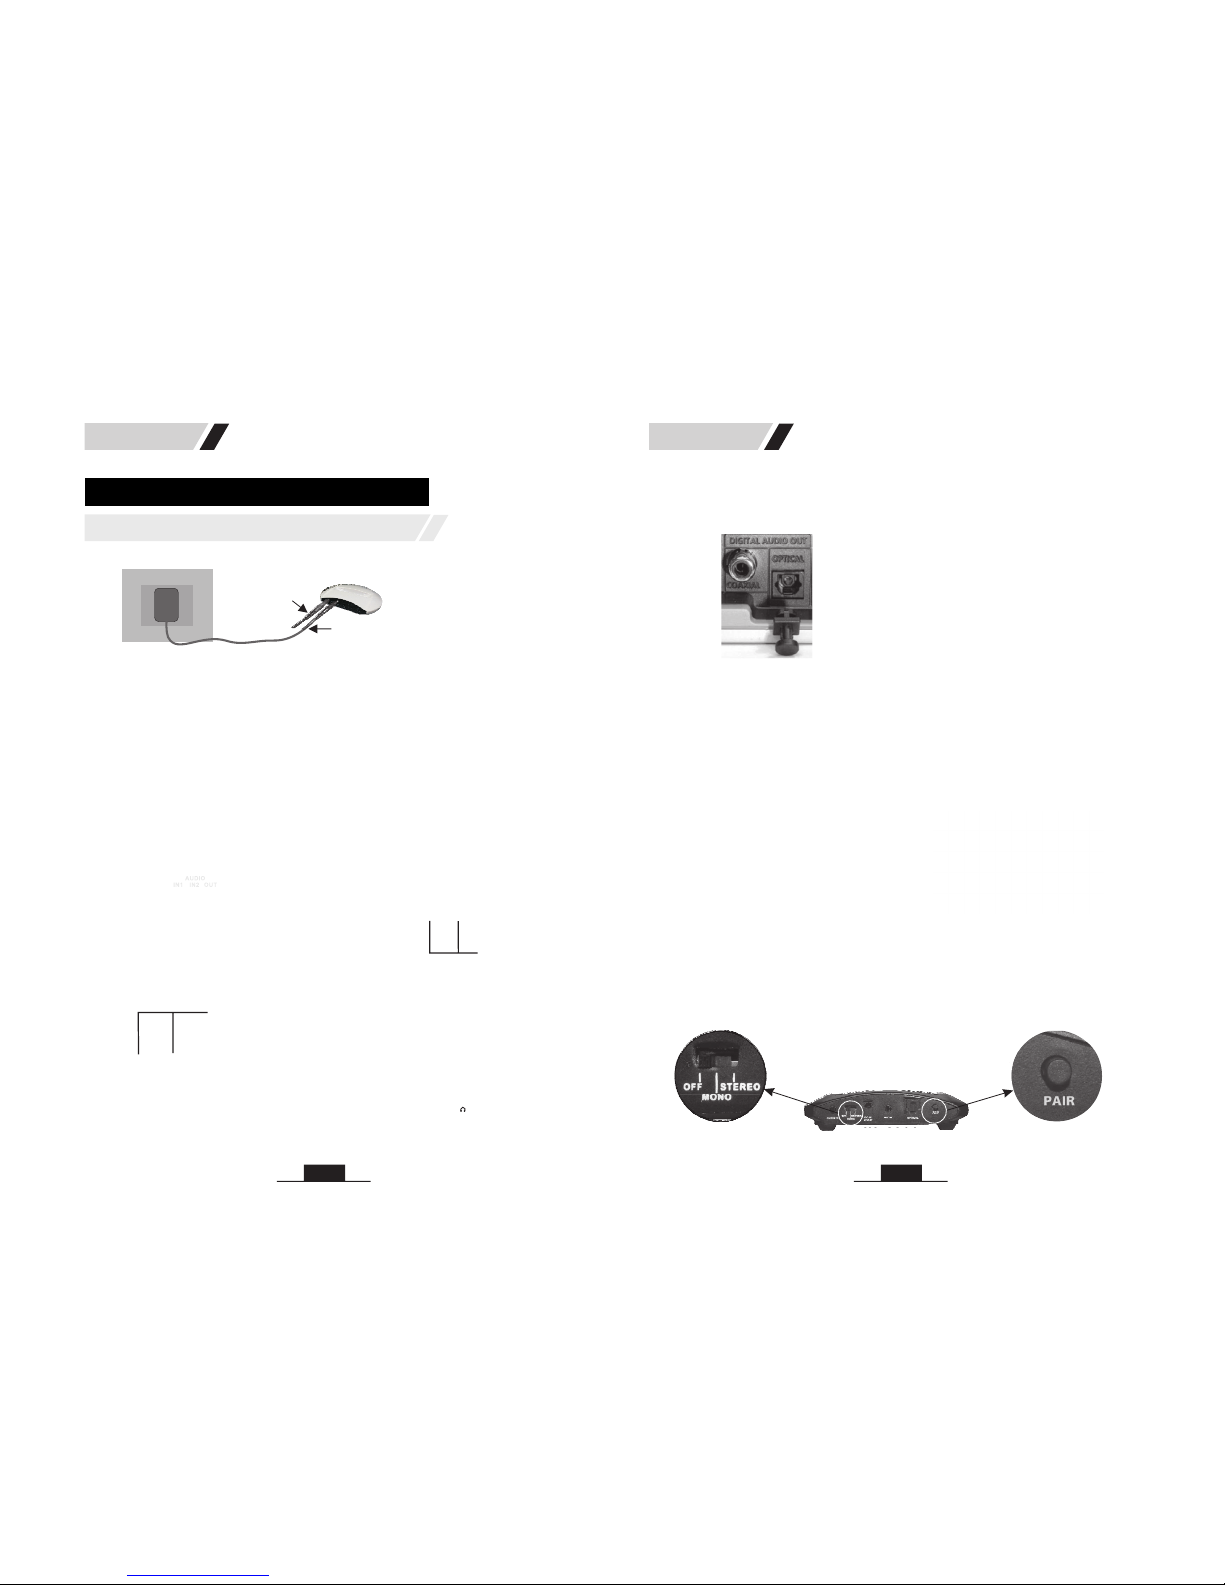
If the sound source has a digital audio output, connect the optical socket of the
sound source with the optical fiber cable. (Just for JH-8014A/B only)
(3) Switch on the transmitter, the working indicator will be on. Choose a suitable
place for the transmitter near your sound source (e.g., a TV). Adjust the audio
source in working status (when the transmitter connected to a
STB, DVD, PC, etc.).
’s volume properly
JH-8013/JH8014 Manual
(4) Put the receiver on correctly, with the indicator facing away from your body.
then switch it on, its blue indicator will be on.A
IMPORTANT: make sure the volume on the receiveris setto thelowest to
protect your hearing, djust the
VOLume to a comfy listening level, you will hearing the sound from the
transmitter.
If the sound source doesn’t have any of the audio out jack mentioned above, just
plug the microphone cable into the MIC IN socket of the transmitter, then fix the
microphone on to the audio source’s speaker.
JH 8014-
JH 8013-
PAIR
MONO/STEREO
DIGITALAUDIO OUT
OPTICAL
COAXIAL
 Loading...