

Page 1

Treasure Hunter Bronze Metal
Detector
PHMD1
www.pyleaudio.com
Instruction Manual
This Metal Detector is a versatile and easy-to-use metal detector. It has higher
sensitivity and has the ability to differentiate between ferrous metals and nonferrous
metals. It is suitable for beginners.
Please read the manual carefully before using the unit.
Page 2

2
CONTENTS
Specification
Assembly
Batteries
Panel and Controller
Quick-Start
Field Operation
Caution
Trouble Shooting Guide
Specification:
• Single mode operation
• No-motion Mode: As long as there is metal obje ct around the search coil, the
detector will have a response.
• Adjusting DISCRIMINATION
• Adjusting TUNE
• Adjusting VOLUME
• Low Batter Indication
• 6.5 inch Water Proof Search Coil
• 1/8 inch Earphone Jack (earphone not supplied)
• Batteries Six AA Batteries(not supplied)
Page 3

3
Assembly
Assembly is easy and requires no special tools.
1. Align the plastic trapeziform raised part on the handle, with the trapeziform lower
groove at the control box bottom (Figure.1).push the two parts tightly.
Figure.1
2. Align the threaded bolts at the handle bottom, with the knobs under the control
box, lock it with the bolts(Figure.2).
Figure.2
3. Turn the stem’s lock nut clockwise until it loosens, lengthen or shorten the stem so
when you stand upright with your detector in your hand, the s earch coil is level
with and about 1/2 inch above the ground with your arm relaxed at your
side.( Figure.3).
Figure.3
4. Loosen the knobs at the s earch coi l ’s end, then adjust the search coil to the desired
angle, let the search coil be parallel with the ground. Be sure the search coil is
attached properly (long end facing front) (Figure.4).
Page 4

4
Figure.4
Batteries
Please use six AA alkaline batteries.
1. Press the “key” on the batter y compartment in the direction of the arrow, pull out
the battery compartment cover (Figure.5). Note: the word UP is engraved on the
battery compartment, don’t mistake the direction.
Figure.5
2. Insert six AA batteries into the compartment as indicated by the polarity symbols
marked inside the compartment(Figure.6).
Figure.6
Page 5

5
3. Close the battery compartment cover, please note that the UP-side is facing up.
4. Six alkaline batteries may be used for more than 40 hours. If you do not plan to
use the detector for a long time, remove the batteries.
5. Do not mix old and new batteries.
Panel And Controller
The Panel Controller (Figure.7)
Figure.7
Power off: To power on/off unit. Use the same knob labeled DISC.
TUNE: It can be used to adjust balance when combined with the red button.
Tuning knob tunes detector while in normal operation state.
Red Button: It is cooperated with TUNE to adjust balance.
DISC: Adjust DISC will help the operator to differentiate between ferrous metals
and nonferrous metals. Note: when it’s in the “MIN” position, the detector
sensitivity is the most strong.
Volume: Is used to adjust the loudness of the speaker.
Low Batter Indication: When the red LED lights, indicates the user should
replace the batteries.
Earphone Jack: When the earphone is plugged in, the speaker will no longer
sound.
Quick Start:
To learn how to master the operation of the metal detector quickly, w e suggest
that you should read the quick start guided carefully, and practice indoor. When you
are familiar with the detector, you can hunt for the treasures just about anywhere.
1. Prepare with a assortment of metal samples
an iron nail
a pull-tab and a five cents nickel coin
a 1 cent zinc coin(after year 82 version)
a 25 cent silver coin
2. Lay the metal detector properly
In order to avoid other metals influence the detector, be sure to wave the metal
detector properly.
Page 6
6
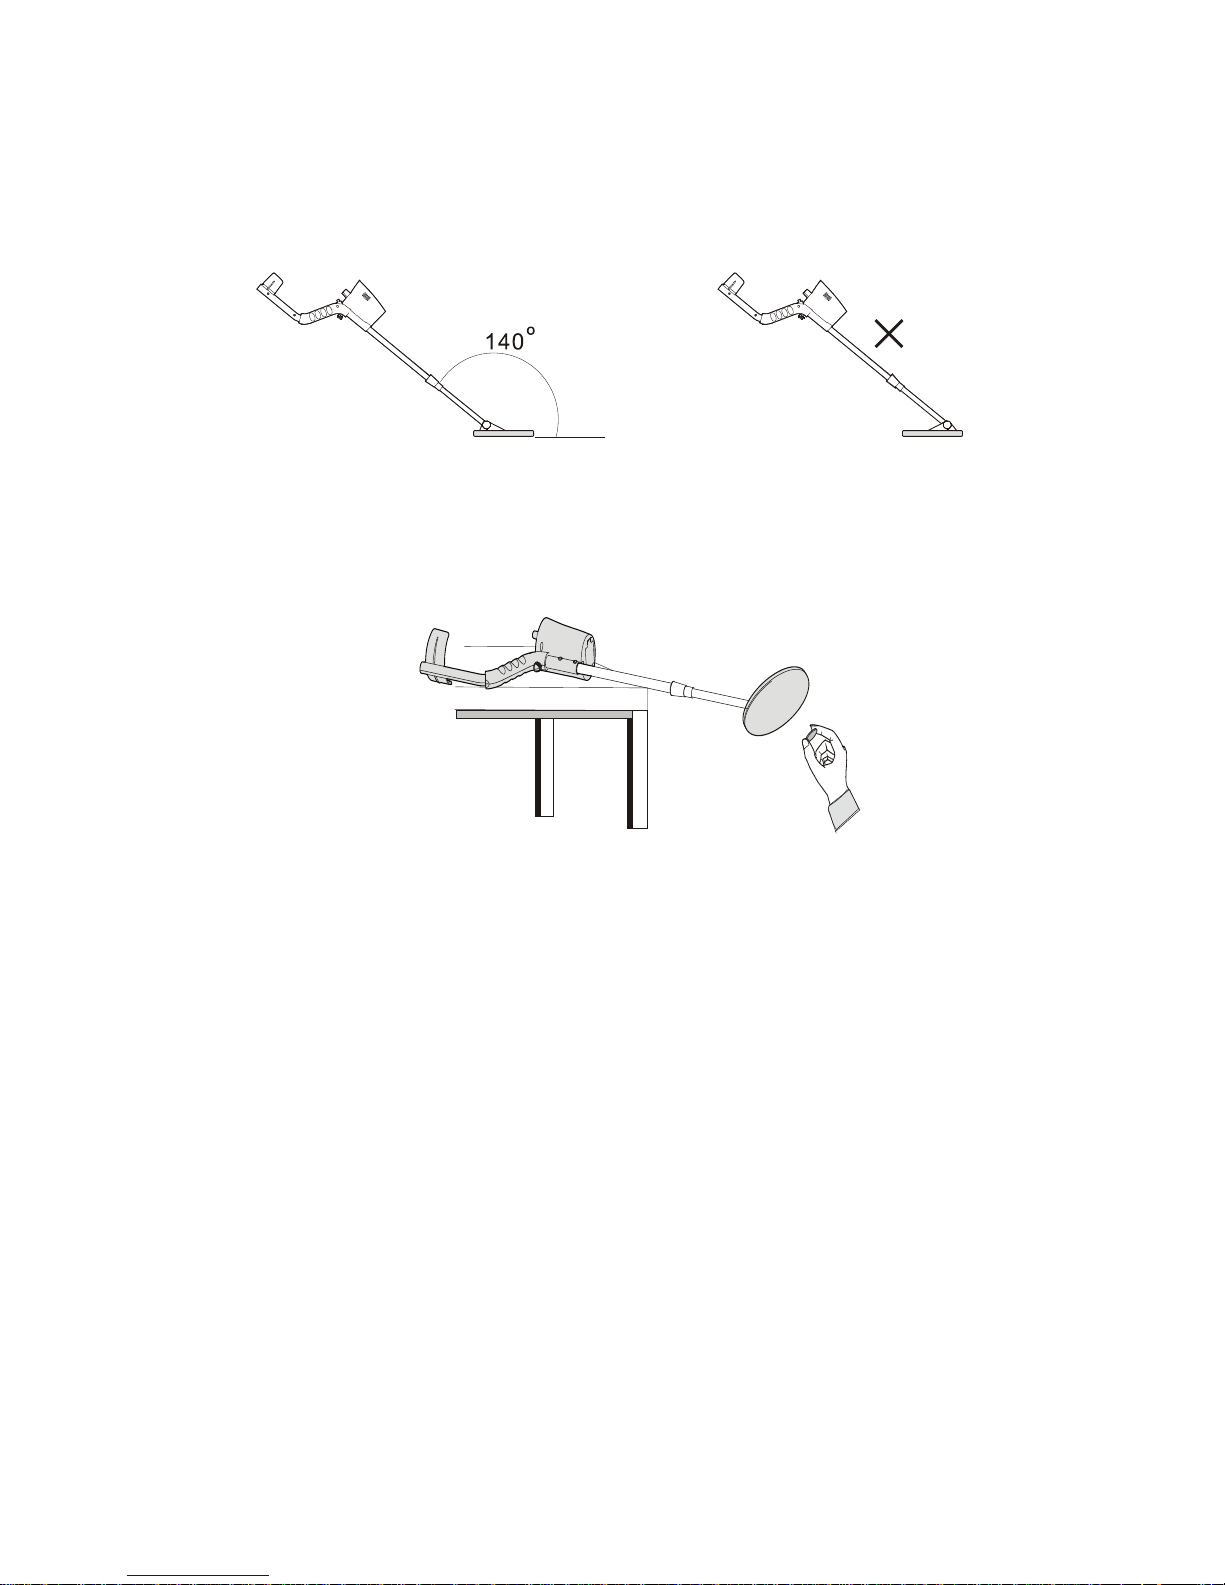
Wave the search coil properly, keep the an gle between s earch coil and aluminum
stem is about 140°. Please note improper backwards installation (Figure.8)
Figure.8
Place the detector on a wooden or plas tic table. Let the search coil han g over the
edge exceeding the table edge more than 5 inches(15cm). (Fig.9)
Figure.9
Please take off your watch, ring or other metal obj ects on your hand or a rm . Keep
the detector away from the wall, floor and other metal objects.
Be sure to keep the detector away from the light, T V, computer and mobile
telephone, which can cause electro-magnetic interference.
3. Turn on
Turn on the power supply.
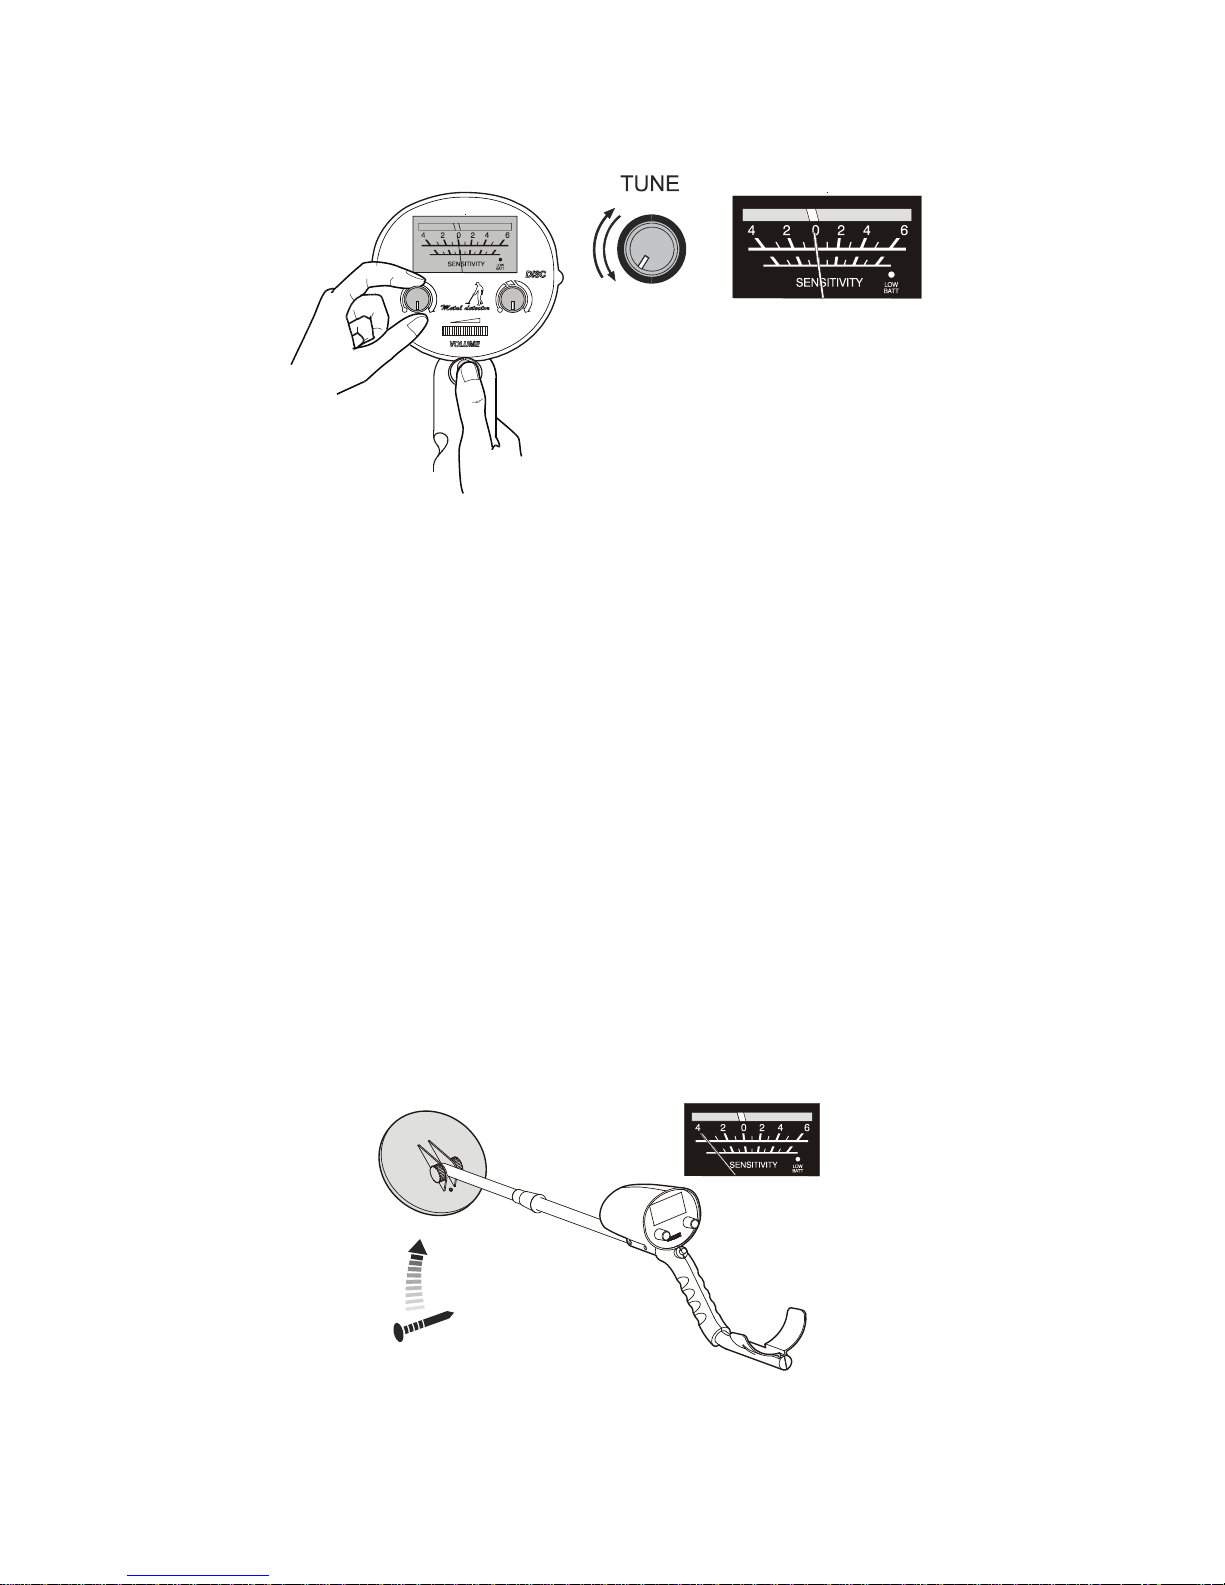
4. Adjust balance.
Press and hold the “Red Button”, and adjust the “TUNE” knob, let the meter
pointer point at “0” position, release the Red Button. The meter pointer should
maintain near the “0”, now the balanc e has been adj usted. The det ector is in the
most sensitive detection state. (Fig.10).
Page 7
7
Figure.10
Adjust the Volume potentiometer, let you can hear the light hum tone, don’t
adjust it too loud.
Once you adjust the “DISC” button, you should adjust the balance over again.
In general, you should only press the Red Button to let the detector return to
the balance state.
During operating, if there is no m etals a round d etector, while the meter pointer
deviates from the “0”position, you should also adjust the balance over again.
5. Test samples, discriminate ferrous metal and nonferrous metal.
Set the “DISC” knob to “MIN”. Adjust the balance to let the meter pointer
point at “0”. Adjust “VOLUME” to let the detector sound a light hum tone.
Let the metal samples approach the search coil in turn, pay attention to the
meter pointer swing and the voice change.
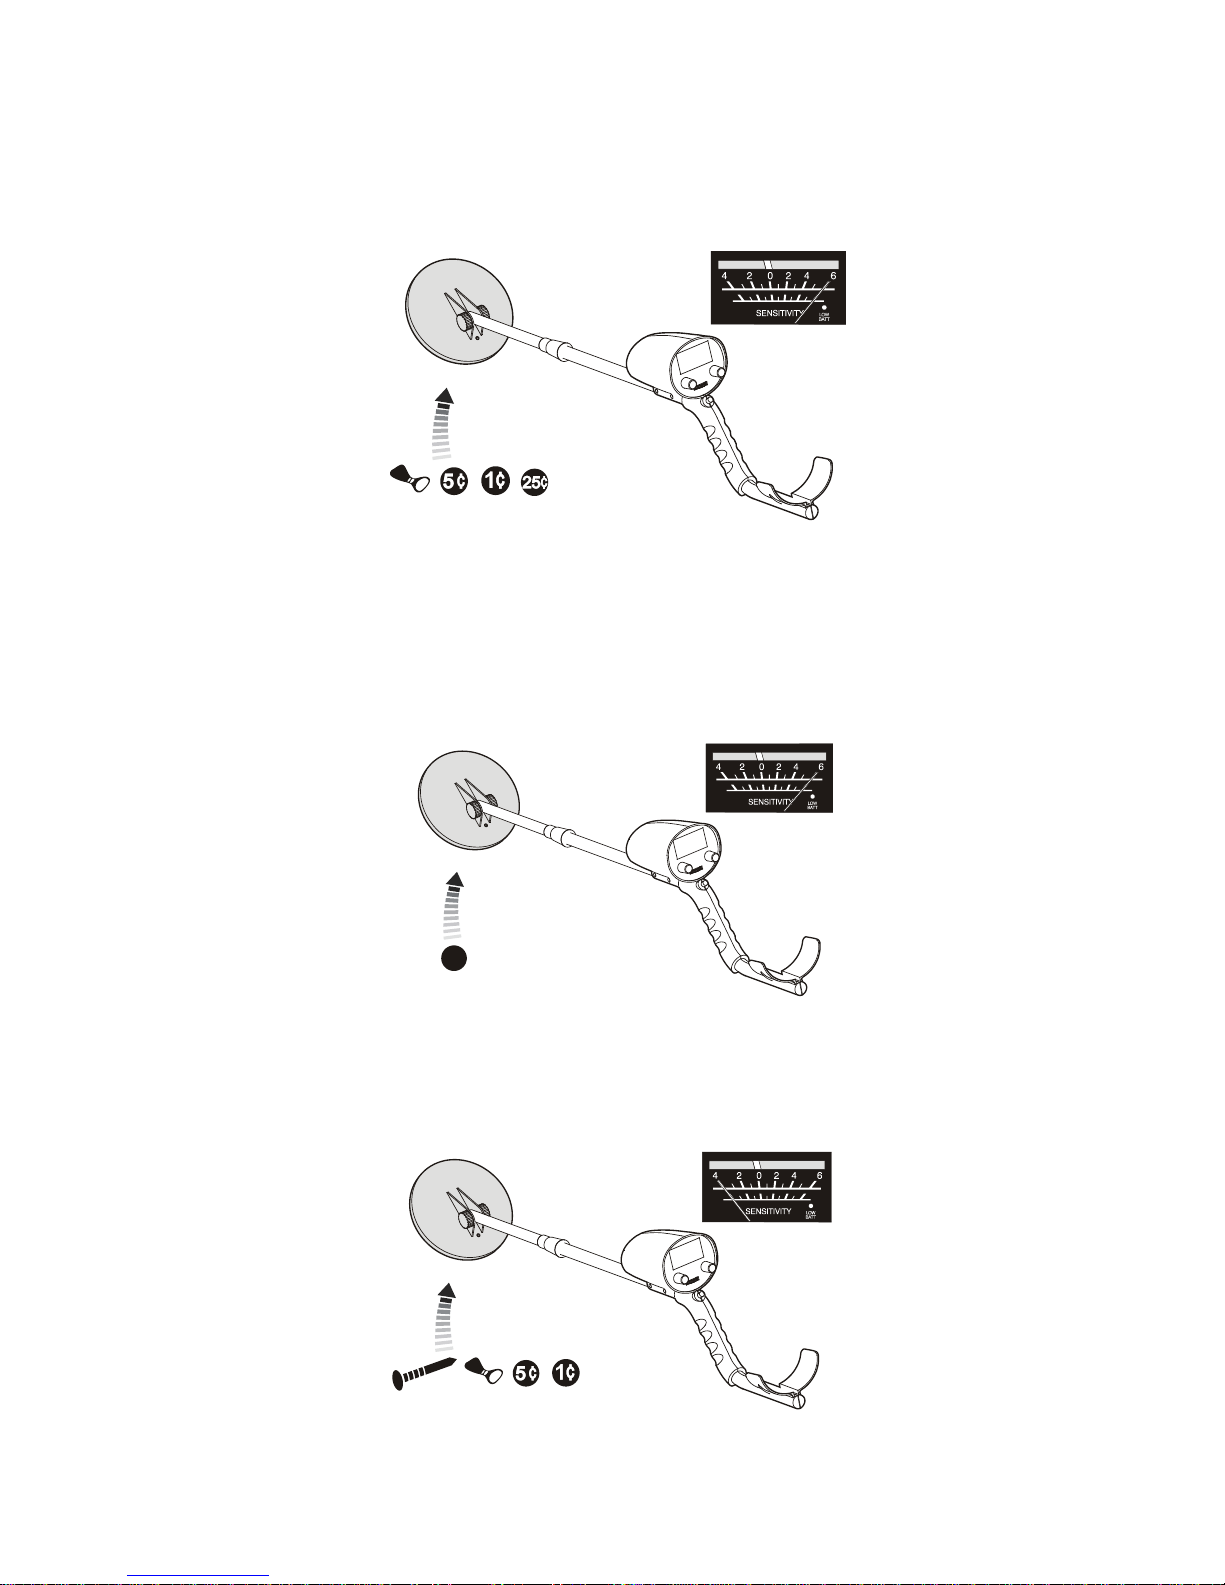
When the iron nail approach the search coil slowly, the meter pointer will
deflect to the left, and the sound will turn light. When the iron nail is more
closer to the search coil, the meter pointer will deflect to the left more and the
sound turns more lighter, until it disappears.(Figure.11)
Figure.11
Page 8
8
Let other nonferrous metals approach the search coil, the meter pointer will
deflect to the right, and the sound will turn louder. (Figure.12)
Figure.12
6. Discriminate silver
Set the “DISC” knob to “MAX”. Adjust the balance to let the meter pointer
points “0”and the detector sound a light hum tone.
Let the 25¢silver coin approach the search coil slow ly, the meter pointer will
deflect to the right, and the sound will turn loud. (Figure.13)
Figure.13
Let other metal samples approach t he sea rch coil slowl y, the meter pointer will
deflect to the left, and the sound will turn light. (Figure.14)
Page 9

9
Figure.14
7. Discriminate different metals approximately
We take 5¢nickel coin and pull tab as an example to explain the approximate
discrimination method.
Set the DISCRIMINATION to about “12:00” position (Figure.15). Adjust the
balance to let the detector sound a hum tone, and the show is “0”
Figure.15
Let the iron nail, 5¢ nickel coin and pull tab approach the search coil
slowly ,the sound tones light ,and the meter pointer deflects to the left.
Let the hi gher conductivity objects, such as1¢zinc coin and 25¢silver coin
approach the search coil slowly, the sound tones louder,a nd the meter pointer
deflect to the right.
The “12:00”position is the 5¢nickel coin and pull tab discrimination position.
Rotate the “DISC” knob from “MIN” to “MAX”, you can find the different
metals discrimination position. The metals with low conductivity,
discrimination position is near the left side, and the iron discrimination position
is in the most left (MIN). The metals with high conductivity, discrimination
position is near the right side, and the silver discrimination position is in the
most right (MAX).
8. Explanation
Discriminating metals is based on the change of sound and meter pointer
direction. The discrimination is preliminary, and it’s only a reference for
treasure hunters.
When the DISC is in the “MIN” position, the detector sensitivity is the most.
9. Operation outdoors
By learning, you have learned how to operate the detector. In the wild, as t he soil,
sea sand, ores and other environmental impacts and the interference of
electromagnetic fields, the detector sensitivity and discrimination location will be
changed. You should practice time after t ime and accumul ate the experi ence t o mas ter
the skill of detecting gradually, and you will taste the joy of treasure-hunting.
Page 10

10
Field Operation
Metal detector is used outdoors. There are too many metals indoors, and also all
kinds of electrical equipments that will cause interference signals , so it’s not fit for
using the metal detector.
Field detection is more complicated, the composition of the detected regional soil,
the component, size, shape and the oxidation degree of the underground metals will
all affect the detection results. This chapter is only the general steps of the field
detection. The operat or should practice ti me after time and accumul ate experience to
achieve good results.
1. Turn on
Rotate the DISC knob to the right side, switch on the power supply. Set the
VOLUME to the mid, the detector may sound a tone or may be silent.
2. Adjust balance
Press and hold the “Red Button”, and adjust the “TUNE” knob, let the meter
pointer points to “0” position. Release the Red Button, the meter pointer should
maintain points to “0” position or near the “0” position. Adjust the “VOLUME”, the
detector will sound a light hum tone, now the balance has been adjusted.
We remind the operator specially, once you adjust the “DISC” button, you should
adjust the balance over again. When the detection environment has a change, you
should also adjust the balance over again.
In general, afte r the balance being adjusted, and some balance d eviation having
occurred, you should only press the Red Button to let the detector return to the
balance state.
3. Adjust volume
The detector is based on the direction of meter pointer deflection and change of
sound to detect metals, and it’s more sensitive to judge by the sound. After the balance
has been adjusted , adjusting the volume will get a light hum tone, don’t adjust it too
loud.
4. Adjust DISC
In general, set the “DISC” to “MIN”, the sensitivity is set to it's highest level at this
time. If you find a ferrous metal, the detector tone will turn light, and the meter
pointer swing to the left. If you find a nonferrous metal, the detector tone will turn
louder, and the meter pointer swing to the right. You should further determine the
general type of nonferrous metals by DISC.
Since the soil will deviate the discrimination position, we suggest you take some
samples with you, such as iron nail, pull tab, 5¢ nickel coin, 25¢ silver coins. Bury
these samples in the detection soil respectively, try detecting and observe the different
metals discrimination position. It will help you judge the type of the target, in case
you accidently omit the treasures that you want to find.
5. Move the search coil
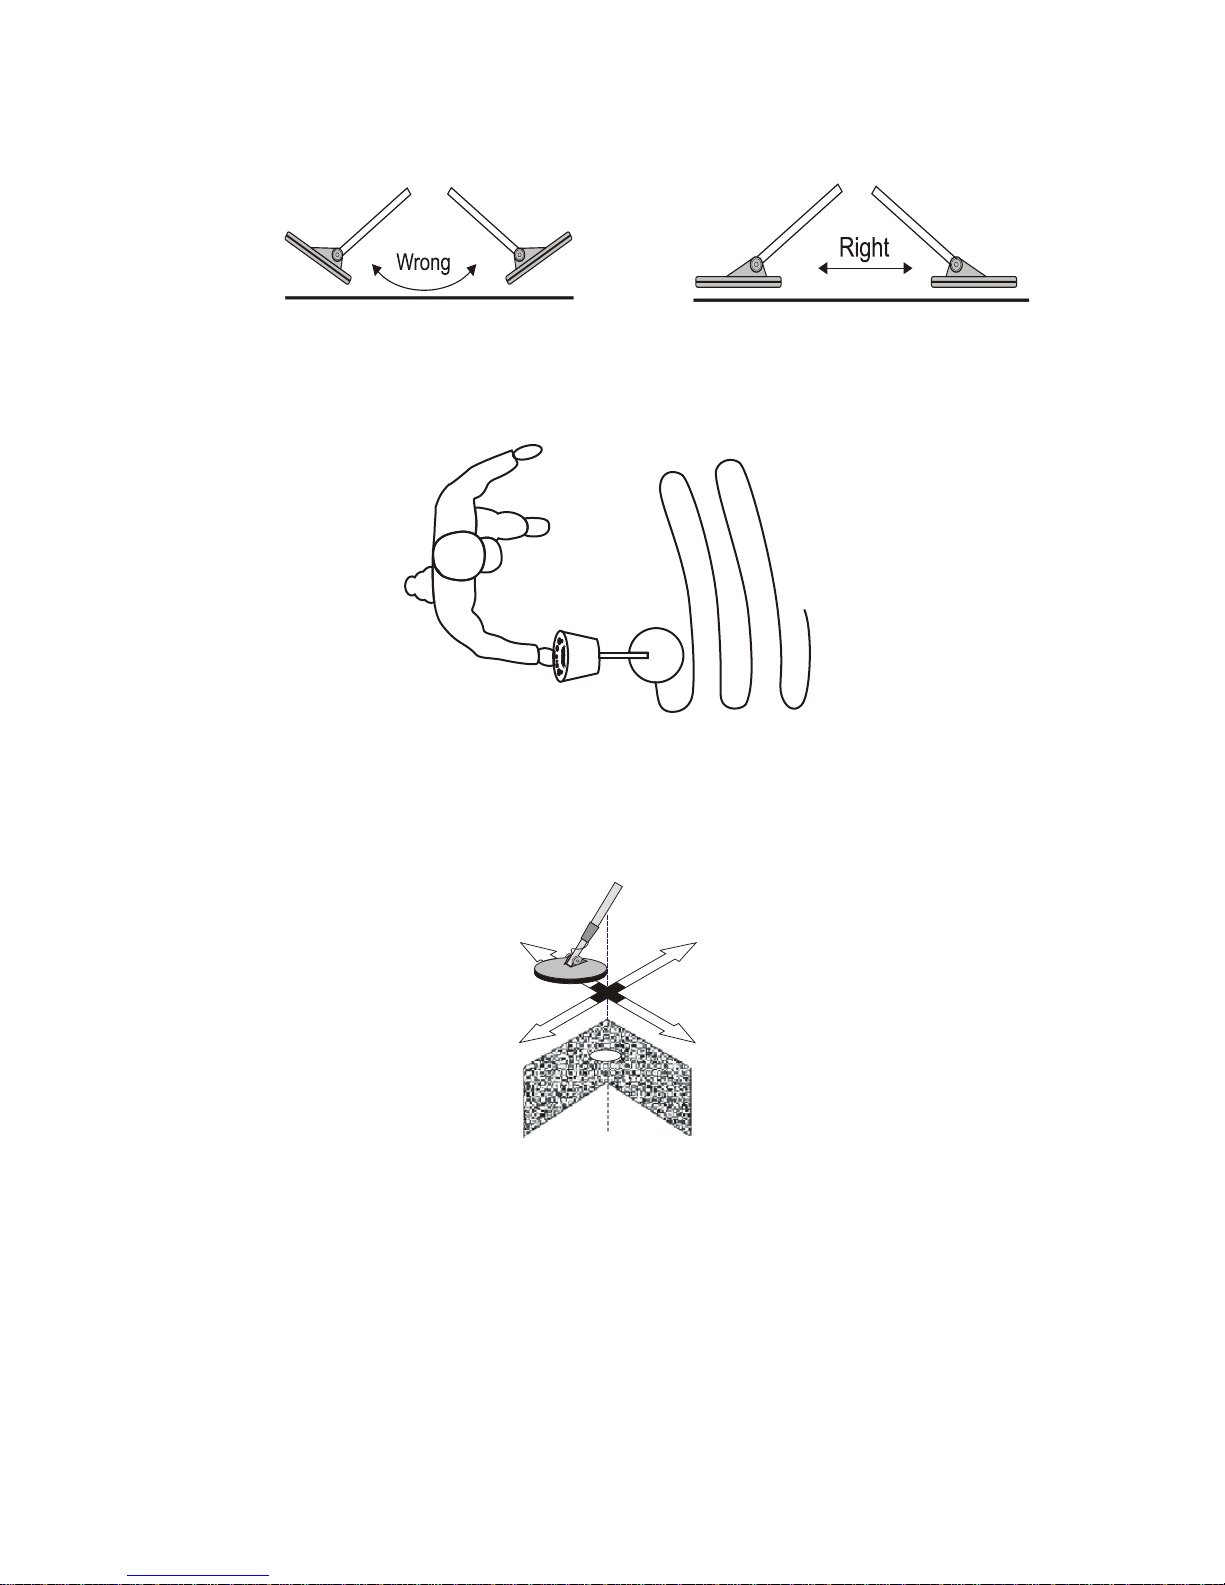
When moving the search coil, you should move it at a constant speed, not
unsteadily. Let the search coil be parallel with and about 1/2 inch from the surface. Do
not to swing it like a pendulum high and low above the ground.( Figure.16,17)
Page 11
11
Figure.16
Figure.17
When finding metal objects, you should move the search coil on the ground
according to figure 16, In order to determine the metal position exactly. The nearer the
search coil from the object, the more strong the response is.
Figure.18
6. Using the earphone
Using headphones allows for more sensitivity to changing sound, and you will get
better detection result.
Caution
Page 12

12
1) Before detection every time, you should press Red Button to adjust balance,
release the button when detecting, you should not press the Red Button while
detecting.
2) The volume should be adjusted so that you can hear the sound, not adjust it too
loud. Normal volume is most productive when trying to differentiate between
sounds.
3) In areas with heavy traffic, please don’t wear earphone, in case an accident occurs.
4) Always obtain permission before searching any site.
5) Keep awa y from the regi on that ma y bury electrical l ine, cable line or pipe line, in
particular the pipes that are full of flammable gases and liquids.
6) Do no detect in the military area that may be bombs or gas explosives.
7) When digging out the target, use a reasonable method, do not destroy the
vegetation. Leave the land and vegetation as it was after excavation.
8) When using earphone, don’t set it too loud, this may damage your hearing.
Trouble Shooting Guide
SYMPTOM
SOLUTION
No power 1.Be sure that the polarity of batteries are
installed correctly.
2.Replace the batteries.
The unit is silent when turns on, and the
meter pointer doesn’t move,
it seems
there is no electricity.
The balance has a deviation.
Press the
Red Button, and adjust the TUNE knob to
let the detector be in balance state.
Sound an irregular tone.
1.Make sure there is no other metal
detector operating around.
2.Don’t use it indoors, because there are
many metals there.
3.Make sure whether there
are no
electromagnetic interference sources,
such as power lines, cables, electronic
fences and so on. Keep awa y from these
areas.
4.The ground may be magnetized due to
soil composition present.
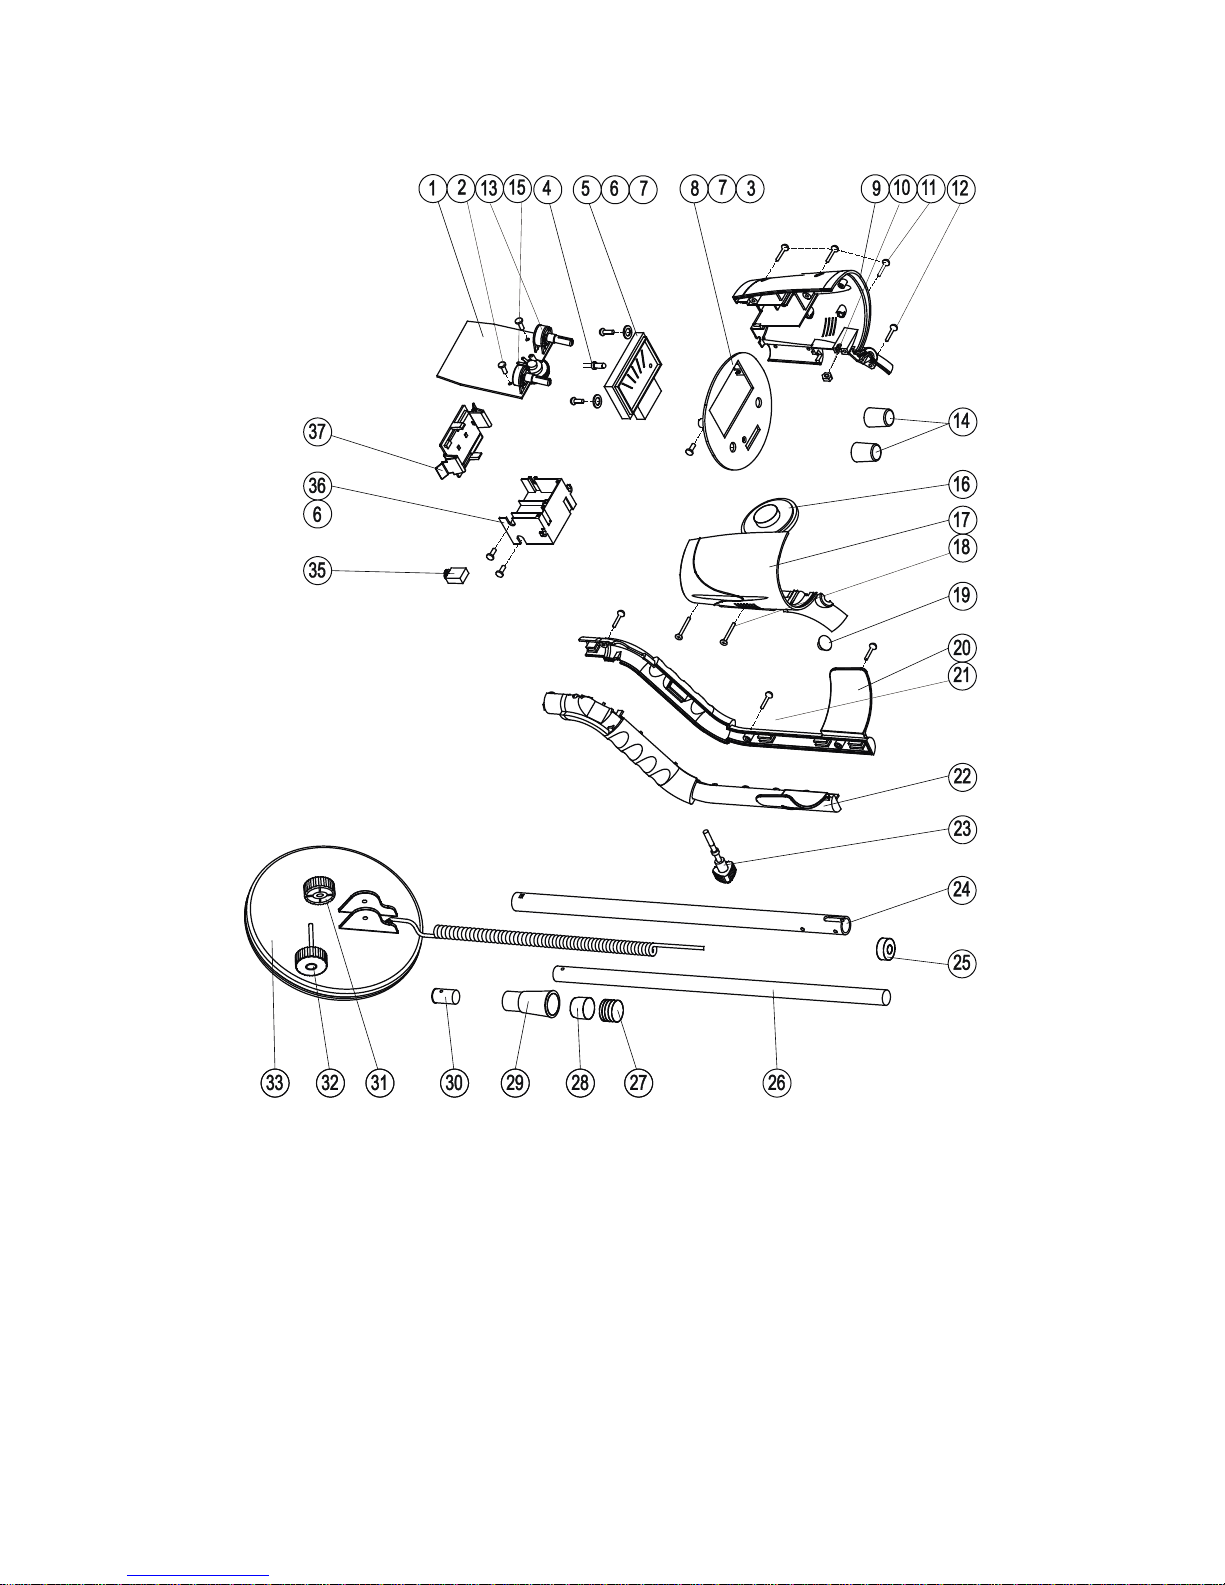
PARTS LIST PARTS LIST
Part Description Q’ty Part Description Q’ty
1 PCB 1 20 Left Arm Rest Support 1
Page 13

13
2 Screw M3X8 2 21 Screw M3X12 3
3 Adhesive St icker 1 22 Right Arm Rest Support 1
4 LED 1 23
Support Arm Adjustment Knob
1
5 View Meter 1 24 Outer Stem 1
6 Washer 3mm 2 25 Washer 1
7 Screw M3X8 2 26 Inner Stem 1
8 Control Panel 1 27 Lock Nut Interior 1
9 Support Arm(Right Side) 1 28 Lock Nut Exterior 1
10 Nut M4 4 29 Look Nut Cover 1
11 Screw M3X18 4 30 Bushing 1
12 Screw M3X14 1 31 Coil Button(Nut) 1
13 DISC Dial 1 32 Coil Button(Screw) 1
14 Knobs 2 33 Search Coil 1
15 TUNE Dial 1 34 Support Arm Pad 1
16 Speaker 1 35 Earphone Jack 1
17 Support Arm(Left Side) 1 36 Battery Compartment 1
18 Screw M3X25 2 37
Battery Compartment Cover
1
19 Red Botton/Switch 1
Page 14
14
Page 15

15
 Loading...