

PDA5BU.0
Compact Wireless BT Stereo Amplifier
Questions? Issues?
We are here to help!
Phone: (1) 718-535-1800
Email: support@pyleusa.com
Home Desktop Stereo Receiver System
with FM Radio, MP3/USB/SD/AUX (200 Watt)
FOREWORD
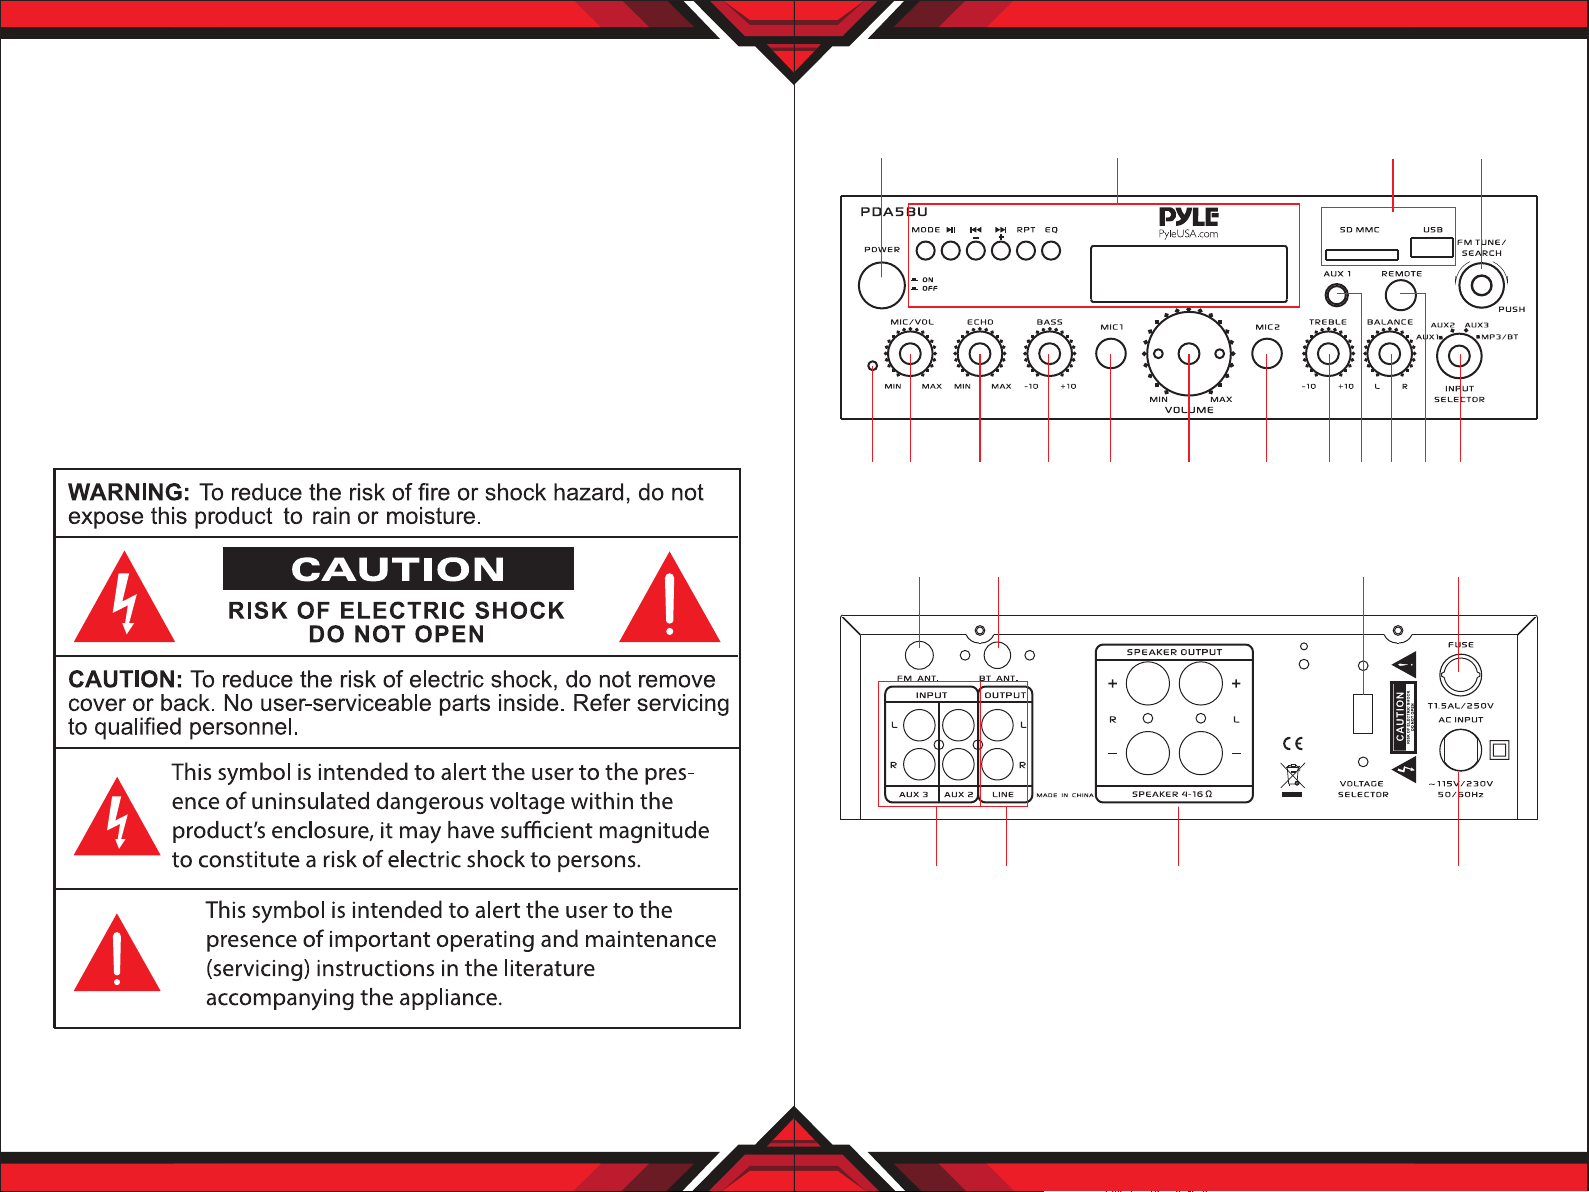
PDA5BU.0 Front and Back Panel
Your New Pyle Amplier gives you the power and versatility you need in a
professional sound system. The amplier's wide frequency response makes it
suitable for amplifying music or vocal program material. lt can be used in
meeting halls, house, restaurant, schools, stores, or for paging systems.
Please read this manual thoroughly before you attempt to set up and use the
amplier. It contains a range of installation suggestions as well as instructions
to ensure safe usage. Installed properly, you can expect years of trouble-free
service from this product.
1 2 3 4
15 14 13 12 10 11 9 8
10
7
5
6
19181716
www.PyleUSA.com
2
23 22 21
20
www.PyleUSA.com
3

Function
1. Power Button: Press this button to power the unit ON and OFF.
2. Mp3 Control and LCD Screen: All information regarding external media or
this device will be displayed from this screen.
3. SD Card Reader/USB Port: For using external media on this device, just plug
your SD/USB into these ports.
4. FM Search/Tunning: Push it for FM Channel searching.
Rotate it for FM Frequency adjusting.
5. Input Selector: Turn this button to choose the favorable input
6. REMOTE RECEIVER: To receive the signal of remote control
7. Balance: Control the volume balance from left to right.
8. IPOD/MP3 JACK-IPOD/MP3 connects to this jack.
9. Treble Control: Turn this knob to adjust the high frequencies of Channel 1
and Channel 2.
10. MIC 1 or MIC2 Inputs: KARAOKE or EXTERNAL MIC connects to these jacks.
11. Master Volume Control: Turn the this knob to adjust the level of master
volume
12. Bass Control: Turn this knob to adjust the low frequencies of Channel
1 and Channel 2.
13. Microphone Echo Volume Control Knob: Turn this knob to adjust the
microphone echo volume level.
14. Microphone Volume Control Knob: Turn this knob to adjust the volume of
microphone
15. Power LED Indicator: When you turn on the unit, the LED will be on.
16. FM ANTENNA CONNECTOR: Connect for FM antennas.
17. WIRELSS BT ANTENNA: Please pull the antenna out when using Wireless BT
input function
18. POWER VOLTAGE SELECTOR: 110V/220V Switch
19. FUSE: Replaceable Power Fuse
The Amplier uses a fuse for protection against surges and short circuit.
If the Amplier suddenly turns of and will not turn On. Check the fuse and
if necessary replace it with a 1. 5- Amp, 250-Volt, Fast-Acting, 5x20mm Fuse
(Not Supplied).
20. POWER SUPPLY: Connect to AC 110V/60Hz & 220V/50Hz outlet.
21. SPEAKER OUTPUT: Connect your speaker system to these terminals.
22. LINE OUTPUT: Connect the RECORD input jacks to these jacks.
23. AUDIO INPUT: Connect the audio output jacks of Aux 1 or Aux2 to these
jacks.
USB/SD Card & FM Button Control
1 2 3
1. Mode switch button for input choice like USB/SD/BT/FM
2. Play/Pause button
3 & 4. Previous or Next music button doubles as Volume + or Volume -
4
5
6
• Short press for Previous or Next music
• Press and hold for Volume+ or Volume-
5. RPT button: Repeat music control
6. EQ button control for Hall, Live, Jazz, Rock, Pop, Normal.
NOTE:
The USB input is ONLY mean to connect to a USB ash drive.
Connecting an MP3 player or computer directly to the USB ash drive input will
result in the unit failing to play the audio from those devices.
www.PyleUSA.com
4
www.PyleUSA.com
5

USB/SD Card Control Console Display Screen
1
5
6
1. Mode Displayed: “USB” or “SD” letters will be displayed here if the “MODE”
button is switched to USB mode or SD mode.
2. The current playing Music’s name will be displayed here.
3. The playing time of the current music will be displayed.
4. The number of the music will be displayed.
5. Formats like Mp3,WAV, WMA, APE, FLAC, etc. will be displayed.
6. “Fm Radio” letters will be displayed here if the ”MODE” button is switched to
FM Radio mode.
7. The current FM Frequency is displayed here
8. The current FM Channel will displayed here
MARK 1: There will be 6 dierent EQ will be displayed on the screen depending
on the setting has been choosed: Hall, Live, Jazz, Rock, Pop, Normal.
MARK 2: USB/SD Card/BT Control Console: After inserting a USB ash drive/
SD Card into the input terminal, be sure to set the input selector to USB/SD,
then press the mode button to choose between audio from the USB Port, SD
Card input, BT or FM radio. If you want to use the BT, check the below steps.
2
4
78
3
STEPS FOR CONNECTING WITH BLUETOOTH DEVICE
A. Press MODE button under the LCD display screen and enter into Wireless BT
mode.
B. Search on the Wireless BT device and you can nd the Wireless BT name
“Pyle Speaker”
C. Select the “Pyle Speaker” Wireless BT name and wait for the device to pair.
D. The Stereo Amplier will make a signal to conrm that the device has
successfully paired and screen will be display “BT CONNECTED”
E. Once being paired, you can play music from your BT device. You can also use
the control buttons on the unit to select the tracks from your BT device.
REMOTE CONTROL FUNCTION:
1. Standy By Button
2. Equalizer Button
(Hall, Live, Jazz, Rock, Pop, Normal)
3. Previous Song Button
Short press for previous music;
Press and hold for fast backward
4. Source Input Volume -
5. MODE: Menu Control Button
Press to select BT/USB/SD/FM
LINE IN etc audio input
6. MUTE Button
7. Source Input Volume +
8. USB/SD Switch Button
9. Next Song Button
Short press for next music
Press and hold for fast forward
10. Play/Pause Button
11. Repeat Song Button
Repeat one music or repeat all
12. Number Buttons for Song Selection
www.PyleUSA.com
6
www.PyleUSA.com
7

Features:
Wireless BT Connectivity:
• Compact Stereo Power Amplier
• Desktop Home Theater Receiver System
• Built-in BT for Wireless Music Streaming
• Next-Generation ‘SMT’ Surface-Mount Technology PCB
• Multi-Channel Audio Input Selection
• FM Radio with Digital LCD Display
• ID3 Tag Song Readout Displays Track Title
• Connect & Stream Audio from External Devices
• MP3 Digital Audio File Playback
• USB Flash Drive & SD Memory Card Readers
• USB Port Doubles as Device Charge Port
• Aux (3.5mm) Input Jack
• RCA (L/R) Input and Output Connector Jacks
• (2) Pairs Banana Plug Speaker Output Connectors
• Receives Wireless Signal for Audio Streaming
• Simple & Hassle-Free Pairing Setup
• Integrated Antenna for Extended Wireless Range
• Works with All of Today’s Latest Wireless BT Devices
(Smartphones, Tablets, Laptops, Computers, etc.)
• Wireless BT Network Name: ‘Pyle Speaker’
• Wireless BT Network Password: ‘0000’ (4 Zeroes)
• Wireless BT Version: 4.2
• Wireless Range: Up to 25’+ ft.
Technical Specs:
• Amplier Component Circuitry: Transistor Type
• Power Output: 200 Watt (@ 4 Ohm) MAX
• Tone Control: Bass, f=100Hz +/-8dB
• (2) 1/4'' Microphone Input Connector Jacks
• Front Panel Button Control Center
• Unique 'Track/Folder' Music Search Control Knob
• Treble, Bass, Master & Microphone Volume Adjustable
What's in the Box:
• Compact Home Amplier
• Remote Control
• Radio Antenna
www.PyleUSA.com
8
• Frequency Response: 20Hz - 20kHz
• Signal to Noise Ratio: >71dB
• T.H.D.: <0.1%
• Radio Station Memory: 60 Station Presets
• Digital Filetype Compatibility: MP3 with MP3, WAVE, WMA, FLAC, APE
• Maximum USB/SD Flash Support: 64GB
• Battery Operated Remote: Requires (1) x ‘CR-2025’ Battery, Included
• Power Supply: 110V/220V
• Dimensions: (L x W x H) 10.03'' x 7.87'' x 3.14'' - inches
www.PyleUSA.com
9
 Loading...