

Page 1
Visit Our Website
SCAN ME
PyleUSA.com
PDA4BU - PDA4BU.5
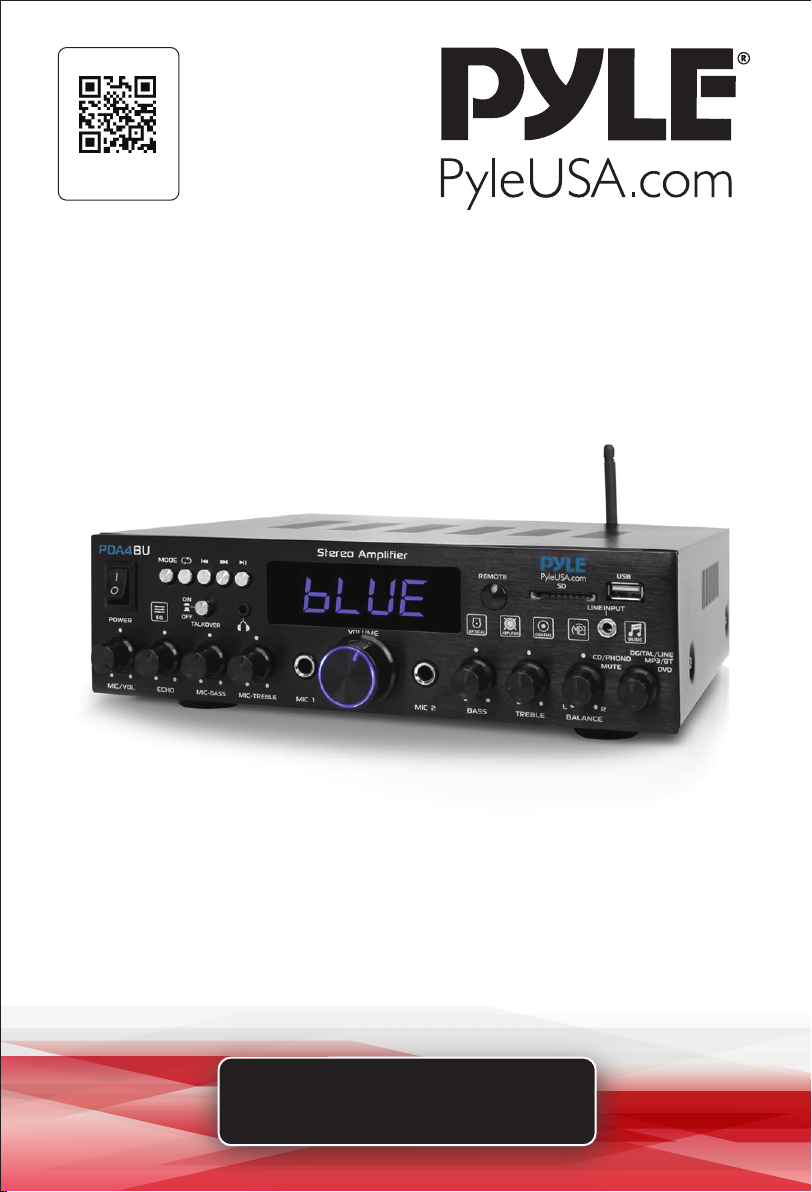
Bluetooth Stereo Amplifier Receiver
USER GUIDE
Page 2

READ ALL INSTRUCTIONS CAREFULLY BEFORE USING THIS PRODUCT.
RETAIN THIS OWNER’S MANUAL FOR FUTURE REFERENCE.
Features:
• USB Flash Drive & SD Memory Card Readers
• FM Radio with LED Digital Display
• Aux (3.5mm) Input
• Desktop Audio Mini Power Amplier
• Compact Home Theater-Stereo Receiver Style
• Built-in Bluetooth for Wireless Music Streaming
• Phono Inputs
• Optical/Coaxial Digital Signal Inputs
• Multi-Channel Audio Input Selection
• MP3/WAV Audio Files Support
• Connect & Stream Audio from External Devices
• (2) 1/4'' Microphone Input Jacks
• (2) Pairs RCA (L/R) Audio Input Connectors
• (2) Pairs Banana Plug Speaker Output Connectors
• (1) Pair RCA (L/R) Audio Output Connectors
• (1) 1/4'' Headphone Output Jacks
• Mic Talk-over Ability to Speak Over Audio, Karaoke Style
• Front Panel Audio Control Center
• Radio Station Auto-Search Scan
• 'Repeat Audio File Functions
• Treble, Bass, Master & Microphone Volume Adjustable
Bluetooth Connectivity:
• Receives Wireless Signal for Audio Streaming
• Simple & Hassle-Free Pairing Setup
• Integrated Antenna for Extended Wireless Range
• Works with All of Today’s Latest Devices
(Smartphones, Tablets, Laptops, Computers, etc.)
• Bluetooth Version: 4.2
• Bluetooth Network Name: 'PDA4BU'
• Wireless Range: 40'+ Ft.
What’s In The Box:
• Desktop Stereo Amplier • Remote Control • FM Antenna
www.PyleUSA.com
2
Page 3

Technical Specs:
• LED Screen Size: 3.3’’ x 1’’
• Remote Control Battery: 3V Lithium Cell (CR2025) Included
• MAX Power Output: 25 Watt (@ 4 Ohm)
• RMS Power Output: 20 Watt x 2 (@ 8 Ohm)
• Tone Control: Bass, f=100Hz +/-12dB, Treble, f=10 KHz +/-12dB
• Tone Control for Mic: Bass, f=100Hz +/-8dB, Treble, f=10 KHz +/-8dB
• Frequency Response: 20Hz-20 kHz
• Frequency Adjustment: +/-2dB
• Signal to Noise Ratio: >71dB
• T.H.D.: <1%
• Radio Station Presets: Up to 60 Stations
• Separation Degree: >48dB
• Power Supply: 115V/230V, Switchable
• Dimensions (L x W x H): 10.2'' x 9.8'' x 2.8'' -inches
FCC INFORMATION
WARNING: Changes or modications not expressly approved by the party responsible
for compliance could void the user’s authority to operate the equipment.
NOTE: This equipment has been tested and found to comply with the limits for a
Class B digital device, pursuant to Part 15 of the FCC Rules. These limits are designed to
provide reasonable protection against harmful interference in a residential installation.
This unit generates, uses, and can radiate radio frequency energy, and if not installed
and used in accordance with the instructions, may cause harmful interference to radio
communications. However, there is no guarantee that interference will not occur in a
particular installation. If this equipment does cause harmful interference to radio or
television reception, which can be determined by turning the equipment o and on,
the user is encouraged to try and correct the interference by one or more of the
following measures:
• Reorient or relocate the receiving antenna.
• Increase the separation between the equipment and receiver.
• Connect the equipment to an outlet on a circuit dierent from that to which the
receiver is connected.
• Consult the dealer or an experienced radio/TV technician for help.
This device complies with Part 15 of the FCC Rules. Operation is subject to the
following two conditions:
1. This device may not cause harmful interference.
2. This device must accept any interference received, including interference that may
cause undesired operation.
www.PyleUSA.com
3
Page 4

WARNING!
CAUTION: TO REDUCE THE RISK OF ELECTRIC SHOCK, DO NOT REMOVE
THE COVER OF THIS UNIT. THERE ARE NO USER-SERVICEABLE PARTS INSIDE.
REFER ALL SERVICING TO A QUALIFIED TECHNICIAN.
The lightning ash with an arrowhead symbol within an equilateral triangle is
intended to alert the user to the presence of “DANGEROUS” voltage within the
product’s enclosure that may be of sucient magnitude to constitute a risk of
electric shock to humans. Users should exercise extra caution when this symbol
appears in this instruction manual and follow all precautions as stated.
The exclamation point within an equilateral triangle is intended to alert the user
to the presence of important operating and maintenance (servicing) instructions
in this manual.
1. Read these instructions thoroughly before using this item.
2. Keep these instructions for future reference.
3. Heed all warnings.
4. Follow all instructions.
5. WARNING: To prevent re or electric shock, do not expose this equipment
to rain or moisture. Do not store or operate this product near any liquids.
6. Clean only with a dry cloth.
7. Do not store or operate this product near any heat sources such as radiators,
heat registers, stoves, or other apparatuses (including ampliers) that
produce heat.
8. Do not defeat the safety purpose of the polarized or grounding-type plug.
A polarized plug has two blades with one wider than the other. A grounding
plug has two blades and a round grounding prong. The wide blade or third
prong is provided for your safety. If the provided plug does not t your
outlet, consult an electrician for the replacement of the obsolete outlet.
9. Protect all wires connected to this unit from being walked on or pinched,
particularly at plugs and the point where they exit from the unit.
When removing the cord from the power outlet, hold the plug, not the cord.
10. Unplug the unit during lightning storms or when unused for long periods
of time.
11. When wiring this unit and all other equipment connected to it, ensure all
equipment is turned OFF.
12. Once installation and wiring are complete, power on all your equipment
with the volume and level controls turned DOWN. Once all the equipment
is ON, slowly raise the volume or level controls to their proper positions.
www.PyleUSA.com
4
Page 5
13. Before placing, installing, rigging, or suspending any product, inspect all
hardware, suspension, cabinets, transducers, brackets, and associated
equipment for damage. Any missing, corroded, deformed, or non-load
rated component could signicantly reduce the strength of the installation,
placement, or array. Any such condition severely reduces the safety of the
installation and should be immediately corrected. Use only hardware rated
for the loading conditions of the installation and any possible short-term,
unexpected overloading. Never exceed the rating of the hardware or
equipment.
14. Consult a licensed, professional engineer regarding physical equipment
installation. Ensure that all local, state, and national regulations regarding
the safety and operation of equipment are understood and adhered to.
15. Refer all servicing to qualied service personnel. Servicing is required when
the apparatus has been damaged in any way, such as if the power supply
cord or plug is damaged, liquid has been spilled, objects have fallen into
the apparatus, the apparatus has been exposed to rain or moisture, does
not operate normally, or has been dropped.
Introduction
To get the most from our Bluetooth Stereo Amplier Receiver, it is recommended
that you review all of the information provided in the instruction manual
before operating the equipment.
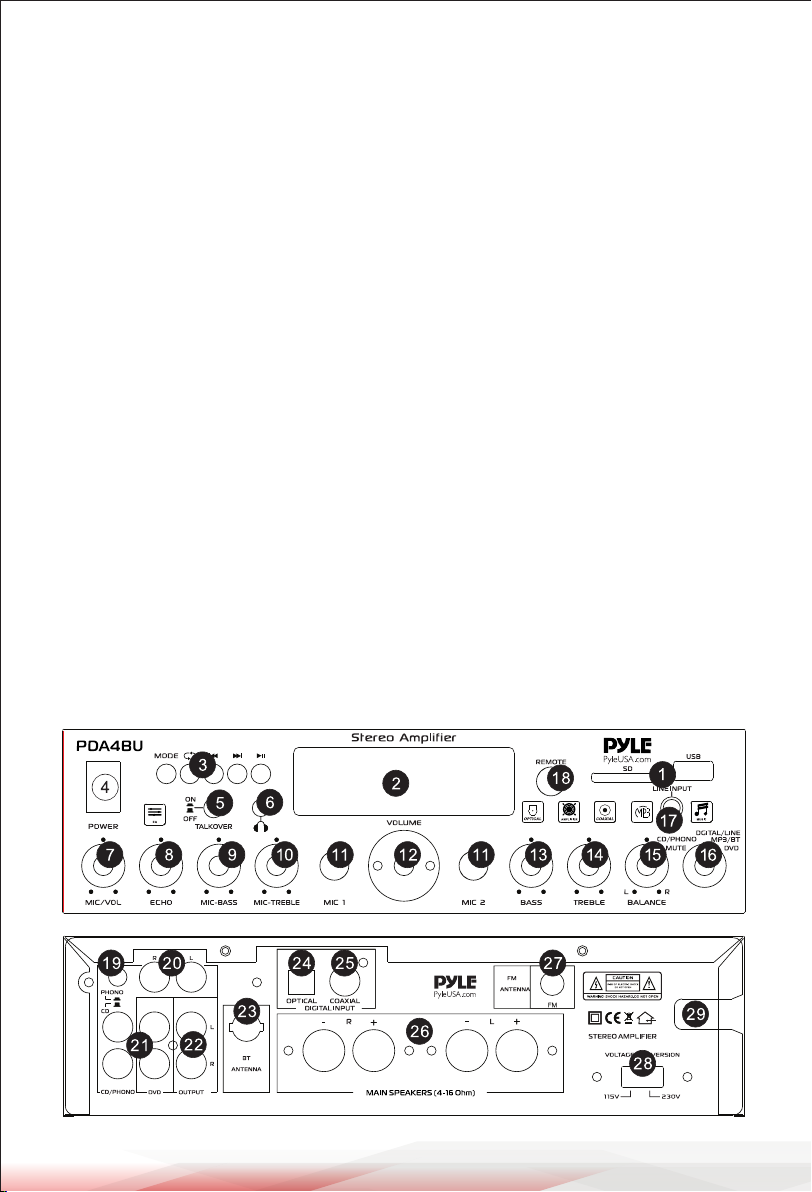
FRONT & BACK PANEL
www.PyleUSA.com
5
Page 6

1. USB PORT/SD CARD SLOT: After inserting a USB ash drive or SD Card into
the input terminal, be sure to set the input selector (16) to DIGITAL/LINE/
MP3/BT, then press the mode button to choose between audio from the
USB port, SD Card input, Line, Optical, Coaxial, Bluetooth, or FM radio.
2. LED DISPLAY SCREEN: Displays the input sources and track time information.
3. CONTROL BUTTONS
A. MODE BUTTON: Press this button to select one of the play modes:
USB/SD mode, FM mode, Bluetooth mode, Optical mode, or Coaxial mode.
The unit will automatically set to Bluetooth mode when turned on.
STEPS FOR CONNECTING WITH WIRELESS BT DEVICE
1. Press the MODE button to choose Bluetooth mode, and "BLUE" will be
displayed on the screen.
2. Search for the Bluetooth device name from another Bluetooth device, and
you will see the Bluetooth name – PDA4BU.
3. Select the PDA4BU Bluetooth name and wait for the device to pair.
4. The PDA4BU will emit a sound indicating that the devices have successfully
paired.
5. Once paired, you can play music from your Bluetooth device. You can also
use the control buttons on the unit to select tracks from your Bluetooth
device.
B. REPEAT BUTTON: This button allows you to play music in repeat mode
(All or Single mode).
ALL: All tracks on the USB or SD Card will be repeated in order without
interruption.
SINGLE: Repeats the track currently playing.
www.PyleUSA.com
6
Page 7

C. PREV BUTTON: Use this button for various functions depending on the
mode:
• In USB/SD mode, it selects the previous track.
• In FM/BT mode, it selects the previous channel.
• In FM/BT mode, holding this button decreases the volume.
D. NEXT BUTTON: Use this button for various functions depending on the
mode:
• In USB/SD mode, it selects the next track or folder.
• In FM/BT mode, it selects the next channel.
• In FM/BT mode, holding this button increases the volume.
E. PLAY/PAUSE BUTTON: Each press toggles between play and pause in
USB/SD or Bluetooth mode.
• Press the PLAY/PAUSE BUTTON once to auto-scan all frequencies.
NOTE: The USB input is ONLY meant to connect to a USB ash drive (thumb
drive). Connecting an MP3 player or computer directly to the USB ash drive
input will result in the unit failing to play the audio from those devices.
4. POWER SWITCH: Press this switch to power the unit on and o.
5. TALKOVER: Press this switch to lower the music volume when using the
microphone input.
6. HEADPHONE: The main speakers will mute after inserting a headphone
(3.5mm connector jack).
7. MICROPHONE VOLUME CONTROL KNOB: Turn this knob to adjust the
microphone volume.
8. MICROPHONE ECHO VOLUME CONTROL KNOB: Turn this knob to adjust
the microphone echo volume level.
9. MICROPHONE BASS CONTROL KNOB: Turn this knob to adjust the low
frequencies of the microphone.
10. MICROPHONE TREBLE CONTROL KNOB: Turn this knob to adjust the
high frequencies of the microphone.
www.PyleUSA.com
7
Page 8

11. MICROPHONE INPUTS: Connect a karaoke or external microphone to
these jacks.
12. MASTER VOLUME KNOB: Turn this knob to adjust the master volume.
13. BASS CONTROL KNOB: Turn this knob to adjust the low frequencies of
the music.
14. TREBLE CONTROL KNOB: Turn this knob to adjust the high frequencies
of the music.
15. BALANCE: Controls the volume balance from left to right.
16. INPUT SELECTOR: Turn this switch to choose the desired input source.
17. 3.5MM JACK: Connects to an MP3 player or iPod with a 3.5mm jack.
18. REMOTE RECEIVER WINDOW: Receives the remote control signal.
19. PHONO AND CD INPUT SELECTOR: Allows you to select between CD
and phono inputs.
20. PHONO INPUT: Signal input that allows the connection of audio sources
with phono level (2 x RCA connectors).
21. CD/DVD INPUT: Signal input that allows the connection of audio sources
with line level (2 x RCA connectors).
22. LINE OUTPUT: Stereo output for connecting to a RECORD input
(2 x RCA connectors).
23. BT ANTENNA: Pull the antenna out when using Bluetooth input.
24. OPTICAL INPUT: Inputs optical digital signal, supports PCM format only.
25. COAXIAL INPUT: Inputs coaxial digital signal, supports PCM format only.
26. SPEAKER OUTPUT: Connect your speaker system to these terminals.
27. FM ANTENNA CONNECTOR: Connects to an FM antenna.
28. POWER VOLTAGE SELECTOR: Selects between 115V and 230V power
supply input.
29. POWER SUPPLY CABLE: Connect to AC 115V/60Hz or 230V/50Hz outlet.
www.PyleUSA.com
8
California Prop 65 Warning
WARNING:
This product contains Nickel Carbonate which is known to the
state of California to cause cancer birth defects and
other reproductive harm. Do not ingest.
For more info go to: www.P65warnings.ca.gov
Page 9
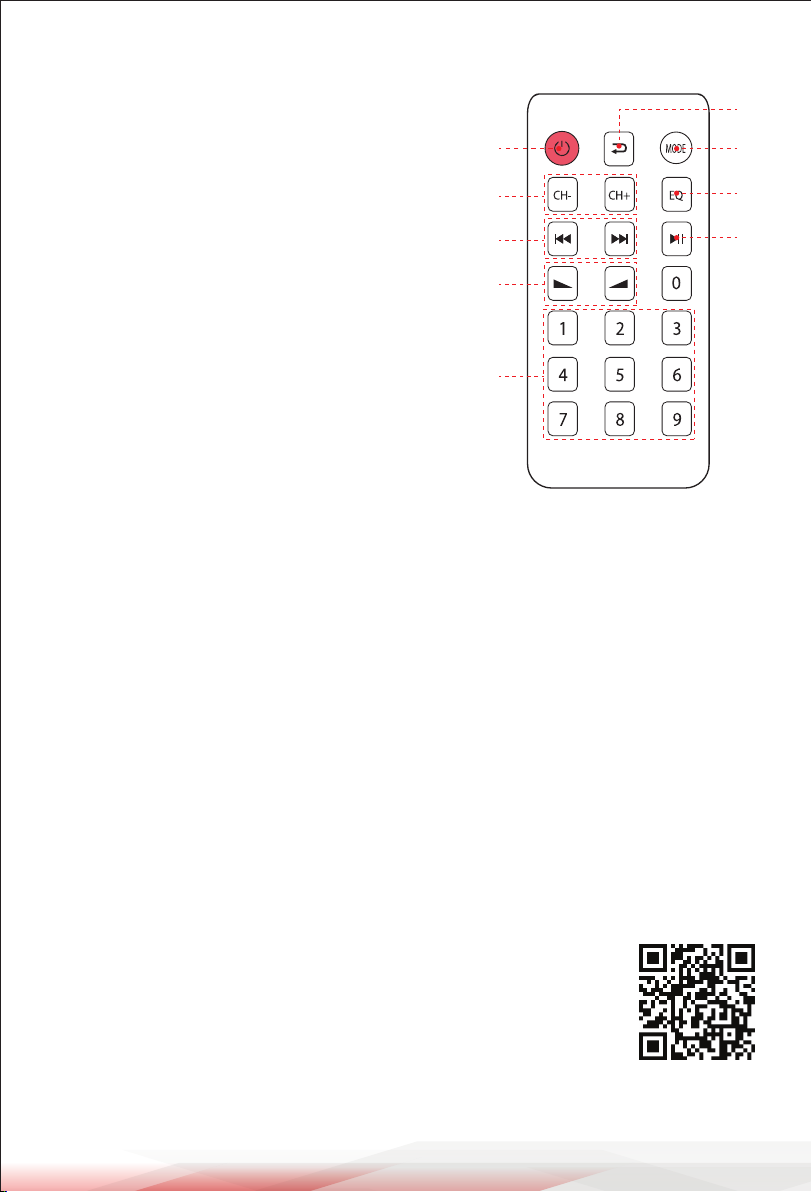
MP3 PLAYER REMOTE CONTROL FUNCTIONS
1. Press this button to turn the MP3 player ON
or OFF
2. In FM mode, press these buttons to select
the previous or next channel.
3. Press these buttons to select the previous or
next track in USB, SD, or Wireless BT mode.
4. Adjust the volume up or down.
5. Press the number buttons to directly select
tracks. The unit may take 1-2 seconds to
respond in USB or SD mode.
6. Press this button to activate the repeat
mode.
7. Press this button to select the playback
mode, such as USB, SD, FM, or Wireless BT.
8. EQ function: Select a pre-set equalizer
mode designed for dierent audio settings.
9. Press this button to play or pause the MP3.
1
2
3
4
5
CLEANING AND STORAGE
Cleaning
• Use a dry, soft cloth to wipe the exterior surfaces.
• Avoid using water, solvents, or abrasive cleaners that may damage the unit.
6
7
8
9
Storage
• When not in use, store the Stereo Amplier Receiver in a cool, dry place.
• Ensure all cables are disconnected and neatly coiled.
• Avoid exposure to direct sunlight, extreme heat, or moisture.
Register Product
Thank you for choosing PyleUSA. By registering your product,
you ensure that you receive the full benets of our exclusive
warranty and personalized customer support.
Complete the form to access expert support and to keep your
PyleUSA purchase in perfect condition.
Start Here
Model Number:
PDA4BU
PyleUSA.com/pages/register
www.PyleUSA.com
9
Page 10

Questions or Comments?
We are here to help!
Phone: 1.718.535.1800
PyleUSA.com/ContactUs
 Loading...