

Page 1

- 1 -
Brand New 3rd Generation Parking Mode
(All-round guardian)
FHD 1080 Dual Dash Camcorder
User’s Guide
<Version 01>
Use only the original
DC 5V car charger
A9
Page 2

- 2 -
Introduction
Thanks for purchasing A9 Camcorder. Please read the included
manual before using this product and confirm whether the items in
the package are complete. If you find any shortage or damage,
please contact the original vendor immediately. The contents of this
product manual are subject to change without notice.
1. Package Content
2. Precautions
3. Functional Descr iption
4. Quick installation guide
5. Buttons and appeara nc e
6. Menu List
7. Features
8. Specification
9. Tr ouble Shooting
Page 3

- 3 -
Package Content
A9 Main Unit Rear Cam Main Unit
Tighten Hook Seat S tick Seat
Hand screw Car holder
Car charger
(with 4 meter USB cable)
Rear lens extension cable (5 meter)
Rear lens cable (0.3 meter) Rear lens cable (0.08 meter)
Page 4

- 4 -
Precaution
Thank you for choosing our A9 Camcorder. Please refer to below
recommendations for safe use o f the produc t :
1. Insert the Micro SD card in the memory card slot before power on
the product.
2. For first time usage, please enter the function menu and set up
correct date and time before using.
3. Please make sure no obstacle is near the lens and keep the
windshield clean of any dirt and dust for clear recording images.
4. Please ensure all installations are firmly done.
5. For your safety, do not operate the Driving Camcorder during
driving.
6. Keep the lens clean. Clean the Driving Camcorder with dry and
soft cloth. Do not clean with detergent or damp cloth, as liquid
may be absorbed by it and lead to damage.
7. Unplug the power cord (of car charger) and stop using the Driving
Camcorder if any abnormality is encountered. Do not attempt to
disassemble or repair by yourself.
We recommend you to fully charge the battery before using your A9
Camcorder for the first time.
Charge the battery with the included DC 5V car charger by inserting it in
the cigarette lighter for about 10 minutes. The power status LED
indicator wil l lig ht in blue before the battery is fully charged.
Page 5

- 5 -
Functional Desc ript ion
1. Parking mode is Off by default (factory setting).
To turn it on, please enter menu selection first then turn it on from there.
Parking Mode:
After the camcorder is being turned off, it still can use its built-in battery and
G-Sensor to detect outside impact to the car. When impact is happened, if the
force of the impact reached the G value being setup by you, the camcorder will
turn on and record for a period, then turn off itself.
Application:
When parking on the road side, if your car happened to be hit, our camcorder
will turn on and record. This recording will record video/sound at that moment
for you.
Precaution:
1) If your car’s charger continue charging even after the engine is turn off,
then we suggest you to unplug the camcorder’s charging cable from the
car charger to avoid power consuming.
2) How to determine your car’s charger is power consuming or not: After the
engine is turned off, please check to see if camcorder’s power LED
(GREEN) is ON? If it is ON, then your car charger continue consumes
power after the engine is off.
2. Auto/Manual Lock File Function. (Lock file’s time definition please refer to next
page, in Loop Recording Setup Section)
Definition: While driving, bumping car will start auto lock file function, which
can avoid this video to be overwritten by the following recording.
If Auto Lock is not ON, you can still manually lock the current video and save it
from being overwritten.
Note:
1) When the car bumping is too slight for the Auto Lock File to turn on itself,
you can always using manual Lock File button to lock your file. (this
button is located on the left of the Screen)
2) During emergency, whenever you need to save your file, you can use
Manual Lock File function to save this file.
3) In order to save locked files, system will use 2G space from your SD card
Page 6

- 6 -
as the space for the locked files. When this space is full, you will no
longer able to lock file. When this happen, you’ll have to clean your
locked files to make room for it.
4) You can use the following methods to clean up your locked files space:
(1). Format your SD card.
(2). Delete all files from your SD card.
(3). Enter menu selection to delete unwanted files.
3. Setup time for the loop recording (default is 3 min.)
There are 3 types of loop recording time, 1/3/5 minutes.
If you set it to AUTO, it will automatically determine the cycle time according to
the capacity of your memory card:
Below 16G: Loop Recording time set to be 1 minute
Above 16 G: Loop Recording time set to be 3 minutes.
Note:
1) When Loop Recording time is set to 1/3/5 min., the recording length
depends on your setting.
2) If lock file happened, system will recording for 60 sec. and save the video
to SD card’s EVENT folder.
3) The file space for locked files is 2GB, if you are using 8G SD card, your
actually Loop Recording space is around 6GB (varied after formatting).
If you need bigger space to save files, please use larger size SD card.
4. Setup Sensibilities for G-Sensor
Definition: A9 has 7 values for G-sensor’s sensibility (Default, Higher, and
Lower). You can setup it according to your own choice.
5. Reset Key (locate under A9 main unit)
Definition: When screen is freeze, or functional key is mall-function, please
use a needle stick into the reset hole under the main unit to re-start the unit.
Page 7
- 7 -
6. Motion Detection Feature (default is OFF)
Definition: When unit is ON, if the surrounding is in still condition, when
something change on the screen, it will start the recording. When screen is
still for 30 sec., it will stop the recording and back to standby mode.
Note:
1) Use this feature when the screen is still or in-door.
2) Don’ t use it whi le drivin g. (a void when hi gh-speed driving, system might
think the images are still)
Quick installation Guide-(Setup)
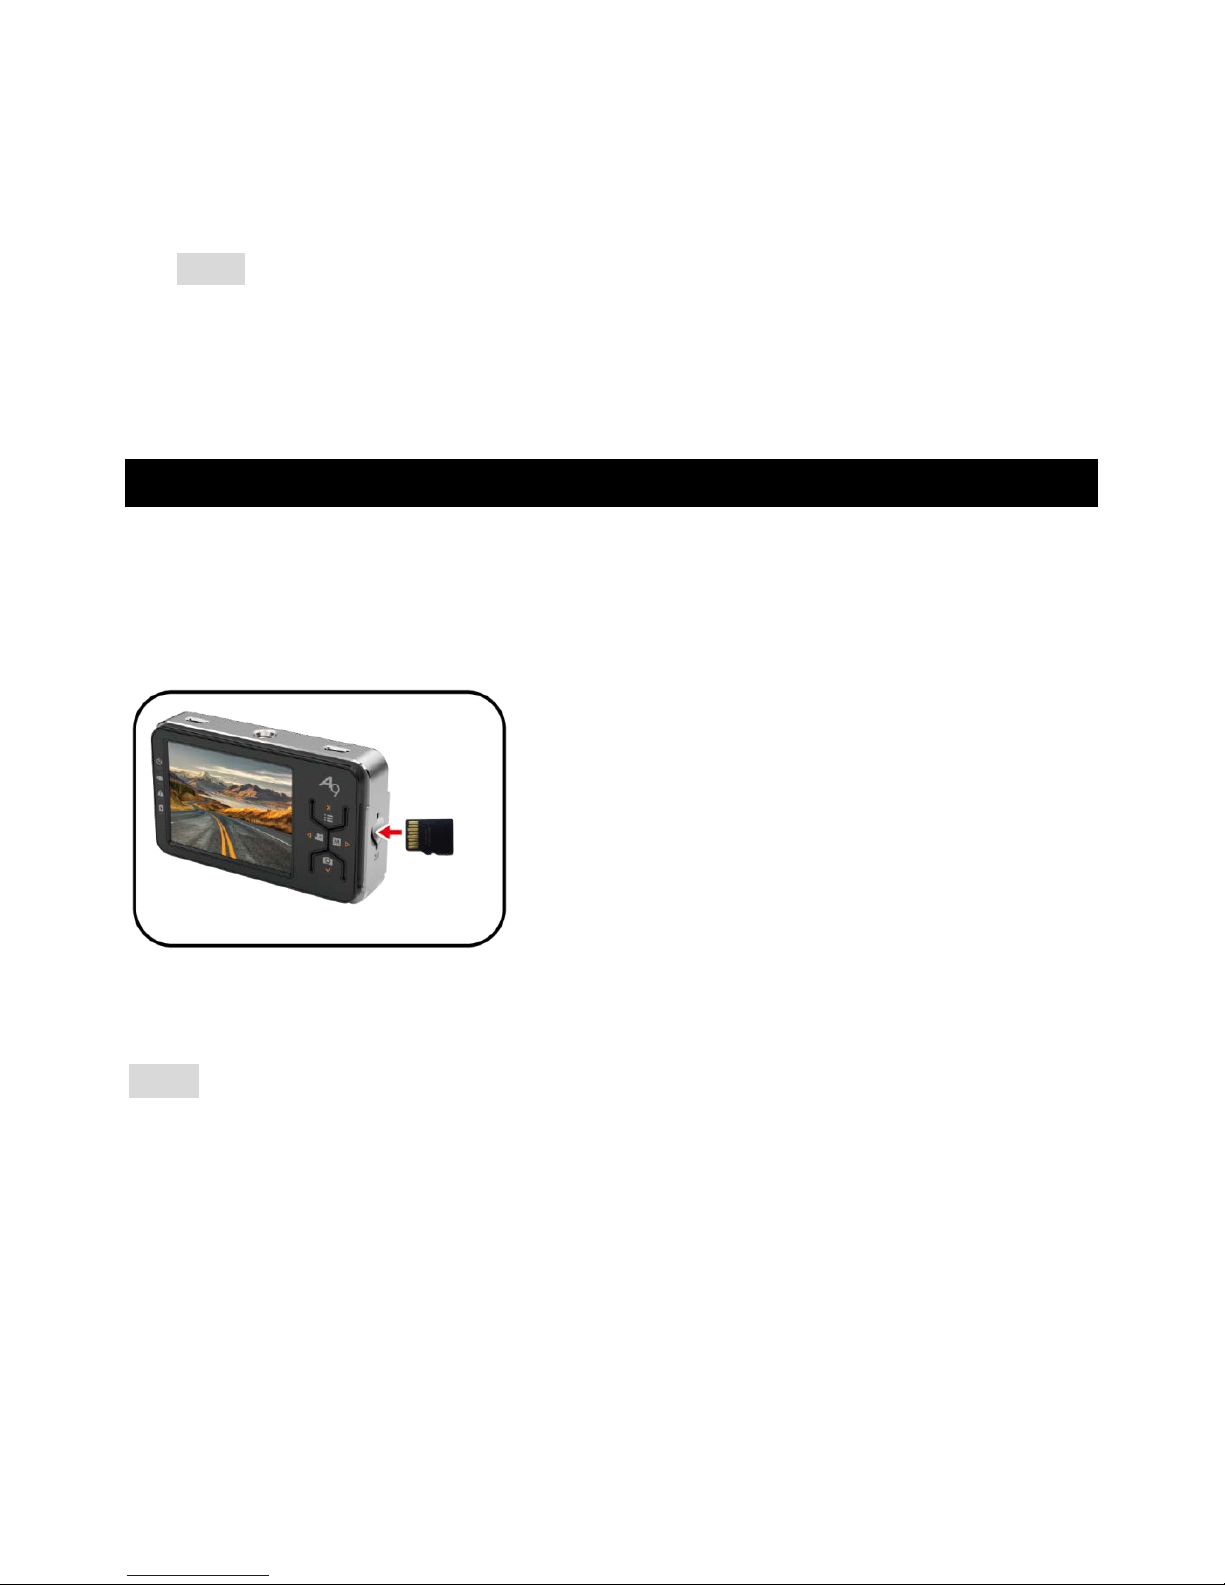
< Step 1: Insert the micro SD card >
-Insert the micro SD card in the memory card slot until it “clicks” into the
slot as illustrated below:
-Remove the memory card:
Press the card gently dow nward, the memory w ill be released from the slot .
Note:
The Camcorder supports micro SD/SDHC 32GB(above) memory
card.
Insert the memory card in correct direction, otherwise the Camcorder
or the memory card may be damaged.
If the memory card cannot be detected by your Driving Camcorder,
please remove and re-insert the memory card, or replace with a new
memory card.
Page 8
- 8 -
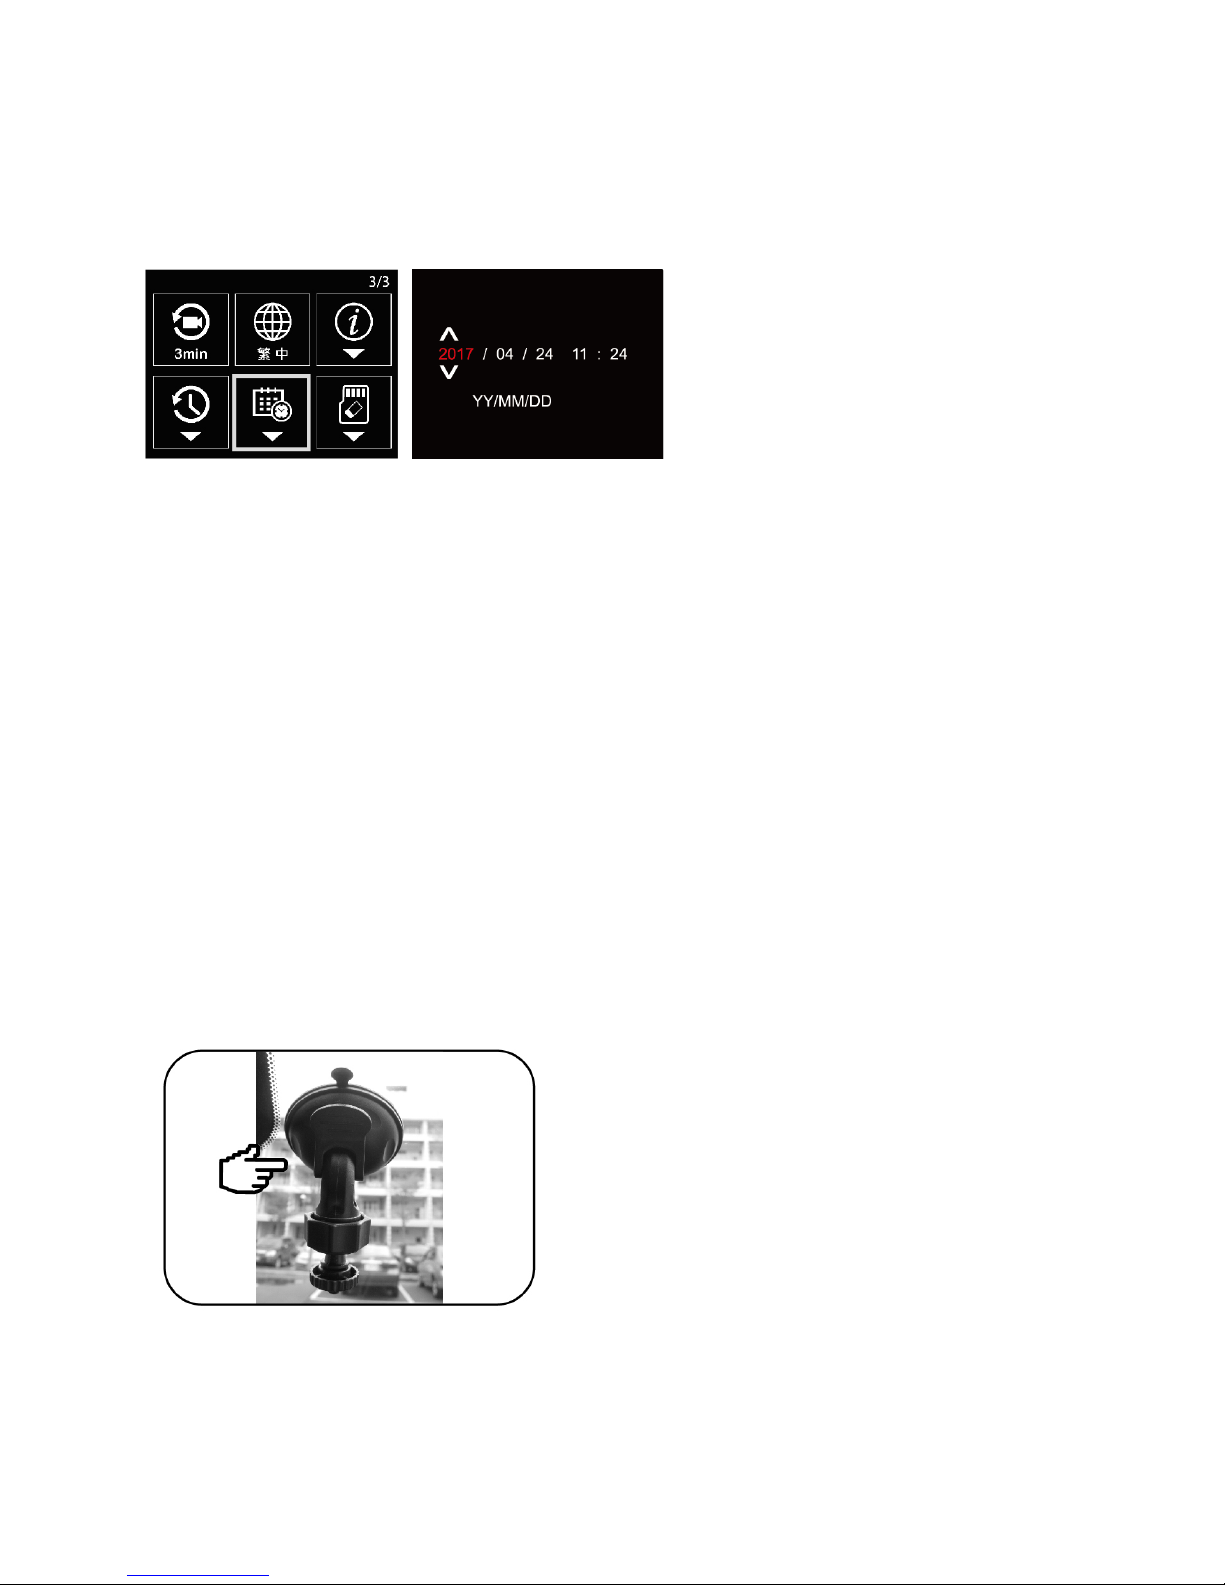
<Step 2: Setup date and time>
For first time usage, please enter the function menu and set up correct date
and time before using.
<Step 3: Format the SD Card>
In order to maintain the stability of the video, when use it for the first
time, please insert the memory card in the recorder and formatting it.
To ensure the recording stability, we suggest you periodically format
your SD card every 1-3 month (depending on your driving frequency).
<Step4: Install the mounting bracket>
Please clean the windshield position where you’re going to place your
cam recorder .
Fix the suction cups on the windshield .
Page 9

- 9 -
<Step5: Install the Cam Recorder>
Screw in the cam recorder into the car holder. (The scr ew of the car
holder is screwed into the frame screw hole in the cam recorder).
Tighten the cam recorder to the car holder, then turn the top screw
knob on the car holder in the opposite direction to tighten and fix.
Turn clockwise to release the ball shaft knob, adjust to the best
shooting angle position, and then turn the ball shaft knob
counterclockwise rotation to fixed it.
Installation Skills:
1. Please use a clean cloth (or toilet paper) to wipe the windshield
where you want to install the suction cup.
2. Make sure the suction cups are clean. (can use cloth to clean
them first)
3. Press the air out of the suction cups and push out the fixed frame
bar.
4. Adjustment Criteria:
4-1 The bottom edge on the recorder screen should see the front
of the car’s left and right angle visual fields.
4-2 The center of the screen is at the center of the car.
After confirming the above actions, now you can turn the shaft
crew knob clockwise to lock it.
Precaution: Normally we install the camcorder behind the rear
mirror or little be right from it. The principle is not to obstruct
your visual and keep the driving safety.
Page 10

- 10 -
<Step 6: Install the Power Supply and Wiring>
1. Connect the USB power supply (Micro USB) of the car charger to the
cam recorder’s Power In.
2. Make a small round ring of the car charger wire around the rear mirror
or car holder rod. (This can buffered vehicle driving shaking cause the
power connector terminal loose)
3. After complete, hide the car charger wire along the car interior seams,
door frame glue, foot carpet (pad) for windi ng fixed action.
4. Use a coin or hard card to push the w i re into the c ar sea ms and fixed it.
5. Place the extra car charger wire under the foot carpet (pad).
6. Connect the car charger head to the car cigarette lighter to complete
the installation.
Page 11

- 11 -
Precaution:
When the vehicle is started, the recorder w ill automatically turn on and
start the automatic recording action. (The automatic recording start
function should be turned ON)
Use only the original DC 5V 1A car charger.
<Step 7: Install the rear cam next to the drive recorder>
This installation method achieves the recording of both video in front
of the car and video inside the car.
Please remove the rear cam tighten hook seat, and combine it with
the rear cam.
With the attached rear cam cable, connect one end to the rear cam
USB, the other end to the main unit’s rear cam USB terminal.
Page 12

- 12 -
<Step 8: Install the rear cam to the car’s rear windshield>
This installation achieves the recording of video of both in front of the
car and behind the car.
Please remove the rear cam sticker seat frame, combine it with the
rear cam.
Wipe clean the rear windshield location where you are going to install
your rear cam.
Tear the back film, attached the rear cam holder seat frame to the
location.
Suggestion: The best location for the rear cam is in center in the top of the
rear windshield.
Page 13

- 13 -
<Step 9: Install the rear cam and wiring>
Please take out the attached lens cable (30 cm), connect one end
with the rear lens, the other end to the USB of the lens extension
cable (5 meters).
Wir ing the lens extension cable (5 meter) along the car, and
connect it to the front recorder unit’ s USB terminal.
< In-Car wiring installation complete wiring illustration >
Page 14

- 14 -
Precaution:
Disconnection between car charger and cigarette lighter tends to occur du e
to different cigarette lighter positions among different car models and the
vibration of the car during driving. This disconnection may lead to abnormal
power On/Off switching.
How to cope with it::
Push the two grounding plates at the car charger’s connector outward
slightly; this can help to firm the connection.
Use Velcr o str ips to fix the car charger on the cigarette lighter.
In case of a cigarette lighter extension set is used to supply power for
multiple devices, please ensure it has sufficient power and enough
consumption current for multiple devices connected to it.
Otherwise, it may lead to malfunctions for devices connected to it e.g.
Driving Camcorder, navigators, and mobile phone.
To solve such problem, connect the Driving Camcorder directly to the
cigarette lighter or replace the extension set with one w higher amp value.
Page 15

- 15 -
Buttons and A ppearance
A
Rear lens connector
B
Connect to the car holder
C
Charging seat
(Connected to the car charger)
D
Power button Power ON / OFF
E
Lock button Lock File
A B C
D
E
Page 16

- 16 -
F
Memory Card Slot
G
Function Button
Mode Record Menu
Enter menu
Exit Menu
Return to record
Switch front / rear lens
video display
Move left
Enter Event Files Move right
Photo shot Switch, confirm
H
G
F
Page 17

- 17 -
H
Action Indication
LED Indication Action
Power
Power On: Green LED ON.
Power Off: Green LED OFF.
Record
Record On: Green LED ON.
Record Off: Green LED OFF.
Alarm
No SD Card:Red LED ON.
SD Card Error:R ed LED O N.
SD Card Inserted: LED OFF.
Battery
Charging:Green LED ON.
Low Power:Red LED ON.
Fully Charged: LED OFF.
Page 18

- 18 -
Menu List
Menu Icon Description Sub-Menu
VIDEO
EVENT
JPG
Voice Rec
Volume
Camera Mode
Page 19

- 19 -
Menu Icon Description Sub-Menu
Front Cam EV
Rear Cam EV
Page 20

- 20 -
Menu Icon Description Sub-Menu
G-SENSOR
lock sensitivity
Shutdown
Collision Start
Sensitivity
Motion Detect
LCD Auto Turn
Off
Page 21

- 21 -
Menu Icon Description Sub-Menu
Cycle Record Time
Language
System Version
Factory Reset
Date & Time
20YY / MM / DD / HH:MM
YY / MM / DD
Format SD-Card
Page 22

- 22 -
Features
* Peace of mind voice prompt
* Fast detection mechanism
* Fast boot video
* Shutdown collision start recording
* Motion detection recording
* Independent EV adjustment
* WDR
* Video delay shutdown
* Record side shot
* F/NO 1.8
* 146゜Wide angle video
* Computer video track playback program
* Capture
Page 23

- 23 -
Specification
MainChip
main unit:iCatch SPCA6350A
rear cam:iCatch SPCA7003
Image Sensor
main unit:SONY IMX323 (2M)
rear cam:SONY IMX323 (2M)
High Resolution
main unit:1920x1080@30
rear cam:1920x1080@30
Lens
F/NO:F/1.8
FOV(D):146 Degree
LCD 2.4" TFT
Storage Media Micro SD / SDHC
Battery Built-in 700mAh
I/O
SD Card (Micro SD)
Power Supply (Micro USB)
Rear Cam (Micro USB)
Microphone / Speaker YES
Dimension
main unit:87.2 x 52 x 19.4 (mm)
87.2 x 52 x 29.4 (mm)(with Lens)
rear cam:25.0 x 50.0 x 29.0 (mm)(with Lens)
Page 24

- 24 -
Trouble Shooting
<Video Related>
Q1: After the installation is finished, the recorder does not start the
recording automatically when the car is started?
Ans:
(1) Please check whether the recorder is turn on after the car starts first.
(2) If the recorder is ON but not recording automatically,please reinstall
your SD card.
(3) If recorder if not ON(red LED is OFF),please make sure the charging
cable is plug into the car cigarette lighter. If not, plug it in.
(4) Once the car charger is plug in, the green light will turn ON.
(5) Car charger’s USB end does not connected with recorder’s USB
terminal.
Q2: Recorder could not either turn On/OFF normally?
Ans:
(1) Try to long press the power button for 2 seconds first.
(2) If the unit does not res tart, po ke the Reset key un der the unit to touch i t
then press the Power key to see if it backs to normal.
(3) If the above methods failed, please check to see if the unit has
sufficient power. (If not, recharge the unit with a USB power c harg er)
(4) Please check the car chargers two power terinals’ connection
(5) Please check to see if the SD card has sufficient capacity。
Q3: While driving, the recorder suspend the recording frequently
without any warning, then back to recording after a while?
Ans:
(1) This is caused by the “Motion Detection” function.。
(2) Please turn off “Motion Detection” function while driving。
Page 25

- 25 -
Q4: When play back the video on the computer there are slightly
shaking phenomenon?
Ans:
(1) Whenever vehicle is idle or driving will generate vibration. (Depending
on the type of engine, shock absorbers, etc., degree of vibration will be
different) Sometimes this vibration will also cause video produce
“resonance”
(2) Please lock all the screws tightly. If the shaking it too large, please
contact the car maintenance shop。
Q5: Play the video files with a computer using the SD card, there is
some pause phenomenon?
Ans:
(1) Please confirm the computer meets the following specifications:
CPU 2.0GHz, Memory 1GB or above.
(2) Turn off the computer’s resident program.
(3) We recommended to use C10 or above memory card for the
recording.。
(4) Copy the files to the com puter from the SD card first.
Q6: After following the instal lation steps, the recording images is still
blurred?
Ans:
(1) May be during installation, the recorder lens leaves a fingerprint or
windshield stains, or water /grease?
(2) Please make sure the windshield is clean。
(3) Please make sure the lens is clean。
(4) If it is dirty, please wipe clean with eyeglass cloth (wiping cloth)
(5) If the installation position is too high, the angle with the windshield is
too large, this will cause the image unclear phenomenon.
Page 26

- 26 -
Q7: The purpose of motion detection?
Ans:
(1) This function is mainly used when the car is at rest. If the image
does not change, the recorder will switch from recording to standby in
order to save SD card space. When the image changed, recorder
will start recording aut oma tically.
(2) Motion detection has a buffer of time to actually start recording. If
anything happened in the delayed time, you won’t be able to record it.
So our recommendation is don’t turn on this function unless it is
necessary. Default setting is off.
Q8: How to use motion detection?
Ans:
(1) Get into the menu and turn the motion detection function ON then exit.
(2) When the image in front of the lens is still about 10 seconds, the unit
will switch into standby mode.
(3) If the image in front of the l ens is moved, the reco rd switch to recordin g
automatically.
Q9: Can I continue recording when the memory card is full?
Ans:
(1) Please confirm the loop recording setup correctly, the time value must
be set in 1/3/5 minutes, cannot be set to OFF.
(2) If the setting is OFF, when the SD card is full, recording is stopped.
(3) Loop recording can set to 1/3/5 minutes。
(4) The default setting for loop recording is 3 minutes. When the SD
card capacity is not enough to do video recording, the oldest video file
will be overwritten by the new file.
(5) As long as the loop recording is ON, you don’t have to worry about the
SD card capacity for video recording。
Page 27

- 27 -
Q10: Memory card has been selected the highest speed, why still
appear too slow warning?
Ans:
(1) The production process is different for each SD card brand, advertised
as high speed R/W still will thus cause different W/R speed.
(2) If after using cam recorder reformatting it still does not improve this
situation, please use your computer to format it again (select normal
speed, quick formatting).
(3) If the above does not solve your problem, please use another SD c ar d
instead.
Q11: Memory card failure, could not use?
Ans:
(1) Use cam recorder to format it.
(2) Use the computer’s low-level format ting program to format it.
(3) If the above methods could not solve your problem, please contact
your memory card manufacturer for memory card rep air or u se another
memory card.
Q12: How long can be recorded under normal usage?
Ans:
With an 32GB SD card, can be recorded for about 200 minutes.
Q13: Recorder automatically On/Off or could not start recording?
Ans:
(1) Unplug the SD Card first. If the screen display is back to normal,
confirm the failure of the memory card cause this.
(2) Please refer to the Answer for memory failure section.
Page 28

- 28 -
<Installation Related>
Q14: How to save the recorded files to the com put er ?
Ans:
(1) Take out the SD card from the recorder, and insert it into a computer
card reader (its name will be varied for different system)
(2) Connect each end of the attached USB cable to the cam recorder and
computer can read files from recorder directly.
(3) It’s not recommended to disassemble the entire recorder cause
frequent removal will leave dirt to the sucker mount cups, thus aff ec t
it’s attachability on the glass later.
Q15: What’s the meaning for the recorder’s LED display?
Ans:
Refer to [Introduction of the Function Keys and Appearance] section in this
manual.
Q16: Use satellite navigation, dash cam and smart phone in the car at
the same time, but only has on car cigarette lighter?
Ans:
(1) You can purchase a cigarette lighter expander.
(2) When using an expander, please confirm the spec of it. The
corresponding voltage and current must meet the back-end
connection equipment (such as: mobile phones, navigators, recorders
etc.) power requirement.
(3) It’s recommended to avoid multiple high-current devices connected to
the same cigarette expansion device at the same time.
Q17: How to fix the mounting bracket to the windshield?
Ans:
(1) Please wipe clean the windshield area for the car holder first。
(2) Adjust the recorder to its best shooting angle then fix it.
(3) It is recommended not to dissemble the vehicle fixed frame too often.
Cause the suck cups could easily accumulate dirt, which lead to
insufficient suction power for it to attached on the windshield.
(4) If suction cup could not suck to the windshield easily, it is
recommended to use cleaning fluid and water to clean the suction cup,
air-dried before usage.
 Loading...