

Page 1

TM
Getting Started With
™
Your PWS
BEV-340
Pure Water Appliance
Includes setup and maintenance information for the
™
PWS
BEV-300 Series Pure Water Appliances.
Page 2

Contents
Chapter 1 Getting Started . . . . . . . . . . . . . . . . . . . . . . . . . . . . . . . . . . . . . . . . . . 4
Setting Up Your BEV System . . . . . . . . . . . . . . . . . . . . . . . . . . . . . . . . . . . 4
Unpack the System . . . . . . . . . . . . . . . . . . . . . . . . . . . . . . . . . . . . . . . . . 4
Planning the Installation. . . . . . . . . . . . . . . . . . . . . . . . . . . . . . . . . . . . . . 5
Attaching the Pre-Filters . . . . . . . . . . . . . . . . . . . . . . . . . . . . . . . . . . . . . . 5
Installing the Chrome Faucet . . . . . . . . . . . . . . . . . . . . . . . . . . . . . . . . . . . 5
Installing the Feed Water Saddle Valve . . . . . . . . . . . . . . . . . . . . . . . . . . . . . 6
Installing the Drain Saddle Valve. . . . . . . . . . . . . . . . . . . . . . . . . . . . . . . . . 6
Mounting the De-Ionization Module . . . . . . . . . . . . . . . . . . . . . . . . . . . . . . 6
Mounting the Pre-fi lter/RO Assembly . . . . . . . . . . . . . . . . . . . . . . . . . . . . . 7
Connecting the System Components. . . . . . . . . . . . . . . . . . . . . . . . . . . . . . 7
Operating Notice . . . . . . . . . . . . . . . . . . . . . . . . . . . . . . . . . . . . . . . . . . 8
Flushing . . . . . . . . . . . . . . . . . . . . . . . . . . . . . . . . . . . . . . . . . . . . . . . .8
Chapter 2 Getting to Know Your BEV System . . . . . . . . . . . . . . . . . . . . . . . . . . . . 9
A Look At The Seven Stages . . . . . . . . . . . . . . . . . . . . . . . . . . . . . . . . . . . 9
Stage One . . . . . . . . . . . . . . . . . . . . . . . . . . . . . . . . . . . . . . . . . . . . . . . 9
Stage Two . . . . . . . . . . . . . . . . . . . . . . . . . . . . . . . . . . . . . . . . . . . . . . . 9
Stage Three . . . . . . . . . . . . . . . . . . . . . . . . . . . . . . . . . . . . . . . . . . . . . . 9
Stage Four. . . . . . . . . . . . . . . . . . . . . . . . . . . . . . . . . . . . . . . . . . . . . . . 9
Stage Five . . . . . . . . . . . . . . . . . . . . . . . . . . . . . . . . . . . . . . . . . . . . . . 10
Stages Six and Seven . . . . . . . . . . . . . . . . . . . . . . . . . . . . . . . . . . . . . . . 10
Component Description . . . . . . . . . . . . . . . . . . . . . . . . . . . . . . . . . . . . 10
Feed Water Saddle Valve . . . . . . . . . . . . . . . . . . . . . . . . . . . . . . . . . . . . . 10
Drain Saddle Valve. . . . . . . . . . . . . . . . . . . . . . . . . . . . . . . . . . . . . . . . . 10
Sink Mounted Chrome Faucet . . . . . . . . . . . . . . . . . . . . . . . . . . . . . . . . . 10
Sediment Pre-fi lter . . . . . . . . . . . . . . . . . . . . . . . . . . . . . . . . . . . . . . . . 10
Granular Activated, Unidirectional, Carbon Pre-fi lters . . . . . . . . . . . . . . . . . . 10
RO Pressure Vessel. . . . . . . . . . . . . . . . . . . . . . . . . . . . . . . . . . . . . . . . . 10
RO Membrane . . . . . . . . . . . . . . . . . . . . . . . . . . . . . . . . . . . . . . . . . . . 11
De-Ionization (DI) Module . . . . . . . . . . . . . . . . . . . . . . . . . . . . . . . . . . . . 11
Built-in Flush Valve . . . . . . . . . . . . . . . . . . . . . . . . . . . . . . . . . . . . . . . . 11
Operating Parameters. . . . . . . . . . . . . . . . . . . . . . . . . . . . . . . . . . . . . . 11
Pressure . . . . . . . . . . . . . . . . . . . . . . . . . . . . . . . . . . . . . . . . . . . . . . . 11
pH . . . . . . . . . . . . . . . . . . . . . . . . . . . . . . . . . . . . . . . . . . . . . . . . . . . 12
Chlorine . . . . . . . . . . . . . . . . . . . . . . . . . . . . . . . . . . . . . . . . . . . . . . . 12
Sediment . . . . . . . . . . . . . . . . . . . . . . . . . . . . . . . . . . . . . . . . . . . . . . 12
Iron . . . . . . . . . . . . . . . . . . . . . . . . . . . . . . . . . . . . . . . . . . . . . . . . . . 12
Chapter 3 Maintenance and Servicing . . . . . . . . . . . . . . . . . . . . . . . . . . . . . . . . 13
Flushing . . . . . . . . . . . . . . . . . . . . . . . . . . . . . . . . . . . . . . . . . . . . . . . 13
Filter Replacement . . . . . . . . . . . . . . . . . . . . . . . . . . . . . . . . . . . . . . . . 14
Replacing the Sediment Pre-fi lter . . . . . . . . . . . . . . . . . . . . . . . . . . . . . . . 14
Replacing the Twin GAC Pre-fi lters . . . . . . . . . . . . . . . . . . . . . . . . . . . . . . 14
Replacing the 4-Stage DI Module . . . . . . . . . . . . . . . . . . . . . . . . . . . . . . . 14
Returning the System to Service . . . . . . . . . . . . . . . . . . . . . . . . . . . . . . . 14
2
Page 3

Chapter 4 Frequently Asked Questions . . . . . . . . . . . . . . . . . . . . . . . . . . . . . . . 16
Chapter 5 Limited Warranty . . . . . . . . . . . . . . . . . . . . . . . . . . . . . . . . . . . . . . . . 18
What the Warranty Covers. . . . . . . . . . . . . . . . . . . . . . . . . . . . . . . . . . . . 18
Exceptions to Lifetime Warranty . . . . . . . . . . . . . . . . . . . . . . . . . . . . . . . . 18
What We Will Do To Correct an Inconvenience . . . . . . . . . . . . . . . . . . . . . . . 18
How You Can Get Service . . . . . . . . . . . . . . . . . . . . . . . . . . . . . . . . . . . . 18
How State Law Relates To the Warranty . . . . . . . . . . . . . . . . . . . . . . . . . . . 18
Appendix A Specifi cations . . . . . . . . . . . . . . . . . . . . . . . . . . . . . . . . . . . . . . . . . . 19
Appendix B Replacement Schedule . . . . . . . . . . . . . . . . . . . . . . . . . . . . . . . . . . . 20
Replacement Components . . . . . . . . . . . . . . . . . . . . . . . . . . . . . . . . . . . 20
Maintenance Log . . . . . . . . . . . . . . . . . . . . . . . . . . . . . . . . . . . . . . . . . 20
Appendix C Connections . . . . . . . . . . . . . . . . . . . . . . . . . . . . . . . . . . . . . . . . . . . 21
Appendix D Schematic . . . . . . . . . . . . . . . . . . . . . . . . . . . . . . . . . . . . . . . . . . . . . 22
Pure Water Systems, Inc.
© 2004 Pure Water Systems, Inc. All rights reserved.
Under the copyright laws, this manual may not be copied, in whole or in part, without the written consent of Pure Water Systems, Inc.
Every effort has been made to ensure that the information in this manual is accurate. Pure Water Systems, Inc. is not responsible for
printing or clerical errors.
Pure Water Systems, Inc.
5707 238th Place NE
Redmond, WA 98053
(425) 765-6175
http://www.purewatersystems.com
Pure Water Systems, Inc., the Pure Water Systems logo, PWS, and Bio Compatible Water are trademarks of Pure Water Systems, Inc.
Other product and company names mentioned herein may be trademarks of their respective companies. Product specifi cations are
subject to change without notice.
March 2004
Contents 3
Page 4

CHAPTER
1
Getting Started
Thank you for your purchase of this quality water purifi cation system by Pure Water Systems, Inc. Your
new PWS™ BEV-300 Series system combines several of the most effi cient methods of water treatment
to achieve a very specifi c result—ultra-pure water that meets the rigorous Vincent (BEV) standards for
bio-compatibility.
As the new owner of a PWS™ BEV-300 pure water appliance there is a totally new experience awaiting
you. You and your family will be amazed at the delightful new taste of your tap water—it’s like owning
your own personal mountain spring.
This manual provides information about the application and servicing of your PWS™ BEV-300 Series
pure water appliance. Descriptions of the components and their functions will help to answer frequently
asked questions. By thoroughly reading this manual you will be better able to operate your new system
and perform simple maintenance.
SETTING UP YOUR BEV SYSTEM
Your PWS™ BEV-300 system requires no electricity—the only requirement is adequate water pressure.
This unit is designed to operate within a pressure range of 40–100 PSI (2.75–6.9 bar). The amount of
purifi ed water produced depends primarily on your water pressure, temperature, and the amount of
dissolved solids. The custom reverse osmosis membrane will produce up to 40 gallons (~150 liters) per
day of pure BEV quality water. If you plan to install this unit on a private well system, you should check
your water pressure gauge. If the pressure is less than 40 PSI (2.75 bar), ask a plumber to adjust and raise
the pressure to the minimum level of 40 PSI.
Quick Description of Installation…
1) Unpack the system.
2) Review this manual.
3) Inspect the installation location—verify the system
and storage tank will fi t beneath sink.
4) Attach the pre-fi lters to the frame.
5) Install the faucet.
6) Install the feed water saddle valve.
7) Install the drain saddle valve.
8) Mount the 4-Stage Deionization Module.
9) Mount the pre-fi lter & RO assembly.
10) Turn on the cold water.
11) Produce and then discard the fi rst tank of water.
1) Unpack the System
As you unpack your new PWS™ BEV-300 Series system, inspect all parts to make sure they have not
been damaged in transit. If damage has occurred immediately fi le a claim with the freight company.
Contents include:
• Chrome Faucet Assembly
• Feed Water Saddle Valve Kit
• Drain Water Saddle Valve Kit
• 4-Stage Deionization Module & Clamp
4
Page 5

• RO Pressure Vessel & Frame
• Pre-fi lter canisters and fi lters (3)
• Tubing
• Storage Tank
• Owner’s Manual
• Registration & Warranty Card
2) Planning the Installation
It is advisable to review the following instructions completely before proceeding.
The BEV-340 system is comprised of several large components which, in most cases, fi t easily beneath
most kitchen sinks. It is wise to establish the desired location of each of the components before hand.
The storage tank has built-in feet for upright positioning. However, it may be placed on its side when
space is limited. (A stand is included.)
3) Attaching the Pre-Filters
Open the package containing the frame assembly and RO pressure vessel (ROPV). Mounted to the bottom of the frame are the tops of the three pre-fi lter canisters. Attached to the outlet port of the third
pre-fi lter top is the auto shut-off valve.
Refer to the picture of the BEV-340 unit at the front of this manual: Pre-fi lter position 1 is on the left,
behind the label reading “IN, FEED WATER.” Pre-fi lter position 2 is the center. Pre-fi lter position 3 is
on the right, behind the label reading “OUT, TO TANK.”
The sediment pre-fi lter should be placed into position one (1). Remove the wrapping, place the fi lter
into the canister, then screw the canister to the top until fi rm, taking care to align the fi lter correct ly.
The granular activated carbon pre-fi lters occupy positions 2 and 3.
4) Installing the Chrome Faucet
Open the package containing the chrome faucet and mounting hardware. Study the diagram printed on
the package for additional installation instructions.
a) Select the location of the faucet on the sink top. (NOTE: Make sure there are no reinforcing ribs
under the sink drilling location.)
b) Use factory approved meth-
od or approved plumbing
practice to drill hole in sink.
For porcelain sinks—facto-
Silicon/Carbide Grinding Wheel
Hi Speed Dremmel Tool
ry approved method is: fi rst
grind away porcelain with
Dremmel® tool and silicon
grinding w h e e l (about
¾” circle). Then, using a
standard ½” high-speed
Porcelain
Sink Top
drill bit, drill hole through
metal portion of sink.
(See Figure 1) Alternately,
use a “glass and tile carbide
spade tipped bit.”
Sink
Metal
Figure 1, Using a Dremmel® Tool to Remove Porcelain
For acrylic sinks use a stan-
dard ½” high-speed drill bit.
For stainless steel sinks use a ½” high-speed drill bit or a ½” Greenlee chassis punch.
c) Install faucet according to the diagram on the package, insuring rubber gaskets are place. Tighten
lock nut beneath sink.
Getting Started 5
Page 6
5) Installing the Feed Water Saddle Valve
Open the package marked FEED VALVE. Study the diagram printed on the package for additional installation instructions. Also see Appendix C.
INSTALL ON COLD WATER LINE ONLY!
a) Shut off the cold water supply line.
b) Clamp the feed valve to the cold water line.
c) Turn the handle fully clockwise to pierce the line, then fully counter-clockwise to allow fl ow.
You are now ready to move to the next step – DO NOT TURN ON THE COLD WATER SUPPLY YET!
(In some instances, the feed water saddle valve will not be an appropriate connection to your existing
plumbing. By furnishing a self-piercing feed water saddle valve, we have attempted to provide a connection that will satisfy most installation scenarios. Should the saddle valve be an inappropriate connection
for your installation, you can obtain appropriate parts from most plumbing supply or home improvement stores. Pure Water Systems carries a limited inventory of alternate fi ttings. On rare occasions, it
may be necessary to contact a plumbing contractor to complete your installation.)
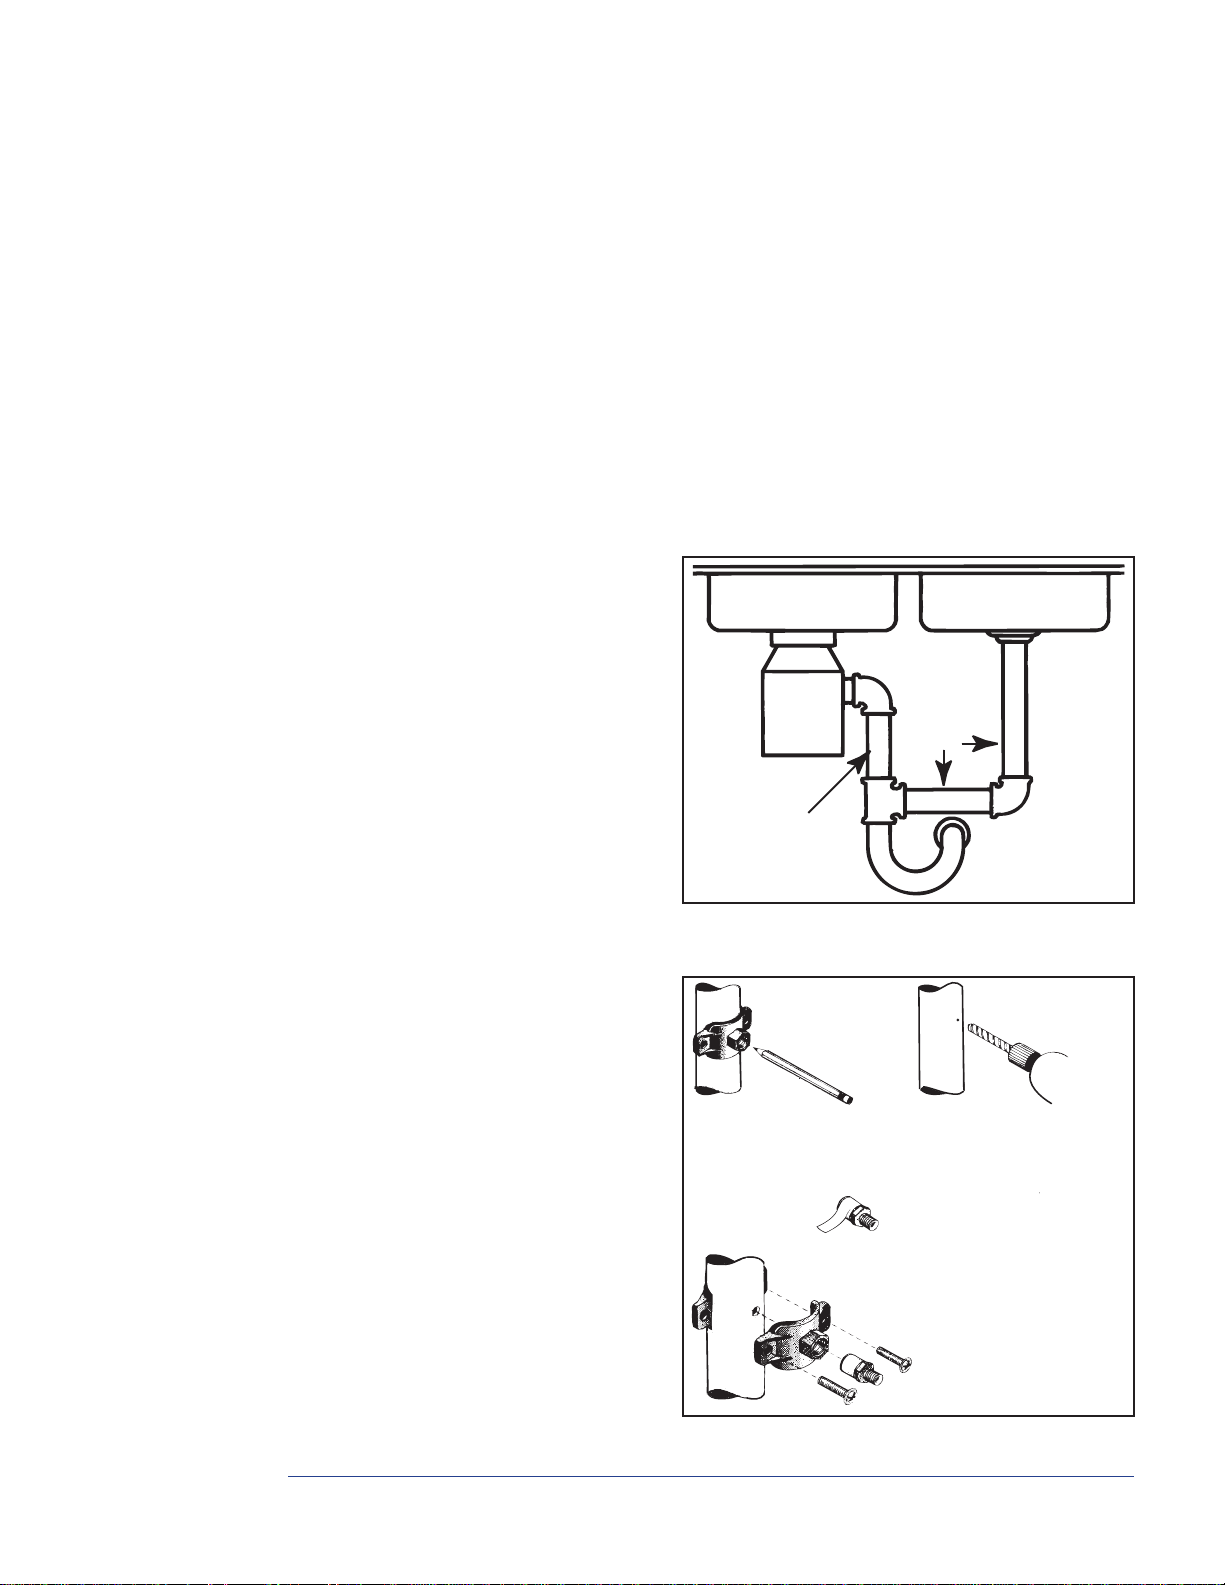
6) Installing the Drain Saddle Valve
Open the package containing the drain
saddle valve and John Guest® fi tting.
a) The drain saddle assembly should
be installed above the trap and on
the vertical or horizontal tailpiece.
(See Figure 2)
Mount
drain saddle
at either
location
NOTE: When installing the pre-
fi lter/RO assembly, it is desirable to
mount the frame above the position
of the drain saddle valve.
Never
mount
here!
b) Refer to Figure 3 and follow steps
one through four to mount the drain
saddle valve.
Figure 2, Drain Saddle Valve mounting locations
7) Mounting the Deionization Module
The 4-stage deionization module can be
placed anywhere convenient, but it is preferable to keep the distance between the
pre-fi lter/RO assembly, the storage tank,
and the DI module as short as possible. The
DI module can be mounted horizontally
(preferred) or vertically. If mounted verti-
cally, the outlet should be at the bottom.
a) Wrap the threads of the supplied John
Guest® “Speedfi t” fi ttings with Tefl on
thread tape and install the fi ttings
into each end of the DI module.
b) Establish the position for the DI module.
c) Secure the module to the wall of the
cabinet using the supplied stainless steel
clamp and screws.
1) Mark hole position,
remove saddle.
2) Drill ¼" hole
through one side.
3) Wrap Teflon tape
on John Guest
“Speedfit” fitting.
Make sure to align
4)
drain saddle to drilled
hole. Attach drain
saddle to the drain
pipe and tighten the
two screws evenly.
Figure 3, Mounting the Drain Saddle Valve
®
Getting Started 6
Page 7
8) Mounting the Pre-fi lter/RO Assembly
Mount the pre-fi lter/RO assembly on the cabinet wall using the screws supplied. It is best to have the
bracket placed above the plane of the drain saddle valve. When this is not possible, it is acceptable to
stand the entire assembly on the cabinet fl oor, but extra care must be taken when routing tubing from
the assembly to the drain saddle valve.
9) Connecting the System Components
A twenty foot length of poly tubing has been supplied with your system. This is more than enough tubing
for most installations. When cutting the poly tubing, DO NOT USE SCISSORS. The approved method
is a razor knife with a fresh blade. When cutting, it is important to not crimp or collapse the tubing. Cut
the tubing with a clean, 90° angle. This will allow the tubing to seat fi rmly into the John Guest® fi ttings,
creating a secure and leak free connection.
a) Measure and cut a length of tubing to connect the sink mounted chrome faucet to the outlet end of
the 4-stage DI module.
To attach the tubing to the chrome faucet extension beneath the sink, use the supplied compres-
sion fi ttings and follow the instructions printed on the plastic bag which contained the chrome
faucet assembly. Connect the other end by pushing the tubing into the John Guest® fi tting at the
outlet of the DI module until you can feel the tubing “bottom out” inside the fi tting. It is normal
to experience some resistance as the tubing is pushed past the O-ring inside the fi tting.
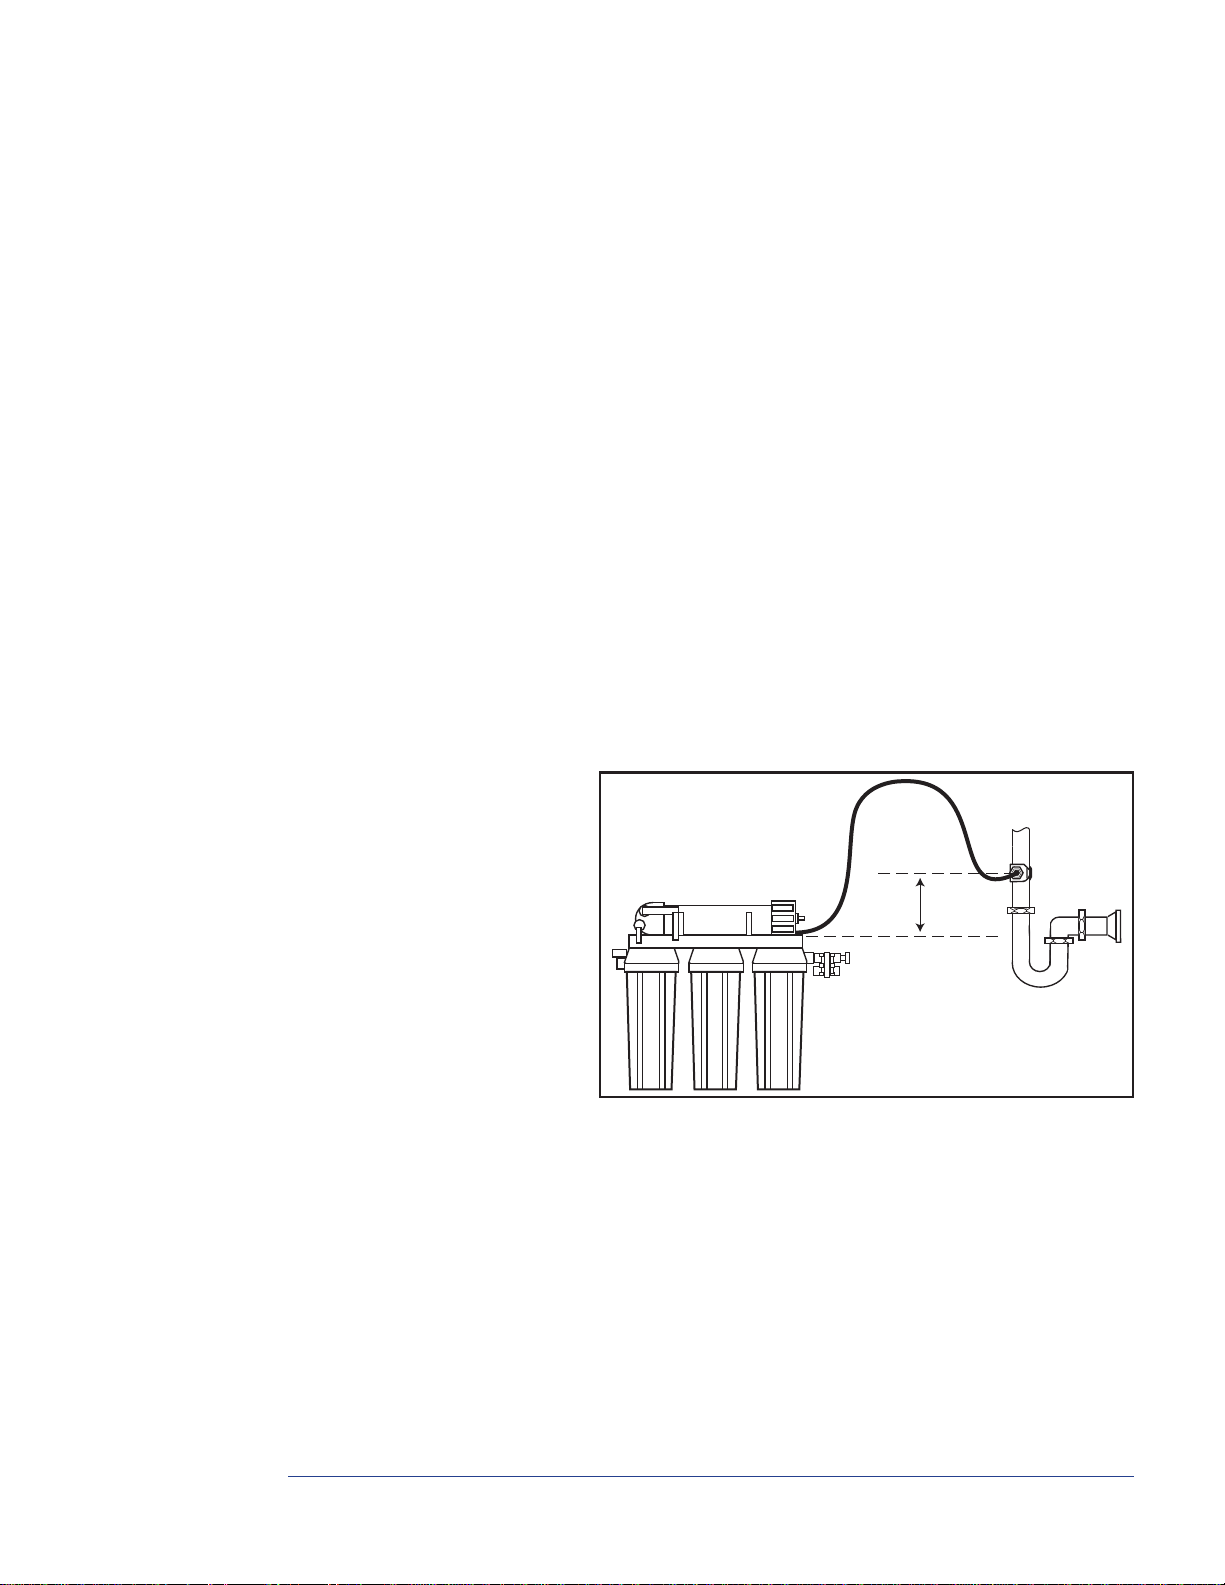
b) Measure and cut a length of tubing to connect the drain water check valve on the pre-fi lter/RO as-
sembly to the drain water saddle valve. See Appendix C.
IMPORTANT: If the frame of the pre-fi lter/RO assembly is not above the drain saddle valve, you
will need to loop the tubing as high as possible beneath the sink. (See fi gure 4) Be sure to allow for
this loop when you measure.
The drain water check valve
is the grey colored fi tting
located just behind the RO
pressure vessel on the top of
the frame. Connect one end
of the tubing to the drain
water check valve and con-
nect the other end to the
drain saddle valve.
c) Measure and cut a length of
tubing to connect the feed
water saddle valve to the
inlet on the left side of the
If frame is below plane of
drain saddle valve, drain tubing
should be looped as high as
possible beneath sink.
pre-fi lter assembly. Connect
the tubing to the saddle
Figure 4, Drain Tubing Connection
valve using the compression
fi ttings provided. See Appendix C.
d) Mounted to the right side of the pre-fi lter/RO assembly, just below the bracket, is the Auto Shut-off
valve. One port from the auto shut-off valve supports a swiveling “T” connector which will con-
nect the pre-fi lter/RO assembly, the storage tank, and the DI module. See Appendix C.
Measure and cut a length of tubing to connect the pre-fi lter/RO assembly to the DI module.
Connect one end to the inlet of the DI module. Connect the other end to one of the ports on the
swivel “T” connector. It does not matter which port you choose.
e) Wrap the threads of the stainless steel fi tting on top of the storage tank with Tefl on thread tape.
Screw the supplied tank shut-off valve onto the storage tank.
f) With all the other components connected, place the storage tank into position. Measure; cut an
appropriate length of tubing; and connect the valve on top of the storage tank to the open port on
Getting Started 7
Page 8

the swivel-T connector. Remember to avoid crimping and excessive tubing length. Open the valve
on top of the storage tank by moving the handle parallel to the tubing.
g) Open the chrome faucet on the sink top.
h) Turn on the cold water supply. In approximately 20 minutes you will see water beginning to drip
from the chrome faucet. Close the faucet and allow the storage tank to fi ll. Check for leaks and
gently tug on all connections to assure a tight fi t.
Operating Notice
The initial fi lling of the storage tank will probably seem slow. The Reverse Osmosis element has been
factory tested for rejection and fl ow, however, the element when new is generally “tight.” The water
cavity of the pressure vessel and deionization module is initially empty and must fi ll before pure water
will appear in the tank. After leaving the unit connected and running for 24–36 hours the storage tank
should be completely full.
Your PWS™ BEV-300 system is easy to operate because the tank auto shut-off does all the work. When
the storage tank is nearly full the auto shut-off will stop the fl ow of feed water to the system. Similarly,
when the water in the tank drops below a certain level, the auto shut-off will re-open the feed water supply allowing the system to refi ll the storage tank.
(The auto shut-off mechanism relies on a pressure differential between the feed water and product water
to operate. For this reason, the system will “turn on” before the tank is completely empty, and will “turn
off” before the tank is completely full.)
Flushing
Flushing is the single most important maintenance function you will need to perform to keep your system
operating at peak effi ciency . This simple operation only takes a few minutes, yet makes a great difference
in the quality of the water your unit produces, and extends the service life of the RO membrane.
a) Flushing the RO membrane can only be accomplished when the system is fi lling (see pressure
gauge). Allow the storage tank to empty until you hear the water fl owing then begin the fl ushing
procedure.
b) Move the black handle on the fl ush valve parallel to the RO pressure vessel. This will open the
fl ush valve and allow water to rapidly fl ow across the surface of the RO membrane, washing away
contaminants which, if allowed to accumulate, might clog the pores of the membrane.
c) Set a kitchen timer so you do not forget to return the fl ush valve to the closed position.
Flushing the unit for 10 minutes every two weeks is ideal.
In the event you forget to fl ush the system for an extended period of time, you can perform an exhaustive fl ush of the membrane by leaving the fl ush valve open for 20 minutes.
If your unit has not been operational for several days (e.g. while you are on vacation), drain the storage
tank (use the water for watering plants, etc.) then fl ush the membrane for 5-10 minutes as described
above.
Getting Started 8
Page 9

CHAPTER
2
Getting to Know Your BEV System
Yo ur PWS™ BEV-300 Series system includes seven unique stages in fi ve different modules. Every system
combines the proven water fi ltration methods of carbon adsorption, reverse osmosis, and deionization. By
carefully matching the components utilizing these methodologies, Pure Water Systems is able to assure
your system produces water which meets or exceeds the Vincent standards for bio-compatibility.
A LOOK AT THE SEVEN STAGES
Stage One
Water entering the system is fi rst subjected to our spun-polyester dual gradient (10-20 micron) sediment
pre-fi lter. Any suspended particles such as sand, rust, or other deposits commonly found in the feed
water supply are removed. This protects the reverse osmosis membrane downstream from particles which
might clog the pores of the membrane. This pre-fi lter has been carefully selected for its extremely high
dirt holding capacity.
Stage Two
Before the feed water reaches the reverse osmosis membrane, it is subjected to twin, unidirectional
granular activated carbon pre-fi lters. Flow is lengthwise, not radial, for maximum contact time and
organic adsorption. Pure Water Systems has chosen to use twin carbon fi lters in this stage where every
other manufacturer uses only a single cartridge. By using twin cartridges we insure complete removal of
organic contaminates including pesticides, herbicides, and other hydrocarbon based compounds.
A single gram of steam washed, bituminous grade, granular activated carbon typically has ~1 500 square
meters of surface area—meaning our twin GAC pre-fi lters provide over 400 acres ( 1.62 square kilometers) of surface area where organic contaminants dissolved in the water have an opportunity to be
adsorbed and eliminated. This immense GAC surface area also insures complete and total conversion of
chlorine—protecting the polyamide thin-fi lm-composite (TFC) reverse osmosis membrane downstream.
Stage Three
A custom designed and extremely effi cient spiral wound reverse osmosis membrane produces up to 40
gallons (~150 liters) of purifi ed water per day. This membrane utilizes the unique properties of a semipermeable material which allows passage of pure water molecules while not allowing dissolved salts,
heavy metals, and organics to pass through. Our extraordinary membrane is designed to consistently and
signifi cantly reduce the total dissolved solids in the source water supply by greater than 97%. It also has
a tremendous capacity to completely reject organic and biological contaminates, including water-borne
microorganisms. (EP A EST. No. 5 253 1 -FL-01)
The operating parameters for this custom designed reverse osmosis membrane are found in the
Specifi cations section of this manual.
Stages four through seven are contained in our unique four-stage, RO matched deionization module.
Stage Four
This stage includes a unique blend of deionization resins carefully matched to our exceptional reverse
osmosis membrane and provides superior rejection of monovalent ions and the ionic residues of pesticides and other hydrocarbon contaminates. It is the inclusion of deionization resins which sets the BEV
9
Page 10

systems apart from other reverse osmosis systems. It is not enough to include any commercial grade
resins; the blend of cationic and anionic resins must be nuclear grade and carefully engineered to match
the reverse osmosis membrane.
Stage Five
Following the DI resins are four inches of granular activated carbon to polish the product water for a
clean, fresh taste. The fl ow rate at this stage provides tremendous contact time to assure complete removal of any remaining organic contaminates.
Stages Six and Seven
The fi nal two stages of our proprietary DI module are included to prevent the reverse migration of contaminates into the system. The incorporation of these stages further separates the BEV systems from other
manufacturer’s designs. After carefully combining the elements of the previous fi ve stages it is essential to
integrate these stages to assure contaminates cannot enter the system from the product water end.
COMPONENT DESCRIPTION
Following is a brief description of the main components of your PWS™ BEV-300 Series system.
Feed W ater Saddle Valve
The feed water saddle valve provides a simple and effective method of connecting your new PWS™ BEV-
300 Series system to most existing home plumbing. Easily attached, the clamp-on valve includes a pierc-
ing mechanism which allows you to tap into the cold water supply line without having to drill holes or
unscrew existing fi ttings.
Drain Saddle Valve
The drain saddle valve included in the installation kit provides a simple and secure method of attaching the brine water discharge from your BEV-300 system to the existing drain line. Like the feed water
saddle valve, this valve is easily attached and does not require disassembly of existing plumbing fi xtures.
Sink Mounted Chrome Faucet
The long reach chrome faucet included in your installation kit is made from the highest quality lead-free
materials and is designed to provide years of trouble free service.
Sediment Pre-fi lter
Our spun-polyester dual gradient (10-20 micron) industrial grade pre-fi lter is designed to remove silt,
sand, rust, scale and other suspended particulates. It has a much higher dirt holding capacity when
compared to sediment pre-fi lters included in most other RO systems. This allows the fi lter to contain
considerably more suspended contaminants before fouling or reducing throughput to the downstream
components.
Granular Activated, Unidirectional, Carbon Pre-fi lters
Only Pure Water Systems offers dual, unidirectional, GAC pre-fi lters where fl ow is engineered to be
lengthwise—not radial like most other designs. Lengthwise fl ow insures maximum contact time providing for total removal of any dissolved organic compounds present in the feed water. By placing two
pre-fi lters in series, we also insure complete chlorine conversion protecting the reverse osmosis membrane which follows.
RO Pressure Vessel
The pressure vessel houses the polyamide thin-fi lm-composite reverse osmosis membrane. The design
provides a means to collect the purifi ed product water and an exhaust opening to drain off the concentrated brine water.
Getting to Know Your BEV System 10
Page 11

RO Membrane
Reverse osmosis is a scientifi c method of reversing nature’s biological process where a dilute or lighter
solution passes through a semi-permeable membrane into a more concentrated solution. In the human
body fl uids pass in and out of such membranes (cell tissues) by the phenomenon known as osmosis
while plants absorb food and moisture from the soil in the same way. Scientists have long realized if
the natural process of osmosis could be reversed—if water from concentrated sources could be made
to pass through a selective membrane and emerge as pure water, many practical applications could be
developed. For instance, unwanted salts and other dissolved inorganic minerals could be removed from
all kinds of water sources. The process was originally perfected by NASA and DOW Chemical to purify
and re-use all liquids aboard spacecraft. Reverse osmosis fi lters out all particles greater than .0001 microns in diameter.
The membrane used in your PWS™ BEV-300 system is a privately manufactured, custom rolled, spiral
wound polyamide thin-fi lm-composite membrane. This membrane has the ability to remove in excess
of 97% of the dissolved inorganics. Rejection is based on degree of removal of sodium and chloride ions.
Although RO has a higher percentage of removal of all di, tri, and quadri-valenced elements (e.g. >99%
of aluminum) any mono-valenced elements are rejected at ~97% level. The nominal remaining 3% of
dissolved solids, mostly monovalent, enter the next stage of the process—the deionization module.
Deionization (DI) Module
Deionization resins are a man-made plastic bead chemically made anionic (OH-) and cationic (H+). The
resins in your PWS™ BEV-300 system are of nuclear grade and carefully matched to the reverse osmosis
membrane. (As opposed to commercial grade resins typically found in water softeners.) In the DI module, H+ and OH- are exchanged for the mono-valenced elements in the product water coming from the
RO membrane. The only thing added to the product water from your BEV-300 system is hydrogen ions
(H+) and hydroxyl (OH-) ions, which combine to form H2O, or pure water.
Following the DI resins are several additional inches of granular activated carbon. This is included to
insure the complete removal of any organic contaminant that might appear in trace form from a partial
degree of removal via RO and DI. Since we’ve never found any organics which are not removed either by
the upstream RO membrane or the DI resins, the GAC at this stage acts primarily to polish the product
water for a clean, fresh taste. GAC is the most common product used to fi lter bottled or “spring” waters.
Finally, the end of the DI module contains two additional stages which are in place as safeguards against
any reverse migration of contaminants.
Built-in Flush Valve
The built-in fl ush valve mounted to the RO pressure vessel provides a quick and simple method to periodically fl ush the surface of the RO membrane. Simply opening the fl ush valve once every two weeks for
ten minutes will wash away impurities that may be concentrating near the surface of the RO membrane.
If not occasionally fl ushed from the membrane surface, impurities can concentrate and clog the pores of
the membrane. Flushing the membrane ensures longer service life and greater rejection of contaminates.
OPERATING PARAMETERS
To insure proper operation of your BEV system, it is advisable to collect the following information about
your water supply. This information is generally available from your municipal water department, and
in many cases is available online.
Pressure
In order to overcome the natural osmotic force, adequate water pressure must be available from your
water supply. The osmotic force is directly proportional to the concentration of dissolved solids in the
water. When the water pressure is equal to the osmotic force, there will be no movement of pure water
molecules across the semi-permeable membrane. A minimum of 40 PSI is recommended. (If your water
pressure is below 40 PSI, a booster pump is available. If you are on a private well, have your plumber
raise the minimum pressure above 40 PSI.)
Getting to Know Your BEV System 11
Page 12

In general, the higher the pressure (up to 100 PSI), the better the performance of the membrane at
rejecting contaminants. Pressures below 40 PSI will result in poor rejection rates and may reduce the
service life of the membrane.
pH
The TFC membrane will hold up very well when the pH of the feed water is between 3 and 11 . Water
supplies with pH over 11 are very rarely, if ever, fo und. (Chlorine bleach has a pH of ~11.5.)
Chlorine
Chlorine is the most common substance added to municipal water supplies. Its purpose is to eliminate
biological growth (i.e. chlorine is toxic). Regulations usually require there to be residual chlorine when
it reaches your tap. Typically, the residual concentrations of chlorine in household water range from 0.5
to 1.0 parts-per-million (ppm).
Besides being toxic, chlorine will degrade the TFC reverse osmosis membrane. Therefore, it is essential
to remove chlorine from your feed water before it reaches the RO membrane. Your BEV system includes
a pre-fi lter containing a special grade of granular activated carbon (GAC) which will very effectively
remove the chlorine from your tap water. It is important to replace the pre-fi lter annually to insure no
chlorine is reaching the membrane.
Sediment
In areas with very high sediment concentrations the pre-fi lter may clog prematurely. If the pre-fi lter becomes clogged, you will likely notice a decrease in the production rate from your system. In areas with
very high sediment concentrations, it may be necessary to replace the pre-fi lter on a semi-annual basis.
Iron
Iron concentrations greater than 0.1 mg/l can degrade overall system performance. If your water supply
has iron concentrations above 0.1 mg/l, iron pretreatment is recommended.
Getting to Know Your BEV System 12
Page 13

CHAPTER
3
Maintenance and Servicing
Minimal work is required to keep your BEV system in peak operating condition. All that is required is
following a regular schedule of fl ushing and replacing the fi lter modules as recommended. Following
these simple steps will insure your unit consistently produces ultra-pure water meeting the Vincent
(BEV) standards for bio-compatibility.
Take care of your BEV system and it will provide many years of healthful drinking and cooking water for
your entire family.
Flushing
Flushing is the single most important maintenance function you will need to perform to keep your
system operating at peak effi ciency. This simple operation only takes a few minutes, yet makes a great
difference in the quality of the water your unit produces, and extends the service life of the RO membrane.
a) Flushing the RO membrane can only be accomplished when the system is fi lling (see pressure
gauge). Allow the storage tank to empty until you hear the water fl owing then begin the fl ushing
procedure.
b) Move the black handle on the fl ush valve parallel to the RO pressure vessel. This will open the
fl ush valve and allow water to rapidly fl ow across the surface of the RO membrane, washing away
contaminants which, if allowed to accumulate, might clog the pores of the membrane.
c) Set a kitchen timer so you do not forget to return the fl ush valve to the closed position.
Flushing the unit for 10 minutes every two weeks is ideal.
In the event you forget to fl ush the system for an extended period of time, you can perform an exhaustive fl ush of the membrane by leaving the fl ush valve open for 20 minutes.
If your unit has not been operational for several days (e.g. while you are on vacation), drain the storage
tank (use the water for watering plants, etc.) then fl ush the membrane for 5-10 minutes as described
above.
FILTER REPLACEMENT
After 12 months of use, it is time to replace the sediment pre-fi lter, the twin GAC carbon fi lters, and the
4-stage Deionization module to insure your system continues to produce water within BEV parameters.
Replacement modules can be ordered directly from Pure Water Systems via our web site at
http: //www.purewatersystems.com.
1) Remove the contents from beneath the kitchen sink where the fi lter assembly is located.
2) Turn off the cold water supply line.
3) Drain ALL the water from the storage tank.
4) Close the valve on the top of the storage tank.
5) Open the Flush Valve
6) Place a towel beneath the pre-fi lter/RO assembly—it will absorb the small amount of water that
will spill from the modules as they are changed out.
It is often helpful to have an empty 3-5 gallon bucket nearby.
13
Page 14

Replacing the Sediment Pre-fi lter
The sediment pre-fi lter is in the fi lter canister on the left side of the assembly (position 1), beneath the
“IN (FEED WATER)” marking on the aluminum frame. The sediment pre-fi lter will likely be rather
distasteful looking—as it is common for sludge to form on the fi lter surface. After one year, this sludge
layer can be fairly thick.
a) Push the red button (on the top of the aluminum frame, above the pre-fi lter canister) to reduce
any back pressure remaining in the canister.
b) Firmly grasp the canister with both hands and unscrew it from the pre-fi lter assembly. Carefu lly
move the canister over the bucket, dump the water, and remove the old pre-fi lte r.
c) Using a long handled, soft bristle brush, scrub the inside of the canister with a mild dish washing
detergent and rinse.
d) Place the new pre-fi lter into the canister, and then carefully re-attach the canister to the assembly.
Tighten until fi rm.
Replacing the Twin GAC Pre-fi lters
The twin unidirectional, GAC pre-fi lters are in the middle canister (position 2) and the canister on the
right (position 3). Follow the same procedure as described for replacing the sediment pre-fi lter (above).
Replacing the 4-Stage DI Module
(Before proceeding, study Figure 5 below)
The tubing is attached to the module using a unique push-in fi tting system manufactured by John
Guest® Company. This system is designed to make connecting and disconnecting fi lter modules very
easy while insuring a water tight connection.
The “collet” assembly will securely
Collet
hold the tubing
in place under
normal operating
conditions. Pulling
on the tubing will
not cause it to release, instead the
“grip” of the collet
will become more
secure. An O-ring
behind the collet
Insert tubing
Figure 5, John Guest® “Speedfi t” fi ttings
5
/
8"
into "collet"
Depress "collet" to release
assures a leak free seal.
a) Disconnect the tubing from both ends of the DI module. (If the DI module was mounted vertically,
you might fi nd less water will be spilled if you remove the tubing from the outlet end afte r remov-
ing the module from the retaining clamp.)
b) Remove one screw from the clamp and remove the old DI module. (The clamp is fairly fl exible and
can be bent out to allow the module to be removed.) Note the direction of the “FLOW” arrow. You
will need to install the new DI module in the same orientation.
c) Place the new DI module into position, taking care to note the direction of fl ow. Secure the clamp
and re-connect the tubing. Gently tug on the tubing to insure a secure, leak free connection.
Returning the System to Service
To return your system to service:
1) Open the sink mounted chrome faucet.
2) Return the membrane fl ush valve to the “production” position.
Maintenance and Servicing 14
Page 15

3) Slowly re-open the cold water supply line.
4) Open the valve on top of the storage tank.
5) After about 20 minutes you should see water coming from the faucet. (It will take some time for
the DI module to fi ll with product water.)
6) Check for leaks around the tops of the pre-fi lter canisters. If water is seeping from any of the canisters turn the cold water supply off, relieve line pressure by pressing the red button on top of the
canister, and then unscrew the leaking canister from the assembly. Check to be sure the O-ring is
properly seated and then carefully re-attach the canister to the assembly, taking care to align the
fi lter module inside. Tighten until fi rm.
7) Check for leaks at either end of the DI module.
8) Close the faucet and allow the system to produce a full storage tank of water.
9) Drain off and discard this initial tank of water. Do not use for cooking or drinking.
10) You are now ready to enjoy great tasting, pure BEV water for another 12 months!
Maintenance and Servicing 15
Page 16

CHAPTER
4
Frequently Asked Questions
Q: How long will my sediment pre-fi lter last before it needs to be replaced?
A: Under typical city water conditions, the pre-fi lter is designed to function properly for 12 months, and
should be replaced annually. Sediment concentrations vary greatly between municipal systems so there
is no way of determining the lifetime of a fi lter without knowing more about the feed water. In some
cases, it may be necessary to replace the pre-fi lter more frequently.
Q: How long will my GAC pre-fi lters last before they need to be replaced?
A: Your PWS™ BEV-300 system has been designed to operate within a wide range of feed water condi-
tions. These conditions vary greatly across municipalities, so it is diffi cult to state precisely how long
your pre-fi lters will last. We have designed the systems so that under the most extreme conditions your
pre-fi lters will still be performing correctly after 12 months of use. Following an annual replacement
schedule will insure your system is consistently performing as designed and producing ultra-pure water
which meets the rigorous Vincent standards for bio-compatibility.
Q: How long will my reverse osmosis membrane last?
A: The membrane’s life depends on the water conditions as listed in the specifi cation section of this
manual. If all these conditions are met, the life of the membrane is generally 2–3 years. If a membrane
fails or its performance becomes reduced before this time, the cause can usually be traced to feed water
conditions outside the specifi cations.
Q: How do I know if there is a problem with the membrane?
A: The best method is to measure the resistivity (conductivity) of the product water and compare it to
the feed water. You can obtain a resistivity meter from Pure Water Systems or you can send samples to
Pure Water Systems for analysis. (Poor rejection rates may also be an indication of a clogged pre-fi lter,
so check that fi lter fi rst.) A large increase in the production rate is also an indication of membrane failure, and can often be traced to the membrane having been subjected to either freezing or hot water.
Q: How can I monitor the performance of the unit?
A: With identical feed water pressure, the production rate should remain fairly constant. If your system
begins to produce water at a much faster rate, the RO membrane may have failed. If your system is producing water at a much lower rate, replacing the pre-fi lter is often indicated.
To monitor the overall system rejection rate, the best method is to obtain either a resistivity meter or
TDS meter from Pure Water Systems.
Q: Will I lose valuable minerals when I drink reverse osmosis water?
A: No, the body does not readily assimilate the minerals found in drinking water. We obtain the major-
ity of our minerals from the foods we eat. There are many, many more chelated minerals in a piece of
organic fruit or a serving of organic vegetables than in several gallons of water.
Q: Will hot water ruin my RO membrane?
16
Page 17

A: YES! Hot water over 100° F will damage the membrane and cause poor rejection of the contaminants
in your water. Make sure you use only COLD water in your BEV system.
Q: How should I store my purifi ed water?
A: We recommend using a sealable glass container. Used one gallon fruit juice bottles are an excellent
choice. We also recommend containers made of 100% LEXAN®, like those available under the Nalgene®
brand. High quality polycarbonate containers are also acceptable for short term storage. If you store or
transport your BEV water in polycarbonate containers, be sure to keep the containers out of direct sunlight.
Q: How should I store my unit when not in use?
A: If you unit is out of service for several days (while you are vacationing, for example) no special pre-
cautions are required. However, we do recommend you fl ush the unit for 10-15 minutes and discard the
fi rst tank of water when you return the system to production.
Frequently Asked Questions 17
Page 18

CHAPTER
5
Limited Warranty
Pure Water Systems, Inc. warrants to the original owner each PWS™ BEV-300 Series pure water appliance to be free from defects in materials and workmanship for as long as you own the product.
What the Warranty Covers
Full Lifetime Warranty on all parts (excluding normal module changes or abuse).
Exceptions to Lifetime Warranty
The Lifetime Warranty does not include damage caused by or resulting from unreasonable use, including failure to provide reasonable maintenance, or incidental or consequential damages, such as water
damage or damage to appliances, fi xtures or other equipment.
Warranty will be void if product failure or damage is due to any of the following:
1) Misuse, misapplication (e.g. unacceptable water conditions), neglect (e.g. inadequate fi lter changes),
alteration, hot feed water, freezing, or accident.
2) Improper installation, operation, or servicing.
No one is authorized to change or add to this warranty.
What We Will Do T o Correct an Inconvenience
Upon notice, we will repair or replace covered defective parts, free of charge.
If it is necessary to ship the product to Pure Water Systems, Inc. or bring it to a dealer for service, the
buyer must pay for any shipping or travel costs.
Pure Water Systems, Inc. will pay for any return shipping charges in the U.S. for parts or products cov-
ered under the warranty.
Pure Water Systems, Inc. will furnish any factory labor to make repairs on parts or products returned to
the factory that are covered under the warranty.
How You Can Get Service
Contact the Pure Water Systems, Inc. customer service department for instructions and authorization
number for returning the defective part or product.
Pure Water Systems, Inc.
Customer Service Dept.
5707 238th Place N.E.
Redmond, WA 98053
Phone: (425) 765-6175
Your Pure Water Systems, Inc. BEV-300 Series pure water appliance is a sophisticated water treatment
system. Failure to use genuine Pure Water Systems, Inc. components shall void the exclusive lifetime
warrant y.
How State Law Relates To the Warranty
Some states do not allow the exclusion or limitation of incidental or consequential damages, so the
above limitation or exclusion may not apply to you. This warranty applies to the original purchaser and
gives you specifi c legal rights. You may also have other rights which vary from state to state.
18
Page 19

APPENDIX
A
Specifi cations
Following are the recommended operating parameters for our custom rolled reverse osmosis membrane:
Membrane type Spiral Wound Polyamide Thin Film Composite (TFC)
Production Up to 40 Gallons-Per-Day (GPD)
Maximum Operating Temperature 40–100° F (4–38° C)
Operating Pressure 40–100 psi (2.75–6.9 bar)
pH Range 3.0–11.0
TDS Level, Maximum 2000 ppm
Turbidity < 1.0 Net Turbidity (NTU)
Chlorine (Cl2) 0.00 mg/l *
Hardness (CaCO3) < 350 mg/l
Iron (Fe) < 0.1 mg/l
Manganese (Mn) < 0.05 mg/l
Hydrogen Sulfi de (H2S) 0.00 mg/l
* Every system is equipped with our unique twin unidirectional granular activated carbon pre-fi lters to
remove organic contaminants and chlorine.
You can obtain specifi cs about your water supply from either your local water department or a water
testing service. If the parameters of your water do not fall within the specifi ed ranges as noted above,
please contact Pure Water Systems or your local dealer for further options.
Production is rated at optimum temperature of 70° F, 60 PSI, and 500 ppm TDS. Actual production will
vary depending on local temperature, pressure, and TDS level.
Low tap water pressure will reduce the volume and quality of the water produced by your system. In low
pressure situations (<40 PSI, 2.75 bar) BEV values cannot be assured. The addition of a booster pump
(PWS-BP-300) is strongly recommended.
ALWAYS USE COLD WATER—hot water will damage the TFC membrane.
The unit must not be allowed to freeze. Freezing water will expand inside the modules—damaging the
membrane and potentially rupturing the fi lter housings. Damage of this type will void the warranty.
19
Page 20

APPENDIX
B
Replacement Schedule
Below you can fi nd the recommended replacement schedule and part numbers for the components of
your BEV-340 pure water appliance. You can order replacement modules online from the Pure Water
Systems, Inc. website at http://www.purewatersystems.com.
Replacement Components
Module Replacement Schedule Order No.
Sediment Pre-fi lter Annually (or as needed) PWS-BEV300-SED
Unidirectional GAC Pre-fi lter Annu al ly PWS-BEV300 -G AC
4-Stage Deionization Module Annually PWS-BEV-DI
BEV 300 Series RO Membrane 2-3 years (as needed) PWS-BEV-RO40
Purchase Date:
Purchased From:
Serial Number:
Maintenance Log
Module Date Replaced
20
Page 21

APPENDIX
C
Connections
Connect tubing from the feed water saddle valve to
the John Guest® “Speedfi t” fi tting on the sediment
pre-fi lter.
Tubing from the tank shut-off valve
connects to one port on the T fi tting.
Tubing from the inlet port of the DI module
connects to the second port on the T fi tting.
It does not matter which port on the T
fi tting is chosen for each connection.
The drain check valve, located on the right side of the frame behind the reverse osmosis pressure vessel, connects to the drain
saddle valve (which is mounted to the existing plumbing).
Drain Check Valve
Flush Valve ,
Open Position
Flush Valve ,
Closed Position
21
Page 22

APPENDIX
D
Schematic
22
 Loading...