

Page 1
Smart Automatic Cat Litter Box
User Manual
Page 2

Page 3

Table of Contents
LavvieBot Authenticity Checkp.2
LavvieBot Specificationp.2
Componentsp.3-4
Safety Instructionsp.5-7
Start your LavvieBot Life p.8-9
LavvieBot Process p.10
Acclimating Your Cat p.10
Indicator Lights and Button Functionsp.11-12
Smartphone Connection p.13
How to Refill Litterp.14
Cleaning LavvieBot p.15-16
FAQs p.17-18
Warranty and Customer Service p.19
Precautions p.20
Page 4

Page 5
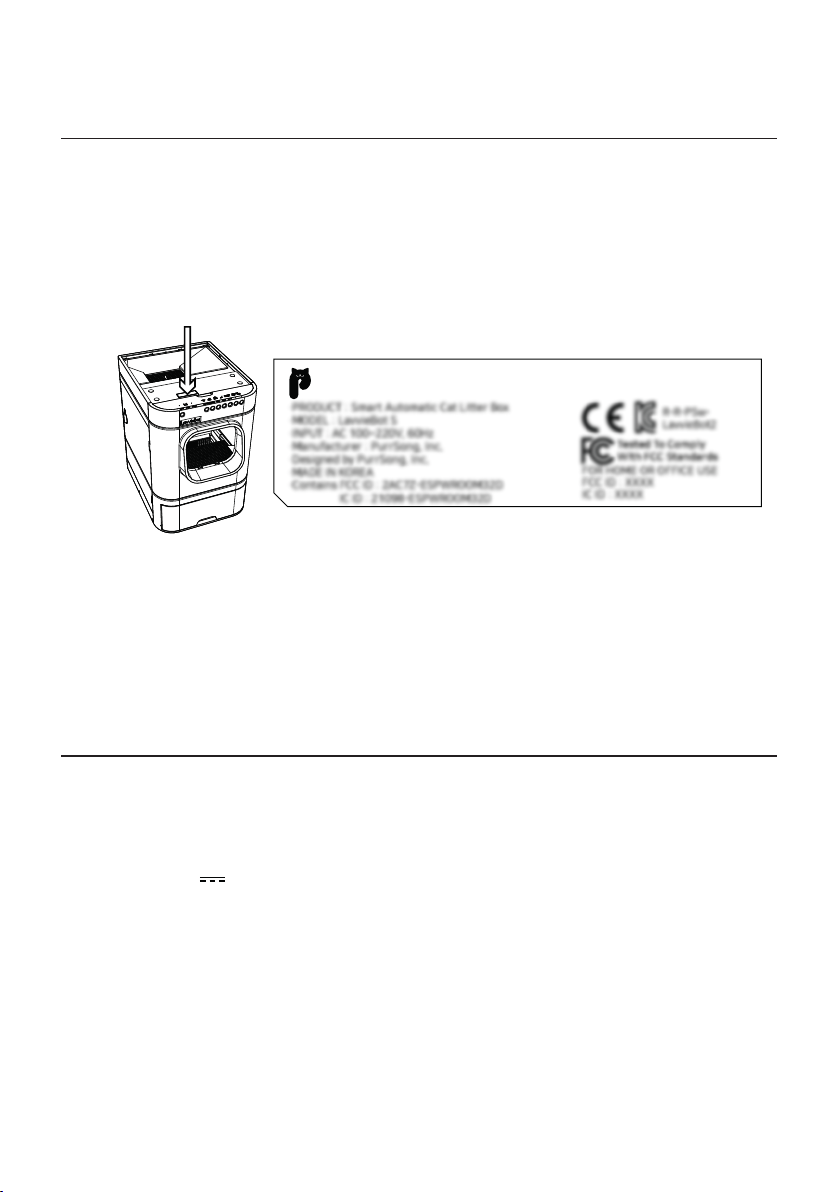
LavvieBot Authenticity Check
Every LavvieBot has a sticker marked with its own product number to guarantee authenticity.
To check the authenticity of your product, please download the PurrSong mobile application
and enter the product number as indicated on the sticker.
PurrSong, Inc. shall not be liable for problems related to the use of an unauthorized product
and its warranty.
Serial Number
XXXX-XXXX-XXXX-XXXX
The authenticity sticker indicating the product number is under the top lid of the LavvieBot.
Contact our Customer Service team for returns, refunds, and warranty information.
LavvieBot Specification
Model: LavvieBot S
Country of Origin: Republic of Korea
Date of Manufacture: Indicated separately
Dimensions: 49.5 x 58.2 x 70.4 (cm) / 19.5 x 22.9 x 27.7 (in)
Input: DC 12V 5A
Power consumption: 18W
Package includes: LavvieBot S, Power adapter, User manual, Waste bags, Deodorizer
Manufacturer : PurrSong, Inc.
Designed by PurrSong, Inc.
2
Page 6
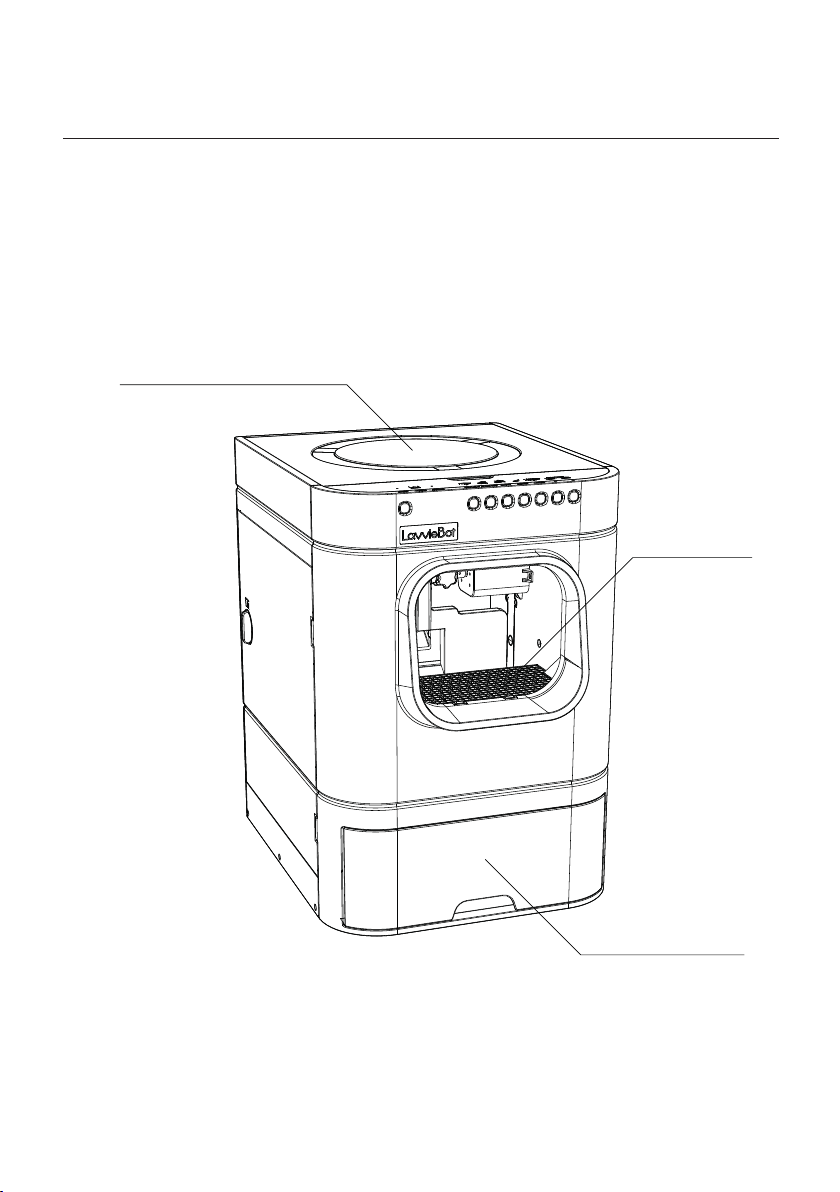
Components
Top Lid
Step Mat
Waste Drawer
3
Page 7
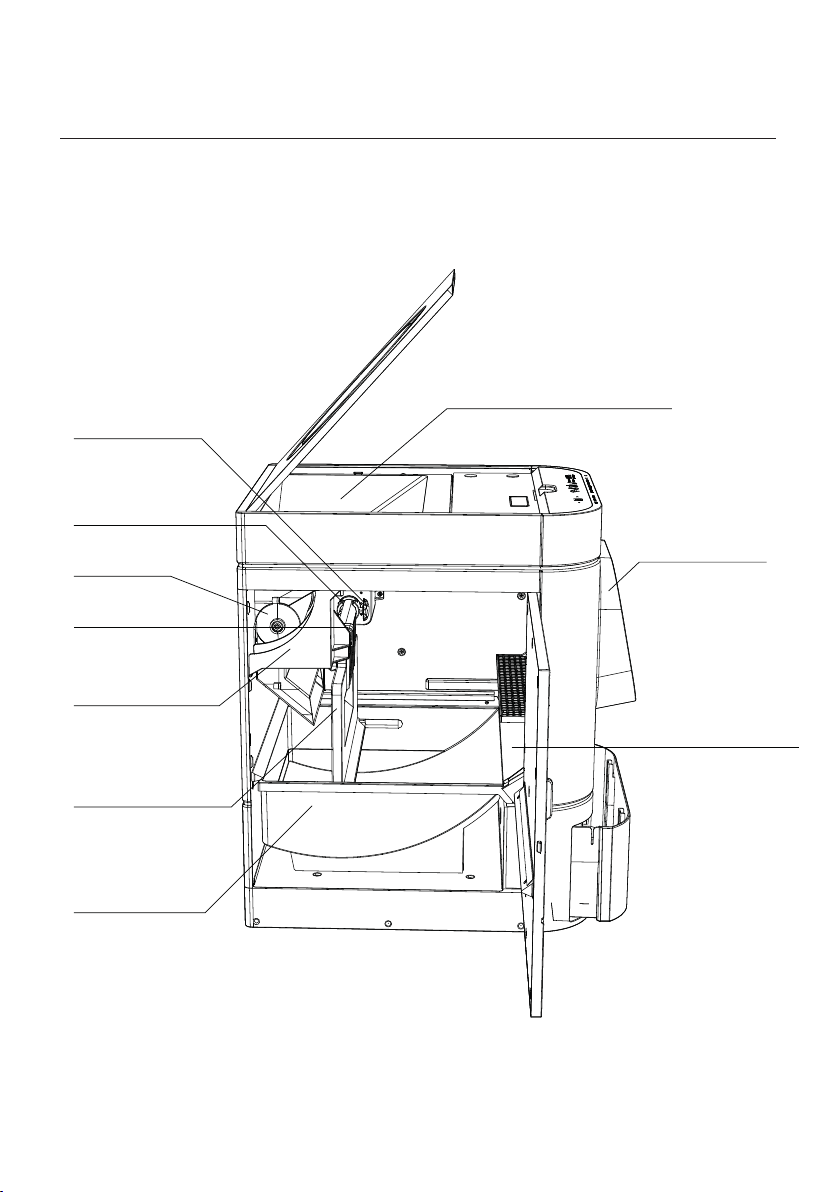
Components
Coupler Handle
Coupler
Litter Storage
Driving Unit
Fixing Slide
Mounter
Separator
Litter Tray
Entrance
Waste Drawer Cover
4
Page 8
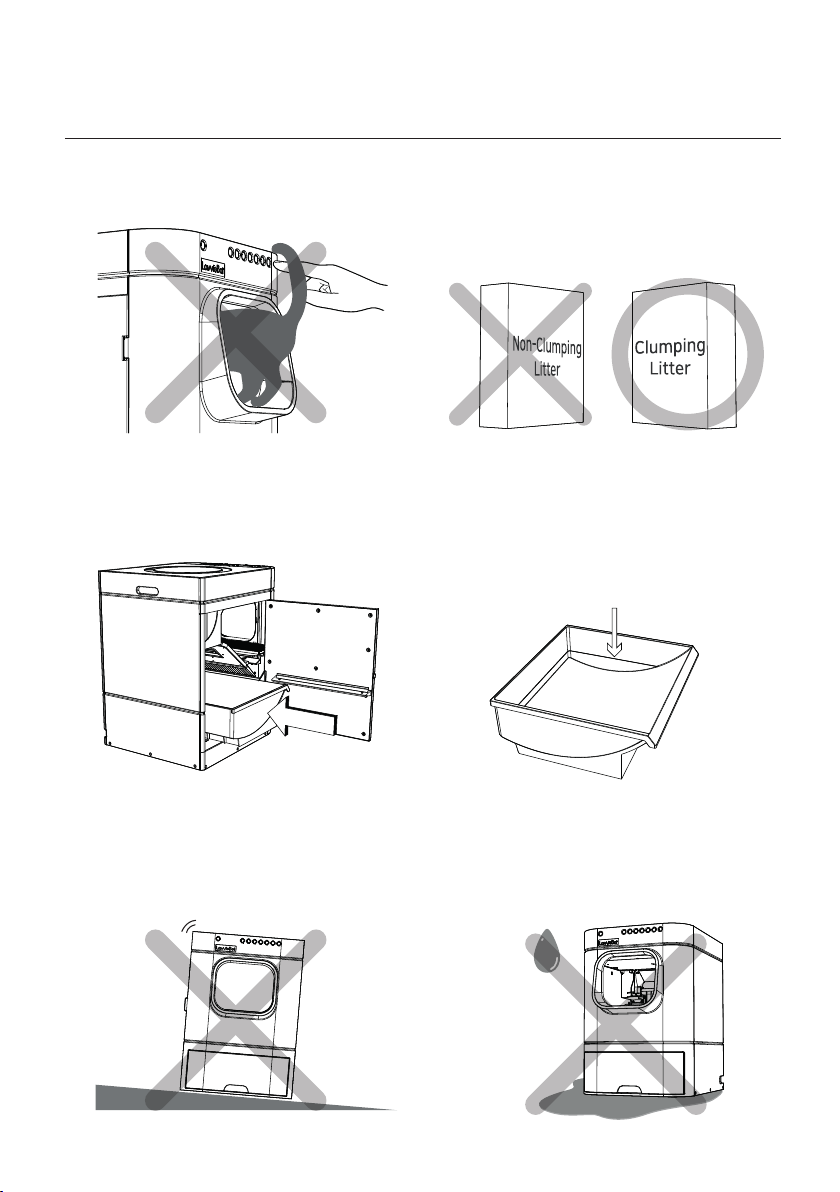
Safety Instructions
Make sure your cat is not in the LavvieBot when
operating. Any LavvieBot operation with your cat
inside can cause serious safety hazards.
Push and engage the litter tray fully into its location
to avoid malfunction or any damage to LavvieBot.
LavvieBot is designed to use only clumping litter of
medium-sized particles. Using a weak clumping cheap
litter or a natural litter with long or excessively big
particles can damage the machine and shorten its
lifespan.
ex) Pellets, Silica gel, etc ex) Bentonite, Natural litters
Check regularly if the litter level is filled enough in
the litter tray. If it is less or more than the baseline,
it may cause operational failure. When adding litter
manually, fill the tray with the litter until it meets
the line and spread flat.
Baseline
The LavvieBot should be placed on a firm, level
floor. Placing the LavvieBot on uneven or unstable
surfaces can result in malfunction or damage to
the machine.
5
Handle the LavvieBot with care. Cleaning the
product with water is prohibited as the machine
consists of metal as well as plastic and includes
electronic components.
Page 9
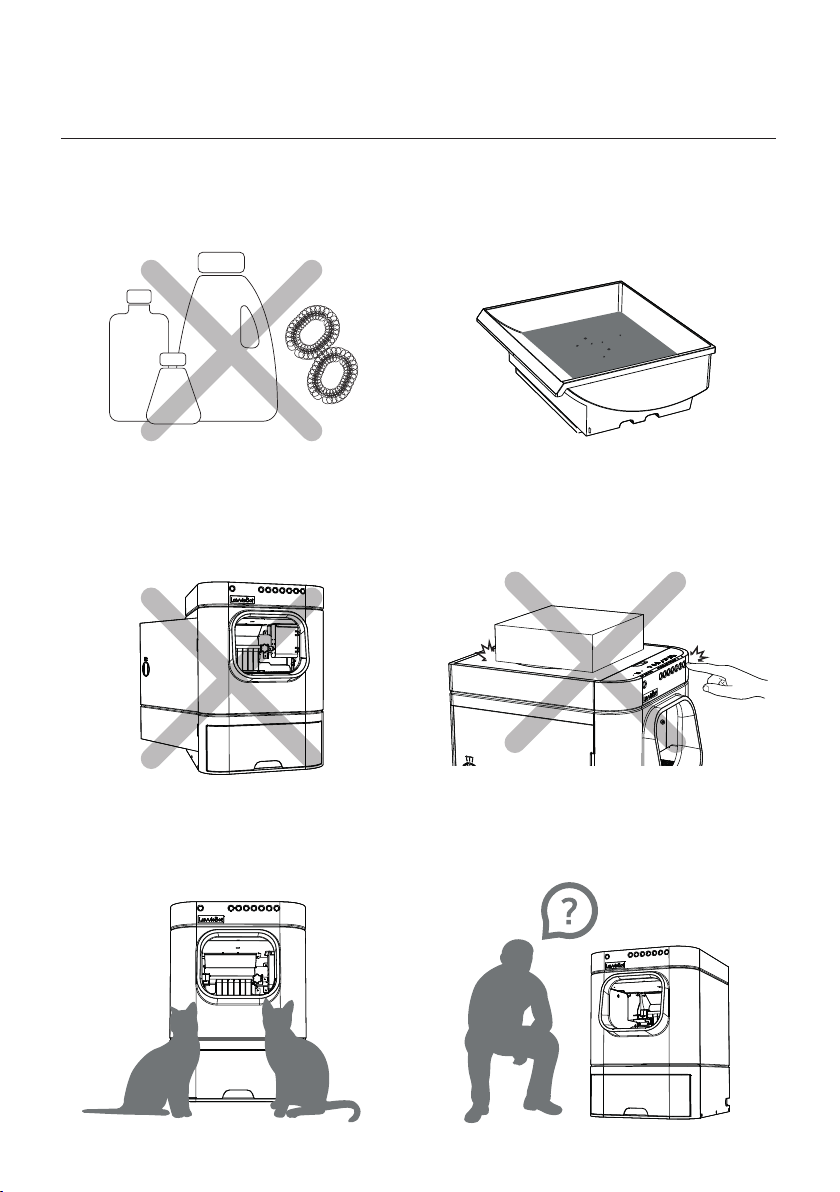
Safety Instructions
Refer to p.15-16 for information for cleaning
LavvieBot. Cleaning the product with scouring
pads or abrasive chemicals can cause damage to
the product.
Safety sensors are located at the entrance.
Always keep the side door closed, except when
cleaning. Leaving the door open or opening it
while the LavvieBot operates can lead to serious
safety consequences.
Small clumps that cannot be sifted by the rake may
be left out in the litter. Clean the LavvieBot regularly
for your cat’s health and a hygienic environment.
Please clean the litter tray once a month to avoid
motor overload problem.
Do not put pressure on the LavvieBot by placing
heavy objects on top of the machine or applying
excessive force to the buttons, which can result in
damage.
We recommend one or two cats for one LavvieBot.
In the case of having more than two cats use one
LavvieBot, the life and performance of the
LavvieBot cannot be guaranteed.
The use of LavvieBot requires supervision. It is not
intended for use by persons who have a restricted
physical, sensory or mental capacity, or persons
lacking experience or knowledge unless they are
supervised.
6
Page 10
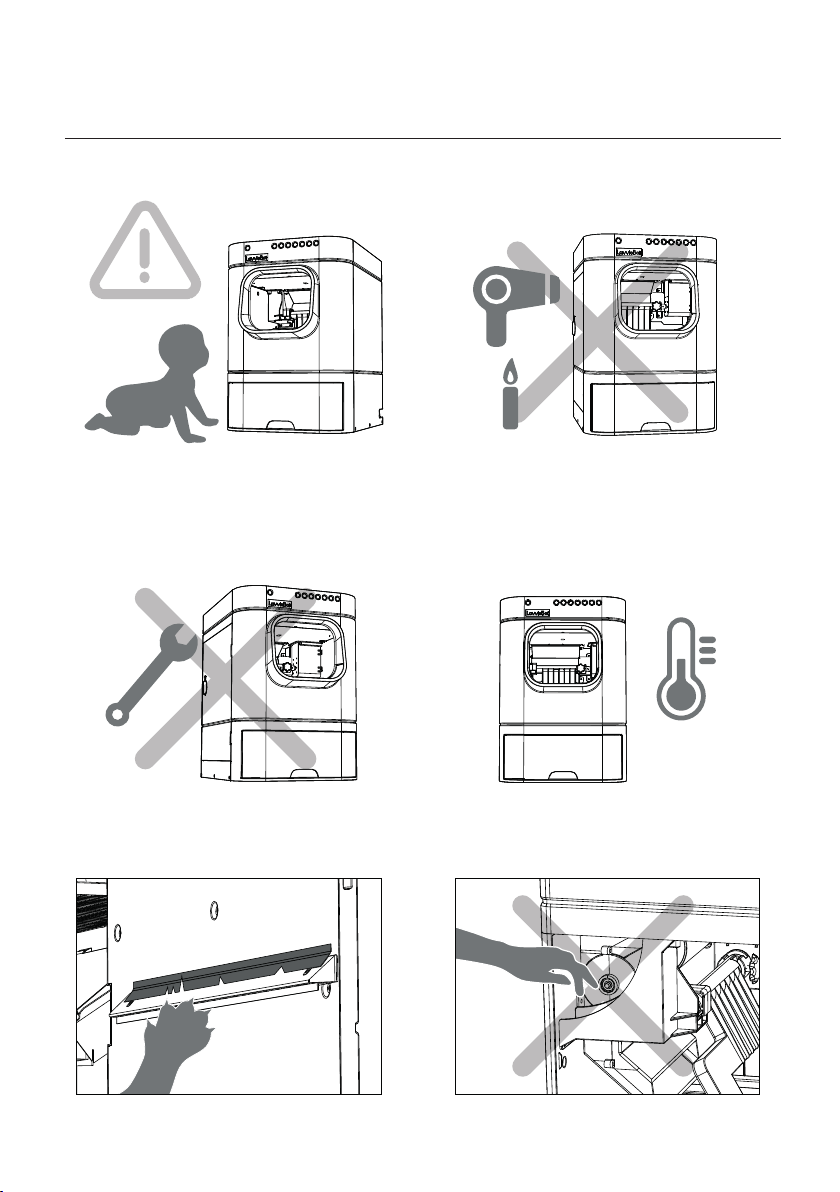
Safety Instructions
Never let an infant or a baby go inside the LavvieBot.
If a product error or failure occurs, do not repair
the machine yourself. Contact our Customer
Service for repair.
Do not try drying out the machine using a hairdryer
and putting a candle inside to remove bad odors.
These attempts can cause electric shock or a fire, or
damage the product.
LavvieBot and its accessories are designed to be
used indoors. Please place the machine where the
temperature is between 10℃ and 35℃. If the
temperature is below or above the range, the
performance of the LavvieBot cannot be guaranteed.
10℃~35℃
50℉~95℉
LavvieBot is equipped with silicone parts which are
made to avoid rust and leaking incidence. Please be
cautious as cats may scratch and damage these parts.
7
Keep hands, feet and loose clohing clear while
machine is in operation.
Page 11
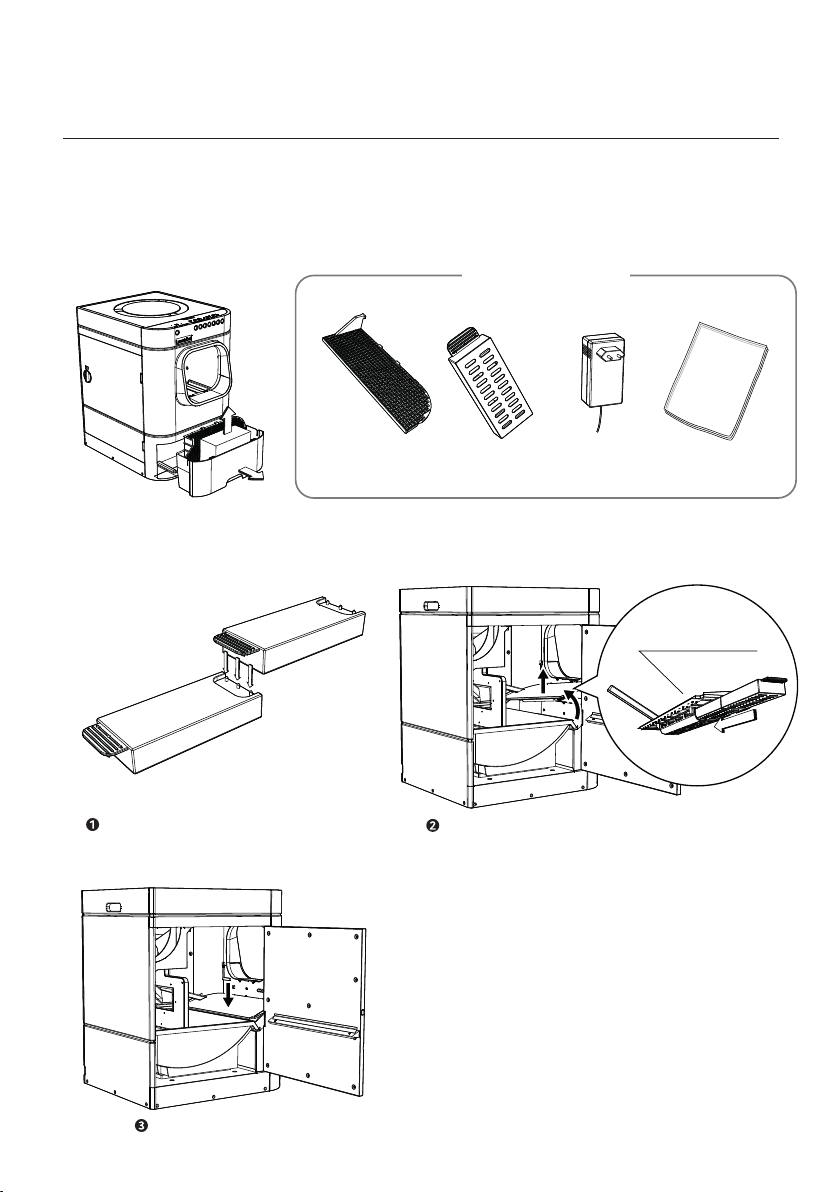
Start your LavvieBot Life
1. Remove packing tapes and package cushioning in and out of LavvieBot.
2. Take out the accessory box, a step mat and waste bags from the waste drawer.
Accessories + Step Mat
Step Mat Deodorizer X 2 Power adapter Waste bags X 10
3. Connect the deodorizers and install this set inside the machine.
Waste Drawer Cover
Connect each end of a deodorizer as shown above
Attach the waste drawer cover.
Install the deodorizer underneath the waste drawer cover after
detaching a waste drawer. When detaching, slightly twist the
waste drawer cover to take it out easily from a machine.
8
Page 12
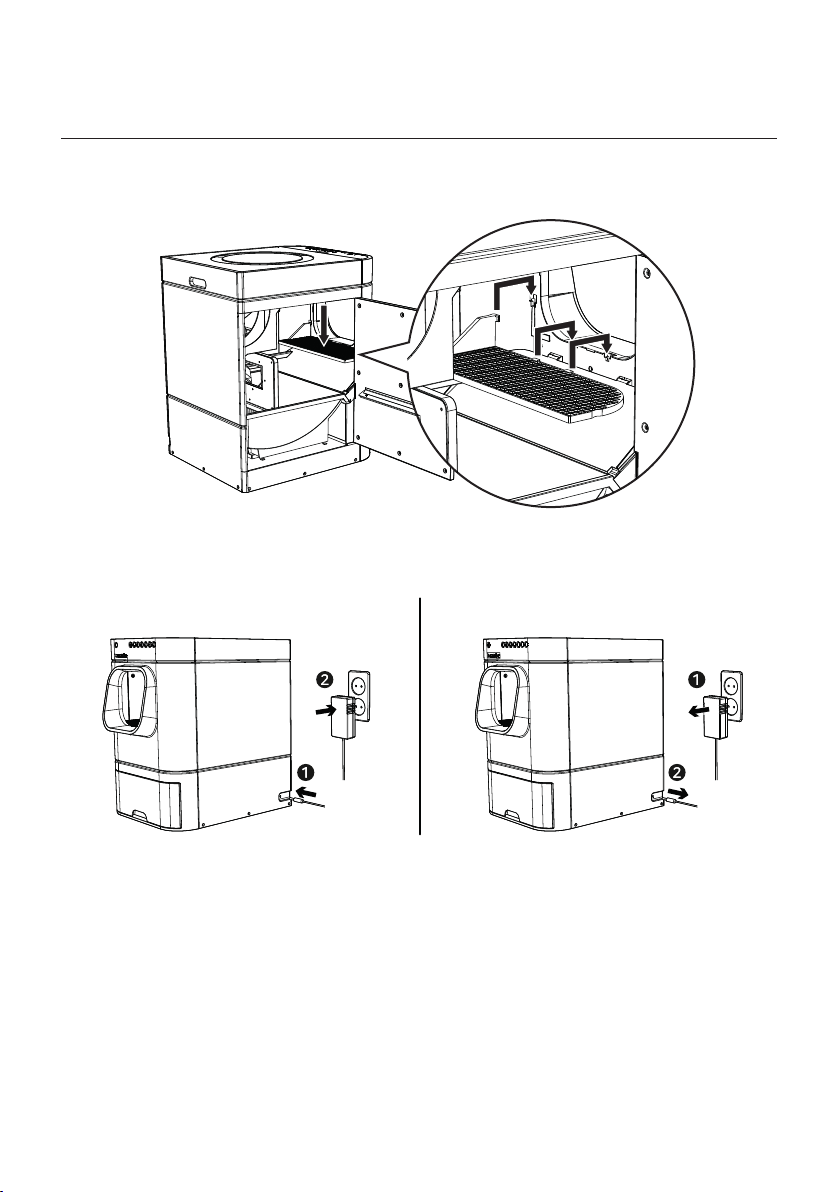
Start your LavvieBot Life
4. Attach the step mat as shown in the picture below.
5. Place the LavvieBot on a firm, level surface.
· First connect the power supply cable to LavvieBot and then plug in.
To turn off, unplug first before detaching the cable from the LavvieBot.
To turn on To turn off
6. See p.13 “Smartphone Connection” to connect it to your electronic device.
7. See p.14 “How to Refill Litter” to fill the litter to LavvieBot.
8. LavvieBot is now ready for use.
· When your cat uses the LavvieBot and leaves, the machine will automatically clean the waste from
the litter tray. Then, empty the waste drawer when it is full.
9
Page 13
LavvieBot Process
LavvieBot is always monitoring the litter tray.
For safety reasons, LavvieBot completely stops auto-cleaning when a cat enters LavvieBot.
1)
It also controls its operation when a cat or person is detected in and around the litter tray.
· Check the STATUS indicator light
When the level of litter in the litter tray is low, it will automatically add a certain amount of
2)
litter from the storage.
· When the litter is filled, the lamp light is blue; red when the litter is less than
half full; red light blinks when it is empty.
· You can change the set-up amount of litter in the tray
When the set time passes after your cat leaves the litter tray, the separator will sift and separate the
3)
solid waste from the tray into the waste drawer.
·You can also adjust the Wait Time depending on the type of litter and cat's bowel movement habits.
(see p.11-12 Indicator Lights and Button Functions)
(see p.11-12 Indicator Lights and Button Functions).
(see p.11-12 Indicator Lights and Button Functions).
All you need to do is making sure that there is a plenty of litter in the litter storage and
changing the waste bag (emptying the drawer) when it is full.
LavvieBot is designed to work automatically. However, if you wish to operate it manually,
refer to p.11-12 Indicator Lights and Button Functions.
Acclimating Your Cat
1. Place the LavvieBot in the same location where a previous litter box was and allow your cat to have
easy access to the new litter box.
2. If your cat is not getting used to the LavvieBot, try putting one or two pieces of the cat’s waste into
the litter tray. Or you can mix the litter in the tray with a cup of litter from the old litter box.
3. If the cat still does not use LavvieBot, try the following directions;
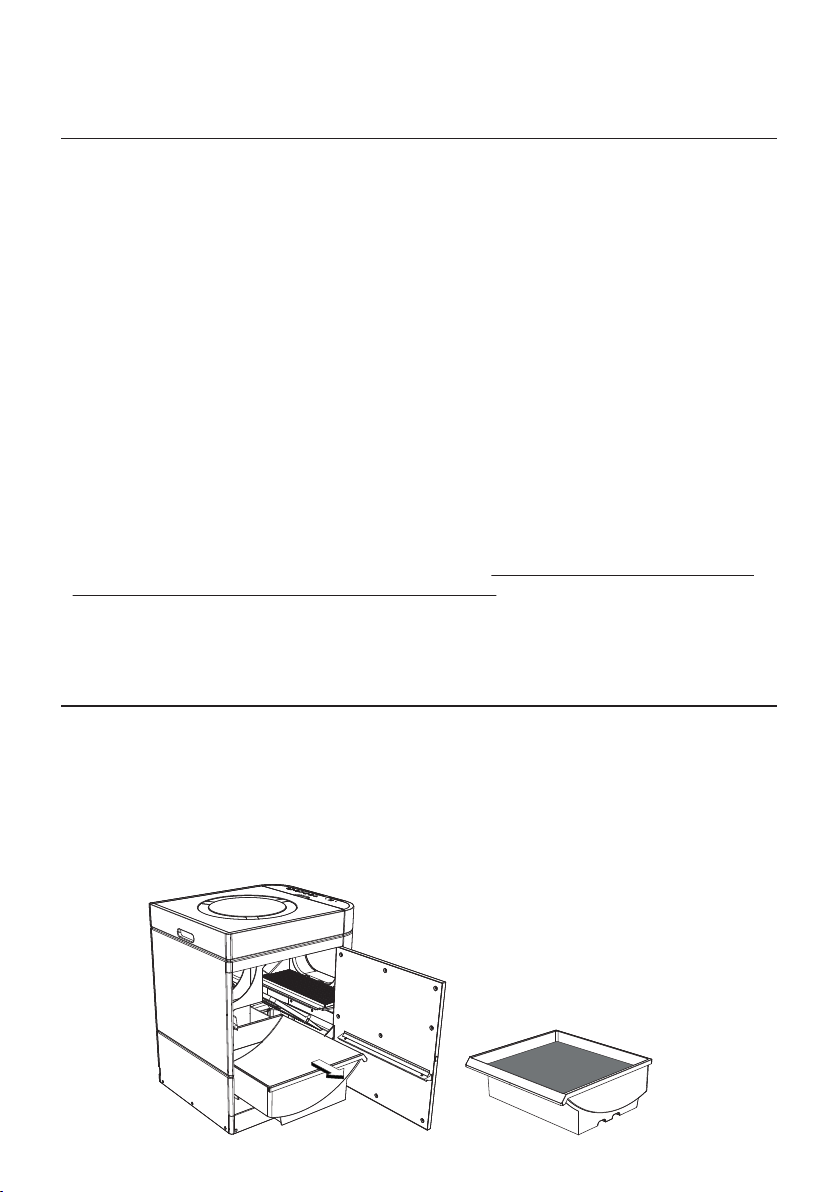
1) Open the side door, lift the separator after pressing the SEPARATE button,
and remove the litter tray (see p.15).
2) Let your cat use the litter tray as if it were a usual litter box.
3) Put the used litter tray back into the machine after about three days.
Litter
10
Page 14
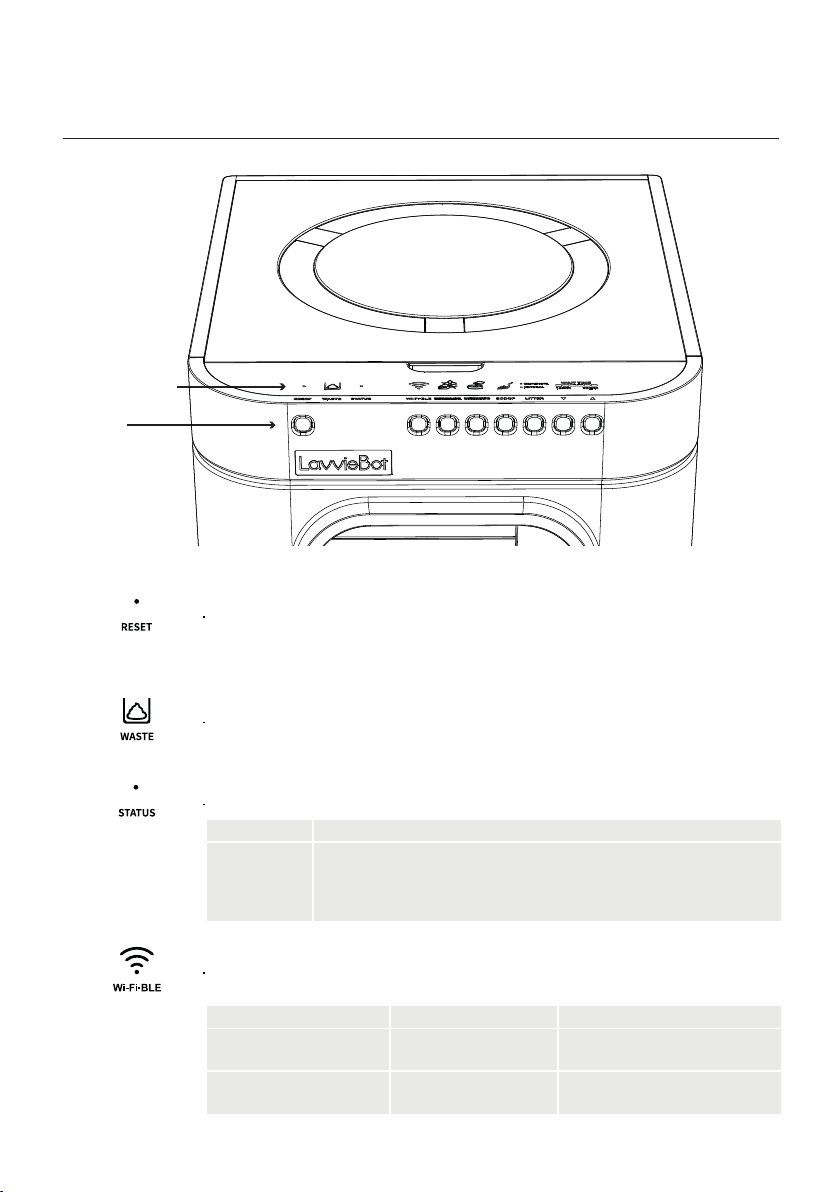
Indicator Lights and Button Functions
Indicator Lights
Buttons
System reset responding to abnormality
When LavvieBot’s operation has a problem, please reset the machine by pressing and
holding the RESET button indicator light appears.
(such information as the IP address of a router, etc. will not be reset).
11
Status of waste drawer
The WASTE indicator light appears when the waste drawer gets full.
Status of LavvieBot
The STATUS indicator lights display the status of the machine.
Indicator Lights Status
Green
Blue
Red
Cats or people are near LavvieBot.
A cat is inside LavvieBot.
Error detected.
· Please contact Customer Service team if the error continues after resetting the machine.
Wi-Fi/BLE light displays the status of connection.
LavvieBot can be connected to the PurrSong mobile application using Wi-Fi and you can
also register and update its firmware via BLE.
Buttons Indicator Lights Status
Press the button Blue light blinking Searching for a Wi-Fi network
Steady blue light Connected to Wi-Fi
Press and hold the button Green light blinking Searching for a Wi-Fi network
(more than 2 secs) Steady green light Connected to BLE
(available only with 2.4 GHz).
Page 15
Indicator Lights and Button Functions
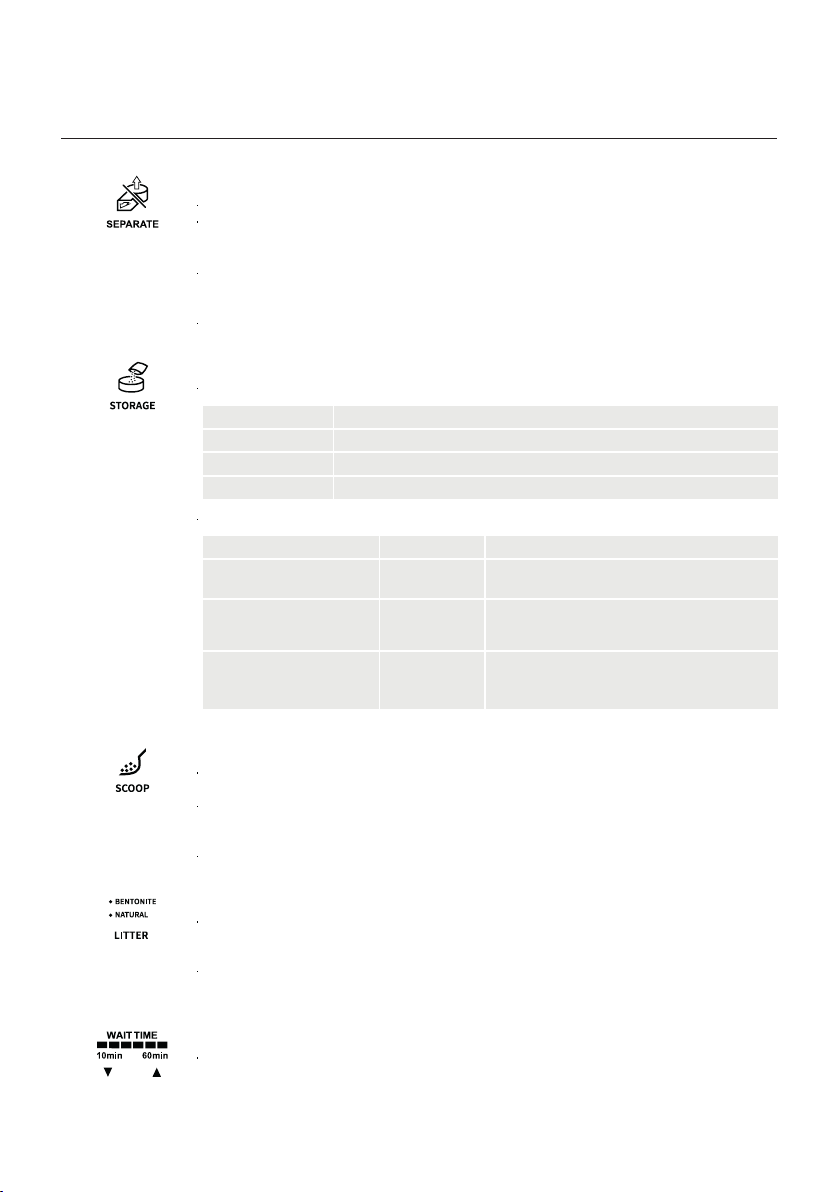
Disassemble for cleaning
The SEPARATE button is used to clean the inside product parts of LavvieBot.
For Litter Tray SEPARATE Mode - Press the button once and the SEPARATE indicator
light will be blue. You can see the separator being lifted toward the entrance.
You can only remove the litter tray during this mode.
For Separator SEPARATE Mode - Press and hold the SEPARATE button more than 2 seconds
and the SEPARATE indicator light will be red. Then, the separator will place itself to
perpendicular to the ground. Now, simply take out the separator.
You can stop/cancel by pressing the SEPARATE button one more time.
Status of litter storage / Refill litter
The STORAGE indicator light displays the status of a litter storage.
Indicator Lights Status
Steady blue light The storage is full.
Light off The storage has not enough litter.
Red light blinking The storage has no litter.
The STORAGE button is used to refill the litter.
Buttons Indicator Lights Status
Press the button Blue light
Press and hold the button
(more than 4 secs)
Press RESET and STORAGE buttons
at once during SEPARATE mode
· Refer to p.12 and p.15
for SEPARATE mode
blinking
Blue light
blinking
Red light/blue
light alternately
blinking
The litter is being refilled.
· It will not work if a litter tray has enough litter in it.
The litter will be refilled while pressing the button.
· It will continue to refill until you release the button.
(max. 5kg)
It releases all the litter from a litter storage.
· Press any button to stop/cancel the process.
Manual scooping
When pressing the SCOOP button, the indicator light will blink and the separator will
start sifting the waste to the waste drawer.
Press the SCOOP button to begin scooping immediately. Please wait until the clumping
gets hard enough so that it won’t stick to the separator or create too small clumps to scoop,
failing to clean effectively.
Press the button again to stop the separator during its cleaning process.
Litter type
Choose the type of cat litter that you will use for LavvieBot by pressing the LITTER button
once. Choose BENTONITE when you use bentonite cat litter and NATURAL to use one of
the natural litters made of tofu, corn or other natural materials.
Press and hold the button to set a level of the litter in the litter tray, and LavvieBot will
keep that set-up amount by refilling litter automatically.
Wait Time Display
Set the length of wait time by pressing ▼ and ▲ buttons.
The Wait Time is the time between a cat’s exit of LavvieBot and beginning of auto-cleaning.
We recommend setting 10 minutes when BENTONITE litter is used.
12
Page 16
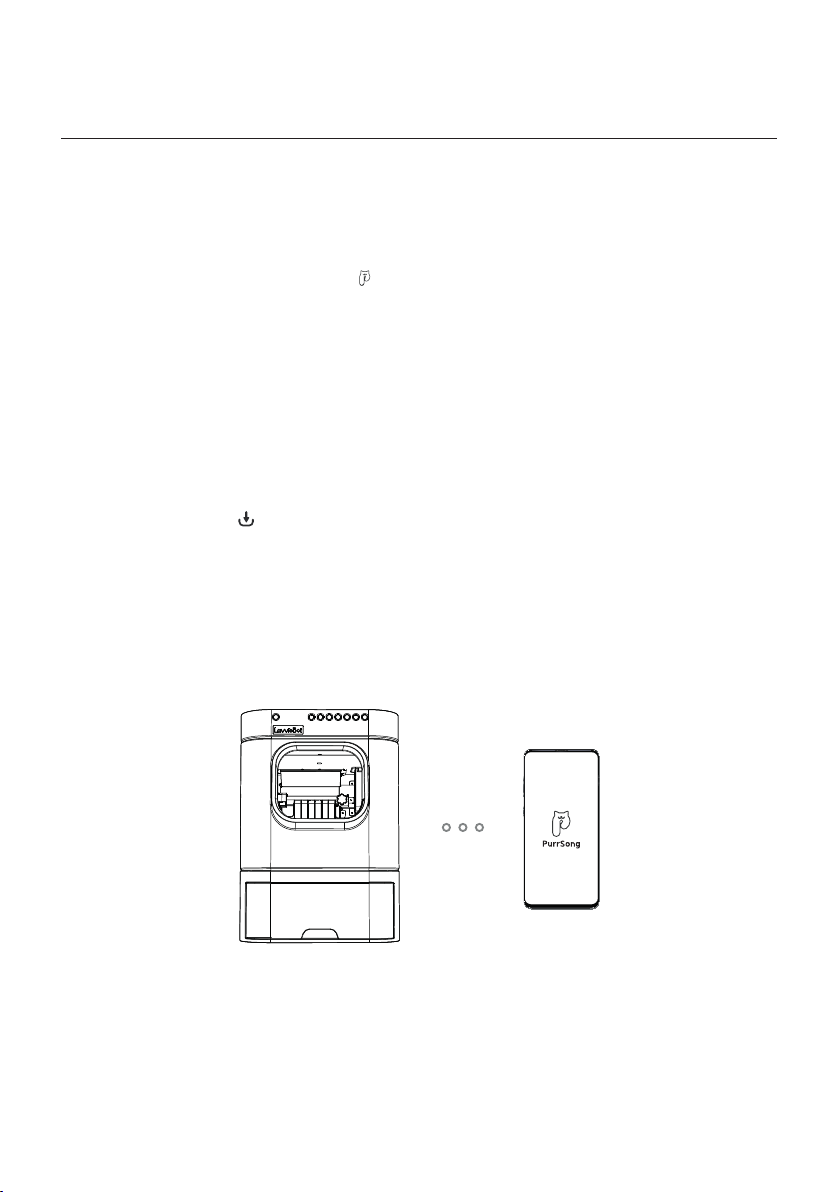
Smartphone Connection
Download the PurrSong mobile application exclusively developed for LavvieBot from
Google Play Store or App Store to connect LavvieBot to your mobile device.
1. Sign up.
2. Register your LavvieBot.
1) After logging in, tap on the main tab bar on the bottom.
2) Click on “IoT” at the top of the screen and choose Register.
· Register your LavvieBot after entering your locations by clicking “Location”.
3) Click on “LavvieBot” and enter the product number as indicated on the sticker under the top lid of LavvieBot.
· Refer to p.2 for LavvieBot Authenticity Check.
4) Follow the guide provided by the app to complete the device and location registrations.
3. Register a router.
1) Choose “Register” from registered LavvieBot.
2) Follow the guide provided on app to register your router as you did for device registration.
· LavvieBot supports only 2.4 GHz Wi-Fi networks. (not available in 5G)
3) Once the router is registered, a blinking green light of Wi-Fi·BLE indicator will turn blue and comes on steady.
4. Update firmware for optimal performance.
1) Click an update icon on the right side of screen. (The icon will appear only when the firmware is ready for update)
2) Follow the guide provided by the app to update the firmware as you did for device registration.
· Be careful not to turn off the phone during the update as this can cause a failure in the system.
5. Register your cat(s).
1) Choose “Cat” at the top of the screen.
2) Tap Register to enter the information of your cat(s) and complete the registration.
PurrSong app is available on Google Play Store and App Store.
We hope you enjoy our smart LavvieBot life using various features provided on the PurrSong app.
13
Page 17
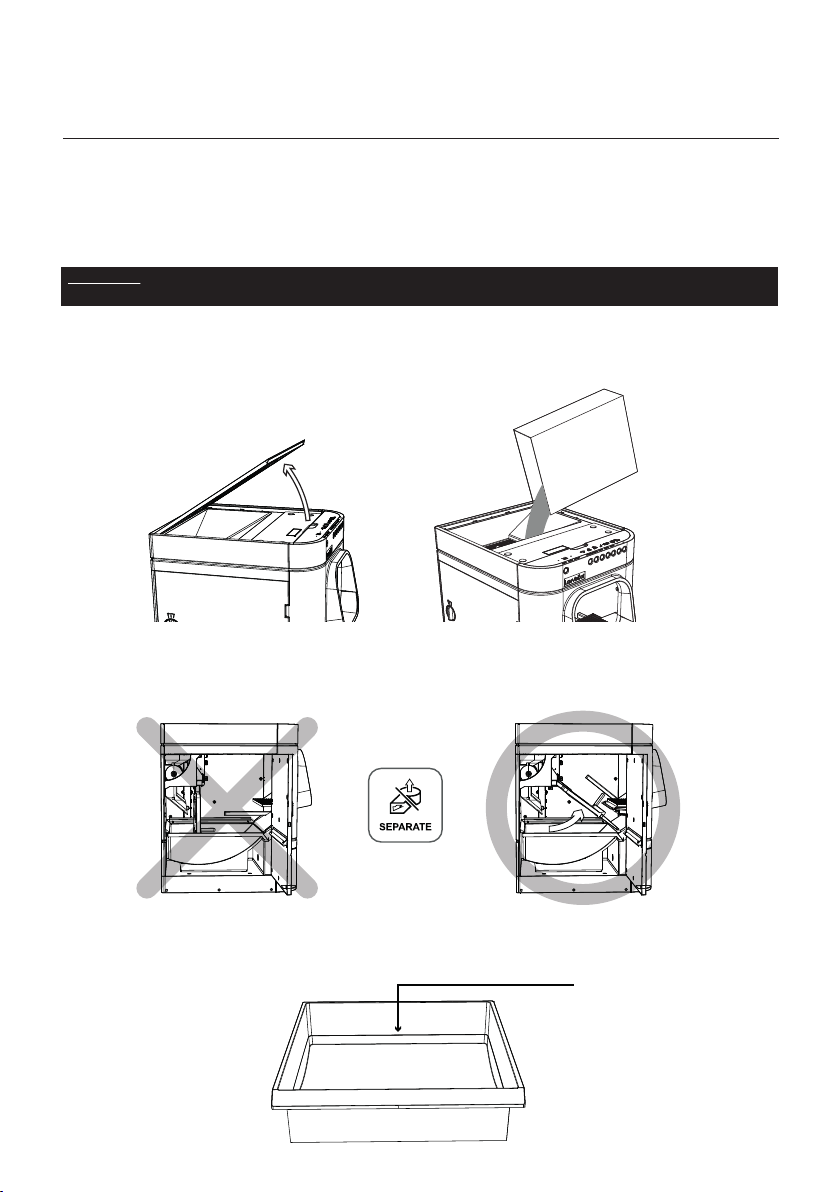
How to Refill Litter
Set up the machine and fill the litter tray with cat litter.
Please use clumping cat litter types for LavvieBot
(recommend using LavvieSand for the best performance).
Do not use clay litter, silicone-based litters, or some natural litters with weak clumpings and big-sized particles.
LavvieBot can have a maximum of 12 liters
(5-5.5 liters in Litter Tray and 6.5 Liters in Litter Storage).
There are two ways to refill the litter.
IMPORTANT If you are using natural litter (1. when the first litter to start LavvieBot is natural litter 2. when changing
to natural litter from bentonite litter), you must follow “2. When a Litter tray is manually refilled” to proceed
1. When a Litter Tray is filled from a Litter Storage
1) Open the top lid of a litter storage and pour the litter in it.
2) Press and hold the Separator button untill the red SEPARATE indicator light turns off. Then, the separator will retract itself
towards the back and this status is called a Basic mode. Press the STORAGE button to fill litter to the litter tray after the
separator is in Basic mode.
3) Open the top lid of a litter storage and pour the litter in it.
4) Put extra litter into the litter storage and then it is all set.
2. When a Litter tray is manually refilled
1) Open the side door as shown in the picture below and make sure the separator is lifted towards the entrance.
If not, press the SEPARATE button to move the separator so that the tray can be taken out.
2) Remove the tray from LavvieBot and look for a line marked inside. This is the baseline that litter has to be filled up to and
spread flat. After adding the litter up to the line and make it flat, press and hold the LITTER button for a long time to
complete the set-up which is setting up the amount of litter for LavvieBot.
Baseline
14
Page 18
Cleaning LavvieBot
Cleaning Separator
You can easily clean the inside product parts of your LavvieBot.
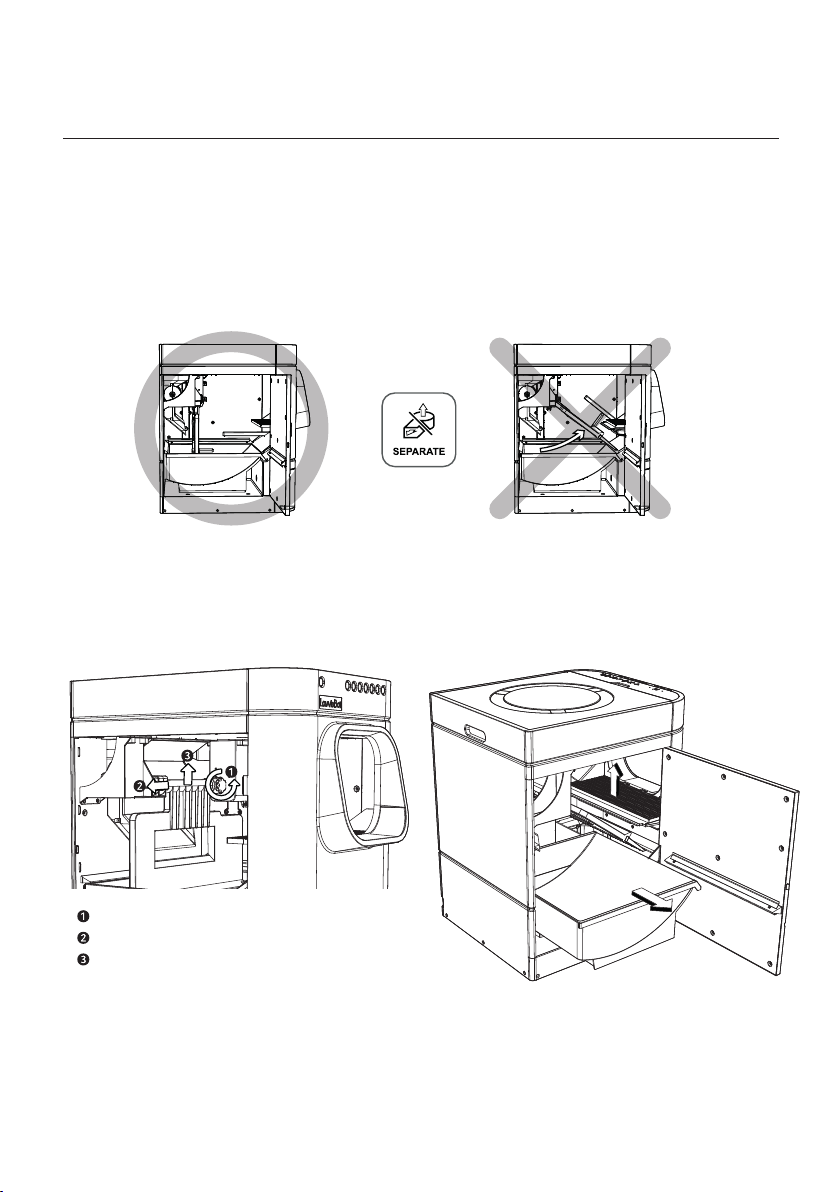
1. First, press SEPARATE button for more than 2 secs to position the separator perpendicular to the ground.
2. Check inside to see if the separator is heading the right direction and unplug the power adapter.
For more than 2 secs
The separator must be placed vertically as in the picture on the left.
3. Now the separator is ready to be cleaned.
1) Loosen the coupler handle to remove the separator.
2) Take out the litter tray.
3) Push the step mat upward to detach it from the unit.
Unscrew the coupler handle counterclockwise.
Open the slide in the same direction as in the picture.
Push the separator upward as in the picture to disassemble.
4. If you’re done cleaning the separator, follow the steps below to reassemble it back to LavvieBot.
1) Push the litter tray back in the unit.
2) Mount the separator to the coupler.
3) Screw the coupler handle until it is fixed tightly.
4) Put the step mat into the groove and press it down to attach.
5) Close the side door.
15
Page 19
Cleaning LavvieBot
Cleaning Litter Storage
If there is a lot of litter left in the storage, you should remove all the litter from the litter tray before cleaning.
1) During the SEPARATE mode, press and hold RESET and STORAGE simultaneously to send all the litter
from the storage into the litter tray.
2) Press the SEPARATE button again to go back to the initial status.
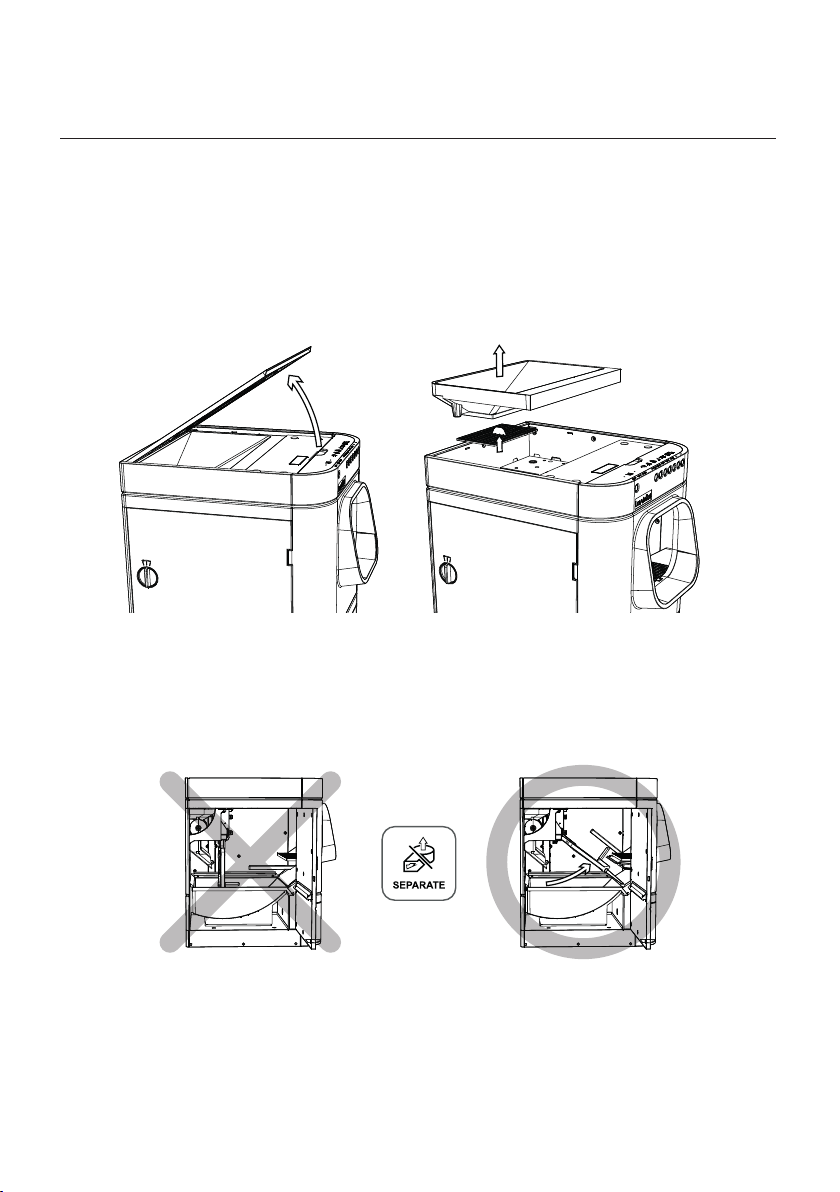
3) Open the top lid of the litter storage and pull up the storage.
4) Wash the storage in running water and dry it thoroughly before putting it back. Please make sure that
the litter storage is not tilted so that it can be placed onto the weight sensor horizontally.
Cleaning Litter Tray
If you want to clean the litter tray only, press the SEPARATE button to raise the separator to take out the litter
tray. When putting the tray back, make sure that it is aligned well and fits in the unit smoothly.
The separator must be raised as in the picture on the right.
Cleaning Interior Walls
If the interior wall of your LavvieBot needs to be cleaned, wipe it with a tightly squeezed damp cloth as if
cleaning a refrigerator, and clean the bottom with a broom or a vacuum cleaner. Use a soft sponge to wipe
the litter tray to prevent scratches.
16
Page 20

FAQs
Q. What should I do if my cat’s stool is watery or mushy?
A. If your cat’s stool is watery or mushy, it might take a while for the litter to be hardened.
In this case, set up the Wait Time to a longer period to give enough time for litter to be
hardened so that LavvieBot can clean the clumping.
Q. Is there a recommended size/weight limit of cats to use LavvieBot?
A. We recommend cats weighing between 7.5kg ~ 1kg to use it, but not applicable to large
size of breeds such as Maine Coon.
Q. My cat has short legs and joint problems. Isn’t the entrance too high for my cat?
A. The height of LavvieBot’s entrance is similar to that of a two-story wooden litter box.
If your cat’s legs are not strong, we recommend placing a cat stair or a cushion in front
of the entrance.
Q. Can I use tofu cat litter?
A. Yes, but you must only use the one with small particles, which is compatible
with LavvieBot.
Q. Do I have to use a custom-fit waste bag?
A. You can use any bag as long as it fits into the unit but recommend using the custom-fit
waste bag. If the size does not match with a waste drawer, LavvieBot may misrecognize
that the waste is full and notify you with an inaccurate info.
Q. How much litter does it use?
A. LavvieBot can contain up to 12L of litter in total (about 5 to 5.5L in the litter tray and
6.5L in the litter storage).
Q. What happens if my cat enters LavvieBot while it is cleaning?
A. If your cat enters the machine during the auto cleaning, its front infrared sensor will instantly
detect the movement, and the separator will be shifted to standby mode immediately.
Q. Can LavvieBot distinguish cats?
A. It can distinguish cats as long as their weight difference is about 1.6lb or more.
However, we are working on a cat pendant to help LavvieBot identify cats regardless of
their weight.
Q. Do I have to remove all the litter before changing a litter type?
A. Please empty both litter tray and litter storage before changing the litter type. Try not to
have/use mixed litter when replacing litter types.
Q. Do I need to replace damaged silicone parts?
A. You may use LavvieBot without the silicone parts; however, for those who want to
replace it, contact a customer center for service. Please note that such service will be
charged accordingly.
17
Page 21

FAQs
Q. What does Location mean in LavvieBot mobile application?
A. It means the location where your cat and LavvieBot are placed. It is mandatory to
choose the Location when registering your cat and LavvieBot.
Q. What is included in the Location?
A. The Location includes Cat, LavvieBot, and User. It shows the location of cat(s) and
LavvieBot(s), and user can check such information by entering that location.
Q. What is Authority of Location? What is Authority given at a location?
A. There are Super User and User. A Super User is the person who creates a Location and
holds an authority to delete that Location. One can not only register and change the
information of Cat and LavvieBot, but also choose the next Super User and grant authority
when leaving the location. However, non-Super User can only access to information of the
Location as a participant.
Q. How should I distinguish the Location?
A. You can distinguish Location based on your cat’s daily living space. For example, if you
have two LavvieBots in your house and multiple cats are using both LavvieBots, all your cats
and the LavvieBots should be registered under the same Location. If your cats have their own
preference and use only one of the two LavvieBots, register them under a different Location
accordingly so that you can have precise information.
18
Page 22

Warranty and Customer Service
Returns and Refunds
If you are not satisfied with this product, for whatever reason, it is possible to return it for refund
within 30 days of receipt. You must first advise RobotShop at [email protected].
RobotShop will provide you with a Return Authorization number. No returns will be accepted
without having a previously obtained RA number.
The product must then be returned in its original packaging.
Please note that all items will be reimbursed within 7 days of receiving the product (shipping
fees excluded). You must also cover the cost of returning the product. Shipping fees will only be
refunded if the return is a result of a shipping error on our part. Cleaning fees (50$) may also be
charged if the Lavviebot S is returned and has not been properly cleaned. Please make sure the
Lavviebot S is cleaned and carefully packaged and in its original packing prior to return.
Warranty North-America
Your Lavviebot S is covered by a 1 year warranty starting from the date of shipment. This warranty
covers all parts and labor for manufacturer defects and is taken care of by a RobotShop certified
repair center. Customers must first obtain a return authorization by contacting RobotShop at
[email protected].
If you have any questions, concerns or need assistance, contact RobotShop Inc.; we’ll be glad to help.
[email protected]
+1-866-627-3178 Toll-free (in North America)
Warranty Europe
Your Lavviebot S is covered by a 2 year warranty starting from the date of shipment. This warranty
covers all parts and labor for manufacturer defects and is taken care of by a RobotShop certified
repair center. Customers must first obtain a return authorization by contacting RobotShop at
[email protected].
If you have any questions, concerns or need assistance, contact RobotShop Inc.; we’ll be glad to help.
[email protected]
+33-8-01-90-23-42 Toll-free (within the European Union)
19
Page 23

Precautions
This product contains sensitive electronically controlled components and must be used indoor
that is not exposed to moisture and direct sunlight for residential use.
If removable parts (separator, mat, etc.) are not fully engaged as written in the guideline,
they can be damaged and pose a threat to your cat’s safety. Please make sure that they are
fully engaged before using the product.
If necessary actions are not taken according to the indicator light, the product can be damaged,
so please follow directions or required actions accordingly in a timely manner.
Keep clear of moving parts when machine is in operation.
Make sure to have children avoid entering or contacting the product while it is operating.
Do not wash the main unit. Remove a litter tray or a separator under a safe condition and clean
them with a damp soft cloth, and then dry it thoroughly before putting it back.
For further information for safety and use, visit www.lavviebot.com for more details.
Any failure arising from failing to acknowledge or comply with this information may be outside
the scope of warranty.
20
Page 24
MARKING ACCORDING TO THE ELECTRICAL APPLIANCES
AND CONSUMER PRODUCTS SAFETY CONTROL ACT
· Certification Number: KC ID: R-R-PSw-LavvieBot2
: FCC ID : 2AWFPLAV2
: IC : 26107-LAV2
· Product Name: Smart Automatic Cat Litter Box
· Model Name: LavvieBot S
· Input: DC 12V 5A
· Temperature setting for the use: 10℃ ~ 35℃
· Place for the use: For residential use (indoor)
· Manufacturer : PurrSong, Inc.
· Address: 3F, 538, Daedeok-daero, Yuseong-gu,
Daejeon, Republic of Korea
· Country of Origin: Republic of Korea
· Date of manufacture: Indicated separately
· RF SPEC.
1. Bluetooth
- Frequency : 2 402 ~ 2 480 MHz
- Version : Bluetooth Low Energy 4.1
- Channel : 0~39 Channel
- Maximum Power
# Class 2 : 2.8 mW (4 dBm) ~ 0.25 mW (-6 dBm)
- Maximum Bandwidth : 2MHz
- Technology : FHSS
2. Wi-Fi
- Protocol : IEEE 802. 11b/g/n_HT20/n_HT40 Supported
- Frequency : 2 412 ~ 2 462 MHz (802.11b/g/n_HT20)
2 422 ~ 2 452 MHz (802.11n_HT40)
- Technology : DSSS (802.11b),
OFDM (802.11g/n_HT20/n_HT40)
- Min 17.5 dBm / Typical 18.5 dBm / Max 20 dBm
· Designed by PurrSong, Inc.
R-R-PSwLavvieBot2
211-171102
XXX-XXXXXX
Tested To Comply
With FCC Standards
FOR HOME OR OFFICE USE
FCC ID : 2AWFPLAV2
IC : 26107-LAV2
Contains FCC ID : 2AC7Z-ESPWROOM32D
IC : 21098-ESPWROOM32D
FCC COMPLIANCE STATEMENT
· This device complies with part 15 of the FCC Rules.
Operation is subject to the following two conditions : (1) This
device may not cause harmful interference, and (2) This device
must accept any interference received, including interference
that may cause undesired operation.
· CAUTION: Changes or modifications not expressly approved by
the party responsible for compliance could void the user’s authority
to operate the equipment
· RF Exposure Statement
A minimum separation distance of 20 cm must be maintained
between the antenna and the person for this appliance to satisfy
the RF exposure requirements
· Industry Canada Statement
This device complies with Industry Canada license-exempt RSS
standard(s). Operation is subject to the following two conditions:
(1) this device may not cause interference, and (2)this device must
accept any interference, including interference that may cause
undesired operation of the device.
· Énoncé d'Industrie Canada(IC)
Le present appareil est conforme aux CNR d’Industrie Canada
applicables aux appareils radio exempts de licence. L’exploitation
est autorisee aux deux conditions suivantes : (1) l’appareil ne doit
pas produire de brouillage, et (2) l’utilisateur de l’appareil doit
accepter tout brouillage radioelectrique subi, meme si le brouillage
est susceptible d’en compromettre le fonctionnement.
· Tout changement ou modification non expressément approuvé par
la partie chargée de la mise en conformité peut annuler le droit de
l’utilisateur à utiliser l’équipement.
· Déclaration d'exposition aux RF
Une distance de séparation minimale de 20 cm doit être maintenue
entre l'antenne et la personne pour que cet appareil satisfasse aux
exigences d'exposition aux RF
 Loading...