


VENTILATEUR SUR PIED
AVEC TÉLÉCOMMANDE
VENTILATORE A COLONNA
CON TELECOMANDO
STAND FAN
WITH REMOTE CONTRO
STANDVENTILATOR
MIT FERNBEDIENING
STAANDE VENTILATOR
MET AFSTANDSBEDIENING
VENTILADOR DE COLUMNA
CON MANDO A DISTANCIA
M I L L
Ø 40 cm
WinEurope - FRANCE
Web : www.purline.com
LIVRET D’INSTRUCTIONS - MANUALE D'ISTRUZIONI - INSTRUCTION
MANUAL BEDIENUNGSANLEITUNG - GEBRUIKSAANWIJZING
MANUAL DE INSTRUCCIONES
FRANÇAIS
Lisez attentivement les instructions avant d’utiliser l’appareil, et conservez-les pour une
utilisation ultérieure.
AVERTISSEMENTS
1. Après avoir déballé l'appareil vérifier son intégrité. En cas de doute ne pa s utiliser
l’appareil et contacter exclusivement notre Centre d’Assistance Technique. Les
éléments d’emballage (sacs en plastique, polystyrène, agr afes métalliques, etc.)
doivent être gardés hors de la portée des enfants dans la mesure où ils
représentent des sources possibles de danger.
Attention :
L’appareil doit être utilisé par des personnes adultes responsab les ;
les enfants et les personnes aux capacités mentales réduites doivent, pour leur
sécurité, utiliser l’appareil sous la surveillance d’un adulte responsable ;
les enfants ne doivent pas utiliser l’appareil comme un jeu, son utilisation doit
toujours avoir lieu sous la surveillance d’un adulte responsable.
2. Avant de brancher l’appareil vérifier si les données reportées sur la plaquette
correspondent à celles du réseau de distribution électrique.
3. Si le cordon d’alimentation est endommagé il doit être remplacé par le Fabricant,
par son Service d’Assistance Technique ou en tout cas par un perso nnel qualifié
afin de prévenir tout type de risque.
4. Cet appareil est exclusivement destiné à l’usage pour lequel il a été fabriqué c’est
à dire comme ventilateur sur pied. Le Fabricant ne pourra être tenu pour
responsable des dommages éventuels dérivant d'usages impropres ou incorrects.
5. Avant d’effectuer toute opération de nettoyage ou d’entreti en, éteindr e l’ ap pareil et
le mettre hors tension en enlevant la fiche de la prise de courant ou en éteignant
l’interrupteur de l’installation.
6. En cas de panne et/ou de mauvais fonctionnement de l’appareil, le mettre hors
service et éviter de le manipuler. Pour toute réparation éventuelle, s’adresser
exclusivement à notre Centre d’Assistance Technique et demander l’utilisation de
pièces de rechange originales. Le non-respect des indications susmentionnées
risque de compromettre la sécurité de l’appareil.
7. Si l’appareil n’est plus utilisé il est recommandé de l’éteindre et de le dé brancher
du réseau électrique.
8. L’utilisation de tout appareil électrique comporte le respect de certaines règles
fondamentales, notamment :
- ne pas utiliser l’appareil à proximité de sources d’eau telles que les baignoires,
les douches ou les piscines
- ne pas toucher l’appareil avec les mains ou les pieds mouillés ou humides
- ne pas exposer l’appareil aux agents atmosphériques
9. Température ambiante maxi 40°C.
10. Ne pas utiliser l’appareil en présence de liquides ou de gaz potentiellement
inflammables ou explosifs.
11. Appareil conforme aux Direct ives 89/336/CEE + 92/31/CEE + 93/68/CEE sur la
Compatibilité Electromagnétique (CEM) et aux Directives 73/23/CEE + 93/68/CEE
sur la Basse Tension (BT).
2

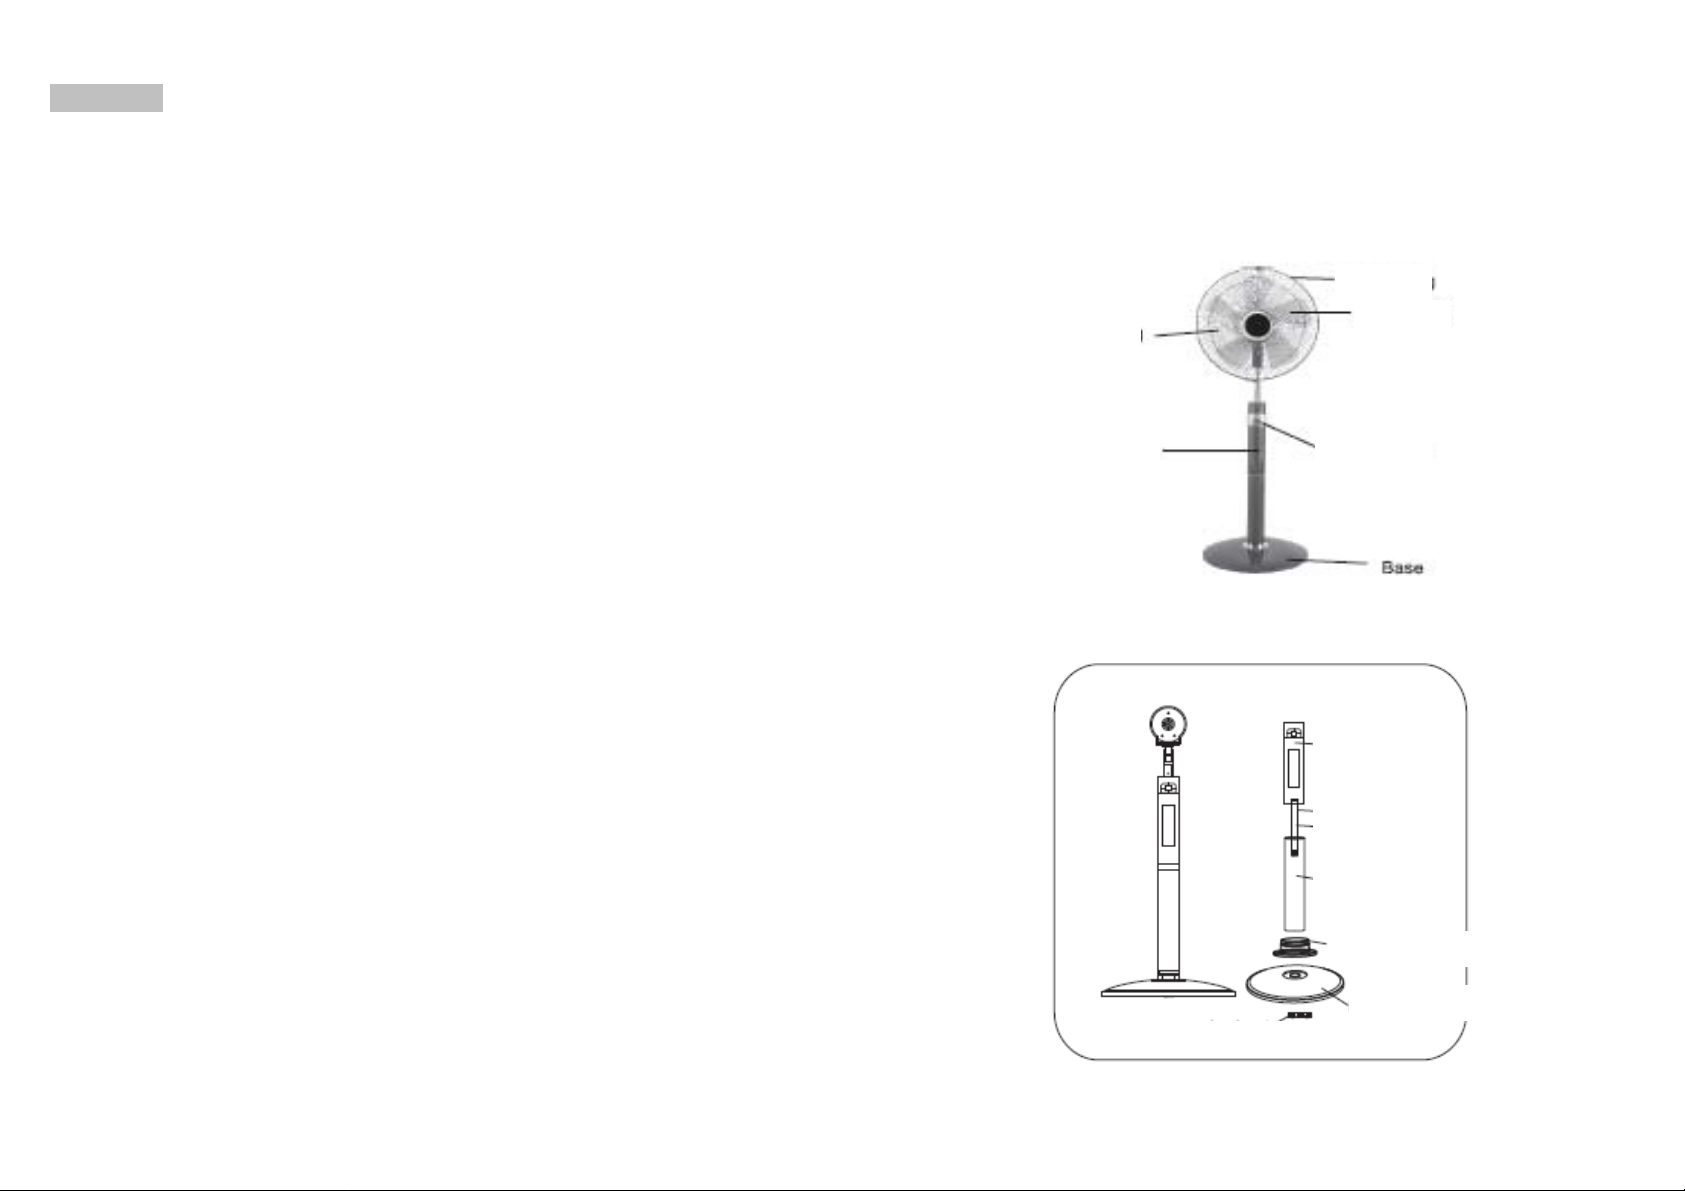
PARTIES DU VENTILATEUR SUR PIED
Grille
Tige
réglable
MONTAGE
Ecrou de fixation
3
Bague
Hélice
Interrupteur
Socle
Command
Vis
Tige
Tube en
aluminium
Petit socle
Grand socle
- Fixer la tige à l’élément de commande, puis serrer la vis.
- Positionner la tige avec l’élément de commande dans le tube en aluminium introduit
dans le petit socle.
- Fixer le grand socle à l’aide de l’écrou de fixation.
RÉGLAGE VERTICAL
- Positionner le ventilateur sur une surface plane.
- Desserrer le bouton 1 et incliner manuellement
la tête du ventilateur dans la position souhaitée
Attention : cette opération doit être exécutée
exclusivement lorsque le ventilateur est éteint.
1
FONCTIONNEMENT DU VENTILATEUR DEPUIS LE PANNEAU DE COMMANDE
TOUCHES DE
COMMANDE
ÉCRAN
FONCTIONS
COMMANDES
Insérer la fiche du ventilateur dans une prise de courant.
Touche ON/SPEED :
fonction de mise en marche du ventilateur-ON
fonction de sélection de la vitesse-SPEED: minimum (1) – moyenne (2) – maximum (3)
Touche TIMER :
elle permet de régler et d’éteindre le ventilateur – en appuyant plusieurs fois il est possible
de faire fonctionner le ventilateur de 0,5 heures à 7,5 heures
4

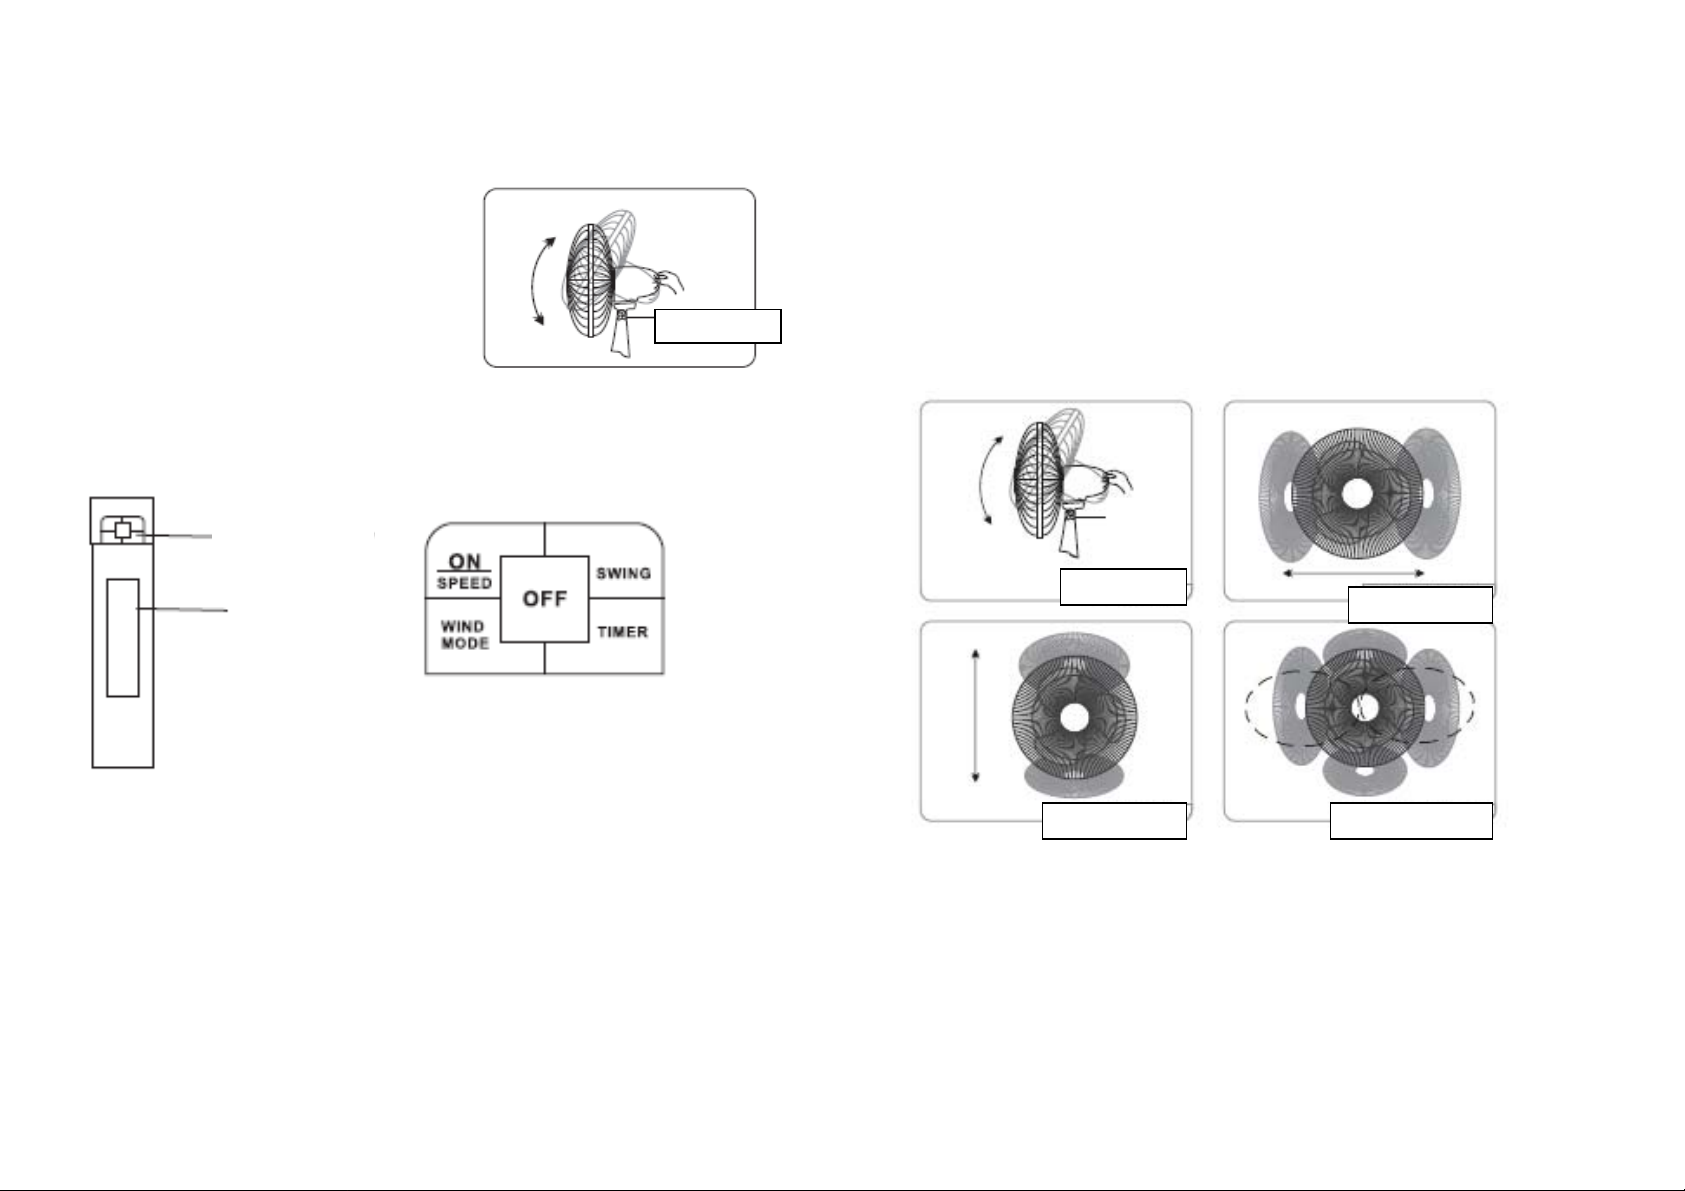
Touche SWING – Fig. A :
la touche SWING permet d’activer l’oscillation dans différentes directions :
- régler l’inclinaison verticale souhaitée (fig. A) selon les indications fourni es dans “Réglage
Vertical”
- appuyer 1 fois : oscillation de droite à gauche (fig. B)
- appuyer 2 fois : oscillation de bas en haut (fig. C)
- appuyer 3 fois : oscillation par rotation, 8 directions en séquence
“droite-gauche bas-haut” (fig. D)
- appuyer 4 fois : désactivation des oscillations
NB- Ne jamais régler le ventilateur à la verticale pendant qu’il oscille.
Touche WIND MODE :
cette touche permet de créer une brise naturelle ou une brise nocturne
FONCTIONNEMENT DU VENTILATEUR AVEC LA TÉLÉCOMMANDE
A
B
C D
Les fonctions sont les mêmes que celles qui sont décrites au paragraphe
“FONCTIONNEMENT DU VENTILATEUR DEPUIS LE PANNEAU DE COMMANDE”
WIND MODE
OFF ventilateur
SWING
ON / SPEED
OSCILLATION
Appuyer sur le bouton situé sur le moteur pour activer l’oscillation.
ENTRETIEN
Avant d’exécuter les opérations de nettoyage, éteindre le ventilateur et le mettre hors
tension. Utiliser uniquement un chiffon doux humide, ne pas utiliser de substances
abrasives.
NB. Ne plonger aucune partie du ventilateur dans l’eau.
DONNÉES TECHNIQUES
Puissance moteur : 65 W
Alimentation télécommande : à piles (non comprises)
Dimensions : 440 x 1300 x 440 mm
Poids : 7 kg
GARANTIE
1 an à partir de la date d’achat pour un « vice de fabrication ».
POUR SE PREVALOIR DE LA GARANTIE, PRIERE D'APPORTER L'APPAREIL OU DE
L'EXPEDIER PORT PAYE A VOTRE REVENDEUR, ACCOMPAGNE DE LA PREUVE
D'ACHAT.
ATTENTION
Le symbole
jeté avec les ordures ménagères. S’agissant d’un déchet spécial, il doit être remis et éliminé
dans un centre de collecte sélective conformément à la Directive européenne 20 02/96/CE
(WEEE). Éliminer séparément un appareil électroménager permet d’éviter les retombées
négatives pour l’environnement et la santé de l’homm e dues à la présence dans le produit
de substances potentiellement dangereuses.
:
figurant sur le produit signifie qu’en fin de vie l’appareil ne doit pas être
5
6
ITALIANO
La ringraziamo molto per aver acquistato un nostro prodotto.
Le chiediamo gentilmente di leggere con attenzione e di conservare questo
manuale d'istruzioni in quanto fornisce importanti indicazioni riguardanti la
sicurezza d'uso e di manutenzione.
AVVERTENZE GENERALI
1. Dopo aver tolto l’imballaggio assicuratevi dell’integrità dell’apparecchio. In caso di
dubbio non utilizzate l’apparecchio e rivolgetevi al nostro Centro Assistenza
Tecnica. Gli elementi dell’imballaggio (sacchetti in plastica, polistirolo, punti
metallici ecc.) non devono essere lasciati alla portata dei bambini in quanto
possibili fonti di pericolo.
Attenzione:
l’apparecchio deve essere utilizzato da persone adulte responsabili;
i bambini e le persone con ridotte capacità mentali, per la loro sicurezza, non
possono utilizzare l’apparecchio se non con la supervisione di persone a dulte
responsabili ;
i bambini non devono utilizzare l’apparecchio come gioco, ma devono sempre
essere supervisionati da personale adulto responsabile.
2. Prima di collegare l’apparecchio accertatevi che i dati di targa siano ris pondenti a
quelli della rete di distribuzione.
3. Se il cavo di alimentazione è danneggiato esso deve essere sostituito dal
costruttore o dal suo Servizio di Assistenza Tecnica o comunque da una persona
con qualifica similare in modo da prevenire ogni rischio.
4. Questo apparecchio dovrà essere destinato solo all’uso per il quale è stato
espressamente costruito ossia come ventilatore a colonna. Il costruttor e non può
essere considerato responsabile per eventuali danni derivati da usi impropri od
errati.
5. Prima di effettuare qualsiasi operazione di pulizia o di manutenzione, spegnete
l’apparecchio e scollegatelo dalla rete di alimentazi one elettrica togliendo la spina
dalla presa di corrente oppure spegnendo l’interruttore dell’impianto.
6. In caso di guasto e/o di cattivo funzionamento dell’apparecchio spegnetelo e non
manomettetelo. Per l’eventuale riparazione rivolgetevi solamente al nostro Centro
di Assistenza Tecnica e richiedete l’utilizzo di ricambi originali. Il manc ato rispetto
di quanto sopra esposto può compromettere la sicurezza dell’apparecc hi o.
7. Quando decidete di non utilizzare più l’apparecchio si raccomanda di renderlo
inoperante spegnendolo e togliendo la spina dalla pres a di corrente.
8. L’uso di qualsiasi apparecchio elettrico comporta l’osservanza di alcune regole
fondamentali, in particolare:
- non usare l’apparecchio nelle vicinanze di sorgenti d’acqua quali vasche,
docce o piscine.
- non toccare l’apparecchio con mani o piedi bagnati o umidi
- non lasciate l’apparecchio esposto ad agenti atmosferici
9. Temperatura ambiente max 40°C.
7
10. Non utilizzare l’apparecchio in presenza di liquidi o gas potenzialmente
infiammabili o esplosivi.
11. Apparecchio conforme alle Direttive Comunitarie 89/336/CEE + 92/31/CEE +
93/68/CEE sulla Compatibilità Elettromagnetica (EMC) e alle Direttive
Comunitarie 73/23/CEE + 93/68/CEE sulla Bassa Tensione (BT).
PARTI DEL VENTILATORE A COLONNA
Griglia
Anello
Ventola
Asta
regolabile
Interruttore
ASSEMBLAGGIO
Comandi
Vite
Asta
Tubo in
alluminio
Base piccola
Dado di fissaggio
Base grande
8
- Fissare l’asta alla parte comandi, quindi fissare la vite.
- Posizionate l’asta con la parte comandi nel tubo di alluminio inserito nella base piccola.
- Fissare ora la base grande con il dado di fissaggio
REGOLAZIONE VERTICALE
- Posizionare il ventilatore su una superficie piana
- Allentare la manopola 1 e manualmente inclinare
la testa del ventilatore nella posizione desiderata
Attenzione: questa operazione deve sempre
essere eseguita a ventilatore spento.
FUNZIONAMENTO DEL VENTILATORE DAL PANNELLO COMANDI
Inserite la spina del ventilatore in una presa di corrente.
Tasto ON/SPEED:
funzione di accesione del ventilatore-ON
funzione di selezione vecoità-SPEED: minimo (1) – medio (2) – massimo (3)
Tasto TIMER:
regola e spegne il ventilatore – premendo più volte si può far funzionare il ventilatore da 0,5
ore a 7,5 ore
TASTI DI
COMANDO
DISPLAY
FUNZIONI COMANDI
9
1
Tasto SWING – Fig. A:
il tasto SWING permette di attivare l’oscillazione in diverse direzioni:
- regolate l’inclinazione verticale desiderata (fig. A) come indicato in “Regolazione Verticale”
- premendo 1 volta : oscillazione da destra a sinistra (fig. B)
- premendo 2 volte : oscillazione dal basso verso l’alto (fig. C)
- premendo 3 volte: oscillazione a rotazione, 8 direzioni in sequenz a
“destra-sinistra basso-alto” (fig. D)
- premendo 4 volte : disattivazione delle oscillazioni
NB- Non regolate il ventilatore in verticale mentre sta oscillando.
Tasto WIND MODE:
con questo tasto si genera una brezza naturale oppure una brezza notturna
FUNZIONAMENTO DEL VENTILATORE CON IL TELECOMANDO
A
B
C D
Le funzioni sono le stesse descritte nel paragrafo “FUNZIONAMENTO DEL VENTILATORE
DAL PANNELLO COMANDI”
10

WIND MODE
OFF ventilatore
SWING
ON / SPEED
OSCILLAZIONE
Premere il bottone posto sopra al motore per attivare l’oscillazione.
MANUTENZIONE
Prima di eseguire le normali operazioni di pulizia, sp egnete il ventilatore e togliete la spina
dalla rete di alimentazione. Usate solo un panno morbido umido e non ut ilizzate sostanze
abrasive.
NB:. Non immergete nessuna parte del ventilatore nell’acqua
DATI TECNICI
Potenza motore: 65 W
Alimentazione telecomando: a pile (non incluse)
Dimensioni : 440 x 1300 x 440 mm
Peso: 7 kg
GARANZIA:
La garanzia è valida per 1 anno per un "difetto di fabbricazione".
Per poter beneficiare della garanzia, restituire il dispositivo al rivenditore con affrancatura
insieme con il documento della prova d'acquisto specificand one la data di acquisto.
ATTENZIONE
Il simbolo sul prodotto indica che al termine della sua vita di funzionamento,
l’apparecchio, non deve essere trattato come un normale rifiuto ma, essendo un rifiuto
speciale, deve essere demolito nelle apposite aree di recupero e smaltim ento come
previsto dalla Direttiva Comunitaria 2002/96/CE (WEEE). Provvedendo a smaltire questo
prodotto in modo appropriato, si contribuisce ad evitare probabili conseguenze negative per
l’ambiente e per la salute dell’uomo dovute alla presenza nel prodotto di sostanze
potenzialmente pericolose.
ENGLISH
Read all the instruction carefully before you use the appliance and keep it for future use.
GENERAL DIRECTIONS
1. Remove the packaging and m ake sur e that the a ppl iance is intact. If in dou bt, do not us e
it and contact qualified personnel only. Packaging materials (plastic bag s, polystyrene,
staples etc.) must be kept out of the reach of children as they could be hazardous.
Caution:
The appliance must only be used by responsible adults; for their own safet y , children
and persons with reduced mental capacities must not use the appliance unless under
the supervision of responsible adults.
Children should not use the appliance as a game, but should always be supervised by a
responsible adult.
2. Before connecting the appliance, check that the appliance rating corresponds to the
mains rating.
3. If the power cable is damaged, it must be replaced by the manufacturer or by its after
sales service or otherwise by a qualified person in order to prevent any risk.
4. This appliance must only be used for the purpose for which it has been manufactured,
i.e. as a stand fan. The manufacturer is not responsible for any damage caused by
improper or incorrect use.
5. Before cleaning or carrying out maintenance on the appliance, switch off the appliance
and disconnect it from the electrical mains by removing the plug from the po wer socket
or by switching off the system switch.
6. If the appliance is faulty and/or operating incorrectly, switch it off without tampering with
it. If any repair is required, please contact our after-sale centres only and ask for original
spare parts. If the above is disregarded, the safety of the appliance may be
compromised.
7. Switch off the appliance and remove the plu g from the power socket when not in use.
8. The use of any electrical appliance calls for the awareness of some basic rules, such as:
- do not use the appliance near sources of water such as baths, showers or swimming
pools
- do not touch the appliance with wet or damp hands or feet
- do not leave the appliance exposed to atmospheric agents
9. Max. ambient temperature 40°C.
10. Do not use the app liance in the pres ence of potentiall y flammabl e or explosive l iquids or
gases.
11. The appliance conforms with Directives 89/336/EEC + 92/31/EEC + 93/68/EEC
regarding Electromagnetic Compatibility (EMC) and Directives 73/23/EEC + 93/68/EEC
regarding Low Voltage (LV).
11
12

STAND FAN PARTS
ASSEMBLY
- Secure the tube to the main body, then secure the screw.
- Position the tube with the main body in the aluminium tube inserted in the small base.
- Now secure the large base using the lock nut.
13
VERTICAL ADJUSTMENT
- Place the fan on a flat surface
- Loosen the knob 1 and manually tilt the
head of the fan to the desired position
Warning: This operation must always be
carried out while the fan is switched off.
1
FAN CONTROL PANEL OPERATION
Plug the fan into a power outlet.
ON/SPEED button:
switches the fan on - ON
speed selection function - SPEED: minimum (1) - medium (2) - maximum (3)
TIMER:
adjusts and turns off the fan - pressing the button repeatedly sets fan operations from 0.5
hours to 7.5 hours
SWING button - Fig A:
14

The SWING button lets you turn on the swing in different directions:
- Set the desired vertical angle (Fig. A) as described in "Vertical adjustment"
- Pressing once: swinging from right to left (Fig. B)
- Pressing twice: swinging from the bottom up (Fig. C)
- Pressing 3 times: rotating swing, 8-way sequential
"Left-right low-high" (Fig. D)
- Pressing 4 times: swing off
N.B. Do not adjust the fan vertically while it is swinging.
A
B
C D
WIND MODE button:
Use this button to generate a natural breeze or an evening breeze
OPERATION OF THE FAN WITH THE REMOTE CONTROL
The functions are the same as described in "FAN CONTROL PANEL OPERATION"
15
SWING
Press the button located above the motor to turn on the swing.
MAINTENANCE
Before carrying out routine cleaning, switch off the fan and disconnect mains power. Use a
soft, damp cloth only and do not use abrasive substances.
NB. Do not submerge any part of the fan in the water.
TECHNICAL DATA
Motor power consumption: 65 W
Remote control power: batteries (not included)
Dimensions: 440 x 1300 x 440 mm
Weight: 7 kg
WARRANTY:
The warranty is valid for 1 year for a "manufacturing fault".
To benefit from the warranty, please return the device to your dealer with POSTAGE PAID
along with the document of purchase proof specifying the date of purchase.
CAUTION
The
considered normal waste but hazardous waste and, as such, must be disposed of in specific
recovery and disposal areas, as prescribed by the EC Directive 2002/96/EC (WEEE). By
disposing of this product correctly, you can prevent negative consequences for the
environment and for human health, due to the presence of potentially hazardous substances
in the product
symbol on the product means that at the end of its life, the appliance must not be
.
16

DEUTSCH
Lesen Sie diese Anleitung sorgfältig durch, bevor Sie das Gerät in Betrieb nehmen, und
bewahren Sie sie zur späteren Einsichtnahme gut auf.
ALLGEMEINE HINWEISE
1. Gerät aus der Verpackung nehmen und auf Unversehrtheit hin überprüfen. Im
Zweifelsfalle das Gerät nicht gebrauchen. Wenden Sie sich diesbezüglich
ausschließlich an unseren Kundendienst. Die einzelnen Verpackungsbestandteile
(Plastiktüte, Styropor, Metallklemmen, usw.) stellen potentielle Gefahrenquellen dar
und müssen als solche für Kinder unzugänglich sein.
Achtung:
Das Gerät darf ausschließlich von haftenden Erwachsenen gebraucht werden.
Kinder und geistig eingeschränkte Erwachsene dürfen das Gerät aus
Sicherheitsgründen nur unter der Aufsicht eines haftenden Erwachsenen;
Kinder dürfen das Gerät niemals als Spielzeug, sondern stets ausschließlich unter
der Aufsicht eines haftenden Erwachsenen gebrauchen.
2. Vor dem Anschluss des Geräts ans Versorgungsnetz sicherstellen, dass die Daten
auf dem Typenschild mit den Netzmerkmalen kompatibel sind.
3. Ein beschädigtes Versorgungskabel muss aus Gründen der Risikovorbe ugung vom
Hersteller, seinem Kundendienst oder von qualifiziertem Fachpersonal
ausgewechs elt wer d en.
4. Das Gerät darf ausschließlich zu seinem ausdrücklich genannten
Verwendungszweck, und zwar als Standventilator, gebraucht werden. Für etwaige
Schäden, die auf unsachgemäßen oder fehlerhaften Gebrauch zurückzuführen sind,
übernimmt der Hersteller keinerlei Haftung.
5. Vor dem Durchführen jeder Art von Reinigung- bzw. Wartungsmaßnahmen den
Ventilator grundsätzlich abschalten und die Stromversorgung trennen, dazu den
Stromstecker ausstecken oder den Hauptschalter der Versorgungsanlage auf AUS
stellen.
6. Gerät bei auftretenden Defekten und/oder Betriebsstörungen ausschalten und
niemals unbefugte Maßnahmen vornehmen. Wenden Sie sich für etwaige
Instandsetzungsmaßnahmen ausschließlich an unser technisches
Kundendienstzentrum und verlangen Sie stets, dass originale Ersatzteile ver wendet
werden. Bei Nichtbeachtung dieser Hinweise kann die Gerätesicherheit
beeinträchtigt werden.
7. Soll das Gerät nicht mehr benutzt werden, so empfehlen wir, seinen Betrieb durch
Ausschalten des Hauptschalters stillzulegen.
8. Beim Gebrauch von Elektrogeräten sollten stets einige Grundregeln beachtet
werden, insbesondere:
- Das Gerät niemals in der Nähe von Wasserquellen wie z.B. Wannen und Becken,
Duschen oder Pools verwenden
- Das Gerät niemals mit nassen oder feuchten Händen berühren
- Das Gerät niemals offen den Witterungseinflüssen aussetzen
9. Umgebungstemperatur max. 40°C.
10. Das Gerät niemals beim Vorhandensein potentiell brennb arer oder explosiver Stoffe
verwenden.
17
11. Das Gerät stimmt mit den Richtlinien 89/336/EWG + 92/31/EWG + 93/68/EWG für
elektromagnetische Kompatibilität (EMV) und den Niederspannungs-Richtlinien
73/23/EWG + 93/68/EWG (NS) überein
BESTANDTEILE DES STANDVENTILATORS
MONTAGE
Gitter
Höhenverst
ellbarer
Ständer
Verriegelungsmutter
18
Ring
Flügelrad
Schalter
Untersatz
Steuerung
Schraube
Ständer
Alu-Rohr
Kleiner Untersatz
Großer Untersatz

- Ständer an der Steuereinheit befestigen, dann die Schraube anziehen.
- Ständer mit angebr achter Steuereinheit in das im kleinen Untersatz sitzende Alu-Rohr
einführen.
- Nun den großen Untersatz mit der Verriegelungsmutter verriegeln.
VERTIKALE EINSTELLUNG
- Ventilator auf einer ebenen Fläche abstellen
- Griff 1 lockern und den Ventilatorkopf von Hand
in die gewünschte Position stellen.
Achtung: Diesen Vorgang stets nur bei
ausgeschaltetem Ventilator vornehmen.
VENTILATORBETRIEB VOM BEDIENFELD AUS
Den Stromstecker des Ventilators in eine Steckdose
einstecken.
Taste ON/SPEED:
Ventilator einschalten-ON
Einstellung der Geschwindigkeitsstufen-SPEED: Mindeststufe (1) – mittlere Stufe (2) –
höchste Stufe (3)
STEUERTASTEN
DISPLAY
STEUERFUNKTIONEN
19
1
Taste TIMER:
Zeiteinstellung des Ventilatorbetriebs – Einstellung des Ventilatorbetriebs durch
mehrmaliges Drücken von 0,5 bis 7,5 Stunden
Taste SWING – Abb. A:
Mit der Taste SWING kann man den Ventilator in verschiedene Richtungen schwenken
lassen:
- Gewünschte Neigung (Abb. A) wie im Abschnitt “Vertikale Einstellung” beschrieben
einstellen
- 1 Mal drücken: Schwenkung von rechts nach links (Abb. B)
- 1 Mal drücken: Schwenkung von unten nach oben (Abb. C)
- 3 Mal drücken: Rotations-Schwenkung, 8 Richtungswechsel in nachstehender Abfolge:
“rechts-links unten-oben” (Abb. D)
- 4 3 Mal drücken: Schwenkung abstellen
HINWEIS- Den Ventilator während der Schwenkung nicht vertikal verstellen.
Taste WIND MODE:
Mit dieser Taste wird ein natürliche bzw. eine nächtliche Brise erzeugt.
VENTILATORBETRIEB PER FERNBEDIENUNG
A
B
C D
Es handelt sich um dieselben Funktionen, die im Abschnitt “VENTILATORBETRIEB VOM
BEDIENFELD AUS” beschrieben wurden
20

WIND MODE
Ventilator OFF
SWING
ON / SPEED
SCHWENKUNG
Oberhalb des Motors angebrachten Schalter drücken, um die Schwenkfunktion in Gang zu
setzen.
WARTUNG
Vor dem Durchführen gewöhnlicher Reinigungsmaßnahmen den Ventilator grundsätzlich
abschalten und die Stromversorgung trennen.
Zur Reinigung nur einen weichen, feuchten Lappen und keine Scheuermittel verwenden.
HINWEIS. Teile des Ventilators niemals in Wasser tauchen
TECHNISCHE DATEN
Motorleistung: 65 W
Stromversorgung der Fernbedienung: Batteriebetrieben (Batterien nicht inbegriffen)
Abmessungen: 440 x 1300 x 440 mm
Gewicht: 7 kg
GARANTIE :
1 Jahr ab Kaufdatum wegen eines « Fertigungsfehler ».
Um die Garantie in Anspruch nehmen zu können, bringen oder senden Sie das Gerät bitte
PORTOFREI und mit dem Kaufbeleg, auf dem das Kaufdatum angegeben ist, an Ihren
Verkäufer.
ACHTUNG
Das auf dem Gerät angebrachte Symbol
seiner endgültigen Stilllegung nicht als gewöhnlicher Hausmüll, sondern als Sondermüll gilt
und dementsprechend gemäß Europarichtlinie 2002/96/EG (WEEE) in entsprechenden
Entsorgungs- und entsorgt werden muss. Wer für eine sachgerechte Entsorgung sorgt, der
leistet einen Beitrag zur Vermeidung etwaiger negativer Folgen für Umwelt und Mensch, die
durch im Gerät enthaltene potentielle Gefahrenstoffe hervorgerufen werden können.
weist darauf hin, dass das Gerät nach
NEDERLANDS
Lees de handleiding goed door alvorens het apparaat te gebruik en en bewaar ze zodat u ze
later nog kunt raadplegen. .
ALGEMENE AANWIJZINGEN
1. Haal het apparaat uit de verpakking en kijk het na op beschadiging. Als u twijfels hebt,
het apparaat niet gebruiken. Wend u in dat geval uitsluitend tot gekwalificeerd vakkundig
personeel. Houd de verpakkingselementen (plastic zakken, polystyreen, metaalklemme n
enz.) uit de buurt van kinderen, want deze vormen mogelijke bronnen van gevaar.
Opgelet:
het apparaat mag uitsluitend gebruikt worden door verantwoordelijke volwassen perso nen.
Kinderen en geestelijke of lichamelijke mindervaliden mogen het a pparaat voor hun eigen
veiligheid alleen gebruiken onder toezicht van een verantwoordelijke volwassene.
Kinderen mogen het apparaat niet gebruiken als speelgoed. Als ze dit apparaat gebruiken,
mag dit alleen gebeuren onder toezicht van een volwassene.
2. Controleer voordat u het apparaat aansluit of de gegevens op het kenplaatje
overeenstemmen met de gegevens van het plaatselijke stroomnet.
Als het stroomsnoer beschadigd is, moet het vervangen worden door de fabrikant, of in
ieder geval door een vakkundige persoon om alle risico's te vermijden.
3. Dit apparaat is uitsluitend bestemd voor het doel waarvoor het gefabriceerd is, d.w.z. als
staande ventilator. De fabrikant kan niet aansprakelijk gesteld worden voor eventuele
schade die voortvloeit uit een onvakkundig of verkeerd gebruik.
4. Trek steeds de stroomstekker uit voor u begint met enige reinigings- of
onderhoudswerkzaamheden.
5. Gelieve de stroomstekker uit te trekken in geval van een defect en/of bij een slechte
werking van het apparaat en probeer nooit om het apparaat zelf te repareren. Het
veronachtzamen van de hierboven vermelde maatregelen kan de veili gheid van het
apparaat in gevaar brengen.
6 .Als het apparaat niet gebruikt wordt, is het raadzaam om het apparaat uit te schakelen
met de hoofdschakelaar en om de stroomstekker uit te trekken.
7. Voor het gebruik van gelijk welk elektrisch apparaat moeten sommige fundamentele
regels in acht genomen worden, onder meer:
- gebruik het apparaat niet in de buurt van waterbronnen, zoals badkuipen, douches of
zwembaden
- raak het apparaat nooit met natte of vochtige handen of voeten aan.
- stel het apparaat niet bloot aan de weersinvloeden
8. Omgevingstemperatuur maximum 40°C.
9. Gebruik het apparaat niet in de buurt van potentieel ontvlambare of explosieve
vloeistoffen of gassen.
10. Het apparaat voldoet aan de richtlijnen 89/336/EEG + 92/31/EEG + 93/68/EEG inzake
de elektromagnetische compatibiliteit (EMC) en de richtlijnen 73/23/EEG + 93/68/EEG
inzake de laagspanning (LS).
21
22

DELEN VAN DE STAANDE VENITLATOR
Rooster
Regelbare
stang
MONTAGE
Bevestigingsmoer
23
Ring
Schroefblad
Schakelaar
Sokkel
Bediening
Schroef
Stang
Buis en
aluminium
Kleine sokkel
Grote sokkel
- Bevestig de stang aan het bedienin gselement en trek vervolgens de schroef aan.
- Plaats de stang met het bedieningselement in de aluminiumbuis die in d e kleine sokkel
steekt .
- Fixeer de grote sokkel met behulp van de bevestigingsmoer.
VERTICALE REGELING
- Plaats de ventilator op een vlakke ondergrond.
- Maak bout 1 los en kantel de kop van de
ventilator met de hand in de gewenste positie.
Opgelet: deze bewerking mag uitsluitend
uitgevoerd worden als de ventilator uitgeschakeld
is.
1
BEDIENING VAN DE VENTILATOR VIA HET BEDIENINGSPANEEL
BEDIENINGSKNOPPEN
SCHERM
BEDIENING VAN DE
FUNCTIES
Steek de stekker van de ventilator in een stopcontact.
Toets ON/SPEED :
Inschakeling van de ventilator –ON
Selectie van de snelheid SPEED: minimum (1) – gemiddeld (2) – maximum (3)
TIMER-toets :
Met deze toets kan de ventilator geregeld en uitgeschakeld worden. – do or deze toets
meerdere keren in te drukken, kan de ventilator van 0,5 uur tot 7,5 uur werken
SWING-toets – AFB. A :
24

De SWING-toets maakt het mogelijk om de oscillatie in diverse richtingen te activeren:
- regeling van de gewenste verticale neiging (afb. A) volgens de indicaties vermeld onder
“Verticale regeling”
- 1 keer indrukken: oscillatie van rechts naar links (afb. B)
- 2 keer indrukken: oscillatie van beneden naar boven (afb. C)
- 3 keer indrukken: oscillatie door rotatie, 8 richtingen in sequentie
“rechts-links beneden-boven” (afb. D)
- 4 keer indrukken : de oscillaties uitschakelen
NB- De ventilator nooit verticaal regelen terwijl hij oscilleert.
Toets WIND MODE :
Met deze toets kan een natuurlijke bries of een nachtelijke bries gecreëer d worden.
BEDIENING VAN DE VENTILATOR MET DE AFSTANDSBEDIENING
A
B
C D
De functies zijn dezelfde als de functies beschreven in de paragraaf "BEDIENING VAN DE
VENTILATOR VIA HET BEDIENINGSPANEEL"
WINDMODUS
Ventilator OFF
ZWENKEN
AAN /SNELHEID
OSCILLATIE
Druk op de knop die zich op de motor bevindt om de oscillatie te activeren.
ONDERHOUD
Alvorens met reinigingswerkzaamheden te beginnen, de ventilator uitschakelen en de
stroomstekker uittrekken. Reinig de ventilator alleen met een zachte, vochtige doek. Geen
schurende middelen gebruiken.
NB. Geen enkel deel van de ventilator onderdompelen in water.
TECHNISCHE GEGEVENS
Vermogen motor : 65 W
Voeding afstandsbediening: met batterijen (niet inbegrepen)
Afmetingen : 440 x 1300 x 440 mm
Gewicht : 7 kg
GARANTIE
1 jaar vanaf de datum van aankoop voor een « fabricagefout ».
ALS U EEN BEROEP WILT DOEN OP DE GARANTIE, GELIEVE HET APPARAAT DAN
NAAR UW VERDELER TERUG TE BRENGEN OF HET MET PORT BETAALD TERUG TE
STUREN NAAR UW VERDELER SAMEN MET UW AANKOOPBEWIJS.
OPGELET
Het symbool
van zijn levensduur niet samen met het huishoudelijke afval verwijderd mag worden.
Aangezien het om speciaal afval gaat, moet het gedeponeerd worden in een erkend
afvalcentrum, zoals beschreven in de Europese richtlijn 2002/96/EG (AEEA). Door dit
product op een correcte manier gescheiden van het gewone huisvui l te verwijderen, helpt u
mee om negatieve gevolgen voor het milieu en de menselijke gezondheid te vermijden,
want dit product kan potentieel gevaarlijke stoffen bevatten.
:
dat op het product afgebeeld is, betekent dat het apparaat aan het einde
25
26

ESPAÑOL
Lea detenidamente estas instrucciones antes de usar el aparato y guárdelas para poderlas
utilizar en el futuro.
ADVERTENCIAS GENERALES
1. Después de haber retirado el embalaje asegurarse de que el aparato se encue ntra
en perfectas condiciones. En caso de duda no utilizar el aparato y ponerse en
contacto con nuestro Servicio Técnico. Los elementos de embalaje (bolsas de
plástico, poliestireno, puntos metálicos etc.) no deben dejarse al alcance de los
niños ya que pueden ser una fuente de peligro.
Atención:
el aparato debe ser utilizado por personas adultas responsables;
los niños y las personas con capacidades mentales reducidas, por su seguridad, no
pueden utilizar el aparato si no están supervisados por personas adultas
responsables;
los niños no deben utilizar el aparato como un juego, si no que deben siempre estar
supervisados por personal adulto responsable.
2. Antes de conectar el aparato asegurarse de que los datos de la placa se
correspondan con aquellos de la red de distribución.
3. Si el cable de alimentación está dañado debe ser sustituido por el fabricante o su
Servicio Técnico, o de todas maneras por una persona con una cua lificación similar
de manera de prevenir todo tipo de riesgo.
4. Este aparato deberá de destinarse exclusivamente al uso para el que ha sido
expresamente fabricado, es decir, como ventilador de columna. El fabricante no se
responsabiliza de daños derivados de usos incorrectos o erróneos.
5. Antes de realizar cualquier operación de limpieza o mantenimiento, apagar el
aparato y desconectarlo de la red de alimentación eléctric a retirando el enchufe de
la toma de corriente o bien apagando el interruptor del sistema.
6. En caso de problema y/o de mal funcionamiento del aparato apagarl o y no tocarlo.
Para la reparación dirigirse exclusivamente a nuestro Cent ro de Asistencia Técnica
y solicite el uso de piezas de recambio originales. No cumplir con las indicacio nes
que se han señalado en la parte superior puede comprometer la seguridad del
aparato.
7. Cuando decida no utilizar más el aparato se recomienda hacerlo inoperativo
retirando el enchufe de la toma de corriente.
8. El uso de cualquier aparato eléctrico conll eva a no observar algunas reglas
fundamentales, particularmente:
- no utilizar el aparato cerca de fuentes de agua como bañeras,
duchas o piscinas.
- no tocar el aparato con las manos o pies mojados o húmedos.
- no dejar el aparato expuesto a agentes atmosféricos.
9. Temperatura ambiente máx. 40°C.
10. No utilizar el aparato en presencia de líquidos o gases alt amente inflamables o
explosivos.
27
11. Aparato de acuerdo con las Directivas Comunitarias 89/33 6/CEE + 92/31/CEE +
93/68/CEE sobre la Compatibilidad Electromagnética (EMC) y Directivas
Comunitarias 73/23/CEE + 93/68/CEE sobre Baja Tensión (BT).
PARTES DEL VENTILADOR DE COLUMNA
Rejilla
Anillo
Ventilado
Antena
regulable
Interruptor
ENSAMBLAJE
Mandos
Tornillos
Antena
Tubo de
aluminio
Tuerca de fijación
Base pequeña
Base grande
28

- Sustentar la antena a la parte de mandos, ajustar los tornillos.
- Colocar la antena con la parte de los mandos en el tubo de aluminio introducido en la
base pequeña.
- Fijar la hora la base grande con la tuerca de fijación
REGULACIÓN VERTICAL
- Colocar el ventilador sobre una superficie llana
- Aflojar la manilla 1 y manualmente inclinar la
cabeza del ventilador en la posición que se desea
Atención: esta operación debe siempre realizarse
con el ventilador apagado.
1
FUNCIONAMIENTO DEL VENTILADOR DEL PANEL DE MANDOS
TECLAS DE
MANDO
PANTALLA
FUNCIONES DE LOS
MANDOS
29
Introducir el enchufe del ventilador en una toma de
corriente.
Tecla ON / SPEED:
función de encendido del ventilador-ON
función de selección de la velocidad-SPEED: mínima (1) – media (2) – máxima (3)
Tecla TIMER:
regula y apaga el ventilador - pulsando más veces si puede hacer funcionar el ventilador de
0,5 a 7,5 horas
Tecla SWING – Fig. A:
la tecla SWING permite activar la oscilación en diferentes direcciones:
- regular la inclinación vertical que se desea (fig. A) tal y como se indica en "Regulación
Vertical"
- pulsado 1 vez: oscilación de derecha a izquierda (fig. B)
- pulsado 2 veces: oscilación de abajo a arriba (fig. C)
- pulsado 3 veces: oscilación a rotación, 8 direcciones en secuencia
“derecha-izquierda abajo-arriba” (fig. D)
- pulsado 4 veces: desactivación de las oscilaciones
Nota- No regular el ventilador en posición vertical mientras está oscilando.
A
B
C D
Tecla WIND MODE
con esta tecla se genera una brisa natural o bien una brisa nocturna
30

FUNCIONAMIENTO DEL VENTILADOR CON EL MANDO A DISTANCIA
Las funciones son las mismas descritas en el apartado “FUNCIONAMIENTO DEL
VENTILADOR DESDE EL PANEL DE MANDOS”
WIND MODE
OFF ventilador
SWING
ON / SPEED:
OSCILACIÓN
Pulsar el botón situado sobre el motor para activar la oscilación.
MANTENIMIENTO
Antes de realizar las operaciones habituales de limpieza, apagar e l ventilador y retirar el
enchufe de la red de alimentación. Utilizar solamente un paño suave humedecido y no
utilizar sustancias abrasivas.
Nota: No sumergir ninguna parte del ventilador en el agua
DATOS TÉCNICOS
Potencia del motor: 65 W
Alimentación del mando a distancia: a pilas (no incluidas)
Dimensiones: 440 x 1300 x 440 mm
Peso: 7 kg
GARANTÍA:
1 año a partir de la fecha de compra para un « vicio de fabricación ».
Para prevalerse de la garantía, aporte el aparto o envíelo en PORTE PAGADO a su
distribuidor, acompañado de la prueba de compra que indica la fecha de dicha compra.
ATENCIÓN
El símbolo que aparece sobre el producto indica que al finalizar su vida de
funcionamiento, el aparato, no debe ser tratado como un desecho normal pero, siendo un
desecho especial, debe ser eliminado en las correspondientes zonas de reciclaje y
eliminación tal y como está previsto por la Directiva Comunitaria 2002/96/CE (WEEE). Si se
toman las correspondientes precauciones para la eliminación de este prod ucto de modo
apropiado, se contribuye a evitar posibles consecuencias negativas para el med io ambiente
y para la salud del hombre debido a la presencia en el producto de sustan c ias altamente
peligrosas.
31
32
 Loading...