

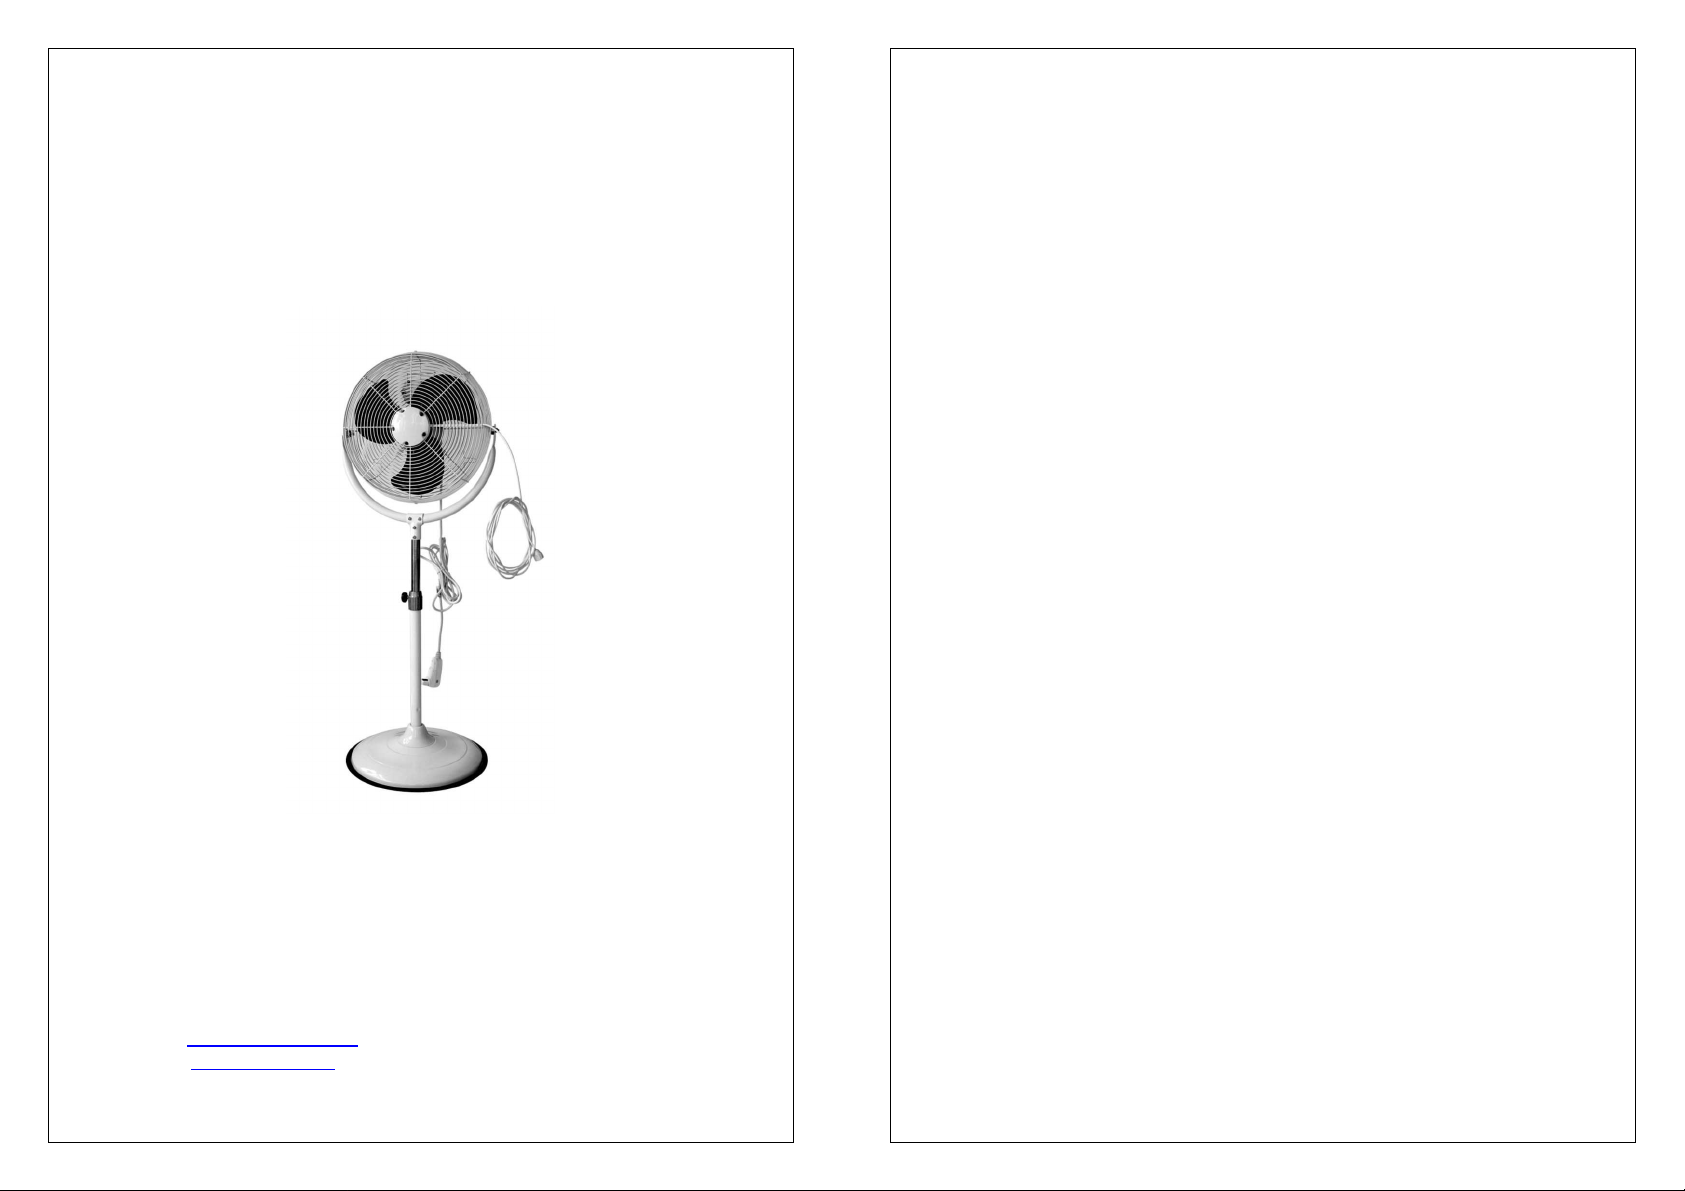
BRUMISATEUR D’AIR
PURLINE
Guide de l'utilisateur
Lire attentivement et conserver ces instructions.
WinEurope - FRANCE.
Email : info@purline.com
Internet : www.purline.com
FR
NOTICE D'ENTRETIEN ET D'UTILISATION DU
BRUMISATEUR
Merci d'avoir choisi un brumisateur d'air PurLine. Cet appareil vous
donnera toute satisfaction pendant de nombreuses années si vous
en prenez soin et l'utilisez normalement.
L'utilisation d'appareils électriques nécessite l'observation de
certaines précautions essentielles notamment :
- Le brumisateur doit être utilisé comme recommandé dans ce
guide : tout autre usage pourrait s’avérer dangereux (risque
d’incendie, d’électrocution…)
- Cet appareil est conçu pour un usage domestique, il ne faut pas
le placer dans l’embrasure d’une fenêtre. Il ne faut pas plonger
l’appareil, le cordon électrique ou la prise, dans de l’eau ou tout
autre liquide.
- Ne jamais laisser un enfant sans surveillance s’il est utilisé à
proximité.
- Débrancher l'appareil quand il ne sert pas, quand on le déplace,
avant d'enlever ou de remonter des pièces et avant de le
nettoyer.
- Il ne faut pas toucher les pièces en mouvement.
- Ne pas utiliser l'appareil en présence de vapeurs explosives
et/ou inflammables.
- Ne jamais utiliser un appareil si le cordon ou la prise sont en
mauvais état, s'il ne fonctionne pas convenablement, s'il a été
renversé ou endommagé.
- Pour débrancher l'appareil, agripper la fiche et la retirer de la
prise murale. Ne jamais tirer sur le cordon.
- Poser toujours l'appareil sur une surface plane, rigide et sèche.
- Ne jamais laisser l'appareil fonctionner sans que les grilles ne
soient en place.
- Il ne faut pas utiliser de rallonge électrique.
- Brancher toujours l'appareil directement dans une prise murale.
- Utiliser uniquement la tension nominale indiquée sur l'étiquette
de la plaque de série.
- Ne pas insérer d'objet à travers les grilles de protection.
-
Ce ventilateur est conçu pour une utilisation à l'extérieur, mais peut être
utilisé à l'intérieur SANS LA FONCTION DE BRUMISATION
AVERTISSEMENT : Pour réduire les risques d'incendie et
d'électrocution, ne pas utiliser le ventilateur avec un régulateur
de vitesse électronique.
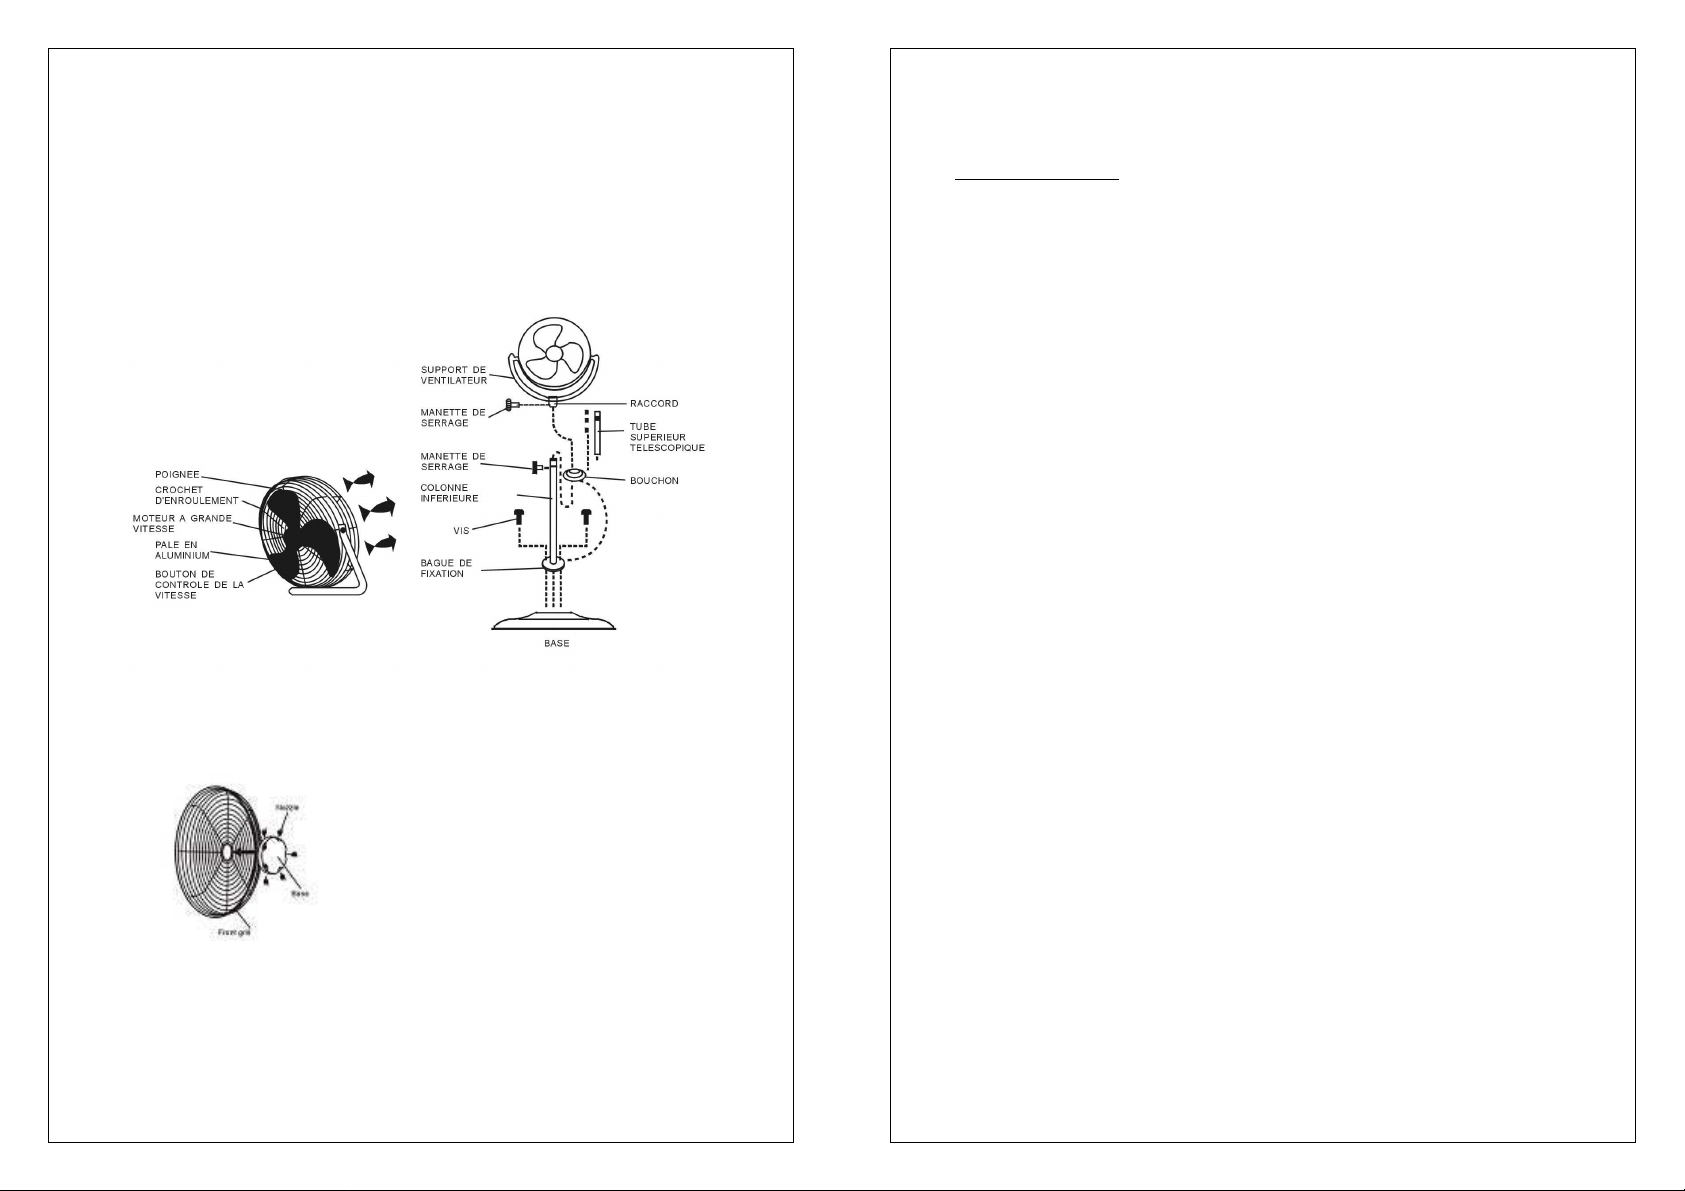
ASSEMBLAGE DE VOTRE BUMISATEUR
Positionner la colonne sur sa base et monter vis et écrous.
Insérer la tête de ventilation dans la partie supérieure de la
colonne en vous assurant que le manchon recouvre les vis.
Serrer avec fermeté la vis de serrage en vous assurant de
positionner l’appareil à la hauteur désirée.
ASSEMBLAGE DE LA TETE DE BRUMISATION :
.
1. Placer le brumisateur au
centre de la grille de
protection du brasseur d’air.
2. Fixer par l’arrière le
brumisateur à l’aide des
visses fournies.
3. Faite courir l’alimentation
d’eau en la fixant sur l’un des
tube métallique de la grille de protection du ventilateur
grâce au deux attaches fournies.
ASSEMBLAGE ET INSTALLATION DU TUBE DE BRUMISATION
AVERTISSEMENT : Risque de chocs électriques pouvant entraîner des
blessures graves ou la mort. Pour votre sécurité, débrancher le courant
électrique à l’entrée avant de commencer à assembler, à installer, à déplacer
ou à effectuer des travaux d’entretien sur votre ventilateur afin de prévenir
tout risque de choc électrique.
1. Avant d’installer le tube de brumisation au ventilateur, veiller à sécuriser
le filtre dans l’attache de la fixée. Ce dispositif permet de filtrer
directement l’approvisionnement en eau afin de prévenir le dépôt de
sédiments qui pourraient bloquer les buses
2. Attacher le tube de brumisation à la fixée. Faire couler l’eau afin de
nettoyer le tube de tous les résidus qui pourraient bloquer les buses de
brumisation.
3. Fermer l’eau.
4. Visser les buses de brumisation dans les ouvertures du tube de manière
sécurisée
MODE D'EMPLOI
1. Installer l’appareil sur une surface sèche, plane et rigide.
2. Dérouler le cordon d’alimentation et brancher le brasseur
dans une prise murale de230Volt AC
3. Dérouler l’alimentation d’eau et branchez là sur un arrivée
d’eau standard, ou un tuyau d’arrosage avec un adaptateur.
4. Appuyer sur le bouton rouge situé à l’arrière de l’appareil
pour sélectionner la puissance du ventilateur.
5. Ouvrez votre robinet d’eau.
6. Vous pouvez ajuster la puissance de votre brumisateur en
ouvrant plus ou moins votre robinet d’eau.
NOTE : Votre brumisateur Utilise environ 200 litres par heure.
NETTOYAGE ET ENTRETIEN.
MISE EN GARDE : Toujours, éteindre et débrancher l'appareil
avant de procéder au nettoyage.
Les buses ont des trous extrêmement petits, il peux arrivé que
le calcaire ou un dépôt puisse venir boucher ce trou.
Il faudra alors dévisser la buse et la plonger dans une solution
du type dissolvant ou vinaigre blanc pendant 30 minutes.

La grille et le socle peuvent être facilement nettoyés avec un
chiffon humide et un nettoyant doux. Le moteur reçoit une
lubrification permanente en usine et ne requiert aucun
graissage supplémentaire.
Si le cordon électrique est endommagé, le faire remplacer par
le fabricant, un fournisseur de service agréé ou une autre
personne qualifiée afin d’éviter tout danger.
SPECIFICATIONS TECHNIQUES
Dimensions Tension Puissance
BKM46-BSW 45 cm 230 V / 50 Hz 150 W
Cordon d’alimentation 16A avec fiche de terre.
GARANTIE
1 an au premier acquéreur
Les conditions de garantie qui s'appliquent à ce produit sont déterminées par
nos représentants dans le pays où l'appareil est vendu. Les détails de la
garantie peuvent être obtenus auprès des détaillants qui vendent l'appareil.
Prière de noter qu'une preuve d'achat sera requise dans tous les cas de
réclamation sous garantie.
2 ans à partir de la date d’achat.
Pour se prévaloir de la garantie prière d’apporter l’appareil ou de l’expédier
PORT PAYE à votre revendeur, accompagné de la preuve d’achat indiquant
la date de cet achat.
récupération et le recyclage des matériaux qui les composent et réduire l'impact sur la santé humaine et
l'environnement.
Le symbole de la « poubelle barrée » est apposé sur tous les produits pour rappeler les obligations de la
collecte séparée.
Les consommateurs devront contacter les autorités locales ou leur revendeur concernant la démarche à
suivre pour l'enlèvement de leur appareil.
Enlèvement des appareils ménagers usagés
La directive Européenne 2002/96/EC sur les Déchets des Equipements Electriques et Electroniques
(DEEE), exige que les appareils ménagers usagés ne soient pas jetés dans le flux normal des déchets
municipaux. Les appareils usagés doivent être collectés séparément afin d'optimiser le taux de

MISTING FAN
PURLINE
Owner’s manual
Please read and save these instructions
WinEurope - FRANCE.
Email : info@purline.com
Internet : www.purline.com
EN
How Does Your Evaporative Misting Fan Work? The hotter it is the
better it works!
Your fan provides outdoor cooling through evaporation. Evaporative cooling
is a very simple process. Water requires thermal energy to evaporate. As
the mist evaporates, it draws the heat out and results in immediate
temperature reduction. The effectiveness of the cooling process improves as
the temperature rises. Above 85F° is the ideal temperature to feel optimal
cooling effects. If your humidity level is above 85%, this reduces the
effectiveness of evaporative cooling. Your temperature-cooling drop varies
depending on temperature and humidity, but cooling over 25 degrees can
result under optimal conditions.
VERY IMPORTANT SAFETY INFORMATION:
His product is intended for household use only and not for commercial or
Industrial use.
Close supervision is necessary when this product is used near children.
Do not operate in the presence of explosives and/or flammable fumes.
Do not hang or mount fan on a wall or celling.
Do not operate without fan frills properly in place.
This fan is intended for outdoor use but may be used indoors WITHOUT THE
MISTING FEATURE.
This appliance is not intended for use by persons (including children) with
reduced physical, sensory or mental capabilities, or lack of experience and
knowledge, unless they have been given supervision or instruction
concerning use of the appliance by a person responsible for their safety.
Children should be supervised to ensure that they do not play with the
appliance.
If the supply cord is damaged, it must be replaced by the manufacturer, its
service agent or similarly qualified persons in order to avoid a hazard.
DANGER:
Do not submerge motor in water or allow motor to be exposed to water.
Personal injury and/or death could result.
Never handle the fan or motor with wet hands or when standing on wet or
damp surface or in water .Fatal electrical shock could occur.
WARNING:
Risk of electrical shock—This fan is supplied with a grounding conductor and
GFCI type plug. To reduce the risk of electrical shock, be certain that it is
connected only to a PROPERLY grounded outlet
DO NOT UNDER ANY CIRCUMSTANCES REMOVE THE POWER
SUPPLY CORD GROUND PRONG OR GROUND FAULT UNIT.
For your personal safety ,the fan must be grounded. The fan is equipped with
a power supply with ground fault circuit interrupting device. Removal or
tampering of power cord will void warranty.

NEVER USE AN EXTENSION CORD TO CONNECT THE FAN TO AN
OUTLET.
All installations must be made into a grounded outlet.
Electric shock hazards—may cause severe personal injury or death. For
your safety, turn off the electrical power supply before installing, moving, or
servicing your fan to avoid any possible electrical shock hazards. Never
make adjustments to the fan when in power is on.
UNPLUG THE FAN WHEN NOT IN USE.
To reduce the risk of fire or electrical shock, do not use this fan with any
solid state speed control device. This appliance has a 3-prong plug. To
reduce the risk of electrical shock, this plug is intended to fit in an outlet only
one way. If this does not fit outlet, contact a qualified electrician. Do not
attempt to bypass this procedure.
CAUTION: Read and follow all instructions before operating fan. Do not use
fan if any part is damaged
RULE FOR SAFE OPERATION:
Never insert fingers or any other objects through
the grill guard when fan is in operation.
Disconnect the fan when moving from one location
to another.
Disconnect the fan when removing guards for
cleaning.
Be sure fan is on a stable, flat surface when in
operation.
DO NOT use when raining or by water .
Rain/water may create electrical hazard.
COLUMN ASSEMBLY INSTRUCTIONS
1. Attach CAST COUPLING to the BASE with the
4 screws as shown.
2. Loosen KNOB on COUPLING and extend
INNER TUBE to desired height.
3. Slide COVER RING down the OUTER TUBE
to rest on top of the BASE.
CAUTION: KNOB must be fully tightened before
assembling the FAN HEAD to the INNER TUBE.
FAN HEAD ASSEMBLY INSTRUCTIONS
1. Fan head and supporting brace come fully
assembled.
2. Place the FRONT MOUNTING PLATE and the
REAR MOUNTING PLATE to the center hold
of the SUPPORT TUBE. Tighten the screw as
show.
3. Firmly attach SUPPORTING TUBE to the INNER TUBE using the 2
mounting screws and spring washers provided.
MISTING TUBE ASSEMBLY AND INSTALLATION
WARNING: Electric shock hazards—may cause severe personal injury or
death. For your safety, turn off the electrical power supply at the service
entrance before assembling, installing, moving, or servicing your fan to avoid
any possible electrical shock hazards.
1. Before installing misting tube to fan, make sure filter is secure in spigot
attachment. This device will filter out any sediment from the water
supply thereby preventing it from getting into the mist line and plugging
the nozzles
2. Attach misting tube to spigot. Turn on water enough to wash out any
residue in tube to prevent clogging of misting nozzles.
3. Turn off water.
4. Screw misting nozzles securely into tube openings
IMPORTANT: Spray angle and droplet size is determined by water pressure
at your location.
OPERATING INSTRUCTIONS
1. Place fan on a flat stable surface in desired position.
2. Attach the 1” hose adapter to any 1” garden hose or spigot.
3. Press the red button to turn on fan to desired speed. Speed control:
Press the SWITCH at the back of the fan to Low, or High for desired air
movement.
4. Turn on water at spigot.
5. To adjust airflow upward or downward: Tilt head of fan to desired angle.
Note: Your PURLINE Outdoor misting fan will use approximately 9 gallons
of water for each hour of operation. This is equivalent to running a typical
garden hose for 1 minute.
CLEANING
WARNING: Electric shock hazard---Unplug from electrical supply source
before cleaning.
FAN BODY : Use soft damp cloth then wipe with dry cloth. Do not use
harmful cleaner to paints or plastics. Do not bend blades.
NOZZLES: Because of the extremely small size of the nozzle opening, some
of the misting nozzles may eventually be clogged from hard water-deposit
build up. If this should occur, the nozzle should be removed and soaked in a
non-toxic cleaning or dissolvent solution such as vinegar or scale remover for
30 minutes.
IMPORTANT: Never at tempy to clear nozzles with pins, nails or other metal
shpar objects as this can damage the misting orifice.

MAINTENANCE
Be sure the electrical plug is removed from the electrical socket before
attempting any cleaning or maintence.
We suggest removing all misting nozzles from the fan at the end of season.
The nozzles should be stored in a dry place until the next usage.
TECHNICAL SPECIFICATIONS
Dimensions Tension Power
BKM46-BSW 45 cm 230 V / 50 Hz 150 W
Supply cord with 16 A grounded plug.
WARRANTY
Two years from the date of purchase.
To use the warranty, please bring or send (PREPAID) the device to your
reseller along with the proof of sale indicating the purchase date.
Removal of used domestic appliances
European directive 2002/96/EC on the Electric and Electronic Equipment
Waste requires that domestic appliances not be thrown out together with the
rest of municipal waste. Used devices must be collected separately in order
to optimize recuperation and recycling rates of the materials that make them
up and so reduce the impact on human health and the environment.
The symbol of the crossed out garbage can appears on all the products to
remind the obligations regarding separated collection.
Consumers must contact local authorities or resellers regarding the
procedure to follow for the device's removal.
 Loading...