


Established 1976
V1.0
December 2014
TV Streamer 2
User Guide

Welcome
Statement
2
Congratulations on your purchase of a TV Streamer 2. TV Streamer 2 will
provide you with high quality streamed audio from your TV, Hi-Fi stereo,
personal computer or similar device directly to your hearing instruments.
Please read this manual carefully to fully benet from the TV Streamer 2.
Ask your hearing care professional if you have any questions. For your
safety, carefully read the chapter Important Information, on page 18.
Model: SAS-3
FCC ID: X26SAS-3
This device complies with Part 15 of the FCC Rules and IC Rules.
Operation is subject to the following two conditions: (1) this device may not
cause harmful interference, and (2) this device must accept any interference
received, including interference that may cause undesired operation.
Note: This equipment has been tested and found to comply with the limits
for a Class B digital device, pursuant to part 15 of the FCC Rules and
ICES-003 of the IC rules. These limits are designed to provide reasonable
protection against harmful interference in a residential installation. This
equipment generates, uses and can radiate radio frequency energy and,
if not installed and used in accordance with the instructions, may cause
harmful interference to radio communications.
However, there is no guarantee that interference will not occur in a particular
installation. If this equipment does cause harmful interference to radio or
television reception, which can be determined by turning the equipment off
and on, the user is encouraged to try to correct the interference by one or
more of the following measures:

3
TV Streamer 2 is intended to enable wireless hearing instrument users to
better follow TV or other audio programs. The essential performance of the
TV Streamer 2 is to transfer signals from a TV set or other audio device to
a wireless hearing instruments.
In the EU: Products are intended for sale in countries within European
Economic Area as well as Switzerland.
Intended Use
List of Countries
Reorient or relocate the receiving antenna.
Increase the separation between the equipment and receiver.
Connect the equipment into an outlet on a circuit different from the receiver
is connected.
Consult the dealer or an experienced radio/TV technician for help.
Changes or modications can void the user’s authority to operate the
equipment.

4
National Restrictions
This product is in compliance with the following regulatory standards:
In EU: The device conforms to the Essential Requirements according to
- Annex I of Council Directive 93/42/EEC for medical devices (MDD) and
essential requirements and other relevant provisions of Directive 1999/5/
EC (R&TTE).
In US: FCC CFR 47 Part 15, subpart C.
In Canada: These hearing instruments are certied under the rules of IC.
Other identied applicable international regulatory requirements in
countries outside EU and US. Please refer to local country requirements
for these areas.
IC: 6941C-BTB2
Cet appareil numérique de la classe B est conforme à la norme NMB-003
du Canada.
Operation is subject to the following two conditions: (1) this device may
not cause interference, and (2) this device must accept any interference,
including interference that may cause undesired operation of the device.
In JP:
Japanese Radio Law and Japanese Telecommunications Business
Law Compliance.
This device is granted pursuant to the Japanese Radio Law and the
Japanese Telecommunications Business Law. This device should not be
modied (otherwise the granted designation number will become invalid).

5
Contents
Description
Getting Started
Pairing to your hearing instruments
Start and stop streaming
Controls
Adjustable delay mode
Important Information
Technical specications
Warranty
Troubleshooting guide
6
7
12
14
16
17
18
20
20
21

6
Description
1. Micro-USB power socket
2. Pairing button
3. Mono/stereo switch
4. Analogue mini-jack audio input
5. Optical (Toslink) audio input
6. Coaxial audio input
7. Increase volume
8. Decrease volume
9. Power light (green)
10. Activity light (yellow)
1
2
4
5
7
9
10
3
6
8

7
Getting Started
Installing the TV Streamer 2
Depending on your TV, Hi-Fi stereo, computer or other audio setup, the
installation of TV Streamer 2 may be done in several ways described in the
following section. The following steps will guide you through the pairing and
connecting process, which can be easily accomplished by almost anyone.
Start by connecting cables between the TV Streamer 2 and the audio
source and nish by pairing the TV Streamer 2 to your hearing instruments.
Connecting the TV Streamer 2 to an analogue audio source
(E.g. TV or Hi-Fi stereo)
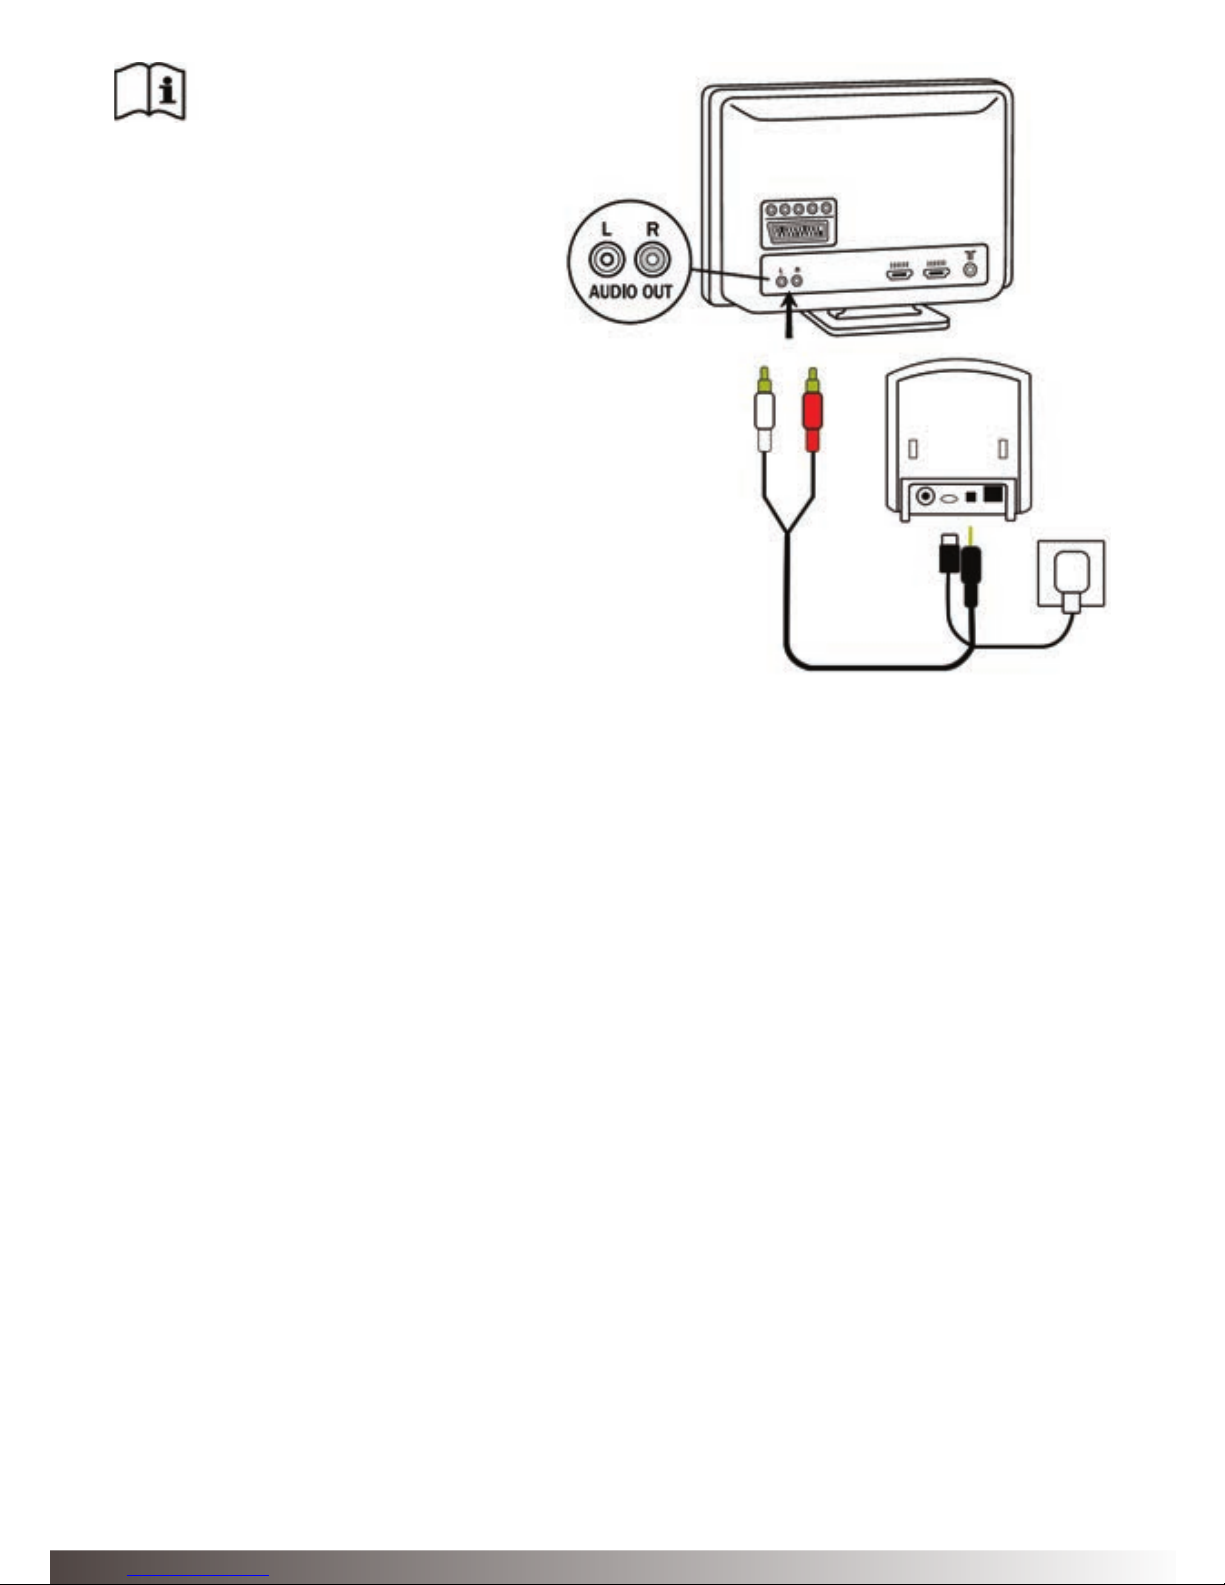
1. Connect the power supply to the wall socket and insert the cable into the
micro-USB socket on the TV Streamer 2.
2. Insert the male stereo mini-jack on the audio cable into the female stereo
mini-jack input on the TV Streamer 2 (4 on page 6).
3. Plug the other end audio cord into the ”AUDIO OUT” terminals on the
audio source.
4. The ”AUDIO OUT” is usually marked ”L – R” for left and right, and can
usually be found on the back of the audio source.
The TV Streamer 2 supports both analogue and digital audio input.
Please read the following sections for information about supported audio
formats and how to connect the TV Streamer 2 to audio sources.
8
Alternative analogue audio cable installations:
If it is not possible to connect the TV Streamer 2 to the AUDIO OUTPUT
of the audio source using the red and white plugs, the following
installation alternatives can be used:
Mini-jack adaptor:
1. Connect the power supply to the wall socket and insert the cable
into the micro-USB socket on TV Streamer 2.
2. Insert the male stereo mini-jack on the audio cable into the female
stereo mini-jack input on the TV Streamer 2 (4 on page 6).
3. Connect the stereo mini-jack adapter to the red and white plugs at
the other end of the audio cable.
4. Plug the stereo mini-jack adapter into the audio sources’
”HEADPHONE” output terminal, or alternatively into your computers’
audio terminal.
Note: With this
installation, most audio
sources will send sound to
both hearing instruments
and additional speakers
connected to the audio
source simultaneously. On
some audio sources you can
adjust the balance between
the AUDIO OUT and the
speakers – consult your
audio source manual for
instructions.

9
Note: The HEADPHONE output terminal is usually located on the
side or front of the audio source. When using the HEADPHONE
terminal, usually only the person wearing the hearing instruments will
hear the sound, and audio source speakers are muted.
If muted speakers are not desired, please refer to the rst installation, or
the one on the following page. Your audio source may support speakers
and HEADPHONE being on simultaneously; check your audio source
manual for instructions.

10
Scart adapter:
1. Connect the power supply to the wall socket and insert the cable into
the micro-USB socket on TV Streamer 2.
2. Insert the male stereo mini-jack on the audio cable into the female
stereo mini-jack input on the TV Streamer 2 (4 on page 6).
3. Connect the scart adapter to the red and white plugs at the other end
of the audio cable.
4. Plug the scart adapter into the audio source’s scart terminal.
Note: The scart output
terminal is usually located on
the back or side of the audio
source. Please consult the
manual of your audio source if
additional conguration of the
scart output is needed.
The TV Streamer 2 supports both
analogue and digital audio input. When
using digital audio input the following
formats are supported:
Dolby Digital
- Channels: Max 5.1
- Bitrate: 32 kbs to 640 kbs
- Sample rate: 32, 44.1 and 48 kHz
Note: Dolby Digital Plus
(requiring an HDMI interface),
Dolby TrueHD, Dolby Pro
Logic, Dolby Digital EX,
Dolby Digital Surround EX,
and AAC (Advanced Audio
Codec) are not supported.
Connecting the TV Streamer 2 to a
digital audio source (E.g.
TV or Hi-Fi stereo)

11
Using the optical (Toslink) audio input
1. Connect the power supply to
the wall socket and insert the cable
into the micro-USB socket on TV
Streamer 2.
2. Insert one of the plugs on the
optical audio cable into the optical audio input
socket (5 on page 6) on TV Streamer 2.
Note: Most optical cables are delivered with
a small protective cap to protect the tip of the
cable. Please remove this protective cap before
inserting the cable.
3. Plug the other end of the optical audio cable into the “Digital
Audio Out/Optical” on your audio source.
Using the coaxial audio input
1. Connect the power supply to
the wall socket and insert the cable
into the micro-USB socket on TV
Streamer 2
2. Connect one of the plugs on the coaxial
audio cable to the coaxial plug (6 on page 6) on
TV Streamer 2
3. Plug the other end of the coaxial audio cable
into the “Digital Audio Out/Coaxial” on your
audio source
(Cable is optional. Please consult your hearing care professional).
(Cable is optional. Please consult your hearing care professional).

12
Note! The following information is intended primarily for your hearing
care professional, who in most cases will complete the necessary tasks
before the TV Streamer 2 can be used with your hearing instruments.
However, the process is designed to be simple and most people can do
it themselves.
It is possible to pair up to three streaming devices - e.g. two TV Streamers
and one Mini Microphone (optional accessory) - with a given pair of hearing
instruments. Therefore channel 1, 2 or 3 must be selected when starting
the pairing process.
Pairing the TV Streamer 2 in channel 1
1. Make sure that the TV Streamer 2 power supply is plugged into a wall
socket and that the green light indicator on the front of the TV Streamer
2 (9 on page 6) is ON. Your hearing instruments must be OFF - open the
battery door.
2. Press the pairing button on the TV Streamer 2 (2 on page 6) once. The
yellow light indicator on the front of the TV Streamer 2 (10 on page 6) will
now blink once every 2 seconds to indicate that the TV Streamer 2 is ready
to be paired in channel 1. Your TV Streamer 2 will remain in pairing mode
for 20 seconds.
3. While pairing mode is activated, close the battery doors of both hearing
instruments and make sure they are ON. A successful pairing will be
indicated by an audible melody being played in both hearing instruments.
You are now ready to use the TV Streamer 2.
Pairing to your hearing instruments

13
Pairing the TV Streamer 2 in channel 2
1. Press the pairing button twice. The yellow light indicator on the front of
the TV Streamer 2 will now blink twice every 2 seconds to indicate that it is
ready to be paired in channel 2.
2. While in pairing mode close the battery doors on the hearing instruments
Pairing the TV Streamer 2 in channel 3
1. Press the pairing button three times. The yellow light indicator on the
front of the TV Streamer 2 will now blink three times every 2 seconds to
indicate that it is ready to be paired in channel 3.
2. While in pairing mode close the battery doors on the hearing instruments.
Pairing
button
pushes
1
2
3
1
2
3
ChannelLight indicator pattern

14
Turn on the TV, Hi-Fi Stereo, computer or other audio device connected to
TV Streamer 2. Make sure your hearing instruments are turned on as well.
Streaming may be started in one of two ways.
1. Press and hold the push button on either hearing instrument for about
three seconds. This must be done separately on both hearing instruments,
in order to hear streamed audio in both ears, unless your hearing
instruments have been set up with Ear-to-Ear synchronisation. Once
TV Streamer 2 has been connected, an audible melody will play in your
hearing instruments and will be followed by the streamed sound.
2. If you have a Remote Control (optional accessory), simply press the
streaming button (not supported by 680 Series) on this Remote Control.
Once the hearing instruments connect to TV Streamer 2, an audible
melody will play in both ears to conrm the presence of streamed audio
and a streaming icon will appear in the display. The streamed sound can
now be heard in your hearing instruments.
Start streaming on a 2nd or 3rd TV Streamer 2 unit.
If more than one TV Streamer 2 device is available, you may press the
streaming button on the Remote Control a 2nd or 3rd time, depending on
which TV Streamer 2 device you want to listen to.
Start and Stop Streaming
15
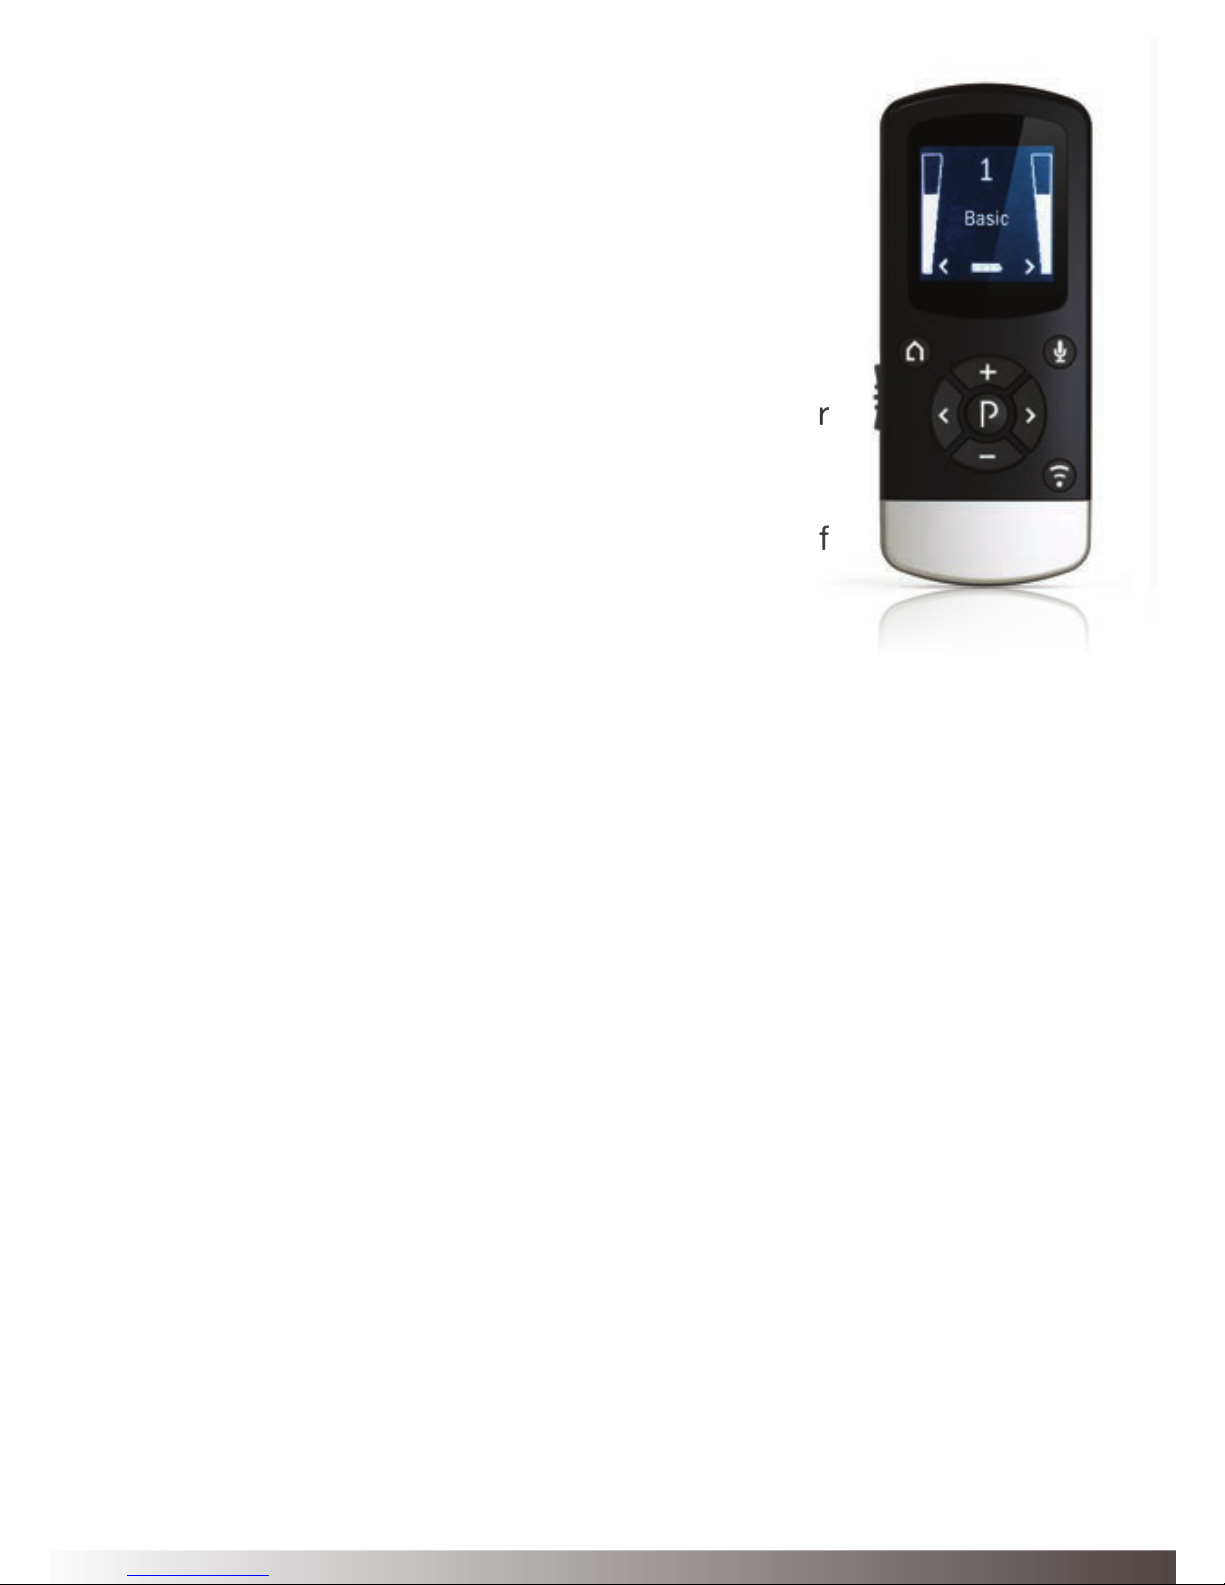
Up to 3 TV Streamer 2 units
are initially labelled by letter
designator A, B or C, and the
streaming device in use is shown
on the Remote Control display.
If you do not have a Remote
Control, press and hold the push
button for about 3 seconds on
the hearing instrument a 2nd or
3rd time to access the 2nd or 3rd
streaming unit.
Stop Streaming
Shortly press the push button on either hearing instrument.
This will cancel streaming on the side pressed and return to the last
program used.
Note: If your hearing instruments have Ear-to-Ear program
synchronisation, enabled a press on one side will take both hearing
instruments back to the last program used.
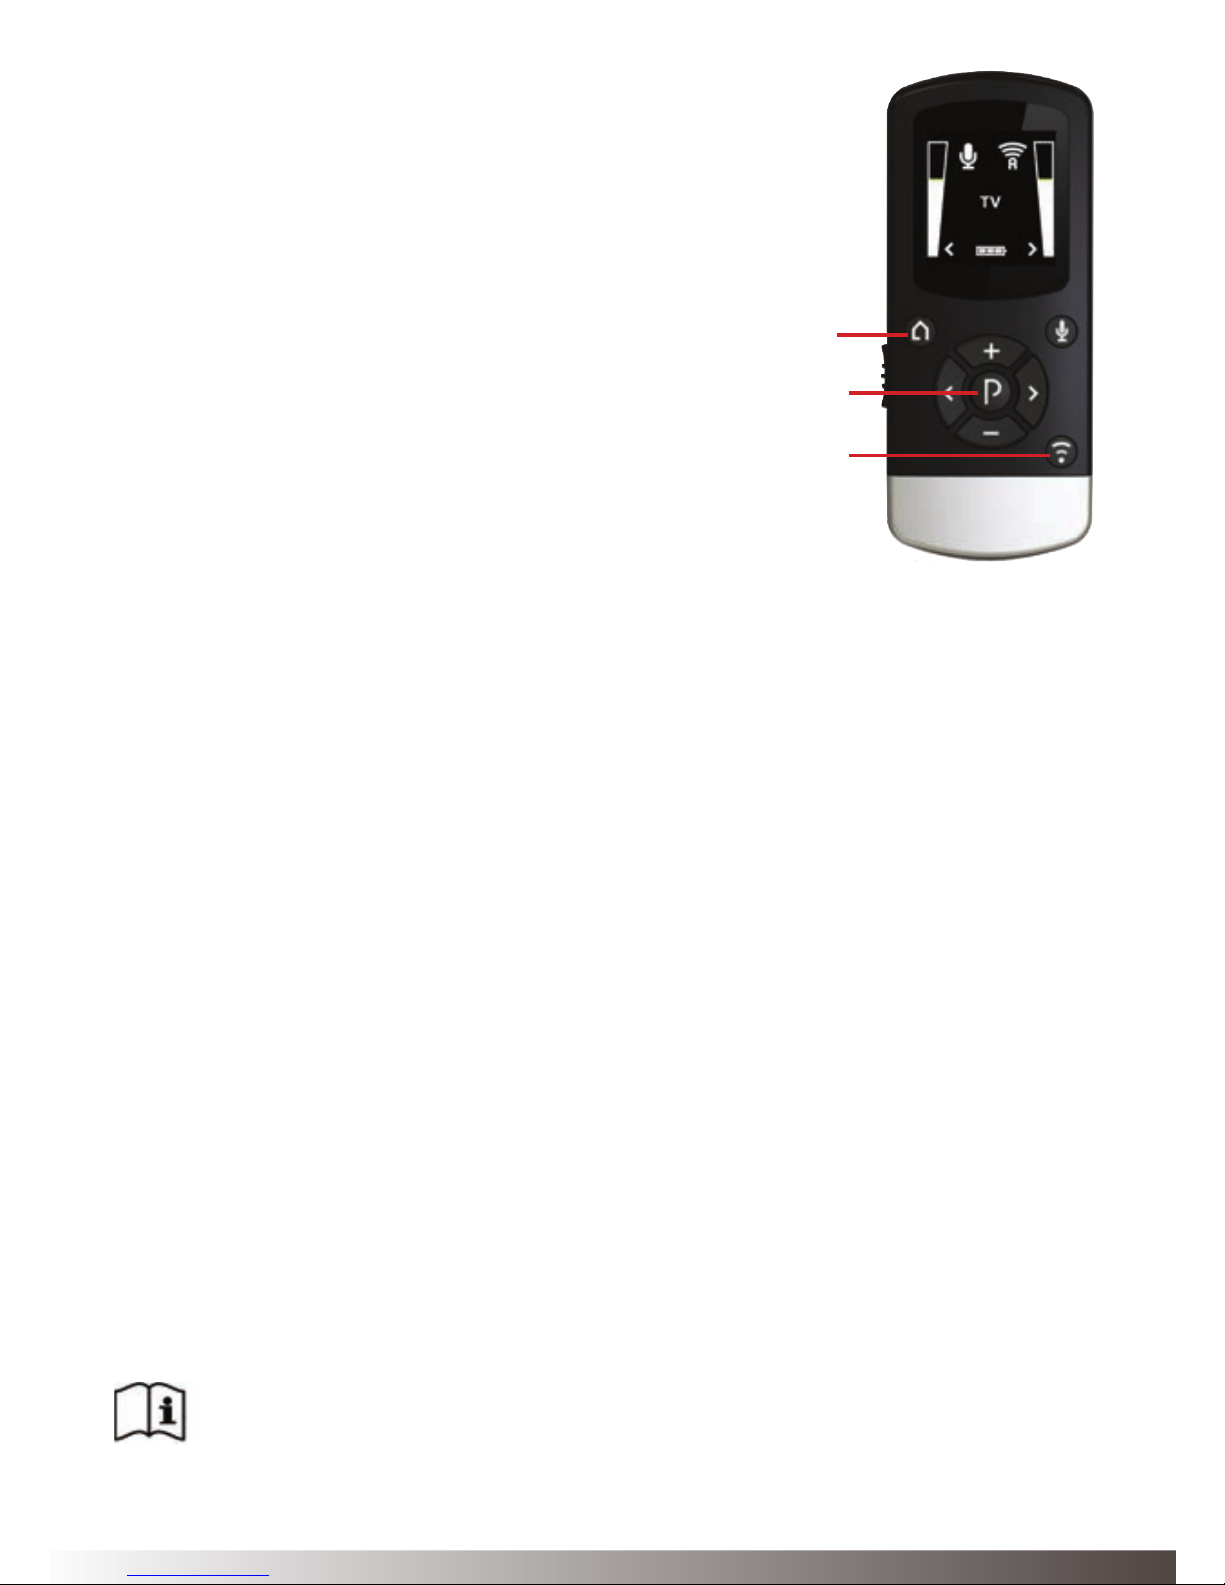
With the Remote Control (optional accessory) you just have to press
the “P” button, located in the centre of the key pad. This will return the
hearing instruments to the last program used. You may also press the
home button to return to your default settings.
If you are using the telephone with Phone Clip 2 (optional accessory)
or Auto Phone, streaming from the TV Streamer 2 will be temporarily
disrupted. When you have ended your phone call, streaming will resume.
Note! You may get out of range (>7m) from your TV Streamer 2.
If you get back in range within 5 minutes, your hearing instruments will
automatically reconnect and continue streaming.
Home Button
Program (P) Button
Streaming Button
Connected To TV

16
Adjust volume
The TV Streamer 2 is designed to provide a comfortable listening level
from the moment it is activated. However, for some devices or listening
environments it may be desirable to adjust the listening volume, and
doing so can be accomplished in a variety of ways. Keep in mind that
volume adjustments on the TV Streamer 2 apply to the streamed signal
only, not the volume of normal environmental sounds.
Use the “+” and “-“ keys (7 and 8 on page 6) to adjust volume to
a comfortable level. Make sure that your hearing instruments are
comfortably adjusted before you change the settings with the volume
control. In most cases this adjustment should only be made one time, as
TV Streamer 2 will store the latest set volume level.
Use the Remote Control (optional accessory) to adjust both the
streaming volume level in the hearing instrument. Ask your hearing care
professional for more information about this accessory.
The volume can, in some cases, be further adjusted at the signal source,
for example by turning the TV volume down. This will adjust the volume
of the streamed sound transmitted wirelessly to the hearing instruments.
Adjusting the TV volume will affect the listening volume in the room as
well.
Mono/stereo control
The two-position switch (3 on page 6) may be used to set Stereo (two
channels) or Mono (one channel) audio streaming. For binaural ttings,
the switch should preferably be set to the Stereo position. For monaural
tting it should be set to the Mono position.
Controls

17
Adjustable Delay Mode
In rare cases there may be a misalignment between the audio streamed
to the hearing instruments and the sound coming from the TV speakers
(echo) or even a misalignment between the streamed audio and the TV
picture (lip-sync). This may be evident in more complex audio setups
where the TV Streamer 2 is not connected directly to the TV (e.g. through
a set-top box or other auxiliary unit).
To overcome such misalignments the streaming delay from the TV
Streamer 2 can be adjusted as follows:
1. Make sure that the TV Streamer 2 is turned on and that your hearing
instruments are receiving the streamed audio.
2. Press and hold the pairing button (2 on page 6) for 3 seconds. Now the
TV Streamer 2 will enter into the adjustable delay mode, where the green
light indicator on the front of the TV Streamer 2 will blink once every 2
seconds. The yellow light indicator will be on whenever an audio signal is
present.
3. Use the “+” and “-“ key (7 and 8 on page 6) on the top of the TV
Streamer 2 to increase or decrease the delay of the streamed signal in 10
ms steps. The streamed signal can be delayed in the range of 0-250 ms.
4. When the optimal alignment between the audio streamed to the
hearing instruments and the sound coming from the TV speakers or
alignment between the streamed audio and the TV picture has been
reached, press and hold the paring button for 3 seconds. Now the TV
Streamer 2 will resume normal operation, indicated by the green light
indicator being constantly on.

18
The offset set in adjustable delay mode will be stored in the TV Streamer
2.
If you do not exit the adjustable delay mode by pressing and holding the
pairing button down for 3 seconds, the TV Streamer 2 will automatically
resume normal operation after 30 minutes. To reset the delay to 0 ms
(factory setting), press and hold the pairing button while simultaneously
powering on the TV Streamer 2.
Maintenance and Care
Clean the TV Streamer 2 using a damp cloth. Never use household
cleaning products (washing powder, soap, etc.) or alcohol to clean the
device.
When the TV Streamer 2 is not being used for longer periods of time,
unplug the power supply from the wall socket.
General Warnings
Keep the TV Streamer 2 out of reach of children under 3 years.
The TV Streamer 2 uses low-powered digitally coded transmissions in
order to communicate with other wireless devices. Although unlikely,
nearby electronic devices may be affected. In that case, move the TV
Streamer 2 away from the affected electronic device.
Use the TV Streamer 2 only with the power supply unit that has been
supplied together with the product. The use of any other types may
damage or destroy the product and could be dangerous. Use of other
power supplies may invalidate any approval or warranty.
Important Information
!

19
• When you disconnect the power cord, grasp and pull the plug, not the
cord.
• Never use a power supply that is damaged.
• Do not attempt to disassemble the power supply as it may expose you
to dangerous electric shock.
• Do not use the power supply outdoors or in damp areas.
When using the TV Streamer 2 and the device is affected by
electromagnetic interference, move away from the source.
General Precautions
Your hearing instrument and the TV Streamer 2 were given a unique
communication network code during the tting. This ensures that TV
Streamer 2 will not affect hearing instruments worn by others.
High-powered electronic equipment, larger electronic installations and
metallic structures may signicantly reduce the operating range.
Use only original accessories.
Do not make any changes or modications to the TV Streamer 2.
Opening the TV Streamer 2 might damage it. If problems occur
which cannot be resolved by following the remedy guidelines in the
troubleshooting section of this user guide, consult your hearing care
professional.
!

20
The TV Streamer 2 may only be repaired by an authorised service centre.
Do not use the TV Streamer 2 in areas where RF transmission is
prohibited, e.g. airplanes etc.
Only connect the TV Streamer 2 to connections for which it is explicitly
intended.
Technical Specifications
Operating range: up to 7 meters
Power supply: External wall adaptor
Wireless: 2,4 GHz
Operating temperature: 0 to 55 °C
Storage temperature: -20 to 60 °C
Temperature test, transport and storage information
The product is subject to various tests in temperature and damp heating
cycling between -25 °C and +70 °C according to internal and industry
standards.
Warranty
The TV Streamer 2 is covered by a limited warranty issued by the
manufacturer for a period of 12 months from the day of the original
purchase. Please notice that extended warranties may apply in your
country. Please contact your local hearing care professional for more
information.

21
What is covered by this warranty?
Any electrical component, that because of workmanship, manufacturing
or design defects fails to function properly under normal use during life of
this warranty will be replaced or repaired at no charge for parts or labour
when returned to the point of purchase.
If it is determined that repair is not feasible, the entire unit may be
replaced with an equivalent unit upon mutual agreement of the hearing
care professional and the customer.
What is not covered by this warranty?
Problems arising from improper handling or care, excessive use,
accidents, repairs made by an unauthorized party, exposure to corrosive
conditions or damage due to foreign objects entering the device are NOT
covered by the limited warranty and may void it. The above warranty
does not affect any legal rights that you might have under applicable
national legislation governing sale of consumer products. Your hearing
care professional may have issued a warranty that goes beyond the
clauses of this limited warranty. Please consult your hearing care
professional for further information.
Symptoms: The streaming button on the Remote Control is pressed but
with no effect at all.
Cause: The TV Streamer 2 and hearing instruments have not been
paired. The Remote Control and hearing instruments are not within
wireless range. Streaming is not supported on the Remote Control for the
680 Series.
Possible Remedies: Carry out pairing process. Ensure that Remote
Control and hearing instruments are within wireless range and activate
streaming again.
Troubleshooting Guide

22
Symptoms: The push button on the hearing instrument has been
pressed for more than 3 seconds but with no effect at all.
Symptoms: The pairing button on the TV Streamer 2 is pressed but no
pairing melody is played in the hearing instrument.
Symptoms: The streaming button on the Remote Control is pressed but
no streamed audio signal is found when searched for (indicated by an ’X’
icon on the display).
Cause: The TV Streamer 2 and hearing instrument have not been paired.
Cause: The TV Streamer 2 and hearing instrument are not within
wireless range. The TV Streamer 2 and hearing instrument have not been
simultaneously in pairing mode.
Cause: The TV Streamer 2 and hearing instruments are not within
wireless range. The TV Streamer 2 is not cabled correctly to the TV. The
TV Streamer 2 is powered off or the sound from the TV output has been
muted. Streaming is not supported on the Remote Control for the 680
Series.
Possible Remedies: Carry out pairing process.
Possible Remedies: Ensure that the TV Streamer 2 and hearing
instruments are within wireless range, and repeat pairing process. Repeat
pairing process and ensure that the battery doors on both hearing
instruments are closed within 20 seconds after the pairing button has
been pressed on the TV Streamer 2.
Possible Remedies: Ensure that TV Streamer 2 and hearing instruments
are within wireless range and activate streaming again. Connect the cable
between the TV Streamer 2 and the TV correctly and activate streaming
again. Power on the TV Streamer 2 or unmute the TV and activate
streaming again.

23
Symptoms: There is no sound in the hearing instruments although it is in
the streaming program.
Symptoms: The volume level from the TV Streamer 2 is very low.
Symptoms: The sound from the TV Streamer 2 is distorted or drop-outs
occur from time to time.
Symptoms: The sound from the TV Streamer 2 is distorted.
Cause: The TV Streamer 2 and hearing instruments are not within
wireless range. The TV might have been powered off or the sound from
the TV has been muted.
Cause: The audio input level from the TV is too low.
Cause: The TV Streamer 2 and hearing instruments are on the edge of
the wireless range. The TV Streamer 2 and hearing instruments are not
within sufcient ”line-of-sight”.
Cause: The audio input level from the TV is too high.
Possible Remedies: Ensure that the TV Streamer 2 and hearing
instruments are within wireless range. Power on or unmute the TV.
Possible Remedies: Adjust the volume using the ”+” and ”-” keys on the
TV Streamer 2 until the sound is sufciently loud.
Possible Remedies: Move a little closer to the TV Streamer 2. Ensure
that the TV Streamer 2 is placed in an adequate position, and that you
are within normal reach without any signicant obstacles obstructing the
streaming.
Possible Remedies: Adjust the volume using the volume button on the
TV Streamer 2 until the sound is no longer distorted.

24
Symptoms: The sound from the TV Streamer 2 is not synchronized with
the TV picture.
Symptoms: The sound from the TV Streamer 2 is not synchronized with
the sound from the TV loudspeakers.
Symptoms: The sound from the hearing instruments is either too low or
too high.
Cause: Your TV is not able to synchronize the sound from the selected
audio outputs and the picture.
Cause: Your TV is not able to synchronize the sound from the selected
audio outputs with the sound from the TV loudspeakers.
Cause: The audio input level is not suitable for listening.
Possible Remedies: If possible, try using another audio output from your
TV. Alternatively, follow the instructions in the “Adjustable delay mode”
section of this user guide. If this does not help, contact your TV dealer.
The TV Streamer 2 audio streaming has almost no latency and does not
contribute itself to any lip sync error.
Possible Remedies: If possible, try using another audio output from your
TV. Alternatively, follow the instructions in the “Adjustable delay mode”
section of this user guide. If this does not help, contact your TV dealer.
The TV Streamer 2 audio streaming has almost no latency and does not
contribute itself to any echo effects.
Possible Remedies: Adjust the volume using the ”+” and ”-” keys on the
TV Streamer 2 until the sound is suitable. Alternatively, use the ”+” and ”-”
keys on the Remote Control (optional) for this operation.

25
Symptoms: A hearing instrument unintentionally drops out of the
streaming program.
Cause: The TV Streamer 2 and hearing instruments have been out
of wireless range for more than 5 minutes. The battery in the hearing
instrument is so depleted that it no longer supports audio streaming.
Possible Remedies: Ensure that TV Streamer 2 and hearing instruments
are within wireless range and activate streaming again. Replace the
battery in the hearing instrument with a new one.
Be aware of information marked with the warning symbol
WARNING points out a situation that could lead to serious
injuries.
CAUTION indicates a situation that could lead to minor and
moderate injuries.
Advice and tips on how to handle your accessory better.
Equipment includes RF transmitter
Manufactured under license from Dolby Laboratories.
Dolby and the double-D symbol are trademarks of Dolby
Laboratories.
!

26
Mini Microphone
Don’t miss a thing
Sometimes you need a boost to even the best
hearing systems. Whether you’re in the car or at
a conference, the Mini Microphone is the easy,
reliable way to make sure you hear every word of
the conversation, whatever the situation. The Mini
Microphone can also be used to transmit speech or
music directly to your wireless hearing system. Just
clip it on to a family member or speaker and stream
their voice directly to your ears.
• Wireless signal with up to 7 meters (23 feet) range.
• No adapters around your neck.
Other wireless accessories available for the P Series
Phone Clip+
Stream phone calls and music directly to the
ears
The Phone Clip+ streams Bluetooth
®
mobile phone
conversations and music directly to your customer’s
hearing systems. A robust signal and effective
background noise reduction ensure that customers
can enjoy excellent speech and sound clarity.
Doubling as a basic remote control, hearing system
settings can be changed from the Phone Clip+.
27
Remote Control 2
Easy overview and simple control of hearing
system settings
The Remote Control 2 is for people who appreciate
an easy overview of their hearing systems and
accessory settings. A large LCD display lets your
customers see and control hearing system settings
for their specic personal preference. Large and
intuitive buttons ensure easy operation and control of
volume, program and streaming devices such as the
TV Streamer 2 and Mini Microphone.
• Adjust volume on one or both hearing systems.
• Change hearing system programs.
• Switch between streaming from TV, radio or laptop.
• Balance the hearing system volume with the streaming volume.
• Mute function to block out surrounding sounds.
• Discreet and clear overview of your hearing system settings.

Established 1976
www.puretone.net
This user guide is also available on request in large text format.
 Loading...