

Page 1
User Guide
Undersink | Drinking Water Systems
TS SERIES
SH SERIES
For correct operation & installation it is essential to observe these instructions.
AS/NZS 3497
Licence No. WM 74617
Australian Certication
Services
APR2018
Page 2

2
Installation & Operation Manual Copyright © Puretec Pty Ltd 2018
What's inside
Introduction ................................................................................................................................. 3
Operation ...................................................................................................................................... 3
Cartridge Installation ............................................................................................................. 4
Installation Guide ..................................................................................................................... 5
Installation Procedure ........................................................................................................... 6
Parts Description ...................................................................................................................... 7
Battery Installation ................................................................................................................. 8
Quick Connect Fittings ................................................................................................................9
Performance Data ................................................................................................................ 10
Warranty ..........................................................................................................................................11
Contact Information ..................................................................................................................12
What's Inside
Page 3

3
Undersink | Drinking Water Filter Systems
Puretec Customer Service
Thank you for purchasing a Puretec undersink drinking water system. Your system is a
proven performer manufactured from only quality materials and components and will
give years of ‘spring fresh’ water free of impurities if maintained properly.
Caution: Do not use with water that is microbiologically unsafe or with water of unknown
quality without adequate disinfection before or aer the system.
The system is designed for metropolitan supply water but can be used in other
situations. For other types of water supply please contact your local Puretec stockist or
call our Puretec Customer Service Helpline.
The Puretec lter systems cartridges need replacing regularly to maintain optimum
performance. This is a simple procedure when following instructions. For cartridge
replacements contact your nearest Puretec stockist.
Customer Service Helpline 1300 140 140 (Australia) 0800 130 140 (New Zealand)
Operation
The Puretec undersink systems are designed to run economically for many years and
this is dependant on the initial installation and periodical maintenance.
Flush systems for 10 minutes aer any period of non-use more than 2 days. For a
period of non-use of 2 weeks or more, it may be necessary to replace cartridges.
This product must be installed in accordance with local plumbing regulations by a
licensed plumber.
Introduction
Page 4

4
Installation & Operation Manual Copyright © Puretec Pty Ltd 2018
Cartridge Replacements
Cartridge Replacement Guide
To maintain the high quality of the puried water the cartridges need changing every 6
months (this is dependant on water quality and usage).
You can obtain replacement cartridges from your local Puretec dealer and to maintain
performance and warranty use genuine Puretec replacements.
System Model No Replacement Cartridge
TS100 PX051, GC051
TS200 PX051, CB951
SH10 GC051
Other cartridges are available to suit a range of requirements upon request.
Important note: When replacing cartridge, ensure you reset the LED reminder light by removing/
replacing the battery from the rubber seat. Please refer to page 8 for a detailed diagram.
Installation
This system comes complete with an installation kit enabling it to be connected to
15mm (½”) copper pipe (Cold supply only - hot water should be ltered prior to heating).
Included is a control valve incorporating backow prevention, anti hammer, ow control
and pressure limiting capabilities in full compliance with the relevant laws.
Installation requirements
1 13mm (½”) Cold water line.
2 Supply pressure: 300-1800 kPa.
3 Supply temperature 3° - 30°C.
4 Suitable location for faucet.
Alternative ttings may be required if being connected to anything other than 15mm
(½”) copper pipe. No electrical or drainage requirements needed.
Page 5

5
Undersink | Drinking Water Filter Systems
Installation Guide
Installation Procedure
1. Select suitable location that is close to the point of ltered water delivery (eg. sink).
Remember to allow access room for changing lters and a suitable place where
water spillage will not cause damage. Location should not be in direct sunlight.
2. Isolate water supply. Uninstall the connections on the cold water line and connect
the Smart Tee™. Reinstall the previous connection to the tee valve.
3. Connect the pressure limiting multivalve to the Smart Tee™ with a length of white
tubing.
4. Choose the best position for the faucet, taking into consideration height of jugs etc.
and also the drainage of any spills. Then drill a 12.5mm hole and install the faucet
as in step 5.
5. To install faucet, place the small rubber washer, chrome washer and large rubber
washer on to the threaded end of the faucet (see gure 1). Insert the faucet into the
hole in sink or bench. Slip the large plastic washer and lock washer onto threaded
end of faucet and screw on nut and tighten making sure faucet is correctly
positioned on top.
6. Reset LED indicator by following instructions on page 8.
7. Install housing assembly by positioning it in the desired location, marking the
position of xing holes and xing with mounting screws. Allow room for the
connecting tubes and for removing the lter bowls (50mm).
8. Fit tubing into connectors (for quick-connect ttings see g 3). Allow slack in the
tubing. Make sure ow is right according to inlet outlet on housing assembly. For
faucet connection see gure 2.
9. Install cartridges as per cartridge installation/changeout.
10. Restore the water supply and check for leaks. The lters need to be only hand tight.
If they leak then undo housing and check the O-Ring is seated properly.
11. Run the system for at least 10 minutes (push the faucet lever to the upright
position) to remove carbon nes. Water may appear milky, but this is normal and is
only tiny air bubbles that will clear aer a short period.
Page 6

6
Installation & Operation Manual Copyright © Puretec Pty Ltd 2018
Installation Procedure
Cartridge Installation/Changeout
To change the lter cartridges adhere to the following procedure.
1. Close ballvalve to prevent water ow.
2. Relieve water pressure by operating faucet lever.
3. Unscrew lter housing bowl using the spanner wrench and discard cartridges. When
removing housings place a container underneath to catch any spillage.
4. Cleanse the inside of the housing using warm water. Check O-Ring and lubricate
with food grade silicone lubricant or similar. Replace O-Ring if kinked or damaged.
(Part No: FPOR)
5. Install new cartridges and replace housing screwing them up HAND TIGHT ONLY.
Sediment lter is on the inlet side and chemical on the outlet side.
6. Reset LED indicator by following instructions on page 8.
7. Restore water supply & check for leaks, rectifying them, if any, before leaving the
unit.
Aer installing cartridges ush unit for 5 - 10 minutes.
Page 7
7
Undersink | Drinking Water Filter Systems
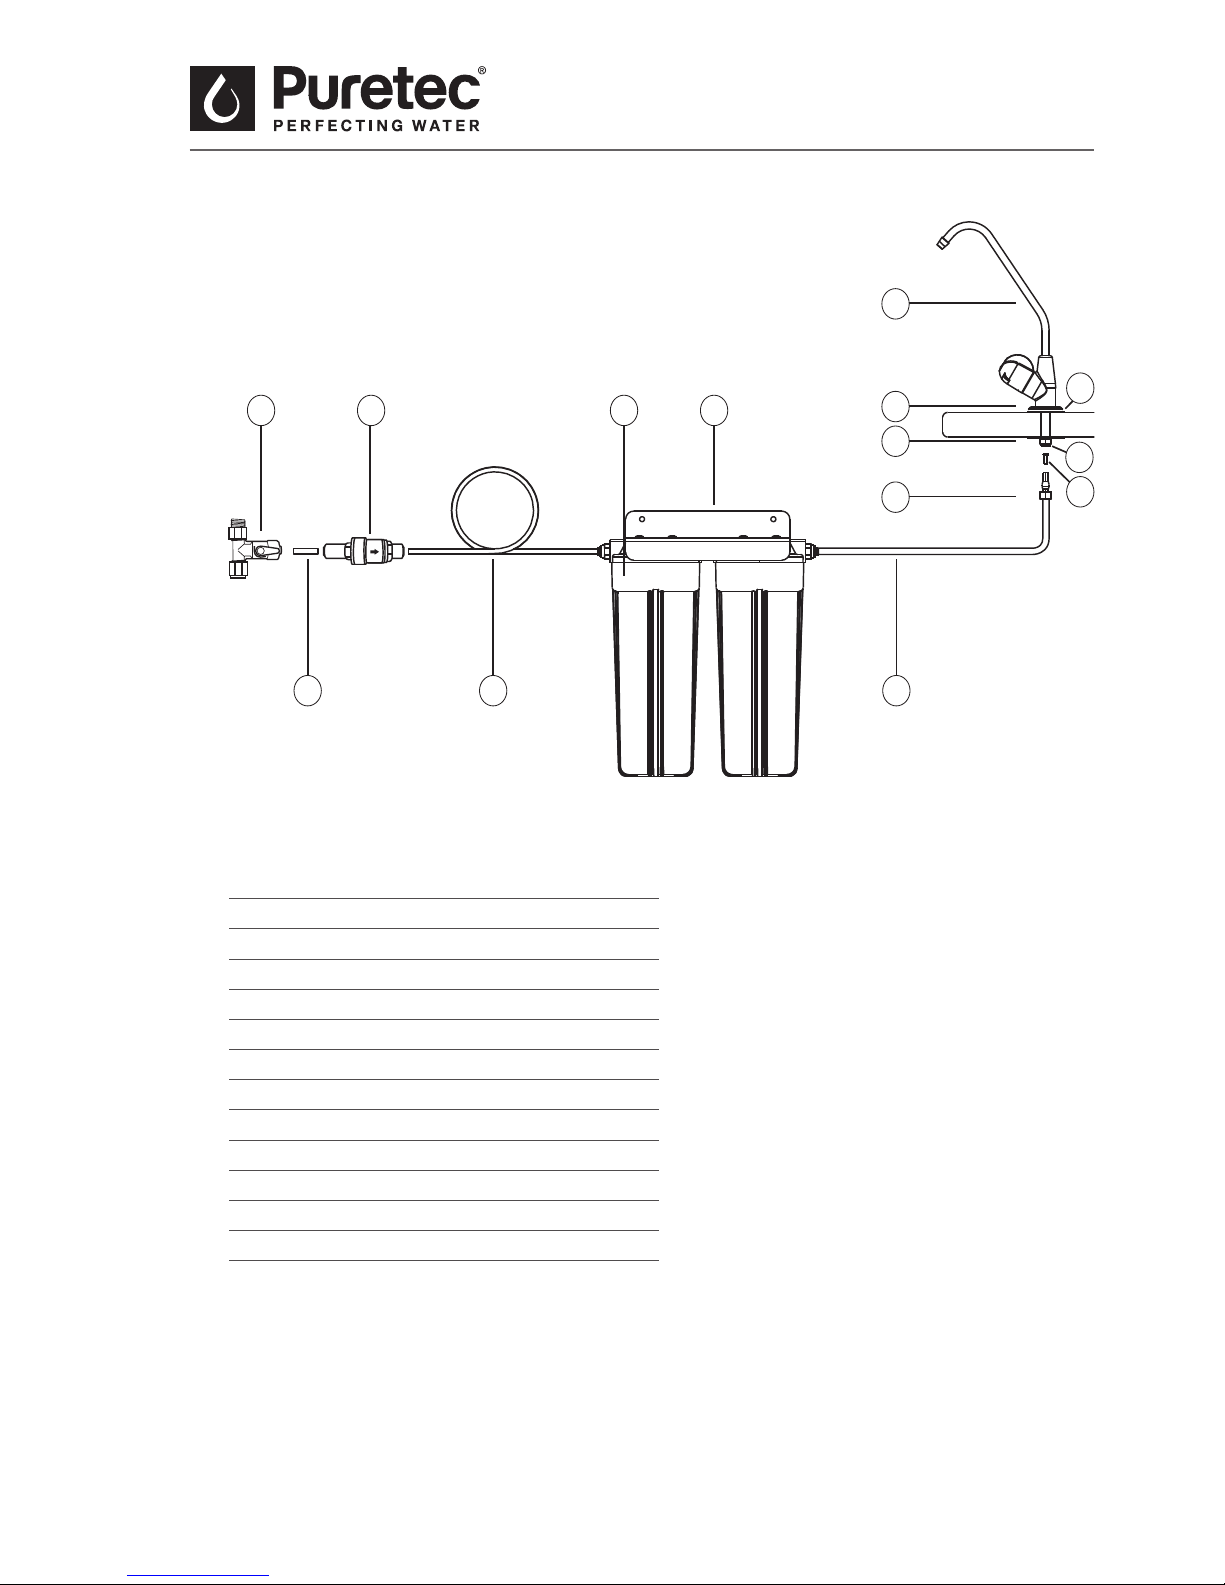
Parts Description
No. DESCRIPTION
1 Smart Tee™ ½"M x ½"F x ¼"T
2 Flexible Tubing
3 Pressure limiting Multivalve
4 Housing Assembly (Twin Pictured)
5 Mounting Bracket
6 Tube, Nut and Ferrule
7 Tube insert
8 Faucet Lock Nut and Washer
9 Black plastic washer
10 Black Rubber Washer
11 Escutcheon Plate
12 Long Reach Faucet
12
6
7
8
10
9
11
3 41
FIGURE 1
5
2 2 2
Page 8
8
Installation & Operation Manual Copyright © Puretec Pty Ltd 2018
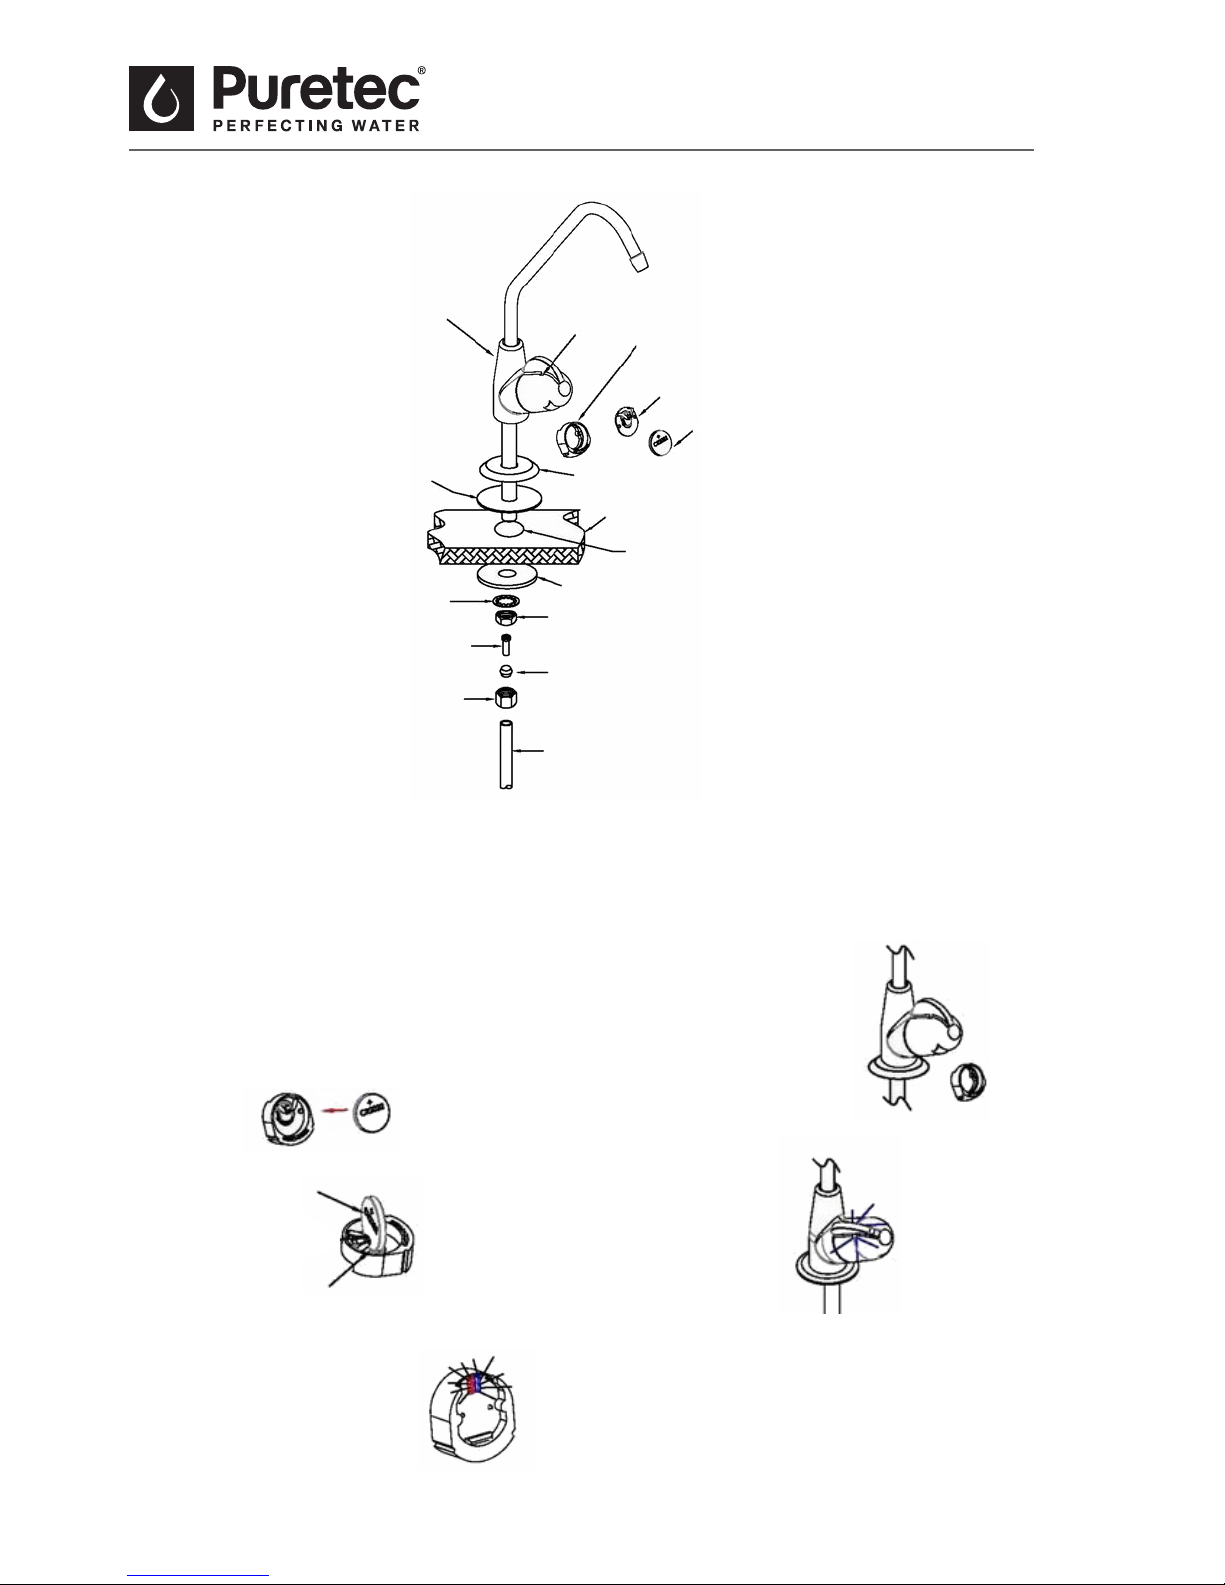
Battery Installation
FIGURE 2
Faucet
Display
Battery Seat
Circuit board
Battery
(CR2032)
Chrome plated metal ange
ø12.5 hole
Counter top
cone washer
locking nut
plastic washer
¼" tube
¼" compression nut
gasket
lock washer
large rubber washer
BATTERY INSTALLATION - LED REMINDER LIGHT
1. Remove the black battery seat from the
faucet lever handle (see gure 2).
2. Install battery into the battery seat,
positive side up.
Note: red light ashes
twice and then followed
by the blue light
3. Reinstall battery
seat assembly
into the faucet
lever
Important note: Battery must be replaced when changing cartridges.
5. Red light ashes indicates your cartridges
are due to be changed (usage has
exceeded 3,000 minutes or 12 months).
Please change the battery when
changing the cartridges.
Positive
side up
Negative on
the PCB
4. Blue light ashes during normal operation.
Page 9
9
Undersink | Drinking Water Filter Systems
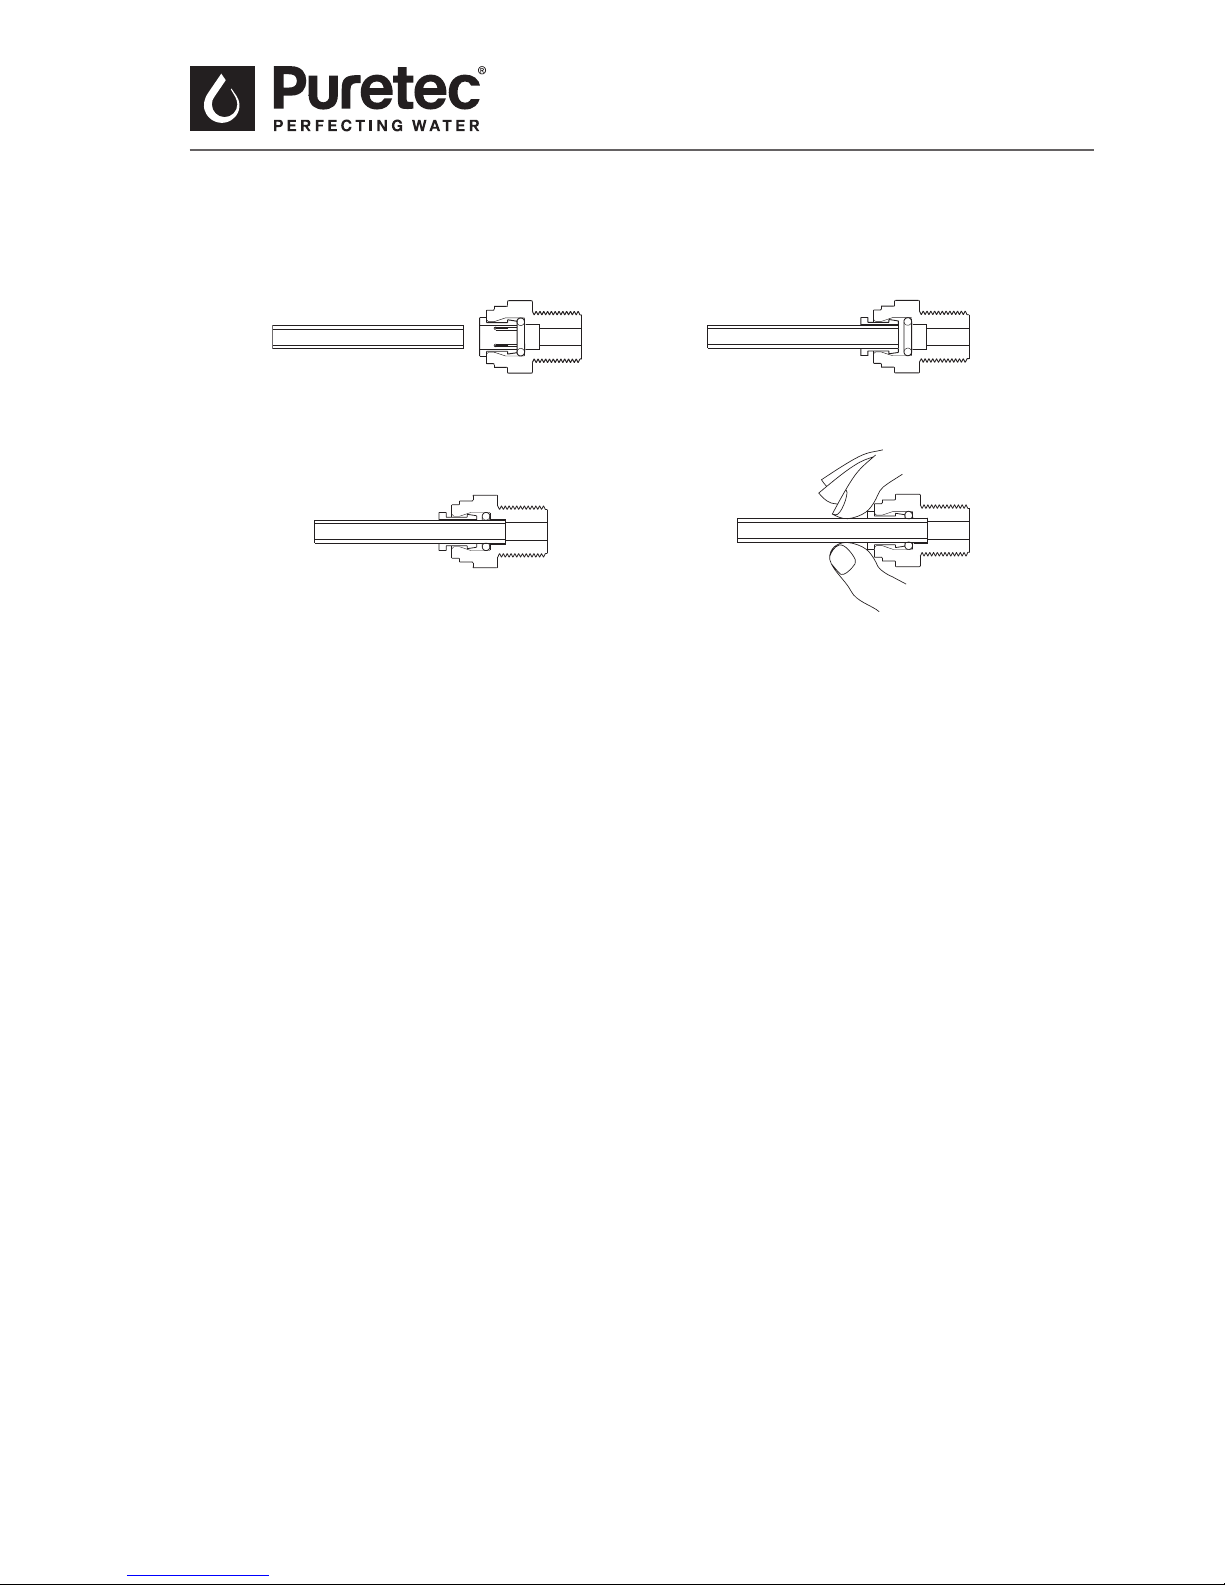
Quick Connect Fittings
FIGURE 3
1. Cut the tube square and push in to
the tube stop. For metal tube remove
burrs and chamfer tube end to prevent
O-Ring seal being damaged.
DISCONNECTION PROCEDURE
4. Push collet against body and
slide tube out of tting.
2. Fitting grips before it seals. Ensure
tube is pushed in to tube stop.
HOW TO USE QUICK CONNECT FITTINGS
3. Tube is secured in position.
USER GUIDELINES
• Minimum operating pressure 100 kPa.
• Maximum operating pressure 875 kPa.
• Do not allow exposure to temperatures below 4°C.
• Maximum operating temperature 38°C.
• Nominal ow rate 4 Lpm.
• This system must be installed according to local plumbing codes on the cold water line.
• Replacement Cartridges: See Cartridge replacement section
• This system requires regular replacement of the lter cartridge to maintain proper operation.
Varying chlorine, sediment, or organic substance levels may aect replacement frequency.
• Be sure to change the lter cartridge at least every 8,000 litres or 6 months which ever occurs rst;
or whenever you detect a change in taste, odour, or decrease in ow. 8,000 litres is approximately
equal to using 20 litres daily for one year.
• When replacing cartridge, ensure you reset the LED reminder light by removing/replacing the
battery from the rubber seat. Please refer to page 8 for a detailed diagram.
Caution: Do not use with water that is microbiologically unsafe or of unknown quality without
adequate disinfection before or aer the system.
Page 10
10
Installation & Operation Manual Copyright © Puretec Pty Ltd 2018
Notes
Performance Data
Substance Guidelines*
Average
Inuent
Concentration
Max Euent
Concentration
Min Percent
Removal
Average
Euent
Concentration
Average
Percent
Removal
NSF Standard 42 Drinking Water Treatment Units
Chlorine
(11,355 L)
5 - H e alt h
0.6 - Aesthetic
2.1 0.3 50% 0.25 >94%
Standard 53 Cyst Live Cryptosporidium POU/POE (TS200)
Cyst <1 100,000 ND (1) 99.98% + ND (1) 99.99%
Test Parameters
Hardness, Total mg/L 120
TDS mg/L 290
Temp deg C 21°C
Turbidity NTU 0.1
pH 7.57
*Australian Drinking Water Guidelines - 1996
ND = Not Detected
This appliance meets the domestic water treatment appliance Standards AS/NZS3497 for the following
water treatment processes:
Class Treatment type Function Pass
I Microbiological Status Will stop bacteria increasing, but will not
remove them unless II(a) is passed
N/A
Bacteriostatic
II Microbiological Treatment
II (a) Bacteria Removal Will remove or inactivate bacteria N/A
II (b) Virus Removal Will remove or inactivate virus N/A
II (c) Protozoa Removal Will remove or inactivate Cryptosporidium
and Giardia, but will not remove or
inactivate bacteria and virises unless II(a)
and II(b) is passed
YES
(TS200)
III Turbidity & Particulate Reduction Reduces cloudiness YES
IV Taste & Odour Reduction Reduces taste & odours YES
V Chemical Treatment Decreases chlorine YES
Page 11

11
Undersink | Drinking Water Filter Systems
WARRANTY
Any claim under this warranty must be made within 3 years of the date of purchase of
the product. This product is warrantied to be free of defect of material and workmanship
for 3 years from date of purchase. To make a claim under the warranty, take the product
and proof of purchase to place where you purchased the product, and they will lodge a
Warranty Request with Puretec.
Puretec will pay your reasonable, direct expenses of claiming under this warranty.
You may submit details and proof of your expense claim to place of purchase for
consideration.
The warranty only applies if the product was used and/or installed in accordance with
the user guide and/or installation instructions. This warranty is given in lieu of all other
express or implied warranties and manufacturer shall in no circumstance be held liable
for damages consequential or otherwise or delays caused or faulty manufacturing
except as excluded by law.
Applicable to all above, is that the Warranties need to be approved by Puretec to ensure
product was not incorrectly used, installed or claimed. False and incorrect claims will
be pursued at Puretec’s discretion, including chargeable inspection and labour costs
incurred.
Warranty/Australia
This warranty is given by Puretec Pty Ltd, ABN 44 164 806 688, 37-43 Brodie Road,
Lonsdale SA 5160, telephone no. 1300 140 140 and email at [email protected].
This warranty is provided in addition to other rights and remedies you have under
law: Our goods come with guarantees which cannot be excluded under the Australian
Consumer Law. You are entitled to replacement or refund for a major failure and to
compensation for other reasonably foreseeable loss or damage. You are also entitled to
have the goods repaired or replaced if the goods fail to be of acceptable quality and the
failure does not amount to a major failure.
Warranty/New Zealand
This warranty is given by Puretec Ltd, Reg. No 4464398, 47 Allwill Drive, Cambridge NZ
3493, telephone no. 0800 130 140 and email at [email protected].
This warranty is provided in addition to other rights and remedies you have under
law: Our goods come with guarantees which cannot be excluded under the Consumer
Guarantees Act. You are entitled to replacement or refund for a major failure and to
compensation for other reasonably foreseeable loss or damage. You are also entitled to
have the goods repaired or replaced if the goods fail to be of acceptable quality and the
failure does not amount to a major failure.
Warranty
Page 12

 Loading...