

Page 1

INSTALLATION AND OPERATION MANUAL
Caution: Please read this manual carefully before operating.
Damage caused by misuse is not covered by the warranty.
Page 2

SAFETY PRECAUTIONS
• Be sure to read the instructions in this section carefully before use. The included conventions of safety
symbols and messages are regarded as essential precautions.
• We recommend that you keep this instruction manual handy for future reference.
SAFETY SYMBOL AND MESSAGE CONVENTIONS
Safety symbols and messages described below are used in this manual to prevent bodily injury and property
damage that could result from mishandling. Before operating this product, read this manual first and
understand the safety symbols and messages so you are thoroughly aware of the potential safety risks.
Indicates a potentially hazardous situation which, if mishandled, could result in
WARNING!
CAUTION!
death or serious personal injury.
Indicates a potentially hazardous situation which, if mishandled, could result in
moderate or minor personal injury, and/or property damage.
WARNING!
IMPORTANT SAFETY INSTRUCTIONS
***THIS PRODUCT MUST BE INSTALLED BY A QUALIFIED TECHNICIAN.
THE PROVIDED INSTALLATION HARDWARE MUST BE USED TO INSTALL THIS PRODUCT.
Pro Acoustics is not responsible for the structural integrity of the installation. Please ensure that a qualified
technician installs this product and that the building’s engineer or architect has approved the equipment and
installation.
SPEAKERS MUST BE ATTACHED BY A SAFETY CABLE!***
• To prevent injury, this apparatus must be securely attached in accordance with the installation
instructions.
• DO NOT install near electricity, smoke, steam, or any heat source such as stoves, radiators, heat registers,
amplifiers, or other apparatuses producing heat.
• DO NOT place any naked flame sources, such as candles, close to the product.
• USE hardware and accessories as indicated by the manufacturer.
• REFER all servicing to qualified service personnel. Servicing is required when the speaker is damaged in
any way, does not operate normally, or has been dropped.
*No user-serviceable parts inside. Refer all servicing to qualified service personnel.
*Changes or modifications not expressly approved by the manufacturer could void the user’s warranty.
CAUTION!
Although these speakers are designed to withstand the elements, you should take precautions to optimize
their long-term performance.
• Keep soil and wood chips from covering the speaker grill. If soil or dust accumulates on the grill, it can be
rinsed away with low water pressure.
• Chemicals commonly used outdoors can damage the speaker's rubber elements. Avoid spraying such
chemicals onto or near the speaker.
• Avoid placing the speakers where the grill area will come in direct contact with sprinklers or other water
sources.
Page 3

DESCRIPTION
Designed to meet the needs of open-ceiling applications, the Pure Resonance Audio PD6 6.5”
indoor/outdoor pendant speaker is weather-resistant, high-powered, and easy to install. The PD6 uses an
acoustically matched 6.5” and 1” tweeter to maximize performance while minimizing the overall footprint of
the speaker. With the addition of a 70-volt transformer, the PD6 can be easily integrated into any distributed
commercial audio system. The PD6 is perfect for restaurants, retail stores, offices, warehouses, or any
open-architecture or high-ceiling environment requiring paging and background music.
FEATURES
• Durable weather-resistant construction for indoor and outdoor use
• 70 Volt/100 Volt transformer with 8 Ohm bypass
• 6.5” Polypropylene woofer and 1” silk tweeter
• 87 dB sensitivity provides quality sound
• Easy and secure installation with included pendant mounting hardware
• Euroblock screw terminal connector
• Available in black (PD6) and white (PD6W)
SPECIFICATIONS
Power Rating
Frequency Response (±10 dB)
Sensitivity (@ 1w/1m) 87 dB
Max Sensitivity
Dispersion
Impedance 8 Ohms
Transformer Taps (70V)
Woofer
Tweeter
Grill
Connection 4-pin Euroblock screw terminal
30 Watts RMS; 70 Watts Peak
65 Hz - 20 kHz
101 dB
Conical 150°
4W, 8W, 16W, 32W; 8 Ohm Bypass
6.5” Polypropylene
1” Silk
Powder-coated aluminum
Dimensions (H x Dia) 10.3” (285 mm) x 8.1” (207 mm)
Weight
Shipping Dimensions (HxWxD)
Shipping Weight
6.35 lbs (2.88 kg)
11.25” (285.75 mm) x 13.5” (342.9 mm) x 10.56” (268.22 mm)
9 lbs (4.08 kg)
Page 4

INSTALLATION GUIDE
SPEAKER PLACEMENT
• If you want music to cover a wide area, it's best to have a larger number of speakers playing at low
volume rather than a few at high volume. Keep this in mind when designing your pendant system.
• Place the speakers as close as possible to the primary listening area. The perceived volume of the
speaker rapidly decreases as it is moved further from the listener.
PENDANT MOUNTING
PLEASE NOTE: Before beginning installation, be sure to take precise measurements.
1. Determine the locations for the speaker(s).
2. Measure the length of cable you will need for the desired mounting height.
3. Ensure you have enough speaker wire to reach from the amplifier to the 1st
speaker and then to each additional speaker.
4. Unpack the speaker unit and mounting hardware.
5. Thread the bare end of the cable through the Fastlink.
6. Secure the cable to or around the structure the speaker will hang from.
7. Thread the cable back through the Fastlink and pull to tighten.
IMPORTANT: Once the tension is pulled through the Fastlink, it cannot be loosened.
8. Attach the carabiner through the eye end of the cable.
9. Run the speaker wire through the oval-shaped hole in the top cover plate.
10. Connect the speaker wire to the first (+) and (-) inputs on the 4-pin Euroblock. Use the second (+) and (-)
for daisy-chaining to your next speaker in 70V applications.
11. Select the desired tap setting.
12. Place the cover plate on top of the speaker unit and screw in the eye bolt until it is fully tightened and the
cover plate is secure.
13. Attach the carabiner through the eye bolt on the back of the speaker.
14. Your speaker should now be securely installed
SCAN HERE FOR
A VIDEO GUIDE
CONNECTING THE SPEAKER TO YOUR SYSTEM
1. Connect the speaker wire connected to the first (+) and (-) inputs on the speaker's 4-pin Euroblock to the
output on the amplifier. Ensure the (+) from the speaker is connected to the (+) on the amplifier and the
(-) on the speaker connects to the (-) on the amplifier (see Figure 1).
2. Turn your amplifier on and test the system with your favorite music.
PLEASE NOTE: Ensure no stray (+) and (-) strands touch each other. Touching strands can cause a short circuit
that could damage the amplifier.
Page 5
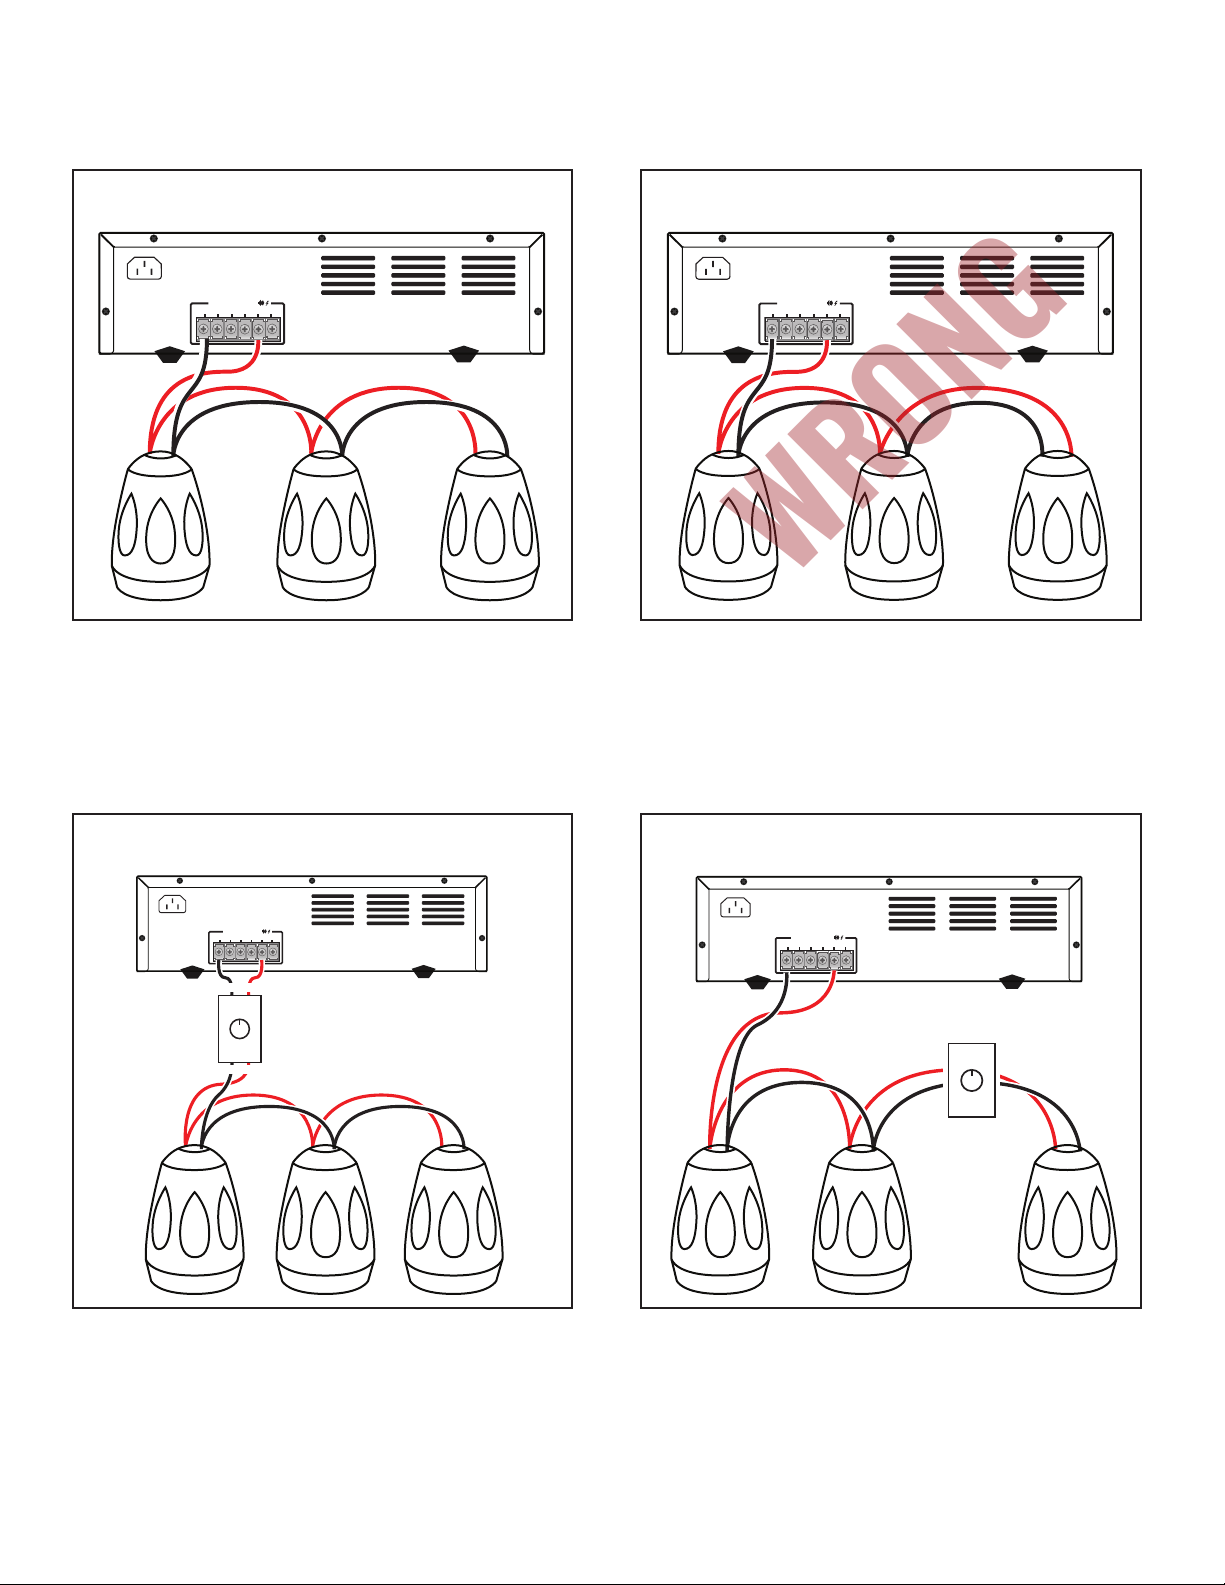
INSTALLATION DIAGRAM
W
R
ONG
Figure 1.
Correct Speaker Wiring
SPEAKER OUTPUT
70V 100V
COM
16Ω
8Ω
4Ω
+
a. b. c.
- - -
+ +
Figure 2.
Incorrect Speaker Wiring
SPEAKER OUTPUT
70V 100V
COM
16Ω
8Ω
4Ω
+
a. b. c.
- - -
+ +
PLEASE NOTE: Be careful not to cross wires when installing your speakers. Wiring should always be negative to
negative and positive to positive (Figure 2. shows speaker c. incorrectly wired).
VOLUME CONTROL INSTALLATION DIAGRAM
Figure 3.
Full Remote Control Attenuation
SPEAKER OUTPUT
70V 100V
COM
16Ω
8Ω
4Ω
ATT IN
SPK OUT
+
a. b. c.
- - -
+ +
Figure 4.
Zone Remote Control Attenuation
SPEAKER OUTPUT
70V 100V
COM
16Ω
8Ω
4Ω
ATT IN SPK OUT
+
a. b. c.
- - -
+ +
Page 6

SERVICE
In the event of a malfunction, ensure the problem is not related to operator error or system devices external to
this unit. Once it is certain that the problem is related to the product, contact your warranty provider as
described in the warranty section of this manual.
LIMITED WARRANTY
PRO ACOUSTICS, LLC. (“PRO ACOUSTICS”) warrants this product to the original purchaser to be free from
defects in materials and workmanship (subject to the terms set forth below), for the following periods from the
date of purchase.
THIS WARRANTY COVERS THE LISTED PRODUCTS AGAINST DEFECTS IN MATERIALS OR
Amplifiers & Electronics
Microphones
Accessories
PRO ACOUSTICS will repair or replace (at PRO ACOUSTICS's option) this product or any defective parts
(excluding electronics and amplifiers) in this product.
Your authorized PRO ACOUSTICS dealer will inspect the product and, if your dealer is not equipped to
perform the repair of your PRO ACOUSTICS product, they will replace your product or return it to PRO
ACOUSTICS for repair, at their discretion. Proof of purchase in the form of a bill of sale or receipted invoice,
which is evidence that this product is within the warranty period, must be presented to obtain warranty
service.
This warranty is invalid if the factory applied serial number has been altered or removed from this product.
This warranty is invalid if this product was not purchased from a PRO ACOUSTICS authorized dealer. Cosmetic damage or damage due to the accident, acts of God, misuse, abuse, negligence, commercial use, or
modification of, or to any part of, the product are not covered in this warranty. This warranty does not cover
damage due to improper operation, maintenance or installation, or attempted repair by anyone other than
PRO ACOUSTICS or a PRO ACOUSTICS dealer which is authorized to do PRO ACOUSTICS warranty work.
Any unauthorized repairs will void this warranty.
WORKMANSHIP FOR THE FOLLOWING PERIOD
Warranty Terms
Speakers
2 Years
1 Year
1 Year
1 Year
This warranty does not cover products sold as is.
REPAIRS OR REPLACEMENTS AS PROVIDED UNDER THIS WARRANTY ARE THE EXCLUSIVE REMEDY OF
THE CONSUMER/PURCHASER. PRO ACOUSTICS U.S.A. SHALL NOT BE LIABLE FOR ANY INCIDENTAL
OR CONSEQUENTIAL DAMAGES FOR BREACH OF ANY EXPRESS OR IMPLIED WARRANTY ON THIS
PRODUCT. EXCEPT TO THE EXTENT PROHIBITED BY LAW, THIS WARRANTY IS EXCLUSIVE AND IN LIEU
OF ALL OTHER EXPRESS AND IMPLIED WARRANTIES WHATSOEVER, INCLUDING BUT NOT LIMITED TO,
THE WARRANTY OF MERCHANTABILITY AND FITNESS FOR A PRACTICAL PURPOSE.
This warranty gives you specific legal rights. You may have other rights which vary from state to state.
PURE RESONANCE AUDIO
(866) 676-7804
Specifications may change without notice.
www.PureResonanceAudio.com
®
 Loading...