

Page 1
PLANET
PR-222R
This product manual contains important information about the safe installation and
use of this projector. Please read and follow these instructions carefully and keep
this manual in a safe place for future reference.
PR LIGHTING LTD.
Yingbin Road, Dashi Panyu, Guangzhou, 511430 China
http://www.pr-lighting.com
Page 2

planet manual.doc
2/14
SECTION PAGE
SAFE USAGE OF THE PROJECTOR 3
INSTALLING THE PROJECTOR 4
FITTING THE LAMP 4
POWER SUPPLY – MAINS 5
OPERATION 5
STAND-ALONE MODE 6
XLR CONNECTORS AND TERMINATOR 6
MASTER/SLAVE SYNCHRO MODE 7
CONTROLLER MODE - DMX OPERATION 8
DMX CONTROL CHANNEL FUNCTIONS 9
MAINTENANCE 10
KEEPING THE PROJECTOR CLEANING 10
TROUBLESHOOTING 10
ELECTRICAL DIAGRAM 11
TECHNICAL DATA 12
Please note that as part of our ongoing commitment to continuous product development, specifications are subject to change
without notice. Whilst every care is taken in the preparation of this manual we reserve the right to change specifications in the
course of product improvement. The publishers cannot be held responsible for the accuracy of the information herein, or any
consequence arising from them.
Every apparatus is tested completely and packed properly by the manufacturer. Please make sure the packing and / or the
apparatus is in good condition before your installation and use. Should there be any damage caused by transportation, consult
your dealer and do not use the apparatus. But any damage caused by improper use will not be assumed by the manufacturer
and / or dealer.
THESE ITEMS ARE PACKED TOGETHER WITH THE PROJECTOR
Mounting Bracket (1 PCS)
M6 Handy Knob for bracket (2 PCS)
Safety cord (1 PCS)
Power-cord (1 PCS)
XLR plug (1 PCS)
XLR socket (1 PCS)
This manual (1 PCS)
Thank you for purchasing our product PLANET PR-222R.
This product manual contains important information about the safe installation and use of this
projector. Please read and follow these instructions carefully and keep this manual in a safe
place for future reference.
The PLANET is an innovative projector with an elegant housing made from high intensity and
heat–resistant complex plastic which has various colors for your selection. The PLANET
complies to CE norms and standards and uses international protocol DMX-512. The PLANET
may be controlled by sound, auto programmes having been set or a controller, and it may be
used as a stand-alone unit, linked with each other for multi-units synchronously running, or
linked to a controller, so it is suitable for many different applications.
The PLANET features 12 colours and 12 gobos, and an independent adjustable strobe/shutter. It
can be setup easily with the touch-switches and a digital display screen.
ACCESSORIES
INDEX
INTRODUCTION
Page 3

planet manual.doc
3/14
The following points are important for safety as well as for the smooth
installation and performance of the unit.
When unpacking and before disposing of the package check there is no transportation damage
before using the projector. Should there be any damage caused by transportation, consult your
dealer and do not use the apparatus. Keep the package well for your possible future
transportation.
The projector is for Indoor use only, IP20. Use only in dry locations. Keep this device away from
rain and moisture, excessive heat, humidity and dust. Do not allow contact with water or any
other fluids, or metallic objects.
The projector is only intended for installation, operation and maintenance by qualified personnel.
The projector must be installed in a location with adequate ventilation, at least 50cm from
adjacent surfaces. Be sure that no ventilation slots are blocked.
Do not project the beam onto inflammable surfaces, minimum distance is 3m. 3m
Avoid direct exposure to the light from the lamp. The light is harmful to the eye.
Do not attempt to dismantle and / or modify the projector in any way.
Electrical connection must only be carried out by qualified personnel.
Before installation, ensure that the voltage and frequency of power supply match the power
requirements of the projector.
It is essential that each projector is correctly earthed and that electrical installation conforms to
all relevant standards.
Do not connect this device to any dimmer pack.
Make sure that the power-cord is never crimped or damaged by sharp edges. Never let the
power-cord come into contact with other cables. Only handle the power-cord by the plug. Never
pull out the plug by tugging the power-cord.
Keep the lamp clean. Do not touch the lamp glass with bare hand.
The lamp used in this projector is an MSD 250W discharge lamp. After being switched off don’t
attempt to restart the projector until lamp has cooled, this will require approx 15 minutes.
Switching the lamp on and off at short intervals will reduce the life of both the lamp and the
projector. Occasional breaks will prolong the life of both the lamp and the projector.
Never run the projector without a lamp.
There are no user serviceable parts inside the projector, do not open the housing and never
operate the projector with the covers removed.
Always disconnect from the mains, when the device is not in use or before cleaning it or
before attempting any maintenance work.
If you have any questions, don’t hesitate to consult your dealer or manufacturer.
SAFE USAGE OF THE PROJECTOR
Page 4
planet manual.doc
4/14
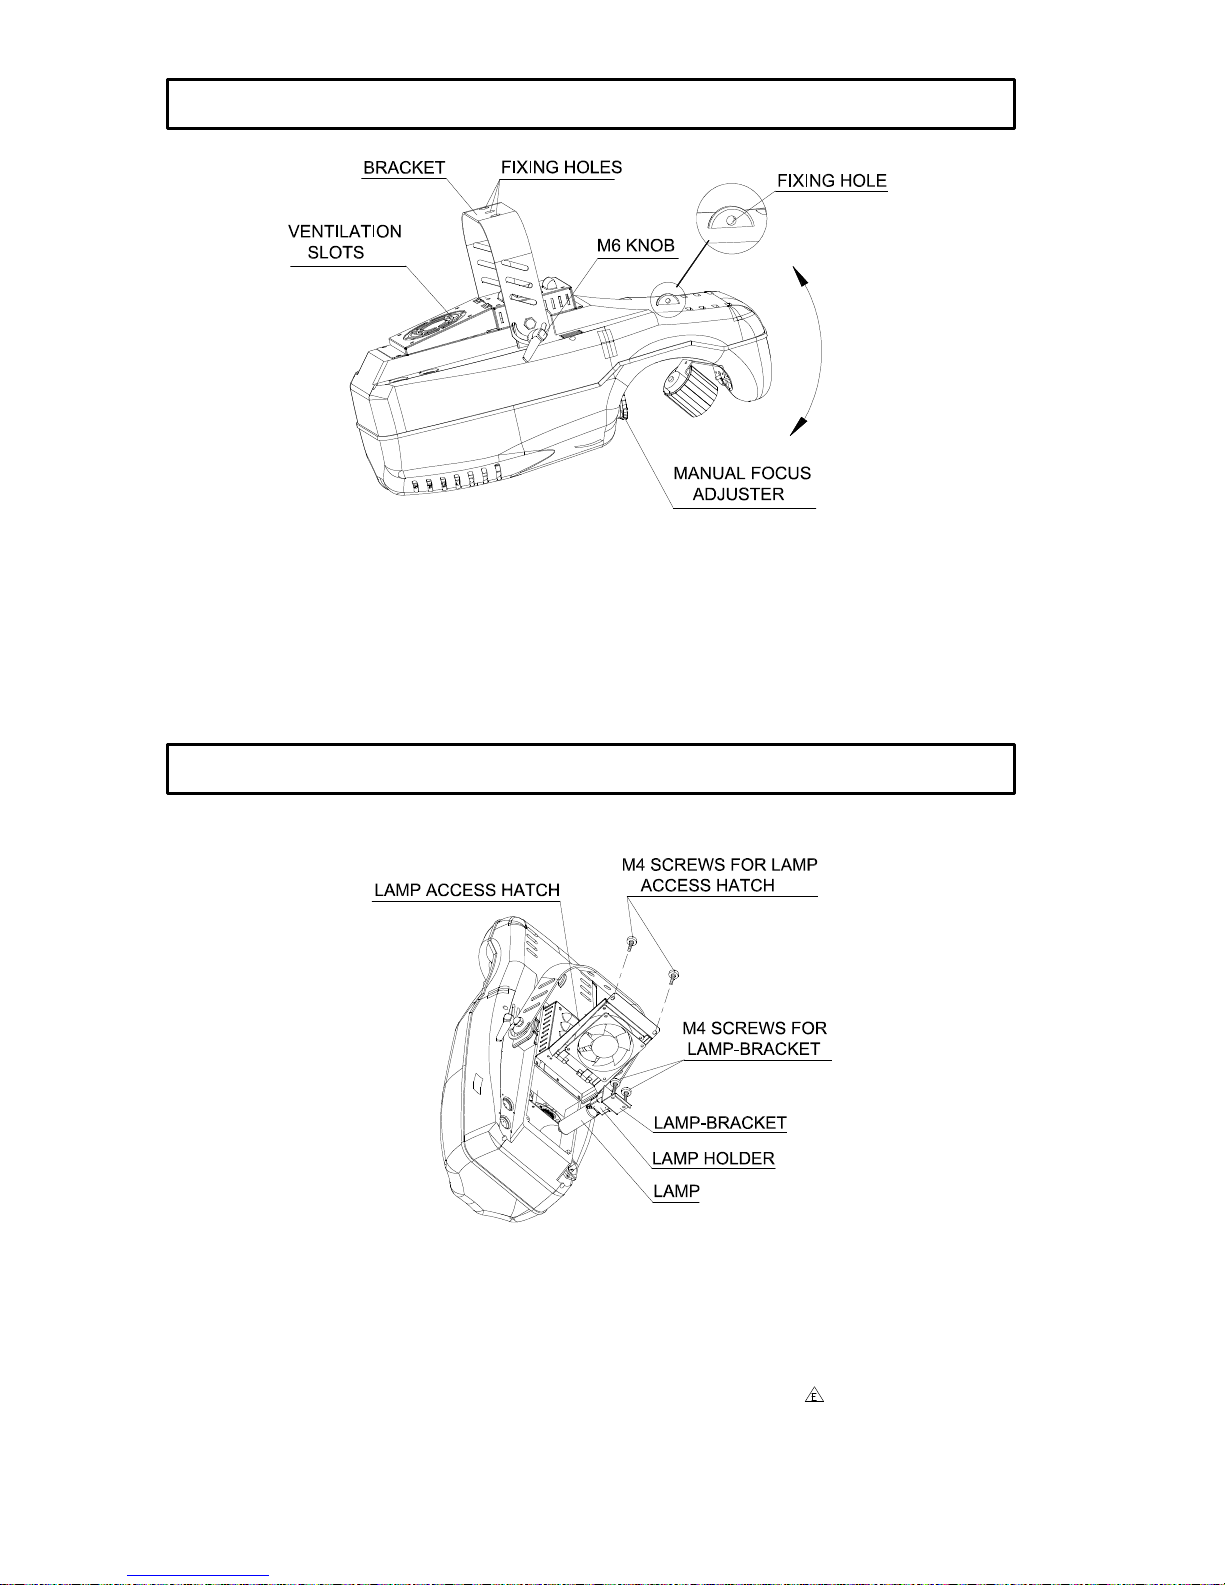
Mount the bracket provided on the body of the projector by 2 M6 knobs provided, then suspend
the projector via its mounting bracket using a M12 size bolt and a nut. When you want to adjust
the angle of the body of the projector, you only loosen the two knobs carefully and then adjust
the angle of the body. After finishing that, it is recommended that you don’t forget to retighten the
two knobs. Always ensure that the projector is firmly positioned to avoid vibration and slipping,
and always ensure that the structure to which you are attaching the projector is secure and is
able to support a weight of 10Kg for each PLANET.
For safety the unit should have a secondary fixing with a safety chain through the fixing hole on
the upper unit, and the safety chain should afford 10 times of the unit’s weight.
Open the lamp access hatch at the bottom of the projector by loosening the 2 M4 screws as
shown above.
Take out the lamp-bracket from the inside of the projector by loosening the 2 M4 screws.
Insert the lamp in the lamp holder.
Install the lamp-bracket on the position slot well and then tighten the 2 M4 handy screws.
Close the lamp access hatch again, and then tighten the 2 M4 handy screws.
NOTE: The MSD series are high pressure lamps with external igniters . Care should always
be taken when handling these lamps. Always read the manufacturers "Instructions for use"
enclosed with the lamp.
INSTALLING THE PROJECTOR
FITTING THE LAMP
Page 5
planet manual.doc
5/14
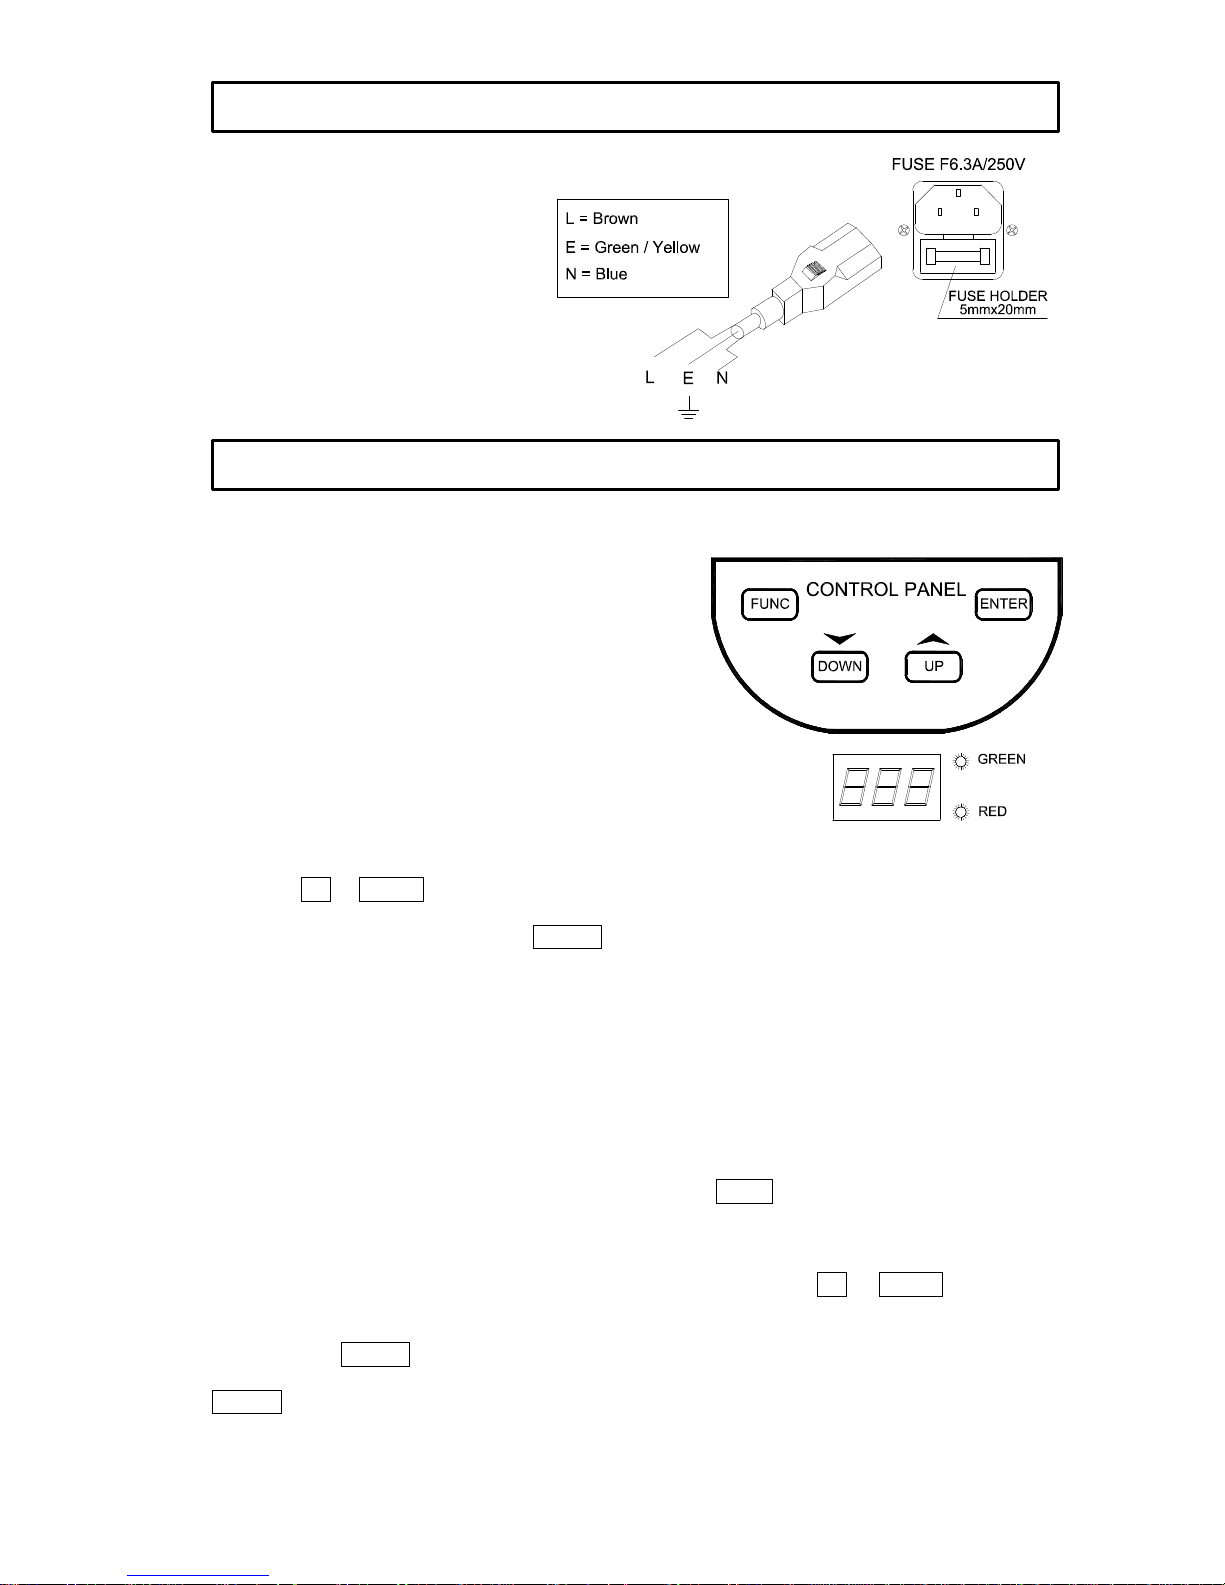
Use the plug provided to connect
the mains power to the projector
paying attention to the voltage and
frequency marked on the panel of
the projector. It is recommended that
each projector is supplied separately
so that they may be individually
switched on and off. It is
recommended that the
green/yellow conductor must
be earthed correctly.
The projector may be controlled by sound, auto
programmes or a controller, and it may be operated in
Stand-Alone automatic mode, in Master/Slave synchro
mode or in Controller mode. With the touch-switches
and the digital display screen, DMX start address can
be easily set and the various setup options may be
configured.
TO SET THE DMX START ADDRESS
The display shows the DMX start address after the
projector is switched on (if you have already set the
DMX start address and saved it, the screen will display
the last setting).
Press the UP or DOWN buttons to select the required DMX start address in the display.
Confirm your choice by pressing the ENTER button, this will save and set the DMX start address.
The display will show the latest setting each time when the projector is powered up.
In Stand-Alone mode, the DMX start address can be set at random.
In the Controller mode and Master/Slave mode, the DMX start address must be set correctly.
(Refer to “Controller mode” and “Master/Slave mode” sections).
SETUP OPTIONS - PROJECTOR CONFIGURATION
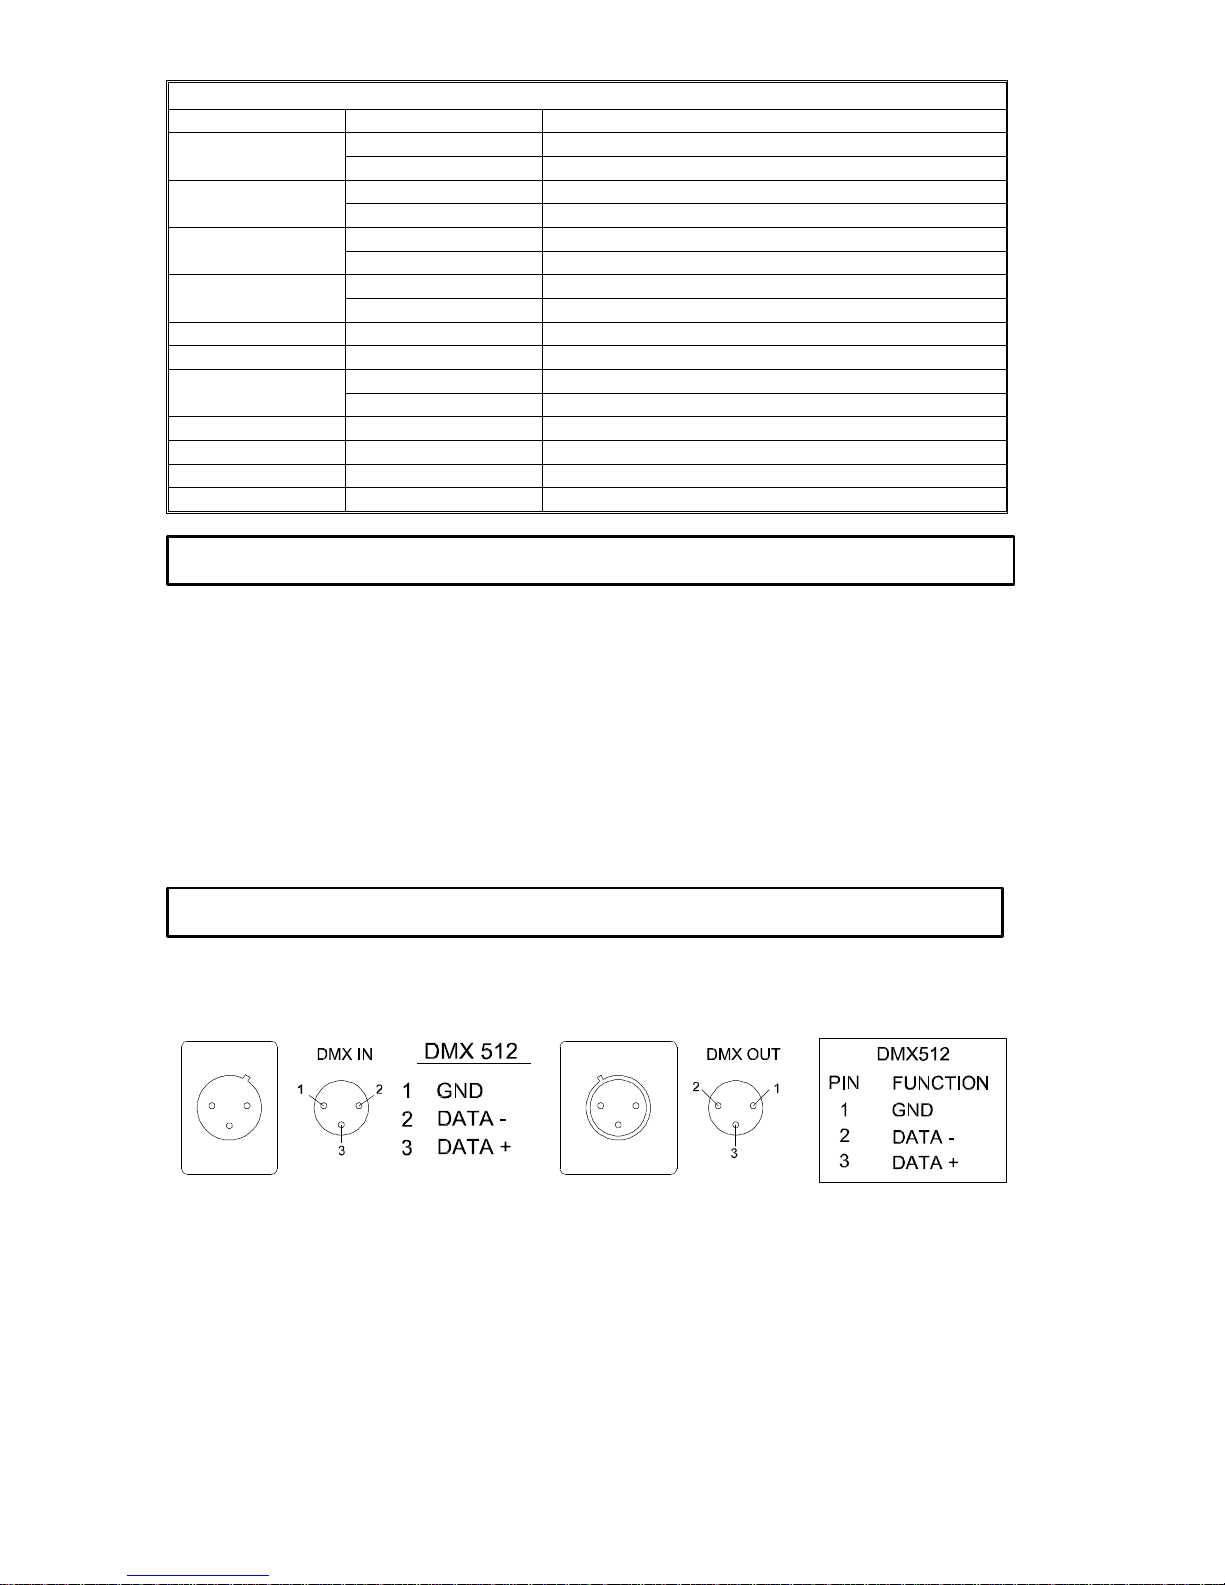
To browse through the various Setup Options, press the FUNC button consecutively. There are
11 option codes (1~9 and A, b), each code has a specific function. The functions provided are
listed in the following table.
Once you have selected the desired operation code, press the key UP or DOWN to select “n”
(means OFF) or “y “ (means ON). N = ON, Y = YES.
Press the key ENTER to save the selected function and configuration. If the display is showing
“y”, then the setting has been enabled. In the same way, if it was showing “n” when you pressed
ENTER the option has been disabled.
The green LED will flash during this operation.
OPERATION
POWER SUPPLY - MAINS
Page 6
planet manual.doc
6/14
SETUP OPTIONAL
CODE CHOICE FUNCTION
Y Pan inversion enable-Pan is inverted
1
N Pan inversion disable-Pan is norma
Y Tilt inversion enable-Tilt is inverted
2
N Tilt inversion disable-Tilt is normal
Y Sound activation enable
3
N Sound activation disable
Y Automatic programmes enable
4
N Automatic programmes disable
5 Reserved for possible future development
6 Reserved for possible future development
Y Reset enable
7
N Reset disable
8 Reserved for possible future development
9 Reserved for possible future development
A Reserved for possible future development
B Reserved for possible future development
Without connecting the controller and the control cable, with the setup option 3 (sound activation)
or 4 (auto process) enable, the projector will run in Stand-Alone mode.
If you enable a combination of setup options 3 (sound activation) and 4 (auto process), the
projector will run in auto programmes.
You may set the DMX start address at random in Stand-alone mode.
When the projector is activatived by sound, the red indicator will flash according to the rhythm of
the music. And when the projector is running in auto programmes, the indicator will be contantly
red.
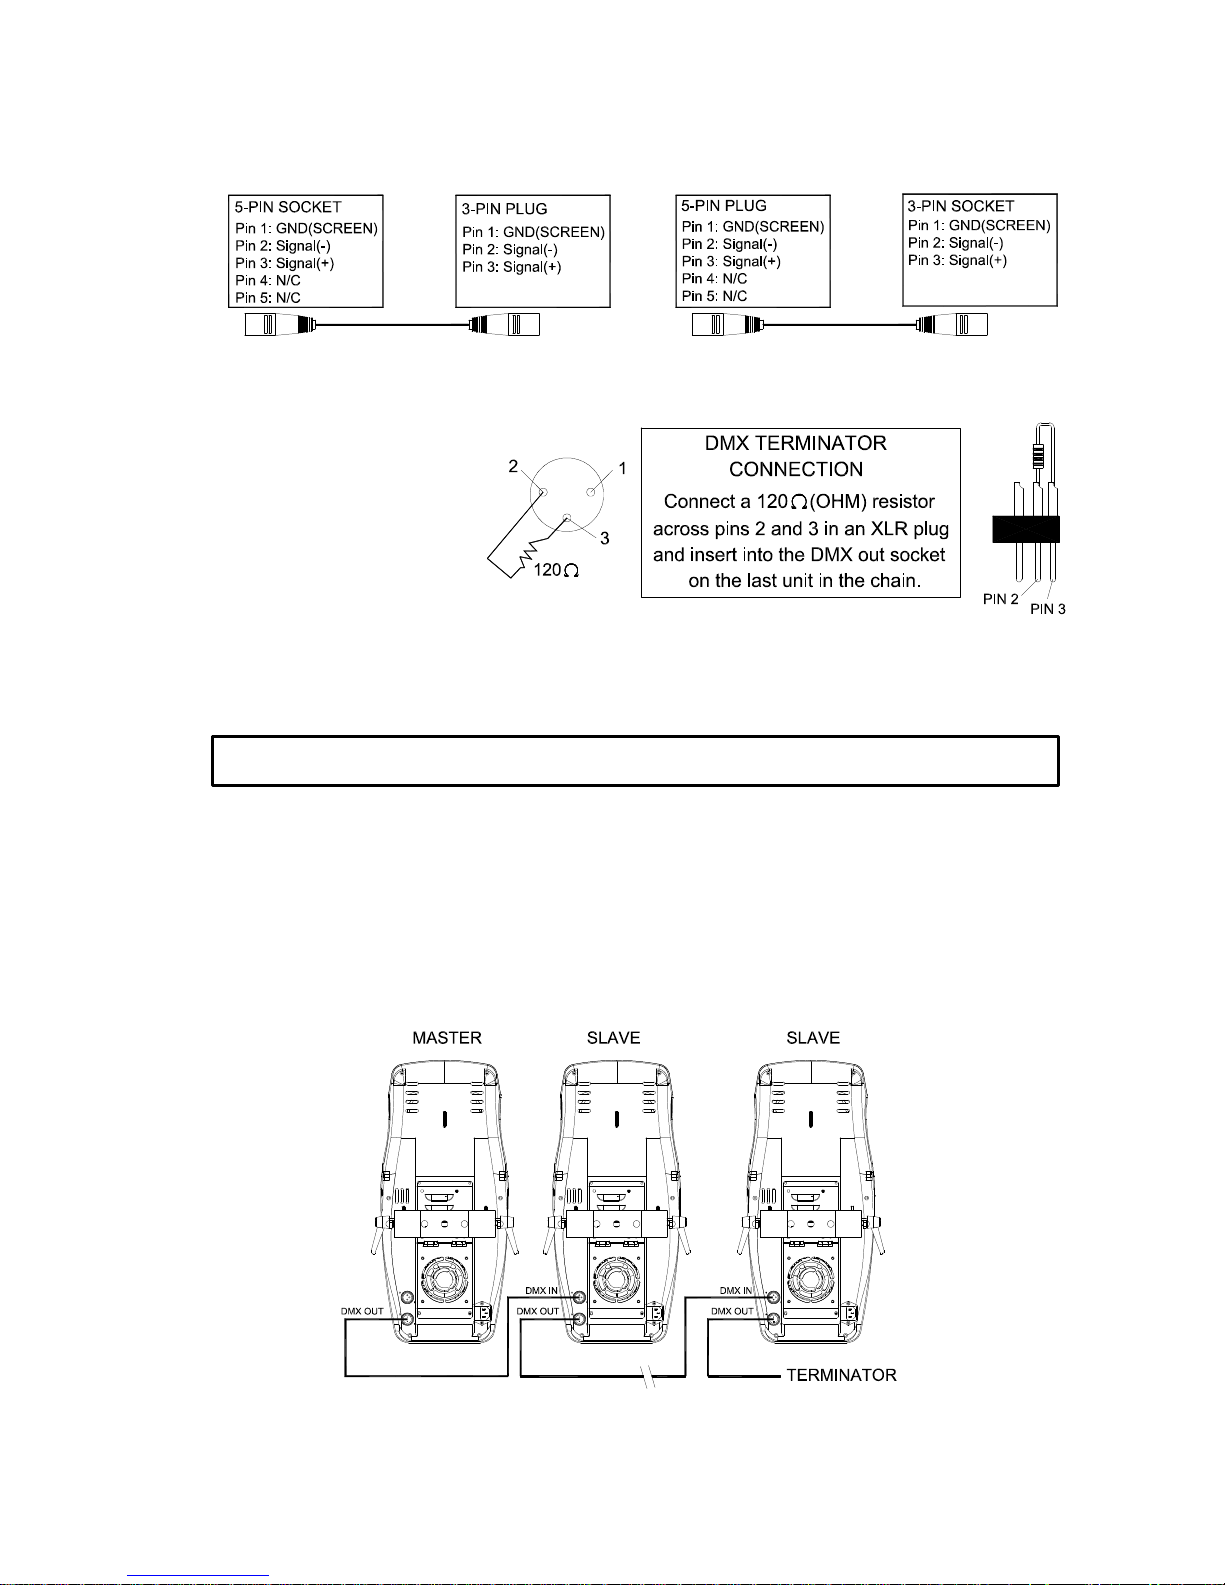
XLR CONNECTORS
Connection between controller and projector and between one projector and another must be
made with 2 core screened cable, with each core having at least a 0.5mm diameter. Connection
to and from the projector is via cannon 3 pin XLR plugs and sockets which are included with the
projector. The XLR's are connected as shown in the table above.
Note, care should be taken to ensure that none of the connections touch the body of the plug or
each other. The body of the plug is not connected in any way. The PLANET accepts digital
control signals in standard DMX512 (1990) format.
STAND-ALONE MODE
XLR CONNECTORS AND TERMINATOR
Page 7
planet manual.doc
7/14
5-PIN AND 3-PIN CONVERSION
PLANET uses 3-pin XLR plug / socket. If your controller uses 5-pin XLR plug / socket, you
should convert 5-pin plug / socket into 3-pin socket / plug as shown below.
DMX TERMINATOR
In the Controller mode or
Master/Slave mode, the
DMX output has to be
connected with a DMX
terminator at the last fixture
in the chain. This prevents
electrical noise from
disturbing and corrupting
the DMX control signals.
The DMX terminator is simply an XLR connector with a 120Ω (ohm) resistor connected
across pins 2 and 3, which is then plugged into the output socket on the last projector in the
chain. The connections are illustrated above.
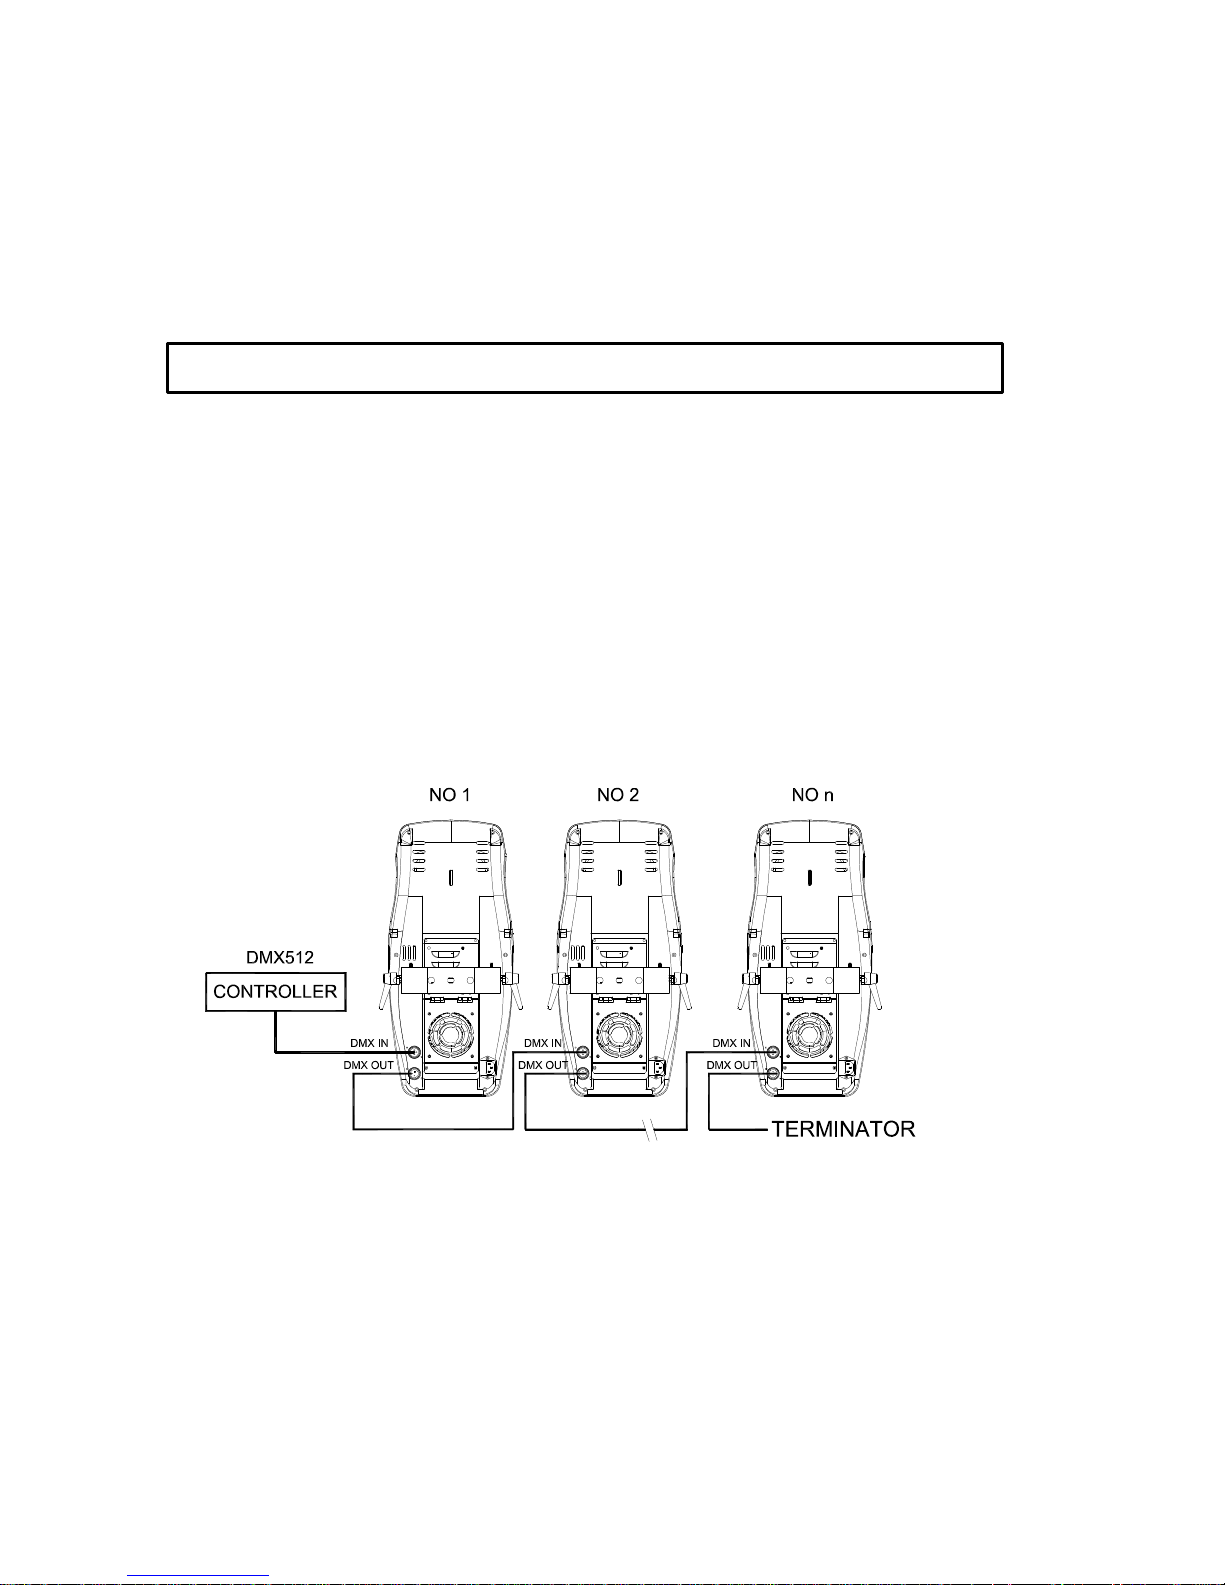
Without using a controller, many projectors can run synchronously in the Master/Slave mode by
linking them with each other.
Select one projector as the master with setting the DMX start address at random. Regard the
other projectors as the slaves setting all DMX start address “001”.
Connect the master’s output to the first slave’s input, and connect the first slave’s output to the
second slave’s input. The rest may be deduced by analogy. Eventually connect the last slave’s
output to a DMX terminator as shown in the figure below.
MASTER / SLAVE MODE
Page 8
planet manual.doc
8/14
In the Master/Slave mode, you may run the master via the auto programmes having been set in
the master or via sound activation through MIC inside the master, and the slaves will run
synchronously with the master.
In the Master/Slave mode, when the master is a combining of setup 3 (sound activation) and 4
(auto programmes), the projectors will run auto programmes.
During operation, you can easily differentiate between the master and the slaves since the
master’s DMX output without connecting any cable. When the master runs in auto programmes,
the master’s red indicator is constantly on but the slaves’ red indicators flash.
Each PLANET must be given a DMX start address so that the correct projector responds to the
correct control signals. This DMX start address is the channel number from which the projector
starts to “listen” to the digital control information being sent out from the controller. The PLANET
has 6 channels, so set the No. 1 projector’s address 001, No. 2 projector’s address 007, No. 3
projector’s address 013, No. 4 projector’s address 019, and so on.
Certainly, you may use formulation: address=channels x (projector No –1) +1
For example, for the No. 4 projector’s start address, you should calculate according to
formulation: 6 x (4 – 1) +1 = 19. So you set the No 4 projector start address 019.
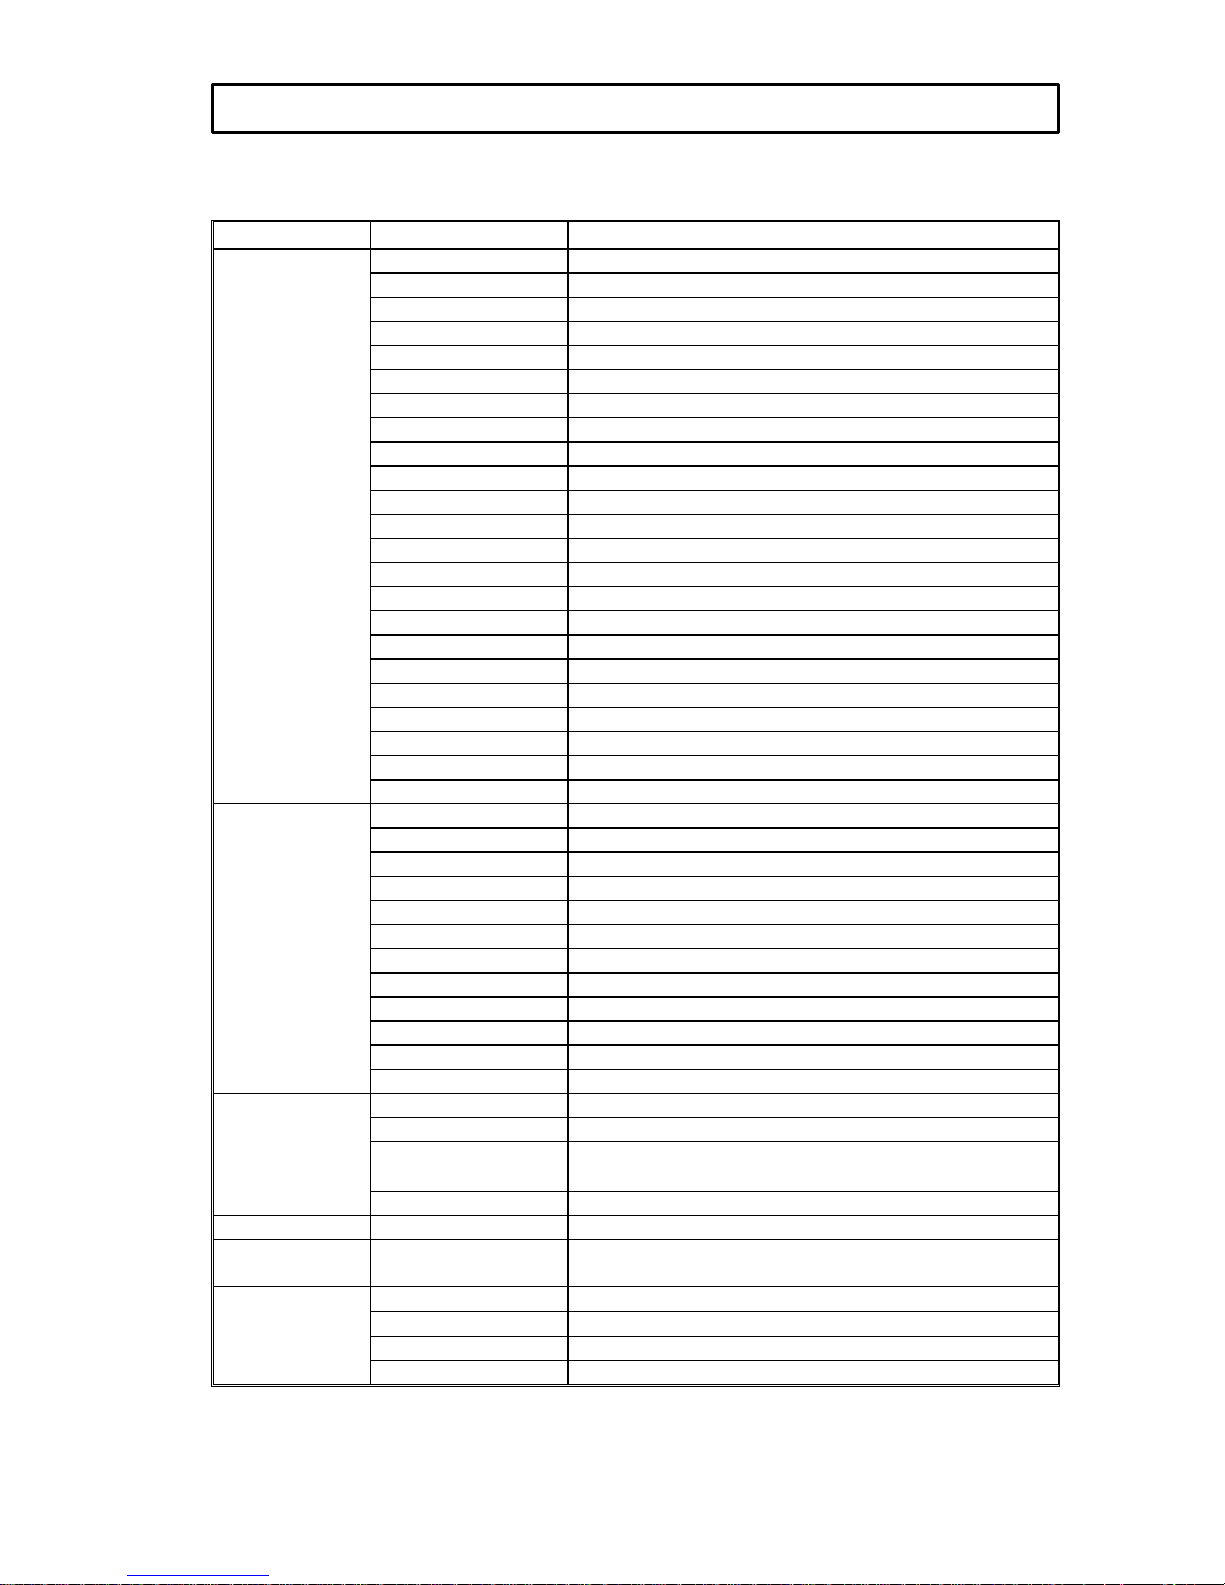
Connect the controller’s output to the first fixture’s input, and connect the first fixture’s output to
the second fixture’s input. The rest may be deduced by analogy. Eventually connect the last
fixture’s output to a DMX terminator as shown in the figure below.
When a DMX 512 signal is received the red indicator will flash. When not receiving a DMX signal
the green and red indicators will be off.
CONTROLLER MODE - DMX 512 OPERATION
Page 9
planet manual.doc
9/14
The PLANET uses 6 channels with standard DMX 512 protocol. They are listed in the following
table.
CHANNEL DMX VALUE DESCRIPTION
0-14 White
15-29 Red
30-44 Yelow
45-59 Orange
60-74 Blue
75-89 Green
90-104 Cyan
105-119 Purple
120-134 Pink
135-149 Light green
150-164 Indigo
165-178 Light blue
179-185 Light blue/ Indigo
186-192 Indigo / Light green
193-199 Light green / Pink
200-206 Pink / Purple
207-213 Purple / Cyan
214-220 Cyan / Green
221-227 Green / Blue
228-234 Blue / Orange
235-241 Orange / Yellow
242-248 Yellow / Red
1
Colour
249-255 Red / White
0-21 Clear (White)
22-43 Gobo 1 (Windmill)
44-65 Gobo 2 (Triangle)
66-87 Gobo 3 (Swirl)
88-109 Gobo 4 (Mult-circle)
110-131 Gobo 5 (Peacock)
132-153 Gobo 6 (Tri-prong)
154-175 Gobo 7 (Eight clows)
176-197 Gobo 8 (Kink)
198-219 Gobo 9 (Twist)
220-241 Gobo 10 (Tri-leaf)
2
Gobo
242-255 Gobo 11 (Pentacle)
0-14 Shutter
15-29 Open
30-250
Strobe adjust from slow to fast (1~ 7 flashes per
second)
3
Strobe
251-255 Open
4 Not used
5
Pan
0-255
Pan movement from 0°to 264°
0-5 (Tilt movement) Stop
6-120 Tilt movement from slow to fast in clockwise
121-140 (Tilt movement) Stop
6
Tilt
141-255 Tilt movement from slow to fast in anti-clockwise
DMX CONTROL CHANNEL FUNCTIONS
Page 10
planet manual.doc
10/14
If the projector’s lens becomes damaged or broken it should be replaced. If the lamp becomes
damaged or deformed in any way it must be replaced. If the light from the lamp appears dim this
would normally indicate that it is reaching the end of its life and it should be changed at once, old
lamps run to the extremity of their life can explode. If the projector does not function, check the
fuse on the power socket of the projector, they should only be replaced by fuse of the same
specified value 6.3A/250V (fast blow, 5mmx20mm). On the main PCB inside the projector there
is also a fuse rated 4A/250V (fast blow, 5mmx20mm). Should these be damaged call a qualified
technician before replacement. The projector has thermal protection device that will switch off
the projector in case of overheating, should thIs operate, check that the fans are not blocked,
and if they are dirty clean them before switching on the projector again. Check that the fans are
operational, if not call a qualified technician.
Any maintenance work should only be carried out by a qualified technician.
To ensure the reliability of the projector it should be kept clean. It is recommended that the fans
should be cleaned every 15 days. The lens and dichroic colour filters should also be regularly
cleaned to maintain an optimum light output. Do NOT use any type of solvent on dichroic colour
filters.
Cleaning frequency depends on the environment in which the fixture operates: damp, smoke or
particularly dirty surroundings can cause greater accumulation of dirt on the unit’s optics. A soft
cloth and typical glass cleaning products should be used in cleaning. It is recommended to clean
the external optics at least once every 20 days and clean the internal optics at least once every
30 / 60 days.
Do not use any organic solvent, e.g. alcohol, to clean the housing of the
projector.
PROBLEM RESOURCE
The projector does not start Check the fuse on the socket is blown or not.
Check if the lamp is good or not.
The projector switches on but does not
answer to commands
Check the projector is correctly configurated.
Check the XLR cable is good.
The projector only functions
intermittently
Check the fan is working and not dirty.
The beam appears dim Check the lamp is not at the end of its life.
Check the optics are clean.
Projection with halo Carefully clean the lamp, the optical group lenses.
Defecting projection Check the lenses are not broken.
Remove dust or grease stored on lenses.
MAINTENANCE
TROUBLESHOOTING
KEEPING THE PROJECTOR CLEAN
Page 11

planet manual.doc
11/14
Power supply: AC230V/50Hz
Optional: AC200V/60Hz
Power consumption: 300W at 220V
Lamp: MSD 250W discharge lamp
Electric strength: 1.5KV
Insulating resistance: >2MΩ
Channels: 6 channels
Signal: Standard DMX 512
Control mode: Sound activation, Auto programmes, Controller
Running mode: Stand-Alone mode, Master/Slave synchro mode, Controller mode
Colours: 11 dichroic colours plus white
Gobos: 11 gobos plus white
Strobe: Adjustable from 1 ~ 7 F.P.S
Beam coverage: 8.5°
Movement: Pan movement 264°/ Tilt movement in both directions
Dimensions: 520mm LENGTH x 240mm WIDE x 210mm HIGH
Net weight: 10kg
Others: Auto thermal cut-off / Manual adjustable focus
TECHNICAL DATA
Page 12
planet manual.doc
12/14
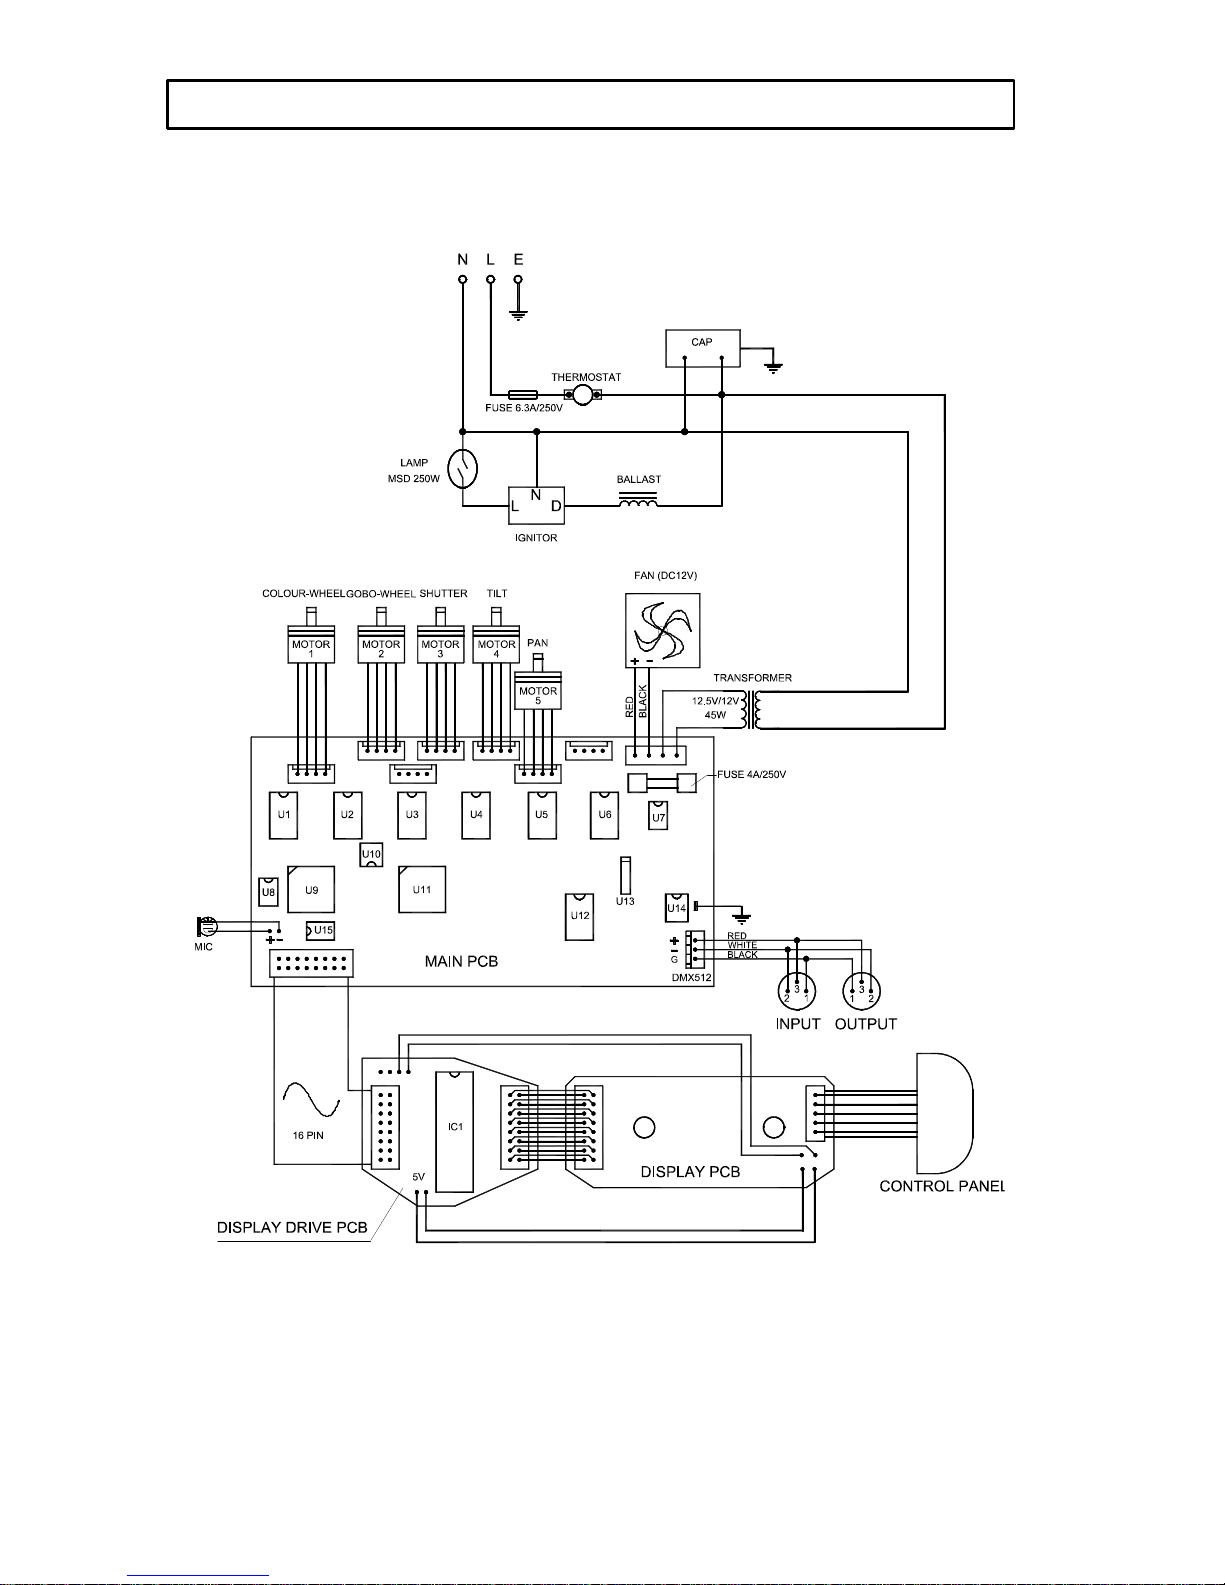
ELECTRICAL DIAGRAM
Page 13

planet manual.doc
13/14
COMPONENT ORDER CODES
NAME PART NO. REMARK
040010006 230V/50Hz TRANSFORMER
040140004 200V/60Hz
040090014 230V/50Hz IGNITOR
040090018 200V/60Hz
040070026 230V/250W/3A BALLAST
040070028 200V/250W/3A
THERMOSTAT 190010035
120℃/15A
FAN 030060008 DC12V
LAMP 100050018 MSD250W
CAP 140010036 32µF/AC 450V
MOTOR 1 (COLOUR-WHEEL) 030040023 17HS0002-38L
MOTOR 2 (GOBO WHEEL)
MOTOR 3 (SHUTTER)
030040056 17HS0002-45L
MOTOR 4 (TILT)
MOTOR 5 (PAN)
030040023 17HS0002-38L
IC1 230040093 DIGITAL-SCREEN CHIP
U1~U6 170110001 DRIVER CHIPS
U7 170170039 STABLE-POWER CHIP
U8 170050002 ARITHMETIC AMPLIFIER
CHIP
U9 230040098 MICROPROCESSOR 1
U10 230040087 WATCH DOG CHIP
U11 230040099 MICROPROCESSOR 2
U12 170040002 TTL REVERSION CHIP
U13 170170034 RESET CHIP
U14 170170012 RECEIVING/TRANSMITTING
CHIP
U15 170040032 EEPROM CHIP
Page 14

planet manual.doc
14/14
PR LIGHTING LTD.
Yingbin Road, Dashi, Panyu, Guangzhou, China
Post-Code: 511430
TEL: 020-8478-1888
FAX: 020-8478-6023
P/N: 321010101
Last Revision: 19:03:2003
 Loading...