

Page 1
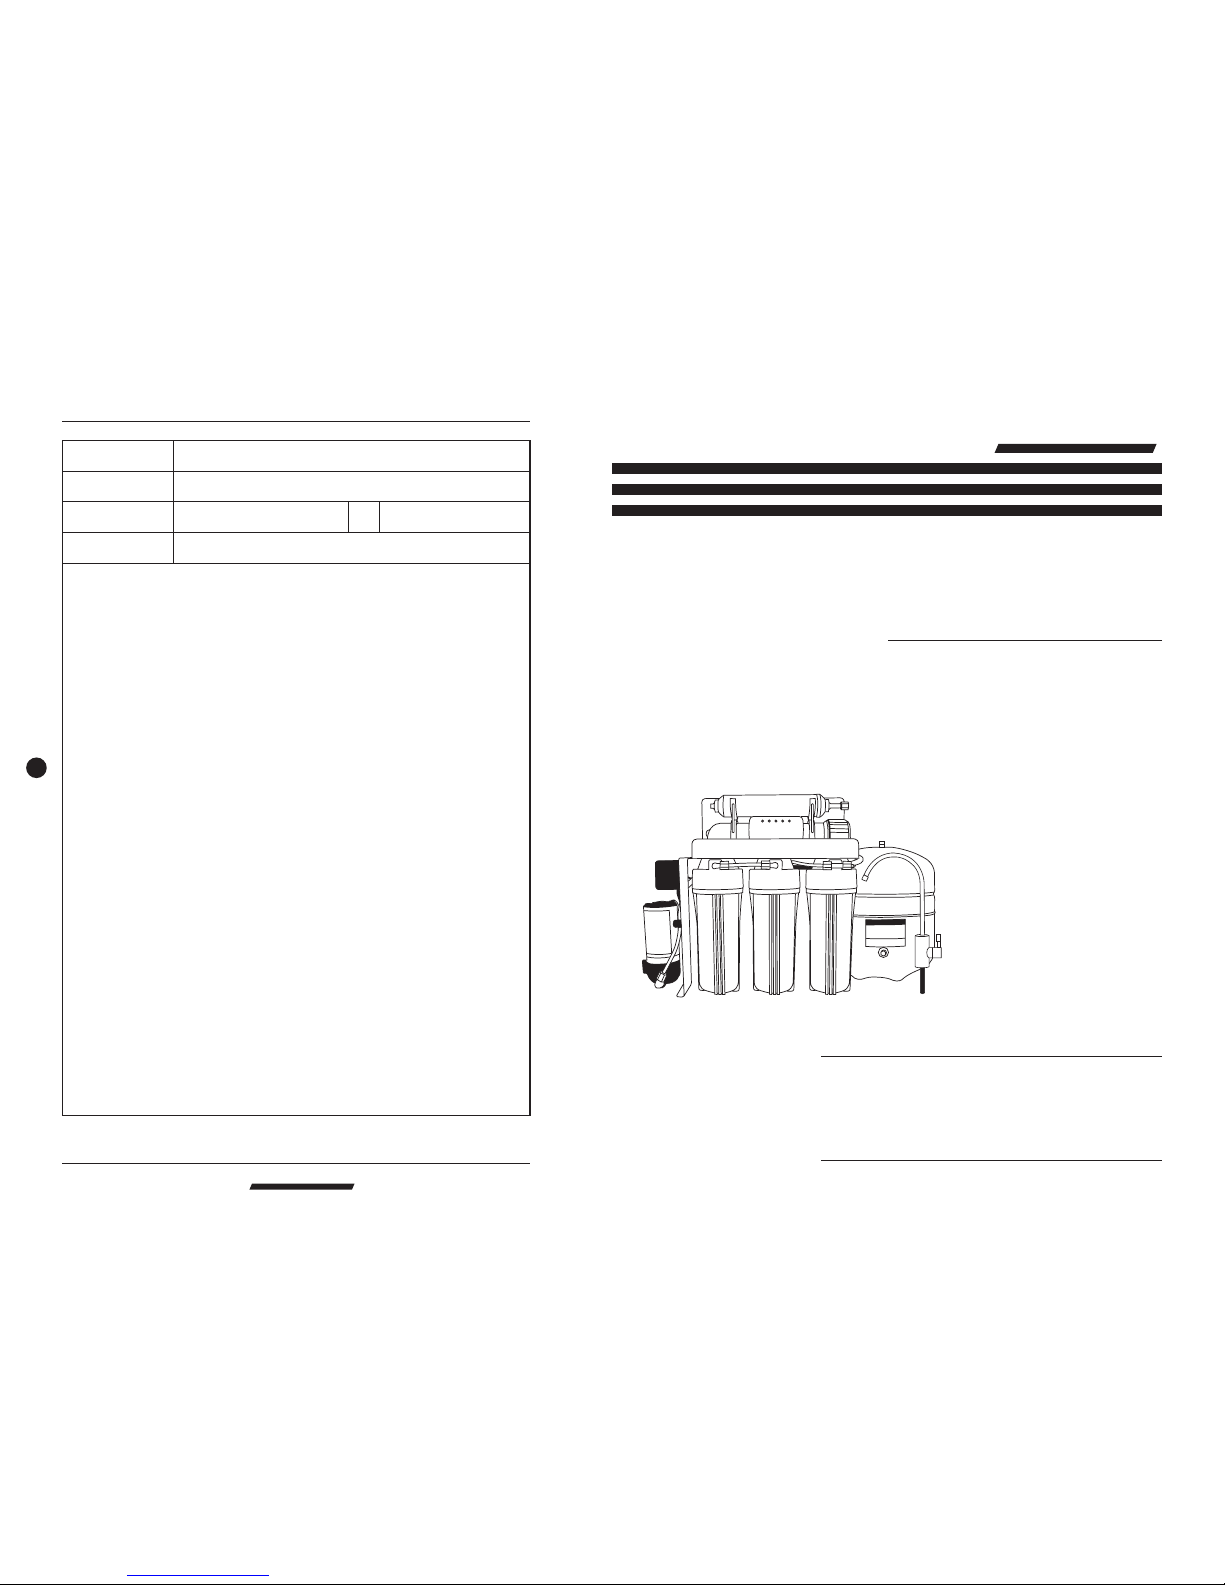
RO103
PRO
P
URE
DRINKING WATER SYSTEM
REVERSE OSMOSIS SYSTEM
15
PURE-PRO
R
EVERSE OSMOSIS SYSTEM
Type of product
Date ofpurchase
Name Tel
Address
MicroComputerController
POWER
SOURCEPROCESSFLUSH
FULL
RO103 Auto Flushing Membrane System
PRO
P
URE
DRINKING WATER SYSTEM
USER'S MANUAL
01 Introduction ofRO103
02 What isreverse osmosis
03 Components &
04 Cartridge filters
05 The parts of RO103
06 LCD display
07 Tubing connection diagram
09 Change filters
10 C embrane
11 Operation regulation
13 FAQ
14 Maintenance checkinglist
15 Memo
Selected filters
08 Installation diagram
hange m
Thank youvery much forselecting PurePro Water Corp.
In order to bring the best use of your system, please read
the user's manual carefully before installation and follow
the regulations.
Memo
Page 2
01
PURE-PRO
R
EVERSE OSMOSIS SYSTEM
14
PURE-PRO
R
EVERSE OSMOSIS SYSTEM
RO103 Auto Flushing Membrane System
PRO
P
URE
DRINKING WATER SYSTEM
RO103 Auto Flushing Membrane System
PRO
P
URE
DRINKING WATER SYSTEM
Introduction of RO103
¨¨RO103
Smart Control Box to auto flush the membrane, build-in TDS meter to know the
water qualityand membrane's effectiveness fromits LCD.
The build-in TDS meter is able to know the water quality. It tells when should
replace the cartridge filters as well as if the membrane need to be replaced from
LCD display.
The membrane always remains clean by build-in auto flushing and self-cleaning
procedure. Water neverstands still fora long timeto avoid bacteriagrowing.
Easy to control the RO system and let you understand more about it. Smart to
warn youif the operationis affected by any reason.
Smart microprocessorcontrol system
Auto flushingmembrane to getthe best waterquality
5 Indicators& LCD display
Specifications
Production: 80GPD / 302LPD
Operation pressure:5 -80 PSI
NSF standardswater storage tank
FDA approved polypropylenemade flat caphousing (double O'ring)
Safety approval:TUV (EN60950) & CE MARK
NSF postcarbon filter
Automatic shut-off valve
Special technicaldesigns (Patented No.068018.flush membrane )
Flow restrictor, stainless steel check valve
Long reachattractive faucet
Feed waterconnector & deliver valve
Drain saddlevalve
Four colorcoded 1/4 inchtubing for system connection
Completely assembled& Water leaking testing
Dimensions: (cm)47 (L) x42(H) x 20 (W) - system
(cm) 28(L) x 28(H)x 35 (W)- tank
Weight: 14 kg - system
4kg-tank
Maintenance checking list
Date
Filters
1st stage 2nd stage 3rd stage
4th stage 5th stage
Other items
Page 3
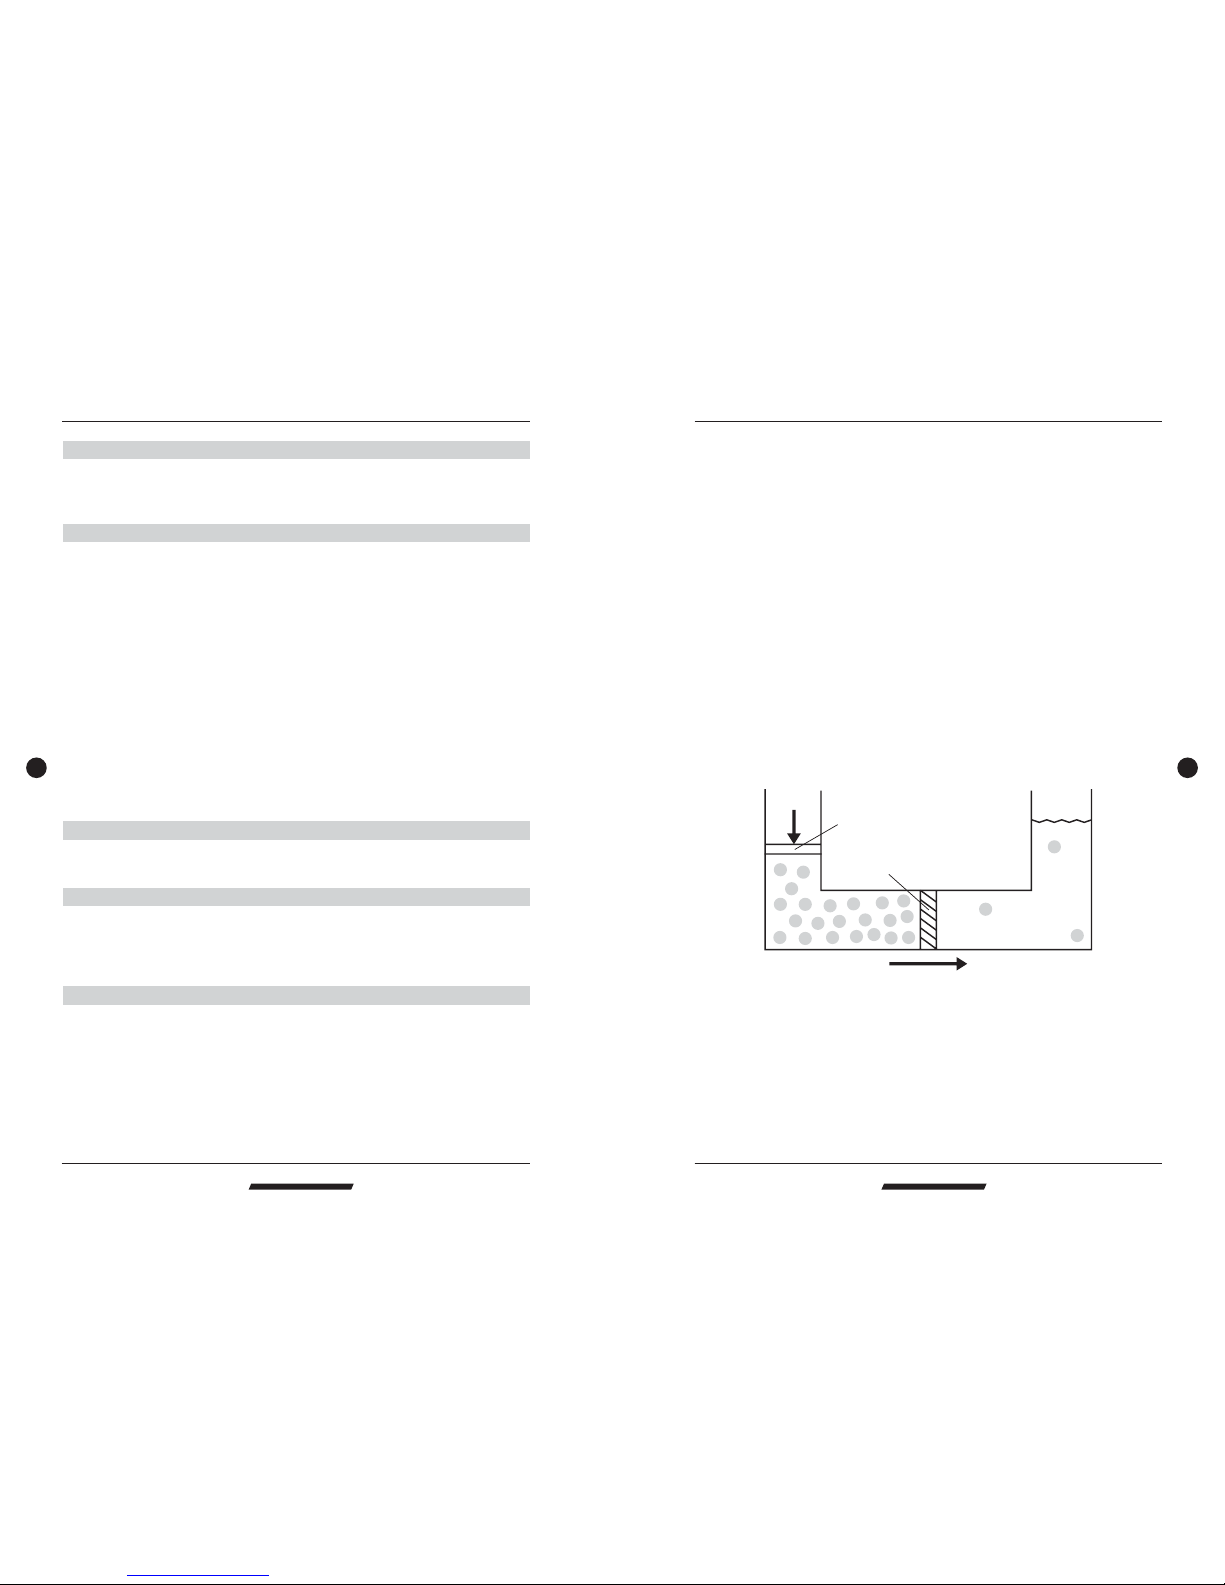
Reverse osmosis was originally designed to make sea water drinkable for the
navy. It is ideal for anyone on a low sodium diet. An R.O. membrane has a pore
size much smaller than bacteria virus, or the cryptosporidium parasite. When
functioning properlyit will removeall microorganisms fromtap water andproduce
sterile water. Reverse osmosis is the reversal of the natural flow of osmosis. In a
water purification system, the goal is not to dilute the salt solution, but to
separate the pure water from the salt and other contaminants. When the natural
osmotic flowis reversed, waterfrom the saltsolution is forcedto pass throughthe
membrane in the opposite direction by application of pressure-thus the term
REVERSE OSMOSIS. Through this process, we are able to produce pure water
by screeningout the saltsand other contaminants.
13
PURE-PRO
R
EVERSE OSMOSIS SYSTEM
02
PURE-PRO
R
EVERSE OSMOSIS SYSTEM
RO103 Auto Flushing Membrane System
PRO
P
URE
DRINKING WATER SYSTEM
RO103 Auto Flushing Membrane System
PRO
P
URE
DRINKING WATER SYSTEM
What is reverse osmosis
Reverse Osmosis
Pressure
Membrane
Water flow
Q: What isthe guarantee on the PurePro system ?
Q: What factorsaffect the quantity and the quality of the water production?
Pressure
Temperature
Total Dissolved Solids (TDS)
Membrane
Q: Can thePurePro system be connected to an extra faucet?
Q: What doesthe PurePro series drinking water taste like?
Q: How willthe PurePro series water affect mixed beverages?
The PurePro System (excluding filters) is guaranteed for 1 years for material
and workmanship. All defective parts will be replaced free within the first year
under natural breakdown.The membrane has one year pro-rated guarantee.
There are fourmajor variables to consider:
1. -The greater the water pressure, the better water quantity and
quality it produced.Water pressure of 60 PSI is ideal.
2. -76 F is the ideal water temperature for R.O. 40 F water will
cause the production of R.O. water to fall to half of that at 76 F. The maximum
water temperature recommendedis 85 F.
3. -The higher the amount of dissolved
contaminants in the water, the lower the quantity of water produced. A high
level of TOTAL DISSOLVED SOLIDS can be overcome with additional water
pressure.
4. -Different membranes have different characteristics. Some
produce more water than others; some have better contaminant rejection
capabilities; some have greater resistance to chemical abrasion for longer life.
PurePro system includes RE1812-70 The Thin Film Composite (TFC)
membranes combine the best of these characteristics and are considered the
finest membrane inthe world.
It only takes a 1/4" tee and tubing to run the water to a refrigerator or a extra
faucet. Some familiesrun PurePro system to all of their bathrooms.
The taste of the PurePro water depends on the amount of contaminants in the
tap water originally. If 95% of dissolved minerals and chemicals are removed,
the R.O. water may taste like distilled water (no minerals), bottled water (low
mineral), or naturalspring water (moderate mineral content).
Because reverse osmosis removes invisible contaminants that mask flavor, it
allows the natural taste of your beverages to come through. You will be able to
use less coffee and still get the full flavor. Concentrated beverages like orange
juice will taste tangier. You will probably be drinking a lot more water as well,
since many people drink soda, Kool-Aid, concentrated juices, and beer as an
alternative to bad-tasting tap water. Also, PurePro eliminates most of the lime
build up on drip coffee makers, preventing the need for frequent cleaning. No
longer will youfind the white scum on the inside of pans after boiling water.
0 0
0
0
FAQ
Page 4
03
PURE-PRO
R
EVERSE OSMOSIS SYSTEM
12
PURE-PRO
R
EVERSE OSMOSIS SYSTEM
T.D.S
UVC-LIGHTING
ULTRAVIOLETWATERSTERILIZER
PRO
P
URE
DRINKING WATER SYSTEM
Infra-Red Filter
PRO
P
URE
DRINKING WATER SYSTEM
Mineral Filter
RO103 Auto Flushing Membrane System
PRO
P
URE
DRINKING WATER SYSTEM
RO103 Auto Flushing Membrane System
PRO
P
URE
DRINKING WATER SYSTEM
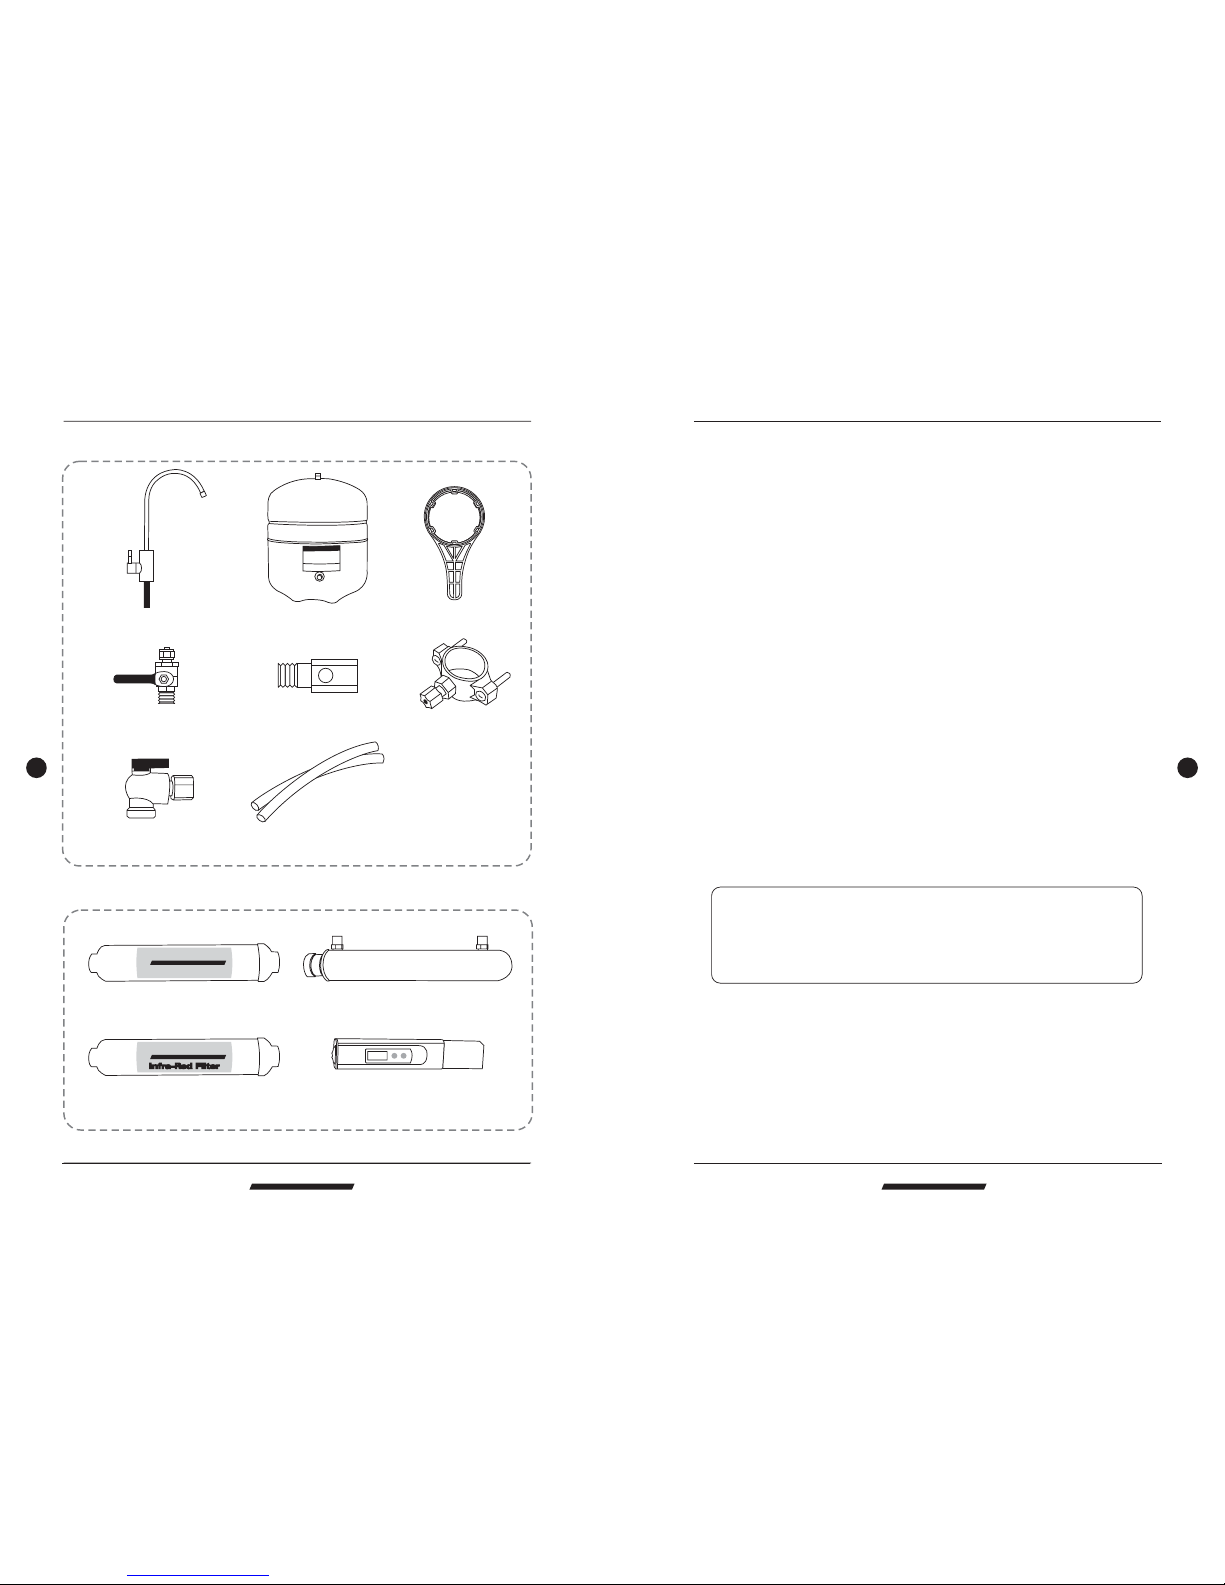
Components & Selected filters
European ceramicfaucet
3.2G waterstorage tank
Housing wrench
Deliver-valve
Water supply connector
Drain saddle
Tankball shut-off valve Four colorcoded 1/4 inch
tubing forsystem connection
¨Selected filters
¨Components
Mineral cartridgefilter
UV watersterilizer
Infra-red cartridgefilter
TDS meter
A.With everythingconnected, turn onthe water checkfor leaks.
B.Make sure the storage tank shut-off valve is "OFF". Open the sink
top faucet.
C.Within a few minutes (up to 15) the water will start to run from the
faucet slowly.
D.Let the water run for at least 30 minutes. This flushes the carbon
filters onfirst time use.
E.After initial flushing, open the shut-off valve on the tank and close
the sinktop faucet.
F.Tank will now full of water (usually 2 to 3 hours) after the tank has
filled. Open the sink top faucet and drain all water until the storage
tank is empty and there is only a small flow from the sink top
faucet.*** DONOT USE FIRST TANK OF WATER.***
G.Close thesink top faucet. The system is now ready for use.
H.Change filters regularly every 6 to 12 months and have the
membrane checkedannually.
Caution
1.Do notuse hot water(over 45 C)!
2.Do notfreeze the machine!
3.Switch off electricity and water source if away for more than 5 days,
and drainout pure water.
0
Operation regulation
Page 5
11
PURE-PRO
R
EVERSE OSMOSIS SYSTEM
04
PURE-PRO
R
EVERSE OSMOSIS SYSTEM
Shelf life
6 Months
4 Years
1 Year
PRO
P
URE
DRINKINGWATER SYSTEM
PRO
P
URE
DRINKINGWATER SYSTEM
PRO
P
URE
DRINKINGWATER SYSTEM
PRO
P
URE
DRINKINGWATER SYSTEM
PRO
P
URE
DRINKING WATER SYSTEM
RO103 Auto Flushing Membrane System
PRO
P
URE
DRINKING WATER SYSTEM
Micro
FUL
Micro Computer Controller
POWER
SOURCEPROCESSFLUSH
FULL
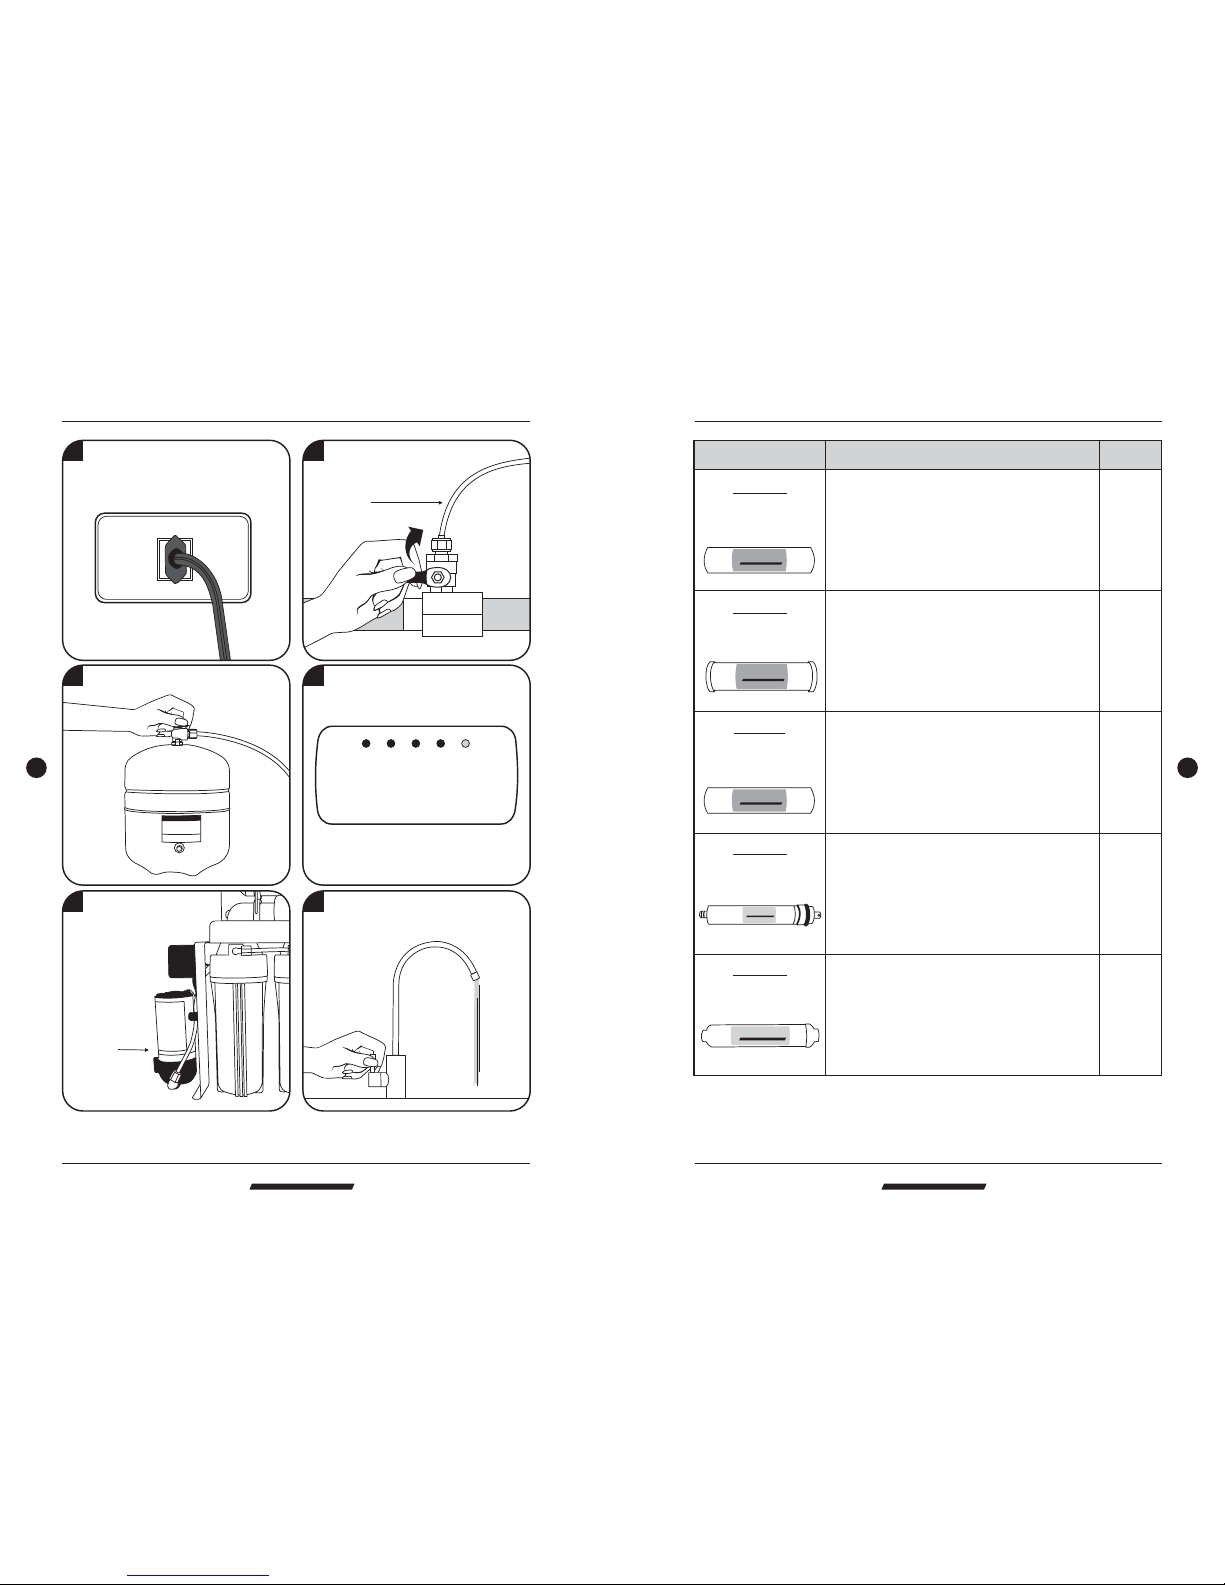
5 Pump starts tofunction.
1 Plug in electricity.
2 Turnon water source.
3 Switch on watertank.
RO103 Auto Flushing Membrane System
PRO
P
URE
DRINKING WATER SYSTEM
6 Let the waterrun for atleast 30
minutes. This flushes the carbon
filters onfirst time use.
Cartridge Filters
Stage 1
Stage3
Stage 2
Block CarbonFilter
Stage 4
TFC Membrane
Stage 5
Post CarbonFilter
Cartridge Filters
Filter Description
6 Months
6 Months
This 5micron sediment filter is made of 100%
pure polypropylene fibers. High capacity filter
removes dusts,particles and rusts.
This block carbon filter is composed of highperformance carbon that removes free chlorine,
odor, organic contaminants, pesticides and
chemicals thatcontributed to tasteand odor.
This 1micron sediment filter is made of 100%
pure polypropylene fibers. High capacity filter
removes dusts,particles and rusts.
Made in USA. High rejection TFC type membrane
with the capacity of producing 80 gallons per day.
This membrane removes the following hard water
contaminants that may be present in your water:
lead, cooper, barium,chromium, mercury, sodium,
cadmium, fluoride,nitrite, nitrate, andselenium.
NSF approved.This post carbon filter is designed
to improve taste. It removes any residual
impurities and odors fromthe tank and provides a
finer conditioningof pure water.
5 Micron
Sediment Filter
1 Micron
Sediment Filter
Operation regulation
ToRO system
Pump
4 Micro computer controllersignals
are on.
Page 6
05
PURE-PRO
R
EVERSE OSMOSIS SYSTEM
10
PURE-PRO
R
EVERSE OSMOSIS SYSTEM
MicroComputerController
POWER
SOURCEPROCESSFLUSH
FULL
RO membrane
IN
OUT
IN
RO103 Auto Flushing Membrane System
PRO
P
URE
DRINKING WATER SYSTEM
RO103 Auto Flushing Membrane System
PRO
P
URE
DRINKING WATER SYSTEM
PRO
NG
WATER
SYSTEM
Joco
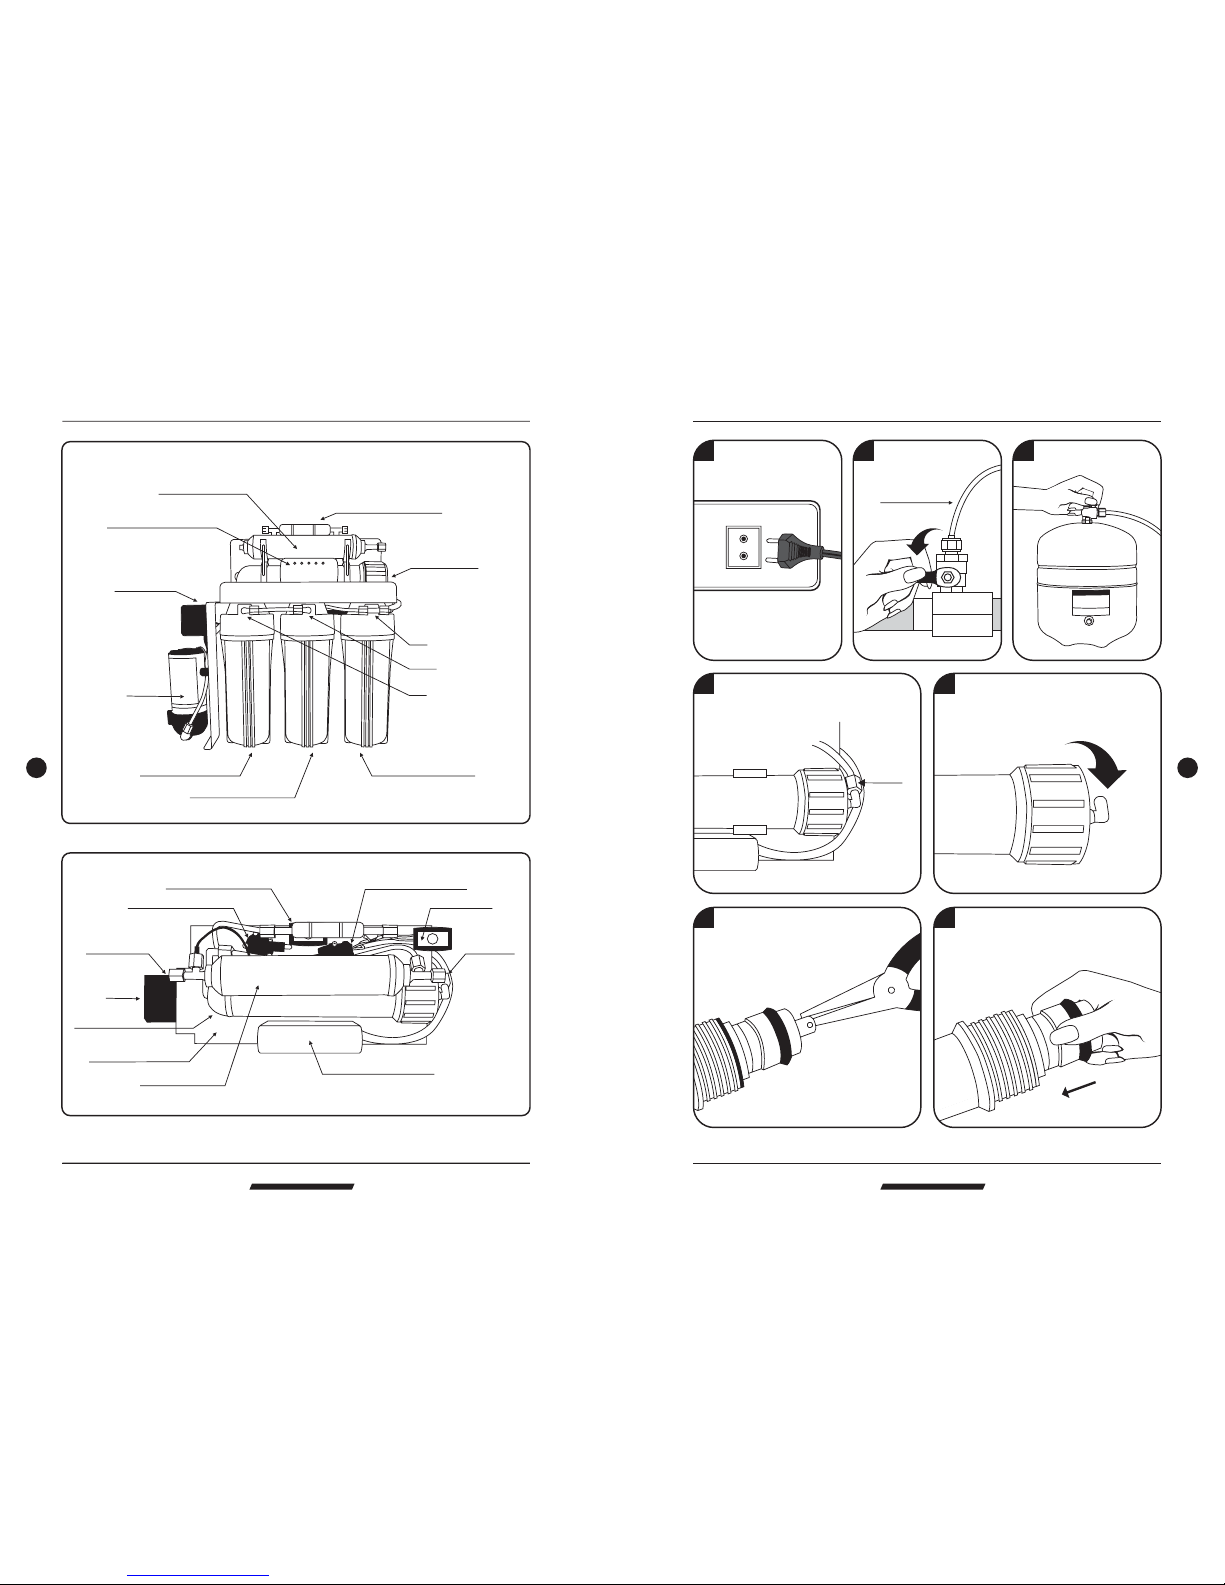
4 Loose the Joco fitting anticlockwise.
5 Remove the membranehousing
cap anticlockwise.
6 Remove the membrane by a pincer.
7 Install the membraneby carefully
pushing thespigot end intothe
socket atthe far endof the housing
until completelyin.
ToRO system
1 Unplug electricity.
2 Turn off water source. 3 Switch offwater tank.
Post carbonfilter
Flow restrictor300ml
The 1st stage housing
The 2nd stage housing
The 3rd stage housing
Pump
Transformer
Low pressure protector
Flushing solenoid valve High pressure protector
Solenoid valve
To thetank
Micro computer controller
Micro computer controller
Post carbonfilter
Housing bracket white
RO membrane
Pump
To thefaucet
Each part of main body
Change membrane
Page 7
ToRO system
Micro ComputerController
POWER
SOURCEPROCESSFLUSH
FULL
06
PURE-PRO
R
EVERSE OSMOSIS SYSTEM
09
PURE-PRO
R
EVERSE OSMOSIS SYSTEM
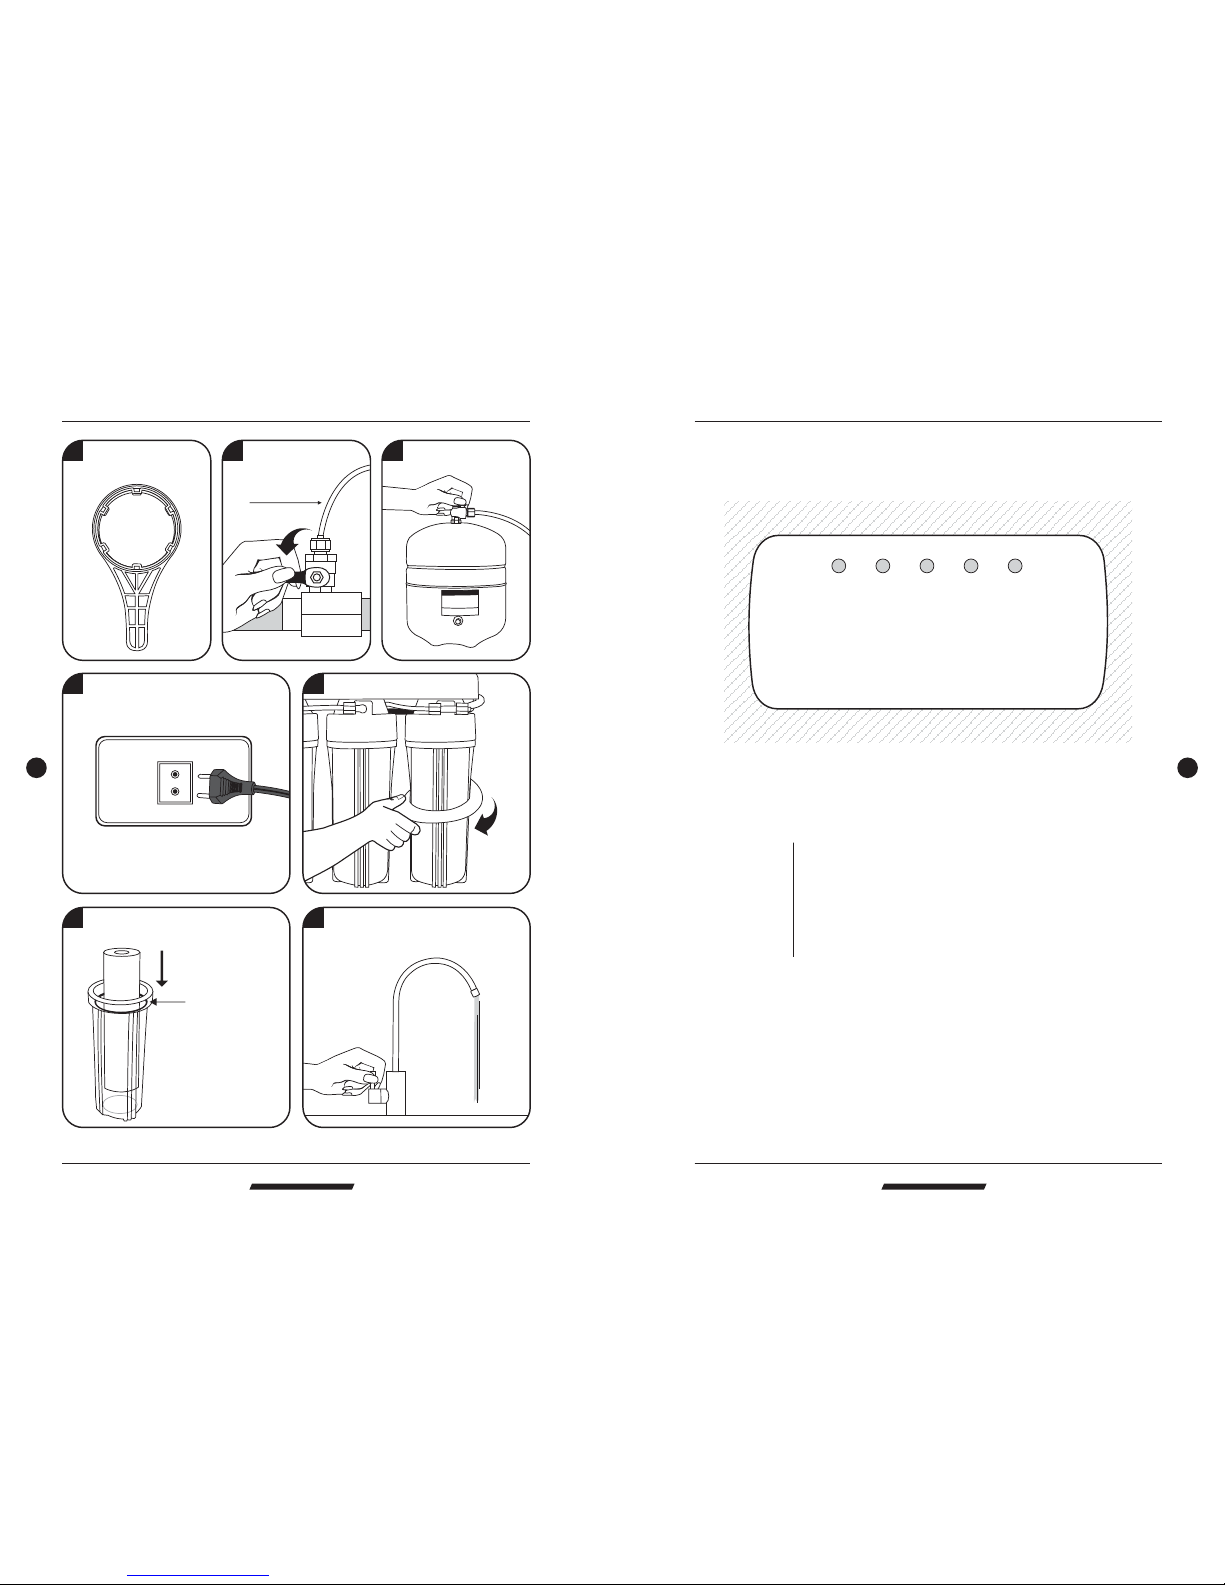
1 Prepare a housing
wrench.
2 Turnoff water
source.
4 Unplug electricity.
6 Put the replacementfilters in the
housings anddouble O' ring.
7 Drain out 1Gallon of waterto
purify replacementfilters.
RO103 Auto Flushing Membrane System
PRO
P
URE
DRINKING WATER SYSTEM
RO103 Auto Flushing Membrane System
PRO
P
URE
DRINKING WATER SYSTEM
3 Switch offwater tank.
LCD display
¨Function express
POWER
SOURCE
PROCESS
FLUSH
FULL
Bulb islightening as connectingpower.
The systemstarts to function20 seconds afterplugging in.
The systembegins to producewater.
Flushing ROmembrane for 45seconds.
Pump stopswhen tank isfull of purewater.
Change filters
Be suretighten with
O-ring toprevent
from leaking.
5 Open housings clockwise with a wrench.
Page 8
PURE-PRO
R
EVERSE OSMOSIS SYSTEM
07 08
PURE-PRO
R
EVERSE OSMOSIS SYSTEM
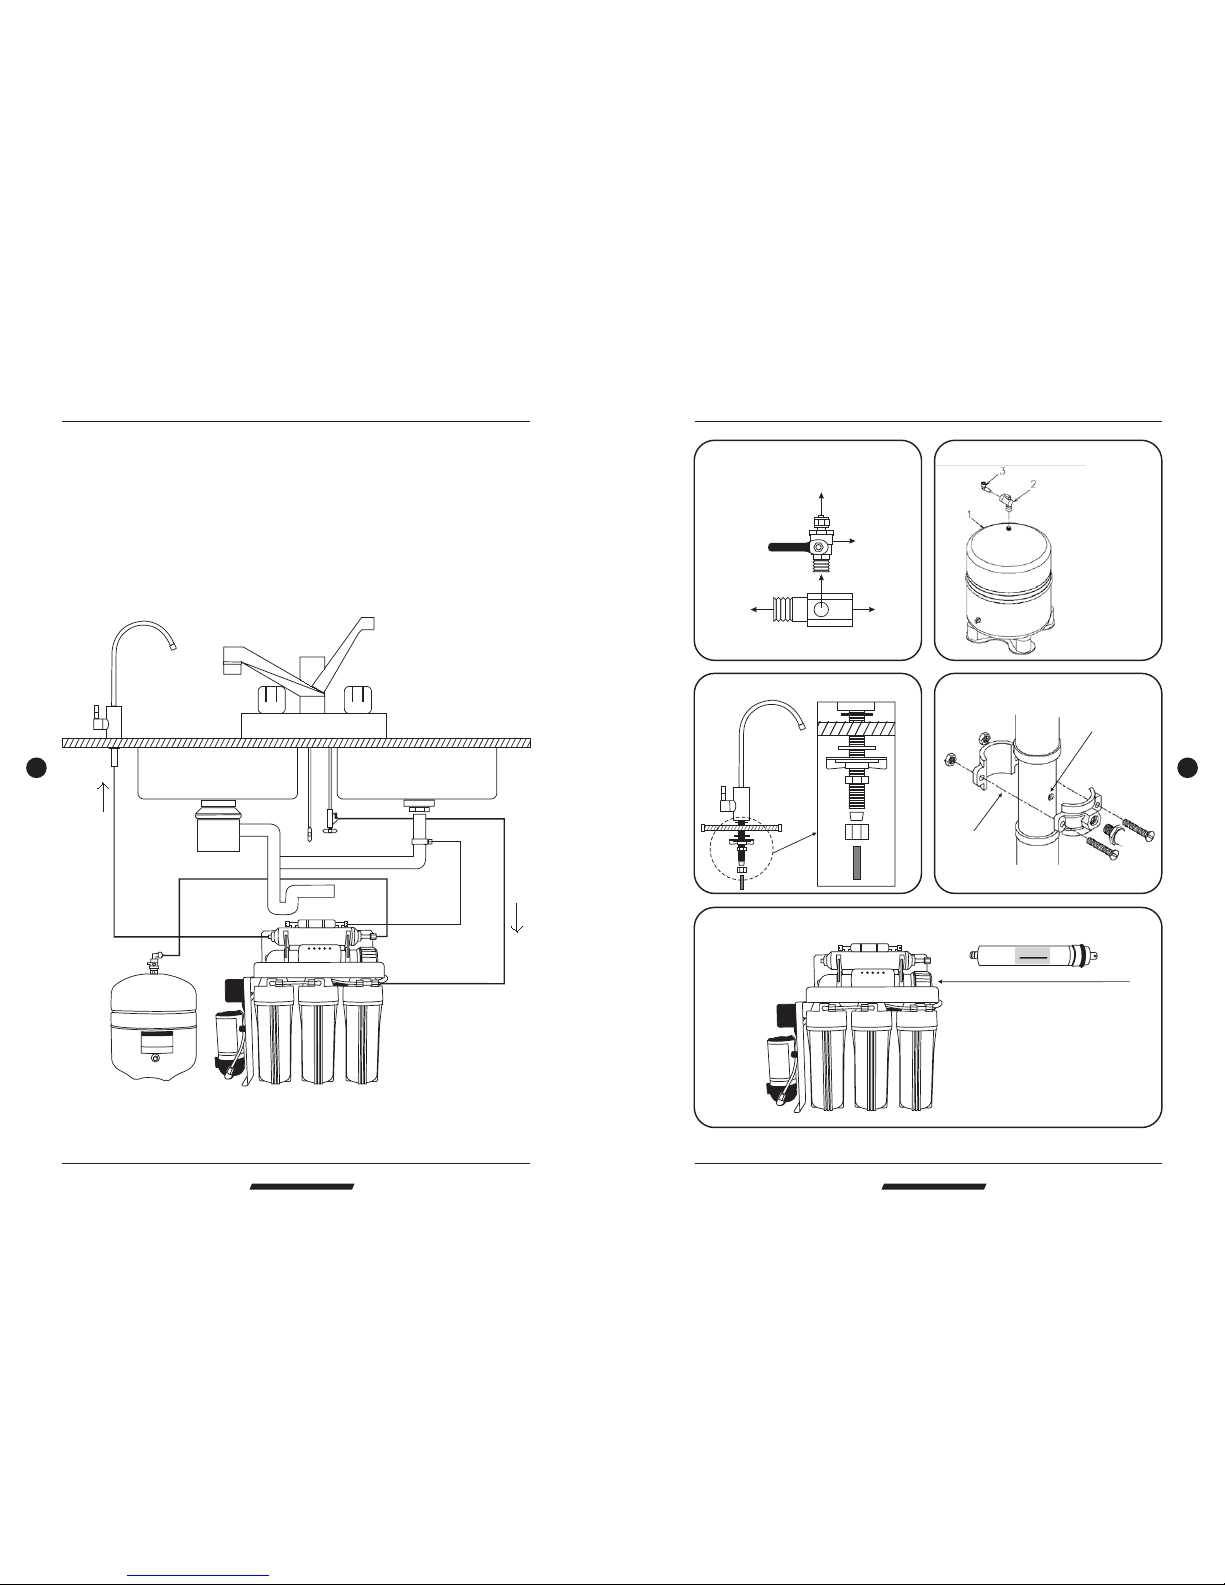
Input water: Install watertank :
MicroComputerController
POWER
SOURCEPROCESSFLUSH
FULL
1.Remove the membrane housing cap.
2.Replace the membrane.
PRO
P
URE
DRINKINGWATER SYSTEM
RO103 Auto Flushing Membrane System
PRO
P
URE
DRINKING WATER SYSTEM
RO103 Auto Flushing Membrane System
PRO
P
URE
DRINKING WATER SYSTEM
Tubing connection diagram
MicroComputerController
POWER
SOURCEPROCESSFLUSH
FULL
Faucet
Tank
Drain
Input water
ToRO system
Deliver valve
Tofaucet
Towater source pipe
Install Europeanceramic faucet :
Install drainsaddle :
Assemble membrane:
Hand tightenplastic
shut-off valveto tank.
Then connectcolor
tubing.
Drill a1/4" hole into
the drainpipe.
Mount drain
saddle aligning
holes.
Installation diagram
CONNECTING THECOLOR TUBING:
A. Connectthe WHITE tubingto the watersupply connector.
B. Connectthe BLUE tubingto the sinktop faucet.
C. Connectthe BLACK tubingto the drainsaddle.
D. Connectthe RED tubingto the storagetank.
A
B
C
D
 Loading...