


Pikes Peak V2
Longs Peak
User Manual R2.2

Table of Contents
1
1. Introduction
1.1. Warranty
1.2. What’s Included
1.3. Technical Specifications
1.4. Disclaimers & Safety Precautions
1.5. Uncrating Your Press
2. Press Setup
2.1. Vertical Orientation Setup
2.2. Horizontal Orientation Setup
2.3. Vertical Dual Pressure Installation
2.4. Horizontal Dual Pressure
Installation
2.5. Automated Pressure Control
Installation
2.6. Using Push Connect Fittings
2.7. Electrical Power
2.8. Compressed Air
4. Pressware Controls
4.1. Home Screen
4.2. Settings
4.3. Workflow Overview
4.4. Quick Press
4.5. Last Run Data
4.6. Edit Recipe
4.6.1. Edit Recipe Cont.
4.7. Preset Recipes
4.8. Recipes (List)
4.9. Run Recipe
4.10. Pre-heat
4.11. Software Updates
5. Press Operation
5.1. Loading the Press
5.2. Automated Pressure Control
5.3. Dual Pressure Control
5.4. Plate Speed Control
3. Rosin Extraction Basics
3.1. Tips & Tricks
3.2. Yield and Material Types
3.3. Choosing Your Material
3.4. Filter Bag Preparation
5.5. Pressing Material
6. Maintenance & Troubleshooting
6.1. Common Issues
6.2. FAQ Part 1
6.3. FAQ Part 2

1. Introduction
From all of us here at PurePressure, thank you for your purchase!
Our rosin presses are engineered to last for many years with proper care.
The following user manual covers virtually every topic, including how to
2
use the press, technical specifications, tips on getting the most out of
your equipment, and much more.
Unless otherwise noted, the instructions contained in this manual apply to
both the Pikes Peak V2 and Longs Peak rosin presses and are
interchangeable.
Sales Inquiries:
sales@gopurepressure.com
General Questions:
info@gopurepressure.com
Technical Support:
support@gopurepressure.com
Contact:
720-446-9565
purepressure.com
@gopurepressure
We’re always here to help. Talk to us!

1.1 Warranty
3
PurePressure's rosin presses are built to last for many years with proper care. We want you to be satisfied with your equipment so if
there are ever any concerns, please do not hesitate to contact us. PurePressure guarantees the following warranty coverage for both the Pikes
Peak and Longs Peak rosin presses:
● 2 year limited warranty against manufacturing defects for structural components (frame, truss and support legs) and pneumatic
cylinder.
● 1 year limited warranty against manufacturing defects for the entire press including electronic and pneumatic components.
Warranty Replacements: In event of an approved warranty replacement or service, PurePressure will supply the necessary part(s) and special
tools, if needed. Shipping costs may be covered by PurePressure at its discretion.
Replacement Parts: Replacement parts for various components are available at reasonable prices for press owners directly from
PurePressure.
Exclusions: Warranty coverage eligibility will be determined by PurePressure and at PurePressure's sole discretion. PurePressure's
warranty obligations do not include (i) reasonable wear and tear; (ii) damage or corrosion caused by outdoor elements or outdoor use; (iii) use
of unapproved parts or unproved alterations to components; (iv) defects or damage caused by misuse, improper electrical power supply, or
compressed air inputs over 150 PSI (v) pneumatic components damaged from internal moisture or having been pressurized with compressed
air which is not clean or dry; (vi) vandalism, negligence, misuse or Force Majeure Events; or (vi) items expected to be consumed or expended
during the normal and routine operation and maintenance. This warranty is eligible for the original purchaser only and is not transferable.
Disclaimer: Except as expressly set forth in this Limited Warranty and to the greatest extent allowed by law, PurePressure makes no other
representations, warranties or conditions, express or implied, including any implied representations, warranties or conditions of
merchantability, fitness for a particular purpose, non-infringement, and non-interference.
Warranty Procedures: If your press is covered under the warranty period, please contact us with detailed information regarding the issue you
are experiencing so that we can get you operational as soon as possible. If you are experiencing a problem and are outside of the warranty
period, we will do everything in our power to get you affordable replacement component(s) in a timely manner. Please send all warranty and
replacement part related inquiries to support@gopurepressure.com. All returned parts must be accompanied by an RMA number, which we
will supply.

1.2 What’s Included
4
Longs Peak
What’s Included With Your Press
(items may differ depending on kit or model)
● LED capacitive touch screen
● Two button safety start
● Emergency-stop
● Plate speed actuation dial
● Compressed air filter / regulator(s)
● Pressure toggle for ramping
control or internal automated
pressure control unit
● Parchment clips
● Vertical orientation legs (qty 2)
● Horizontal orientation legs (qty 2)
● Leveling feet (qty 4)
Pikes Peak V2
● Industrial ¼” male air fitting
● Power cable
5 Tons of Force 8 Tons of Force

1.3 Technical Specifications
5
Specification Pikes Peak V2 Longs Peak
Weight 120 lb 130 lb
Overall Dimensions
Depth x Width x Height
Power Requirement 120/240VAC
Fuses (2x) Type: Fast Acting 250V
Compressed Air Requirements PSI: 5 - 120
Pneumatic Cylinder Maximum Force
Output
Frame & Enclosure Metal A36 Steel A36 Steel
Horizontal: 29.2” x 19.7” x 13.5”
Vertical: 15.5” x 19.7” x 33.3”
8A at startup / 2A continuous
Current: 10A
Dimensions: 5mm x 20mm
CFM: 2.1 or greater
Dry clean air
9,876 lb @ 120 PSI 15,300 lb @ 140 PSI
Horizontal: 32.6” x 19.7” x 13.5”
Vertical: 15.5” x 19.7” x 36.8”
120/240VAC
8A at startup / 2A continuous
Type: Fast Acting 250V
Current: 10A
Dimensions: 5mm x 20mm
PSI: 5 - 140
CFM: 2.7 or greater
Dry clean air
Heat Plates Sizes: 10” x 2.5”
Material: 6061 Aluminum
Maximum Temperature: 300 °F
Sizes: 10” x 3”
Material: 6061 Aluminum
Maximum Temperature: 300 °F

Please review this
1.4 Disclaimers & Safety
Precautions
WARNING: HEAT PLATES CAN CAUSE SERIOUS BURNS. NEVER PLACE FOREIGN OBJECTS, FINGERS, HANDS OR OTHER BODY PARTS
ON OR BETWEEN THE HEAT PLATES.
WARNING: PINCH POINT CAN CAUSE SERIOUS INJURY. NEVER PLACE FOREIGN OBJECTS, FINGERS, HANDS OR OTHER BODY PARTS
ON OR BETWEEN THE HEAT PLATES.
WARNING: ALWAYS WEAR EYE AND EAR PROTECTION AS WELL AS HEAT RESISTANT GLOVES FOR SAFE OPERATION.
WARNING: PUREPRESSURE, LLC IS NOT RESPONSIBLE FOR INJURY OR LOSS DUE TO IMPROPER USE OF EQUIPMENT.
DISCLAIMER: COMPRESSED AIR SOURCE REQUIRED. MAX ALLOWABLE WORKING PRESSURE 140PSI. THIS PRODUCT OPERATES
UTILIZING A PNEUMATIC CYLINDER.
DISCLAIMER: YOUR PRESS SPEED VALVE IS TURNED OFF FOR SHIPPING. THE DIAL MUST BE OPENED TO OPERATE YOUR PRESS
PNEUMATIC.
DISCLAIMER: CONNECTING TO ANY OTHER POWER SOURCE OTHER THAN WHAT YOUR PRESS IS RATED FOR ON ITS SERIAL LABEL
WILL VOID YOUR WARRANTY.
WARNING: EXCEEDING 150PSI ON YOUR PRESS WILL TERMINATE YOUR WARRANTY. A MECHANICAL BLOW OFF VALVE WILL
EXHAUST AND YOUR FIRMWARE WILL DETECT THE OVERPRESSURE FAULT.
WARNING: ONLY USE THE DESIGNATED AC POWER PLUG PROVIDED WITH YOUR PRESS. USING ALTERNATE VOLTAGES OTHER THAN
SPECIFED CAN RESULT IN DAMAGE TO YOUR UNIT.
WARNING: IF THE HEAT PLATE ICON ON YOUR SCREEN IS RED THEN THE PLATES ARE HOT ENOUGH TO CAUSE BURNS.
WARNING: PARCHMENT CLIPS ARE NOT HANDLES. DO NOT USE TO LIFT THE PRESS.
WARNING: EMERGENCY STOP BUTTON - YOU MAY CANCEL THE OPERATION AT ANY POINT BY PRESSING THE EMERGENCY STOP
BUTTON. THIS WILL DISPLAY EMERGENCY STOP ON THE LED TOUCH SCREEN AND WILL CUT POWER TO THE HEATERS WHILE
RETRACTING THE AIR CYLINDER. NOTE: AN INLET AIR SUPPLY OF AT LEAST 10 PSI IS REQUIRED FOR THE CYLINDER TO RETRACT.
DISCONNECTING THE AIR SUPPLY PRIOR TO PRESSING THE EMERGENCY STOP BUTTON WILL NOT RETRACT THE PRESS. TO CLEAR
THE EMERGENCY STOP, TWIST THE BUTTON TO RELEASE. THIS WILL REBOOT THE SYSTEM AND RETURN YOU TO THE MAIN MENU.
THE HEATERS WILL BE OFF AT THIS POINT.
WARNING: DO NOT PRESS ANYTHING OTHER THAN SOFT PLANT MATERIALS IN THE PIKES PEAK, PIKES PEAK V2, OR LONGS PEAK
PRESS. PRESSING OTHER OBJECTS WILL VOID THE WARRANTY.
WARNING: WHEN USING ISOPROPYL ALCOHOL TO CLEAN THE HEAT PLATES THE POWER SHOULD BE DISCONNECTED, AND THE
HEAT PLATES SHOULD BE AT ROOM TEMPERATURE. ALWAYS WEAR GLOVES AND EYE PROTECTION.
6
information
carefully prior to
press operation!

1.5 Uncrating Your Press
7
Steps to Safely Uncrate Your Press
Note: Use two people to lift the press safely.
1. Using a Phillips screwdriver or power tool,
remove wood screws from top lid. (Figure 1A)
2. Lift off crate cover.
3. Remove contents from top section and remove
crate shelf. (Figure 2A)
4. Remove the loose foam packing blocks around
the press (some foam blocks are glued to the
crate itself - do not remove them).
5. Using the two straps around the press pull
straight up to remove the press from the crate
and set on a sturdy table. (Figure 3A)
Figure 1A
Figure 4A
Figure 2A
6. Remove the plastic wrapping and set your Dual
Pressure kit as well as your vertical legs aside.
7. Turn your emergency stop button clockwise to
release.
8. Turn your Speed Controller knob all the way
counter clockwise to open the valve. This will
allow the plates to fully actuate.

Note: Your press comes set up in
2. Press Setup
the horizontal orientation for shipping
purposes.
8
Vertical vs. Horizontal Orientation
Most users will encounter greater utility and productivity using the Pikes Peak V2 or Longs Peak rosin press in the vertical orientation.
This is because loading and unloading bags and parchment tends to be easier. It is our recommendation that you become familiar
with the press in the vertical orientation first, and then move to the horizontal orientation if desired.
For horizontal orientation pressing, virtually any of our silicone products or parchment paper works well as a collection surface.

2.1 Vertical Orientation Setup
Note: Leave leg bolts barely loose
so the press can be leveled before
tightening in place.
9
Vertical Orientation Setup
Warning: HEAVY EQUIPMENT! Two people
recommended for setting up the press vertically or
horizontally.
1. The vertical orientation requires the two triangular
shaped legs. To change to the vertical orientation from
the default horizontal orientation, carefully bring the two
front legs off the edge of a table while ensuring the press
will not fall forward. (Figure 1A)
2. Using a ¼” Allen wrench or bit, remove the (qty4)
screws securing the horizontal legs as well as the (qty2)
adjacent screws just above them. Remove legs on both
sides. (Figure 2A)
3. Line up each vertical triangular leg to the three blank
holes on the side of the frame and then replace the (qty
3) screws on each side. (Figure 3A)
Vertically Oriented Pikes Peak
Figure 2A
Figure 1A
Figure 3A
4. Then, fasten leveling feet into place, and lift the press
into the full upright vertical orientation.
5. Place the touchscreen display enclosure to the recessed
position so it is flush with the front of the press.

2.2 Horizontal Orientation Setup
10
Horizontal Orientation Setup
Warning: HEAVY EQUIPMENT. Two people
recommended for setting up the press vertically or
horizontally.
1. The horizontal orientation requires the two short
rectangular legs. To change to the horizontal orientation
from the vertical orientation, first lean the press slightly
forward and have a friend unscrew the leveling feet.
Then, re-screw two of the leveling feet into the two
holes on back of the press, near the top.
2. Next, carefully lay the press on its back and using a ¼”
Allen wrench or bit, remove the (qty6) screws securing
the vertical legs. (Figure 1A)
3. Line up each horizontal rectangular leg to the two blank
holes on the side of the frame and then replace the (qty
2) screws on each side. (Figure 2A). Put the additional
remaining screw in the empty holes on each side.
Horizontally Oriented Pikes Peak
Figure 2A
Figure 1A
Figure 3A
4. Then, fasten leveling feet (qty2) on the bottom screw
hole ports of the horizontal rectangular legs. (Figure
3A)
5. Slide your press back so it sits securely on your table
for operation.

2.3 Vertical Dual Pressure
Installation
11
Note: Your Dual Pressure system installs
easily in both the horizontal and vertical
orientations with just a Phillips screwdriver.
There is a separate bag included in your
press kit with additional pneumatic tubing for
the horizontal setup..
Hooking Up Your Dual Pressure Regulators
Vertical orientation installation detailed below
1. Unscrew the black collar nuts (qty2) atop each regulator and
remove the aluminum mounting bracket. Using the short screws
(qty2), attach the bracket to your press. (Figure 1A). Tighten
them with your Phillips screwdriver. For horizontal setup, simply
install the bracket perpendicular to this so that the regulators are
always vertically oriented. This allows the condensate trap to
function properly.
2. Take your Dual Pressure regulators and re-insert both through
the mounting bracket. Then, re-screw on your black regulator
collar nuts onto both sides so they are hand tight. (Figure 2A)
3. Next, using the long screws (qty3) provided, attach your Dual
Pressure toggle switch and tighten each screw. (Figure 3A)
4. Attach your short pneumatic hose from the toggle switch to the
push connect fitting on the press, and then attach the pneumatic
hoses from the Dual Pressure regulators to the toggle switch.
(Figure 4A)
Figure 1A
Figure 2A
Figure 3A
Figure 4A
5. In the vertical orientation, your pneumatic tubing from the Dual
Pressure regulators should cross and all push fittings should be
firmly seated.
2.4 Horizontal Dual Pressure Installation
12
Note: Your Dual Pressure system installs
easily in both the horizontal and vertical
orientations with just a Phillips screwdriver.
There is a separate bag included in your press
kit with additional pneumatic tubing for the
horizontal setup.
Hooking Up Your Dual Pressure
Regulators
Horizontal orientation installation detailed below
1. Unscrew the black collar nuts (qty2) atop each regulator and
remove the aluminum mounting bracket. Using the short
screws (qty2), attach the bracket to your press. (Figure 1A).
Tighten them with your Phillips screwdriver. For horizontal
setup, simply install the bracket perpendicular to this so that
the regulators are always vertically oriented. This allows the
condensate trap to function properly.
2. Take your Dual Pressure regulators and re-insert both
through the mounting bracket. Then, re-screw on your black
regulator collar nuts onto both sides so they are hand tight.
(Figure 2A)
3. Next, using the long screws (qty3) provided, attach your
Dual Pressure toggle switch and tighten each screw.
(Figure 3A)
Figure 1A
Figure 2A
Figure 3A
Figure 4A
4. Attach your short pneumatic hose from the toggle switch to
the push connect fitting on the press, and then attach the
pneumatic hoses from the Dual Pressure regulators to the
toggle switch.
5. In the horizontal orientation, your pneumatic tubing from the
Dual Pressure regulators should not cross and all push
fittings should be firmly seated. (Figure 4A)

2.5 Automated Pressure Control
Installation
Note: Your Automated Pressure Control
system also installs easily in both the
horizontal and vertical orientations with just a
Phillips screwdriver.
13
Hooking Up Your Automated Pressure
Control Regulator
Vertical orientation installation detailed below
1. Unscrew the black collar nut (qty1) atop the regulator and
remove the single hoop aluminum mounting bracket. Using the
short screws (qty2), attach the bracket to your press. (Figure
1A). Tighten them with your Phillips screwdriver. For horizontal
setup, simply install the bracket perpendicular to this so that
the regulator is vertically oriented.
2. Take your single regulator and re-insert it through the mounting
bracket. Then, re-screw on your black regulator collar nut onto
both sides so they are hand tight. (Figure 2A)
3. Next, attach your short pneumatic hose from the left side of the
air regulator to the push connect fitting on the press by
carefully pushing it into the black hose port. (Figure 3A)
Figure 1A
Figure 2A
Figure 3A
4. Finally, ensure that your push connect fitting is snug by
gently pulling on it to ensure it’s seated fully.
For horizontal installation, repeat these same steps and make
sure to mount your regulator bracket and regulator so that its
cap is upward.
All other components of your Automated Pressure Control unit are
internally mounted and ready to operate once your air regulator has
been properly installed as shown here.

2.6 Using Push Connect Fittings
Attaching & Using Push Connect Fittings
14
Your push connect fittings securely hold your
pneumatic tubing in place.
To Insert:
1. Simply take your pneumatic tubing and insert it as far into the
fitting as it will sit. (Figure 1A)
2. Verify it is fully connected and seated by gently pulling back on
the hose. It should not give and will remain secured.
To Remove:
1. Using your fingers, push down on the grey ring as much as
you are able (it will only move downward a tiny bit).
2. While pushing down on the grey ring, gently push the
pneumatic hose into the fitting, and then pull outward to
remove. If it is not releasing, push down slightly harder onto the
grey ring to release the tubing.
Figure 1A

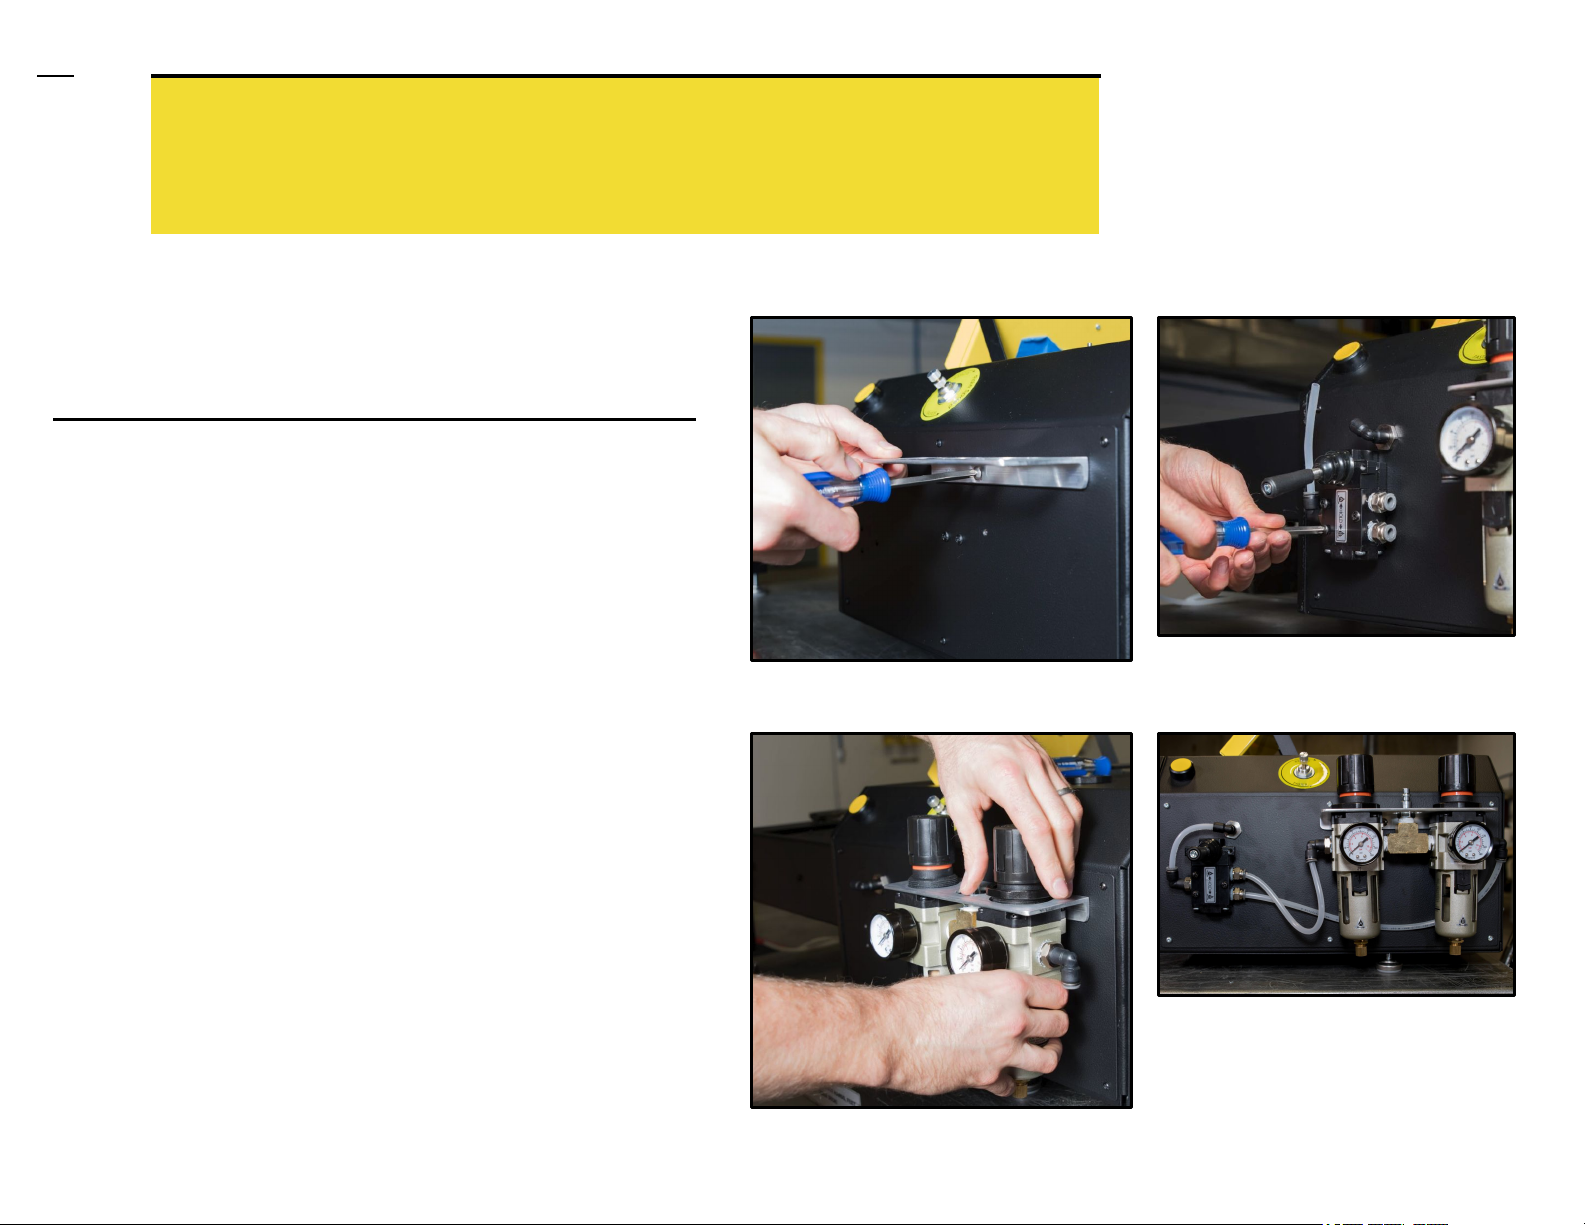
2.7 Electrical Power
Power Module
Your press kit will come with an appropriate power cable
for your location.
Power Draw: 8 amps while heat ramping, 2 amps
continuous draw.
Emergency Stop: In the event of an emergency, pushing the
E-Stop button disconnects power to the heaters and the
solenoid valve. Disconnecting power to the solenoid valve will
Figure 1A
15
Note: Your product serial label will indicate if
your press is rated for 120/240VAC or just
120VAC. The fuses on this machine should
now under normal operation. Should your
fuses blow, it is likely that there is a problem
with the supplied power.
cause the plates to immediately retract so long as an air
supply (10 PSI minimum for the Pikes Peak and 20 PSI
minimum for the Longs Peak ) is supplied.
Fuse Replacement
1. Ensure the power switch is in the OFF position and remove the
power cable. Wait for at least 60 seconds.
2. Using a small screwdriver, gently pry loose and remove the
fuse holder. (Figures 1A, 2A)
3. Carefully replace the fuses [Fast Acting 250V, 10A, 5mm x
20mm]. (Figure 3A)
Figure 2A
Figure 3A

2.8 Compressed Air
Pneumatic Operation
16
Note: The Pikes Peak V2 (5 PSI
minimum) and Longs Peak (5 PSI
minimum) both require compressed air
supply to actuate the plates down as
well as to retract them.
Both the Pikes Peak V2 and Longs Peak require clean, dry compressed
air for long term reliability. While there are many brands and types of air
compressors, we specifically suggest a California Air Tools
CAT15020C, Quincy QT54 package, or a Chicago Pneumatic QRS air
compressor depending on your total compressed air needs, which can
all be found on our website at at www.purepressure.com.
Please contact us if you are unsure which air compressor to get and we
would gladly help you select the right unit! Make sure to check out our
Universal Air Compressor Connection kit if you aren’t sure which tubing
and fittings you may need.
Pikes Peak V2 Recommended Air Compressor Specifications
Maximum PSI: 140 +
CFM Output: 2.1 +
Storage Tank Size: 30 gallons +
Longs Peak Recommended Air Compressor Specifications
Maximum PSI: 150 +
CFM Output: 2.7 +
Storage Tank Size: 30 gallons +
Figure 1A
¼” Industrial Quick Connect Fitting
If you do not already have the necessary fittings and tubing, check out
our Pneumatics Kit on our website. To hook up your air compressor,
attach your pneumatic hose from your air compressor to your Pikes
Peak V2 or Longs Peak rosin press with a ¼” industrial quick connect
fitting. (Figure 1A)

3. Rosin Extraction Basics
Rosin is created with heat, pressure, and
17
filtration.
● The heat being applied to your material liquefies the
glandular trichome heads present in cannabis, then
the pressure forces the resulting cannabinoid-rich oil
through the filtration media.
● Technically speaking, rosin is a mechanical
separation process, as opposed to a true
“extraction”. However, the term extraction is used
interchangeably with solvent-based and solvent-less
processes.
● Rosin can be produced with a variety of different
textures or consistencies and has a potency level
that is on par with hydrocarbon-based extraction
(60% - 90% +). Rosin can also often be extremely
terpene-rich and aromatic if high quality material is
being pressed.
● Different materials, strains, growing media, and other
factors contribute to the yield and quality of your
rosin. We encourage ample experimentation with
your material to dial in the perfect settings with your
PurePressure rosin press to get the best results
possible!
Consistencies & Textures
Lower temperatures tend to produce
budders and batters, where higher
temperatures can often produce a shatter
or oil-like consistency. Depending on your
material, rosin can be made into sugar,
wax, shatter sauce, budder, and more!
Live Rosin
Live rosin is made by washing fresh frozen
cannabis into bubble hash and then
pressing it into rosin. For optimal results,
use a freeze dryer to dry your hash in order
to get the best color and terpene profile.

3.1 Tips & Tricks
18
Top Rosin Tips
1. For the best, lightest color possible, use
extremely fresh dried material.
2. Always make sure your flower is properly
cured. Flowers should be between 55% - 62%
RH in the jar for optimal yields with flower rosin.
3. Quality in = quality out. Use the best material
available for stellar results.
4. Typically higher temperatures will increase yield
and decrease terpene preservation. Lower
temperatures will ensure the highest level of
terpene preservation but tend to decrease
yields. Press accordingly!
5. For optimal terpene preservation, do not press
rosin above 220 °F unless you know what you
are doing.
6. Making rosin is easy. Stick with it and keep
experimenting with your variables until you get
it just right for your material.
Tricks to Help You Press Amazing
Rosin
1. Making great rosin always starts in the garden.
Certain strains will over perform, and others will
underperform, so always go into the process with
quality in mind.
2. Press within a few weeks after harvesting, if
possible. Older material tends to underperform both
with yield and clarity. As your material ages, it
oxidizes and chemical changes occur within the
cannabinoids themselves, making it both less potent
and less terpene-rich.
3. Store your rosin in an airtight container within a
cooled environment (such as a refrigerator or
freezer) to preserve terpenes and texture.
4. Experiment with different starting materials. If you
normally press flower, try your hand at making
bubble hash or tumbling some kief. The possibilities
with rosin are endless - fresh frozen live rosin, rosin
sauce, solvent-less THCA separation, and more can
be made with a PurePressure rosin press.

3.2 Choosing Your Material
19
Starting Material and Filter Type
1. First and foremost, you will need to choose what kind of starting material you intend to press into rosin. The
most common materials used in this process are freshly dried cannabis flowers, kief (or dry sift), or ice water
bubble hash. We do not recommend pressing trim as-is because of the amount of inert plant material your
oil must travel through to escape the bag. You will achieve greater yields and a better product sifting your
trim first.
2. Next, you’ll need to select the micron filter size you wish to use. A larger micron number corresponds to
larger pore openings in the mesh fabric. We typically recommend 25μm or 36μm for dry sift and hash, and
115μm for flower and shake.
Bubble Hash
Dry Sift / Kief Flower Micron Usages
25μm/36μm/72μm
Ideal for bubble hash, dry sift
90μm/115μm
Ideal for flower, shake

3.3 Yield & Material Types
20
Note: Some strains tend to yield very well,
whereas others may not. Try not to get
discouraged if your yields aren’t what you
expected on your first press. Heavily
resinous, terpene-rich strains will always
yield the highest quality rosin!
PSI: The PSI on the X axis refers to the pressure at your bag, not the compressed air pressure that is available from
your air compressor.
While the Pikes Peak V2 and Longs Peak can automatically calculate bag pressure, the formula is as follows:
(Pressing Force / Bag Area (sq inches) = PSI at the Bag
Example:
(9,000 LBF) / (12 square inch bag) = 750 PSI at the bag

3.4 Filter Bag Preparation
Visit our YouTube channel for helpful
how-to videos!
@GoPurePressure
YouTube.com/c/GoPurePressure
21
Properly Filling Your Rosin Filter
Bag
1. Turn your PurePressure rosin filter bag inside out
using the Quick Flip tool. (Figures 1-3A)
2. Using the provided filling funnel, fill the bag with
your material, making sure it is evenly distributed
in the bag and that there is at least ¾” left at the
end of your bag to fold over. (Figures 1-2B)
3. Fold over the remaining, unfilled portion of your
rosin filter bag and insert the bag, folded-side
down, into chamber of your pre-press mold.
Replace the top of the pre-press mold and push
down with hand pressure, or use an arbor press
(1 ton max). (Figure 1C)
4. Flip your pre-press mold over, remove the top
facing plate, and press down on the middle
chamber to release your prepared rosin filter bag.
Figure 1A
Figure 2A
Figure 3A
Figure 1B
Figure 1C
Figure 2B
See page 32 in this manual for maximum recommended filling capacities
and other helpful tips for your process.

4. Pressware Controls
The Pressware Interface Allows for Total
Control
PurePressure’s Pressware has been
designed and engineered specifically for
solventless cannabinoid oil extraction.
22
Heat, press time, pressure stages for repeatable results,
and more are all custom controlled by the most
consistent results in the market. With individually
customizable pressure stages and ultra accurate
temperature control, you can ensure that your results
are always consistent.
In the settings menu, you can also modify the interface
units individually to be metric or imperial.
Depending on which pressure control unit you’ve
purchased, there will be different options available for
the manual Dual Pressure versus the Automated
Pressure presses. You can upgrade your press to the
Automated version at any time by
www.purepressure.com and purchasing the upgrade
kit.
Save Up to 29 Recipes Touchscreen LCD Tech
In the following sections we will cover exactly how to
use your Pressware controls and how you can get the
most out of your PurePressure rosin press.

4.1 Home Screen
23
The Home Screen appears after startup from this screen you can manage heater settings, view active
pressure values, view a loaded recipe and navigate to a variety of menu options. You cannot press while on
the Home Screen.
1: Heaters 1 and 2
Tap to turn your upper and
lower heaters on and off.
2: Quick Press
Start pressing immediately
with your current settings.
You can also save your Quick
Press settings in order to
build a new recipe from the
Last Run Data tab.
3: Run Recipe
Load and use an existing
pre-made or custom recipe.
4: Last Run Data
View the data from your last
pressing operation. This
includes heat, time, pressure,
and pressure stages.
5: Temperature Settings
Tap to set and change your temperature on
your top and bottom plates; red indicates
the plate surfaces are hot enough to burn
you.
5
1
2
3
4
6: Loaded Recipe
If you’re running a recipe, it will
display which one you are using
here.
6
9
10
11
7: Home Button
Return to the home screen at any
time.
8: Force Toggle Button
7
8
1) Tap to view your total available
force, compressed air PSI, and
pressure at the bag (if set).
2) You may also adjust your
pressure digitally with the
Automated Pressure system here
as well.
9: System Settings
Review and adjust your values for
Imperial or Metric as well as your
desired buzzer sound level and
adjust operating voltages.
10: Recipes
View, save, edit, and load all of your
pre-saved recipes - you may have
up to 30 saved at one time.
11: Contact Info
Return to the home screen at any
time.
Note: Adjusting the
temperature or pressure units
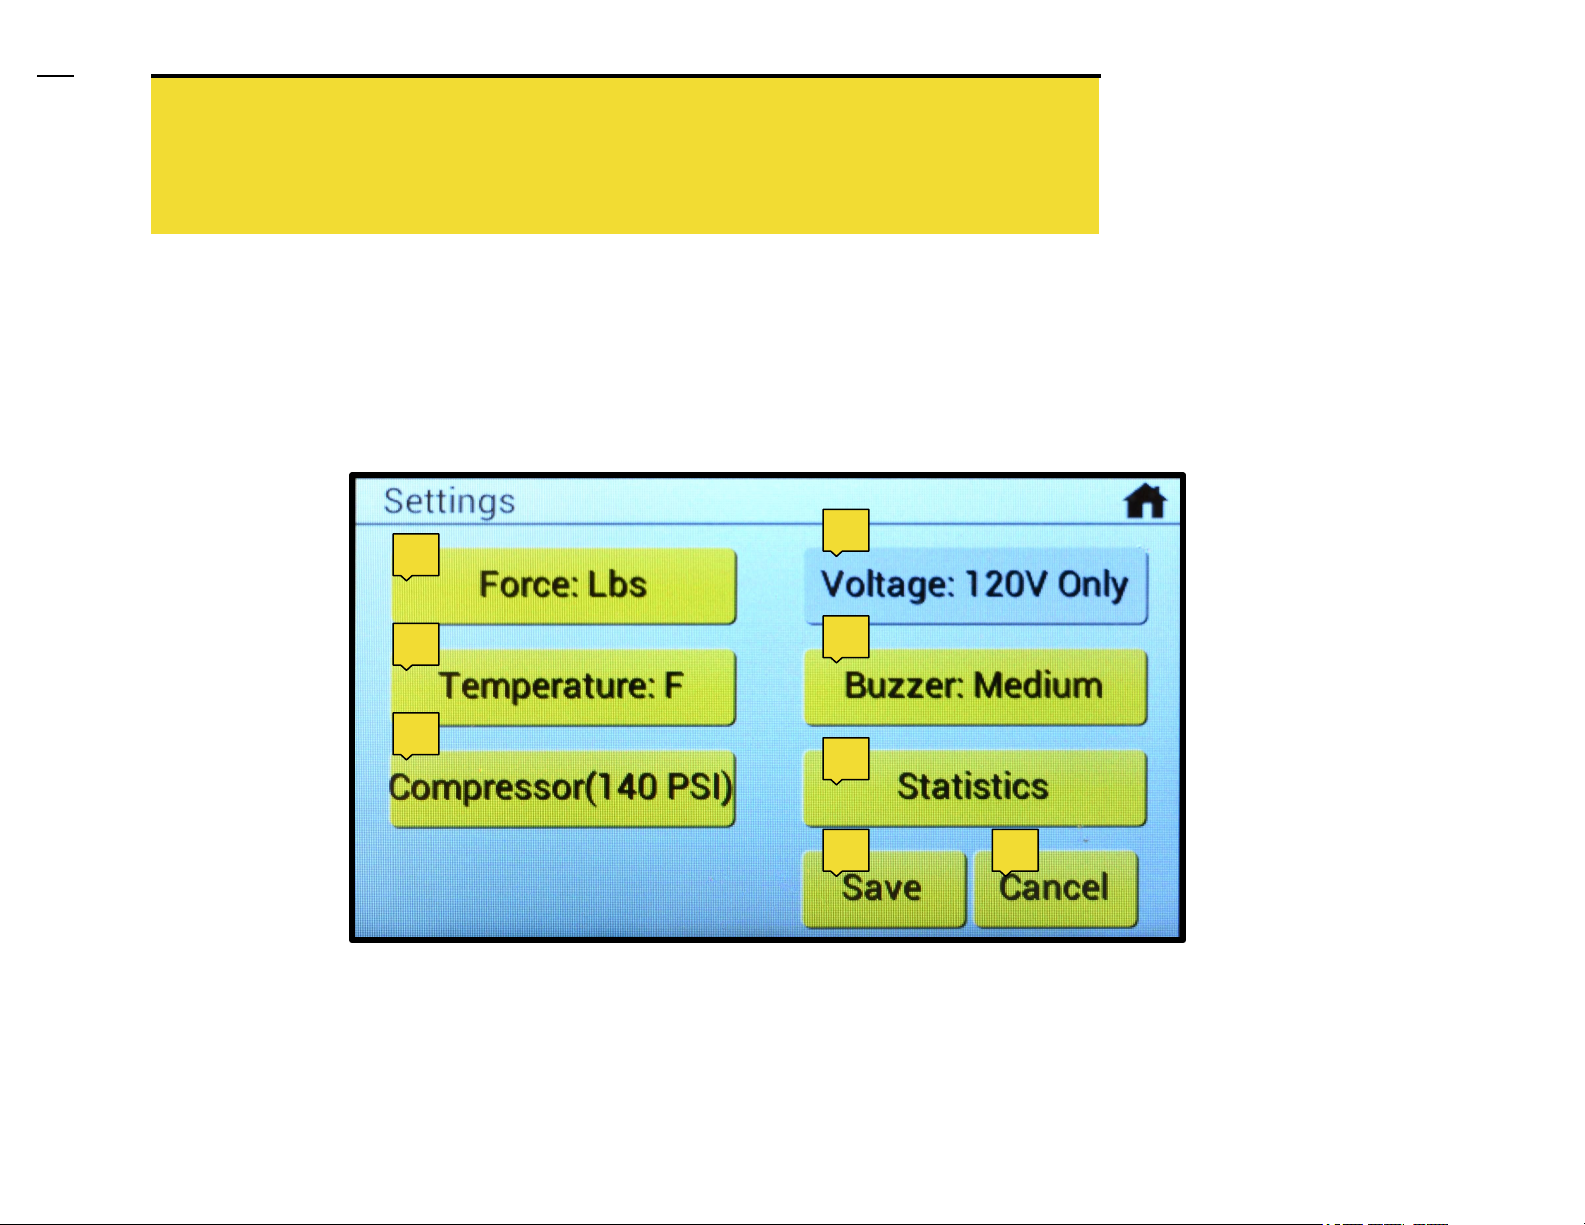
4.2 System Settings
24
will require you to convert
these values manually in any
saved recipes.
You can adjust your System Settings at any time. This will allow you to change a few key things, including
whether your press displays numbers in Imperial or Metric, as well as how loud you want the beeping
indicator to be (you can also silence it) to alert you during cycle pressure changes.
1: Force
Displays in either LB or KG.
2: Temperature
Displays in either Fahrenheit
or Celsius.
3: Compressor
Max air pressure setting. Not
available on Dual Pressure
systems.
4
1
2
5
Displays 120 or 240
depending on your system’s
capabilities. If this option is
not available, your press is
only capable of operating on
120 VAC.
5: Buzzer
4: Input Volts
3
6
7 8
Noise settings available are
high, medium, low, and silent
or off.
6: Statistics
This tab offers detailed
information about your press,
usage stats, and error codes
for debugging if necessary.
7: Save
Saves your settings.
8: Cancel
Exits the menu without saving
any changes.

4.3 Workflow Overview
25
One-off Press
Quick Press
Creating a Recipe
Quick Press
Last Run
Data
Edit Recipe
Pressing a Known Material
Recipe / Run
Recipe
Select
Repeat
Run Recipe
Recipe
Run Recipe
Repeat
Recipe

Note: When using the Automated
Pressure system, whenever you use the
4.4 Quick Press
26
force increase or decrease buttons, the
Air Pressure toggle will turn yellow and
wait two seconds to accept the value
before executing the command.
Quick Press is one of Pressware’s most powerful features because it allows you to
save your parameters into a recipe for later use! Set your temperature and starting pressure,
and then begin pressing using two yellow start buttons. Hold for 5 seconds to fully initiate the press.
● Using the Quick Press menu is the
easiest way to start pressing and
figure out how to run a good recipe
for your material. It will enable you to
store up to 6 pressure stages and
the time you spent on each.
● When using the Automated
Pressure system, your pressure
stages will be logged automatically
as you change pressure.
● When using the Dual Pressure
system, simply hit “Next Stage” to
record your maximum force and
initiate the next stage.
Note: Your notification bar will display your current stage, any notifications,
errors, and so on.
● Once you get the perfect press from
your material, you can then view
your Last Run Data and save all of
your settings into a stored recipe!
Note: For each pressure stage, the total time spent and maximum pressure
achieved is what will be recorded. On the Dual Pressure system, you will need
to manually hit “Next Stage” to record the next stage.

4.5 Last Run Data
27
Once you’ve pressed, the Last Run Data menu will tell you exactly what you did
and how you did it. You can save this information directly into a new recipe, or just look to see
what you want to change for your next press.
1. The press records your set
temperature, total press time,
pressure, and pressure stages from
your most recent press cycle.
2. The Last Run Data menu is the most
accurate way to dial in your settings
by learning what you did and then
adjusting from there.
1
3. Easily save your Last Run Data
settings directly into a new Recipe,
where you can make changes or
re-use those settings at will.
2
3
Note: These inputs are dependent on the user and are not automatically
captured by the press when saved into a recipe if you are running a Quick
Press, or will display if you are viewing Last Run Data from running a
pre-existing recipe.

4.6 Edit Recipe
With Recipes, you can save every variable and then your press will run those
settings at the push of a button.
● You can store up to 29 recipes to be
repeated and used later.
● These menu options enable you to run
our pre-loaded recipes, which cover
most materials and bag sizes for instant
results.
● Recipes can be created either manually
with these menu options, or from a Last
Run Data set.
28
● Selecting a bag size will allow the press
to automatically calculate the exact
pressure at your bag.
● Recipes will automatically control your
temperature and press time. The
Automated System also saves and
executes pre-set pressure ramping.
● Material, weight, bag micron type,
actuation speed, and humidity are all for
reference purposes.

4.6.1 Edit Recipe Cont.
29
The Automated Pressure system enables you to set your pressure stages and
their times to execute automatically. The Dual Pressure system allows you to set the same
stages and times, but as a guide to follow.
6: Weight
Set the weight of your
material to have a repeatable
bag fill and make yield
calculations easier.
1: Material
Flower, dry sift, or hash.
2: Stages 1 - 6
Air pressure and pressing
time are set here, with up to
six stages possible. Select the
number of stages with the
Stages box.
3: Name
Enter a reference name for
your recipe. We recommend
entering the strain as the
recipe (and be sure to select
the material type).
4: Save
Save your recipe as-is.
7: Bag Size
Set your bag size in order for
the press to calculate
pressure accurately.
1
2
3 4 5
6 7 8 9 10
8: Micron
Choose the ideal filter micron
for your material.
13
9: Speed
Choose Fast, Medium, or Slow as a
reference for your plate actuation speed,
which is controlled manually with the
speed dial.
10: Humidity
Set the relative humidity value
of your material, if desired.
11: Heater 1 and 2
Set the top and bottom plate
temperatures for your recipe.
12: Cancel
11
Exit the Edit Recipe menu and
discard any changes you
have made.
13: Delete
Erases and deletes your
recipe permanently. Your
settings will not be
recoverable after deletion.
12
5: Save&Run
Saves and brings you to the
Run Recipe screen to be
used immediately.

4.7 Preset Recipes
With the Automated Pressure Control interface, you can select a material type
and a bag size - the system will populate an automatic recipe that will do the rest.
● Tap the “Material” button to
select what you are planning to
press. The available options are
Flower, Kief, and Hash.
● Then, hit the “Bag Size” button
to select which sized bag you
intend to use.
30
● Once these two selections have
been made, your press will
automatically load an
appropriate recipe that you can
simply run.
● Once you run these recipes, you
can then modify time,
temperature, pressure, and so
on to easily make your own
special recipes with your
material, via Last Run Data.

4.8 Recipes (List)
From the Recipes screen, all of your saved recipes are stored and catalogued.
● Each page displays 5 recipes, including
their name, material, weight, bag size,
and micron type (if set).
● To access a specific recipe, simply tap
the name to enter the “Edit Recipes”
screen.
● There are a maximum of 29 total open
recipe slots on both pressure systems.
31
● Any recipe that has been created and
stored is available in this menu subset.
Hit “Page Down” to scroll through all
stored recipes.
● You can also return to the home screen
from the “Recipes” list by hitting
“Home”.

4.9 Run Recipe
From the Run Recipes screen, you can automatically load any saved recipe to be
used immediately. There are two ways to run a recipe. First, you can load a recipe from the “Run
Recipe” off of the home screen, or you can select the recipe you wish to use from the “Saved Recipes” list.
● By hitting the “Load Recipe” button
underneath the “Air Pressure” toggle,
you will be taken to the “Saved Recipes”
list to choose the recipe you wish to run.
● From there, it will take you directly to the
“Recipe” settings menu of your choice.
● Simply hit “Save&Run” at the bottom to
load you recipe and begin using it.
32
● Ensure that your temperatures have
stabilized and your input pressure from
your air regulators is accurate before
initiating your press. This helps ensure
your recipe is executed correctly.

4.10 Pre-heat
The Pre-heat function is available only for Automated Pressure Control systems
and enables you to warm up your bag while applying zero force. This feature is
especially helpful when pressing high quality ice water hash and sift, but is also useful for pressing flower too.
● Once you press the Pre-heat button it
will highlight yellow, indicating it is
enabled.
● Next, press your two start buttons,
which will enable a slow descension of
your plates.
Note: Your press will need at least 5
PSI to descend the plates but when
stopped will not apply any force.
33
● Simply release the two start buttons
once your plates have made contact
with your bag.
● Finally, once you are when you are
ready to apply force, tap the Pre-heat
button once more (it will return to a grey
color) and hold the two start buttons for
5 more seconds as you normally would
to start your press cycle.

4.11 Software Updates
34
With PurePressure’s Pressware Connect
software, you can always stay up to date with
the latest version of our firmware.
1. Using a T15 or T10 (depending on unit) torx screwdriver [star bit],
remove the 11 screws and the top panel from your rosin press.
(Figure 1A)
2. Set your screws and panel aside, and then locate the USB-B port
on top of your electrical panel. (Figure 2A)
3. Using a USB-A to USB-B cable (also known as a standard printer
cable), plug your press into a Windows or Mac computer and run
the Pressware Connect application.
4. Whenever firmware updates are released, we will automatically
email you the file that you need.
Figure 1A
Figure 2A
USB-B Port
5. Next, visit Downloads
(https://gopurepressure.com/pages/downloads) to download the
appropriate files you will need. Make sure to select either the
correct Windows or Mac file version depending on your computer.
6. Once downloaded, unzip and open the files contained within the
firmware update folder. There will be step-by-step instructions
included that are specific for either operating system to update
your firmware to the latest version.

5. Press Operation
35
Loading and operating your PurePressure rosin press is simple and intuitive.
In the following sections, we will cover how to best operate your press.
Basic Steps to Start Pressing
1. Turn your press on.
2. Set your desired temperature(s) and then turn on
your top and bottom heaters.
3. Set your pressure with the air regulators.
4. Load your parchment into the front and rear
parchment clips, and then your bag between the
parchment.
5. Hit the two yellow buttons and start pressing!

5.1 Loading the Press
First, prepare your work area by having your
pre-filled filter bags and parchment paper
ready to go.
WARNING: be mindful of your heated press
plates!
Step 1: Fold a 12” x 20” PurePressure sheet of parchment
paper in half
● For vertical pressing, insert the folded end into the rear parchment clip.
● For horizontal pressing, insert the folded end into the front parchment
clip.
Note: We recommend using high
quality nitrile gloves whenever you
are working with rosin.
36
Figure 1A
Figure 2A
Step 2: Tuck the unfilled end of your rosin bag underneath
itself and then carefully insert and center your rosin filter bag
on top of the lower bottom heat plate. (Figure 1A)
Step 3: Lastly, cover the rosin filter bag with the top
parchment fold, re-center the bag, and while using tension on
the parchment, insert the open parchment end into the
parchment clip. (Figure 2A)
● For horizontal pressing, use tension on the parchment to close it
properly so that your bag does not slip down beyond the edge of the
heat plates.

5.2 Automated Pressure Control
How to Use the Automated Pressure System
Step 1: Ensure Your Air Pressure is Set to Maximum
Your press automatically comes set to the maximum
recommended PSI, but using the Air Regulator cap you can
adjust it up or down if necessary.
Check out this video for simple, visual
instructions.
@GoPurePressure
http://bit.ly/DualPressureVid
37
2
Components:
1. Air Regulator
2. Twist Cap
Recommended Regulator Settings
Pikes Peak: 120 PSI (set to maximum)
Longs Peak: 140 PSI (set to maximum)
Step 2: Adjusting Your Pressure
You can adjust the pressure either in the Quick Press menu
(described on slide 26) while pressing, or with the Air Pressure toggle
screen, which is show here (Figure 4). You can set your force either
in PSI or LBS, depending on your preference. Simply use the three
arrow button next to the Air Pressure menu option to toggle your
force selection.
Simply put in the pressure you wish you achieve and the system will
do the rest. When you are doing a Quick Press, your Automated
Pressure system will automatically record each pressure increase up
to 6 stages so you can save that into a new recipe, which will
increase in pressure just as you did.
Note: We recommend doing a few dry runs using the
Automated Pressure system to get a hang of it before you do
your first press.
1
3
3. Pressure
Gauge
4

5.3 Dual Pressure Control
How to Use the Dual Pressure System
Step 1: Set Regulator Pressures
To adjust pressure, pull up on the air regulator caps so that the
orange band is showing. Turn clockwise [right] to increase
pressure, and counterclockwise [left] to decrease pressure.
Check out this video for simple, visual
instructions.
@GoPurePressure
http://bit.ly/DualPressureVid
38
Components:
1. Regulator A,
Note: When decreasing pressure, it is important to go well below the
set point and then increase pressure to your desired set point. If this
is not performed as described, the pressure will drop as soon as air
begins to flow through the regulator. You may then increase the
pressure to your set point and it will stay steady.
Recommended Regulator Settings
Pikes Peak A: 5 PSI, B: 120 PSI
Longs Peak A: 5 PSI, B: 140 PSI
Note: you must operate your A regulator as the low pressure
regulator, and your B regulator as the high pressure regulator. If
you reverse this, it will cause solenoid/air signal malfunction.
Step 2: Using the Toggle Switch
The press will draw pressure from whichever regulator the toggle is
positioned towards, and will hold pressure (air is trapped in the
cylinder and applies a consistent pressing force) in the HOLD
position (middle).
To increase pressure slowly, move the toggle to the middle position
and then “bump” it to the right for approximately 1-2 seconds, and
then return to the HOLD position. Repeat 2-3 times until you achieve
the desired maximum pressure.
A B
C
used for low
pressure [left]
2. Regulator B,
used for high
pressure
[right]
3. Pressure
Toggle
Switch
Note: We recommend
doing a few dry runs
using the Dual Pressure
system to get a hang of
it before you do your
first press.

Note: Spend some time playing with
5.4 Plate Speed Control
the speed controller to get a hang of
what the press is capable of.
39
Controlling the actuation speed of your plates is helpful depending on what material
you are pressing.
To adjust your plate actuation speed, simply turn the
dial clockwise [right] to decrease speed or
counterclockwise [left] to increase speed.
The plate speed actuation knob acts as a flow
controller which throttles the air that is exhausting
from the opposite side of the piston in the air cylinder.
This opposing air pressure is bled out at a rate
controlled by the speed dial. This also means that the
initial pressing forces is applied at that speed. This is
useful to prevent bag blowouts when pressing kief, dry
sift and bubble hash.
Recommended Usage Speeds
● Flower: fast, fully threaded out
● Kief and Hash: slow, mostly threaded in
Note: If the plate speed controller is set too slow, the plates may not
come into contact and may make a hissing sound.

Note: Check out Section 3 of this
5.5 Pressing Material
manual for top tips, tricks, and
ideas to get the most out of your
PurePressure rosin press.
40
Now it’s time to put it together and press!
Once you’ve filled, packed, and gotten your bag ready to press, set your temperatures on the press. We
highly recommend using the preset recipes to begin pressing.
Step 1: Make sure your temperature and pressure
settings are set.
Step 2: Load your bag between the parchment,
ensuring it is properly centered. Then, secure both
parchment clip ends closed.
Step 3: Enter the “Quick Press” menu or load the recipe
you intend to use. You cannot operate the press from
the “Home” screen.
Step 4: Hold the two yellow buttons for 5 seconds to
initiate your press. If you release either button before
then, the press will automatically retract the heat plates.
There will be a countdown on the top.
Step 5: Once you see the oil flow slowing considerably
or stopping, end your cycle by hitting “Stop Press” or
letting the time expire on your pre-set recipe.

6. Maintenance & Troubleshooting
41
Your PurePressure rosin press is engineered to go the distance. Make sure to do
the following to ensure long term reliability.
★ Use an adequately grounded power outlet or a surge
protector.
★ Use clean, dry compressed air with your press.
★ Use your press indoors in a clean, low-dust room.
★ Use denatured alcohol or rubbing alcohol to quickly
clean your heat plates when they are at room
temperature with power disconnected.
★ If oil overflows onto the heater wires, turn the press off,
remove the power cable, and carefully clean them with
denatured alcohol or rubbing alcohol. Then, use some
extra parchment to prevent it from happening in the
future. Make sure the entire assembly is fully dry before
powering your press back on.
If you encounter an issue with your press that is not described in the following
pages, please contact us at support@gopurepressure.com

6.1 Common Issues
42
Problem: My plates won’t fully make contact.
Solution: Make sure to turn your plate speed
controller counterclockwise a few turns to open it up
as it comes threaded all the way in for shipping.
Problem: My plates aren’t retracting.
Solution: Make sure your pressure toggle switch is in
the A or B position. If it is in the hold position, it will
not be able to draw pressure to retract.
Problem: My pressure isn’t getting high enough.
Solution: Make sure the output pressure of your air
compressor is properly set. If your press is not
receiving full, adequate pressure, your regulators will
not be able to reach full pressure.
Problem: My flower isn’t yielding well.
Solution: Material relative humidity impacts flower
considerably - make sure your flower is properly
humidified to at least 55% - 62%. We recommend
using a humidor or a Boveda pack.
Problem: My bags are blowing out.
Solution: Make sure that you are starting at the
minimum pressure and that your Plate Speed Controller
is dialed nearly all the way in (clockwise) so that your
plates meet very slowly. Ramp up your pressure even
more slowly than you did before and ensure that oil is
flowing before you continue to increase pressure.
Additionally, we recommend double bagging your kief
and bubble hash until you determine safe pressure
stages, and especially if you are pressing very high grade
bubble hash. This is best done by having seams on
opposite sides, and the folded-end of the first bag
inserted downward into the second bag to ensure a fold
on both ends as well. We often double bag a 36 micron
inside of a 115 micron for the durability the 115 offers,
while getting the filtration of the 36 micron.
If you are ever blowing out a bag with flower, it is
probably because the bag is significantly over-packed
causing a blowout.

6.2 Frequently Asked Questions
43
What Micron Filter Bag Should I Use?
We typically recommend 36μm for kief and 115μm for
flower or shake to start, but highly suggest
experimenting with our 4 different micron types to see
where you find your best results.
25μm/36μm/72μm: bubble hash, kief/dry sift
90μm/115μm: flower, shake
Do I Need to Use a Filter Bag?
Unless you are pressing just a few well-humidified buds,
which you can certainly do without a bag, but otherwise,
you will need to.
At What Temperature Should I Press ?
For flower, most users find their best results between
200 °F and 220 °F. With kief or dry sift, most users find
their best results between 190 °F and 220 °F. Finally,
bubble hash, most users find their best results between
160 °F and 210 °F.
A higher temperature typically correlates to a higher
yield, but it can also mean terpene loss. Similarly, at a
lower temperature, quality tends to be higher but yields
often decrease.
What Pressure Should I Use?
For flower, use full pressure at a fast pressing speed. That
means 120 PSI for the Pikes Peak and 140 PSI for the Longs
Peak.
For kief and bubble hash, begin your press at the minimum
pressure (10 PSI) and work up from there.
How Much Should I Put in a Filter Bag?
Maximum Recommended Fill Amounts
● 2” x 3” Flower (6g) Kief/Bubble Hash (8g)
● 2” x 6” Flower (12g) Kief/Bubble Hash (16g)
● 2” x 9” Flower (18g) Kief/Bubble Hash (35g)
● 2.5” x 9” Flower (35g) Kief/Bubble Hash (70g)
How Long Should I Press For?
A good rule of thumb is that the smaller your bag is, the less
time you will need to press. Here are some general time
ranges based on bag size:
● 2” x 3” :45 - 2:00
● 2” x 6” 1:00 - 3:00
● 2” x 9” 1:30 - 4:00
● 2.5” x 9” 2:00 - 5:00

6.2 Frequently Asked Questions
cont.
How Do I Get a Lighter Colored Rosin?
Use the freshest material possible. Freshness of material is
critical to achieving clarity - the older it is, the darker it
tends to be. The sooner after harvesting and drying the
better, ideally within a week or two.
The other key factor involved in clarity is typically
temperature. The hotter the temperature, the darker it may
turn out, but only to a point. Find a balance between yield
and temperature for optimal results.
What Yields Can I Expect?
Material Yield Ranges
Flower: 15% - 30%
-Most commonly 18% - 24% with high quality material
Kief / Dry Sift: 30% - 60%
-Most commonly 40% - 50% with high quality material
44
What Strains Yield the Best?
Highly resinous, trichome-rich, and high potency strains are
always going to be your best yielders. These tend to skew more
towards indicas and hybrids, but sometimes a sativa will
surprise you!
Can I Press Trim?
We do not recommend pressing just straight trim; you will get
much better yields sifting your trim into kief first as opposed to
just pressing it as-is.
What is the Best Starting Material?
It is largely assumed that high quality bubble hash is the best
starting material for making rosin. Ultimately, it really comes
down to the quality of the starting material above all else. Ultra
premium flower will typically create a better rosin than 3 or 4
star bubble hash, however 5 and 6 star bubble hash will make
the highest value rosin.
Bubble Hash: 60% - 80%
-Most commonly 65% - 75% with high quality material
These yield ranges may vary and depend largely on the
quality and age of your material.
Should I Use Dry Ice with My Sifter for Rosin?
Using dry ice can lead to higher concentrations of undesired
plant matter into your dry sift or kief. We recommend only using
a small amount of pelletized dry ice (around the size of a grains
of rice), or even better, not using dry ice at all, if possible.

720-446-9565
purepressure.com
Sales Inquiries:
sales@gopurepressure.com
General Questions:
info@gopurepressure.com
Technical Support:
support@gopurepressure.com
@gopurepressure
User Manual R2.2
We’re always here to help.
 Loading...