

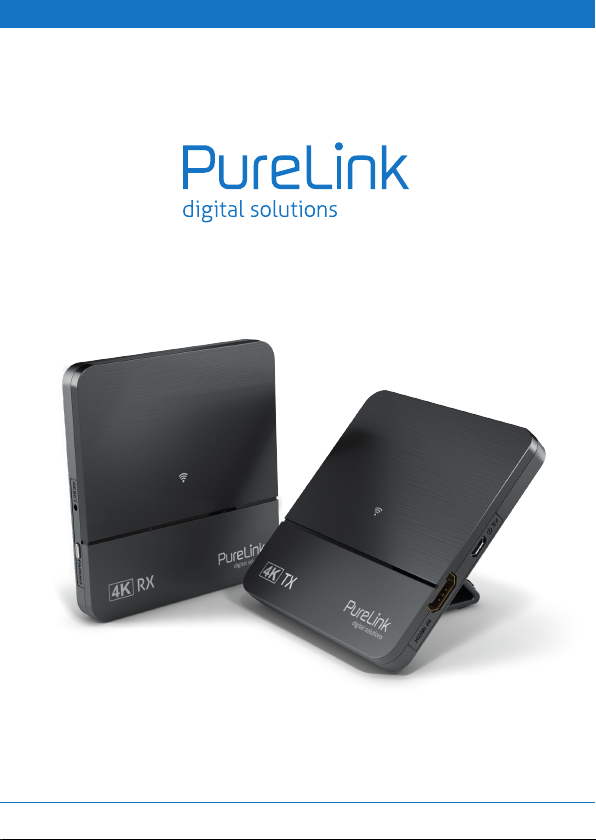
CSW200 User Manual | Benutzerhandbuch
Version: 2019-07-08

CSW200 | TABLE OF CONTENT
CHAPTER PAGE
Introduction ............................................................................................................................................................. 3
Intended Use ............................................................................................................................................................ 3
Intended Countries ................................................................................................................................................. 3
Safety Instructions ............................................................................................................................................ 3 - 4
Delivery Content ..................................................................................................................................................... 4
Features ..................................................................................................................................................................... 4
Specications .......................................................................................................................................................... 5
Connection Diagram .............................................................................................................................................. 6
Interface .................................................................................................................................................................... 7
Operation .................................................................................................................................................................. 8
Troubleshooting / FAQ ..................................................................................................................................... 8 - 9
Maintenance ............................................................................................................................................................ 9
Cleaning .................................................................................................................................................................... 9
Warranty and Liability ......................................................................................................................................... 10
CE Conformity ........................................................................................................................................................ 10
Disposal of the device ......................................................................................................................................... 10
Disclaimer ............................................................................................................................................................... 11
-2-
INTRODUCTION
Thank you for purchasing HDMI 4K Wireless Extender. Your satisfaction is very important to us. HDMI
4K Wireless Extender is designed to make the use of your 4K equipment more comfortable and versatile.
HDMI 4K Wireless Extender is the ideal product for UltraHD wireless applications. Sometimes you
may nd that a cabled connection is not suitable, a long HDMI cable is not available, or a cabled
connection is just not an option. You can use the HDMI 4K Wireless Extender for your UltraHD wire-
less applications such as Home Theatre, meeting rooms, or game room applications.
INTENDED USE
This product is intended for indoor use only. Do not use it outdoors. Contact with moisture, e.g. in
bathrooms, must be avoided under all circumstances.
For safety and approval purposes (CE), you must not rebuild and/or modify this product. If you use
the product for purposes other than those described above, the product may be damaged. In addition, improper use can cause hazards such as short circuiting, re, electric shock etc.
Read the instructions carefully and keep them. Make this product available to third parties only together with its operating instructions.
INTENDED COUNTRIES
Germany
SAFETY INSTRUCTIONS
Read the operating instructions carefully and especially observe the safety information. If you do
not follow the safety instructions and information on proper handling in this manual, we assume
no liability for any resulting personal injury or damage to property. Such cases will invalidate the
warranty/guarantee.
The device is not a toy. Keep it out of the reach of children and pets.
Do not leave packaging material lying around carelessly. These may become dangerous playing material for children.
Suocation Risk! Keep packaging materials away from children!
Protect the product from extreme temperatures, direct sunlight, strong jolts, high humidity, moisture,
ammable gases, vapors and solvents.
Do not place the product under any mechanical stress.
If it is no longer possible to operate the product safely, take it out of operation and protect it from
any accidental use.
-3-
ENGLISH

Safe operation can no longer be guaranteed if the product:
• is visibly damaged,
• is no longer working properly,
• has been stored for an extended period in poor ambient conditions or
• has been subjected to any serious transport-related stresses.
Please handle the product carefully. Jolts, impacts or a fall even from a low height can damage the
product.
Also observe the safety and operating instructions of any other devices which are connected to the
product.
Consult an expert when in doubt about the operation, safety or connection of the device.
This product contains radio frequency transmitters that emit electromagnetic elds. These electromagnetic elds may interfere with pacemakers, debrillators, and other medical devices. Keep at
least 6 inches (approximately 15 cm) of separation between your pacemaker or debrillator and this
product. If you suspect this product is interfering with your pacemaker or any other medical device,
stop using it and consult your physician for information specic to your medical device.
Make sure to observe the polarity and magnitude of the output voltage. Incorrect polarity or excessive voltage input leads to the destruction of the connected electrical appliance.
Sucient ventilation is essential when operating the product. Do not cover the product. Never place
the product on a table cloth or on a carpet! Place it on a hard, ame resistant base.
The product should not be used immediately after it has been brought from an area of cold temperature to an area of warm temperature. Condensed water might destroy the product. Wait until the
product adapts to the new ambient temperature before use.
Make sure that the output of the power adapter is not short-circuited.
DELIVERY CONTENTS
1x CSW200 Transmitter
1x CSW200 Receiver
2x Stand
2x DC 5V/1A Power Supply (Micro USB)
1x User Manual
FEATURES
• Supports wireless transmission of HDMI up to 4K@30p
• No Compression No latency
• Ultra Wide Band 60GHz
• HDCP compliant
• Long distance up to 10m Line of Sight
• Low power consumption
-4-

SPECIFICATIONS
Resolutions:
Supported HDTV resolution (HDMI): 480P, 576P, 720P, 1080P 24/30/60Hz, 4K 24/30Hz
Supported PC Resolution (max.) Max. 4096 x 2160p@30
Supported 3D formats Frame Packing 1080p@24Hz,720p@50/60Hz
Supported audio formats (digital)
Compressed formats AC3, Dolby 5.1, DTS
Supported standards HDMI, HDCP 2.0, HDMI1.4
Wireless Frequency Band: 60G
Operating range Up to 10m LOS
Latency Max. Near 0 seconds
RF Power Output: 28dBm max. / Receive Level -70dBm min.
Transmitter
HDMI input 1x
Dimensions 95 x 100 x 21.8mm
Receiver
HDMI output 1x
Dimensions 95 x 100 x 21.8mm
Power Supply
2x 100-240V AC @ 50-60Hz, 5V1A DC
-5-
ENGLISH
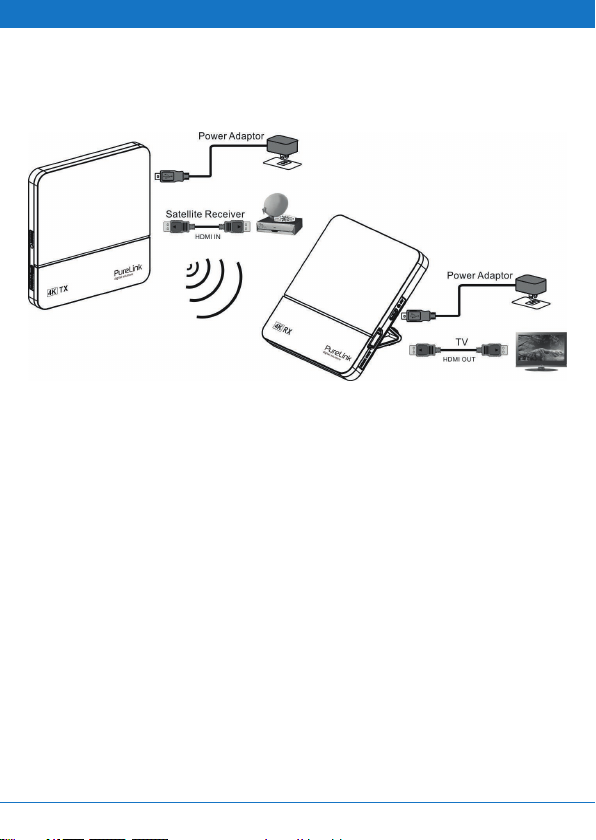
CONNECTION DIAGRAM
Connection:
Step 1: Use HDMI cable to connect the HDMI IN of CSW200 Transmitter to a 4K Source device
(Satellite receiver, CATV STB, BD player, PS4, Xbox)
Step 2: Use HDMI cable to connect the HDMI OUT of CSW200 Receiver to a 4K Display device
(UltraHDTV, Projector)
Step 3: Install the Stand in the most stable state , the stand can put change 45 or 90 degree
Step 4: Connect a DC 5V/1A power adaptor to the Power Jack (Micro USB type) of CSW
Transmitter and Receiver.
Step 5: Connection completed & ready to use.
If no video signal on your display, please pairing the TX and RX rst. (Press the PAIRING key of RX box
and then press the PAIRING key of TX box).
-6-
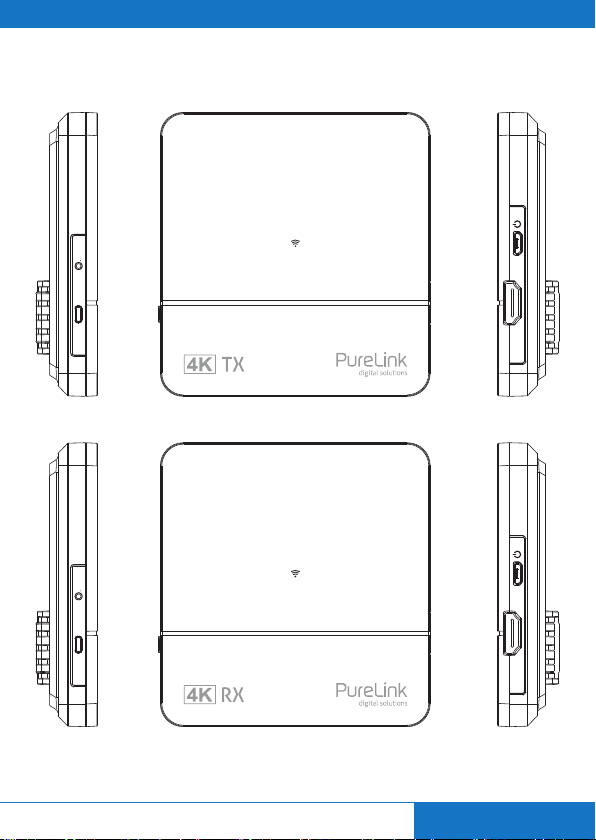
INTERFACE
RESET PAIRING
Side TopTransmitter-Box Receiver-Box Side
RESET PAIRING
5V
HDMI IN
5V
HDMI OUT
-7-
ENGLISH

OPERATION
A. Installation
1. Make sure your input AC voltage conforms to the adaptor specications. (Only use the power
adaptor provided with the CSW200. If you use your own adaptor, make sure the output connector
is micro USB and power output is DC 5V /1A.)
2. With direct line-of-sight, the maximum range of A/V signal transmission can reach up to about 10
metre, and this distance would be shortened by obstacles or walls placed between transmitter and
receiver. (The optimum indoor range is less than 10 metre)
B. TX & RX Pairing Mode
1. First Press “PAIRING” key once on the Receiver BOX.
2. And then Press “PAIRING” key once on the Transmitter BOX.
3. Connection will be auto-established after successfully paired.
LED Indication
There are LEDs for indication of System operation, for more detail please check the table bellowed.
Condition TX RX
Star up Power on
& No connection
PAIRING WHITE LED Flashing WHITE LED Flashing
Connection & Play LED solid WHITE LED solid WHITE
Note: To prevent overheating, please do not cover CSW200 Transmitter and Receiver with any object.
Factory Reset
Press the „Reset“ button and hold it for app. 1 second. When the LEDs ash, the CSW200 is being
reset to factory settings.
As soon as the LEDs light up white again, the reset is completed. The devices are automatically paired, no further manual pairing is required.
WHITE LED Flashing WHITE LED Flashing
TROUBLESHOOTING / FAQ
1. When there is no picture presented:
Then please make sure that the direct connection from source device to sink device can work
properly.
Check if all connectors are connected well; check if all cables can support the transmission
speed. High Speed HDMI cables are recommended.
Unplug the power cable to restart CSW200.
2. When there is no sound:
Then please try to adjust the volume of TV.
Check cable connection to see if it ts properly.
Check cable to see if it supports video transmission only (DVI) or it is damaged already.
HDCP may not match very well at rst connection; please unplug the power cable to restart
CSW200.
3. If the video is unstable, or snowing image shows on screen:
You might get interference form other wireless device or heavy power consumption house ware
-8-

(ex. Wi-Fi Router, Microwave, air conditioner…). Please keep CSW200 away from those sources of
interference.
The wireless transmission distance may be too far or blocked by wall or other object. Please
place CSW200 at other location where you can get good signal and video quality.
Please change the direction of Transmitter and Receiver stand to get better reception.
4. If the wireless connection fails:
Please make sure the power of source device which you want to use is turned ON.
Unplug the power cable to restart CSW200.
5. If the TX side is normally playing the video but RX side HDTV has no signal:
Ensure RX side HDTV supports higher or equal resolution.
MAINTENANCE
There are no components located inside the product that require maintenance. Never open or
attempt to dismantle the product.
Maintenance, modications and repairs are to be performed exclusively by an expert or at a qualied
shop.
If you have questions which remain unanswered by these operating instructions, contact our technical support service or other technical personnel.
CLEANING
Before cleaning the product, it must be disconnected from all other connected products.
Only use dry and soft cloth to clean the product housing of the.
Do not use abrasives or solvents.
Do not use any aggressive cleaning agents, rubbing alcohol or other chemical solutions as they can
cause damage to the housing or cause malfunctions.
To clean the product, use a soft, dry cloth. Do not apply too much pressure to the housing as this may
cause scratch marks.
You can easily remove dust using a soft bristled brush.
-9-
ENGLISH

WARRANTY AND LIABILITY
The manufacturer guarantees full statutory warranty terms on all new devices.
As the manufacturer has no inuence on installation, warranty only applies to the product itself.
If any fault or damage is detected on your product, please contact your dealer and provide your
sales slip or invoice as evidence of the purchase, if necessary. Your dealer will repair the fault either
on site, or send the device to the manufacturer. You make the work of our technicians considerably
easier, describing possible faults in detail – only then can you be assured that intermittent faults, will
be found and repaired with certainty!
The manufacturer is not liable for damages to persons or property caused by improper installation,
operation or maintenance, not described in this manual.
Do not alter or modify the product or its accessories.
Any use other than described in this user`s manual is not permitted and causes loss of warranty, loss
of guarantee, and non-liability.
CE CONFORMITY
PureLink GmbH hereby declares that the CSW200 radio communication system complies
with Directive 2014/53/EU.
The full text of the EU Declaration of Conformity is available at the following internet
address:
www.purelink.de/ce/4251364718537_CE.pdf
DISPOSAL OF THE DEVICE
WEEE-Reg. No.: DE 93847290
According to the European WEEE directive, any electrical and electronic equipment must
not be disposed of along with consumer waste. As a consumer, you are committed by law
to deposit electrical and electronic devices at public collecting points or to the dealer for
free at the end of the device’s lifetime. Details are regulated in the respective national
legislations. The Wheelie Bin symbol on the product, in the manual or on the packaging
refers to these terms. With the return of your used devices you actively take part in protecting the environment.
-10-

DISCLAIMER
This product complies with the statutory national and European requirements. All company names
and product names are trademarks of their respective owners.
We reserve our right for misprints and changes to the device, packaging or user manual.
The manufacturer reserves the right to make changes in the hardware, packaging, manual and any
accompanying documentation without prior notice.
The terms HDMI, HDMI High-Denition Multimedia Interface and the HDMI Logo are trademarks or
registered trademarks of HDMI Licensing LLC in the United States and other countries. CSW200 incorporates HDMI® technology.
-11-
ENGLISH

CSW200 | INHALTSVERZEICHNIS
KAPITEL SEITE
Einleitung ............................................................................................................................................................... 13
Bestimmungsgemäßer Gebrauch ...................................................................................................................... 13
Bestimmungsländer ............................................................................................................................................. 13
Sicherheitshinweise .................................................................................................................................... 13 - 14
Lieferumfang .......................................................................................................................................................... 14
Merkmale ................................................................................................................................................................ 15
Spezikationen ...................................................................................................................................................... 15
Anschlussplan ........................................................................................................................................................ 16
Schnittstelle ........................................................................................................................................................... 17
Inbetriebnahme ..................................................................................................................................................... 18
Problembehandlung / FAQ ........................................................................................................................ 18 - 19
Wartung ................................................................................................................................................................... 19
Reinigung ................................................................................................................................................................ 19
Gewährleistung und Haftung ............................................................................................................................. 20
CE Konformität ...................................................................................................................................................... 20
Geräteentsorgung ................................................................................................................................................. 20
Haftungsausschluss .............................................................................................................................................. 21
-12-

EINLEITUNG
Vielen Dank, dass Sie sich für den HDMI 4K Wireless Extender entschieden haben. Ihre Zufriedenheit
ist uns sehr wichtig. Der HDMI 4K Wireless Extender wurde entwickelt, um die Verwendung Ihrer
4K-Geräte komfortabler und vielseitiger zu gestalten.
HDMI 4K Wireless Extender ist das ideale Produkt für kabellose UltraHD-Anwendungen. In manchen
Fällen kann es vorkommen, dass eine Kabelverbindung nicht geeignet ist, ein langes HDMI-Kabel
nicht verfügbar ist oder eine Kabelverbindung nicht möglich ist. Sie können den HDMI 4K Wireless
Extender für Ihre kabellosen UltraHD-Anwendungen wie Heimkino, Besprechungsräume oder Spie-
lezimmeranwendungen verwenden.
BESTIMMUNGSGEMÄSSER GEBRAUCH
Eine Verwendung ist nur in geschlossenen Räumen, also nicht im Freien erlaubt. Der Kontakt mit
Feuchtigkeit, z.B. im Badezimmer u.ä. ist unbedingt zu vermeiden.
Aus Sicherheits- und Zulassungsgründen (CE) dürfen Sie das Produkt nicht umbauen und/oder verändern. Falls Sie das Produkt für andere Zwecke verwenden, als zuvor beschrieben, kann das Produkt
beschädigt werden. Außerdem kann eine unsachgemäße Verwendung Gefahren wie zum Beispiel
Kurzschluss, Brand, Stromschlag, etc. hervorrufen.
Lesen Sie sich die Bedienungsanleitung genau durch und bewahren Sie diese auf. Reichen Sie das
Produkt nur zusammen mit der Bedienungsanleitung an dritte Personen weiter.
BESTIMMUNGSLÄNDER
Deutschland
SICHERHEITSHINWEISE
Lesen Sie sich die Bedienungsanleitung aufmerksam durch und beachten Sie insbesondere die
Sicherheitshinweise. Falls Sie die Sicherheitshinweise und die Angaben zur sachgemäßen Hand-
habung in dieser Bedienungsanleitung nicht befolgen, übernehmen wir für dadurch resultierende
Personen-/Sachschäden keine Haftung. Außerdem erlischt in solchen Fällen die Gewährleistung/
Garantie.
Dieses Produkt ist kein Spielzeug. Halten Sie es von Kindern und Haustieren fern.
Lassen Sie das Verpackungsmaterial nicht achtlos liegen. Dieses könnte für Kinder zu einem gefährlichen Spielzeug werden.
Erstickungsgefahr! Halten Sie Verpackungsmaterial von Kindern fern!
Schützen Sie das Produkt vor extremen Temperaturen, direktem Sonnenlicht, starken Erschütterungen, hoher Feuchtigkeit, Nässe, brennbaren Gasen, Dämpfen und Lösungsmitteln.
Setzen Sie das Produkt keiner mechanischen Belastung aus.
-13-
DEUTSCH

Wenn kein sicherer Betrieb mehr möglich ist, nehmen Sie das Produkt außer Betrieb und schützen
Sie es vor unbeabsichtigter Verwendung. Der sichere Betrieb ist nicht mehr gewährleistet, wenn das
Produkt:
• sichtbare Schäden aufweist,
• nicht mehr ordnungsgemäß funktioniert,
• über einen längeren Zeitraum unter ungünstigen Umgebungsbedingungen gelagert wurde oder
• erheblichen Transportbelastungen ausgesetzt wurde.
Gehen Sie vorsichtig mit dem Produkt um. Durch Stöße, Schläge oder das Fallen schon aus geringer
Höhe kann das Produkt beschädigt werden.
Beachten Sie auch die Sicherheitshinweise und Bedienungsanleitungen der weiteren Geräte, an die
das Produkt angeschlossen wird.
Wenden Sie sich im Zweifel an einen Sachverständigen, wenn Sie Fragen zur Arbeitsweise, Sicherheit
oder Anschluss des Produktes haben.
Dieses Produkt enthält Komponenten, die elektromagnetische Felder erzeugen. Diese elektromagnetischen Felder können zu Beeinträchtigungen bei Herzschrittmachern, Debrillatoren und anderen medizinischen Geräten und Apparaturen führen. Achten Sie darauf, dass Sie das Produkt stets in
einem Abstand von etwa 15 cm zu Ihrem Herzschrittmacher oder Debrillator verwenden. Wenn Sie
den Verdacht hegen, dass das Produkt mit Ihrem Herzschrittmacher oder einem anderen medizinischen Gerät interferiert, stellen Sie die Verwendung unverzüglich ein und ziehen Sie Ihren Arzt zu
Rate, um genauere Informationen zu Ihrem medizinischen Gerät zu erhalten.
Beachten Sie die Polarität und Stärke der Ausgangsspannung. Falsche Polarität oder zu starke Span-
nung führen zur Zerstörung des angeschlossenen Geräts.
Achten Sie beim Betrieb des Geräts auf eine ausreichende Luftzirkulation. Decken Sie das Produkt
nicht ab. Stellen Sie das Gerät niemals auf eine Tischdecke oder einen Teppich! Platzieren Sie das
Gerät auf einer stabilen, feuerfesten Unterlage.
Das Gerät sollte nicht sofort nach einem Wechsel von kalter zu warmer Umgebung angeschlossen
werden. Kondenswasser könnte zu Schäden am Gerät führen. Warten Sie, bis sich das Gerät der neuen Umgebungstemperatur angepasst hat.
Stellen Sie sicher, dass der Ladeausgang nicht kurzgeschlossen wird.
LIEFERUMFANG
1x CSW200 Transmitter
1x CSW200 Empfänger
2x Ständer
2x DC 5V/1A Netzteil (Micro USB)
1x Bedienungsanleitung
-14-

MERKMALE
• Unterstützt die drahtlose Übertragung von HDMI bis zu 4K@30p
• Keine Komprimierung keine Latenz
• Ultra Wide Band 60GHz
• HDCP-kompatibel
• Große Entfernung bis zu 10m Sichtweite
• Energieezient
SPEZIFIKATIONEN
Auösungen
Unterstützte HDTV-Auösung (HDMI): 480P, 576P, 720P, 1080P 24/30/60 Hz, 4K 24/30 Hz
Unterstützte PC-Auösung (max.) Max. 4096 x 2160p@30
Unterstützte 3D-Formate Frame Packing 1080p @ 24Hz, 720p @ 50 / 60Hz
Unterstützte Audioformate (digital)
Komprimierte Formate AC3, Dolby 5.1, DTS
Unterstützte Standards HDMI, HDCP 2.0, HDMI1.4
Funkfrequenzband: 60G
Betriebsbereich Bis zu 10m Sichtweite
Latenz max. In der Nähe von 0 Sekunden
max. abgestrahlte Sendeleistung: 28dBm max. / Empfangsstufe -70dBm min.
Sender
HDMI-Eingang 1x
Abmessungen 95 x 100 x 21,8 mm
Empfänger
HDMI-Ausgang 1x
Abmessungen 95 x 100 x 21,8 mm
Netzteil
2x 100-240 V DC bei 50-60 Hz, 5V1A DC
-15-
DEUTSCH

ANSCHLUSSPLAN
Verbindung:
Schritt 1: Verwenden Sie ein HDMI-Kabel, um den HDMI IN des CSW200 Transmitter an ein
4K-Quellgerät (Satellitenempfänger, CATV STB, BD-Player, PS4, Xbox) anzuschließen.
Schritt 2: Verwenden Sie ein HDMI-Kabel, um den HDMI OUT des CSW200 Receiver an ein
4K-Anzeigegerät (UltraHDTV, Projektor) anzuschließen.
Schritt 3: Installieren Sie den Standfuß im stabilsten Zustand, der Standfuß kann um 45 oder
90 Grad eingestellt werden
Schritt 4: Schließen Sie ein DC 5V / 1A-Netzteil an die Power-Buchse (Micro-USB-Typ) des
CSW-Senders und -Empfängers an.
Schritt 5: Verbindung abgeschlossen und einsatzbereit.
Wenn auf Ihrem Display kein Videosignal angezeigt wird, koppeln Sie zuerst TX und RX. (Drücken Sie
die PAIRING-Taste der RX-Box und dann die PAIRING-Taste der TX-Box).
-16-

SCHNITTSTELLE
RESET PAIRING
RESET PAIRING
5V
HDMI IN
OberseiteTransmitter-Box Receiver-Box Seitenansicht Seitenansicht
5V
HDMI OUT
-17-
DEUTSCH

INBETRIEBNAHME
A. Installation
1. Stellen Sie sicher, dass Ihre Eingangswechselspannung den Adapterspezikationen entspricht.
(Verwenden Sie nur das mit dem CSW200 gelieferte Netzteil. Wenn Sie einen eigenen Adapter
verwenden, stellen Sie sicher, dass der Ausgangsstecker Micro-USB ist und der Ausgang DC 5V /
1A ist.)
2. Bei direkter Sichtverbindung kann die maximale Reichweite der A/V-Signalübertragung bis zu 10
Meter betragen. Diese Entfernung würde durch Hindernisse oder Wände zwischen Sender und
Empfänger verkürzt. (Die optimale Innenreichweite beträgt weniger als 10 Meter)
B. TX- und RX-Pairing-Modus
1. Drücken Sie einmal die Taste „PAIRING“ an der Receiver BOX.
2. Drücken Sie dann einmal die “PAIRING” -Taste an der Transmitter BOX.
3. Die Verbindung wird nach erfolgreichem Pairing automatisch hergestellt.
LED-Anzeige
Es gibt LEDs zur Anzeige des Systembetriebs. Weitere Informationen nden Sie in der untenstehenden Tabelle.
Bedingung TX RX
Star up Power einschalten
& Keine Verbindung
PAIRING WEIßE LED blinkt WEIßE LED blinkt
Connection & Play LED durchgehend WEIß LED durchgehend WEIß
Hinweis: Um eine Überhitzung zu vermeiden, decken Sie den CSW200-Sender und -Empfänger nicht
ab.
Werkseinstellungen Zurücksetzen
Halten Sie den „Reset“ Knopf ca. 1 Sekunde gedrückt. Die LEDs blinken und der CSW200 wird auf
Werkszustand zurückgesetzt.
Sobald die LEDs wieder durchgehend weiß leuchten, ist der Reset abgeschlossen. Die Geräte sind
automatisch miteinander gekoppelt, kein weiteres Pairing erforderlich.
WEIßE LED blinkt WEIßE LED blinkt
PROBLEMBEHANDLUNG / FAQ
1. Wenn kein Bild angezeigt wird:
Stellen Sie dann sicher, dass die direkte Verbindung vom Quellgerät zum Senkengerät ordnungsgemäß funktioniert.
Prüfen Sie, ob alle Anschlüsse korrekt verbunden sind. Prüfen Sie, ob alle Kabel die Übertragungsgeschwindigkeit unterstützen. Es werden Hochgeschwindigkeits-HDMI-Kabel empfohlen.
Ziehen Sie das Netzkabel ab, um den CSW200 neu zu starten.
2. Wenn kein Ton vorhanden ist:
Dann versuchen Sie bitte, die Lautstärke des Fernsehers einzustellen.
Überprüfen Sie die Kabelverbindung, um festzustellen, ob sie richtig passt.
Überprüfen Sie das Kabel, um zu sehen, ob es nur Videoübertragung (DVI) unterstützt oder be-
reits beschädigt ist.
-18-

HDCP stimmt bei der ersten Verbindung möglicherweise nicht gut überein; Bitte ziehen Sie das
Netzkabel heraus, um den CSW200 neu zu starten.
3. Wenn das Video nicht stabil ist oder ein Bild auf dem Bildschirm erscheint, wenn es schneit:
Es kann zu Störungen durch andere drahtlose Geräte oder Hausgeräte mit starkem Stromverbrauch kommen (z. B. WLAN-Router, Mikrowelle, Klimaanlage…). Bitte halten Sie den CSW200
von diesen Störquellen fern.
Die drahtlose Übertragungsentfernung ist möglicherweise zu weit entfernt oder durch eine
Wand oder ein anderes Objekt blockiert. Stellen Sie den CSW200 an einem anderen Ort auf, an
dem Sie eine gute Signal- und Videoqualität erhalten.
Bitte ändern Sie die Richtung von Sender und Empfänger, um einen besseren Empfang zu erhalten.
4. Wenn die drahtlose Verbindung fehlschlägt:
Stellen Sie sicher, dass die Stromversorgung des Quellgeräts, das Sie verwenden möchten, eingeschaltet ist.
Ziehen Sie das Netzkabel ab, um den CSW200 neu zu starten.
5. Wenn auf der TX-Seite normalerweise das Video abgespielt wird, der HD-Fernseher auf der
RX-Seite jedoch kein Signal hat:
Stellen Sie sicher, dass der RX-seitige HDTV eine höhere oder gleiche Auösung unterstützt.
WARTUNG
Es sind keinerlei für Sie zu wartende Bestandteile im Inneren des Produkts, önen/zerlegen Sie es
deshalb niemals.
Lassen Sie Wartungs-, Anpassungs- und Reparaturarbeiten ausschließlich von einem Fachmann bzw.
einer Fachwerkstatt durchführen.
Sollten Sie noch Fragen haben, die in dieser Bedienungsanleitung nicht beantwortet werden konnten, wenden Sie sich an unseren technischen Kundendienst oder an einen Sachverständigen.
REINIGUNG
Vor jeder Reinigung ist das Produkt von den angeschlossenen Produkten zu trennen.
Verwenden Sie nur ein trockenes, weiches Tuch, um das Gehäuse des Produkts zu reinigen.
Verwenden Sie keine Scheuer- oder Lösungsmittel.
Verwenden Sie auf keinen Fall aggressive Reinigungsmittel, Reinigungsalkohol oder andere chemische Lösungen, da dadurch das Gehäuse angegrien oder gar die Funktion beeinträchtigt werden
kann.
Zur Reinigung genügt ein trockenes, weiches und sauberes Tuch. Drücken Sie nicht zu stark auf das
Gehäuse, dies führt zu Kratzspuren.
Staub kann mit Hilfe eines langhaarigen, weichen und sauberen Pinsels leicht entfernt werden.
Gewährleistung und Haftung
-19-
DEUTSCH

GEWÄHRLEISTUNG UND HAFTUNG
Der Hersteller gewährt auf ein neues Produkt die gesetzliche Gewährleistung.
Da der Hersteller keinen Einuss auf die Installation des Produktes hat, deckt die Gewährleistung
nur das Produkt selbst ab.
Falls ein Fehler oder Defekt an Ihrem Produkt festgestellt werden sollte, wenden Sie sich bitte an
Ihren Fachhändler und zeigen Sie ggf. Ihre Quittung oder Rechnung als Kaufnachweis vor. Ihr Händ-
ler wird den Fehler entweder vor Ort beheben, oder das Produkt an den Hersteller weiterleiten. Sie
erleichtern unseren Technikern ihre Arbeit sehr, wenn Sie eventuelle Fehler ausführlich beschreiben – nur dann haben Sie Gewähr, dass auch selten auftretende Fehler mit Sicherheit gefunden und
beseitigt werden!
Der Hersteller haftet nicht für Personen- oder Sachschäden, die durch unsachgemäße Installation,
Bedienung oder Wartung, die nicht in dieser Anleitung beschrieben sind, entstanden sind.
Ändern und modizieren Sie das Produkt und dessen Zubehör nicht.
Ein anderer als in dieser Betriebsanleitung beschriebener Einsatz ist unzulässig und führt zu Gewährleistungsverlust, Garantieverlust und Haftungsausschluss.
CE KONFORMITÄT
Hiermit erklärt PureLink GmbH, dass der Funkanlagentyp CSW200 der Richtlinie
2014/53/EU entspricht.
Der vollständige Text der EU-Konformitätserklärung ist unter der folgende Internetad-
resse verfügbar:
www.purelink.de/ce/4251364718537_CE.pdf
GERÄTEENTSORGUNG
WEEE-Reg. Nr.: DE 93847290
Elektrische und elektronische Geräte dürfen nach der europäischen WEEE Richtlinie
nicht mit dem Hausmüll entsorgt werden. Als Verbraucher sind Sie nach dem ElektroG
verpichtet, elektrische und elektronische Geräte am Ende ihrer Lebensdauer an den
dafür eingerichteten, öentlichen Sammelstellen oder an die Verkaufsstelle kostenlos
zurückzugeben. Einzelheiten dazu regelt das jeweilige Landesrecht. Das Symbol auf dem
Produkt, der Gebrauchsanleitung oder der Verpackung weist auf diese Bestimmungen
hin. Mit dieser Art der Verwertung von Altgeräten leisten Sie einen wichtigen Beitrag
zum Schutz unserer Umwelt.
-20-

HAFTUNGSAUSSCHLUSS
Das Produkt entspricht den gesetzlichen, nationalen und europäischen Anforderungen. Alle enthaltenen Firmennamen und Produktbezeichnungen sind Warenzeichen der jeweiligen Inhaber.
Druckfehler und Änderungen an Gerät, Verpackung oder Anleitung behalten wir uns vor.
Der Hersteller behält sich das Recht vor, Änderungen an Hardware, Verpackung, Handbuch oder
anderen dazugehörigen Dokumenten ohne vorausgehenden Hinweis zu ändern.
Die Marken HDMI, HDMI High-Denition Multimedia Interface und das HDMI Logo sind Markenzei-
chen oder eingetragene Markenzeichen von HDMI Licensing LLC in den USA und anderen Staaten.
CSW200 beinhaltet HDMI® Technologie.
-21-
DEUTSCH

Empfohlene Distanz (80% der angegebenen max. Reichweite)
Recommended distance (80% of the max. specied distance)
-22-
0%

110%100%80%

Stein- und Betonwände
absorbieren das Signal
(teilweise)
Stone- and concrete walls
(partly) absorb the signal
Wi-Fi-Router können für
Interferenzen sorgen
Wi-Fi-Routers can cause
interferences
Metalltüren
blockieren / reektieren
das Signal
Metal doors
block / reect the signal
-24-

Stahlbetonwände
blockieren / reektieren
das Signal
Ferroconcrete walls
block / reect the signal
Spiegel blockieren das Signal
Mirrors block the signal
1m Abstand zu anderen Geräten
1m Distance to other devices
Verzögerung > 500ms
Delay > 500ms

-26-

-27-

PureLink GmbH
Von-Liebig-Straße 10
D - 48432 Rheine
Germany
Telefon: 0049 (0)5971-800 299 -0
Fax: 0049 (0)5971-800 299 -99
E-mail: info@purelink.de
Internet: www.purelink.de
© 2019 PureLink GmbH. All rights reserved.
All trade names are registered trademarks of
respective manufactures listed.
HDMI® is a registered trademark of
HDMI Licensing Administrator, Inc.
 Loading...