

Puregas P4200PM, P5000PM User Manual
P4200PM / P5000PM
Remote Air Dryer
User’s Guide
P012649 – Rev B


PUREGAS, LLC P4200PM / P5000PM Remote Air Dryer User’s Guide
1. Welcome & Congratulations
Congratulations on your purchase of a new PUREGAS P4200PM / P5000PM Air Dryer!
We here at PUREGAS are very proud of our products and we are committed to providing
you with the best value and service possible.
We are sure that you will be satisfied with your new air dryer and would like to thank you
for choosing PUREGAS for your air dryer requirements. We also hope that you will
continue to choose us for your future air pressure and related product purchases.
For information about this and other PUREGAS products, please visit us on the web at:
www.puregas.com
2. Introduction
PLEASE READ THIS USER’S GUIDE THOROUGHLY AND SAVE FOR
FUTURE REFERENCE.
This User’s Guide is provided for the benefit of our customers and contains information
and direction specific to the PUREGAS P4200PM / P5000PM Air Dryer. It will cover
topics including: safety, specifications, installation, registration, operation, testing,
maintenance, replacement parts, service, and troubleshooting issues. Observation and
compliance with this User’s Guide will ensure the maximum life and efficiency of your
air dryer.
This User’s Guide should be read thoroughly prior to installing, operating, or servicing
the air dryer in order to become familiar with the recommended procedures. This will
minimize the possibility of personal injury or damage to the unit due to improper
operation or handling.
Page 3 of 79 P012649 – Rev B

PUREGAS, LLC P4200PM / P5000PM Remote Air Dryer User’s Guide
3. Table of Contents
8.12 Connecting to Common Alarm Terminal
1. Welcome & Congratulations .......................... 3
Block ............................................................... 31
2. Introduction ..................................................... 3
3. Table of Contents ............................................. 4
4. Safety & Warning Information ...................... 6
5. Overview & Specifications .............................. 8
5.1 Product Description .................................... 8
5.2 Key Features ............................................... 8
5.3 Technical Specifications ............................. 9
5.4 Dryer Function Overview ......................... 10
6. Installing Your Dryer .................................... 11
6.1 Safety & Warning Information ................. 11
6.2 Before You Begin ..................................... 12
6.3 Included Contents ..................................... 13
6.4 Required Tools and Materials ................... 13
6.5 Installation Steps ....................................... 14
6.6 Installation Checklist ................................ 21
8.13 Reconfiguring the Common Alarm ........ 31
9. Testing Your Dryer ....................................... 32
9.1 Safety & Warning Information ................. 32
9.2 Measuring Compressor Amp Draw .......... 33
9.3 Measuring Voltage to Compressor ........... 34
9.4 Measuring Incoming Voltage ................... 35
9.5 Measuring Voltages at Solid State Relay .. 36
9.6 Testing Consistent Heatless Dryer
Cycling............................................................ 38
9.7 Testing Unloader Valve ............................ 39
9.8 Measuring Heatless Dryer Solenoid
Voltage............................................................ 41
9.9 Testing Fan ............................................... 42
9.10 Testing Cabinet Heater ........................... 43
9.11 Testing Compressor ON/OFF Cycling ... 44
9.12 Testing Compressor Excessive Run
Time Alarm ..................................................... 45
9.13 Testing Humidity Alarm and System
7. Registering Your Dryer ................................ 21
8. Operating Your Dryer .................................. 22
8.1 Safety & Warning Information ................. 22
8.2 Connecting Air Lines to the Dryer ........... 23
8.3 Powering the Dryer ON & OFF ................ 23
8.4 Opening Doors and Panels ........................ 24
8.5 Sliding the Compressor Tray Out ............. 25
8.6 Depressurizing the Dryer .......................... 25
8.7 Setting the System Pressure ...................... 26
8.8 Setting the Outlet Pressure ........................ 27
8.9 Identifying Control Board Components ... 28
8.10 Setting the Low Pressure Alarm Set
Point ................................................................ 29
8.11 Setting the Compressor Run Time Alarm30
Shutdown ........................................................ 46
9.14 Testing Humidity Open Circuit, Bypass
Valve, and Shutdown ...................................... 48
9.15 Testing Low Outlet Pressure Alarm ....... 50
9.16 Testing Air Fittings & Hoses for Leaks .. 52
10. Maintaining Your Dryer ............................. 53
10.1 Safety & Warning Information ............... 53
10.2 Six Month Maintenance .......................... 55
11. Replacement Parts & Accessories .............. 56
11.1 Upper Section Parts ................................ 56
11.2 Front Panel Assembly Parts .................... 57
11.3 Internal Cabinet Parts .............................. 58
11.4 Heatless Dryer Assembly Parts ............... 59
11.5 Lower Section Parts ................................ 60
Page 4 of 79 P012649 – Rev B

PUREGAS, LLC P4200PM / P5000PM Remote Air Dryer User’s Guide
11.6 Compressor Assembly Parts ................... 61
11.7 Accessories for Your Dryer .................... 62
11.8 Ordering Parts from PUREGAS ............. 63
12. Service & Repair .......................................... 64
12.1 Services Offered ..................................... 64
12.2 Initiating a Service Transaction .............. 64
13. Troubleshooting Your Dryer ...................... 65
13.1 Before You Call PUREGAS ................... 65
13.2 Safety & Warning Information ............... 65
13.3 Air Dryer Won’t Power ON ................... 67
13.4 Low Outlet Pressure Alarm .................... 67
13.5 Can’t Create a Low Pressure Alarm ....... 67
13.6 High Humidity ........................................ 68
13.7 Can’t Create a High Humidity Alarm /
Shutdown ........................................................ 69
13.8 Inconsistent Heatless Dryer Cycling ....... 69
13.13 Can’t Create a Compressor Excessive
Run Time Alarm ............................................. 72
13.14 Compressor Rapid ON/OFF Cycling .... 72
13.15 Contacting PUREGAS Technical
Support............................................................ 73
14. Appendix ...................................................... 74
14.1 Wiring Diagram ...................................... 74
14.2 Set Point Limits and Defaults ................. 76
15. Limited Warranty Agreement .................... 77
Registration Reminder .................................... 77
16. Contacting PUREGAS ................................ 78
16.1 General .................................................... 78
16.2 Sales ........................................................ 78
16.3 Service .................................................... 78
16.4 Technical Support ................................... 78
13.9 Compressor Doesn’t Operate .................. 70
13.10 Compressor Won’t Build Pressure ....... 70
13.11 Compressor Excessive AMP Draw ....... 71
13.12 Compressor Excessive Run Time
Alarm .............................................................. 71
17. Notes.............................................................. 79
Page 5 of 79 P012649 – Rev B
PUREGAS, LLC P4200PM / P5000PM Remote Air Dryer User’s Guide
4. Safety & Warning Information
This section contains general information about safety and warning points to consider and
adhere to during installation, operation, and maintenance of your air dryer. PLEASE
READ THIS SECTION BEFORE PERFORMING ANY OPERATION OR
PROCEDURE ON YOUR AIR DRYER.
Additional warnings specific to an operation or procedure will also be presented
throughout the following sections. These will include the
“WARNING!
attention for these warnings and read them as you encounter them.
”, “CAUTION!”, or “IMPORTANT!”. Please be sure to pay close
WARNING!
For your safety, all the information in this User’s Guide must be
followed to minimize the risk of electrical shock, and prevent
property damage or personal injury.
WARNING!
Extreme care should be exercised to avoid contact with live
electrical circuits. Many procedures performed during installation,
operation, testing, and maintenance of this air dryer require the
equipment to be running, creating a situation for potential electrical
shock. It is highly recommended that you remove all jewelry before
performing any procedures.
symbol as well as a label of
Page 6 of 79 P012649 – Rev B
WARNING!
Internal surfaces may be hot. Use care when coming into contact
with internal components as there is a potential for some of these
components to become hot when in operation or standby.
PUREGAS, LLC P4200PM / P5000PM Remote Air Dryer User’s Guide
y
CAUTION!
Proper Installation & Maintenance as outlined in this User’s Guide is
extremely important to ensure the reliability and longevity of the
equipment as well as prevent damage or personal injury.
CAUTION!
Depressurizing the air dryer may be necessary before performing
certain procedures. NEVER remove pressure sensing tubes from the
Control Board without depressurizing the air dryer first, or damage to
the Control Board will occur.
CAUTION!
Incoming power to dryer must be 110 - 125 VAC, 1 Phase, 50/60 Hz
with minimum 30 amp service with a 25 amp slow blow fuse. If hard-wiring
directly, minimum of 14 AWG wire must be used.
CAUTION!
This Air Dryer does not contain an internal Surge Protection Device
(SPD). If an SPD is required it must be supplied by the user.
CAUTION!
Observe precautions for handling Electrostatic Sensitive Devices.
IMPORTANT!
Performing routine maintenance as outlined in the Maintaining Your
Dryer section will ensure optimal performance over the lifecycle of
our air dryer.
Page 7 of 79 P012649 – Rev B

PUREGAS, LLC P4200PM / P5000PM Remote Air Dryer User’s Guide
IMPORTANT!
5. Overview & Specifications
5.1 Product Description
The P4200PM / P5000PM Air Dryer from PUREGAS is designed to intake wet
ambient air and remove the moisture for delivery to applications requiring a constant,
on-demand source of dry, pressurized air. This process is fully automatic and will
remain consistent with minimal required periodic maintenance. This dryer is designed
Performing procedures not described in this User’s Guide or installing
components not supplied by PUREGAS is NOT RECOMMENDED
AND MAY VOID THE WARRANTY.
specifically for outdoor use.
The P4200PM / P5000PM Air Dryer employs the principles of compression and
pressure swing adsorption. The operation is fully automatic and relatively
maintenance free. The unit offers the necessary gauges and controls to ensure the
delivery of dry air at proper pressure and humidity, along with removable component
assemblies allowing easier access for adjustment and maintenance.
5.2 Key Features
Solid state based circuitry eliminates costly maintenance
Accurate humidity sensing within 0.1% RH
Removable compressor tray, front panel, and heatless dryer for easy
maintenance
Oil-less type compressor
Page 8 of 79 P012649 – Rev B

PUREGAS, LLC P4200PM / P5000PM Remote Air Dryer User’s Guide
5.3 Technical Specifications
P4200PM P5000PM
Output Capacity
Normal:
Maximum:
Power Requirements
Running Amps
Outlet Pressure Range
Outlet Air Humidity
Compressor Type
Drying Method
Operating Temperature
Range
Noise Level:
Alarms
Outlet Connections
Dimensions
Net / Shipping Weight
2,600 SCFD continuous
4,200 SCFD emergency
110 - 125 VAC, 1 Phase, 50/60 Hz
(30 Amp service recommended)
12 Amps 16 Amps
0 – 20 PSI (adjustable)
Less than 2% RH
2-cylinder, 3/4 HP, Rocker,
oil-less
Heatless Desiccant
-40 to 120 F (-40 to 48 C)
(Optimal: 40 to 85 F (5 to 30 C))
48 dBA at 3’ 68 dBA at 10’
Standard alarms – Complete measurement of all critical
1/2” NPT Female
23.25” D x 17.5” W x 47.75” H
(59.0 cm x 44.5 cm x 121.3 cm)
212 lbs (96 kgs) /
233 lbs (106 kgs)
3,000 SCFD continuous
5,000 SCFD emergency
2-cylinder, 1 HP, Piston,
points
255 lbs (116 kgs) /
276 lbs (125 kgs)
oil-less
Page 9 of 79 P012649 – Rev B
PUREGAS, LLC P4200PM / P5000PM Remote Air Dryer User’s Guide
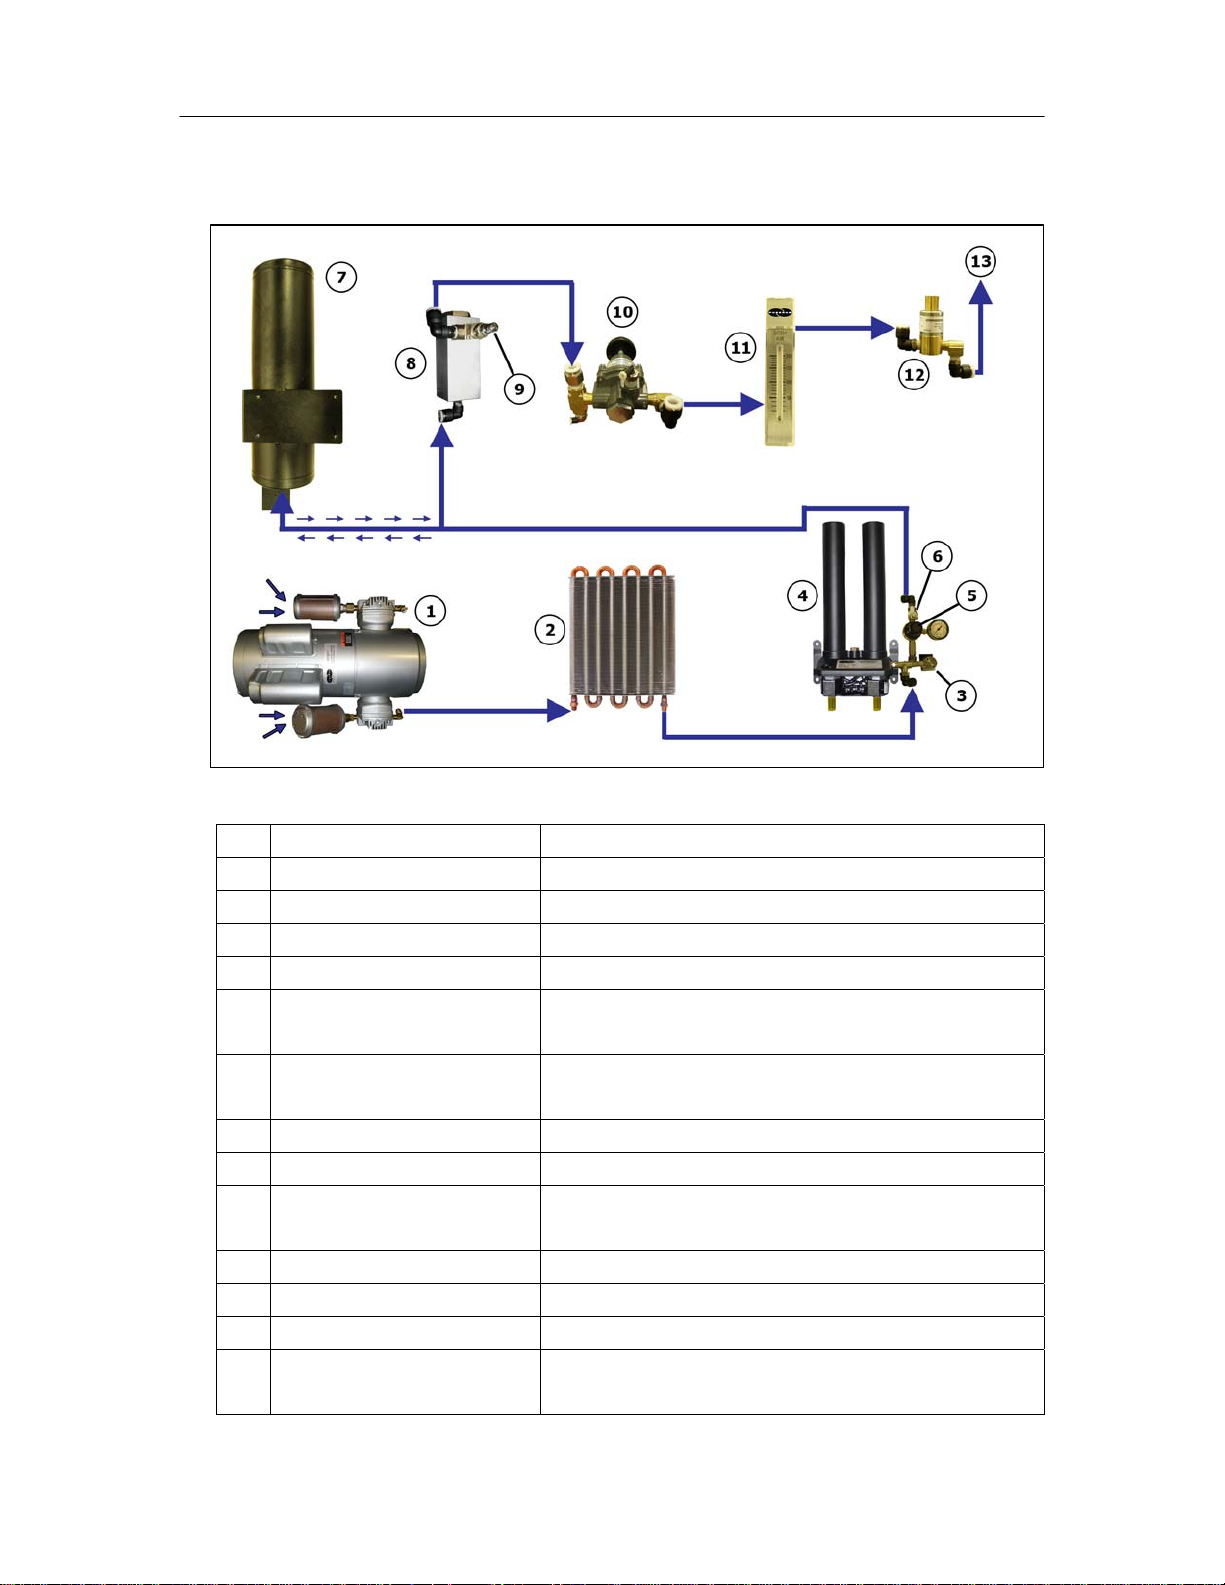
5.4 Dryer Function Overview
# Component Description
1 Compressor Compresses drawn in ambient air.
2 Precooler Cools compressed air prior to drying function.
3 Unloader Valve Relieves excess compressor head pressure.
4 Heatless Dryer Removes moisture from compressed air.
5 Capacity Control Valve Regulates system pressure and prevents air from
bleeding back through the heatless dryer.
6 Safety Relief Valve Prevents system from over pressurizing by
releasing at high pressure.
7 Air Tank Stores dry compressed air.
8 Humidity Sensor Measures the humidity of the compressed air.
9 F-Type Valve Provides a point to test system Humidity with an
external tester.
10 Outlet Pressure Regulator Regulates the outlet pressure.
11 Flow Meter Measures the flow of compressed air.
12 Bypass Valve Bypasses wet humid air to atmosphere.
13 Pressure Outlet Outputs the pressure set by the Outlet Pressure
Regulator.
Page 10 of 79 P012649 – Rev B
PUREGAS, LLC P4200PM / P5000PM Remote Air Dryer User’s Guide
6. Installing Your Dryer
6.1 Safety & Warning Information
WARNING!
Internal surfaces may be hot. Use care when coming into contact
with internal components as there is a potential for some of these
components to become hot when in operation or standby.
WARNING!
Extreme care should be exercised to avoid contact with live
electrical circuits. Many procedures performed during
installation, operation, testing, and maintenance of this air dryer
require the equipment to be running, creating a situation for
potential electrical shock. It is highly recommended that you
remove all jewelry before performing any procedures.
CAUTION!
Proper Installation & Maintenance as outlined in this User’s Guide
is extremely important to ensure the reliability and longevity of the
equipment as well as prevent damage or personal injury.
CAUTION!
Incoming power to air dryer must be 110 - 125 VAC, 1 Phase, 50/60
Hz with minimum 30 amp service with a 25 amp slow blow fuse. If hardwiring directly, minimum of 14 AWG wire must be used.
Page 11 of 79 P012649 – Rev B
PUREGAS, LLC P4200PM / P5000PM Remote Air Dryer User’s Guide
CAUTION!
This Air Dryer does not contain an internal Surge Protection Device
(SPD). If an SPD is required it must be supplied by the user.
IMPORTANT!
Performing procedures not described in this User’s Guide or installing
components not supplied by PUREGAS is NOT RECOMMENDED
AND MAY VOID THE WARRANTY.
6.2 Before You Begin
6.2.1 Carefully inspect the unit, including the shipping box as well as the air
dryer, for ANY DAMAGE CAUSED BY SHIPPING. If any shipping
damage is detected, it is important to file a claim with the shipping
company prior to continuing the installation procedures.
6.2.2 Read the entire Installing Your Dryer section to familiarize yourself with the
components and procedures before performing the air dryer installation.
6.2.3 Verify the installation location of the air dryer:
6.2.3.1 Well secured location
6.2.3.2 PUREGAS recommends the air dryer be mounted a minimum of one
(1) foot from the ground.
6.2.3.3 Ambient temperature lower than 120°F (85° F optimal).
NOTE: Higher temperatures will decrease component lifespan.
Page 12 of 79 P012649 – Rev B
PUREGAS, LLC P4200PM / P5000PM Remote Air Dryer User’s Guide
6.2.3.4 Meets the following power requirements:
110 - 125 VAC, 50/60 Hz
Minimum 30 amp service with a 25 amp slow blow fuse
If hard-wiring directly, minimum of 14 AWG wire must be used
6.2.4 Notify the alarm center of the installation and potential for alarms during the
process (as necessary).
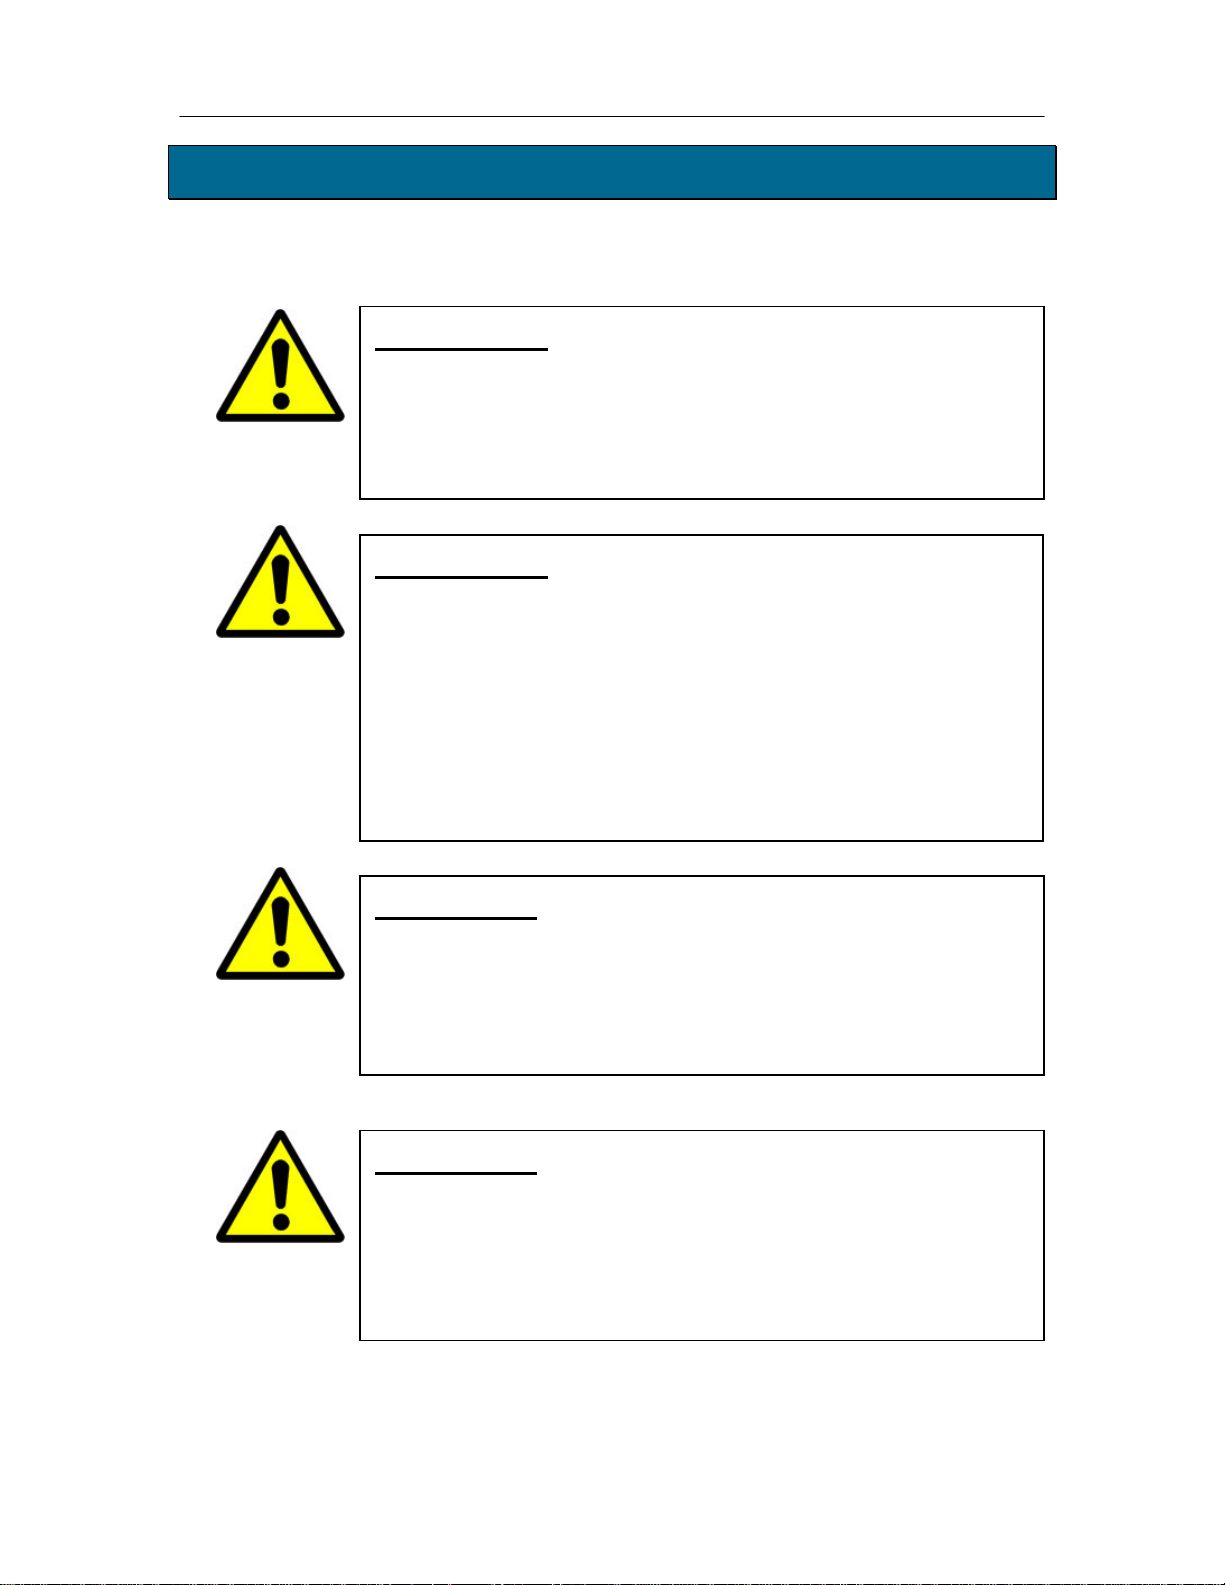
6.3 Included Contents
(1) P4200PM / P5000PM Air
Dryer
(1) Installation Guide (not shown)
Package located inside the dryer:
(1) Compressor Connector
Tool
(1) User’s Guide
6.4 Required Tools and Materials
Large adjustable wrench
7/16” wrench
Band cutters or snips
5/16” nut driver
Pipe dope or pipe thread tape
Cup of soapy water
1-inch paint brush
(recommended)
Medium Phillips head
screwdriver
Page 13 of 79 P012649 – Rev B
PUREGAS, LLC P4200PM / P5000PM Remote Air Dryer User’s Guide
6.5 Installation Steps
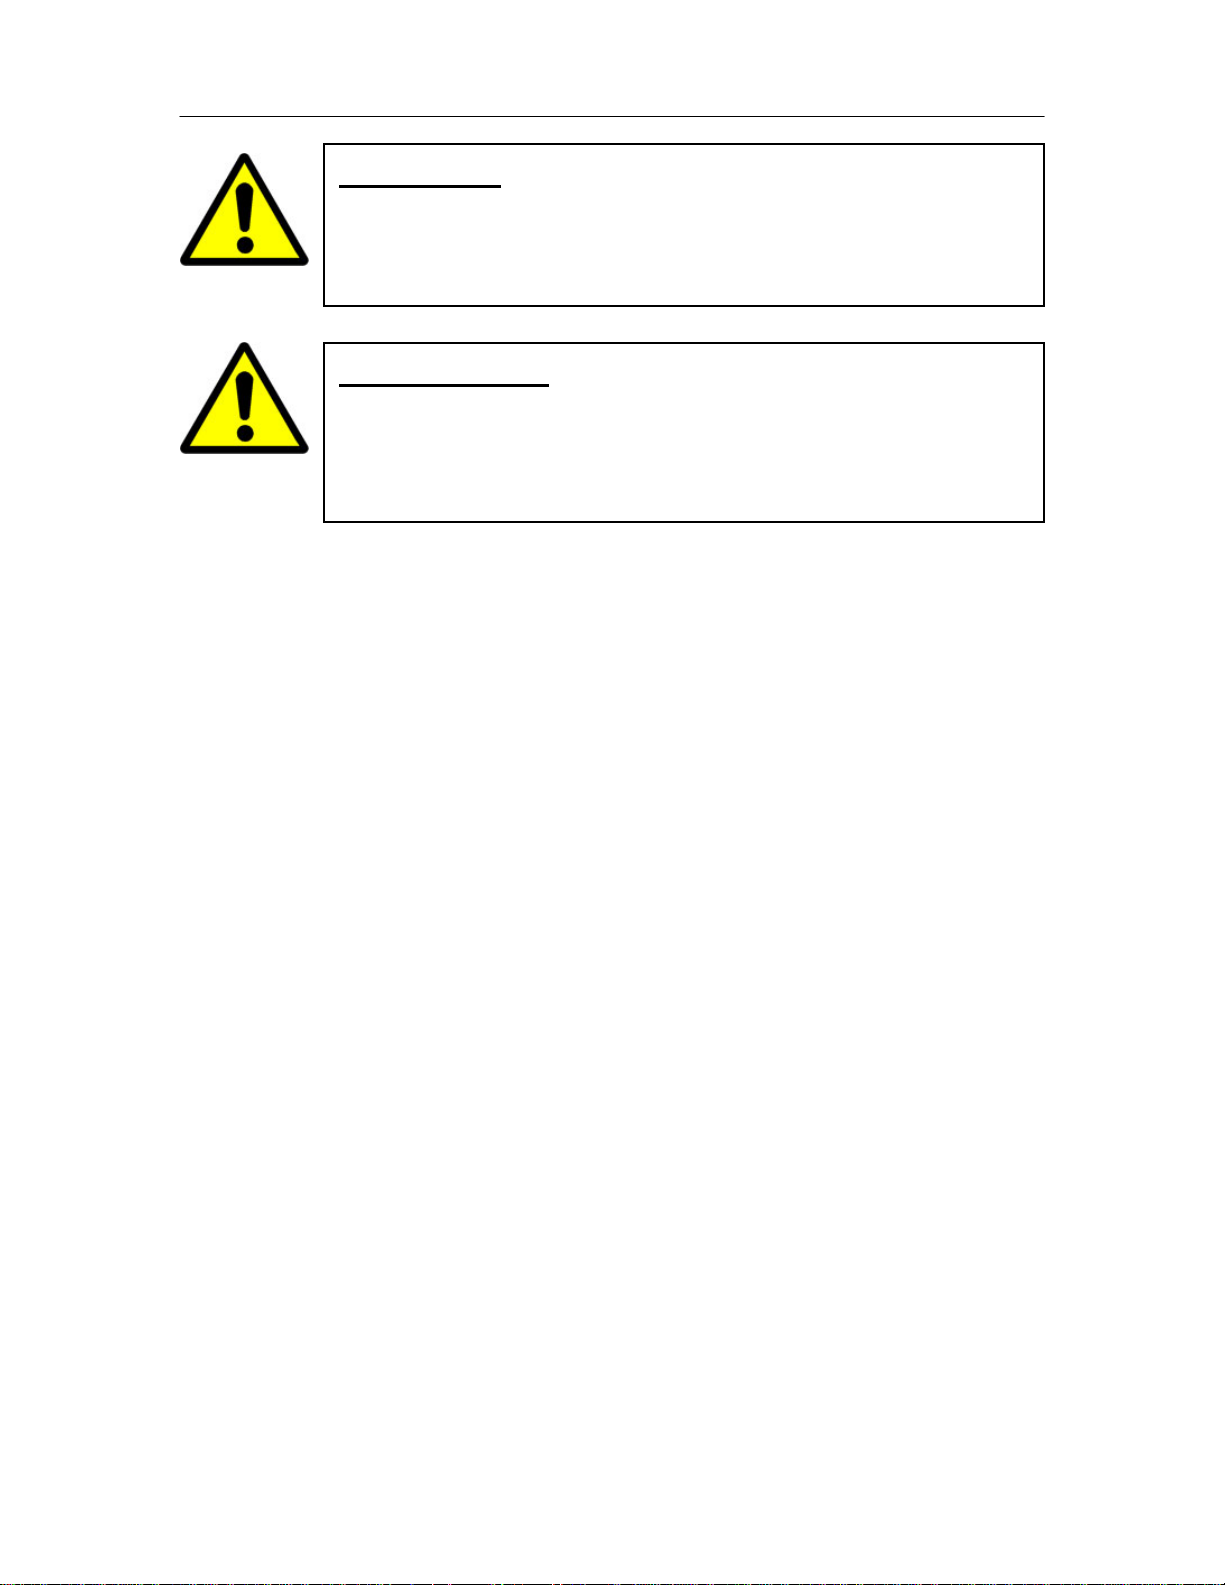
6.5.1 Remove all shipping
materials and hardware.
NOTE: If ANY SHIPPING
DAMAGE is detected, file a
claim with the shipping
company prior to continuing
the installation procedures.
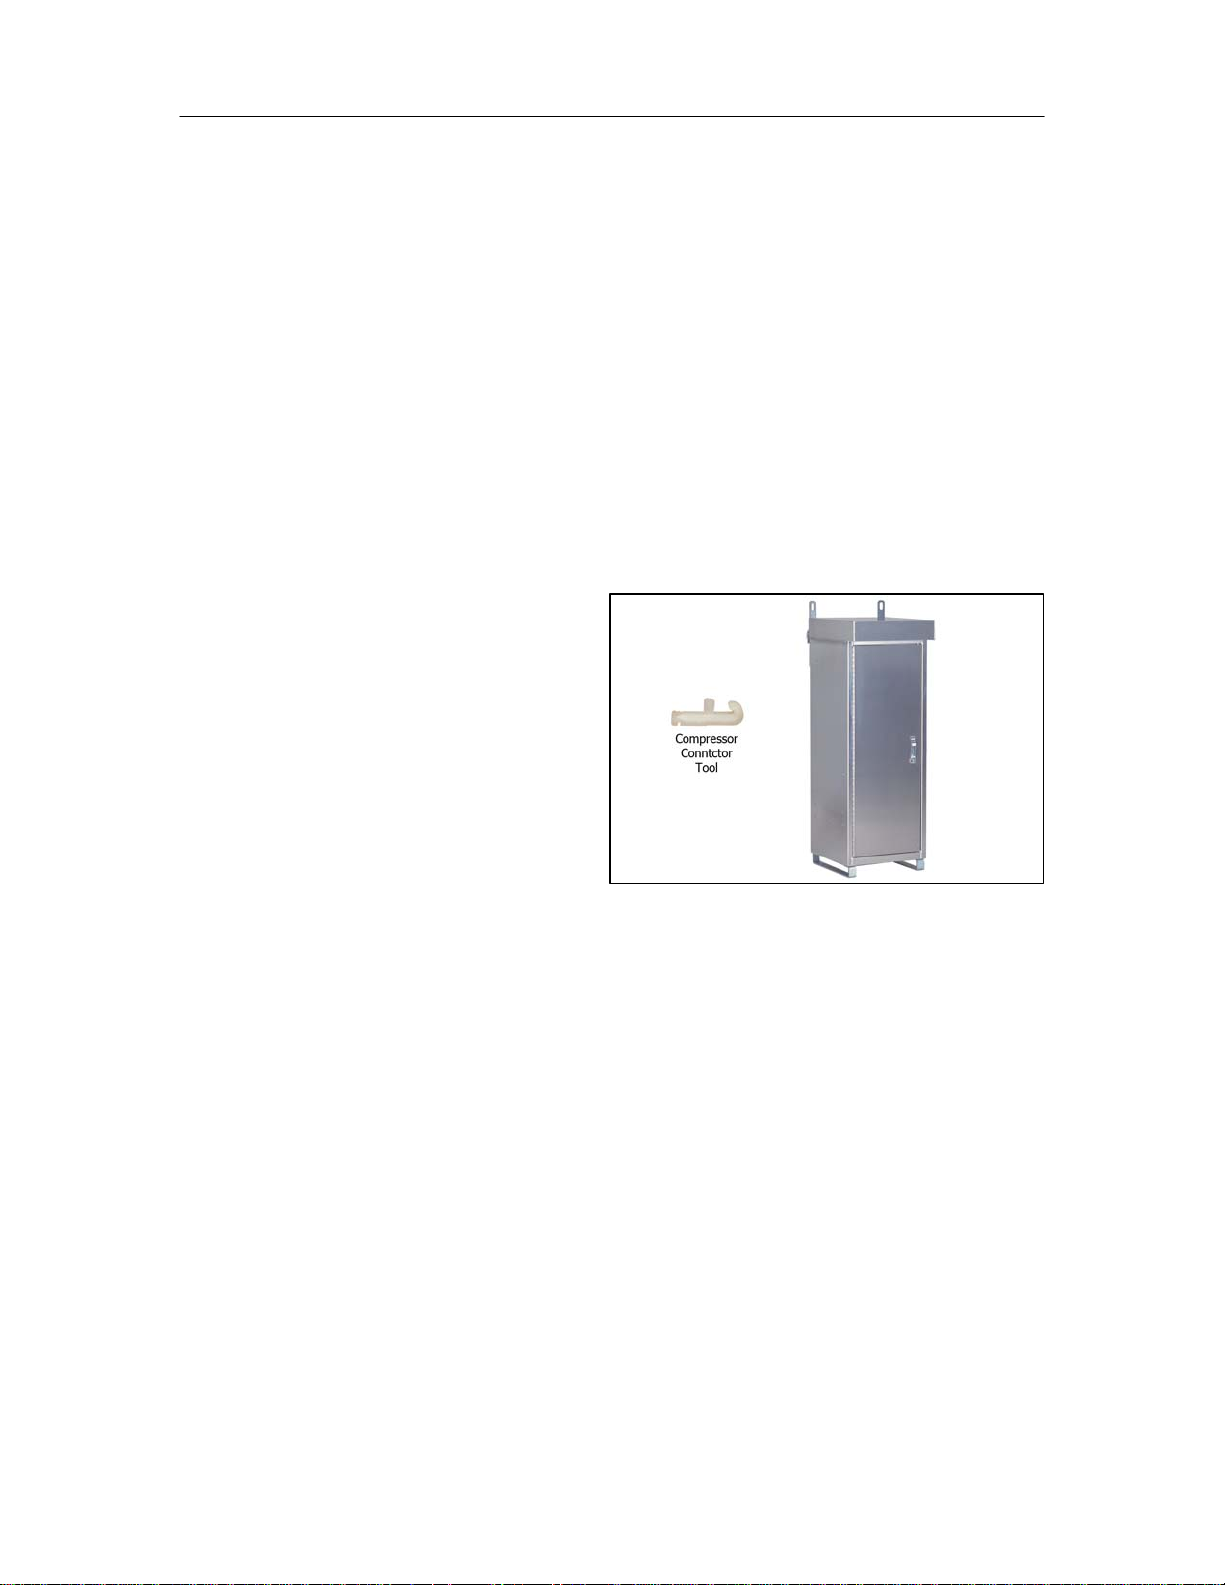
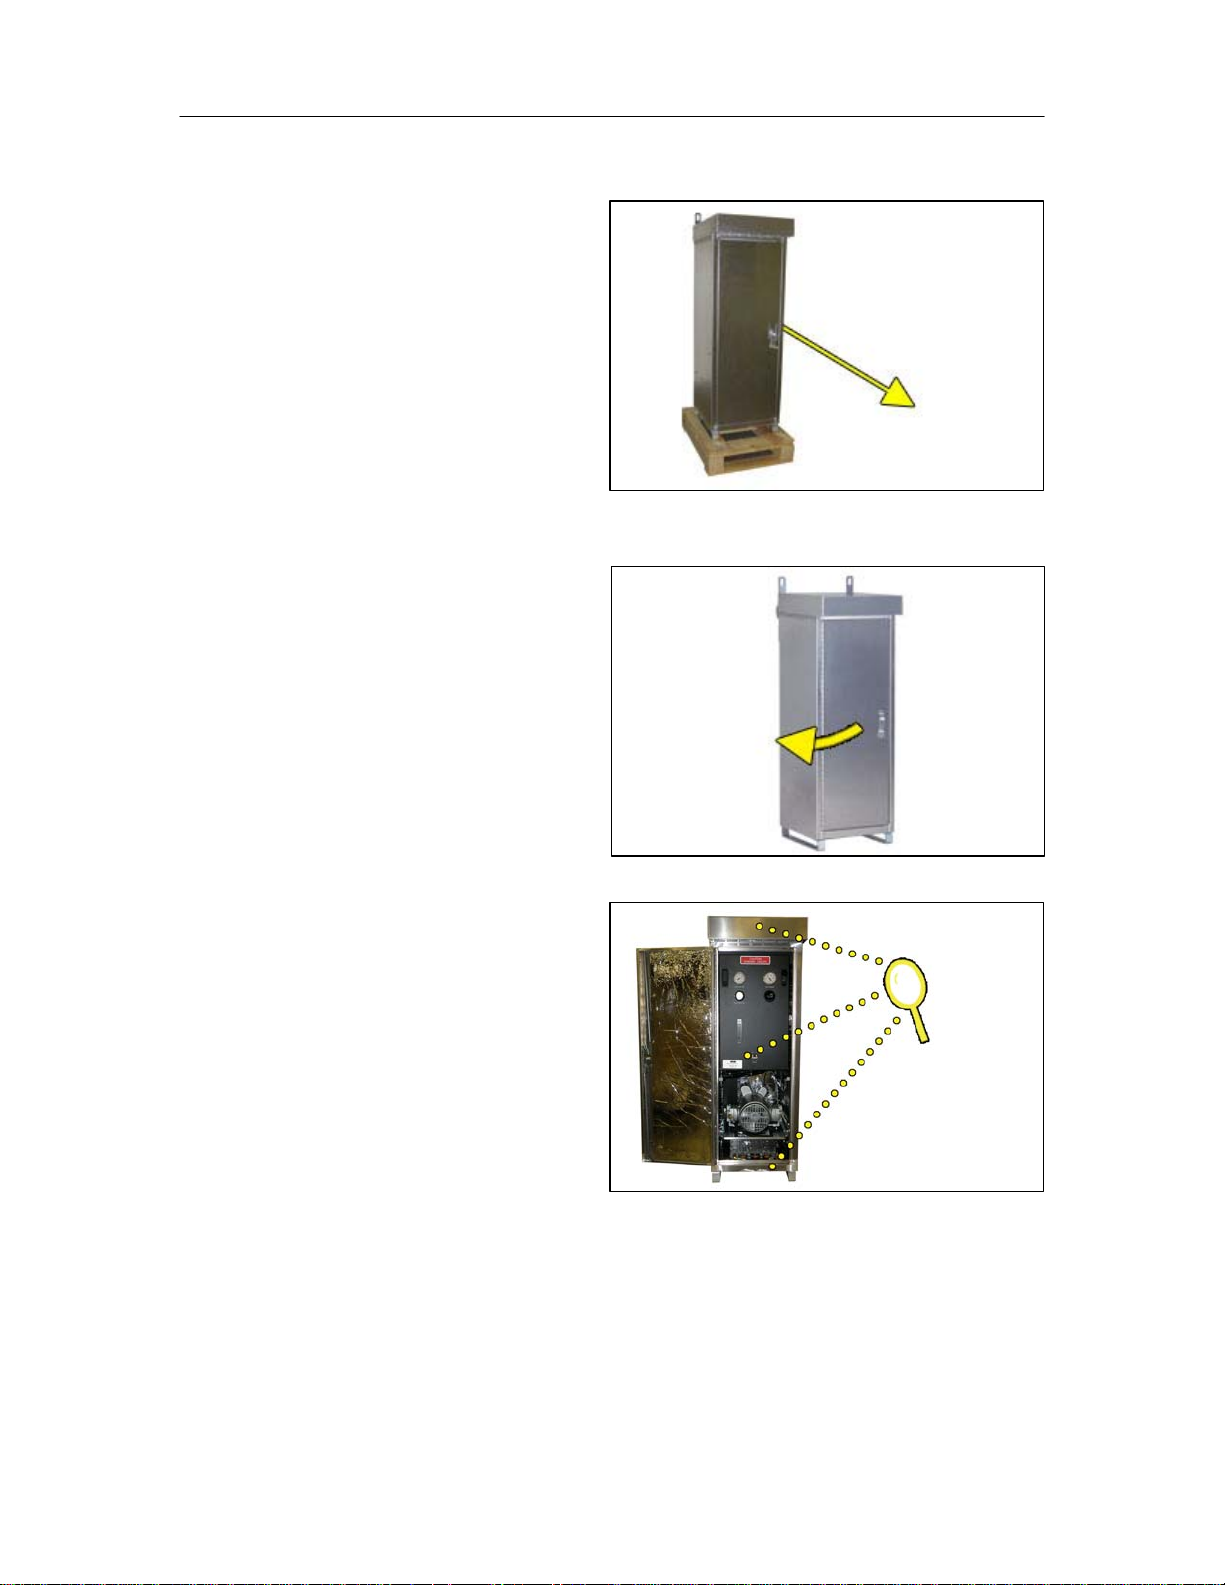
6.5.2 Open the front door.
6.5.3 Check for loose parts, hoses,
or wiring.
NOTE: If ANY SHIPPING
DAMAGE is detected, file a
claim with the shipping
company prior to continuing
the installation procedures.
Page 14 of 79 P012649 – Rev B
PUREGAS, LLC P4200PM / P5000PM Remote Air Dryer User’s Guide
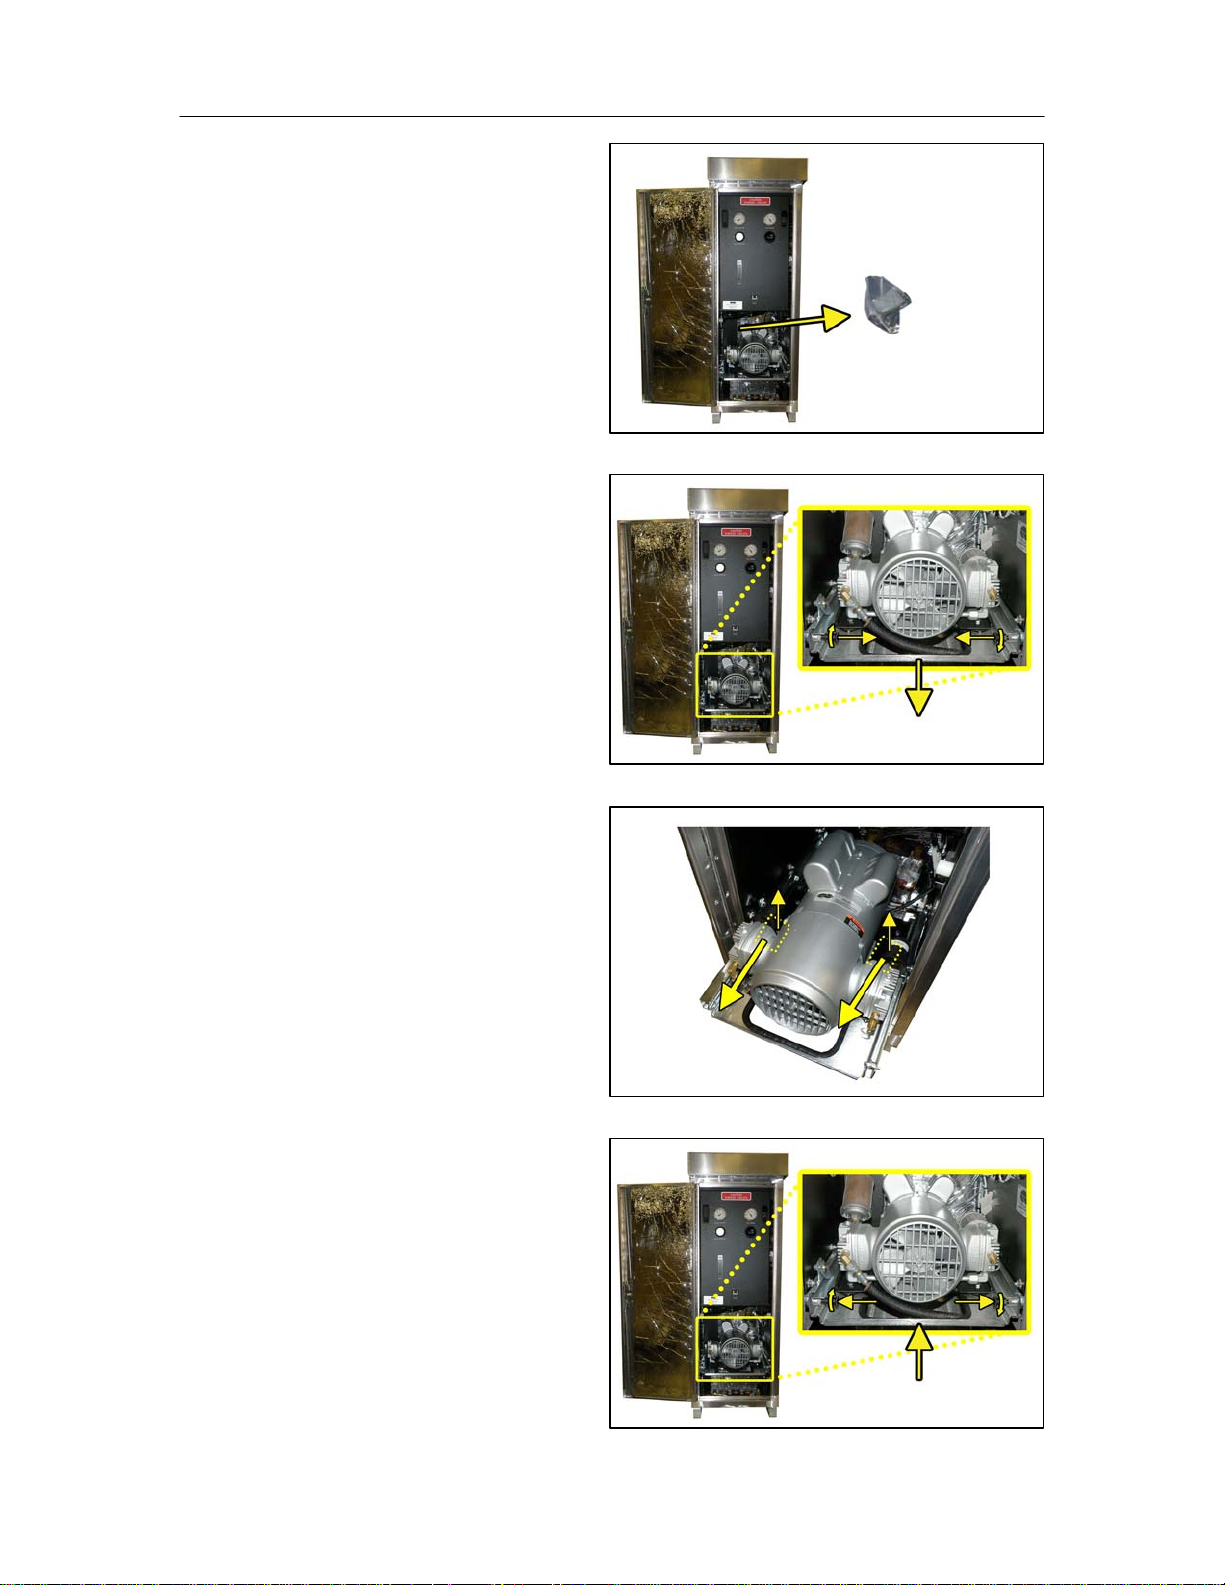
6.5.4 Remove the ship-loose
contents package.
6.5.5 Pull out and rotate the quick
pins ¼ turn to lock in the
Open position.
6.5.6 Pull the Compressor Tray
out.
6.5.7 With a 7/16” wrench remove
the shipping blocks from
under the compressor plate.
Discard blocks and bolts.
6.5.8 Slide the Compressor Tray
into place.
6.5.9 Rotate the quick pins ¼ turn
to the Lock position.
Page 15 of 79 P012649 – Rev B

PUREGAS, LLC P4200PM / P5000PM Remote Air Dryer User’s Guide
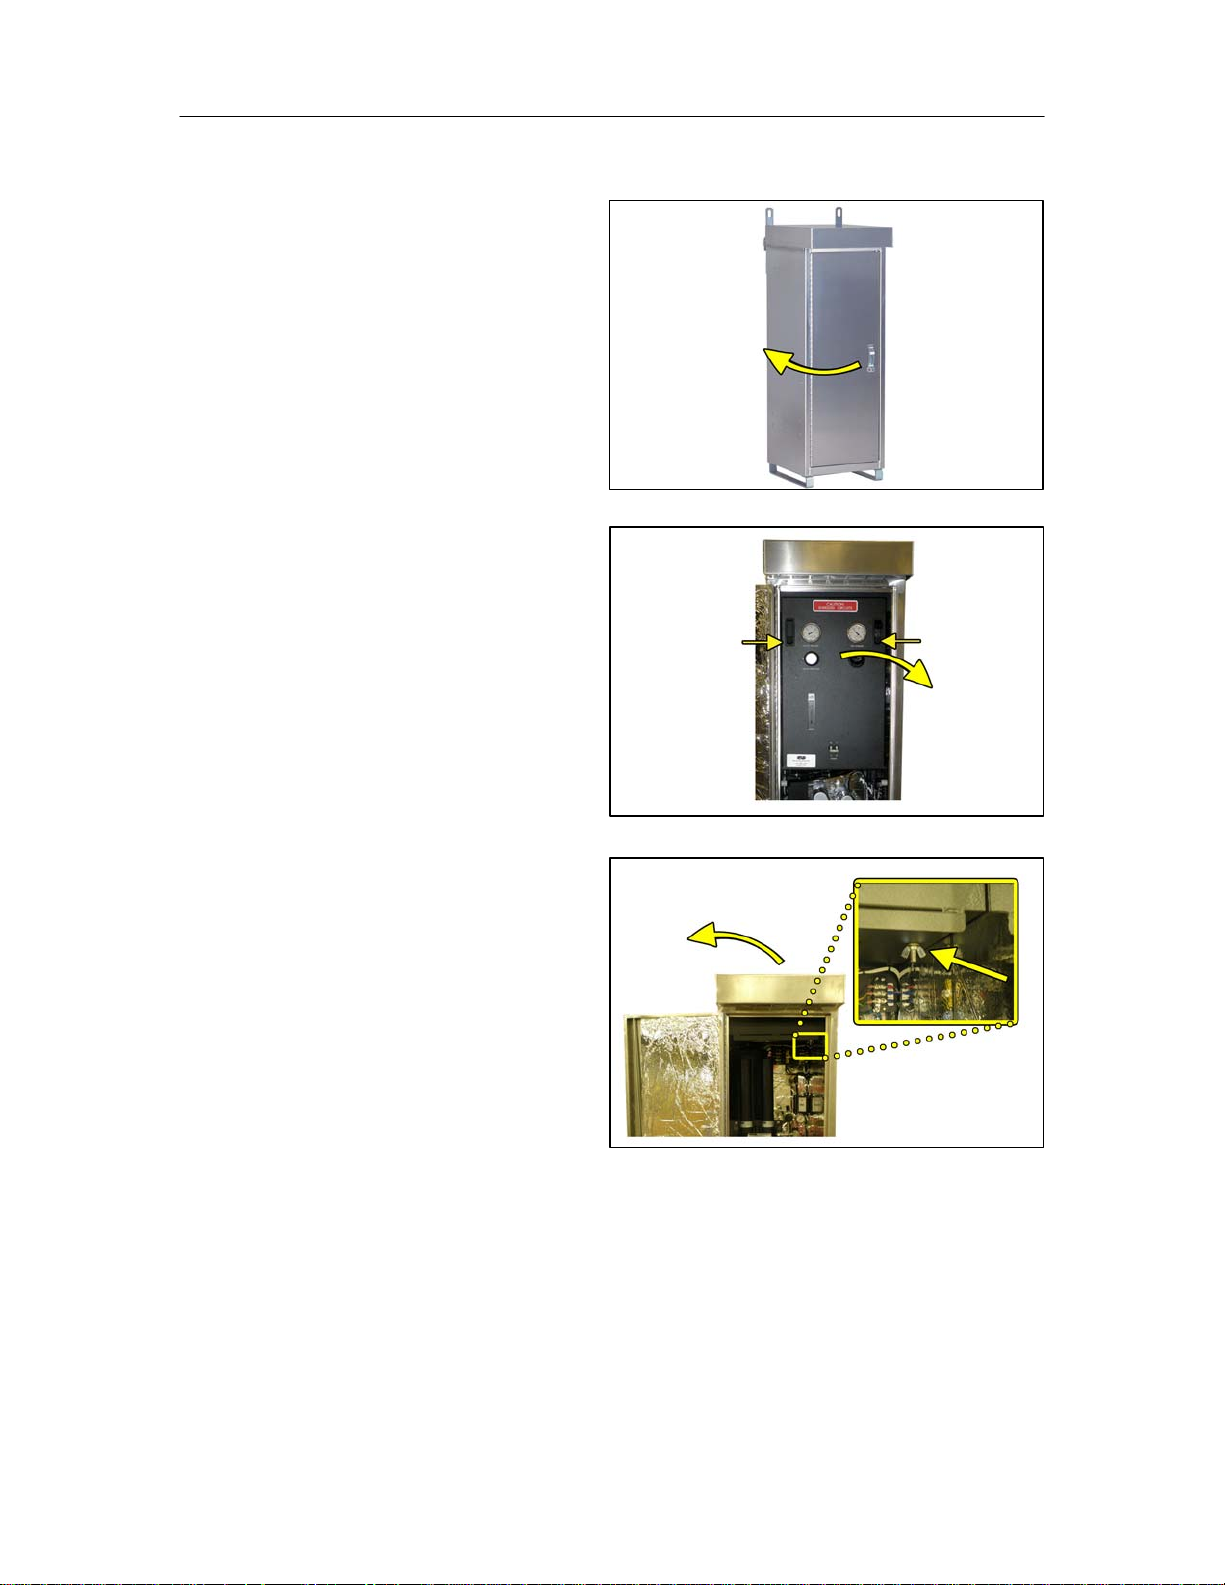
6.5.10 Place the dryer at the operating location.
NOTE: Close the front door if necessary.
6.5.11 Verify that the dryer is powered OFF.
6.5.12 Depress the latches and
lower the front panel.
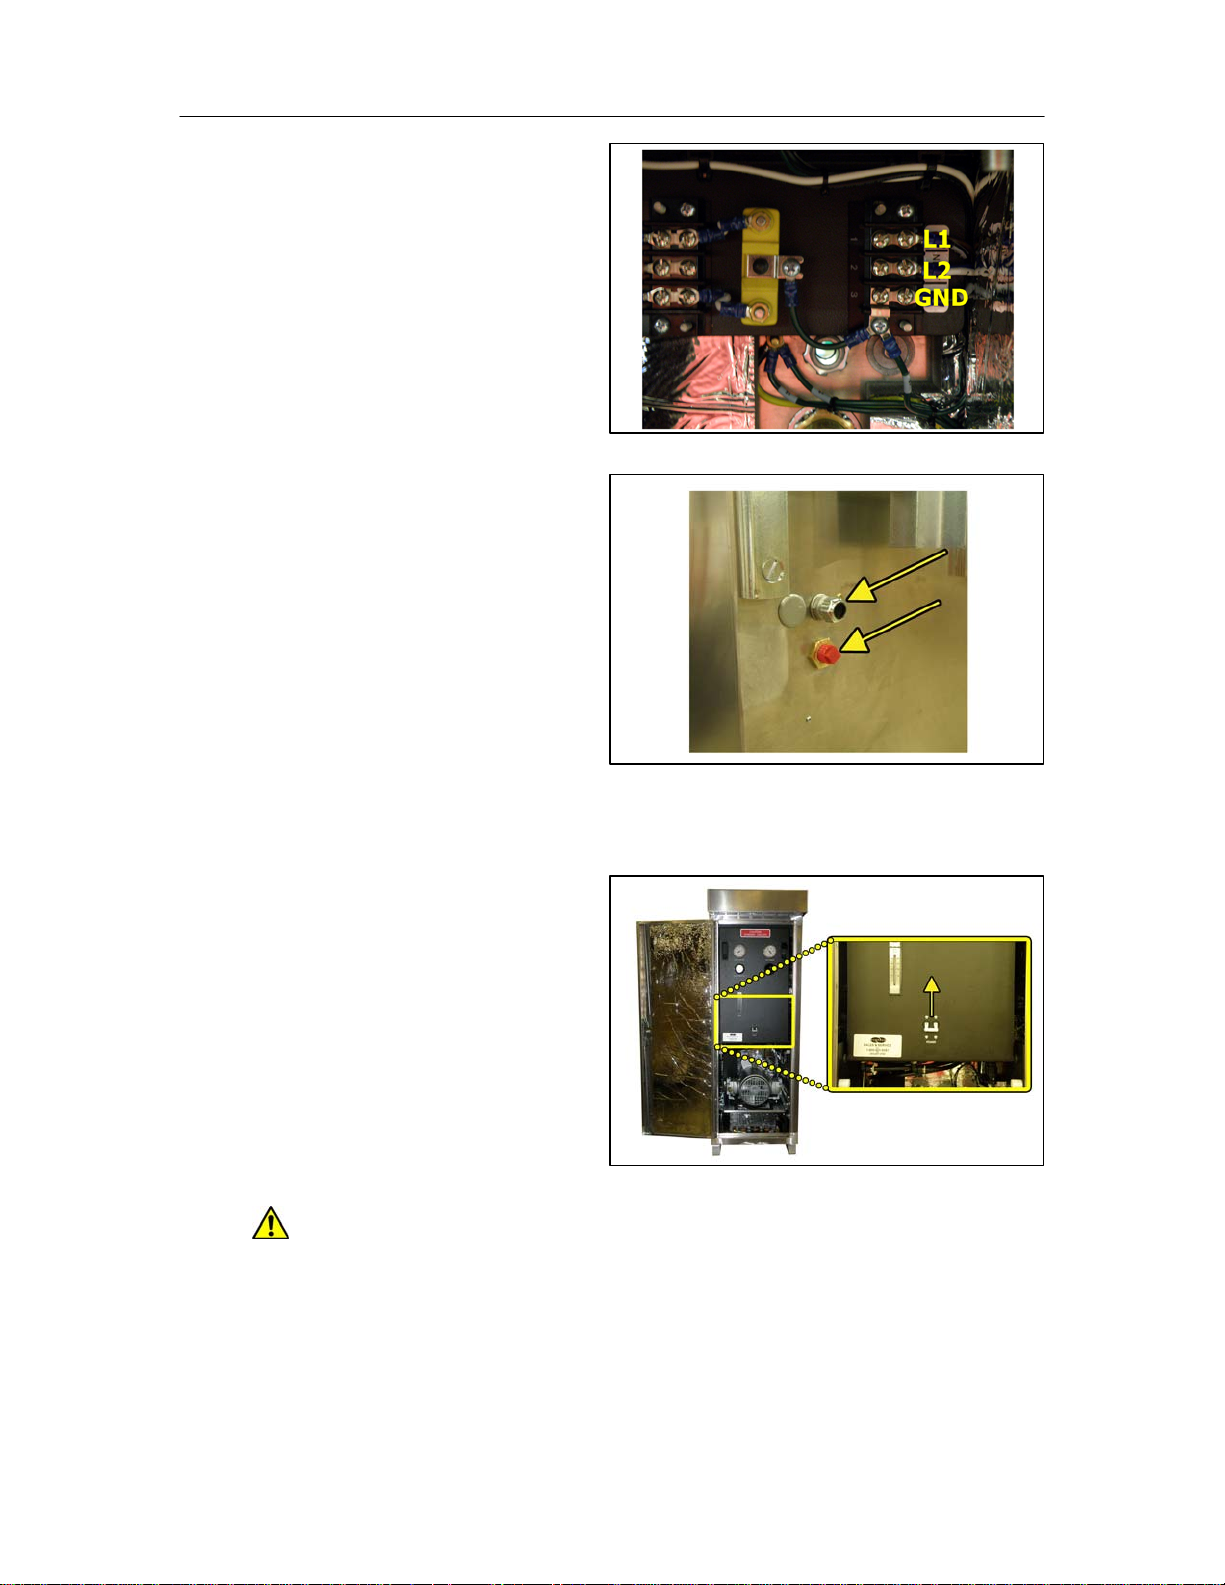
6.5.13 Route incoming power
through strain relief fitting on
the back where shown.
6.5.14 With a 5/16” nut driver,
remove the cover from the
terminal block.
Page 16 of 79 P012649 – Rev B
PUREGAS, LLC P4200PM / P5000PM Remote Air Dryer User’s Guide
6.5.15 With a screwdriver, wire
power to the terminal block
of the dryer.
6.5.16 Reinstall the terminal block
cover.
6.5.17 Tighten the strain relief.
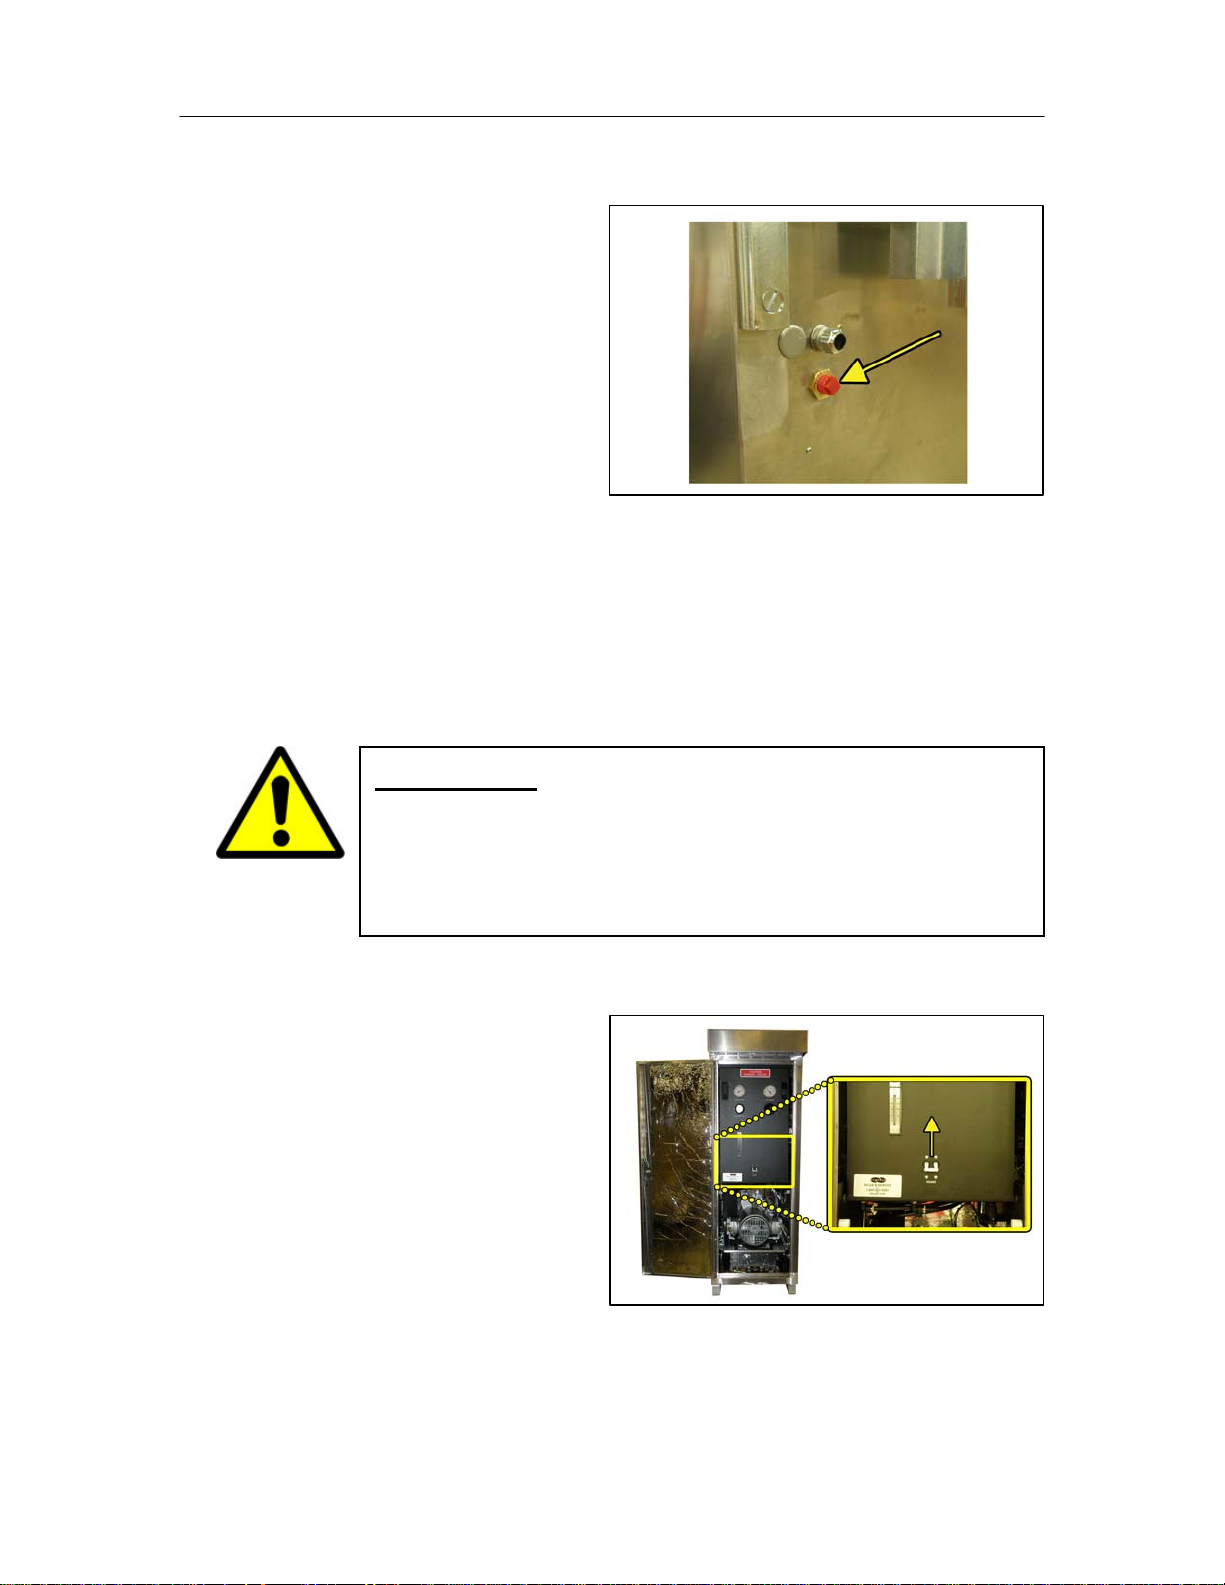
6.5.18 Remove dust plug and
connect the air supply line to
the dryer Outlet Pressure
port.
6.5.19 Close the front panel.
6.5.20 Power the dryer ON.
IMPORTANT: Press RESET if the dryer goes into SHUTDOWN due to
Humidity.
Page 17 of 79 P012649 – Rev B
PUREGAS, LLC P4200PM / P5000PM Remote Air Dryer User’s Guide
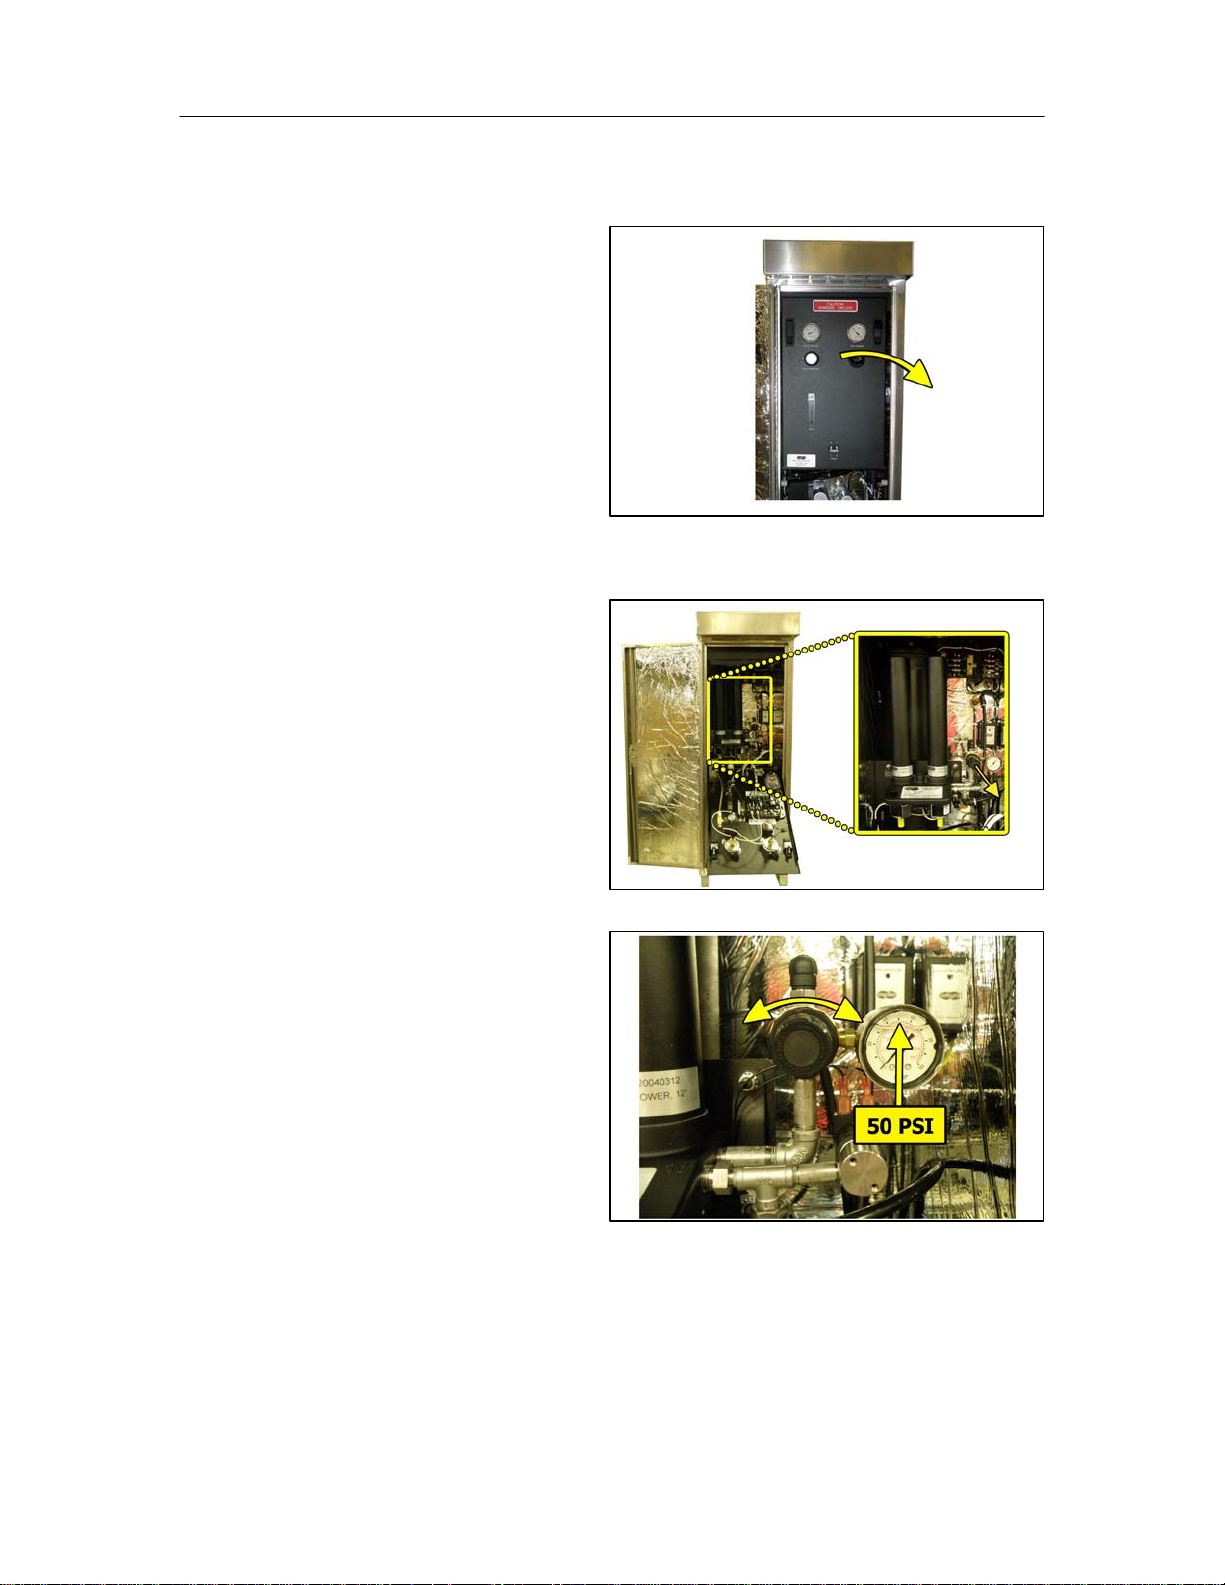
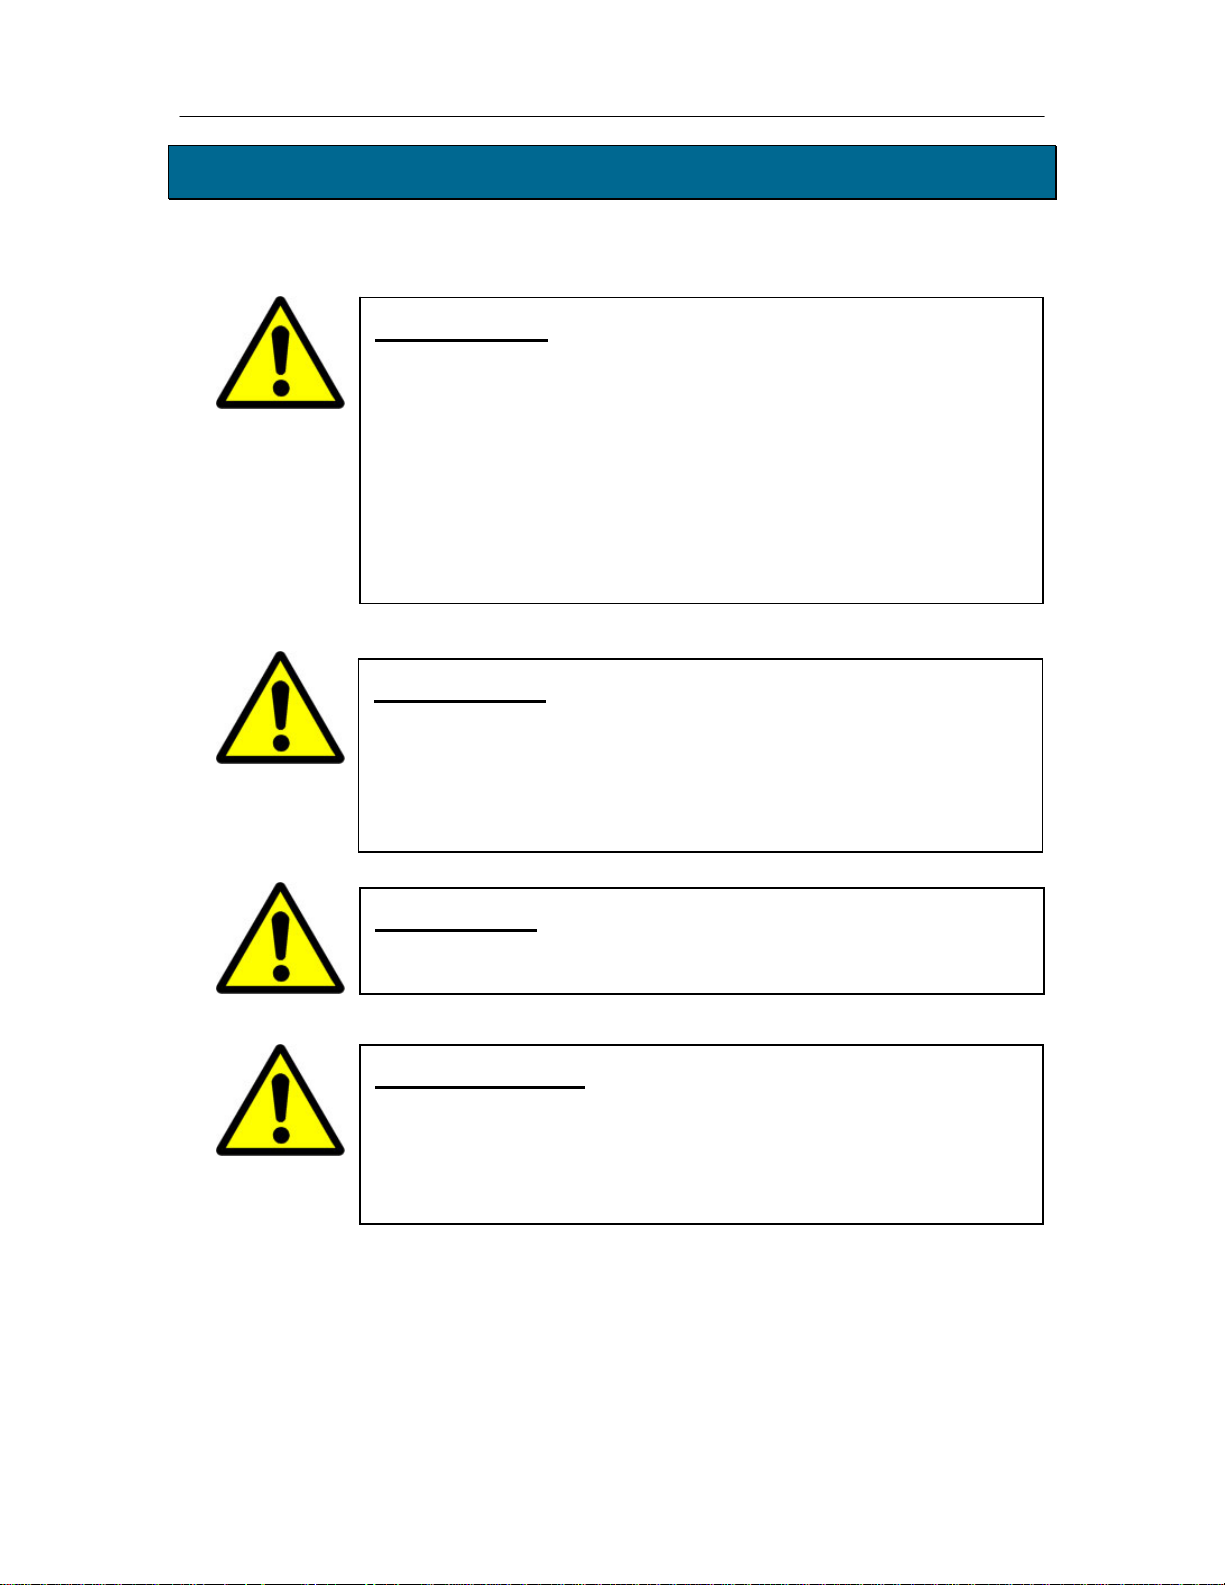
6.5.21 Set the System Pressure:
6.5.21.1 Lower the front
panel.
With Compressor running:
6.5.21.2 Pull the Capacity
Control Valve knob out.
6.5.21.3 Turn the knob until
the reading on the
pressure gauge is 50
PSI.
6.5.21.4 Push the knob in, to
lock.
Page 18 of 79 P012649 – Rev B
PUREGAS, LLC P4200PM / P5000PM Remote Air Dryer User’s Guide
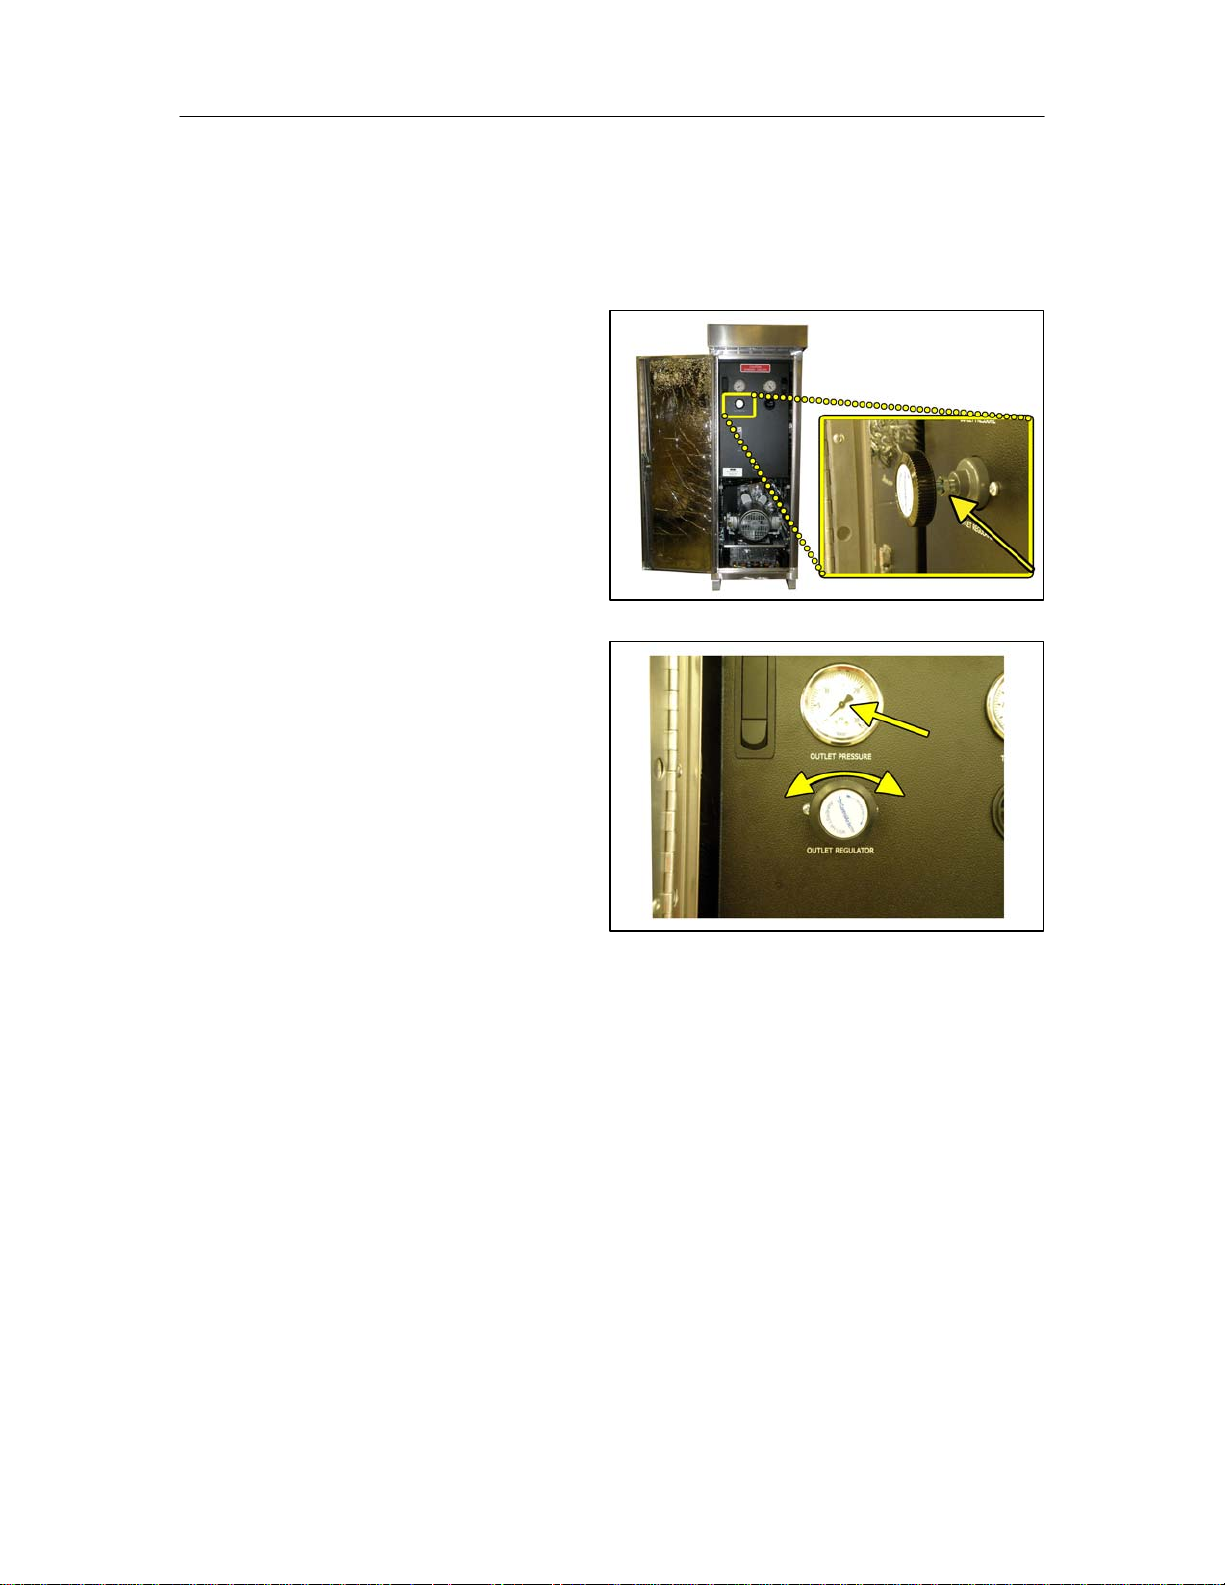
6.5.22 Set the Outlet Pressure:
6.5.22.1 Close the front panel.
6.5.22.2 Loosen the Outlet
Pressure Regulator
Locknut.
6.5.22.3 Turn knob until
Outlet Pressure (OUTP)
reading is at the desired
setting.
6.5.22.4 Tighten nut to lock.
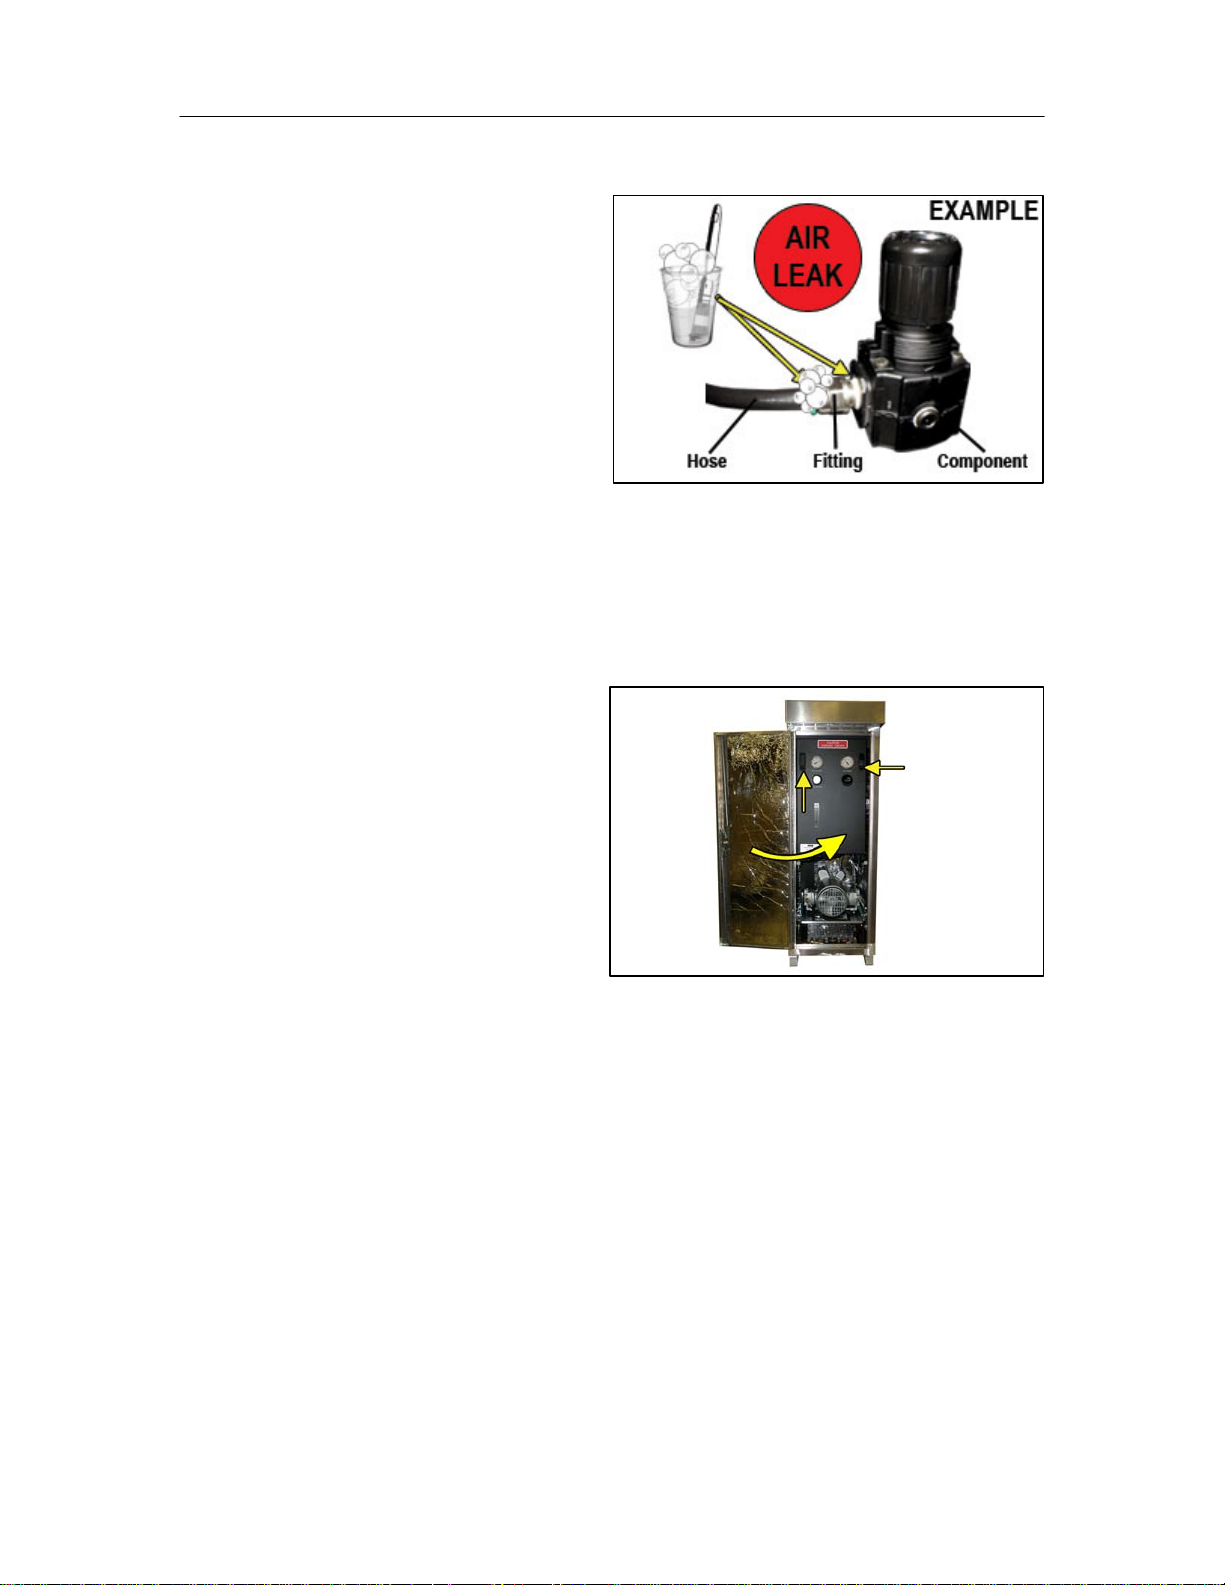
6.5.23 Check for air leaks:
NOTE: This is a general procedure that can be applied to any fitting or hose
that has air pressure in it. DO NOT SOAP TEST THE HUMIDITY
SENSOR. DAMAGE TO THE SENSOR MAY OCCUR.
With Compressor NOT running:
6.5.23.1 Listen for any ‘hissing’ sounds which may indicate a fitting or hose
air leak.
Page 19 of 79 P012649 – Rev B
PUREGAS, LLC P4200PM / P5000PM Remote Air Dryer User’s Guide
With Compressor running:
6.5.23.2 Use a 1-inch paint
brush to dab soapy water
on the air fitting or hose
connection to be tested.
If air bubbles appear at the
connection, this indicates that
air is leaking from the
connection.
If any leaks are detected, take steps to seal them off (as necessary):
Tighten the fitting
Re-connect the hose end
Replace the
fitting/hose/compon
ent
6.5.24 Close the front panel and
depress latches.
6.5.25 Close the front door and
latch.
6.5.26 REGISTER YOUR DRYER. See section 7. for details.
Page 20 of 79 P012649 – Rev B

PUREGAS, LLC P4200PM / P5000PM Remote Air Dryer User’s Guide
6.6 Installation Checklist
No shipping damage was detected.
Dryer location meets the following requirements:
o Well secured location
o Mounted a minimum of one (1) foot from the ground (Recommended)
o Ambient temperature lower than 120°F (85° F optimal)
Shipping blocks removed from compressor tray.
System Pressure is set to 50 PSI.
No air leaks are present in the system.
No alarms are present.
7. Registering Your Dryer
Please take a moment to register your PUREGAS P4200PM / P5000PM Air Dryer.
Registering is necessary to activate the Limited Warranty on your product. Once you
register, you are eligible to receive free technical support, as well as updates
concerning your PUREGAS products.
Register Online at www.puregas.com/registration
Or by Phone 1-800-521-5351 (option 2)
Have the following information available:
Model #: Serial #:
Company Name:
Shipping Address:
City:
State: Zip Code:
Location Name:
Contact Name: Phone #: ( ) - ext.
Email:
Page 21 of 79 P012649 – Rev B
PUREGAS, LLC P4200PM / P5000PM Remote Air Dryer User’s Guide
8. Operating Your Dryer
8.1 Safety & Warning Information
WARNING!
Extreme care should be exercised to avoid contact with live
electrical circuits. Many procedures performed during
installation, operation, testing, and maintenance of this air dryer
require the equipment to be running, creating a situation for
potential electrical shock. It is highly recommended that you
remove all jewelry before performing any procedures.
WARNING!
Internal surfaces may be hot. Use care when coming into contact
with internal components as there is a potential for some of these
components to become hot when in operation or standby.
CAUTION!
Observe precautions for handling Electrostatic Sensitive Devices.
IMPORTANT!
Performing procedures not described in this User’s Guide or
installing components not supplied by PUREGAS is NOT
RECOMMENDED AND MAY VOID THE WARRANTY.
Page 22 of 79 P012649 – Rev B
PUREGAS, LLC P4200PM / P5000PM Remote Air Dryer User’s Guide
8.2 Connecting Air Lines to the Dryer
8.2.1 Remove dust plug from the
back of the Dryer and
connect the air supply line to
the dryer Outlet Pressure
port.
8.3 Powering the Dryer ON & OFF
8.3.1 POWER Circuit Breaker -
Controls the main power to
the Dryer.
CAUTION!
Incoming power to dryer must be 110 - 125 VAC, 1 Phase, 50/60
Hz with minimum 30 amp service with a 25 amp slow blow fuse.
If hard-wiring directly, minimum of 14 AWG wire must be used.
Page 23 of 79 P012649 – Rev B
PUREGAS, LLC P4200PM / P5000PM Remote Air Dryer User’s Guide
8.4 Opening Doors and Panels
8.4.1 Open the Front Door.
8.4.2 Depress the latches and
lower the Front Panel.
8.4.3 Remove wing nut and
washer. Open Top Cover.
Page 24 of 79 P012649 – Rev B
 Loading...