

Page 1
FOR AGES:
13+
WEIGHT LIMIT:
250 Lbs
114 Kgs
ADULT(S) NEEDED:
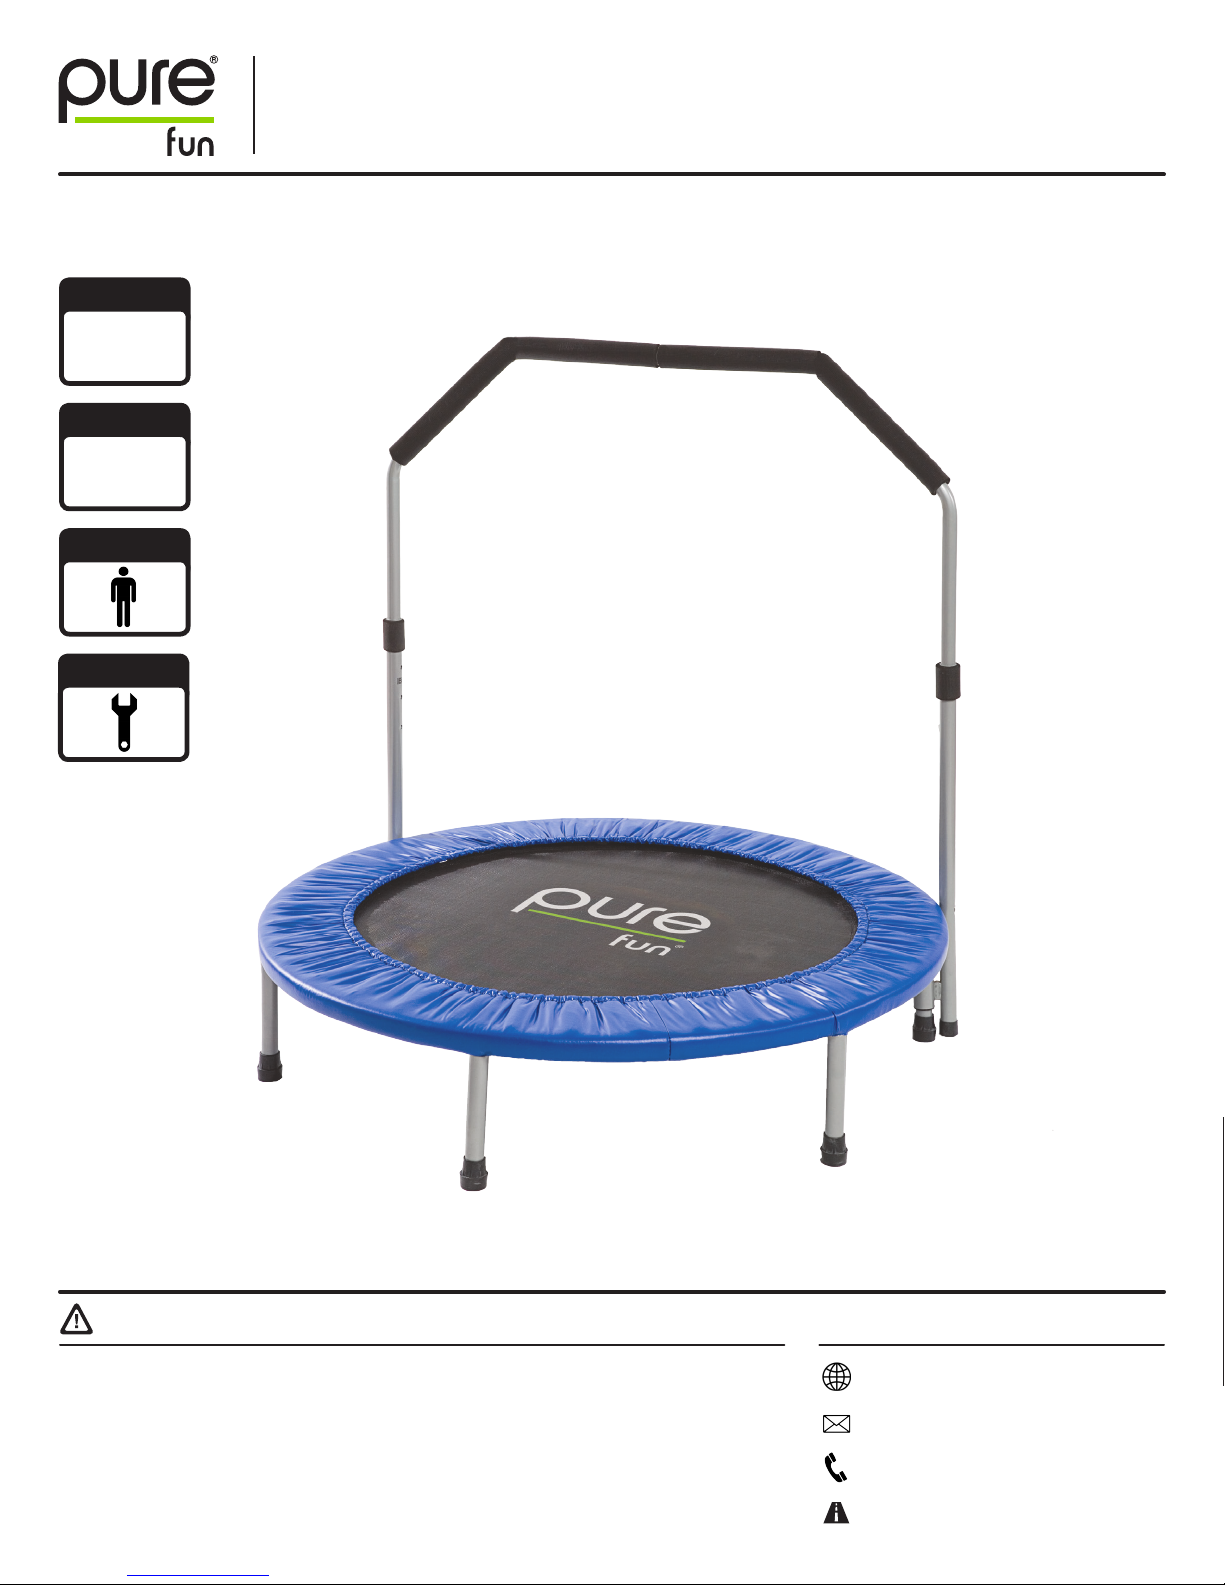
40” MINI TRAMPOLINE WITH HANDRAIL
MODEL# 9005MTH
PRODUCT MANUAL VERSION 01.17.04
TOOLS NEEDED:
WARNING/ADVERTENCIA CUSTOMER SERVICE
• Consult a physician before beginning any
exercise program or strenuous activity.
• Do not allow more than one person on this
product at any time.
• Not recommended for children under
13 years of age.
• The contents of this package are not suitable
for children under 3 years of age. Contains
small parts which may cause choking.
• ADULT ASSEMBLY REQUIRED.
GQBrands.com
CustomerService@gqbrands.com
1-866-498-5269
4009 Distribution Dr, Suite 240
Garland, TX 75041
Page 2

CUSTOMER SERVICE INFORMATION
Thank you for purchasing:
40” MINI TRAMPOLINE WITH HANDRAIL
MODEL# 9005MTH
At Global Quality Brands®, we want all of our customers to be
completely satisfied with their purchase. Please take time to review
the contents of the product you have just received to make sure that
all of the parts are included. If you find that any parts are missing or
damaged, we will happily provide replacement parts at no charge
within 30 days of purchase.
Please keep in mind that for select damaged part replacement
requests, we will require a photo for submission.
If you request replacement parts, please be sure to include the
following information in your correspondence:
YOUR NAME:
YOUR MAILING ADDRESS:
YOUR EMAIL ADDRESS:
PRODUCT NAME:
PRODUCT MODEL #:
PART # (Located In Manual)
RETAILER WHERE YOU PURCHASED PRODUCT:
DATE OF PURCHASE:
To order these parts, or if you have any other questions or concerns
about this GQ Brands product, please contact us at
PureFun.net
Global Quality Brands®
Phone: 1-866-498-5269
Email: [email protected]
4009 Distribution Dr, Suite 240
Garland, TX 75041
Sincerely,
Customer Service
ORDER # (If Available)
SERIAL#:
QUANTITY NEEDED:
PICTURE OF DAMAGED PART(s) SUBMIT VIA Email, Fax, or Mail
2
CustomerService@GQBrands.comGQBrands.com
1-866-498-5269
Page 3

LIMITED WARRANTY
Global Quality Brands® warrants this product to be free from defects
in workmanship and materials under normal use and conditions
for a period of 90 DAYS FROM THE DATE OF ORIGINAL PURCHASE.
This Limited Warranty is not transferable and is available only for the
original purchaser of the Product. The Company’s obligation under
this warranty is limited to replacing or repairing the Product, at the
discretion of the company.
All warranty coverage extends only to the original retail purchaser
from the date of purchase, GQ Brands obligation under this warranty
is limited to replacing or repairing, at Global Quality Brands® option.
All products for which a warranty claim is made must be received
by Global Quality Brands® and accompanied by sufficient proof of
purchase (photocopy of the original store receipt, indicating the date
of purchase). All freight and handling fees are the responsibility of
the consumer to pay, both to and from Global Quality Brands®. All
warranty claims must be preauthorized by Global Quality Brands®
pre-authorization can be obtained by calling 866-498-5269.
This warranty does not cover ordinary wear and tear, weathering,
failure to follow directions, improper installation, improper
maintenance, or acts of nature, (such as damage caused by wind,
lightning, snow, water, or ice) weather damage, damage caused by
unauthorized repair work or damage caused by improper use of the
products are not covered by the product warranty. No other warranty
beyond that specifically set forth above is authorized by GQBrands®.
GLOBAL QUALITY BRANDS® IS NOT RESPONSIBLE OR LIABLE FOR
INDIRECT, SPECIAL OR CONSEQUENTIAL DAMAGES ARISING OUT
OF OR IN CONNECTION WITH THE USE OR PERFORMANCE OF THE
PRODUCT OR OTHER DAMAGES WITH RESPECT TO ANY ECONOMIC
LOSS, LOSS OF PROPERTY, LOSS OF REVENUE OR PROFITS, LOSS
OF ENJOYMENT OR USE, COST OF REMOVAL, INSTALLATION
OR OTHER CONSEQUENTIAL DAMAGES. SOME STATES DO NOT
ALLOW THE EXCLUSION OR LIMITATION OF INCIDENTAL OR
CONSEQUENTIAL DAMAGES. ACCORDINGLY, THE ABOVE LIMITATION
MAY NOT APPLY TO YOU. THE WARRANTY EXTENDED HEREUNDER
IS IN LIEU OF ALL OTHER WARRANTIES AND GLOBAL QUALITY
BRANDS®, SPECIFICALLY DISCLAIMS ANY IMPLIED WARRANTY
OF MERCHANTABILITY OR FITNESS FOR A PARTICULAR PURPOSE
IS LIMITED IN ITS SCOPE AND DURATION TO THE TERMS SET
FORTH HEREIN. SOME STATES DO NOT ALLOW LIMITATION ON HOW
LONG AN IMPLIED WARRANTY LASTS. ACCORDINGLY, THE ABOVE
LIMITATION MAY NO APPLY TO YOU. THIS WARRANTY GIVES YOU
SPECIFIC LEGAL RIGHTS. YOU MAY ALSO HAVE OTHER RIGHTS,
WHICH VARY FROM STATE TO STATE.
WHILE EVERY ATTEMPT IS MADE TO ENSURE THE HIGHEST DEGREE
OF PROTECTION IN ALL EQUIPMENT, WE CANNOT GUARANTEE
FREEDOM OF INJURY. THE USER ASSUMES ALL RISK OF INJURY DUE
TO USE. ALL MERCHANDISE IS SOLD ON THIS CONDITION, WHICH NO
REPRESENTATIVE OF GQ BRANDS® CAN WAIVE OR CHANGE.
MODEL# 9005MTH
3
Page 4
WARNINGS
IMPORTANT MESSAGE
WARNING - PLEASE READ
ADULT ASSEMBLY REQUIRED
CHOKING HAZARD - Small Parts
NOT for children under 3 years of age.
WARNING:
While every attempt is made to ensure the highest degree of protection in all
equipment, we cannot guarantee freedom from injury. The user assumes all
risks of injury due to use. All merchandise is sold on this condition, which no
representative of the company can waive or change.
4
CustomerService@GQBrands.comGQBrands.com
1-866-498-5269
Page 5
WARNINGS
Please read these warnings and the information in this manual in its entirety.
Failure to comply with the following instructions may increase the risk of serious injury and/or death:
• This unit is designed only for jogging in
place and similar bounding exercises.
• Not recommended for children under
13 years of age.
• Maximum weight limit: 250lbs. (114kgs)
• Caution and care must be taken in
underneath a light fixture or ceiling fan.
• The contents are not suitable for children
under 3 years. This product contains small
parts, which may cause choking.
• This trampoline is designed for one user
only. Do not let more than one person use
this product at the same time.
• Immediately discontinue use if any
breakage to the frame assembly or
springs are found. Failure to do this may
result injury and/or further damage to the
product.
• This trampoline is only designed for
normal residential use. It is NOT intended
for commercial applications and/or in
public areas such as schools, parks, day
cares, commercial/communal gyms, etc.
• When in use, your trampoline must be
placed at a safe distance from any vertical
or horizontal obstructions, such as
stairways/stairwells, power lines, ceiling
fans, pools, walls, overhead or wall light
fixtures, windows, furniture, appliances,
etc. Keep on a level surface.
• Outdoor use – position well away from
water on flat firm ground; ideally grass.
Never position on or near hard surfaces
such as patios or driveways, or position
trampoline close to buildings, walls or
roadways.
• DO NOT store trampoline outdoors or
where exposed to moisture or extreme
temperatures.
• Ensure area under and around trampoline
is clear of any toys/obstacles that may
cause injury. Do not allow small children
or pets to crawl or hide under the
trampoline.
• DO NOT wear glasses or helmets when
using the trampoline.
• DO NOT store items, playthings, or
place any obstructions underneath the
trampoline mat.
• Users should not wear clothing, jewelry,
or anything could catch or snag on
the product (e.g. loose clothing, cords,
shoulder bags).
• DO NOT fall or bounce on your knees,.This
can cause injury.
• DO NOT somersault. This can cause
serious injury resulting in paralysis or
death.
• DO NOT allow infants or animals to crawl
underneath the trampoline mat.
• Do not allow small children to wander into
the play area where the trampoline is in
use.
• ALWAYS secure the trampoline against
unauthorized and unsupervised use.
• ALWAYS wear socks when using the
trampoline
• Before each use, inspect and replace
any worn, defective or missing parts. It
is important to check the trampoline to
ensure the frame is steady and all parts
are in good condition.
• Before each use, make sure the frame
padding is in place with the springs and
frame fully covered.
• AVOID bouncing too high. Maintain safe
control at all times.
• Mount and dismount the trampoline with
care as injury may result.
• ALWAYS make sure to store your
trampoline safely, where it will not present
a tripping or obstacle hazard.
• ALWAYS jump in the middle of the
trampoline mat.
• Dispose of all packaging materials safely
and per local ordinance.
• NEVER place trampoline for use on
or near hard surfaces such as patios,
driveways or gravel paths, or place near
power lines, bodies of water, buildings,
walls, roadways, unleveled ground or other
hazards.
• Indoor use – position so that there is
sufficient ceiling height. Never position
trampoline
MODEL# 9005MTH
• DO NOT use or allow use of the trampoline
under the influence of any substance
or medication which may impair the
supervisor’s or jumper’s judgment and/or
coordination.
• Users should stand or bounce as near
to the center of the mat as possible.
Bouncing or standing near the edge of the
trampoline could cause the frame to tip
over or damage the mat/springs.
5
Page 6
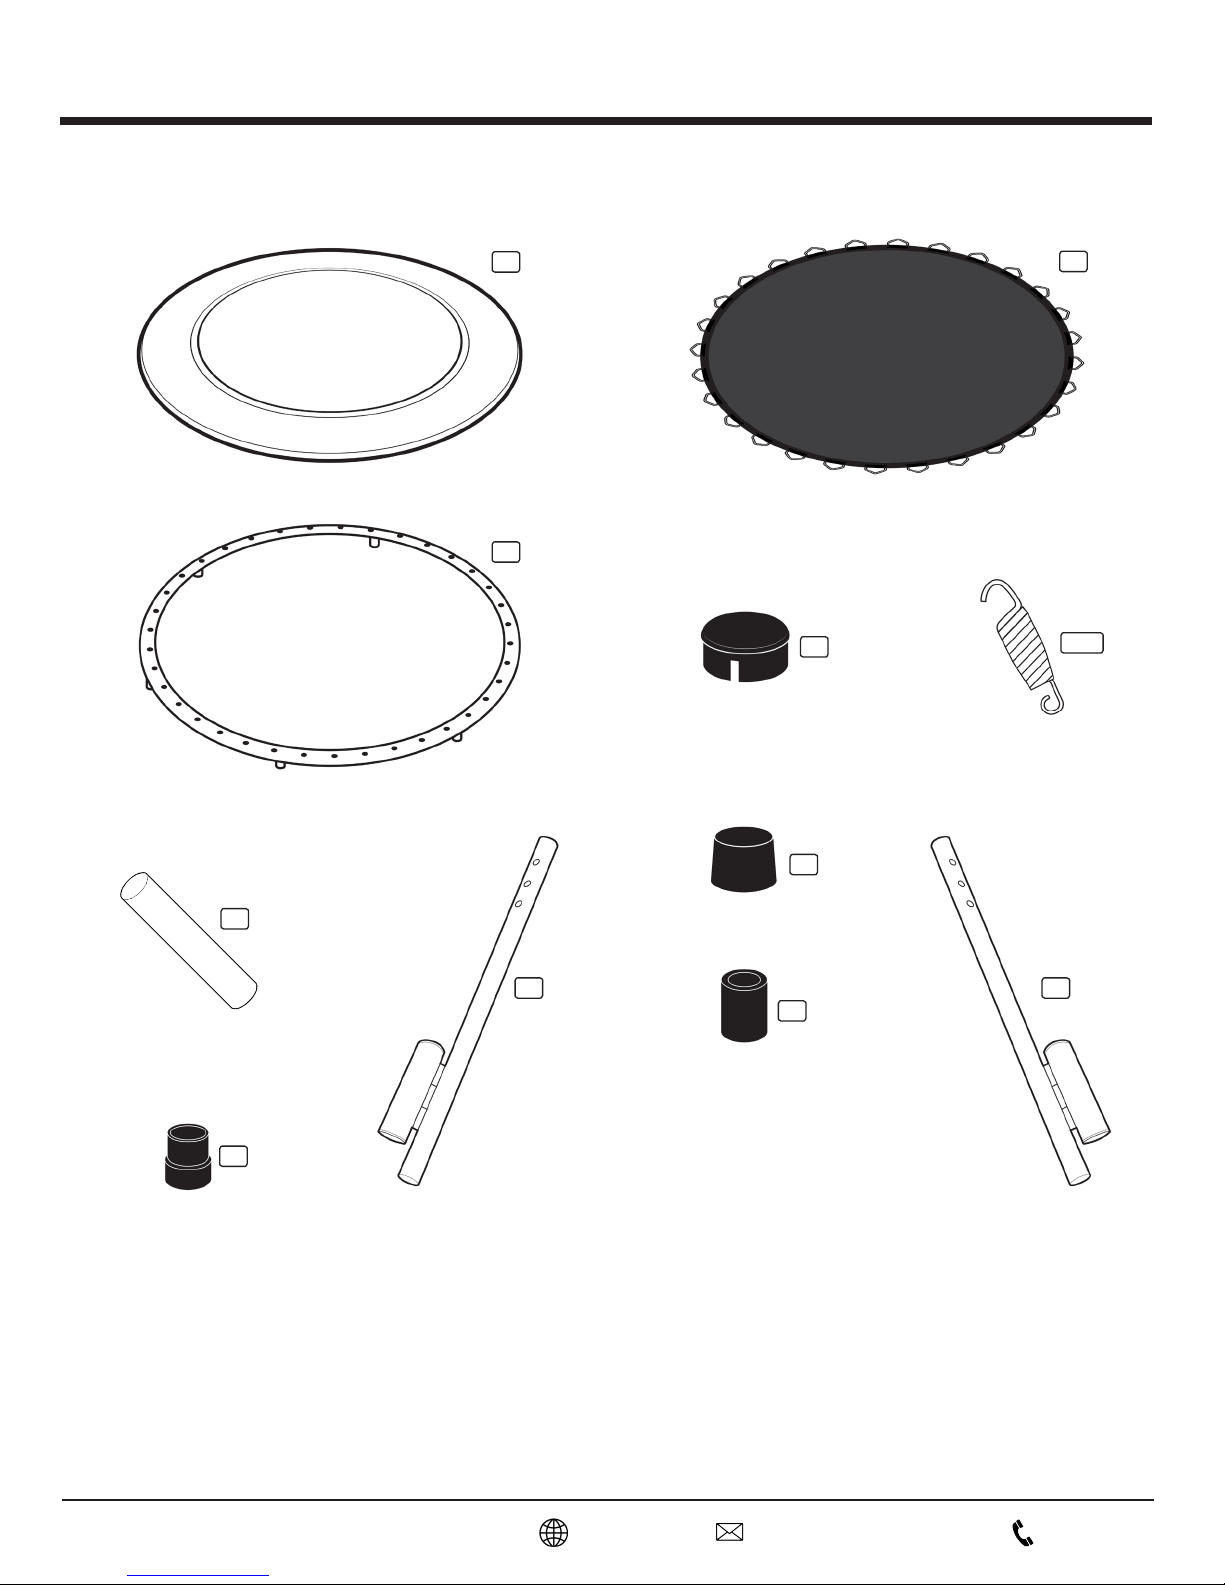
PARTS LIST
Frame Pad
2 -
Top Rail
4 -
x1
x1
Trampoline Mat
3 -
Top Rail Cap
4A -
x4
5 -
x1
Spring
x36
6 -
6A -
Leg Tube
Leg Cap
x4
x6
Handrail Support Left
7 -
7A -
Handrail Cap
Handrail Support Right
8 -
x2
Handrail Foam
7B-
x1 x1
x2
6
CustomerService@GQBrands.comGQBrands.com
1-866-498-5269
Page 7

PARTS LIST
Top Handrail Left
9 -
Top Handrail Foam
9A -
x2
x1
M5 x 45mm Bolt
11 -
x4
Top Handrail Right
10 -
Nut
12 -
x6
x1
13 -
Nut Cap
x6
T-Section Leg Tube
14 -
x2
M5 x 65mm Bolt
15 -
x2
16 -
Wrench
x1
X1-
Washer
x6
MODEL# 9005MTH
7
Page 8
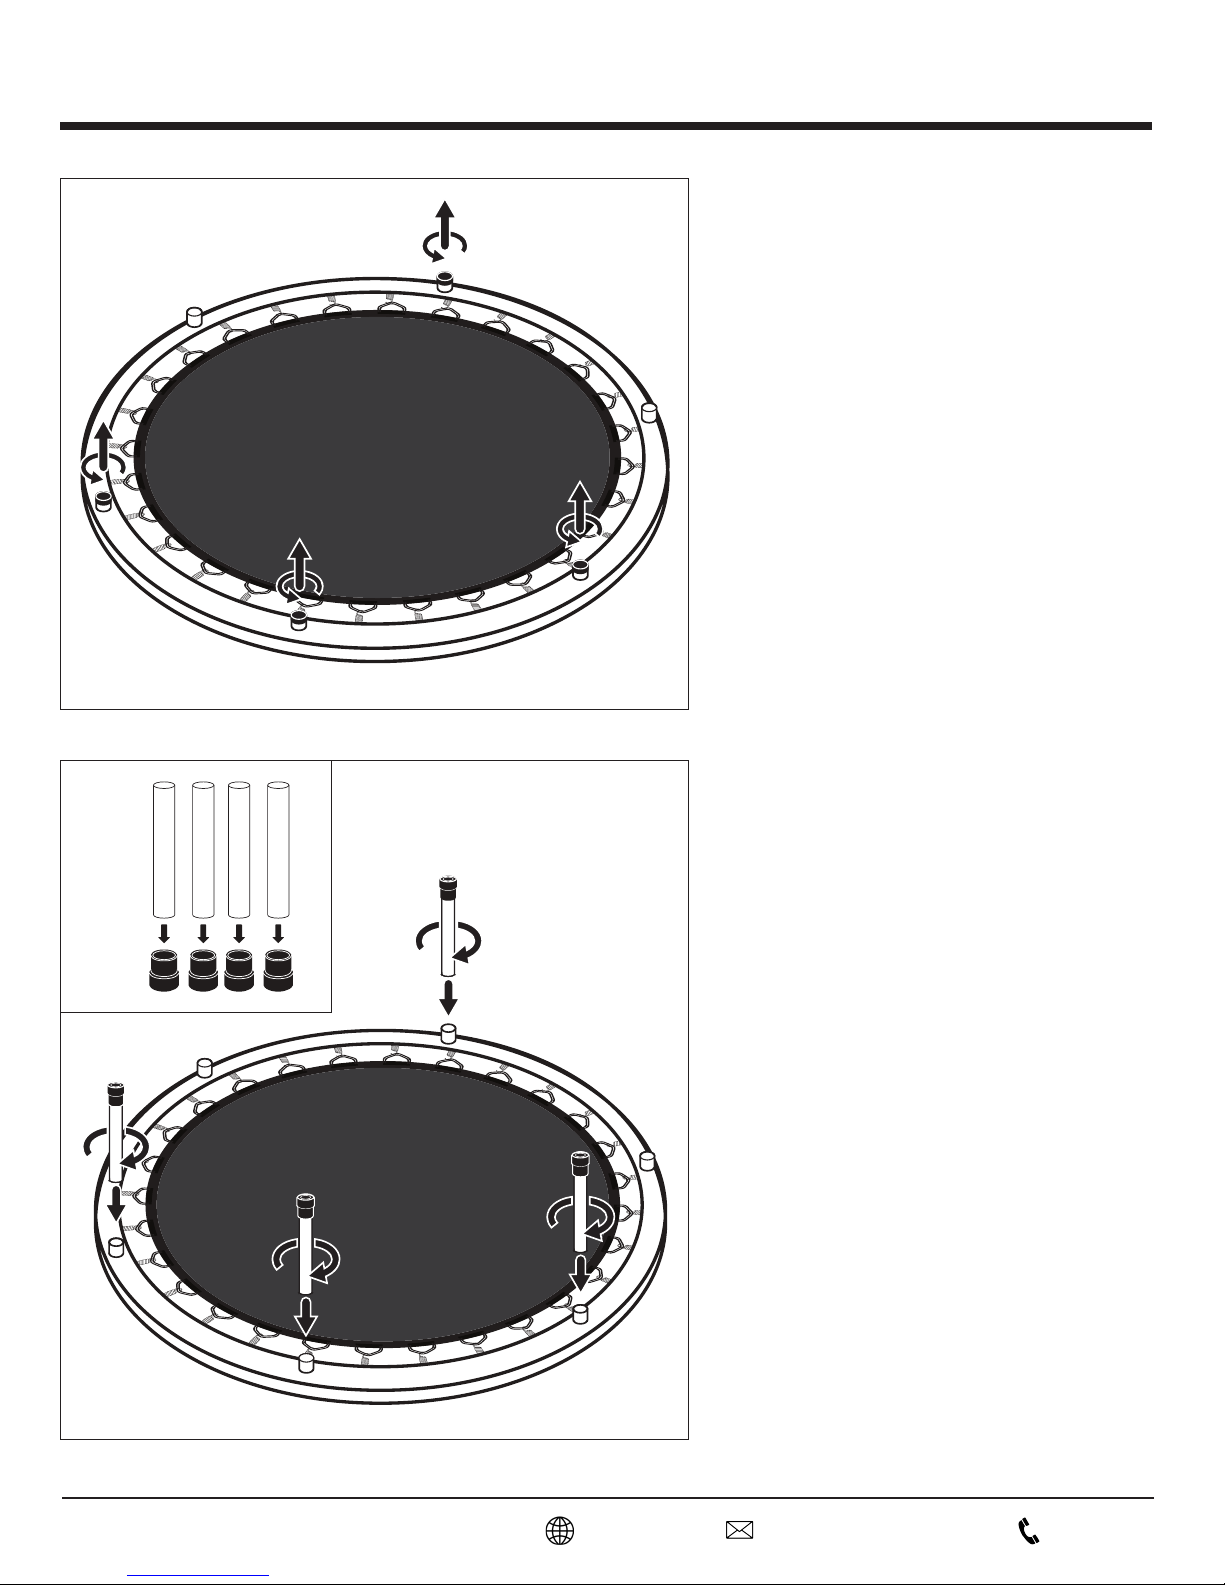
ASSEMBLY INSTRUCTIONS
(4A)
STEP 1:
Parts:
Part 2 (x1) - Frame Pad
Part 3 (x1) - Trampoline Mat
Part 4 (x1) - Top Rail
Part 4A (x4) - Top Rail Cap
Part 5 (x36) - Spring
NOTE: Parts 2, 3, 4, 4A, and 5 might come
pre-assembled for your convenience. Flip
The Trampoline Mat so the logo is facing the
floor, and the leg openings are facing up.
STEP 2:
(4A)
(6)
(6A)
(4A)
(4A)
Parts:
Part 4A (x4) - Top Rail Cap
Remove all 4x Top Rail Caps (Part 4A) from
the Top Rail. Store in a safe place.
STEP 3:
Parts:
Part 6 (x4) - Leg Tube
Part 6A (x4) - Leg Cap
NOTE: Parts F and H, might come preassembled for your convenience. If not,
simply attach a Leg Cap (Part 6) to a Leg
Tube (Part 6A). Repeat these steps until you
have 4x assembled legs.
Install all four assembled Leg Tubes into
the Top Rail by spinning clockwise. Install
in the same openings the Top Rail Caps
where removed from.
8
CustomerService@GQBrands.comGQBrands.com
1-866-498-5269
Page 9
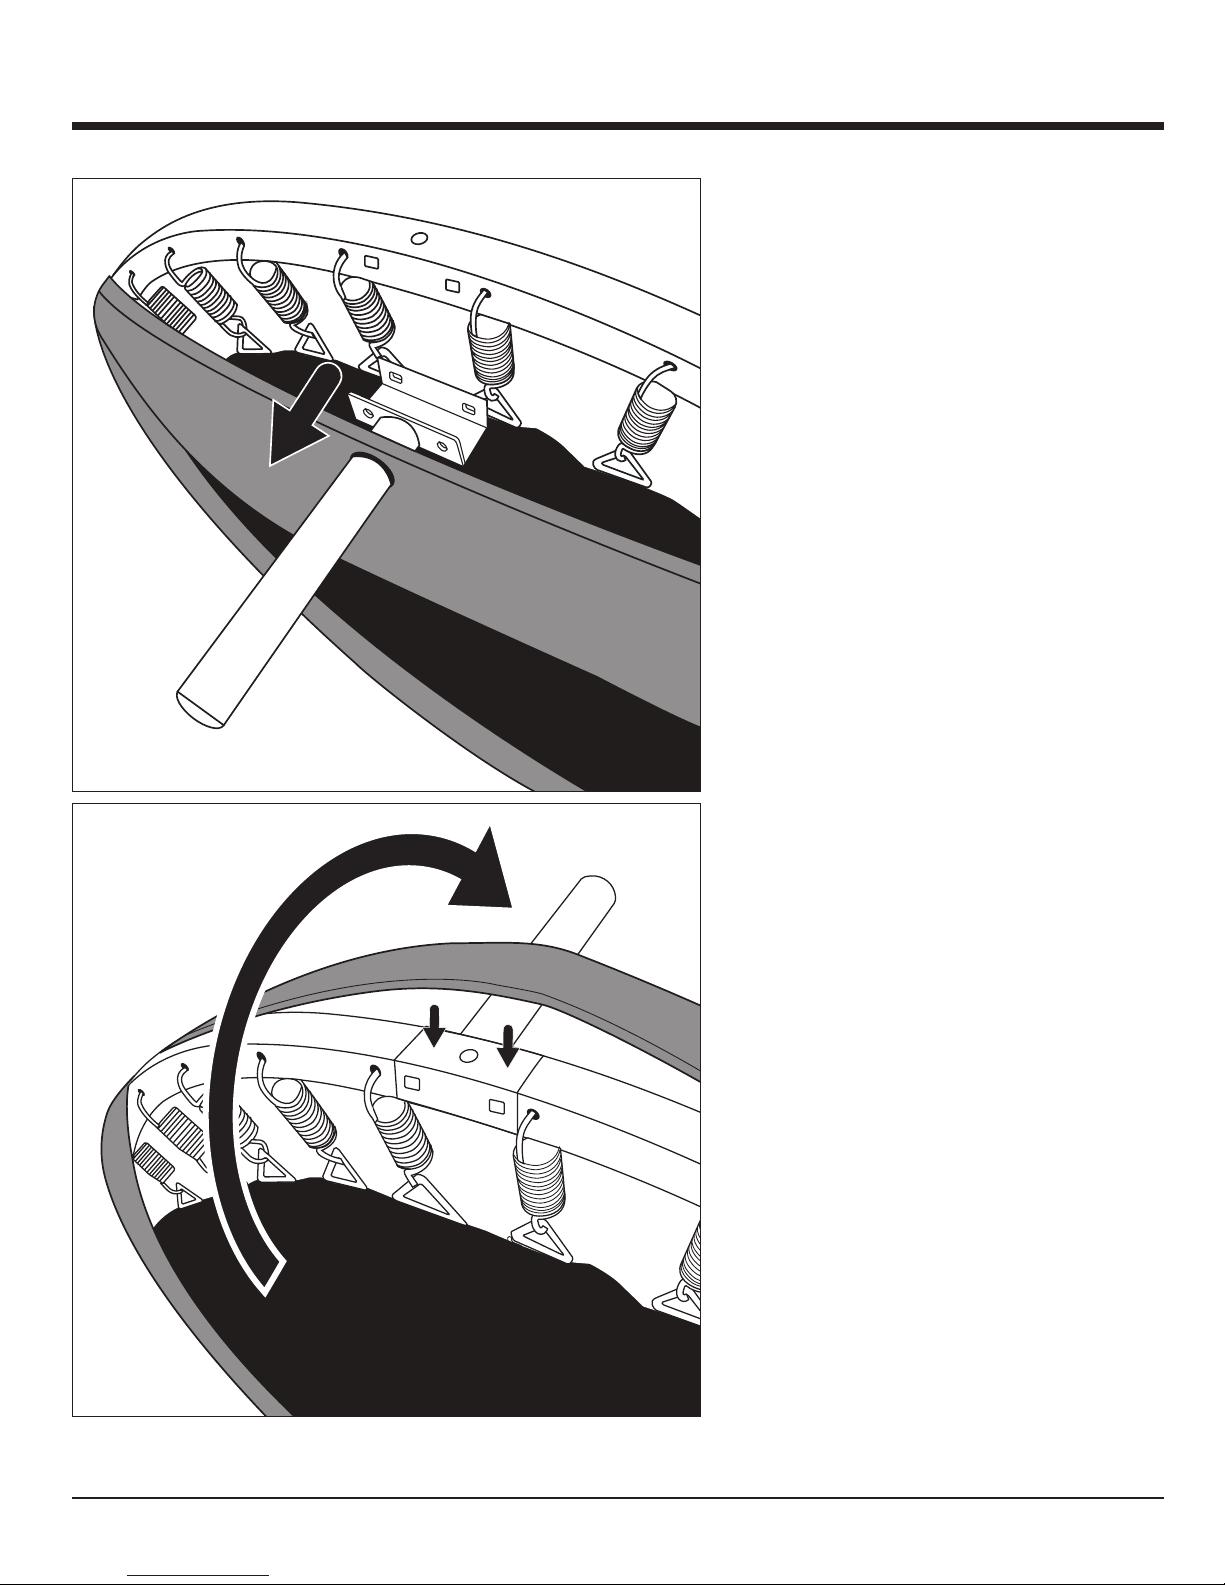
ASSEMBLY INSTRUCTIONS
(14)
STEP 4:
Parts:
Part 14 (x2) - T-Section Leg Tube
Insert the T-Section Leg Tube through the
bigger opening in the frame pad, it will be
the closest to the Top Rail Opening.
Flip the tube 180 degrees so the open area
of the T-Section aligns to the opening of the
top rail.
MODEL# 9005MTH
9
Page 10

ASSEMBLY INSTRUCTIONS
STEP 5:
(11)
(12)
(X1)
(13)
(11)
(12)
(X1)
(13)
Parts:
Part 11 (x4) - M5 x 45mm Bolt
Part 12 (x4) - Nut
Part 13 (x4) - Nut Cap
Part X1 (X4) - Washer
Before you place the Frame Pad back on top
of the Top Rail, Secure both T-Section Leg
Tubes by using 4x M5x45mm Bolts (Part
11) by sliding from the top of the T-Section.
Secure with 4x Washers (Part X1), 4x Nuts
(Part 12), and 4x Nut Caps (Part 13).
Make sure both T-Section Legs are secure
and all Legs are facing the same direction.
NOTE: All bolts must be inserted from the
top square openings of the T-Section so the
flatheads are under the frame pad. Failure
to do this might result in injury if installed
incorrectly.
STEP 6:
Once both T-Sections are secure to the
Top Rail, flatten the Frame Pad so all the
Springs are covered.
Make sure the smaller opening aligns with
the side opening of the T-Section.
10
CustomerService@GQBrands.comGQBrands.com
1-866-498-5269
Page 11
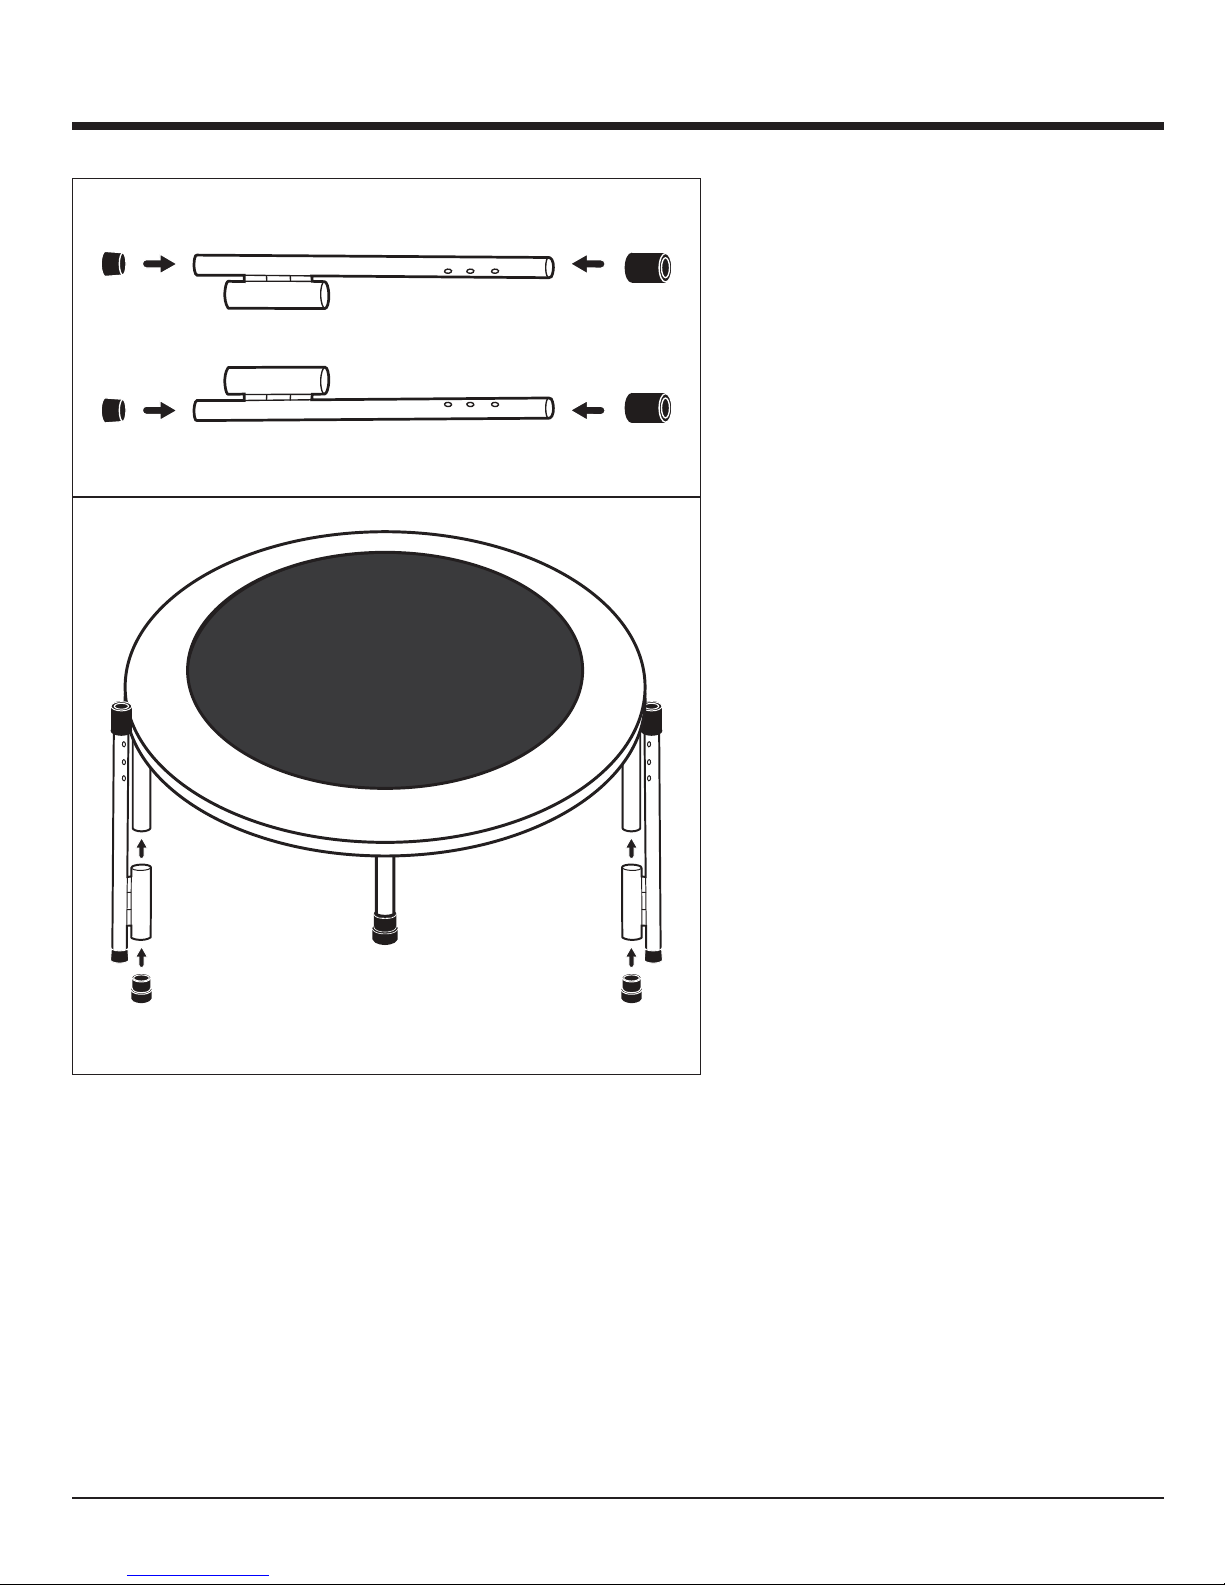
ASSEMBLY INSTRUCTIONS
STEP 7:
(7A)
(7A)
(8)
(7)
(7B)
(7B)
Parts:
Part 7 (x1) - Handrail Support Left
Part 8 (x1) - Handrail Support Right
Part 7A (x2) - Handrail Cap
Part 7B (X2) - Hand Rail Foam
NOTE: Parts 7, 7A, 7B, and 8, might come
pre-assembled for your convenience. If not,
attach the Handrail Foam (Part 7B) to the
edge of the Handrail Support tubes without
covering the 3 openings. At the bottom of
the Handrail Support place a Hand Rail
Cap (Part 7A). Follow these steps for both
Handrail Support Left (Part 7) and Handrail
Support Right (Part 8).
Use the smaller tube at the bottom of the
Handrail Support and slide through the
T-Section Leg tube and secure with a Leg
Cap (Part 7A). Repeat these steps for both
Part 7 and 8.
NOTE: Make sure that the 3 openings on
their respective Handrail Supports are
facing each other. This will let you know
that they are installed in the correct side.
(8) (7)
(6A) (6A)
MODEL# 9005MTH
11
Page 12
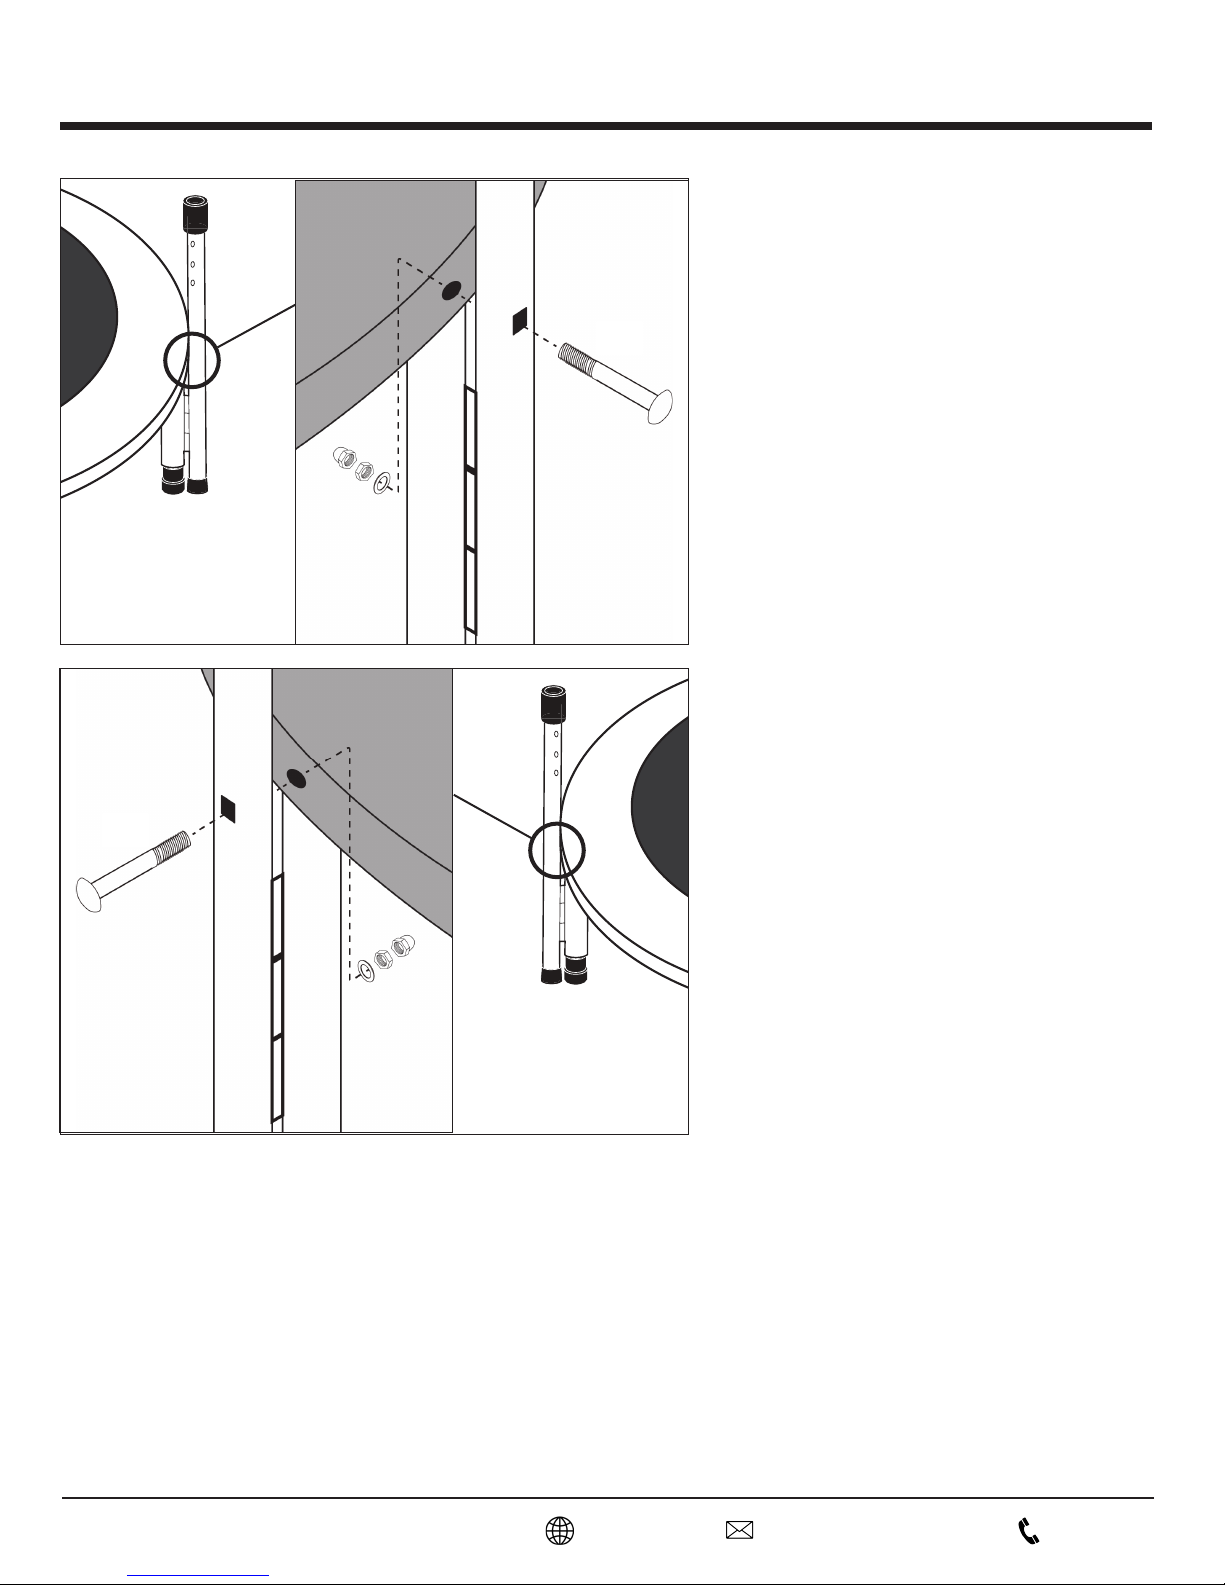
ASSEMBLY INSTRUCTIONS
(15)
(13)
(12)
(X1)
STEP 8:
Parts:
Part 15 (x1) - M5 x 65mm
Part 12 (x1) - Nut
Part 13 (x1) - Nut Cap
Part X1 (X1) - Washer
Locate the smaller opening on the Frame
Pad, and align with the bottom opening of
the Handrail Support Left (Part 7).
Insert 1x M5x65mm Bolt (Part 15) from the
outside of the trampoline, and secure with
1x Washer (Part X1), 1x Nut (Part 12), and
1x Nut Cap (Part 13).
STEP 9:
(15)
(X1)
(12)
(13)
Parts:
Part 15 (x1) - M5 x 65mm
Part 12 (x1) - Nut
Part 13 (x1) - Nut Cap
Part X1 (X1) - Washer
Locate the smaller opening on the Frame
Pad, and align with the bottom opening of
the Handrail Support Right (Part 8).
Insert 1x M5x65mm Bolt (Part 15) from the
outside of the trampoline, and secure with
1x Washer (Part X1), 1x Nut (Part 12), and
1x Nut Cap (Part 13).
12
CustomerService@GQBrands.comGQBrands.com
1-866-498-5269
Page 13

ASSEMBLY INSTRUCTIONS
(9A)(9)
STEP 10:
Parts:
Part 9 (x1) - Top Handrail Left
Part 10 (x1) - Top Handrail Right
Part 9A (x2) - Top Handrail Foam
(10)
(9A)
NOTE: Parts 9, 10, and 9A might come
pre-assembled for your convenience. If
not, Slide the Top Handrail Foam (Part
9A) through the upper opening of the Top
Handrail Left (Part 9) and Top Handrail
Right (Part 10)
STEP 11:
Align the Top Handrail Left (Part 9) to the
Handrail Support Left and slide. Align the
Top Handrail Right (Part 10) to the Handrail
Support Right and slide.
(10)
MODEL# 9005MTH
(9)
13
Page 14

ASSEMBLY INSTRUCTIONS
STEP 12:
In order to choose a height in the
Trampoline, push the Snap Click button on
the bottom of Top Handrail and slide into
the Handrail Support.
Choose from the three available openings
and guide the button to surface on the
opening that your prefer for your height.
NOTE: Both buttons on the Top Handrails
must be inserted in the same parallel
openings from both Handrail Supports.
Failure to do this might result in breakage
of the product or injury when the
trampoline is in use.
14
CustomerService@GQBrands.comGQBrands.com
1-866-498-5269
Page 15
ASSEMBLY INSTRUCTIONS
STEP 13:
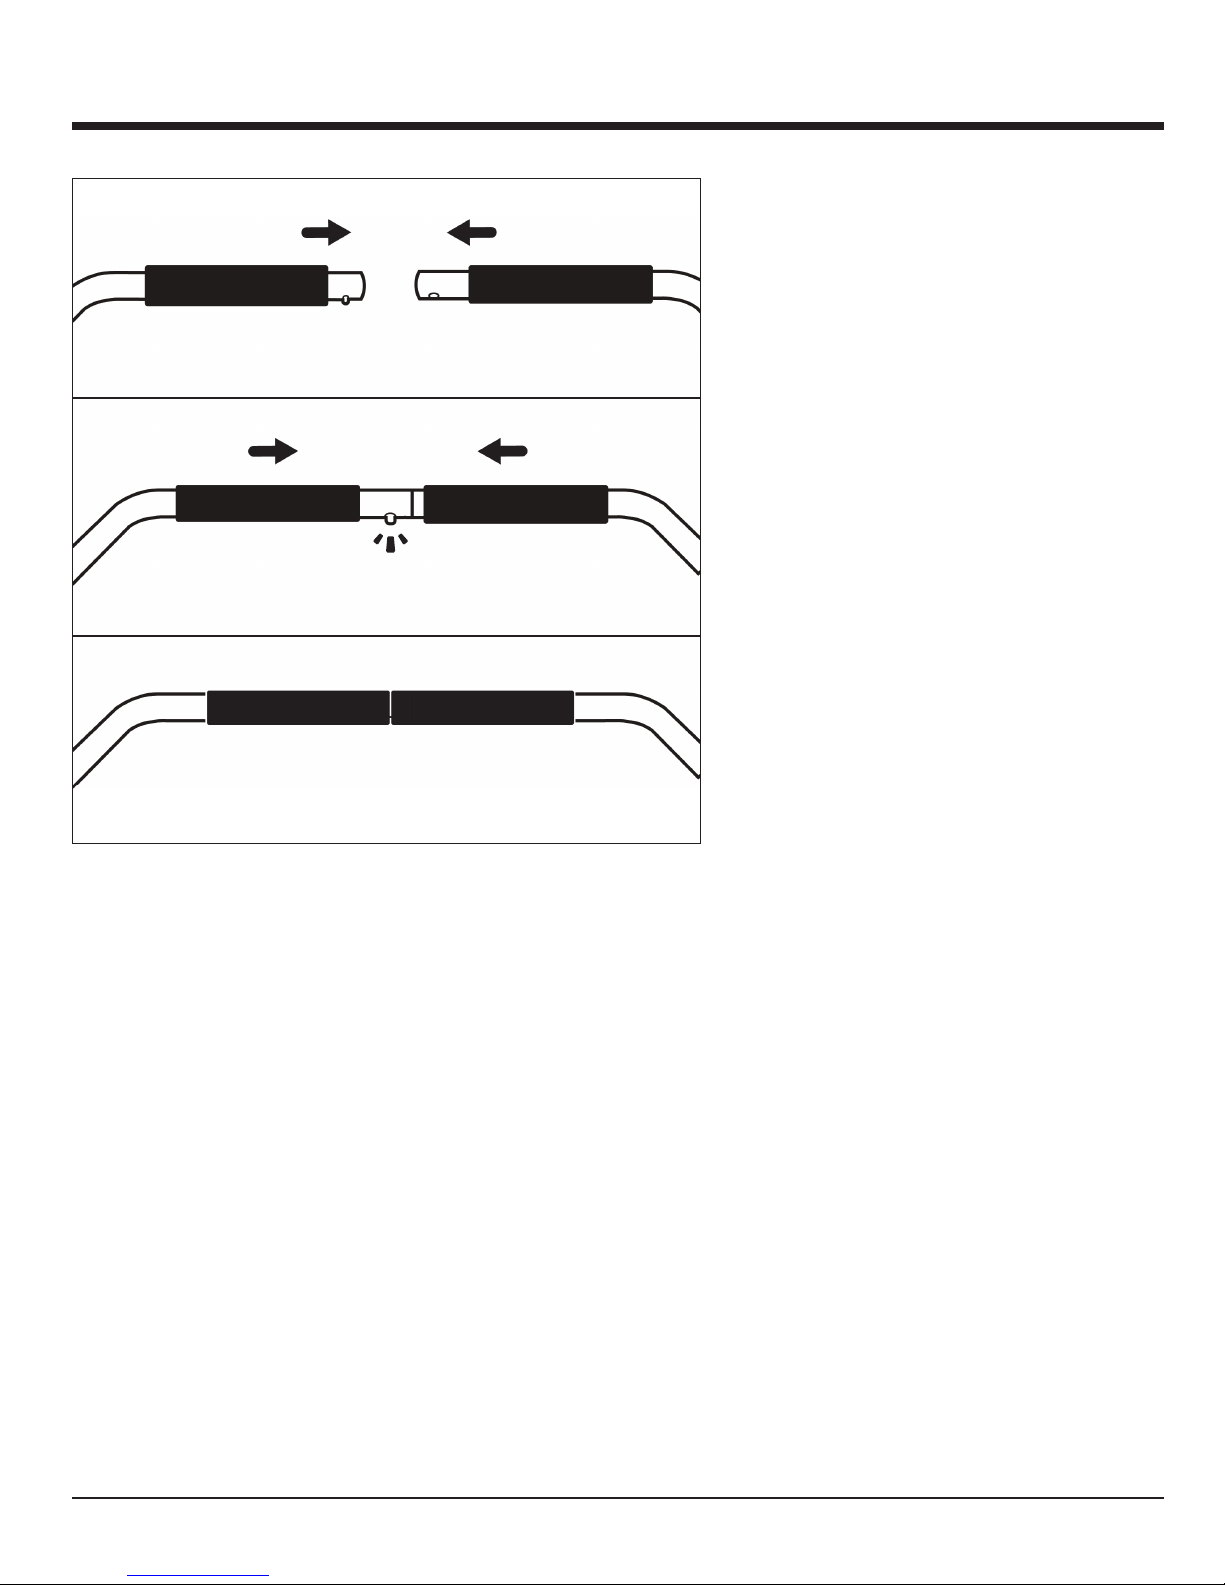
Guide the Snap Button from the Top
Handrail Right (Part 10) into the opening of
Top Handrail Left (Part 9)
Once the Snap Button is secure, slide the
Handrail foams to each other to avoid
pinching when using and holding out the
Handrail.
MODEL# 9005MTH
15
Page 16
FREQUENTLY ASKED QUESTIONS
• Question: “One of my trampoline legs has
broken” or “The trampoline padding or mat
is damaged, how do I replace it?”
Answer: If you are still within your warranty
period (90-Days from Initial purchase) You
should contact customer service. You can
also purchase select replacement minitrampoline parts at: www.GQBrands.com
• Question: “How do I remove the black caps
on the frame of the trampoline?”
Answer: Refer to page 8 of this manual for
instructions on how to remove the Leg Cap
Covers from the Trampoline Frame.
• Question: “I had a part missing from my
box” or “something was damaged during
assembly, can you send it to me?”
Answer: If it has been 30 days or less from
the date of your initial purchase, you can
contact customer service for a replacement
part to be issued.
• Question: “How do I separate the Handrail
Support pieces? They are stuck together.”
Answer: Parts 6&7: The Handrail Supports
ship as one piece. To Separate them, press
the pins on each of the Handrail Support
pieces and pull them apart.
16
CustomerService@GQBrands.comGQBrands.com
1-866-498-5269
 Loading...