


Doc # 904-PSB-2_3_4X100W-24VDC-RGB_06
1718 W. Fullerton Chicago, IL 60614
Ph: 773.770.1195 ● Fax: 773.935.5613
www.PureEdgeLighting.com ● info@PureEdgeLighting.com
© 2016 PureEdge Lighting. All Rights Reserved.
Installation Instructions for 2 X 100 / 3 X 100 / 4 X 100 Watt 24 Volt DC
RGB DMX LED Power Supply
SAVE THESE INSTRUCTIONS!
GENERAL INFORMATION IMPORTANT SAFETY INSTRUCTIONS
- RISK OF FIRE: This product must be installed by a
qualified electrician. Turn the power to the electrical box off
during installation. Read the "Important Safety Instructions"
before installation.
- NOTE: To avoid overheating the power supply, install it in a
ventilated remote location where air flows. Maintain proper
spacing among power supplies when multiple power
supplies are installed in the same remote location.
- This product is not suitable for wet locations. It is approved
for the use at any height above the finished floor.
- A typical installation is shown. Specific installation must be
in accordance with the local electrical codes.
- TO REDUCE RISK OF FIRE, it is important to wire the
power supply for the system as described in this
installation instruction.
- Load each power supply to MAXIMUM 100 Watts.
- Use CDP color dial or CTP color touch screen controller with
RGB LED soft strip.
- Do not install this power supply in a wet location.
- To reduce the risk of the system overheating and possibly
causing a fire, make sure all the connections are tight.
- Do not install *LED fixture closer than three inches or as
specified in the *LED fixture installation instructions to
curtains or similarly combustible materials. Keep insulation
at least 3" away from the enclosure.
- Turn the electrical power off before modifying the lighting
system in any way.
- The system is "ETL" listed for USA and Canada only when
all the products used are supplied by Edge Lighting.
* See LED fixture installation instructions for proper
placement.
100W, 24VAC LOW VOLTAGE WIRE SIZE CHART
WIRE LENGTH
3%
VOLTAGE
DROP
IN FT
WIRE SIZE
VOLTAGE AT END
OF THE WIRE
UP TO 31FT
14 AWG
23.28 VAC
32FT-49FT
12 AWG
23.29 VAC
50FT-81FT 82FT-124FT
10 AWG 8 AWG
23.28 VAC 23.28 VAC
1
Using LED Power Supply with RGB Soft Strip & CDP or CTP
M
Controller
A
COVER
COVER
M
PHILLIPS SCREW
1
ENCLOSURE
DVR-RGB-60
2
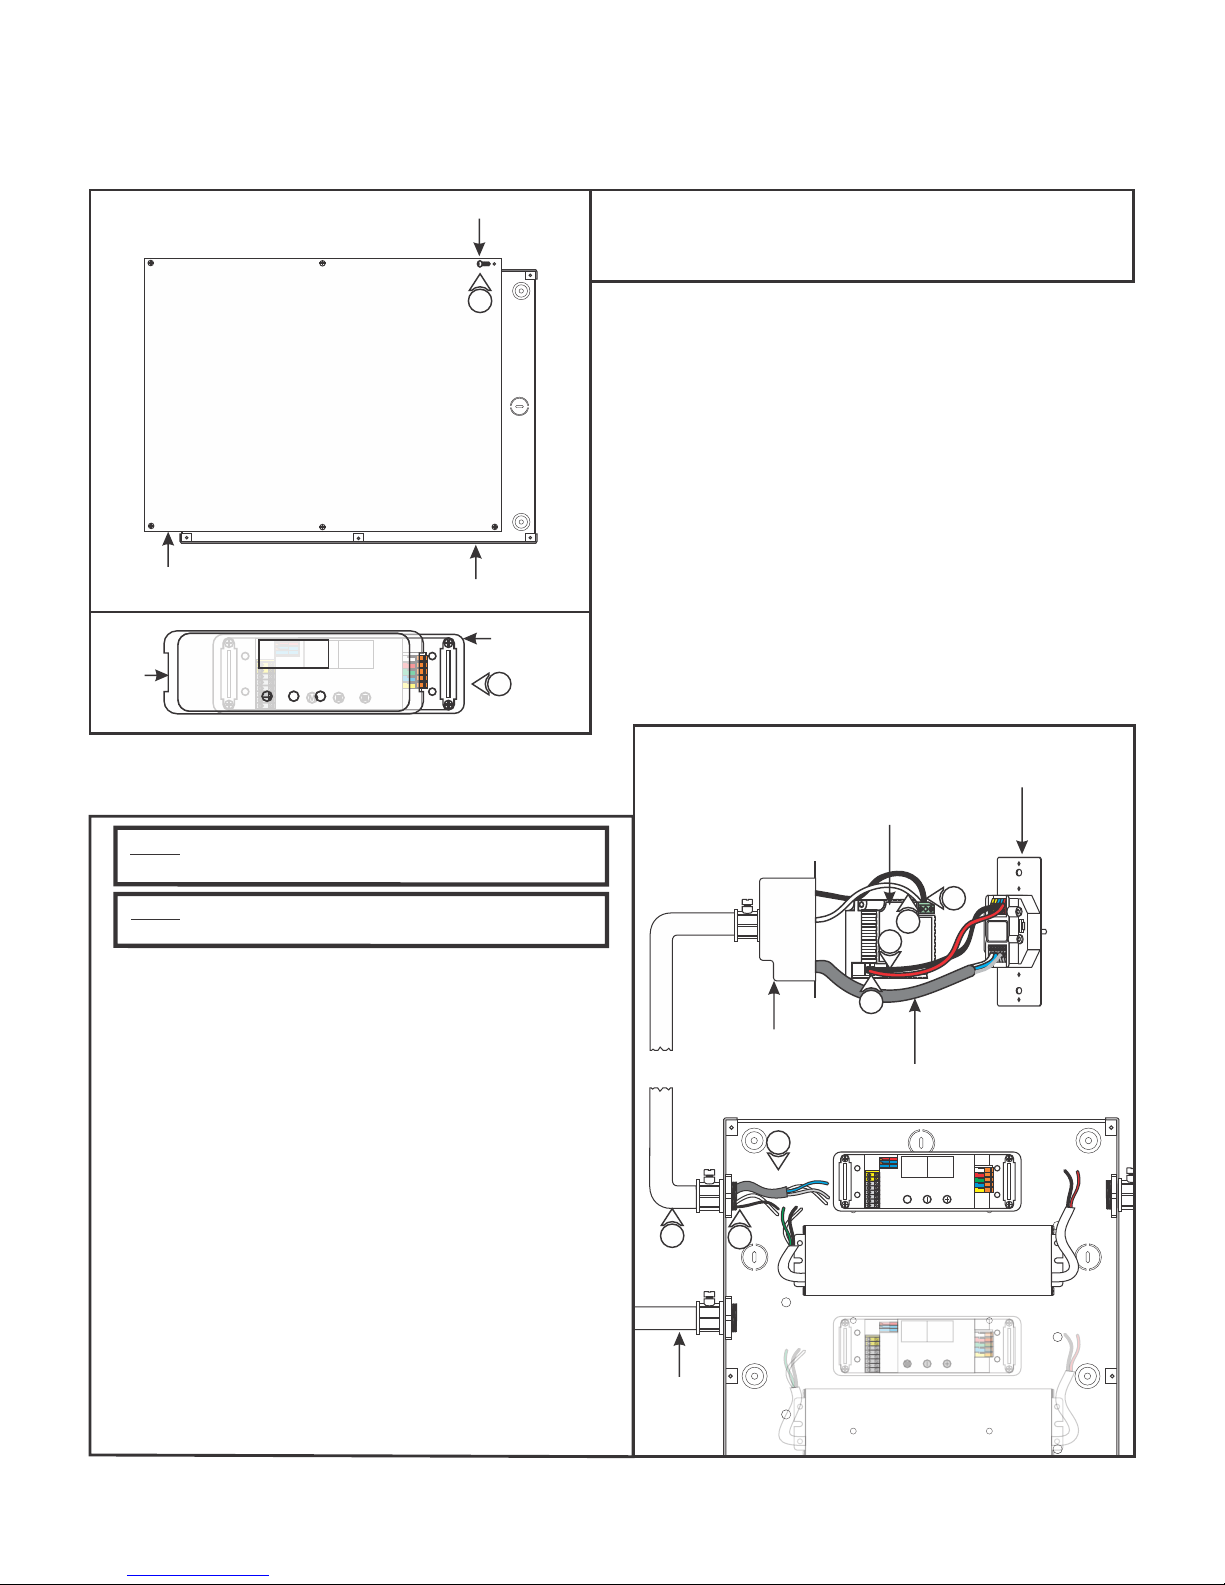
NOTE: Use a deep double gang boxes to fit the controller
and controller power supply.
NOTE: Refer to the "Configuring and Operating Dim Wheel"
on pages 5 and 6 to properly operate the controller.
3: Connect one end of a red wire to the "VDC+" terminal of the
controller and the other end to the "+24VDC" terminal of the
controller power supply.
4: Connect one end of a black wire to the "Ground" terminal of
the controller and the other end to the "-24VDC" terminal of
the controller power supply.
1: Loosen the six Phillips screws on front of the power supply to
remove the cover.
2: Carefully pull off the cover from the DVR-RGB-60 driver.
B
CONTROLLER
CONTROLLER
POWER SUPPLY
6
5
4
3
ELECTRICAL BOX
DMX CABLE (BELDEN #9841)
5: Connect the white wire to the "N" terminal of the controller
power supply.
6: Connect the black wire to the "L" terminal of the controller
power supply.
7: Install conduits from the controller, main panel (line voltage),
and soft strip to the power supply enclosure.
8: Run the black and white line voltage wires coming from
the controller power supply to the power supply enclosure.
9: Run the proper size DMX cable (Belden #9841
recommended) with three data wires from controller to the
power supply box.
7
CONDUIT
9
8
POWER SUPPLY
2
M
C
M
M
Ext in-
Ext in+
DMX in +
DMX in -
DMX in shield
LedSync thru+
LedSync thru-
LedSync shield
Driver
M
Ext in-
Ext in+
DMX in +
DMX in -
DMX in shield
LedSync thru+
LedSync thru-
LedSync shield
Driver
VDC+
VDC-
VDC+
VDC-
EXT in-
EXT in+
VDC-
VDC+
DMX in +
DMX in -
DMX in
shield
LEDSync
out +
LEDSync
out-
LEDSync
out shield
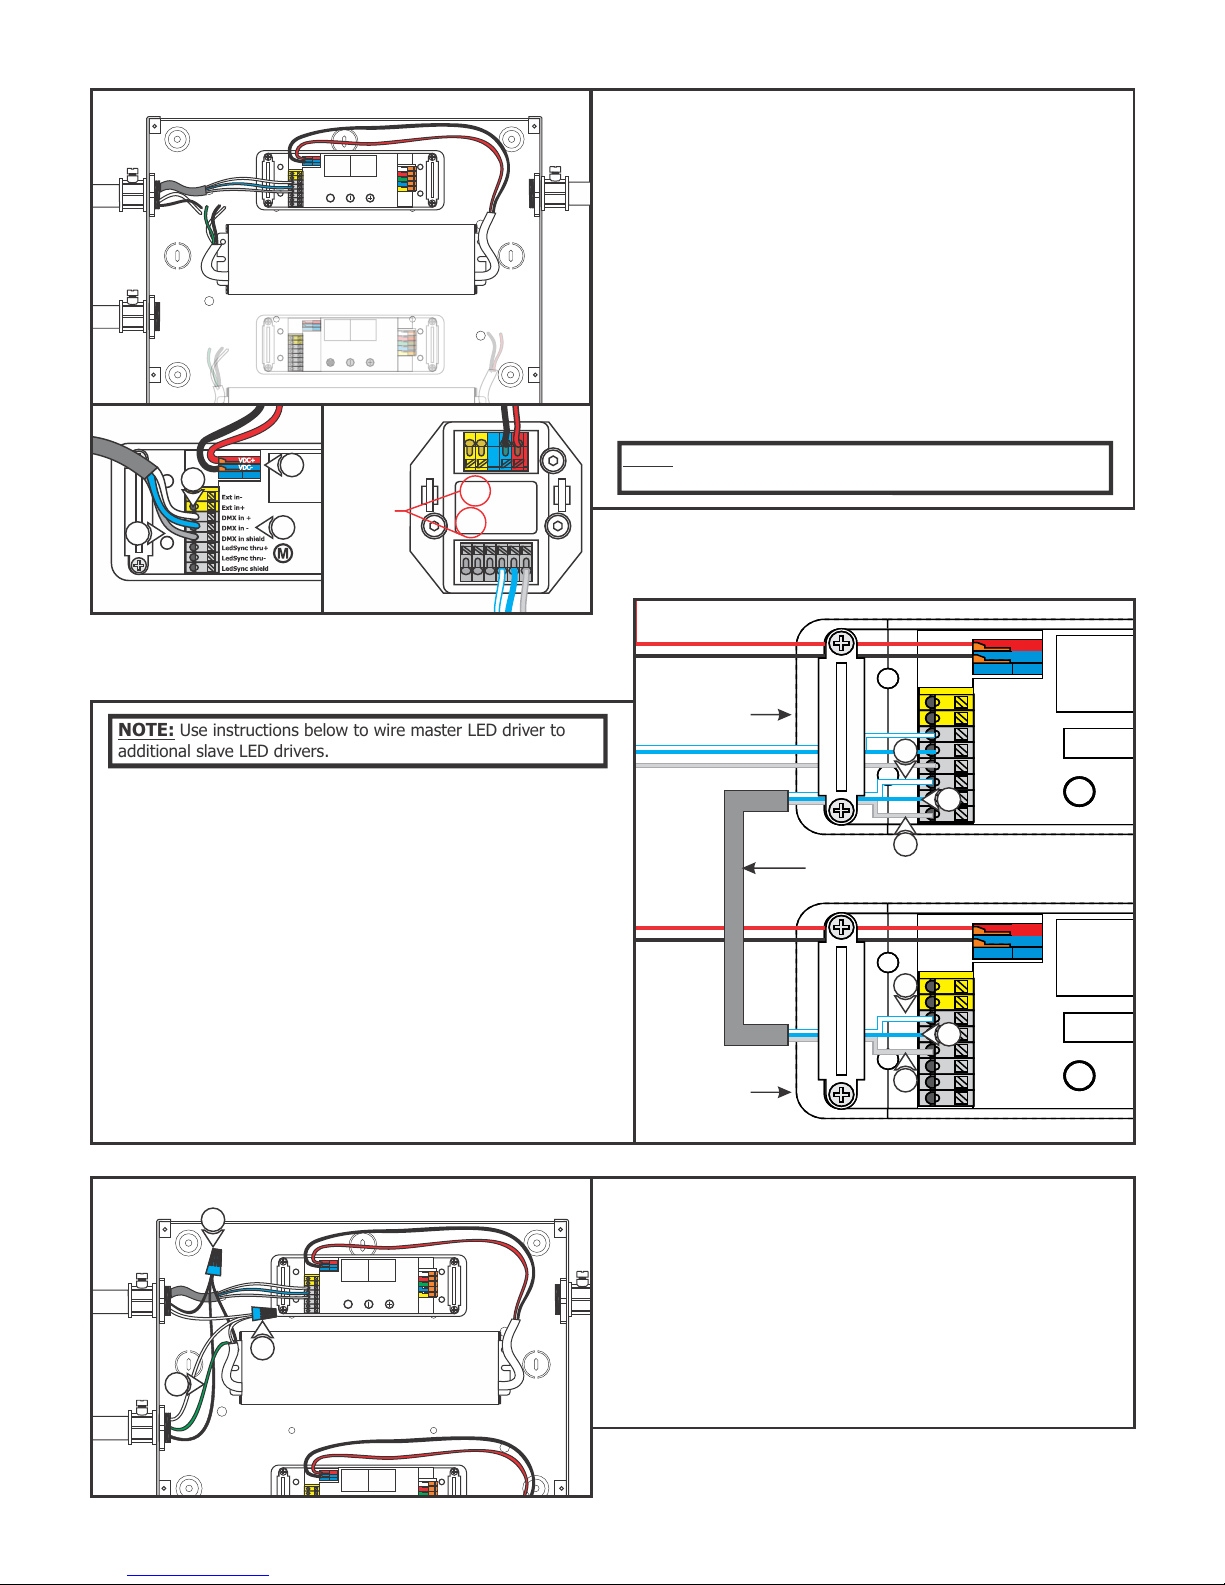
10: Install a red wire from the power supply to DVR-RGB-60
"VDC+" red terminal and a black wire from power supply
to DVR-RGB-60 "VDC-" blue terminal.
11: Connect one end of a data wire (blue with white stripes
wire) to controller "LEDSYNC OUT–" terminal. Connect the
other end into the DVR-RGB-60 "DMX in –" terminal.
POWER SUPPLY
12: Connect one end of a data wire (white with blue stripes
wire) to controller "LEDSYNC OUT+" terminal. Connect the
other end into the DVR-RGB-60 "DMX in +" terminal.
13: Connect one end of a data wire (bare shield wire) to
controller "LEDSYNC SHIELD" terminal. Connect the other
end into the DVR-RGB-60 "DMX in shield" terminal.
12
10
DO NOT
13
DVR-RGB-60
11
USE
CONTROLLER
NOTE: Use instructions below to wire master LED driver to
additional slave LED drivers.
14: Connect one end of a data wire (blue with white stripes
wire) to master LED driver "LEDSYNC OUT–" terminal.
Connect the other end into the DVR-RGB-60 "DMX in –"
terminal.
15: Connect one end of a data wire (white with blue stripes
wire) to master LED driver "LEDSYNC OUT+" terminal.
Connect the other end into the DVR-RGB-60 "DMX in +"
terminal.
16: Connect one end of a data wire (bare shield wire) to
to master LED driver"LEDSYNC SHIELD" terminal. Connect
the other end into the DVR-RGB-60 "DMX in shield"
terminal.
17: Repeat steps 14-16 for additional slave LED drivers.
E
19
NOTE: "DMX in+", "DMX in-", "EXT in+" & "EXT in-", controller
terminals are not used on controller.
D
MASTER LED
DRIVER
15
14
16
DMX CABLE (BELDEN #9841)
15
14
SLAVE LED
DRIVER
18: Run the line voltage power wires into the power supply.
19: Connect the hot power wire to the black power supply wire
and black controller power supply wire with a wire nut.
16
20
21
20: Connect the neutral power wire to the white power supply
wire and white controller power supply wire with a wire
nut.
21: Make sure the green transformer wire is grounded in
accordance with local electrical codes.
3

F
NOTE: The DVR-RGB-60 terminals adapt maximum 18 AWG
size. To avoid voltage drop, use 6" of 18 AWG size in RGB
terminals connected inline to proper size gauge wire attached
to the RGB LED wires with wire nuts. See the "Low Voltage
Wire Size Chart" on page 1.
LED SOFT STRIP
27
26
25
24
NOTE: Do not exceed the maximum wattage of the power
supply.
NOTE: Use only 24 volt LED RGB soft strip with this power
supply.
22: Use the "Low Voltage Wire Size Chart" on page 1 to
determine proper wire size connecting to the DVR-RGB-60
terminals.
23: Run the proper size green, red, blue, and black wires from
the RGB LED soft strip to the power supply enclosure.
24: Connect the black wire into the DVR-RBG-60 "LED
SUPPLY +" white terminal. Connect the other end to the
black wire(s) of the RGB soft strip.
25: Connect the red wire into the DVR-RBG-60 "Group 1-" red
terminal. Connect the other end to the red wire(s) of the
RGB soft strip.
26: Connect the green wire into the DVR-RBG-60 "Group 2-"
green terminal. Connect the other end to the green wire(s)
of the RGB soft strip.
27: Connect the blue wire into DVR-RGB-60 "Group 3-" blue
terminal. Connect the other end to the blue wire(s) of the
RGB soft strip.
29: Replace the DVR-RGB-60 cover.
30: Replace the power supply cover and secure it by tightening
the six Phillips screws.
28: Repeat steps 23-27 for additional DMX controllers and soft
strips.
G
30
4

O N
1 2 3 4 5 6 7
H
CONTROLLER
FACE PLATE
1.5MM ALLEN
WRENCH
PUSH
BUTTON
31: Align the face plate to the controller and secure using the
two flat head screws.
32: Attach the push button onto the controller center rod and
secure by tightening the M3 set screw with the 1.5mm Allen
wrench provided.
28
FLAT HEAD
27
SCREW
Configuring and Operating Dim Wheel
Selecting Modes
Configure your CDP by setting the DIP switches on the front:
O N
1 2 3 4 5 6 7
O N
1 2 3 4 5 6 7
1- Turn the light on 2- Change brightness 3- Turn the light off
COLOR MODE
CHASE MODE
Operating CDP
TAP TAP
BRIGHTNESS
NOTE: The DIP switches must
remain accessible after installation.
When making changes in the DIP
switch settings, disconnect and
reconnect the power supply to
activate new settings.
1- Turn the light on 3- Set Color2- Activate configuration mode
TAP TAP
Advanced Operation for Color Mode
4- Save color saving
2 SEC
5

Advanced Operation for Chase Mode
1- Turn the light on 3- Set show speed2- Activate configuration mode
TAP TAP
1- Turn the light on 3- Set Color2- Activate configuration mode
TAP TAP
5- Set White
6- Save settings
2 SEC
2 SEC
4- Save color saving
Advanced Operation for RGBW
4- Activate White
7- Dim
TAP
BRIGHTNESS
6

CTP
Group 1 -
Group 2 -
LED supply +
Group 3 -
Group 4 -
Group 1 -
Group 2 -
LED supply +
Group 3 -
Group 4 -
DMX CABLE
CDP
24VDC
(+)(-)
(-)
Power Supply
24VDC
N L
24VDC
+ -
LINE
(+)
CDMX
S3
S2
Input Wiring Diagram for 2x100W (Shown)
S1
Driver
M
DVR-RGB
VDC-
VDC+
Ext in-
Ext in+
DMX in +
DMX in -
DMX in shield
LedSync thru+
LedSync thru-
LedSync shield
(+)
(-)
Driver
M
DVR-RGB
VDC-
VDC+
Ext in-
Ext in+
DMX in +
DMX in -
DMX in shield
LedSync thru+
LedSync thru-
LedSync shield
Power Supply
120VAC
L
N
L
N
120VAC
7

Output RGB Wiring for 2x100W (Shown)
VDC+
VDC-
Ext inExt in+
DMX in +
DMX in DMX in shield
LedSync thru+
LedSync thruLedSync shield
LED supply +
Group 1 Group 2 -
Driver
Group 3 -
Group 4 -
M
24VDC
RGB LED Soft Strip
DVR-RGB
VDC+
VDC-
Ext inExt in+
DMX in +
DMX in DMX in shield
LedSync thru+
LedSync thruLedSync shield
LED supply +
Group 1 Group 2 -
Driver
Group 3 -
Group 4 -
M
24VDC
RGB LED Soft Strip
DVR-RGB
Output RGB+W Wiring for 2x100W (Shown)
VDC+
VDC-
Ext inExt in+
DMX in +
DMX in DMX in shield
LedSync thru+
LedSync thruLedSync shield
Driver
M
DVR-RGB
LED supply +
Group 1 Group 2 -
Group 3 -
Group 4 -
24VDC
RGB + W LED Soft Strip
VDC+
VDC-
Ext inExt in+
DMX in +
DMX in DMX in shield
LedSync thru+
LedSync thruLedSync shield
LED supply +
Group 1 Group 2 -
Driver
Group 3 -
Group 4 -
M
24VDC
RGB + W LED Soft Strip
DVR-RGB
Output Tunable White Wiring Diagram for 2x100W (Shown)
VDC+
VDC-
Ext inExt in+
DMX in +
DMX in DMX in shield
LedSync thru+
LedSync thruLedSync shield
VDC+
VDC-
Ext inExt in+
DMX in +
DMX in DMX in shield
LedSync thru+
LedSync thruLedSync shield
Driver
M
DVR-RGB
Driver
M
DVR-RGB
LED supply +
Group 1 Group 2 -
Group 3 -
Group 4 -
LED supply +
Group 1 Group 2 -
Group 3 -
Group 4 -
24VDC
Tunable White (2K4K) LED Soft Strip
24VDC
Tunable White (2K4K) LED Soft Strip
8
 Loading...