

Page 1
Owner’s manual
EN
Bedienungsanleitung
Manuel de l’utilisateur
Manuale dell’utente
Brugsvejledning
Manual de instrucciones
DE
FR
IT
DK
ES
Page 2

Safety instructions
Keep the unit away from heat sources.
Avoid ob jects or l iquids get ting int o the unit.
Do not remove screws from or open the
unit casing.
Fit th e mains adap tor to an eas ily acces sible
socke t, locate d near the unit a nd ONLY use
the mains power adapter supplied.
Should not be immersed in water, used
in shower or bathroom if plugged into
the mains.
Sicherheitshinweise
Halten Sie das Gerät fern von Heizquellen.
Verhindern Sie, dass Gegenstände oder
Flüssigkeiten in das Gerät gelangen.
Entfernen Sie keine Schrauben vom
Gehäus e und öffnen Sie dieses nicht.
Schlie ßen Sie das Net zteil an eine
leicht erreichbare Steckdose in der
Nähe des Geräte an, und benut zen Sie
AUSSCHLIES SLIC H das mit geliefer te
Netzteil.
Im Net zbet rieb sollte das Ger ät nicht in
Wasser getaucht, unter der Dusche oder
im Badezimmer benut zt werden.
Consignes de sécurité
Tenir l’appareil éloignée de toute source
de chaleur.
Éviter que des objets ou des liquides ne
pénèt rent à l’intérieur de l’appareil.
Ne pas ouvrir le boîtier de l’appareil ou en
enlever les vis.
Branchez l’adaptateur sur une pris e de
courant fac ilement acce ssible, à pr oximité
de l’ appareil et utilisez UNIQUEMENT
l’adaptateur fourni.
Si l’ a ppa re il e st b ra nch ée au s ec teu r, n e la
mettez pas dans l’eau, et ne l’utilisez pas
dans la douche ou la salle de bains.
Istr uzioni di sicurez za
Tenere il dispositivo lont ana da fonti di
calore.
Evitare che ogget ti o liquidi penetr ino nel
dispositivo.
Non rimuovere le viti né aprire l’involucro
della dispositivo.
Collegare l’ad attator e di rete ad una pr esa
della corrente facilmente accessibile,
situata vicino al disposi tivo e u tilizzare
ESCLUSIVAMENTE l’adattatore di rete
fornito.
Non immergere in acqua o usare nella
doccia o bagno s e collegato alla corrente
Veiligheid sinstru cties
Houd de radio uit de buur t van
warmtebronnen.
Vermijd dat voorwer pen of vloeistoffen in i
apparatet terechtkomen.
Verw ijder geen sc hroeven uit d e omkasting
van de radio en open het nie t.
Stee k de lichtne tadapt er in een gema kkelijk
toega nkelijk st opcont act in de buur t van de
radio en gebruik ALL EEN de meegeleverde
spanningsadapter voor het lichtnet.
Bør ikke nedsænkes i vand, bruges i
bruseren eller i badevaerelset hvis tilsluttet
stikkontakt
Instrucciones de
seguridad
Mantenga la radio alejada de fuentes
de calor.
No utilice la radio cerca del agua.
Evite que entren objetos o líquidos en
la radio.
No re ti re lo s to rn il lo s ni ab ra e l a lo jam ie nt o
de la radio.
Ajuste el adaptador de corriente a un
enchufe accesible, situado cerca de la
radio y u se EXCLU SIVAMENT E el adapta dor
de corriente suministrado.
Copyright
Copyr ight 2011 by Imag ination Tec hnologie s
Limited. All rights reserved. No part of this
publication may be copied or distributed,
transmitted, transcribed, stored in a retrieval
system, or translated into any human
or computer language, in any form or
by any means, electronic, mechanical,
magnetic, manual or otherwise, or disclosed
to thir d parties w ithout the expre ss wr itt en
permission of Imagination Technologies
Limited.
Copyright
Copyr ight 2011 Imagination Technolog ies
Limited. Alle Rechte vorbehalten. Kein Teil
dieser Publikation darf ohne ausdrückliche
und schriftliche Zus timmung von Imagination
Technologies Limited in irgendeiner Form
(elektronisch, mechanisch, magnetisch,
manuell oder auf andere Weise) kopier t,
verteilt, übermi ttelt, überschrieben, in einem
Suchsystem gespeichert, in eine andere
natürliche oder Computersprache übersetz t
oder Dritten zugänglic h gemacht werden.
Copyright
Copyr ight 2011 Imagination Technolog ies
Li mi te d. Tou s d ro it s r és er v és . A uc une pa rt ie
de la présente publication ne doit être
copiée ou diffusée, transmise, retranscrite,
stockée dans un système de récupération
de données ou traduite, que ce soit dans
une langue humaine ou dans un langage
infor matique, sous quelque forme et par
quelque moyen que ce soit, élec tronique,
mécanique, mag nétique, manuel ou autr e,
ou encore diffusée auprès de tiers sans
autorisation écri te expresse de Imagination
Techn ologies Limited.
Copyright
Copyr ight 2011 Imagination Technolog ies
Limit ed. Tut ti i diritt i riservati. Ne ssuna
part e della presente pubblicazione può
essere copiata o distr ibuita, trasmessa,
tras critta, memorizzata in un sistema di
archiviazione, o tradotta in un formato
normalmente comprensibile, in qualsiasi
forma o c on qualsiasi me zzo, elettronico,
meccanico, mag netico, manuale o altr o,
o divulgata a terze parti senza il per messo
scri tto di Ima ginatio n Technologi es Limit ed.
Copyright
Copyright 2011 door Imagination
Technologies Limited. Alle rechten
gereserveerd. Geen enkel gedeelte
van deze publicatie mag gekopieerd
of gedistribueerd, uitgezonden,
overgeschreven, opgeslagen in een retrieval
system of vertaald in om het even welke
menselijke of computertaal, in geen
enkele vorm of door geen enkel middel,
elektronisch, mechanisch, magnetisch,
manuee l of anders of b ekend gemaak t aan
derde partijen zonder de uitdrukkelijke
geschreven toes temming van Imaginat ion
Techn ologies Limited.
Copyright
Copyr ight 2011 por Ima ginatio n Technolog ies
Limited. Reservados todos los derechos.
Ninguna part e de esta publicación puede
copiarse o distribuirse, transmitirse,
transcribirse, almacenarse en un sistema
de recuperación, o traducirse a ningún
idioma humano o informático, de ninguna
forma o p or ningún me dio, ya sea ele ctróni co,
mecánico, magnético, manual o de otr o
tipo, ni r evelarse a terceras par tes sin el
consentimiento explíc ito por escr ito de
Imagination Technologies Limited.
Trademarks
Contour, PURE, t he PURE logo, PU RE, the PURE log o, EcoPlus, th e EcoPlus logo,
Imagi nation Tech nologies , and the Imag ination Te chnologi es logo are t rademar ks
or registered trademarks of Imagination Technologies Limited. iPad, iPod and
iPhone are trademar ks of Apple Inc., register ed in the U.S. and ot her countries.
“Made for iPod,” and “Made for iPhone,” mean that an electronic accessory
has been desig ned to connec t spec ifically to iPod or iPhone, respectively, and
has been certified by the developer to meet Apple per formance s tandards.
Apple is not responsible for the operation of this device or it s compliance with
safety and regulatory standards. Please note that the use of this accessory
with iPod or iPhone may affect wireless performance. All other product name s
are trademarks of their respective companies. Version 1 October 2011.
Warenzeichen
Contour, PURE, das PURE L ogo, PURE, das PURE Logo, EcoPlus, das
EcoPlus logo, Imagina tion Technologies und das Imaginat ion Technologies
Logo sind Warenzeichen oder eingetragene Warenzeichen von
Imagination Technologies Limited. iPad, iPod und iPhone sind in den
USA und anderen L ändern eingetragene War enzeichen von Apple Inc.
“Made for iPod” und “Made for iPhone” bedeuten, dass elekt ronisches
Zubehör eigens für den Anschluss an einen iPod bzw. ein iPhone entwickel t
wurde und der Entwickler die Erf üllung der Leistung sst andar ds von Apple
best ätig t. Apple ist nicht für die Funktion dieses Geräts und für die
Einhaltung der Sicherheit s- und sonstigen Auflagen verantwortlich. Bi tte
beachten Sie, dass die Verwendung dieses Zubehörs mit iPod bzw. iPhone
sich auf die Wireless-Leistung auswirken kann. Alle ander en Pro dukt namen
sind Warenzeichen ihrer jeweiligen Besitzer. Version 1 Oktober 2011
Marques commerciales
Contour, PURE, le logo PURE, PURE, le logo PURE, EcoPlus, le logo
EcoPlus, Imagination Technologies et le logo Imagination Technologies
sont des marques commerciales ou des marques déposées de Imagination
Technologies Limited. iPad, iPod et iPhone sont des marques de commerce
d’Apple Inc., enregistrée s aux Ét ats -Unis et dans les autres pay s.
Les ét iquettes « Made for iPod » et « Made for iPhone » signif ient qu’un
accessoire électronique a été développé spécifiquement pour connecter un
iPod ou un iPhone (respectivement) et que son développeur certifie qu’il
répond aux normes de performance Apple. Apple n’est pas responsable du
fonctionnement de ce dispositif ou de sa conformité avec les normes de
sécur ité et réglement aires. Veuillez noter que l’utilisation de cet ac cessoire
avec un iPod ou un iPhone peut avoir une incidence sur les performances
du dispositif sans fil. Tous les autres noms de produits sont des marques
commerciales de leurs détenteurs re spec tifs. Version 1 Octobre 2011
Marchi
Contour, PURE, il logo PURE, PURE, il logo PURE, EcoPlus, il logo EcoPlus,
Imagination Technologies e il logo Imagination Technologies sono marchi o
marchi registrati di Imagination Technologies Limited. iPad, iPod e iPhone sono
marchi commerciali di Apple Inc., registrati negli Stati Uniti e in altr i Paesi.
Le diciture “Made for iPod” e “Made for iPhone” attestano che l’ac ces sorio
elet tronic o è stato s pecifi camente c oncepit o per ess ere colle gato ad iPo d e iPhone
e che lo sv iluppato re ne cer tifica l a conform ità agli s tandard pr estaz ionali App le.
Apple non è responsabile del f unzionamento di questo apparec chio e della sua
confo rmità al le norme di s icurez za o ai requi siti di le gge. L’uso di que sto acce ssori o
con iPod e iPhone può influire sulle prestazioni wireless. Tutti g li altri nomi di
prodo tti son o marchi di pr opriet à delle ris petti ve socie tà. Versi one 1 Otto bre 2011.
Handelsmerken
Cont our, PURE, het PUR E logo, PURE, het P URE logo, EcoP lus, het EcoP lus logo,
Imagination Technologies en het Imagination Technologies logo zijn handelsmerken
of gere gistr eerde han delsmer ken van Imag ination Te chnolog ies Limi ted. iPad, iP od
og iPhon e er vare mærker t ilhør ende App le Inc., de r er regi stre ret i USA o g andre la nde.
“Made for iPod,” og “Made for iPhone,” betyder, at en elektroniske tilbehørsdel
er designet med henblik på tilslutning til iPod og iPhone og er godkendt af
udviklere i henhold t il Apples ydelses standarder.. Apple er ikke ansvarlig for
håndteringen af denne enhed eller overholdelsen af sikkerhedsstandarder
og regulative standarder. Bemærk, at bruge af dette t ilbehør sammen med
iPod eller iPhone kan påvirke den trådløse ydelse. Alle andere pr oductnamen
zijn handelsmerken van hun respec tieve firma’s. Versie 1 Oktober 2011.
Marcas comerciales
Contour, PURE, el logotipo PURE, Ecoplus, el logotipo Ecoplus, Imagination
Technol ogie s y el logo tipo I magin atio n Technol ogie s son mar cas c omer ciale s o marc as
comer ciales r egistr adas de Imag ination Te chnologi es Limit ed. iPad, iPo d y iPhone
son mar cas come rciales d e Apple Inc., r egist radas en lo s EE.UU. y en ot ros paíse s.
“Fabricado para iPod” y “Fabricado para iPhone” significan que un
accesorio electrónico se ha diseñado para conectarse específicamente
a un iPod y a un iPhone, r espectivamente, y que el desar rollador lo ha
certificado para que cumpla los estándares de rendimiento de Apple.
Apple no se hace responsable del funcionamiento de este dispositivo ni
de su cumplimien to de las normas de seguridad y legales. Tenga en cuent a
que el uso de este accesorio con el iPod o el iPhone puede afec tar a la
prestación inalámbrica. Todos los demás nombres de productos son marcas
comer ciale s de sus respectivas compañías. Versión del 1. Oc tubre 2011.
Page 3

Contents
Getting started ............................................................................ 2
Setting up .......................................................................................................................2
Controls and connectors .................................................................................................3
Remote control ...............................................................................................................4
Display ...........................................................................................................................4
Listening to iPod/iPhone/iPad ...................................................... 5
Compatibility ..................................................................................................................5
Docking your device ........................................................................................................5
Selecting the iPod source ................................................................................................5
Controlling your device ....................................................................................................5
Changing the information displayed on screen ................................................................5
Listening to radio ......................................................................... 6
Selecting Digital or FM radio ...........................................................................................6
Changing stations ...........................................................................................................6
Saving and selecting your favourite stations ....................................................................6
Changing the information displayed on screen ................................................................6
Using the aux input ...................................................................... 7
Connecting an auxilary device .........................................................................................7
Selecting the auxiliary input ............................................................................................7
Using the sleep timer ................................................................... 7
Setting the sleep timer ....................................................................................................7
Cancelling the sleep timer ...............................................................................................7
Using the alarms .......................................................................... 8
Setting an alarm .............................................................................................................8
Cancelling a sounding alarm ...........................................................................................9
Snoozing a sounding alarm .............................................................................................9
Changing the snooze duration .........................................................................................9
Options and settings .................................................................. 10
Digital radio options .................................................................................................... 10
General options ........................................................................................................... 10
Help .......................................................................................... 11
Secondary and inactive stations .................................................................................. 11
Hints and tips .............................................................................................................. 11
Software updates......................................................................................................... 11
Specifications ............................................................................ 12
PURE Warranty Statement for Australia ........................................ 13
EN
1
Page 4

Getting started
Setting up
Fully extend the aerial.
1
Insert the connector of the mains
3
power adapter into the socket on
the rear of the radio.
Attach the appropriate adapter
pins for your region, if required
and plug in to the mains supply.
Press and on the remote to view the available
4
languages (English/French/German/Italian) used for
displaying menus and options and press Select to
confirm your choice.
2
Pull the plastic tab from
the remote control battery
compartment and remove
the protective film from
remote buttons.
LANGUAGE
Wait for Contour 100Di to complete an autotune,
5
which finds all available digital stations (this takes
about a minute).
When the autotune is complete, a digital station will
be selected.
DR
SCAN 26
DR
bBC R2
2
Page 5

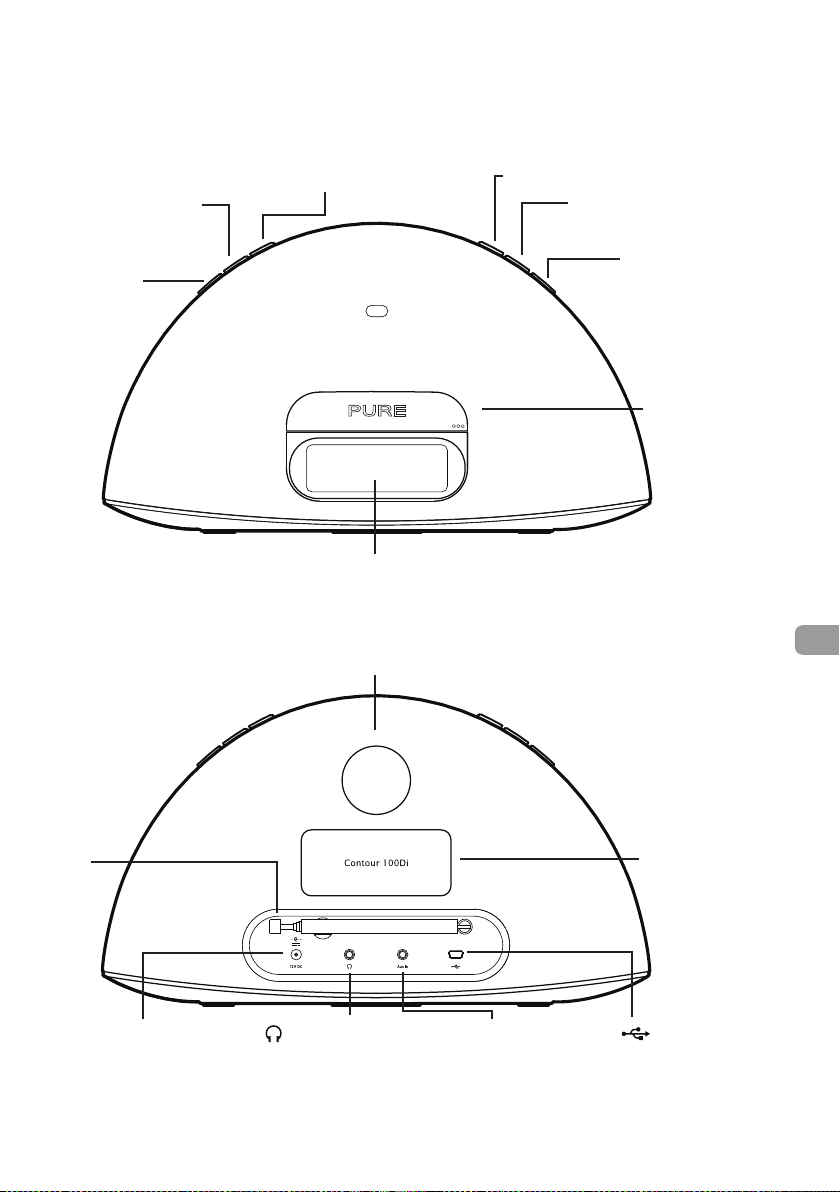
Controls and connectors
Favourites
Source
Press to change between
Digital radio, FM, iPod,
and Auxiliary input
On/Standby
Press and repeat to
browse through your
favourite stations
Mute
Volume down
Volume up
iPod/iPhone/iPad
dock
Press right hand
end of the front
panel to release
the iPod dock
Telescopic
Aerial
Power adapter socket
Connector for supplied
mains power adapter
LCD display
Bass port
Headphone socket
3.5mm stereo
headphone socket
Aux In socket
Analogue stereo
input for iPod/
MP3 player
EN
Remote control holder
Storage recess for
remote control
USB socket
USB connector for
software upgrades
(mini-B type)
3
Page 6

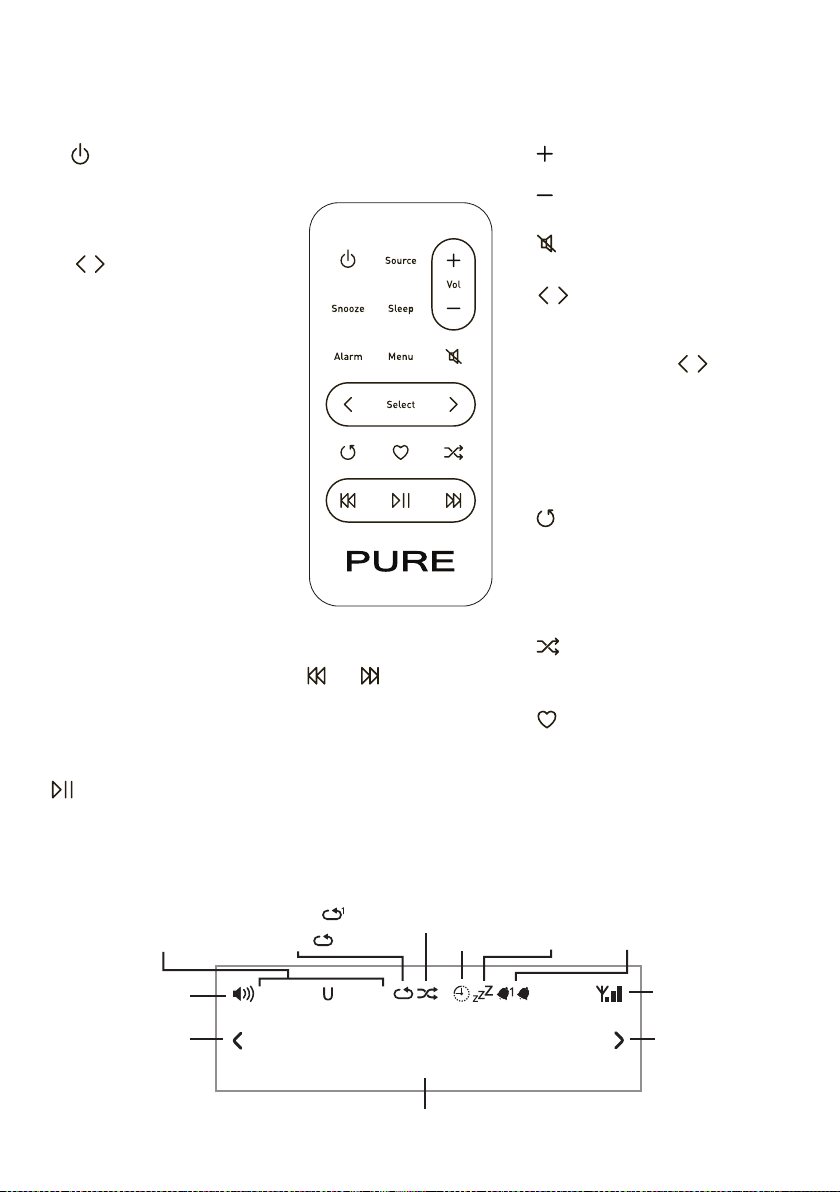
Remote control
On/Standby
Source
Press to change between
Digital radio, FM, iPod, and
Auxiliary input
Volume up
Snooze
Press to view the curent
Snooze time. Use
and Select to change.
Press to snooze a
sounding alarm.
Sleep
Press and repeat to set a
sleep timer.
Alarm
Press and repeat to
view alarm status. Press
Select to change status
or alarm settings.
Menu
Press to view options menu to
change settings.
In iPod source press to
navigate iPod menu. Press and
hold to view options menu.
Play/Pause
Play/pause
current track.
and Skip to start
of current track or go to
previous/next track. Hold to
fast rewind or fast foward.
In FM seek tune to the next
station.
Volume down
Mute
and Select
Browse and select stations,
tracks and menu options.
In FM step down and
up the frequency range in
steps of 0.05MHz. Press
and hold to seek tune to
the next station.
Repeat
Toggle to repeat current track,
repeat all or no repeat.
Shuffl e
Shuffl e the track playback
order.
Favourites
Press to view your favourite
stations list.
Then press and hold to save
the current station.
Display
4
Source
indicators
Volume
Scroll
indicator
Repeat one
Repeat all
DR iPod
AX
FM
Shuffl e
Sleep
timer set
1
bBC R2
Text area
1
Alarm
snoozed
2
Alarm 1/2
set
Signal strength
Scroll
indicator
Page 7
Listening to iPod/iPhone/iPad
Compatibility
Contour 100Di is compatible with most iPod, iPhone and iPad models. For the latest information,
check the compatibility table on our website: www.pure.com/products/ipod-compatibility.
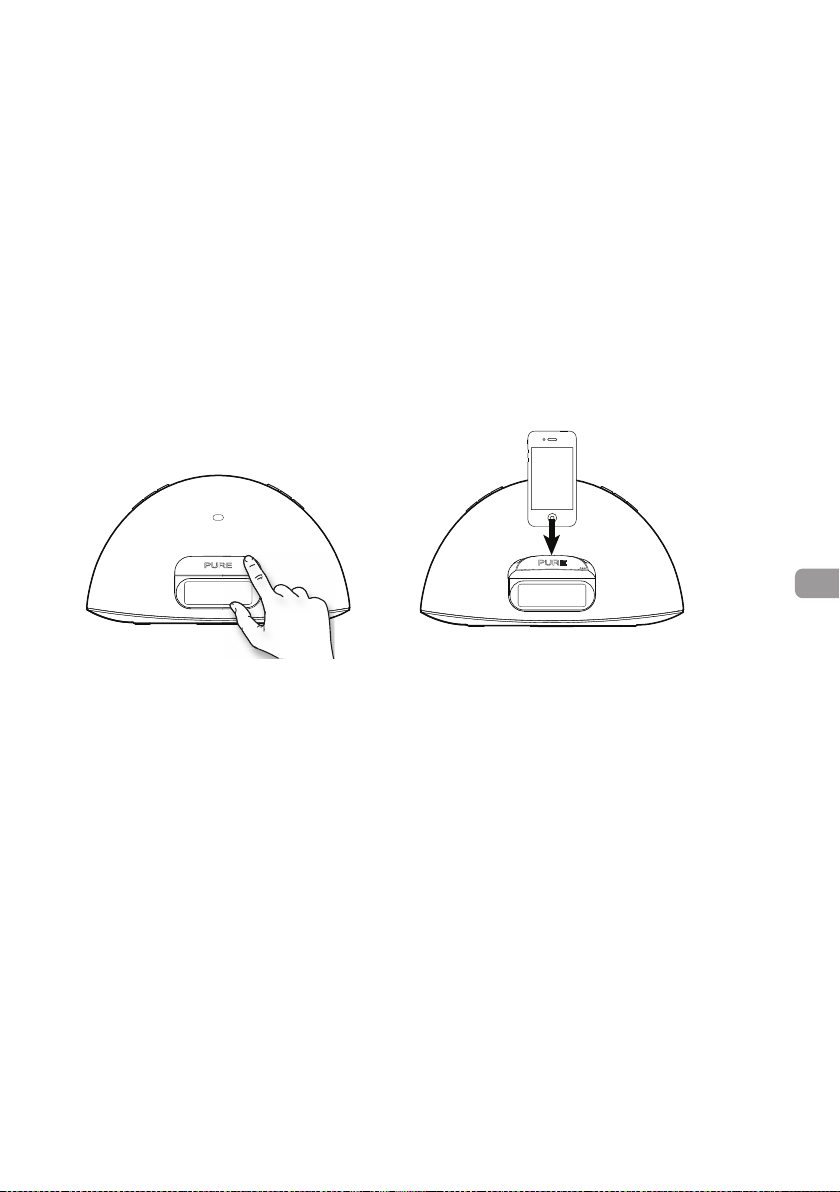
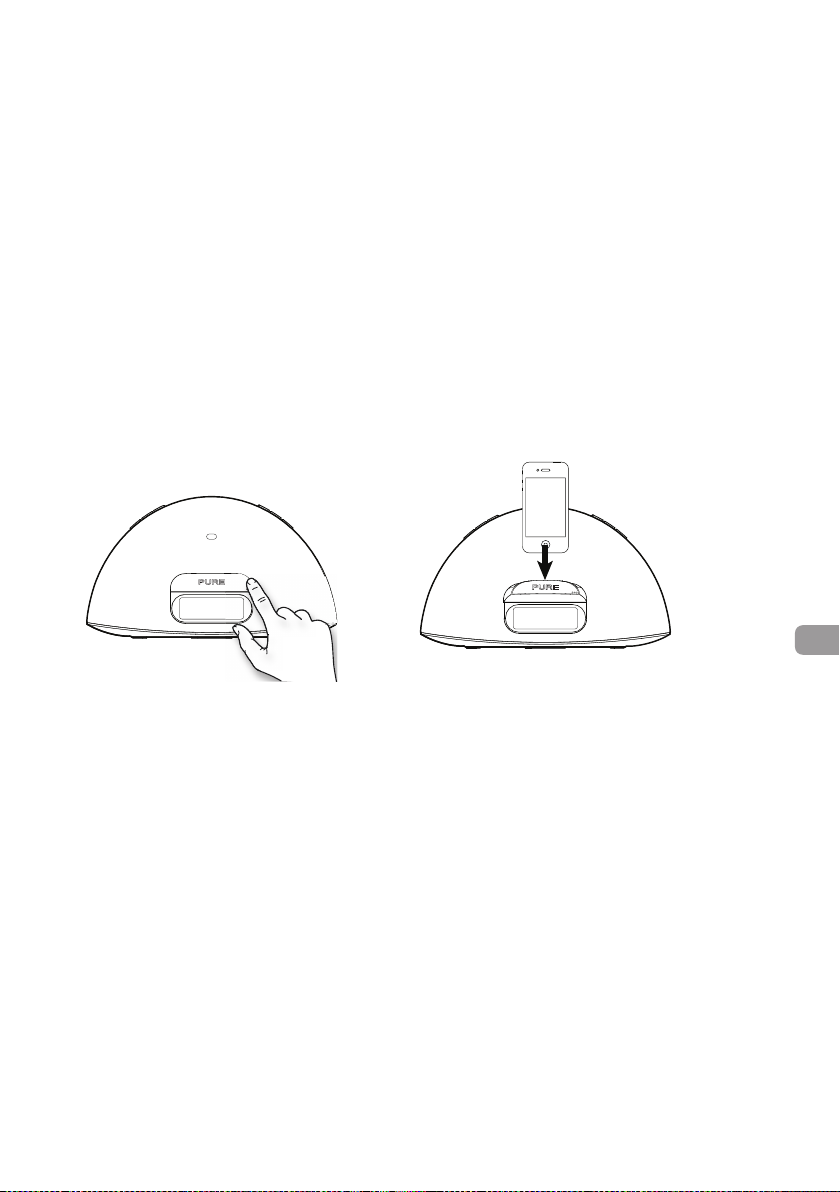
Docking your device
1. Push the right hand end of the front panel as shown to release the dock.
2. Carefully dock your device onto the connector.
Your device will start charging as soon as it is docked and will continue charging whether
Contour 100Di is switched on or in standby.
Note The headphone socket is disabled when an iPhone/iPod/iPad is docked.
EN
Selecting the iPod source
Press the Source button to select IPOD. On devices with apps you can also play audio from other
apps e.g. the PURE Lounge internet radio app, if you pause the iPod playback.
Controlling your device
When the iPod source is selected your device will start playing the last iPod track you were
listening to. Use the remote or controls on your Apple device to navigate menus and control
playback.
To access the Contour 100Di options menu while you have an iPod/iPhone docked, press and
hold the Menu button on the remote.
Changing the information displayed on screen
Press and hold the Menu button, press Select to choose the DISPLAY option.
Choose one of the following options:
TITLE/ARTIST Track title and artist name
TIME Full screen clock
5
Page 8
Listening to radio
Selecting Digital or FM radio
Press the Source button to select DIGITAL or FM. You’ll see the relevant icon
Changing stations
Digital
Press and to browse the available stations and press Select to tune to a station.
FM
Press or (or hold or ) to seek to the next station with a strong signal.
Press or to change the frequency in steps of 0.05 MHz.
Saving and selecting your favourite stations
You can save up to 40 (FM or digital) stations in a list for easy access.
Saving
1. Tune to the station you want to save as a favourite.
2. Press on the remote to view the favourites list.
3. Press or on the remote to decide where you want to save the favourite (if you choose an
existing favourite it will be replaced).
4. Press and hold down or Select on the remote until you see ‘SAVED’ on the screen.
Selecting
Press on the unit or remote to view the favourites list.
Press again on the unit to cycle through the list or press or on the remote.
Wait for the station to change if using the unit or press Select on the remote to change
immediately.
Changing the information displayed on screen
Press the Menu button, press and to browse and press Select to choose the DISPLAY option.
Choose one of the following options:
STATION Station name or frequency
TEXT Scrolling text broadcast by the station
TIME Full screen clock updated by the radio broadcast
6
Page 9
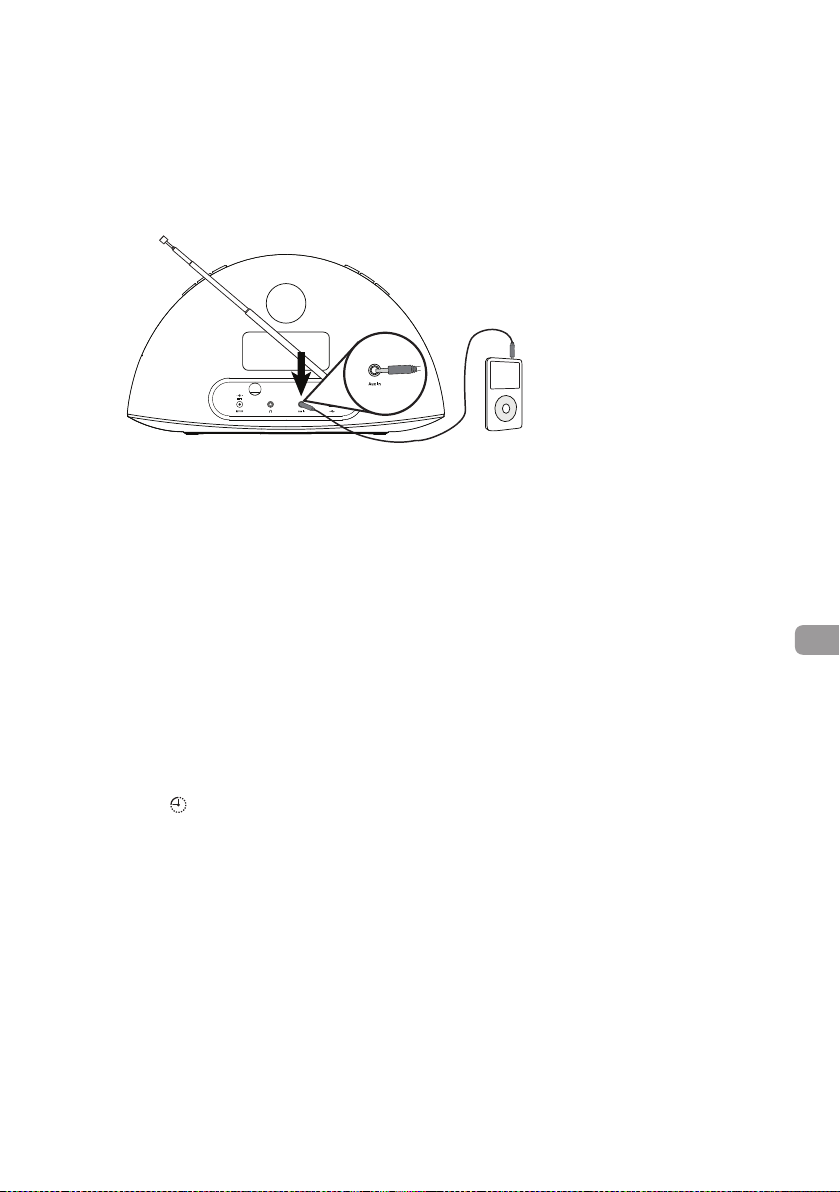
Using the aux input
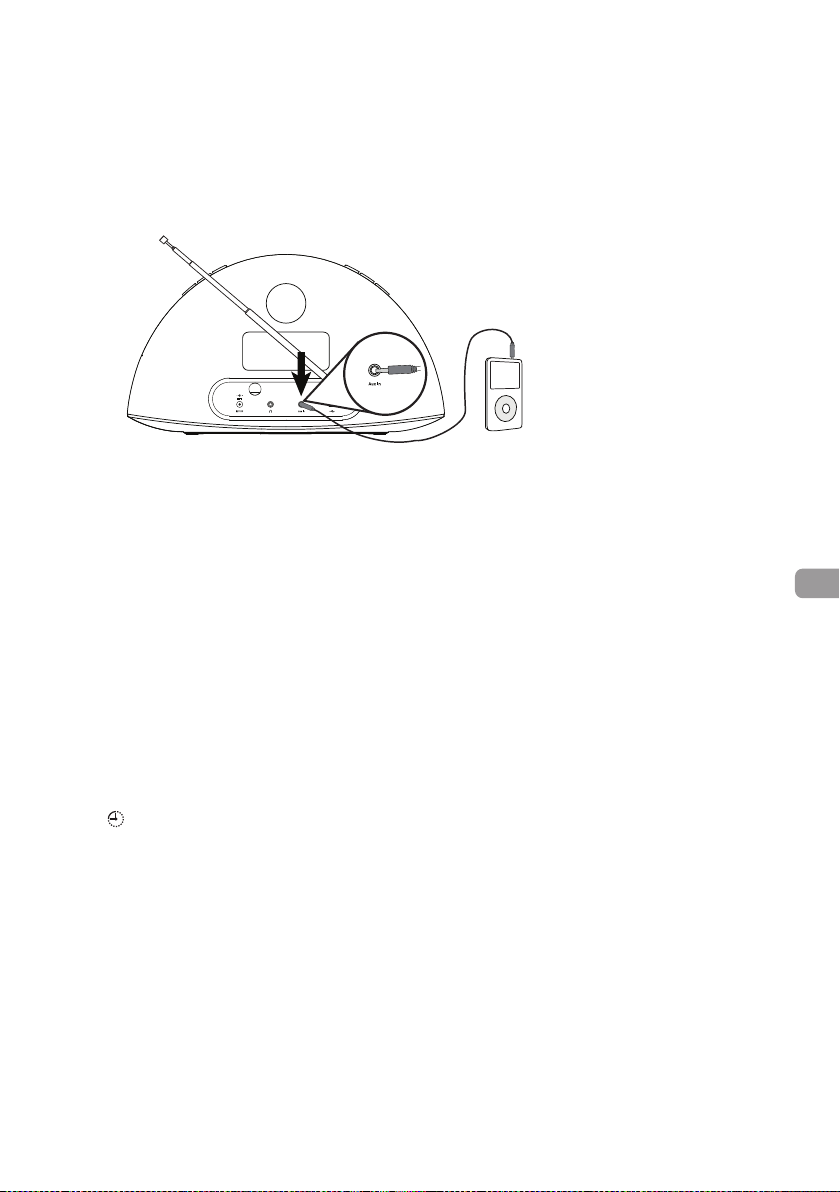
Connecting an auxilary device
Connect the line out or headphone socket of your auxiliary device to the Aux-In socket on your
Contour 100Di using a suitable cable.
Selecting the auxiliary input
Press the Source button to select AUX.
Using the sleep timer
The sleep timer switches your radio into standby after a number of minutes has elapsed.
EN
Setting the sleep timer
1. Press the Sleep button on the remote and repeat to increase the duration of the sleep timer
from 15 to 90 minutes.
2. Push Select, or wait to start the sleep timer.
The icon on the screen indicates when the sleep timer is set.
Tip Push the Sleep button again at any time to view the time remaining.
Cancelling the sleep timer
Press the Sleep button and set the timer duration to OFF.
7
Page 10
Using the alarms
Contour 100Di has two alarms which you can set to sound a tone, tune to a radio station or play
an track from your iPod/iPhone.
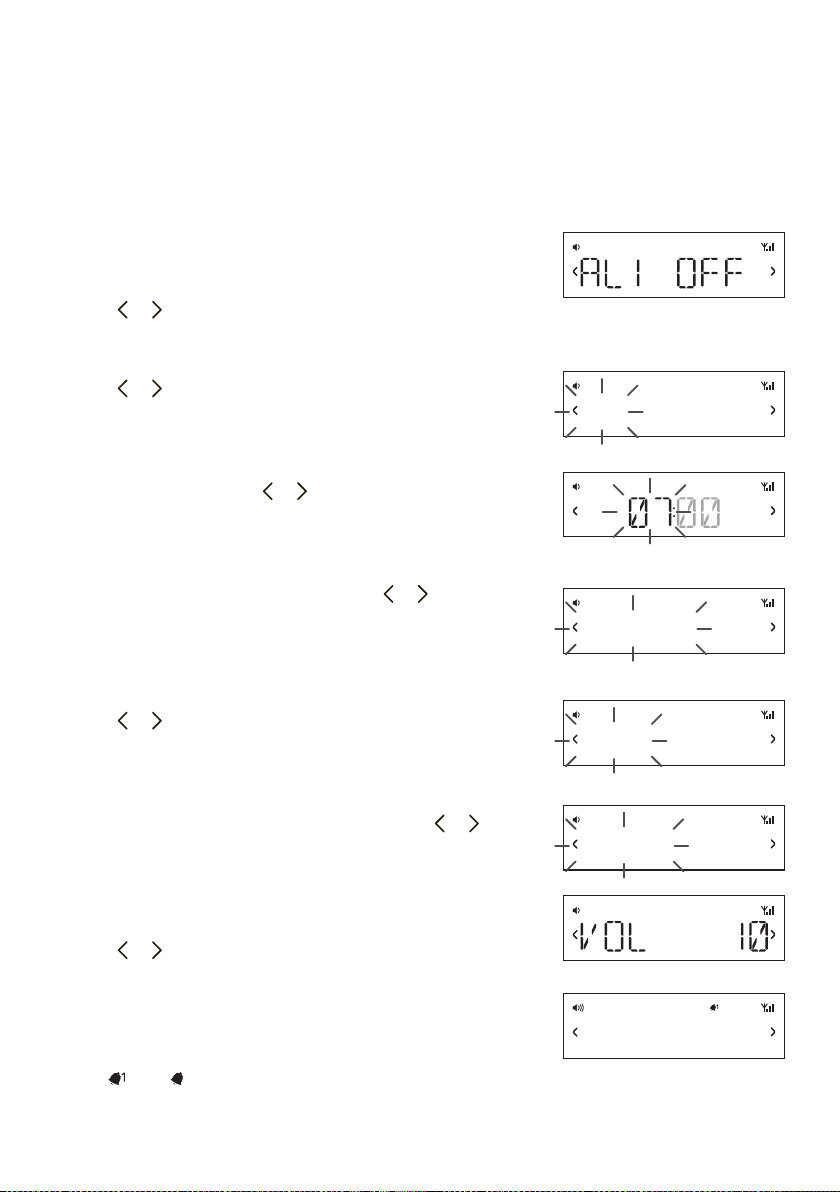
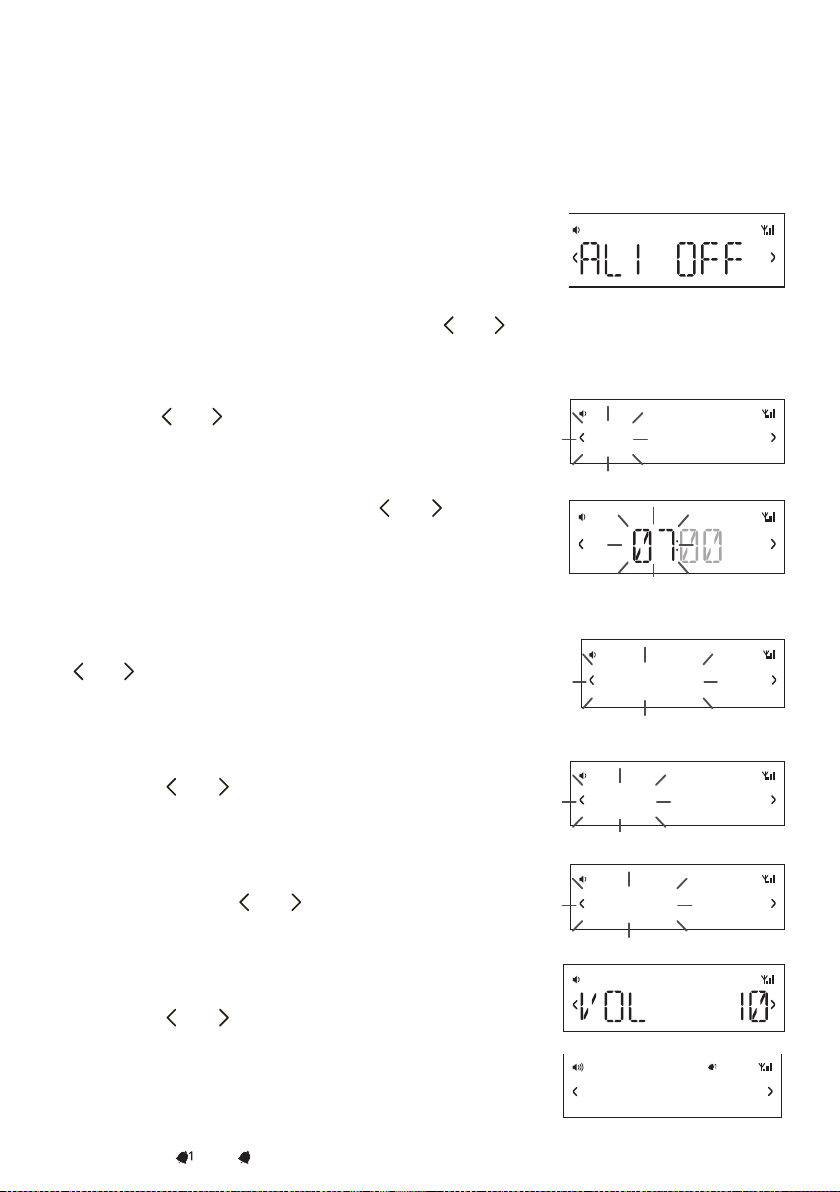
Setting an alarm
Press the Alarm button on the remote to show the status of
Alarm 1, press again to show the status of Alarm 2.
Press the Select button to choose and adjust either alarm and
press or and Select to adjust the following settings:
Alarm on/off
Press or to choose between ‘ON’ (alarm sounds) or ‘OFF’
(alarm does not sound) and press Select.
Time
Set the alarm time. Press or to adjust the hours then press
Select. Repeat to set the minutes then press Select.
Days
Set the days that the alarm sounds. Press or to choose
between: DAILY (every day), ONCE (no repeat), WEEKENDS or
WEEKDAYS (Monday to Friday) then press Select.
DR
DR
ON
DR
DR
DAILY
Type
Press or to choose between: DIGITAL, FM IPOD or TONE
(buzzer).
Station
If you’ve set alarm mode as DIGITAL or FM, press or to
choose between: LAST USED (Last station tuned to) or select a
favourite if you have any saved.
Volume
Press or to change the alarm volume then press Select.
You see the message ‘SAVED’ once you have completed all the
alarm settings.
1
The
and 2 icons on the screen indicate when an alarm is
set.
8
DR
DAB
DR
LAST
DR
DR
SAVED
1
Page 11

Cancelling a sounding alarm
To cancel a tone alarm press the Alarm, Select or Standby button.
To cancel a radio alarm press any button except volume.
Note A sounding alarm will switch off after one hour unless you cancel it.
Snoozing a sounding alarm
To snooze a sounding alarm press the Snooze button on the remote. The alarm will be silenced
for 10 minutes (the default snooze time) then sound again.
icon on the screen indicates when an alarm is snoozed.
The
Changing the snooze duration
The default snooze time for the alarms is 10 minutes. To change the snooze time:
Press the Snooze button on the remote and press or to choose a snooze duration then press
Select to confi rm.
EN
9
Page 12

Options and settings
Press the Menu button to access the options menu, press or to scroll through and change the
options and press Select to confi rm. Current value of settings are indicated by an asterisk (
Digital radio options
Autotune
Scans all digital frequencies for stations, automatically adds any new stations found to the
station list and removes inactive stations. To stop an autotune press Menu.
General options
Clock
The clock is automatically set if you have a good digital or FM signal and will automatically
update for GMT/BST clock changes in the UK. You can adjust the following settings:
SET TIME Manually set the time and date if required
12/24HR Choose between 12 or 24 hour time display
SNOOZE Set your preferred snooze duration for alarms
Backlight
DURATION
Choose how long the backlight remains switched on:
TIMED The backlight turns on for 7 seconds when any button is pressed (default).
OFF The backlight does not switch on.
ON The backlight is always on when the radio is on.
).
LEVEL
Choose the brightness of the backlight:
AUTO Adjusts automatically depending on the light level in your room (default).
1-5 Set a brightness level between 1 (dim) and 5 (bright)
Audio
Adjust the bass and treble:
BASS Adjust the bass between -3 (minimal bass), 0 (neutral) and 3 (maximum bass).
TREBLE Adjust the treble between -3 (minimal treble), 0 (neutral) and 3 (high treble).
Language
Choose from English, French, German or Italian.
Reset
Reset removes all saved favourites, clears the station list and resets all options to their defaults.
Choose YES to confi rm the reset or NO to cancel the reset.
10
Page 13

Help
Secondary and inactive stations
Secondary digital services
Secondary services accompany some stations, providing extra information or alternative content
and may only be broadcast at certain times. Secondary services will appear next to the primary
station in the list.
Hints and tips
Display says ‘NO SIG’
Use Autotune (page 10) to search for stations. Try adjusting your aerial or radio position.
Receiving new digital stations that have started broadcasting
Use Autotune (page 10) to scan for new stations and add any new stations to the station list.
Software updates
Software updates for your Contour 100Di may be made available in the future. If you register
your product and include a valid e-mail address you will receive notifi cation of software updates
(register at www.pure.com/register). Available software updates are also listed at
http://support.pure.com.*
To upgrade:
1. From digital radio, FM or Aux sources, press and hold the Menu button on the remote for
three seconds to access the maintenance menu.
2. Select UPGRADE and follow the instructions provided with the upgrade software*.
EN
*Requires a PC (not Mac) with internet access running Windows XP/Vista/7 and a suitable USB cable (not included).
11
Page 14

Specifications
Radio Digital and FM. UK products receive DAB and FM; non-UK products receive
DAB/DAB+/DMB-Radio/FM depending on region.
iPod/iPhone/iPad Supports most iPod, iPhone and iPad* models.
For the latest information, check the compatibility table on our website:
www.pure.com/products/ipod-compatibility.
Speakers 2 full-range 3" drive units.
Audio output 2 x 10W RMS. Rear bass port.
Input connectors 12V DC power adapter socket. iPod/iPhone connector. 3.5mm Aux-in for
auxiliary devices. USB (mini-B type) for software updates.
Output connectors 3.5mm stereo output for headphones.
LCD display Custom auto-dimming LCD display, large text and feature icons.
Remote control Infrared remote control. CR2025 button cell battery included.
Mains power supply 100-240V, 50/60Hz 12V DC 2.4A external power adapter.
Dimensions 308mm wide x 174mm high x 145mm deep.
Aerial Telescopic aerial.
Approvals CE marked. Compliant with the EMC and Low Voltage Directives (2004/108/
EC and 2006/95/EC). ETSI EN 300 401 compliant.
* iPad and iPad 2 charging only supported when Contour 100Di is in standby.
12
Page 15

PURE Warranty Statement for Australia
This statement replaces any reference to warranty which may be contained elsewhere within this manual
What do you need to do now?
Option 1: You can register your purchase on-line at https://www.pure.com/au/register/register.asp
Option 2: Or you can do nothing other than keep your proof of purchase as evidence of your purchase date.
This proof of purchase would need to be presented if warranty service was ever required.
If you have any questions about your warranty you can call us toll free .... 1800 988 268
What’s covered by this warranty?
• PURE agrees to refund, repair or replace, at your election, without charge to you, any part found to be
defective during the warranty period.
• If equipment has been used according to its accompanying instruction manual and is used in a domestic
situation, a two year warranty period applies (excludes rechargeable ChargePAK where fi tted. A one year
warranty period applies to all ChargePAKs.)
How do you make your claim?
Call 1800 988 268 for instructions on how to return your PURE product for warranty service or go to
http://support.pure.com/au/ and complete the contact us form.
What’s NOT covered by this warranty?
Under this express warranty PURE will not be liable for loss or damage of any kind whatsoever, whether direct,
indirect, incidental, consequential or otherwise.
• Replacement of parts due to normal wear and tear
• Products with serial number defacement, modifi cation or removal
• Water damage or corrosion caused by dampness
• Any damage or deterioration due to shipment
• Any product which has been subjected to misuse, abuse or accident
EN
Australian consumers — The benefi ts to the consumer given by this express warranty are in addition
to other rights and remedies of the consumer under a law in relation to the goods or services to which this
warranty relates. Our goods come with guarantees that cannot be excluded under the Australian Consumer Law,
You are entitled to a replacement or refund for a major failure and for compensation for any other reasonably
foreseeable loss or damage. You are also entitled to have the goods repaired or replaced if the goods fail to be
of acceptable quality and the failure does not amount to a major failure.
PURE is proudly distributed and supported in Australia by...PIONEER ELECTRONICS AUSTRALIA PTY LTD, 5 ARCO
LANE, HEATHERTON, VICTORIA, 3202
Disposal of Waste Electrical & Electronic Equipment
This symbol on the product or on its packaging indicates that this product should not be treated
as household waste. Instead it should be handed over to a suitable collection point for the
recycling of electrical and electronic equipment. By ensuring this product is disposed of correctly,
you will help prevent potential negative consequences for the environment and human health,
which could otherwise be caused by inappropriate waste handling of this product. The recycling
of materials will help to conserve natural resources. For more detailed information about
recycling of this product, please contact your local council office, your household waste disposal
service or the shop where you purchased the product.
13
Page 16

14
Page 17

Inhalt
Erste Schritte ............................................................................... 2
Einrichtung .....................................................................................................................2
Regler, Schalter und Anschlüsse ......................................................................................4
Fernbedienung ................................................................................................................4
Anzeige ...........................................................................................................................4
Anhören von iPod/iPhone/iPad ..................................................... 5
Kompatibilität .................................................................................................................5
Andocken des Geräts ......................................................................................................5
Auswahl der iPod-Quelle .................................................................................................5
Kontrolle über das Gerät .................................................................................................5
Ändern der angezeigten Informationen ............................................................................5
Radio hören ................................................................................. 6
Digital- oder UKW-Radio auswählen ................................................................................6
Senderwechsel ...............................................................................................................6
Lieblingssender sichern und auswählen ..........................................................................6
Ändern der angezeigten Informationen ............................................................................6
Zusatzeingang verwenden ............................................................. 7
Externes Gerät anschließen .............................................................................................7
Externes Gerät wählen ....................................................................................................7
Verwenden des Sleep-Timers ......................................................... 7
Einstellen des Sleep-Timers ............................................................................................7
Sleep-Timer abstellen .....................................................................................................7
DE
Alarme verwenden ........................................................................ 8
Alarm einstellen ..............................................................................................................8
Abbrechen eines Wecktons .............................................................................................9
Schlummerfunktion verwenden .......................................................................................9
Ändern der Schlummer-Dauer .........................................................................................9
Optionen und Einstellungen ........................................................ 10
Digitalradio-Optionen ................................................................................................... 10
Allgemeine Optionen .................................................................................................... 10
Hilfe .......................................................................................... 11
Sekundärsender/inaktive Sender ................................................................................. 11
Tipps und Tricks ........................................................................................................... 11
Software-Upgrade ........................................................................................................ 11
Technische Daten ....................................................................... 12
1
Page 18

Erste Schritte
Einrichten
Ziehen Sie die Antenne
1
vollständig aus.
Stecken Sie den Stecker des
3
Netzkabels in den Anschluss
auf der Rückseite des Radios.
Schließen Sie ggf. die passenden
Adapterstifte für Ihre Region
an und stecken Sie das
Netzkabel ein.
Drücken Sie und an der Fernbedienung, um die
4
für die Anzeige der Menüs und Optionen verfügbaren
Sprachen (Englisch/Französisch/Deutsch/Italienisch)
anzuzeigen, und drücken Sie Select (Auswahl),
um Ihre Auswahl zu bestätigen.
2
Ziehen Sie den
Plastikstreifen vom
Batteriefach der
Fernbedienung ab
und ziehen Sie die
Schutzfolie von den
Fernbedienungstasten ab.
LANGUAGE
Warten Sie, bis Contour 100Di die automatische
5
Sendersuche für alle verfügbaren digitalen Sender
abgeschlossen hat (dies dauert etwa eine Minute).
Wenn die automatische Sendersuche abgeschlossen
ist, wird ein digitaler Sender ausgewählt.
DR
SCAN 26
DR
bBC R2
2
Page 19
Regler, Schalter und Anschlüsse
Source (Quelle)
Drücken Sie, um zwischen
Digitalradio, UKW, iPod und
dem Zusatzeingang
zu wechseln
On/Standby
(Ein/Standby)
Favourites (Favoriten)
Drücken Sie mehrmals,
um durch die Liste Ihren
Lieblingssender zu blättern
LCD-Display
Bassanschluss
Mute
Lautstärkeregelung (Leiser)
Lautstärkeregelung
(Lauter)
iPod/iPhone/
iPad Dock
Drücken Sie
rechts auf
das vordere
Bedienfeld, um
den iPod-Dock
zu öffnen
DE
Teleskop
antenne
Netzteilanschluss
Anschluss für das
mitgelieferte Netzteil
Kopfhörerbuchse
3,5-mm-Buchse für
Stereokopfhörer
Aux-In-Buchse
Analoger StereoEingang für iPod/
MP3-Player
FernbedienungsHalterung
AufbewahrungsVertiefung für die
Fernbedienung
USB-Buchse
USB-Anschluss
(Typ mini-B) für
Software-Upgrades
3
Page 20
Fernbedienung
On/Standby (Ein/Standby)
Snooze-Funktion
Drücken Sie, um die aktuelle
Schlummerzeit anzuzeigen. Verwenden
Sie
Ändern der Einstellung. Drücken
Sie, um die Schlummerfunktion zu
verwenden, wenn ein Alarm ertönt.
Sleep
Drücken Sie die Taste mehrmals,
um einen Sleep-Timer einzustellen.
Alarm
Drücken Sie die Taste mehrmals,
um den Alarmstatus anzuzeigen.
Drücken Sie Select (Auswahl),
um den Status oder die
Alarmeinstellungen zu ändern.
Menu (Menü)
Drücken Sie die Taste, um das
Optionsmenü anzuzeigen und die
Einstellungen zu ändern.
Drücken Sie bei iPod-Quelle die
Taste, um zum iPod-Menü zu
navigieren. Drücken Sie die Taste
und halten Sie sie gedrückt, um das
Optionsmenü anzuzeigen.
Wiedergabe-/Pause-Taste für
aktuellen Titel.
Select (Auswahl) zum
und
Wiedergabe/Pause
Source (Quelle)
Drücken Sie, um zwischen
Digitalradio, UKW, iPod
und dem Zusatzeingang
zu wechseln
und
Überspringen zum
Anfang des aktuellen Titels
oder zum vorigen/nächsten
Titel. Halten Sie die Taste
gedrückt, um schnell voroder zurückzuspulen. Versucht
bei UKW, den nächsten
Sender einzustellen.
Lautstärkeregelung (Lauter)
Lautstärkeregelung (Leiser)
Mute (Stummschalten)
und Select
Durchsuchen und Auswählen von
Sendern, Titeln und Menüoptionen.
Verschiebt bei UKW
Frequenzbereich in Schritten von
0,05 MHz nach oben oder unten.
Drücken Sie die Taste und halten
Sie sie gedrückt, um den nächsten
Sender zu suchen.
Repeat (Wiederholen)
Umschalten zwischen "Alle
wiederholen", "Aktuellen Titel
wiederholen" und "Keine
Wiederholung".
Shuffl e (Mischen)
Titel-Wiedergabereihenfolge mischen.
Favoriten
Drücken Sie die Taste, um die Liste
der Favoriten-Sender anzuzeigen.
Drücken Sie die Taste und halten
Sie sie gedrückt, um den aktuellen
Sender zu sichern.
(Auswahl)
den
Anzeige
Source (Quelle)
Indikatoren
4
Lautstärke
BlätternIndikator
1x Wiederholen
(Mischen)
Alles Wiederh.
Shuffl e
DR iPod
AX
FM
bBC R2
Textbereich
Sleep-Timer
aktiviert
1
1
AlarmSnooze
aktiviert
2
Alarm 1/2
aktiviert
Signalstärke
BlätternIndikator
Page 21
Anhören von iPod/iPhone/iPad
Kompatibilität
Das Contour 100Di ist kompatibel mit den meisten iPod, iPhone und iPad Modellen. Aktuelle
Informationen fi nden Sie in der Kompatibilitätstabelle auf unserer Website:
www.pure.com/products/ipod-compatibility.
Andocken des Geräts
1. Drücken Sie auf die rechte Seite des vorderen Bedienfelds, wie in der Abbildung gezeigt,
um das Dock zu öffnen.
2. Docken Sie das Gerät vorsichtig an den Anschluss an.
Der Ladevorgang beginnt, sobald das Gerät angedockt ist, und er wird auch dann fortgesetzt,
wenn das Contour 100Di eingeschaltet wird oder sich im Standby-Modus befi ndet.
Hinweis Der Kopfhöreranschluss ist deaktiviert, wenn ein iPhone/iPod/iPad angedockt ist.
DE
Auswahl der iPod-Quelle
Wählen Sie mit der Taste Source (Quelle) die Option IPOD aus. Bei Geräten mit Apps können
Sie auch Audiodaten von anderen Apps abspielen, z. B. von der PURE Lounge Internetradio-App,
wenn Sie die iPod-Wiedergabe unterbrechen.
Kontrolle über das Gerät
Bei Auswahl der iPod-Quelle beginnt Ihr Gerät mit dem Abspielen des zuletzt abgespielten
iPod-Tracks. Verwenden Sie die Fernbedienung oder die Bedienelemente an Ihrem Apple Gerät
zum Navigieren in Menüs und zum Steuern der Wiedergabe.
Für den Aufruf des Contour 100Di Optionsmenüs, während ein iPod/iPhone angedockt ist,
drücken Sie die Menütaste an der Fernbedienung und halten Sie sie gedrückt.
Ändern der angezeigten Informationen
Drücken Sie die Menütaste und halten Sie sie gedrückt, und drücken Sie die Taste Select (Auswahl),
um die Option DISPLAY (Anzeige) auszuwählen.
Eine der folgenden Optionen auswählen:
TITLE/ARTIST Titel des Tracks und Name des Künstlers
TIME Vollanzeige-Uhr
5
Page 22

Radio hören
Digital- oder UKW-Radio auswählen
Wählen Sie mit der Taste Source (Quelle) die Option DIGITAL oder FM (UKW) aus. Das
entsprechende Symbol wird angezeigt
Senderwechsel
Digital
Drücken Sie und , um durch die verfügbaren Sender zu blättern, und drücken Sie Select
(Auswahl), um einen Sender einzustellen..
FM (UKW)
Drücken Sie oder (oder halten Sie oder
starken Signal zu suchen.
Drücken Sie oder , um die Frequenz in Schritten von 0,05 MHz einzustellen.
Lieblingssender sichern und auswählen
Sie können bis zu 40 (UKW- oder digitale) Sender in einer Liste speichern, um einfacher darauf
zugreifen zu können.
Sichern
1. Stellen Sie den Sender ein, den Sie als einen Favoriten sichern wollen.
2. Drücken Sie
3. Drücken Sie oder an der Fernbedienung, um zu entscheiden, ob der Favorit gesichert
werden soll (wenn Sie einen vorhandenen Favoriten auswählen, wird er ersetzt).
4. Drücken Sie oder Select (Auswahl) an der Fernbedienung und halten Sie sie gedrückt,
bis Sie die Anzeige SAVED’ (GESICHERT) auf dem Bildschirm sehen.
an der Fernbedienung, um die Liste der Favoriten anzuzeigen.
gedrückt), um den nächsten Sender mit einem
Auswahl
Drücken Sie an der Fernbedienung oder dem Gerät, um die Liste der Favoriten anzuzeigen.
Drücken Sie noch einmal an dem Gerät, um durch die Liste zu blättern, oder drücken Sie
oder an der Fernbedienung.
Warten Sie, bis der Sender wechselt, wenn Sie das Gerät direkt verwenden, oder drücken Sie
Select (Auswahl) an der Fernbedienung, um den Sender sofort zu wechseln.
Ändern der angezeigten Informationen
Drücken Sie die Menütaste, drücken Sie die Tasten und zum Durchsuchen, und drücken Sie
Select (Auswahl), um die Option DISPLAY (Anzeige) auszuwählen.
Wählen Sie eine der folgenden Optionen aus:
STATION (SENDER) Sendername oder -frequenz
TEXT Vom Sender übermittelter Lauftext
TIME Vollanzeige-Uhr, die vom Radiosignal aktualisiert wird
6
Page 23
Zusatzeingang verwenden
Externes Gerät anschließen
Schließen Sie über ein geeignetes Kabel die Buchse Line-Out oder Kopfhörer Ihres Zusatzgeräts
an den Zusatzeingang an Ihrem Contour 100Di an.
Zusatzeingang auswählen
Drücken Sie die Taste Source (Quelle), um AUX auszuwählen.
Verwendung des Sleep-Timers
Der Sleep-Timer schaltet Ihr Radio nach einer Anzahl von Minuten in den Standby-Modus.
Einstellen des Sleep-Timers
1. Drücken Sie mehrmals die Taste Sleep an der Fernbedienung, um die Zeitspanne für den
Sleep-Timer von 15 bis auf 90 Minuten zu erhöhen.
2. Drücken Sie Select (Auswahl) oder warten Sie, um den Sleep-Timer zu starten.
Das Symbol auf der Anzeige zeigt an, wenn der Sleep-Timer aktiviert ist.
Tipp
Sie können die Sleep-Taste jederzeit erneut drücken, um die verbleibende Zeit anzuzeigen.
Sleep-Timer abstellen
Drücken Sie die Sleep-Taste und stellen Sie die Timer-Dauer auf OFF (AUS).
DE
7
Page 24
Alarme verwenden
Das Contour 100Di besitzt zwei Wecktöne, die so eingestellt werden können, dass entweder ein
Signalton ertönt oder ein Radiosender oder ein Titel von Ihrem iPod abgespielt wird.
Alarm einstellen
Drücken Sie die Taste Alarm an der Fernbedienung, um den Status
von Alarm 1 anzuzeigen, und drücken Sie sie erneut, um den Status
von Alarm 2 anzuzeigen.
Drücken Sie die Taste Select (Auswahl), um einen der Alarme
auszuwählen, passen Sie den Alarm an, drücken Sie oder
und Select (Auswahl), um die folgenden Einstellungen auszuwählen:
Alarm on/off (Alarm ein/aus)
Drücken Sie oder , um zwischen ‘ON’ (Alarm ertönt) und ‘OFF’
(Alarm ertönt nicht) zu wählen, und drücken Sie Select (Auswahll).
Time (Uhrzeit)
Stellen Sie die Alarmzeit ein. Drücken Sie oder , um die
Stunden einzustellen, und drücken Sie anschließend Select
(Auswahll). Wiederholen Sie diesen Schritt, um die Minuten
einzustellen, und drücken Sie anschließend Select (Auswahll).
Days (Tage)
Stellen Sie die Tage ein, an denen der Alarm ertönt. Drücken Sie
oder , um auszuwählen zwischen: DAILY (jeden Tag), ONCE
(nur ein Mal), WEEKENDS (an Wochenenden) oder WEEKDAYS
(Montag bis Freitag), und wählen Sie dann Select (Auswahl).
DR
DR
ON
DR
DR
DAILY
Typ
Drücken Sie oder , um auszuwählen zwischen: DIGITAL,
FM (UKW), IPOD oder TONE (Buzzer).
Sender
Wenn Sie den Alarm-Modus als DIGITAL oder UKW EINGESTELLT
HABEN, DRÜCKEN SIE oder , um auszuwählen zwischen:
LAST USED (Letzter ausgewählter Sender), oder wählen Sie
einen Favoriten aus, falls Favoriten gespeichert sind.
Lautstärke
Drücken Sie oder , um die Lautstärke des Alarms
einzustellen, und drücken Sie anschließend Select
(Auswahl).
Die Meldung ‘SAVED’ (gesichert) wird angezeigt, sobald alle
Alarmeinstellungen abgeschlossen sind.
8
Die Symbole
1
und
2
auf der Anzeige geben an, ob ein Alarm eingestellt ist.
DR
DAB
DR
LAST
DR
DR
SAVED
1
Page 25

Abbrechen eines Wecktons
Wenn Sie einen Weckton abbrechen möchten, drücken Sie die Taste Alarm, Select (Auswahl) oder
Standby.
Wenn Sie einen Radioweckton abbrechen möchten, drücken Sie eine beliebige Taste außer Volume
(Lautstärke).
Anmerkung
Ein Weckton wird nach einer Stunde deaktiviert, wenn Sie diesen nicht abbrechen.
Schlummerfunktion verwenden
Wenn ein Alarm ertönt und Sie die Schlummerfunktion verwenden wollen, drücken
Sie die Schlummertaste an der Fernbedienung. Der Alarm wird für 10 Minuten
(die Standard-Schlummerzeit) unterdrückt und ertönt dann erneut.
Das Symbol auf dem Bildschirm gibt an, wenn ein Alarm durch die Schlummerfunktion
unterdrückt wird.
Ändern der Schlummer-Dauer
Die Standard-Schlummerdauer für die Alarme beträgt 10 Minuten. So ändern Sie die
Schlummerdauer:
Drücken Sie die Schlummertaste an der Fernbedienung, und drücken Sie oder , um die
gewünschte Schlummerdauer auszuwählen, und drücken Sie anschließend Select (Auswahl)
zur Bestätigung.
DE
9
Page 26

Optionen und Einstellungen
Drücken Sie die Taste Menü, um auf das Optionsmenü zuzugreifen, drücken Sie oder , um
durch die Optionen zu blättern und sie einzustellen, und drücken Sie Select (Auswahl) zur
Bestätigung. Der aktuelle Wert der Einstellungen ist durch ein Sternchen ( ) gekennzeichnet.
Digitalradio-Optionen
Autotune
In der Autotune-Funktion durchsucht das Gerät automatisch alle Digital-Frequenzen nach
Sendern, fügt diese zur Senderliste hinzu und entfernt inaktive Sender. Zum Stoppen einer
Automatischen Einstellung drücken Sie die Menütaste.
Allgemeine Optionen
Uhr
Die Uhr wird automatisch eingestellt, wenn Sie ein gutes Digital- oder UKW-Signal haben, und sie
wird automatisch auf die Sommerzeit-Umstellung in Großbritannien umgestellt. Sie können die
folgenden Einstellungen vornehmen:
SET TIME Gegebenenfalls können Sie die Uhrzeit und das Datum manuell einstellen
12/24 STD Sie können zwischen 12-Stunden- und 24-Stunden-Anzeige wählen
SNOOZE Stellen Sie die gewünschte Schlummerdauer für Alarme ein
Hintergrundbeleuchtung
DURATION (DAUER)
Wählen Sie aus, wie lange die Hintergrundbeleuchtung eingeschaltet bleiben soll:
TIMED Die Hintergrundbeleuchtung wird für 7 Sekunden aktiviert, wenn eine
Taste gedrückt wird (Standard).
OFF Die Hintergrundbeleuchtung wird nicht aktiviert.
ON Die Hintergrundbeleuchtung ist bei eingeschaltetem Radio immer aktiv.
LEVEL (HELLIGKEIT)
Wählen Sie die Helligkeit der Hintergrundbeleuchtung aus:
AUTO Automatische Anpassung an die Helligkeit im Raum (Standardwert).
1-5 Einstellung einer Helligkeitsstufe zwischen 1 (schwach) und 5 (hell)
Audio
Einstellung von Bässen und Höhen:
BASS Passen Sie den Bass zwischen -3 (Minimum), 0 (neutral) und 3 (Maximum) an.
HÖHEN Passen Sie die Höhen zwischen -3 (Minimum), 0 (neutral) und 3 (Maximum) an.
Language (Sprache)
Wählen Sie Englisch, Französisch, Deutsch oder Italienisch.
Rücksetzen
Setzt das Radio zurück, entfernt alle gesicherten Favoriten, löscht die Senderliste und setzt alle
Optionen auf die Standardwerte zurück.
Wählen Sie YES (Ja) aus, um das Rücksetzen zu bestätigen, oder NO (Nein), um die Rücksetzung
abzubrechen.
10
Page 27

Hilfe
Sekundärsender/inaktive Sender
Secondary digital services (Sekundäre Digital-Dienste)
Sekundäre Dienste beziehen sich auf einige Sender und bieten zusätzliche Informationen oder
alternative Inhalte und werden ggf. nur zu bestimmten Zeiten ausgestrahlt. Sekundäre Dienste
erscheinen neben dem primären Sender in der Liste.
Tipps und Tricks
Die Anzeige zeigt ‘NO SIG’
Nutzen Sie die Autotune-Funktion (Seite 10) zur automatischen Sendersuche. Verwenden Sie die
Autotune-Funktion zur Suche nach Sendern.
Empfang neuer Digitalsender, die ihren Sendebetrieb gerade aufgenommen haben
Verwenden Sie die Autotune-Funktion (Seite 10) zur Suche nach neuen Sendern und zur Aufnahme
von neuen Sendern in die Senderliste.
Software-Updates
Möglicherweise stehen künftig Software-Updates für Ihr Contour 100Di zur Verfügung. Wenn
Sie Ihr Produkt registrieren und eine gültige E-Mail-Adresse angeben, erhalten Sie eine
Benachrichtigung über Software-Updates (registrieren Sie sich unter www.pure.com/register).
Verfügbare Software-Updates werden auch aufgelistet unter
http://support.pure.com.*
So führen Sie einen Upgrade durch:
1. Drücken Sie von den Quellen Digitalradio, UKW oder Zusatzeingang aus die Menütaste
an der Fernbedienung drei Sekunden lang, um das Wartungsmenü zu öffnen.
2. Wählen Sie UPGRADE aus, und befolgen Sie die Anweisungen der Upgrade-Software*.
DE
*Sie benötigen einen PC mit Internet-Anschluss und Betriebssystem Windows XP/Vista/7 sowie ein passendes USB-Kabel
(nicht im Lieferumfang enthalten).
11
Page 28

Technische Daten
Radio Digital und UKW. Produkte für Großbritannien empfangen DAB und FM;
Produkte für andere Länder empfangen je nach Region DAB/DAB+/
DMB-Radio/UKW.
iPod/iPhone/iPad Unterstützt die meisten iPod, iPhone und iPad* Modelle.
Aktuelle Informationen fi nden Sie in der Kompatibilitätstabelle auf unserer Website:
www.pure.com/products/ipod-compatibility.
Lautsprecher 2 Vollbereichslautsprecher 3".
Audioausgang 2 x 10W RMS. Hinterer Bassanschluss.
Eingänge 12 V DC Netzanschluss. iPod/iPhone-Anschluss. 3,5-mm-AUX-Eingangsbuchse
für Zusatzgeräte. USB-Eingang (Typ Mini B) für Software-Updades.
Ausgänge: 3,5-mm-Stereoausgang für Kopfhörer.
LCD-Display Individuelles Auto-Dimming LCD-Display, großer Text und Funktionssymbole.
Fernbedienung Infrarot-Fernbedienung CR2025 Knopfbatterie im Lieferumfang enthalten.
Stromversorgung 100-240 V, 50/60 Hz 12 V DC 2,4 A externer Netzadapter.
Abmessungen 308 mm Breite x 174 mm Höhe x 145 mm Tiefe.
Antenne Teleskopantenne.
Prüfungen CE-Zeichen. Erfüllt die EMV- und Niederspannungsrichtlinien (2004/108/EG
und 2006/95/EG). Erfüllt ETSI EN 300 401.
Entsorgung von gebrauchten elektrischen und elektronischen Geräten
Das Symbol auf dem Produkt oder seiner Verpackung weist darauf hin, dass dieses
Produkt nicht als normaler Haushaltsabfall zu behandeln ist, sondern an einer
Annahmestelle für das Recycling von elektrischen und elektronischen Geräten abgegeben
werden muss. Durch Ihren Beitrag zum korrekten Entsorgen dieses Produkts schützen
Sie die Umwelt und die Gesundheit Ihrer Mitmenschen. Umwelt und Gesundheit werden
durch falsches Entsorgen gefährdet. Materialrecycling hilft den Verbrauch von Rohstoffen
zu verringern. Weitere Informationen über das Recycling dieses Produkts erhalten Sie von
Ihrer Gemeinde, den kommunalen Entsorgungsbetrieben oder dem Geschäft, in dem Sie
das Produkt gekauft haben.
* Das Laden von iPad und iPad 2 wird nur unterstützt, wenn das Contour 100Di im Standby-Modus ist.
12
Page 29

Table des matières
Préparation à l’emploi .................................................................. 2
Programmation ...............................................................................................................2
Connectique et commandes ...........................................................................................4
Télécommande ...............................................................................................................4
Affi chage ........................................................................................................................4
Écouter l'iPod/iPhone/iPad .......................................................... 5
Compatibilité ..................................................................................................................5
Installation de votre appareil sur la station d'accueil .......................................................5
Sélection de la source pour iPod .....................................................................................5
Contrôle de votre appareil ...............................................................................................5
Sélection des informations affi chées à l'écran ................................................................5
Écouter la radio ........................................................................... 6
Sélection de la radio numérique ou FM ...........................................................................6
Changement de station ...................................................................................................6
Enregistrement et sélection de vos stations préférées......................................................6
Sélection des informations affi chées à l'écran ................................................................6
Utilisation de l'entrée auxiliaire .................................................... 7
Connexion d'un appareil auxiliaire ...................................................................................7
Sélection de l'entrée auxiliaire ........................................................................................7
Utilisation de la mise en veille ...................................................... 7
Programmation de la minuterie de mise en veille ............................................................7
Annulation de la minuterie de mise en veille ...................................................................7
FR
Utilisation des alarmes ................................................................. 8
Programmation d'une alarme ..........................................................................................8
Arrêt d'une alarme déclenchée .......................................................................................9
Interruption d'une alarme qui retentit ..............................................................................9
Modifi er la durée de l'arrêt momentané ..........................................................................9
Options et paramètres ................................................................ 10
Options de la radio numérique ..................................................................................... 10
Options générales ........................................................................................................ 10
Aide .......................................................................................... 11
Services annexes et stations inactives ......................................................................... 11
Conseils et astuces ...................................................................................................... 11
Mises à jour logicielles ................................................................................................. 11
Spécifications ............................................................................ 12
1
Page 30

Pour commencer
Programmation
Déployez l'antenne, au
1
maximum de sa longueur.
Branchez le connecteur de
3
l'adaptateur secteur dans la prise
correspondante à l'arrière de la
radio.
Utilisez l'adaptateur de fiche
adapté à votre pays, si nécessaire
et branchez sur une prise de
courant.
Appuyez sur les boutons et de la télécommande
4
pour afficher les langues disponibles (anglais/
français/allemand/italien) utlisées pour l'affichage
des menus et des options, puis appuyez sur Select
pour valider votre choix.
2
Tirez sur la languette en
plastique du compartiment
à piles et retirez le film de
protection des boutons de
la télécommande.
LANGUAGE
Attendez que votre Contour 100Di ait terminé la
5
syntonisation automatique sur toutes les stations
numériques qu'il reçoit (environ 1 minute).
Lorsque la syntonisation automatique est terminée,
une station numérique est sélectionnée.
DR
SCAN 26
DR
bBC R2
2
Page 31

Connectique et commandes
Source
Appuyez sur ce bouton
pour sélectionner radio
numérique, FM, iPod et
Entrée auxiliaire
On/Standby
Favoris
Appuyez autant de fois que
nécessaire pour parcourir
vos stations préférées
Écran LCD
Évent de basses
Silence
Volume moins fort
Volume plus fort
Station d'accueil
pour iPod/iPhone/
iPad
Appuyez sur
l'extrémité droite
de la face avant
pour libérer la
station d'accueil
pour iPod.
Antenne
télescopique
Prise d'adaptateur secteur
Prise pour relier
l'adaptateur secteur fourni
Prise casque.
Prise casque stéréo
format mini-jack
Prise Entrée AUX
Entrée stéréo
analogique pour
iPod/lecteur MP3
FR
Support de la
télécommande
Espace de
rangement pour la
télécommande
Prise USB
Port USB (type
mini-B) pour les mises
à jour logicielles
3
Page 32

Télécommande
On/Standby
Snooze
Appuyez sur ce bouton pour affi cher
la durée d'arrêt momentanée
actuelle. Utilisez les boutons
et Select pour la modifi er.
Appuyez sur ce bouton pour
interrompre une alarme qui retentit.
Sleep
Appuyez autant de fois que
nécessaire pour programmer la
mise en veille.
Alarm
Appuyez autant de fois que
nécessaire sur ce bouton pour
affi cher le statut de l'alarme.
Appuyez sur Select pour modifi er le
statut ou les paramètres de l'alarme.
Menu
Appuyez sur ce bouton pour
affi cher le menu d'options afi n de
modifi er les paramètres.
Avec source iPod, appuyez sur ce
bouton pour parcourir le menu
iPod. Maintenez le bouton enfoncé
pour affi chez le menu des options.
Play/Pause
Lecteur/Mise en pause du
morceau actuel.
Source
Appuyez sur ce bouton
pour sélectionner radio
numérique, FM, iPod et
Entrée auxiliaire
et Permettent
de passer au début du
morceau actuel ou au
morceau précédent/suivant.
Maintenez le bouton enfoncé
pour passer en mode retour/
avance rapide En mode FM,
permet de rechercher la
station suivante.
Volume plus fort
Volume moins fort
Silence
et Select
Permet de parcourir et sélectionner
des stations, pistes et options de
menu.
Dans FM, les boutons
permettent de monter et descendre
la fréquence par tranche de
0,05 MHz. Maintenez ces boutons
enfoncés pour rechercher et
syntoniser la station suivante.
Repeat (Répétition)
Activer/désactiver pour répéter la
piste en cours de lecture, répéter
tout ou aucune piste
Shuffl e (Aléatoire)
Lecture aléatoire des pistes.
Favoris
Appuyez sur ce bouton pour faire
apparaître la liste de vos stations
préférées.
Ensuite, maintenez enfoncé pour
enregistrer la station actuelle.
Display (Affichage)
Source
indicateurs
Volume
Indicateur de
défi lement
4
Réglage de
la minuterie
de mise en
veille
1
Répét. titre
Répét. titres
DR iPod
AX
FM
Shuffl e
(Aléatoire)
bBC R2
Zone de texte
1
Alarme
en pause
2
Réglage de
l'alarme 1/2
Puissance du signal
Indicateur de
défi lement
Page 33

Écouter l'iPod/iPhone/iPad
Compatibilité
Votre Contour 100Di est compatible avec la plupart des modèles d'iPod, iPhone et iPad. Pour
obtenir les informations les plus récentes, consultez le tableau de compatibilité situé sur notre
site Web www.pure.com/products/ipod-compatibility.
Installation de votre appareil sur la station d'accueil
1. Poussez l'extrémité droite de la face avant comme indiqué pour libérer la station d'accueil.
2. Connectez avec précaution votre appareil au connecteur.
Votre Contour 100Di commencera à se recharger dès qu'il sera placé sur la station d'accueil
et continuera à le faire, qu'il soit activé ou en mode veille.
Remarque La prise pour casque d'écoute est désactivée lorsqu'un iPhone/iPod/iPad
est installé sur la station d'accueil.
Sélection de la source pour iPod
Appuyez sur le bouton Source pour sélectionner IPOD. Sur les appareils disposant d'applications,
vous pouvez également lire du contenu audio depuis d'autres applications, comme l'application
radio internet PURE Lounge, si vous mettez la lecture de l'iPod en pause.
Contrôle de votre appareil
Une fois la source pour iPod sélectionnée, votre appareil commencera à lire la dernière piste que
vous avez écoutée. Utilisez la télécommande ou les commandes de votre appareil Apple pour
naviguer entre les menus et contrôler la lecture.
Pour accéder aux options du menu de votre Contour 100Di lorsqu'un iPod/iPhone est connecté,
maintenez le bouton Menu de la télécommande enfoncé.
Sélection des informations affichées à l'écran
Maintenez le bouton Menu enfoncé, appuyez sur Select pour sélectionner l'option DISPLAY.
Sélectionnez l'une des options suivantes :
TITLE/ARTIST Titre de la piste et nom de l'artiste
TIME Horloge en plein écran
FR
5
Page 34

Écouter la radio
Sélection de la radio numérique ou FM
Appuyez sur le bouton Source pour sélectionner DIGITAL (Numérique) ou FM. L'icône
correspondante s'affi che
Changement de station
Numérique
Pour parcourir les stations disponibles, appuyez sur et et pour syntoniser sur une station,
appuyez sur Select.
FM
Appuyez sur ou
station avec un signal puissant.
Appuyez sur ou
Enregistrement et sélection de vos stations préférées
Vous pouvez enregistrer jusqu'à 40 stations (FM ou numériques) dans une liste pour un accès plus rapide.
Enregistrement
1. Syntonisez sur la station que vous souhaitez enregistrer parmi vos stations préférées.
2. Appuyez sur le bouton
3. Appuyez sur le bouton ou de la télécommande pour décider d'enregistrer ou non la
station parmi vos préférées (si vous sélectionnez l'une de vos stations préférées, celle-ci sera
remplacée).
4. Maintenez enfoncé le bouton ou Select de la télécommande jusqu'à ce que « SAVED »
(ENREGISTRÉ) apparaîsse à l'écran.
Sélection
Appuyez sur le bouton de l'unité ou de la télécommande pour affi cher la liste des stations préférées.
Appuyez une nouvelle fois sur le bouton de l'unité pour parcourir la liste ou appuyez sur le
bouton ou
Si vous utilisez l'unité, attendez que la station change ou appuyez sur le bouton Select de la
télécommande pour passer immédiatement à une autre station.
(ou maintenez la touche ou
pour modifi er la fréquence tous les 0,05 MHz.
de la télécommande pour affi cher la liste des stations préférées.
de la télécommande.
enfoncée) pour rechercher la prochaine
Sélection des informations affichées à l'écran
Appuyez sur le bouton Menu, sur
l'option DISPLAY.
Sélectionnez l'une des options suivantes :
STATION Fréquence ou nom de la station
TEXT Texte défi lant diffusé par la station
TIME Horloge en plein écran mise à jour par la station
6
et pour parcourir les stations et sur Select pour choisir
Page 35

Utilisation de l'entrée auxiliaire
Connexion d'un appareil auxiliaire
Connectez la prise de sortie audio ou casque de votre appareil auxiliaire à la prise d'entrée
auxiliaire de votre Contour 100Di à l'aide d'un câble adapté.
Sélection de l'entrée auxiliaire
Appuyez sur le bouton Source pour sélectionner AUX.
Utilisation de la mise en veille
La minuterie de mise en veille met votre radio-réveil en mode veille à l'expiration d'un délai de
plusieurs minutes.
FR
Programmation de la minuterie de mise en veille
1. Appuyez sur le bouton Sleep de la télécommande autant de fois que nécessaire pour
augmenter le délai de mise en veille (de 15 à 90 minutes).
2. Appuyez sur Select ou attendez le lancement de la minuterie de mise en veille.
L'icône située sur l'écran indique que la minuterie de mise en veille est réglée.
Conseil Appuyez sur une nouvelle fois sur le bouton Sleep à tout moment
afi n d'affi cher le temps restant.
Annulation de la minuterie de mise en veille
Appuyez sur le bouton Sleep et réglez le délai de mise en veille sur OFF.
7
Page 36

Utilisation des alarmes
Votre Contour 100Di dispose de deux alarmes que vous pouvez programmer de sorte qu'il joue
un bruiteur, qu'il se syntonise sur une station de radio ou lise une piste depuis votre iPod/iPhone.
Programmation d'une alarme
Appuyez sur le bouton Alarm de la télécommande afi n d'affi cher
le statut de l'alarme 1 ; appuyez une nouvelle fois pour affi cher le
statut de l'alarme 2.
Appuyez sur le bouton Select pour sélectionner et ajuster l'une
des alarmes et appuyez sur
les paramètres suivants :
et Select pour modifi er
ou
DR
Alarme activée/désactivée
Appuyez sur
« OFF » (l'alarme ne retentit pas) et appuyez sur Select.
pour sélectionner « ON » (l'alarme retentit) ou
ou
Time (Heure)
Défi nissez l'heure de l'alarme. Appuyez sur
heures, puis appuyez sur Select. Répétez l'opération pour régler les
minutes, puis appuyez sur Select.
pour régler les
ou
Jours
Défi nissez les jours où l'alarme retentira. Appuyez sur
our faire votre choix entre : DAILY (chaque jour), ONCE (aucune
p
répétition), WEEKENDS ou WEEKDAYS (du lundi au vendredi), puis
appuyez sur Select.
ou
Type
Appuyez sur
IPOD ou TONE (sonnerie).
pour faire votre choix entre : DIGITAL, FM,
ou
Station
Si vous avez défi ni le mode alarme sur DIGITAL ou FM, appuyez
sur
station syntonisée) ou sélectionnez une station préférée si vous
en avez enregistrées.
pour faire votre choix entre : LAST USED (dernière
ou
Volume
Appuyez sur
appuyez sur Select.
pour modifi er le volume de l'alarme, puis
ou
DR
ON
DR
DR
DAILY
DR
DAB
DR
LAST
DR
Une fois que vous avez réglé l'ensemble des paramètres de
l'alarme, le message « SAVED » apparaît.
2
1
et
Les icônes
affi chées à l'écran indiquent que l'alarme est réglée.
8
DR
SAVED
1
Page 37

Arrêt d'une alarme déclenchée
Pour interrompre une alarme par bruiteur, appuyez sur le bouton Alarm, Select ou Standby.
Pour interrompre une alarme déclenchée sur la radio, appuyez sur n'importe quel bouton, excepté
le bouton de volume.
Remarque Une alarme qui s'est déclenchée s'arrête au bout d'une heure,
à moins que vous ne l'interrompiez avant.
Interruption d'une alarme qui retentit
Pour interrompre une alarme qui retentit, appuyez sur le bouton Snooze de la télécommande.
L'alarme s'arrêtera pendant 10 minutes (la durée d'arrêt momentané par défaut), puis elle
retentira de nouveau.
L'icône
sur l'écran indique que l'alarme est interrompue.
Modifier la durée de l'arrêt momentané
La durée de l'arrêt momentané pour les alarmes est de 10 minutes. Pour modifi er la durée
d'arrêt momentané :
Appuyez sur le bouton Snooze de la télécommande et sur ou
momentané, appuyez ensuite sur Select pour valider.
pour choisir une durée d'arrêt
FR
9
Page 38

Options et paramètres
Appuyez sur le bouton Menu pour accéder aux menu des options, puis sur ou
les options et les modifi er et enfi n sur Select pour valider. Les valeurs actuelles des paramètres sont
signalées par un astérisque ( ).
Options de la radio numérique
Autotune
Cette fonction permet d'explorer toutes les fréquences numériques à la recherche des stations et de
compléter automatiquement la liste des stations reçues avec celles nouvellement trouvées. Elle permet
également de supprimer les stations inactives. Pour désactiver la fonction Autotune, appuyez sur Menu.
Options générales
Horloge
L'horloge est automatiquement réglée si vous disposez d'un signal numérique ou FM suffi sant et
sera automatiquement mise à jour pour les changements d'heure GMT/BST au R-U. Vous pouvez
modifi er les paramètres suivants :
SET TIME Si nécessaire, vous pouvez régler manuellement l'heure et la date.
12/24HR Vous avez le choix d'affi cher l'horloge au format 12 ou 24 heures.
SNOOZE Défi nissez votre durée d'arrêt momentanée souhaitée pour les alarmes
Rétroéclairage
DURÉE
Choisissez la durée pendant laquelle le rétroéclairage reste activé :
TIMED Le rétroéclairage s'allume dès lors que vous appuyez sur une touche
et pour une durée de 7 secondes.
OFF Le rétroéclairage ne s'allume pas.
ON Le rétroéclairage est toujours allumé lorsque la radio est en fonctionnement.
LEVEL
Choisissez la luminosité du rétroéclairage :
AUTO Permet de la modifi er automatiquement en fonction du niveau de lumière
de la pièce (par défaut).
1-5 Défi nissez une luminosité entre 1 (luminosité faible) et 5 (luminosité forte)
Audio
Permet de régler les graves et les aigus
BASS Réglez les graves entre -3 (niveau minimum), 0 (neutre) et 3 (niveau maximum).
TREBLE Réglez les aigus entre -3 (niveau minimum), 0 (neutre) et 3 (niveau maximum).
Langue
Vous avez le choix entre l'anglais, le français, l'allemand ou l'italien.
Réinitialiser
La réinitialisation permet d'effacer toutes les listes d'éléments préférés, les listes de stations
mémorisées et de rétablir toutes les options à leur choix par défaut.
Sélectionnez YES pour confi rmer la réinitialisation ou NO pour l'annuler.
10
pour faire défi ler
Page 39

Aide
Services annexes et stations inactives
Services numériques annexes
Des services annexes sont disponibles sur certaines stations, fournissant des informations
supplémentaires ou des contenus alternatifs, et pouvant être diffusés à certains moments
seulement. Des services annexes apparaîtront à côté de la station prioritaire dans la liste.
Conseils et astuces
L'écran affiche « NO SIG »
Utilisez la fonction de syntonisation automatique (voir page 10) pour rechercher les stations.
Essayez de changer la radio ou l’antenne de position.
Réception des nouvelles stations numériques qui viennent de commencer
à émettre
Utilisez la fonction de syntonisation automatique (voir page 10) pour rechercher les nouvelles
stations et en ajouter à la liste des stations déjà disponibles.
Mises à jour logicielles
Des mises à jour logicielles sont susceptibles d'être disponibles à l'avenir pour votre
Contour 100Di. Si vous enregistrez votre produit et nous communiquez une adresse valide de
courriel, vous serez avisé de la mise à disposition de ces mises à jour (pour vous enregistrer,
connectez-vous sur www.pure.com/register). Une liste des mises à jour logicielles disponibles
se trouve également à l'adresse http://support.pure.com.*
Pour mettre à niveau :
1. Depuis les sources radio numérique, FM ou AUX, maintenez le bouton Menu enfoncé sur la
télécommande pendant trois secondes pour accéder au menu de maintenance.
2. Sélectionnez « UPGRADE » et suivez les instructions fournies avec la mise à jour*.
FR
*la mise à jour par USB nécessite un PC (pas un Mac) connecté à internet et équipé de Windows XP/Vista/7,
ainsi qu’un câble USB adapté (non fourni).
11
Page 40

Spécifications
Radio Numérique et FM. Les produits destinés au marché britannique captent
les stations DAB et FM ; les produits non destinés au marché britannique
captent les stations DAB/DAB+/DMB/FM, selon les régions.
iPod/iPhone/iPad Prend en charge la plupart des modèles d'iPod, iPhone et iPad*.
Pour obtenir les informations les plus récentes, consultez le tableau de
compatibilité situé sur notre site Web
www.pure.com/products/ipod-compatibility.
Enceintes 2 haut-parleurs 3” à gamme étendue.
Sortie audio 2 x 10 W RMS. Évent de basses arrières.
Connectique d'entrée Prise adaptateur secteur 12 V CC. Connecteur iPod/iPhone. Entrée auxiliaire
format mini-jack pour appareils auxiliaires. Prise USB (type mini-B), pour les
mises à jour logicielles.
Connectique de sortie Prise jack 3,5 mm stéréo pour casque d'écoute.
Écran LCD Écran LCD personnalisable avec atténuation automatique de la luminosité,
texte grande taille et icônes.
Télécommande Télécommande infrarouge. Pile bouton CR2025 incluse.
Alimentation secteur Adaptateur secteur externe 100-240 V, 50/60 Hz, 12 V CC, 2,4 A.
Dimensions 308 mm (largeur) x 174 mm (hauteur) x 145 mm (profondeur).
Antenne Antenne télescopique.
Homologations Certifi é CE. Conforme aux directives CEM et basse tension (2004/108/CE
et 2006/95/CE). Conformité ETSI EN 300 401.
Traitement des appareils électriques et électroniques en fi n de vie
Ce symbole, apposé sur le produit ou sur son emballage, indique que ce produit
ne doit pas être traité avec les déchets ménagers. Il doit être remis à un point de
collecte approprié pour le recyclage des équipements électriques et électroniques. En
s’assurant que ce produit est bien mis au rebus de manière appropriée, vous aiderez
à prévenir les conséquences négatives potentielles pour l’environnement et la santé
humaine. Le recyclage des matériaux aidera à conserver les ressources naturelles.
Pour toute information supplémentaire au sujet du recyclage de ce produit, vous
pouvez contacter votre municipalité, votre déchetterie ou le magasin où vous avez
acheté le produit.
* le rechargement d'iPad et iPad 2 est uniquement pris en charge lorsque votre Contour 100Di est en veille.
12
Page 41

Sommario
Per iniziare .................................................................................. 2
Impostazioni ...................................................................................................................2
Comandi e connettori .....................................................................................................4
Telecomando ..................................................................................................................4
Display ...........................................................................................................................4
Ascolto di iPod/iPhone/iPad ........................................................ 5
Compatibilità ..................................................................................................................5
Sincronizzazione del dispositivo ......................................................................................5
Selezione della sorgente iPod .........................................................................................5
Controllo del dispositivo ..................................................................................................5
Modifi ca delle informazioni visualizzate sul display ..........................................................5
Ascolto della radio ....................................................................... 6
Selezione radio digitale o FM ..........................................................................................6
Selezione di una stazione ...............................................................................................6
Salvataggio e selezione delle stazioni preferite ................................................................6
Modifi ca delle informazioni visualizzate sul display ..........................................................6
Utilizzo dell'ingresso Aux .............................................................. 7
Collegamento di un dispositivo ausiliario ........................................................................7
Selezione dell'ingresso ausiliario .....................................................................................7
Utilizzo del timer di autospegnimento ............................................ 7
Impostazione del timer di autospegnimento ....................................................................7
Annullamento del timer di autospegnimento ...................................................................7
Utilizzo delle sveglie ..................................................................... 8
Impostazione di una sveglia ............................................................................................8
Annullamento della sveglia .............................................................................................9
Ripetizione della sveglia ..................................................................................................9
Modifi ca della durata della ripetizione.............................................................................9
Opzioni e impostazioni ............................................................... 10
Opzioni radio digitale ................................................................................................... 10
Opzioni generali ........................................................................................................... 10
Aiuto ......................................................................................... 11
Stazioni secondarie e inattive ...................................................................................... 11
Domande e risposte .................................................................................................... 11
Aggiornamento software .............................................................................................. 11
Specifiche ................................................................................. 12
IT
1
Page 42

Per iniziare
Impostazioni
Estendere completamente
1
l'antenna.
Inserire il connettore
3
dell'adattatore di rete, fornito in
dotazione, nella presa della parte
posteriore della radio.
Se necessario, collegare
i terminali dell'adattatore
idonei alla zona e collegare
all'alimentazione di rete.
Premere e sul telecomando per visualizzare
4
le lingue disponibili (Inglese/francese/Tedesco/
Italiano), utilizzate per visualizzare menu e opzioni,
e premere Select per confermare la scelta.
2
Tirare la linguetta di plastica
dal vano batterie del
telecomando e rimuovere la
pellicola di protezione dai
tasti del telecomando.
LANGUAGE
Attendere che Contour 100Di completi la
5
sintonizzazione automatica, che consentirà di trovare
tutte le stazioni digitali disponibili (questa operazione
richiederà circa un minuto).
Una volta completata la sintonizzazione automatica,
verrà selezionata una stazione digitale.
DR
SCAN 26
DR
bBC R2
2
Page 43

Comandi e connettori
Source
Premere per selezionare
radio digitale, FM, iPod o
ingresso ausiliario
On/Standby
Favourites
Premere e ripetere
per sfogliare le
stazioni preferite
Display LCD
Porta dei bassi
Mute
Riduzione volume
Aumento
volume
Dock per iPod/
iPhone/iPad
Premere il lato
destro del pannello
anteriore per
sbloccare il dock
per iPod
Antenna
telescopica
Presa adattatore
di alimentazione
Connettore per
adattatore di rete
in dotazione
Presa cuffi e
Presa cuffi e stereo
da 3,5 mm
Presa Aux In
Ingresso stereo
analogico per
iPod/lettore MP3
IT
Supporto del
telecomando
Slot di appoggio
del telecomando
Presa USB
Connettore USB per
l'aggiornamento del
software (tipo mini-B)
3
Page 44

Telecomando
On/Standby
Snooze
Premere per visualizzare l'attuale
tempo di ripetizione. Agire su
Select per modifi care.
e
Premere per attivare la
ripetizione di una sveglia.
Sleep
Premere e ripetere per impostare
il timer di autospegnimento.
Alarm
Premere e ripetere per visualizzare
lo stato delle sveglie. Premere
Select per cambiare lo stato o le
impostazioni delle sveglie.
Menu
Premere per visualizzare il menu
delle opzioni e modifi care le
impostazioni.
In modalità iPod, premere per
navigare nel menu iPod. Premere
e tenere premuto per visualizzare
il menu delle opzioni.
Play/Pause (Riproduci/pausa)
Riproduce o interrompe
la traccia attuale.
Source
Premere per selezionare
radio digitale, FM, iPod o
ingresso ausiliario
Passa all'inizio
e
della traccia attuale o va
alla traccia precedente/
successiva. Tenere premuto
per il riavvolgimento o
l'avanzamento rapido. In
modalità FM, sintonizza la
stazione successiva.
Aumento volume
Riduzione volume
Mute
e Select
Sfogliare e selezionare stazioni,
tracce e opzioni menu.
In modalità FM, consentono
di ridurre e aumentare il campo
di frequenza a passi di 0,05
MHz. Premere e tenere premuto
per sintonizzare la stazione
successiva.
Repeat (Ripeti)
Scegliere di ripetere la traccia
attuale, ripetere tutto o non
ripetere.
Shuffl e (Riproduci in
modo casuale)
Ordine di riproduzione casuale.
Favourites (Preferiti)
Premere per visualizzare
l'elenco delle stazioni preferite.
Quindi, premere e tenere
premuto per salvare la
stazione attuale.
Display
4
Indicatori
sorgente
Volume
Indicatore di
navigazione
Shuffl e
(Riproduci
AX
in modo
casuale)
1
Ripeti uno
Ripeti tutti
DR iPod
FM
bBC R2
Area testuale
Timer
di auto
spegnimento
1
Ripetizione
sveglia
2
Sveglia
1/2
Intensità di
segnale
Indicatore di
navigazione
Page 45

Ascolto di iPod/iPhone/iPad
Compatibilità
Contour 100Di è compatibile con la maggior parte dei modelli di iPod, iPhone e iPad. Per le
informazioni più aggiornate, controllare la tabella di compatibilità sul nostro sito web:
www.pure.com/products/ipod-compatibility.
Sincronizzazione del dispositivo
1. Premere il lato destro del pannello anteriore (come illustrato) per sbloccare il dock.
2. Posizionare con cautela il dispositivo sul connettore.
Il dispositivo inizia a caricare non appena posizionato e continua a caricare se Contour
100Di è acceso o in standby.
Nota: quando il dock è occupato da un iPod/iPhone/iPad, la presa cuffi e è disabilitata.
Selezione della sorgente iPod
Premere il tasto Source per selezionare IPOD. Sui dispositivi con app, è possibile riprodurre
audio anche da altre app (ad es. app radio Internet PURE Lounge), se si mette in pausa la
riproduzione iPod.
Controllo del dispositivo
Quando viene selezionata la sorgente iPod, il dispositivo inizia a riprodurre l'ultima traccia
ascoltata sull'iPod. Per sfogliare i menu e controllare la riproduzione, utilizzare il telecomando o i
comandi sul dispositivo Apple.
Per accedere al menu delle opzioni di Contour 100Di con un iPod/iPhone in sede, premere e
tenere premuto il tasto Menu sul telecomando.
Modifica delle informazioni visualizzate sul display
Premere e tenere premuto il tasto Menu, premere Select per scegliere l'opzione DISPLAY.
Scegliere una delle seguenti opzioni:
TITLE/ARTIST Titolo della traccia e nome dell'artista
TIME Orologio a schermo intero
IT
5
Page 46

Ascolto della radio
Selezione radio digitale o FM
Premere il tasto Source per selezionare DIGITAL o FM. Viene visualizzata l'icona corrispondente.
Selezione di una stazione
Digitale
Premere e
FM
Premere o
Premere o per modifi care la frequenza a passi di 0,05 MHz.
Salvataggio e selezione delle stazioni preferite
È possibile salvare in un elenco fi no a 40 stazioni (FM o digitali), per facilitare l'accesso.
Salvataggio
1. Sintonizzare la stazione da salvare tra i preferiti.
2. Premere sul telecomando per visualizzare l'elenco dei preferiti.
3. Premere o
è già occupato, la vecchia stazione verrà sostituita).
4. Premere e tenere premuto o Select sul telecomando fi no a visualizzare "SAVED" sul display.
per sfogliare le stazioni disponibili e premere Select per sintonizzare una stazione.
(o tenere premuto o ) per cercare la stazione successiva con un segnale forte.
sul telecomando per decidere dove salvare la stazione (se il posto tra i preferiti
Selezione
Premere sull'unità o sul telecomando per visualizzare l'elenco dei preferiti.
Premere nuovamente sull'unità per sfogliare l'elenco o premere o
Attendere il cambio della stazione o premere Select sul telecomando per cambiare
immediatamente.
Modifica delle informazioni visualizzate sul display
Premere il tasto Menu, premere e
Scegliere una delle seguenti opzioni:
STATION Nome o frequenza della stazione
TEXT Testo a scorrimento trasmesso dalla stazione
TIME Orologio a schermo intero aggiornato dalla trasmissione radio
6
per sfogliare e Select per selezionare l'opzione DISPLAY.
sul telecomando.
Page 47

Utilizzo dell'ingresso Aux
Collegamento di un dispositivo ausiliario
Con un cavo adeguato, collegare la presa "line out" o la presa cuffi e del dispositivo ausiliario alla
presa Aux-In di Contour 100Di.
Selezione dell'ingresso ausiliario
Premere il tasto Source per selezionare AUX.
Utilizzo del timer
di autospegnimento
Il timer di autospegnimento fa sì che la radio si porti in modalità standby dopo un certo numero
di minuti.
Impostazione del timer di autospegnimento
1. Premere il tasto Sleep sul telecomando e ripetere per aumentare la durata del timer di
autospegnimento da 15 a 90 minuti.
2. Premere Select o attendere l'avvio del timer di autospegnimento.
L'icona sul display segnala che il timer di autospegnimento è impostato.
Suggerimento: premere nuovamente il tasto Sleep, in qualunque momento,
per visualizzare il tempo rimanente.
Annullamento del timer di autospegnimento
Premere il tasto Sleep e impostare la durata del timer su OFF.
IT
7
Page 48

Utilizzo delle sveglie
Contour 100Di ha due sveglie che possono essere impostate per riprodurre un tono, sintonizzare
una stazione radio o riprodurre una traccia registrata su iPod/iPhone.
Impostazione di una sveglia
Premere il tasto Alarm sul telecomando per visualizzare lo stato
di Alarm 1 e ripremere per visualizzare lo stato di Alarm 2.
Premere il tasto Select per scegliere e regolare una delle due
sveglie e premere o e Select per modifi care le seguenti
impostazioni:
DR
Alarm on/off
Premere o per scegliere tra "ON" (la sveglia suona)
o "OFF" (la sveglia non suona) e premere Select.
Time
Impostare l'ora della sveglia. Premere o per impostare l'ora
e quindi Select. Ripetere per impostare i minuti e premere Select.
Days
Impostare i giorni in cui la sveglia deve suonare. Premere
per scegliere tra: DAILY (tutti i giorni), ONCE (una volta),
o
WEEKENDS o WEEKDAYS (da lunedì a venerdì);
quindi, premere Select.
Type
Premere o
(buzzer).
per scegliere tra: DIGITAL, FM IPOD o TONE
Station
Se la modalità della sveglia è impostata su DIGITAL o FM,
premere o per scegliere tra: LAST USED (ultima stazione
sintonizzata) o selezionare una stazione tra i preferiti.
Volume
Premere o
Select.
per cambiare il volume della sveglia e premere
DR
ON
DR
DR
DAILY
DR
DAB
DR
LAST
DR
Completate tutte le impostazioni della sveglia, viene visualizzato
il messaggio "SAVED".
2
Le icone
1
e
sul display indicano se una sveglia è impostata.
8
DR
1
SAVED
Page 49

Annullamento della sveglia
Per annullare una sveglia con buzzer, premere il tasto Alarm, Select o Standby.
Per annullare una radiosveglia, premere un tasto qualsiasi tranne quello del volume.
Nota: la sveglia si spegne dopo un'ora a meno che non venga annullata.
Ripetizione della sveglia
Per ripetere la sveglia, premere il tasto Snooze sul telecomando. La sveglia rimane silenziata per
10 minuti (tempo predefi nito) e poi suona di nuovo.
L'icona
sul display indica quando la funzione di ripetizione della sveglia è attivata.
Modifica della durata della ripetizione
Il tempo di ripetizione predefi nito della sveglia è di 10 minuti. Per cambiare il tempo di
ripetizione:
Premere il tasto Snooze sul telecomando e premere o
premere Select per confermare.
per scegliere una durata; quindi,
IT
9
Page 50

Opzioni e impostazioni
Premere il tasto Menu per accedere al menu delle opzioni, premere o
modifi care le opzioni e premere Select per confermare. Il valore attuale delle impostazioni è
indicato da un asterisco ( ).
Opzioni radio digitale
Sintonizzazione automatica
L'apparecchio esegue una scansione automatica di tutte le frequenze digitali per ricercare le
stazioni, aggiungere tutte le stazioni nuove all'elenco corrispondente e rimuovere le stazioni
inattive. Per interrompere una sintonizzazione automatica, premere Menu.
Opzioni generali
Clock
In presenza di un segnale digitale o FM suffi ciente, l'orologio viene impostato automaticamente
e verrà aggiornato in base all'ora GMT/BST nel Regno Unito. È possibile modifi care le seguenti
impostazioni:
SET TIME Se necessario, è possibile impostare manualmente l'ora e la data
12/24HR Scegliere il formato di visualizzazione dell'ora, 12 o 24
SNOOZE Impostare la durata di ripetizione delle sveglie
Backlight
DURATION
Scelta della durata della retroilluminazione:
TIMED La retroilluminazione si attiva per 7 secondi quando si preme un tasto
qualsiasi (predefi nito).
OFF La retroilluminazione non si attiva.
ON La retroilluminazione è sempre attiva quando la radio è accesa.
LEVEL
Scelta del livello di luminosità della retroilluminazione:
AUTO Regolazione automatica in base al livello di luce nel locale
(impostazione predefi nita).
1-5 Impostare un livello di luminosità tra 1 (smorzato) e 5 (luminoso)
Audio
Regolazione di bassi e acuti:
BASS Regolare i toni bassi tra -3 (minimo), 0 (neutro) e 3 (alto).
TREBLE Regolare i toni acuti tra -3 (minimo), 0 (neutro) e 3 (alto).
Language
Scelta tra Inglese, Francese, Tedesco o Italiano.
Reset
Il reset della radio rimuove tutti i preferiti salvati, elimina l'elenco delle stazioni e ripristina tutte le
impostazioni predefi nite.
Scegliere YES per confermare il reset o NO per annullarlo.
10
per sfogliare e
Page 51

Aiuto
Stazioni secondarie e inattive
Servizi digitali secondari
I servizi secondari sono disponibili su alcune stazioni e forniscono informazioni aggiuntive
o contenuti alternativi, che possono essere trasmessi solo in determinati momenti. I servizi
secondari vengono visualizzati vicino alla stazione principale nell'elenco.
Domande e risposte
Il display visualizza "NO SIG"’
Utilizzare la funzione di sintonizzazione automatica (p. 10) per ricercare le stazioni. Regolare la
posizione dell’antenna o della radio.
Ricezione di nuove stazioni digitali che hanno appena iniziato a trasmettere
Utilizzare la sintonizzazione automatica (pagina 10) per eseguire la scansione di nuove stazioni
e aggiungere nuove stazioni all'elenco corrispondente.
Aggiornamento software
In futuro potranno essere disponibili aggiornamenti per Contour 100Di. Registrando il prodotto
acquistato e indicando un indirizzo e-mail valido, l'utente riceverà comunicazioni relative ad
aggiornamenti del software (registrarsi su www.pure.com/register). Gli aggiornamenti software
disponibili sono elencati anche su
http://support.pure.com.*
Per effettuare aggiornamenti:
1. Con radio digitali o sorgenti FM o Aux, premere e tenere premuto per tre secondi il tasto
Menu del telecomando, per accedere al menu di manutenzione.
2. Selezionare UPGRADE e seguire le istruzioni fornite con il software di aggiornamento*.
IT
*Richiede un PC (non Mac) con accesso Internet, Windows XP/Vista/7 e un cavo USB adeguato (non incluso).
11
Page 52

Specifiche
Radio Digitale ed FM. I prodotti commercializzati nel Regno Unito ricevono stazioni
radio DAB ed FM; i prodotti commercializzati in paesi diversi dal Regno Unito
ricevono stazioni radio DAB/DAB+/DMB/FM, a seconda della zona.
iPod/iPhone/iPad Supporto della maggior parte dei modelli di iPod, iPhone e iPad*.
Per le informazioni più aggiornate, controllare la tabella di compatibilità sul
nostro sito web: www.pure.com/products/ipod-compatibility.
Altoparlanti 2 unità di comando a copertura totale da 3”.
Uscita audio 2 x 10W RMS. Porta dei bassi posteriore.
Connettori in ingresso Presa adattatore di corrente 12 V CC. Connettore iPod/iPhone. Ingresso
Aux In da 3,5 mm per dispositivi ausiliari. USB (tipo mini-B) per gli
aggiornamenti software.
Connettori in uscita Uscita stereo da 3,5 mm per cuffi e.
Display LCD Display LCD personalizzato con regolazione automatica della luminosità,
testo a caratteri grandi e icone delle funzioni.
Telecomando Telecomando a infrarossi. Batteria a pastiglia CR2025 inclusa.
Alimentazione di rete Adattatore di corrente esterno 100-240 V, 50/60 Hz, 12 V CC, 2,4 A.
Dimensioni 308 mm (L) x 174 mm (A) x 145 mm (P).
Antenna Antenna telescopica.
Approvazioni Marchio CE. Conforme alla direttiva sulla compatibilità elettromagnetica
e alle direttive di bassa tensione (2004/108/CE e 2006/95/CE)
Conforme a ETSI EN 300 401.
Trattamento del dispositivo elettrico od elettronico a fi ne vita
Questo simbolo sul prodotto o sulla confezione indica che ilprodotto non deve essere
considerato come un normale rifiuto domestico, ma deve invece essere consegnato
ad un punto di raccolta appropriato per il riciclo di apparecchi elettrici ed elettronici.
Assicurandovi che questo prodotto sia smaltito correttamente, voi contribuirete a
prevenire potenziali conseguenze negative per l’ambiente e per la salute che potrebbero
altrimenti essere causate dal suo smaltimento inadeguato. Il riciclaggio dei materiali
aiuta a conservare le risorse naturali. Per informazioni più dettagliate circa il riciclaggio
di questo prodotto, potete contattare l’ufficio comunale, il servizio locale di smaltimento
rifiuti oppure il negozio dove l’avete acquistato.
* Carica iPad e iPad 2 supportata solo quando Contour 100Di è in standby.
12
Page 53

Indhold
Sådan kommer du i gang .............................................................. 2
Opsætning ......................................................................................................................2
Stik og knapper ..............................................................................................................4
Fjernbetjening .................................................................................................................4
Display ...........................................................................................................................4
Afspilning af iPod/iPhone/iPad ..................................................... 5
Kompatibilitet .................................................................................................................5
Docking af enheden ........................................................................................................5
Valg af iPod-kilde ............................................................................................................5
Styring af enheden ..........................................................................................................5
Ændring af de oplysninger, der vises på skærmen ...........................................................5
Afspilning af radio ........................................................................ 6
Valg af digital- eller FM-radio ..........................................................................................6
Skift mellem stationer .....................................................................................................6
Lagring og valg af dine favoritstationer ............................................................................6
Ændring af de oplysninger, der vises på skærmen ...........................................................6
Brug af AUX-indgang .................................................................... 7
Sådan tilslutter du AUX-enheder ......................................................................................7
Sådan vælger du AUX-indgang ........................................................................................7
Brug af sleep timer ...................................................................... 7
Indstilling af vækkeuret ...................................................................................................7
Annullering af vækkeuret .................................................................................................7
Brug af alarmer ............................................................................ 8
Indstilling af en alarm .....................................................................................................8
Annullering af alarm .......................................................................................................9
Afbrydelse af alarm ........................................................................................................9
Ændring af slumretiden ...................................................................................................9
Valgmuligheder og indstillinger ................................................... 10
Digitalradio-indstillinger ............................................................................................... 10
Generelle indstillinger .................................................................................................. 10
Hjælp ........................................................................................ 11
Sekundære og inaktive stationer .................................................................................. 11
Gode råd og tip ........................................................................................................... 11
Programopdatering ...................................................................................................... 11
Specifikationer .......................................................................... 12
DK
1
Page 54

Sådan kommer du i gang
Opsætning
Træk antennen helt ud.
1
Indsæt bøsningen på
3
hovedstrømsadapteren i
indgangsstikket bag på radioen.
Indsæt de adapterstik, der
passer til din region, og tilslut
hovedstrømforsyningen.
Tryk på og på fjernbetjeningen for at se de
4
tilgængelige sprog (engelsk/fransk/tysk/italiensk),
som bruges til at vise menuer og menupunkter,
og tryk på Select for at bekræfte dit valg.
2
Fjern plastfligen
fra batterirummet
i fjernbetjeningen, og
fjern beskyttelsesfilmen
fra knapperne.
LANGUAGE
Vent, indtil Contour 100Di har fuldført en
5
automatisk tuning af alle tilgængelige digitale
stationer (dette tager ca. et minut).
Når den automatiske indstilling er fuldført,
vælges en digital station.
DR
SCAN 26
DR
bBC R2
2
Page 55

Stik og knapper
Source
Tryk for at skifte mellem
digitalradio, FM-radio,
iPod og AUX-indgang
On/Standby
Favoritter
Tryk og gentag for
at søge gennem
listen med dine
favoritstationer
LCD-display
Bas-port
Mute
Skru ned for lyden
Skru op for
lyden
iPod/iPhone/
iPad-dock
Tryk den
højre ende af
frontpanelet ind
for at frigøre
iPod-docken
Teleskop
antenne.
Strømadapterstik
Stik til medfølgende
hovedstrømadapter.
Hovedtelefonstik
3,5 mm stereohovedtelefonstik.
Aux In-stik
Analog
stereoindgang
til iPod/mp3afspiller
Holder til
fjernbetjening
Fordybning til
opbevaring af
fjernbetjening
USB-stik
USB-stik til
programopdateringer
(mini-B-type).
DK
3
Page 56

Fjernbetjening
On/Standby
Source
Tryk for at skifte mellem
digitalradio, FM-radio, iPod
og AUX-indgang
Skru op for lyden
SNOOZE
Tryk for at få vist den aktuelle
slumretid. Brug
til at skifte. Tryk for at afbryde
en aktiv alarm.
Sleep
Tryk og gentag for at
indstille en sleep timer.
Alarm
Tryk og gentag for at få vist
alarmstatus. Tryk på Select
for at skifte status eller
alarmindstillinger.
Menu
Tryk for at få vist
indstillingsmenuen, hvor du
kan ændre indstillingerne.
Åbn iPod-kilden, og tryk for
at navigere til iPod-menuen.
Tryk og hold inde for at få vist
indstillingsmenuen.
Play/Pause
Afspilning/pause
af aktuelt spor
og Select
Gå til begyndelsen
og
af det aktuelle lydspor eller
gå til forrige/næste lydspor.
Hold nede for at søge hurtigt
frem eller tilbage. I FM kan
du søge til næste station.
Skru ned for lyden
Mute
og Select
Søg efter, og vælg stationer,
spor og menuindstillinger.
I FM
ned på frekvensbåndet i trin
a 0,05 MHz. Tryk og hold
nede for at søge til næste
station.
Skift mellem aktuelt sporg,
gentaget afspilning af
alle eller ingen gentaget
afspilning.
Bland afspilningsrækkefølgen.
Tryk for at få vist en liste med
dine favoritstationer.
Tryk derefter og hold inde for at
gemme den aktuelle station.
kan du søge op og
Repeat
Shuffl e
Favourites
Display
4
Source
indikatorer
Lydstyrke
Rulleindikator
Repeat one
(gentag en)
Repeat all
(gentag alle)
DR iPod
AX
FM
Shuffl e
Sleep
timer
indstillet
1
bBC R2
Tekstfelt
1
Alarm
afbrudt
2
Alarm 1/2
indstillet
Signalstyrke
Rulleindikator
Page 57

Afspilning af iPod/iPhone/iPad
Kompatibilitet
Contour 100Di er kompatibel med de fl este iPod-, iPhone- og iPad-modeller. Du kan fi nde
de nyeste oplysninger om kompatibilitet i tabellen på vores website: www.pure.com/products/
ipod-compatibility.
Docking af enheden
1. Skub højre ende af frontpanelet som vist for at frigøre docken.
2. Sæt forsigtigt enheden i stikket i docken.
Enheden begynder at lade, så snart den er tilsluttet og fortsætter med at lade, uanset om
Contour 100Di er tændt eller i standby.
Bemærk! Hovedtelefonstikket deaktiveres, når en iPod/iPod/iPad dockes.
Valg af iPod-kilde
Tryk på knappen Source for at vælge IPOD. På enheder med apps kan du også afspille lyd fra
andre apps som f.eks. PURE Lounge-internetradio, hvis du pauser iPod-afspilningen.
Styring af enheden
Når du har valgt iPod-kilde, begynder enheden af afspille det sidste iPod-spor, du lyttede til. Brug
fjernbetjeningen eller knapperne på din Apple-enhed til at navigere i menuer og styre afspilningen.
Hvis du vil have adgang til Contour 100Di-indstillingsmenuen, mens du har sluttet en iPod/iPhone
til docken, skal du trykke på knappen Menu og holde den nede på fjernbetjeningen.
Ændring af de oplysninger, der vises på skærmen
Tryk på knappen Menu, og hold den nede, og tryk på Select for at vælge menupunktet DISPLAY.
Vælg et af følgende menupunkter:
TITLE/ARTIST Sporets titel og kunstnerens navn
TIME Ur vist på hele skærmen
DK
5
Page 58

Afspilning af radio
Valg af digital- eller FM-radio
Tryk på knappen Source, og vælg DIGITAL eller FM. Du får vist det relevante ikon
Skift mellem stationer
Digital
Tryk på og
FM
Tryk på eller
Tryk på eller
Lagring og valg af dine favoritstationer
Du kan gemme op til 40 (FM eller digital) stationer på en liste, så giver dig hurtig adgang.
Lagring
1. Stil ind på den station, du vil lagre som favorit.
2. Tryk på på fjernbetjeningen for at få vist listen med favoritter.
3. Tryk på eller på fjernbetjeningen for at vælg, hvor du vil gemme favoritten (hvis du vælger
en eksisterende favorit, bliver den overskrevet).
4. Tryk på eller Select på fjernbetjeningen, og hold knappen inde, indtil ‘SAVED’ vises på
skærmen.
for at søge efter tilgængelige stationer, og tryk på Select for at indstille en station.
(eller hold eller
for at ændre frekvens i trin a 0,05 MHz.
inde) for at søge til næste station med kraftigt signal.
Valg
Tryk på på enheden eller fjernbetjeningen for at få vist listen med favoritter.
Tryk på igen på enheden for at søge gennem listen, eller tryk på eller
Vent, indtil stationen skifter, hvis du bruger enheden, eller tryk på Select på fjernbetjeningen for at
skifte med det samme.
på fjernbetjeningen.
Ændring af de oplysninger, der vises på skærmen
Tryk på knappen Menu, tryk på og for at søge, og tryk på Select for at vælge
menupunktet DISPLAY.
Vælg et af følgende menupunkter:
STATION Stationens navn og frekvens
TEXT Rulletekst udsendt af stationen
TIME Ur på hele skærmen, som opdateres af radioudsendelsen
6
Page 59

Brug af AUX-indgang
Sådan tilslutter du AUX-enheder
Slut Line out eller hovedtelefonstikket på AUX-enheden til Aux-In-stikket på Contour 100Di ved
hjælp af et egnet kabel.
Sådan vælger du AUX-indgang
Tryk på knappen Source for at vælge AUX.
Brug af sleep timer
Vækkeuret får din radio til at gå i standby efter et vist antal minutter.
Indstilling af vækkeuret
1. Tryk på knappen Sleep på fjernbetjeningen, og gentag for at øge varigheden af sleep timeren
fra 15 til 90 minutter.
2. Tryk på knappen Select, eller vent med at starte sleep timeren.
Ikonet på skærmen viser, hvornår sleep timer er indstillet.
Tip Tryk på knappen Sleep igen for at få vist den resterende tid.
Annullering af vækkeuret
Tryk på knappen Sleep, og indstil varigheden af timeren til OFF.
DK
7
Page 60

Brug af alarmer
Contour 100Di har to alarmer, som du kan indstille til at give en lyd, indstille radiostationen eller
afspille et spor fra din iPod/iPhone.
Indstilling af en alarm
Tryk på knappen Alarm på fjernbetjeningen for at få vist status for
Alarm 1, og tryk igen for at få vist status for Alarm 2.
Tryk på knappen Select for at vælge og indstille en af alarmerne,
og tryk på eller
og Select for at foretage følgende indstillinger:
Alarm on/off
Tryk på eller
‘OFF’ (alarmen lyder ikke), og tryk på Select.
for at vælge mellem ‘ON’ (alarmen lyder) og
Time
Indstil alarmtiden. Tryk på eller
og tryk på Select. Gentag for at indstille minutterne, og tryk
derefter på Select.
for at indstille timerne,
Days
Indstil de dage, hvor alarmen skal lyde. Tryk på eller for
at vælge mellem: DAILY (hver dag), ONCE (ingen gentagelse),
WEEKENDS (weekender) eller WEEKDAYS (mandag til fredag),
og tryk derefter på Select.
DR
DR
ON
DR
DR
DAILY
Type
Tryk på eller for at vælge mellem: DIGITAL, FM IPOD eller
TONE (summer).
Station
Hvis du har indstillet alarmtilstand til DIGITAL eller FM, skal du
trykke på eller for at vælge mellem: LAST USED (senest
indstillede station), eller vælg en favorit, hvis du har gemt
nogen.
Lydstyrke
Tryk på eller
alarmen, og tryk derefter på Select.
Du får vist meddelelsen ‘SAVED’, når du har afsluttet alle
alarmindstillinger.
Ikonerne
for at ændre lydstyrke for
2
1
og
på skærmen viser, hvornår en alarm er indstillet.
8
DR
DAB
DR
LAST
DR
DR
SAVED
1
Page 61

Annullering af alarm
Hvis du vil annullere en lydalarm, skal du trykke på Alarm, Select eller knappen Standby.
Hvis du vil annullere en radioalarm, kan du trykke på en vilkårlig knap (undtagen
lydstyrkeknappen).
Bemærk: En lydalarm afbrydes efter en time, medmindre du annullerer den inden.
Afbrydelse af alarm
Hvis du vil afbryde en aktiv alarm, skal du trykke på knappen Snooze på fjernbetjeningen.
Alarmen afbrydes i 10 minutter (standardslumretiden), hvorefter den lyder igen.
Ikonet
på skærmen viser, hvornår en alarm er afbrudt.
Ændring af slumretiden
Standardslumretiden for alarmer er 10 minutter. Sådan ændrer du slumretiden:
Tryk på knappen Snooze på fjernbetjeningen, og tryk på eller
slumretiden, og tryk derefter på Select for at bekræfte.
for at vælge varighed for
DK
9
Page 62

Valgmuligheder og indstillinger
Tryk på knappen Menu for at åbne indstillingsmenuen, tryk på eller
menupunkterne, og tryk på Select for at bekræfte. De aktuelle indstillinger vises med en asterisk (
for at rulle gennem og ændre
Digitalradio-indstillinger
Autotune
Scanner alle digitale frekvenser for stationer, føjer automatisk eventuelle nye stationer, som den
fi nder, til stationslisten og fjerne inaktive stationer. Hvis du vil standse en automatisk indstilling, skal
du trykke på Menu.
Generelle indstillinger
Ur
Uret indstilles automatisk, hvis du har et godt digital- eller FM-signal og opdateres automatisk for
GMT/BST-ændringer i Storbritannien. Du kan foretage følgende ændringer:
SET TIME Indstil om nødvendigt tid og dato manuelt.
12/24HR Vælg mellem 12 timers og 24 timers tidsvisning.
SNOOZE Indstil den foretrukne slumretid for alarmer
Baggrundsbelysning
DURATION
Vælg, hvor længe baggrundslyset skal forblive tændt:
TIMED Baggrundslyset tændes i 7 sekunder, hvis du trykker på en vilkårlig knap (standard).
OFF Baggrundslyset tænder ikke.
ON Baggrundslyset er altid tændt, når radioen er tændt.
).
LEVEL
Vælg lysstyrke for baggrundsbelysningen:
AUTO Indstiller automatisk afhængigt af lysstyrken i lokalet (standard).
1-5 Indstil lysstyrken til mellem 1 (meget mørk) og 5 (meget lys).
Audio
Indstil bas og diskant:
BASS
TREBLE Bruges til at indstille diskanten mellem -3 (minimal diskant), 0 (neutral) og
Bruges til at indstille bassen mellem -3 (minimal bas), 0 (neutral) og 3 (maksimal bas).
3 (meget diskant).
Sprog
Vælg mellem engelsk, fransk, tysk og italiensk
Reset
Nulstilling fjern alle gemte favoritter, rydder stationslisten, og nulstiller alle indstillinger til
standardindstillingerne.
Vælg YES for at bekræfte nulstillingen eller NO for at annullere nulstillingen.
10
Page 63

Help
Sekundære og inaktive stationer
Sekundære digitale tjenester
Nogle radiostationer leverer sekundære tjenester eller serviceydelser, der omfatter ekstra
informationer eller et alternativt indhold, og som måske kun sendes på bestemte tidspunkter.
De sekundære tjenester vises ud for den primære station på listen.
Gode råd og tip
På displayet vises ‘NO SIG’
Brug Automatisk indstilling (side 10) for at søge efter stationer. Forsøg at justere trådantennen
eller radioens position.
Modtagelse af nye digitale stationer, som er startet med at sende
Brug Automatisk indstilling (side 10) for at scanne efter nye stationer, og tilføje eventuelle nye
serviceydelser til stationslisten.
Programopdatering
Fremtidige programopdateringer for Contour 100Di kan være tilgængelige. Hvis du registrerer
dit produkt og angiver en gyldig e-mail-adresse vil du få meddelelse om programopdateringer
(registrer ved www.pure.com/register). De tilgængelige softwareopdateringer fi ndes også på
http://support.pure.com.*
Sådan udføres opgradering
1. Åbn digitalradioen, FM-radioen eller AUX-kilden, og tryk på knappen Menu på
fjernbetjeningen, og hold den inde i tre sekunder for at få adgang til vedligeholdelsesmenuen.
2. Vælg UPGRADE, og følg anvisningerne, der fulgte med opdateringsprogrammet.
DK
*kræver en computer (ikke Mac) med internetadgang, samt med Windows XP, Vista eller 7 og et korrekt USB-kabel (medfølger ikke).
11
Page 64

Specifikationer
Radio Digital og FM. UK-produkter modtager DAB og FM; ikke-UK-produkter modtager
DAB/DAB+/DMB-radio/FM afhængigt af region.
iPod/iPhone/iPad Understøtter de fl este iPod-, iPhone- og iPad*-modeller.
Du kan fi nde de nyeste oplysninger om kompatibilitet i tabellen på vores website:
www.pure.com/products/ipod-compatibility.
Højttalere 2 full-range 3” drevenheder.
Audioudgang 2 x 10W RMS. Bageste basport.
Input-stik 12 V DC-strømadapterstik. iPod/iPhone-stik. 3,5 mm AUX-input til ekstra
enheder. USB (mini-B type) til softwareopdateringer.
Udgangsstik 3,5 mm stereo-udgangsstik til hovedtelefoner.
LCD-display LCD-display med automatisk dæmpning, store tekst- og funktionsikoner.
Fjernbetjening Infrarød fjernbetjening. CR2025-cellebatteri medfølger.
Strømforsyning 100-240 V, 50/60 Hz 12 V DC 2,4 A ekstern strømadapter.
Mål 308 mm bred x 174 mm høj x 145 mm dyb.
Antenne Teleskopantenne.
Godkendelser
CE-mærket. Overholder EMC-direktivet og lavspændingsdirektivet (2004/108/
EF og 2006/95/EF). I overensstemmelse med ETSI EN 300 401.
Bortskaffelse af elektriske og elektroniske produkter
Hvis dette symbol findes på produktet eller på emballagen betyder det, at det
pågældende produkt ikke må bortskaffes som almindeligt husholdningsaffald. Du skal
i stedet aflevere det på et indsamlingssted, så det elektriske og elektroniske udstyr kan
blive genbrugt. Når du bortskaffer produktet korrekt, hjælper du med at forhindre de
mulige negative påvirkninger af miljøet eller sundheden, der kan opstå, hvis produktet
bortskaffes på upassende vis. Genbrug af materialer er med at bevare naturens
ressourcer. Yderligere oplysninger om genbrug af produktet fås på kommunen, på
genbrugscentralen eller i den butik, hvor du købte produktet.
* iPad- og iPad 2-opladning understøttes kun, når Contour 100Di er i standby.
12
Page 65

Índice
Primeros pasos ............................................................................ 2
Confi guración .................................................................................................................2
Mandos de control y conectores .....................................................................................4
Mando a distancia ..........................................................................................................4
Pantalla ..........................................................................................................................4
Escuchar el iPod/iPhone/iPad ...................................................... 5
Compatibilidad ...............................................................................................................5
Acoplamiento del dispositivo ..........................................................................................5
Selección de la fuente iPod ............................................................................................5
Control del dispositivo ....................................................................................................5
Modifi cación de la información que aparece en pantalla ................................................5
Escuchar la radio ......................................................................... 6
Selección de radio digital o FM .......................................................................................6
Cambio de emisora ........................................................................................................6
Guardar y seleccionar emisoras favoritas ........................................................................6
Modifi cación de la información que aparece en pantalla ................................................6
Uso de la entrada auxiliar ............................................................. 7
Conexión de un dispositivo auxiliar .................................................................................7
Selección de la entrada auxiliar ......................................................................................7
Usar el temporizador de apagado automático ................................ 7
Confi guración del temporizador de apagado automático .................................................7
Cancelación del temporizador de apagado automático ...................................................7
Uso de las alarmas ...................................................................... 8
Ajuste de una alarma .....................................................................................................8
Cancelación del tono de alarma .....................................................................................9
Silenciado del tono de alarma ........................................................................................9
Cambio de la duración del silenciado .............................................................................9
Opciones y ajustes ..................................................................... 10
Opciones de radio digital ............................................................................................. 10
Opciones generales ..................................................................................................... 10
Ayuda ........................................................................................ 11
Emisoras secundarias e inactivas ................................................................................. 11
Sugerencias y recomendaciones .................................................................................. 11
Actualización de software ............................................................................................ 11
Especificaciones ........................................................................ 12
ES
1
Page 66

Primeros pasos
Configuración
Extienda la antena
1
completamente.
Introduzca el conector del
3
adaptador eléctrico de corriente
en la toma situada en la parte
posterior de la radio.
Conecte las clavijas del
adaptador correspondiente a su
zona, si es necesario, y enchúfelo
a la red eléctrica.
Pulse
4
y en el mando a distancia para ver los
idiomas disponibles (inglés/francés/alemán/italiano)
para la visualización de los menús y las opciones, y
Select para confirmar su elección.
pulse
2
Quite la pestaña de plástico
del compartimento de la
pila del mando a distancia
y retire la película
protectora de los botones
del mando a distancia.
LANGUAGE
Espere a que la unidad Contour 100Di complete
5
la autosintonización para encontrar todas las
emisoras digitales disponibles (esta acción tarda
aproximadamente un minuto).
Una vez haya finalizado la autosintonización, se habrá
seleccionado una emisora digital.
DR
SCAN 26
DR
bBC R2
2
Page 67

Mandos de control y conectores
Fuente
Pulse para cambiar entre
radio digital, FM, iPod
y entrada auxiliar
Encendido/
En espera
Favoritas
Pulse este botón y
vuelva a pulsar para
desplazarse por sus
emisoras favoritas
Pantalla de LCD
Puerto de graves
Silenciar
Bajar volumen
Subir
volumen
Puerto de iPod/
iPhone/iPad
Pulse el extremo
derecho del
panel frontal para
mostrar el puerto
del iPod
Antena
telescópica
Toma para adaptador
de corriente eléctrica
Conector del adaptador
eléctrico de corriente
suministrado
Toma de auriculares
Toma de auriculares
estéreo de 3,5 mm
Toma de entrada
auxiliar
Entrada estéreo
análoga para iPod/
reproductor de MP3
Soporte de mando
a distancia
Espacio para
guardar el mando
a distancia
Puerto USB
Conector USB para
actualizaciones de
software (tipo mini-B)
ES
3
Page 68

Mando a distancia
Encendido/En espera
Snooze
Pulse este botón para ver el
tiempo de silenciado actual.
Utilice
cambiar. Pulse este botón para
silenciar el tono de una alarma.
Sleep
Pulse y repita para activar
un temporizador de apagado
automático.
Alarm
Pulse y repita para ver el
estado de la alarma. Pulse
Select para cambiar el estado
o la confi guración de la alarma.
Menu
Pulse este botón para ver las
opciones del menú y cambiar
la confi guración.
En la fuente de iPod, pulse para
navegar por el menú del iPod.
Mantenga pulsado el botón
para ver las opciones del menú.
Reproducir/Pausar
Reproduce/pone en pausa
la pista actual.
Seleccionar para
y
Source
Pulse para cambiar entre
radio digital, FM, iPod y
entrada auxiliar
y Desplácese para
iniciar la pista actual o ir a
la pista anterior/siguiente.
Mantenga pulsado este botón
para rebobinar o avanzar
rápidamente. En FM, sintoniza
la siguiente emisora.
Subir volumen
Bajar volumen
Silenciar
y Select
Busque y seleccione emisoras,
pistas y opciones de menú.
En FM
intervalo de frecuencias en
pasos de 0,05 MHz. Mantenga
pulsado el botón para
sintonizar la siguiente emisora.
Pulse alternadamente para
repetir la pista actual, repetir
todo o no repetir.
Mezcla el orden de
reproducción de las pistas.
Pulse este botón para ver la
lista de emisoras favoritas.
Mantenga pulsado el botón
para guardar la emisora actual.
suba y baje el
Repetición
Aleatorio
Favoritos
Pantalla
Indicador de
desplazamiento
4
Fuente
indicadores
Volumen
Repetir una vez
Repetir todo
DR iPod
FM
Aleatorio
AX
bBC R2
Área de texto
Ajuste de
temporizador
de apagado
automático
1
2
1
Alarma
silenciada
Ajuste de
alarma 1/2
Potencia de señal
Indicador de
desplazamiento
Page 69

Escuchar el iPod/iPhone/iPad
Compatibilidad
Contour 100Di es compatible con la mayoría de modelos de iPod, iPhone y iPad. Para obtener la
información más reciente, consulte la tabla de compatibilidad en nuestro sitio web: www.pure.
com/products/ipod-compatibility.
Acoplamiento del dispositivo
1. Presione en el extremo derecho del panel frontal, como se muestra en la imagen, para
acceder al puerto.
2. Coloque el dispositivo en el conector cuidadosamente.
El dispositivo comenzará a cargarse en cuanto se acople y continuará cargándose si la
unidad Contour 100Di está encendida o en espera.
Nota La toma de auriculares se desactiva cuando se acopla un iPhone/iPod/iPad.
Selección de la fuente iPod
Pulse el botón Source para seleccionar IPOD. En los dispositivos con aplicaciones, también
puede reproducir audio desde otras aplicaciones, por ejemplo la aplicación de radio por Internet
PURE Lounge, si pausa la reproducción del iPod.
Control del dispositivo
Cuando se selecciona la fuente de iPod, el dispositivo comienza a reproducir la última pista del
iPod que estaba escuchando. Utilice el mando a distancia o los controles de su dispositivo de
Apple para desplazarse en los menús y controlar la reproducción.
Para acceder al menú de funciones de Contour 100Di mientras está acoplado un iPod/iPhone,
mantenga pulsado el botón Menu del mando a distancia.
Modificación de la información que aparece en pantalla
Mantenga pulsado el botón Menu y pulse Select para seleccionar la opción DISPLAY.
Elija una de las siguientes opciones:
TITLE/ARTIST Título de la pista y nombre del artista
TIME Reloj de pantalla completa
ES
5
Page 70

Escuchar la radio
Selección de radio digital o FM
Pulse el botón Source para seleccionar DIGITAL o FM. Verá el icono correspondiente
Cambiar de emisora
Digital
Pulse
y para desplazarse por las emisoras disponibles y pulse
FM
Pulse
Pulse
o (o mantenga pulsado o ) para buscar la siguiente emisora con buena señal.
o para cambiar la frecuencia en pasos de 0,05 MHz.
Guardar y seleccionar emisoras favoritas
Puede guardar hasta 40 emisoras (FM o digitales) en una lista de fácil acceso.
Guardar
1. Sintonice la emisora que quiera guardar como favorita.
2. Pulse
3. Pulse
(si elige una que ya existe, se reemplazará).
4. Mantenga pulsado o Select en el mando a distancia hasta que aparezca ‘SAVED’
en la pantalla.
en el mando a distancia para ver la lista de emisoras favoritas.
o en el mando a distancia para decidir si quiere guardar la emisora favorita
Select para sintonizar una.
Seleccionar
Pulse
Vuelva a pulsar
Espere que la emisora cambie si utiliza la unidad o pulse Seleccionar en el mando a distancia para
cambiar inmediatamente.
en la unidad o en el mando a distancia para ver la lista de favoritas.
en la unidad para desplazarse por la lista o pulse o en el mando a distancia.
Modificación de la información que aparece en pantalla
Pulse el botón Menu, pulse
Elija una de las siguientes opciones:
STATION Nombre o frecuencia de la emisora
TEXT Texto desplazable que emite la emisora
TIME Reloj de pantalla completa que actualiza la emisión de radio
y para buscar y pulse
6
Select para elegir la opción DISPLAY.
Page 71

Uso de la entrada auxiliar
Conexión de un dispositivo auxiliar
Conecte la línea de salida o la toma de auriculares del dispositivo auxiliar a la toma de entrada
auxiliar de la unidad Contour 100Di mediante el cable adecuado.
Selección de la entrada auxiliar
Pulse el botón Source para seleccionar AUX.
Usar el temporizador
de apagado automático
El temporizador de apagado automático pone la radio en modo de espera después de que hayan
transcurrido unos minutos.
Configuración del temporizador de apagado automático
1. Pulse el botón Sleep del mando a distancia y vuelva a pulsarlo para aumentar la duración
del temporizador de apagado automático de 15 a 90 minutos.
2. Pulse Select o espere para iniciar el temporizador de apagado automático.
El icono de la pantalla indica que está activado el temporizador de apagado automático.
Recomendación Vuelva a pulsar el botón Sleep en cualquier momento para ver el tiempo
restante.
Cancelación del temporizador de apagado automático
Pulse el botón Sleep y ajuste la duración del temporizador a OFF.
ES
7
Page 72

Uso de las alarmas
Contour 100Di tiene dos alarmas que se pueden confi gurar para que reproduzcan un tono,
sintonicen una emisora de radio o reproduzcan una pista del iPod/iPhone.
Configuración de una alarma
Pulse el botón Alarm del mando a distancia para ver el estado de
la Alarma 1 y pulse de nuevo para ver el estado de la Alarma 2.
Pulse el botón Select para elegir y ajustar las alarmas y pulse
Select para ajustar las siguientes opciones:
o y
DR
Activar/Desactivar la alarma
Pulse o
‘OFF’ (la alarma no suena), y pulse Select.
para elegir la opción ‘ON’ (la alarma suena) o
Hora
Ajusta la hora de la alarma. Pulse o
y luego pulse
pulse Select.
Select. Repita para ajustar los minutos y luego
para ajustar la hora
Días
Ajusta los días que sonará la alarma. Pulse o
entre: DAILY (cada dia), ONCE (una vez), WEEKENDS (fi nes de
semana) o WEEKDAYS (de lunes a viernes) y, a continuación,
pulse Seleccionar.
para elegir
Tipo
Pulse o
para elegir entre: DIGITAL, FM IPOD o TONE (timbre).
Emisora
Si ha seleccionado el modo de alarma DIGITAL o FM, pulse
o para elegir entre: LAST USED (última emisora sintonizada)
o seleccione una emisora favorita si tiene alguna guardada.
DR
ON
DR
DR
DAILY
DR
DAB
DR
LAST
Volumen
Pulse o
Select.
Aparecerá el mensaje ‘SAVED’ cuando haya terminado de
realizar los ajustes de la alarma.
Los iconos
para cambiar el volumen de la alarma y luego pulse
2
1
y
de la pantalla indican que se ha activado una alarma.
8
DR
DR
SAVED
1
Page 73

Cancelación del tono de alarma
Para cancelar el tono de alarma, pulse el botón Alarm, Select o Standby.
Para cancelar una alarma de radio, pulse cualquier botón excepto el de volumen.
Nota: El tono de alarma se apagará al cabo de una hora a excepción de que lo cancele antes.
Silenciado del tono de alarma
Para silenciar el tono de una alarma, pulse el botón Snooze del mando a distancia. La alarma
se silenciará 10 minutos (tiempo de silenciado predeterminado) y luego volverá a sonar.
El icono
de la pantalla indica que se ha silenciado una alarma.
Cambio de la duración del silenciado
El tiempo de silenciado predeterminado de las alarmas es de 10 minutos. Para cambiar el
tiempo de silenciado:
Pulse el botón Snooze del mando a distancia y pulse o para elegir una duración de
silenciado y, a continuación, pulse Select para confi rmar.
ES
9
Page 74

Opciones y ajustes
Pulse el botón Menu para acceder al menú de opciones, pulse o
opciones, cámbielas y pulse Select para confi rmar. Los valores actuales de los ajustes se indican
mediante un asterisco ( ).
Opciones de radio digital
Autotune (Autosintonizar)
Examina todas las frecuencias digitales en busca de emisoras, agrega automáticamente todas
las emisoras nuevas a la lista de emisoras y elimina las emisoras inactivas. Para detener una
autosintonización pulse Menu.
Opciones generales
Clock (Reloj)
El reloj se ajusta automáticamente si tiene una buena señal digital o FM, y se actualizará
automáticamente en los cambios horarios GMT/BST en el Reino Unido. Puede ajustar las
siguientes opciones:
SET TIME Ajuste manualmente la hora y la fecha, si es necesario
12/24HR Elija entre la visualización de 12 o 24 horas
SNOOZE Ajuste la duración del silenciado que prefi era para las alarmas
Backlight (Retroiluminación)
DURATION
Elija el tiempo que permanece encendida la retroiluminación:
TIMED La retroiluminación se enciende durante 7 segundos al pulsar
cualquier botón (opción predeterminada).
OFF La retroiluminación no se enciende.
ON La retroiluminación siempre está encendida cuando la radio está encendida.
LEVEL
Elija el brillo de la retroiluminación:
AUTO Se ajusta automáticamente según el nivel de la habitación (predeterminado).
1-5 Ajusta un nivel de brillo entre 1 (tenue) y 5 (luminoso)
Audio
Ajusta los graves y los agudos:
BASS. Ajuste los graves -3 (valor mínimo), 0 (neutral) y 3 (valor máximo).
TREBLE Ajuste los agudos entre -3 (valor mínimo), 0 (neutral) y 3 (valor máximo).
Language (Idioma)
Elija inglés, francés, alemán o italiano.
Reset (Reinicio)
Reset elimina todas las emisoras favoritas guardadas, borra la lista de emisoras y restablece
todos los ajustes a las opciones predeterminadas.
Elija YES para confi rmar el reinicio o NO para cancelarlo.
10
para desplazarse por las
Page 75

Ayuda
Emisoras secundarias e inactivas
Servicios digitales secundarios
Algunas emisoras ofrecen servicios secundarios, como información adicional o contenido
alternativo, que pueden retransmitirse en determinados momentos. Los servicios secundarios
aparecerán junto a la emisora principal de la lista.
Sugerencias y recomendaciones
En la pantalla aparece ‘NO SIG’
Utilice Autosintonizar (página 10) para buscar emisoras. Intente ajustar la antena o la posición
de la radio.
Recibir emisoras digitales nuevas que hayan empezado a emitir
Utilice Autosintonizar (página 10) para buscar emisoras nuevas y añadir emisoras nuevas
a la lista de emisoras.
Actualización de software
Próximamente habrá actualizaciones de software para su Contour 100Di. Si registra su producto
e indica una dirección de correo electrónico válida, recibirá avisos de actualizaciones de software
(regístrese en www.pure.com/register). Las actualizaciones de software disponibles aparecen listadas en
http://support.pure.com.*
Para actualizar:
1. Desde la radio digital, FM o fuentes auxiliares, mantenga pulsado el botón Menu del mando
a distancia durante tres segundos para acceder al menú de mantenimiento.
2. Seleccione UPGRADE y siga las instrucciones incluidas con el software de actualización*.
*Requiere un PC (no Mac) con acceso a Internet, sistema operativo Windows XP/Vista/7 y un cable USB adecuado (no incluido).
ES
11
Page 76

Especificaciones
Radio digital y FM. Los productos procedentes del Reino Unido reciben DAB y FM;
los productos no procedentes del Reino Unido reciben DAB/DAB+/
DMB-Radio/FM, según la región.
iPod/iPhone/iPad Es compatible con la mayoría de los modelos de iPod, iPhone y iPad*.
Para obtener la información más reciente, consulte la tabla de
compatibilidad en nuestro sitio web:
www.pure.com/products/ipod-compatibility.
Altavoces 2 unidades de control de rango completo de 3”.
Salida de audio 2 x 10 W RMS. Puerto posterior de graves.
Conectores de entrada Toma para adaptador de corriente eléctrica de 12 V de CC. Conector para
iPod/iPhone. Aux-in de 3,5 mm para dispositivos auxiliares. USB (tipo
mini-B) para actualizaciones de software.
Conectores de salida Salida estéreo de 3,5 mm para auriculares.
Pantalla de LCD Pantalla gráfi ca LCD con atenuación personalizada, iconos de texto y de
función de gran tamaño.
Mando a distancia Mando a distancia por infrarrojos. Pila de botón de litio CR2025 incluida.
Alimentación eléctrica Adaptador externo de corriente eléctrica de 100-240 V, 50/60 Hz 12 V
de CC 2,4 A.
Dimensiones 308 mm de anchura x 174 mm de altura x 145 mm de profundidad.
Antena Antena telescópica.
Homologaciones Certifi cado CE. Cumple con las Directivas EMC y de bajo voltaje (2004/108/
CE y 2006/95/CE). Cumple con la norma ETSI EN 300 401.
Eliminación de equipos eléctricos y electrónicos
Este símbolo en el producto, o en su embalaje, indica que el producto no debe
tratarse como un residuo doméstico. En su lugar, se entregará a un punto de recogida
adecuado de reciclaje de equipos eléctricos y electrónicos. Al asegurar que desecha
este producto correctamente ayudará a evitar consecuencias negativas potenciales
para el medio ambiente y para la salud humana que, de otra manera, se causarían por
la manipulación incorrecta en la eliminación de este producto. El reciclaje de materiales
ayudará a conservar los recursos naturales. Para más información sobre el reciclaje de
este producto, póngase en contacto con la autoridad local, el servicio de recogida de
residuos domésticos o la tienda donde adquirió este producto.
*La carga de iPad y iPad 2 solo se permite cuando la unidad Contour 100Di se encuentra en espera.
12
Page 77

Page 78

Page 79

Warranty information
Imagination Technologies Ltd. warrants to the end us er that this pr oduc t will be f ree from
defec ts in materials and workmanship in the course of normal use for a perio d of two years
from t he date of pur chase. This g uarantee c overs brea kdowns due to ma nufactur ing or desig n
fault s; it does not apply in c ases such as accidental damage, however caused, wear and
tear, neg ligence, adjustment, modification or repair not au thor ised by us. Please visit www.
pure.com/register to register your pr oduct with us. Should you have a problem with your unit
pleas e contact y our supplier o r contact P URE Suppor t at the addre ss shown on t he rear of thi s
manual. If you need to return your product please use the or iginal packaging and include all
part s and accessorie s. We reserve the right to refuse incomplet e or badly packaged returns.
Disclaimer
Imagination Technol ogies Limited makes no rep resenta tion
or warr anties wit h respect to the content of this document
and specifically disclaims any implied warranties of
merch antabil ity or fit ness fo r any part icular pur pose. Fur ther,
Imagi nation Tech nologies L imited r eserv es the rig ht to revi se
th is pub lica tion a nd to m ake ch ange s in it from t ime t o tim e
without obligation of Imagination Technologies Limited t o
notify any person or organization of such revisions or changes.
Garantie-Informationen
Imagination Technologies Ltd. garant iert dem Endbenut zer, dass dieses Pr oduk t für die
Dauer von zwei Jahren ab K aufdatum bei normalem Gebrauch frei von Schäden an Material
oder Verarbeitung ist. Diese Garantie umfasst Ausfälle aufgrund von Herstellungs- und
Konstruk tionsfeh lern; sie gi lt nicht für Un fallschäde n, wie auch immer v erursacht, Ver schleiß,
Fahrlässig keit und Veränderung oder Reparatur durch von uns nicht autorisier te Per sonen.
Regis trier en Sie Ihr Pro dukt bei un s unter ww w.pure.c om/regis ter. Soll ten Sie mit Ih rem Gerä t ein
Probl em haben, wen den Sie sich a n Ihren Verk äufer oder d en PURE Supp ort. Die A dresse f inden
Sie auf der Rücks eite dieser Bedienungsanleitung. Verwenden Sie bei Rücksendungen bitte
die Ori ginalver packung und f ügen Sie alle Tei le und das voll ständige Z ubehör bei. W ir behalte n
uns das Recht vor, unvollständige oder unzureichend verpackte Rücksendungen abzulehnen.
Garantie
Imagi nation Techno logies Lt d. garanti t à l’utilisa teur que le pré sent prod uit est exem pt de défaut s en
termes de matériaux et de main-d’œuvre, dans le cadre d’une utilisation normale, pour une période
de deux a ns à compter de l a date d’achat. L a présent e garantie c ouvre les pannes du es à un défaut
de conception ou de fabrication ; elle ne prend pas en compte les dommages accidentels, quelle
que soit leur cause, l’usure normale du produit, ainsi que tous dommages dus à la négligence, à la
modif icatio n, au réglag e ou à la répar ation ef fectu é(e) sur l ’appareil s ans notre a utoris ation. Vi siter le
site w ww.pur e.com/re giste r pour enre gistr er votr e produi t auprès d e nos ser vices . En cas de pr oblème
avec votre appareil, veuillez cont acter votr e fournisseur ou le centre d’assistance PURE, à l’adre sse
indiqu ée au dos du pré sent manu el. Si vous so uhaitez r etourne r votre ar ticle, ve uillez le r envoyer dan s
son emb allage d’origi ne et ne pas oublie r de retourn er également t ous les éléme nts/acce ssoires du
produ it. Nous n ous rés ervo ns le droi t de refu ser tou t artic le reto urné qui s erait in comple t ou mal emba llé.
Informazioni sulla garanzia
Imagination Technologies Ltd. garantisce all’utente finale che il presente prodotto è esente
da difetti di mater iale e fabbricazione in condizioni normali di ut iliz zo per un periodo di due
anni a par tire dalla data di acquist o. La pr esente gar anzia copre i danni dov uti a difetti di
fabbr icazion e o proget tazion e; non si appl ica in casi qu ali danni acc identali , in qualsias i modo
siano stati provoc ati, usura, negligenza, regolazione, modifica o riparazione non autorizzate.
Visitare il sito www.pure.com/register per registrare il prodotto. In caso di problemi relativi
all’unità, contattare il proprio for nitore oppure contattare il Supporto tecnic o PURE all’indirizzo
indica to sul retro del presente manuale. Nel caso in cui il prodotto debba es sere rest ituito,
è necessar io utilizzare l’imballaggio originale, includendo tutte le part i e gli accessori. Ci
rise rviamo il d iritt o di respin gere prod otti re stitui ti con l’im ballagg io incompl eto o danneg giato.
Garantioplysninger
Imagination Technologies Ltd. garanterer over for slutbrugeren, at dette produkt ikke er fejlbehæftet,
hvad ang år materia ler og håndvær ksmæss ig udførel se ved norma l brug i to år fr a købsdato en.
Denne g aranti dæ kker samm enbrud, de r skylde s fremst illings - eller des ignfejl. D en dækker ik ke i
tilf ælde, hvor en heden bes kadiges s om følge af h ændelig t uheld, uan set hvord an dette s ker, samt
slitage, uag tsomhed, ju stering, ændring eller repara tion, som ikke er godkendt af os. Besøge
www.pure.com/reg ister for at r egis trere produktet hos os. Hvis der skulle opstå problemer
med enheden, bedes du kontak te leverandøren eller PURE Support på adres sen, der er
angivet på bag siden af denne vejledning. Hvis det bliver nødvendigt at r etur nere dit produkt,
skal du bruge den originale emballage og vedlægge alle komponenter og tilbehør sdele.
Vi forbeholder os ret til at afvise ufuldst ændige eller dårlig t emballerede produkter.
Ausschlusshinweis
Imagination Technol ogies Limit ed gewährt k eine Garantien
für den Inhalt dieses Dokuments und lehnt insbesondere
impliz iert e Garan tien fü r die allge meine Ge brauch staug lichke it
bzw. die E ignung für spe zielle Zwecke ab. Weit erhin behält
sich Ima gination Te chnologie s Limited da s Recht vor, die se
Publikation von Zeit zu Zeit zu überarbeiten und zu ändern,
ohne dass daraus eine Verpflichtung für Imagination
Technologies Limited entsteht, irgendeine Person oder
Or ga ni sa ti on vo n so lc he n Ä nd er un gen in Ke nn tn is z u s et ze n.
Avis de no n-responsabilité
Imagination Technologies Limited refuse toute
représentation ou garantie vis-à-vis du contenu du
présent document et refuse spécifiquement toute garantie
implicite de valeur marchande ou d’adéquation à un usage
spécifique. En outre, Imagination Technologies Limited
se rés erve le droit de rév iser la présente publication et
d’y apporter des modifications, quand elle le souhaite,
sans obligation de sa part de notifier toute personne
ou organisation desdites révisions ou modifications.
Dichi arazion e di non respo nsabili tà
Imagination Technologies Limited non si assume alcuna
responsabilità rispetto al contenuto del presente
documento, in particolar e non riconos ce nessuna garanzia
implicita di commer ciabilità o idoneit à per uno scopo
specifico. Inoltre, Imagination Technologies Limited si
riserva il dirit to di revisionare la presente pubblicazione
e di apportarvi modifiche periodiche senza alcun
obbligo di noti fica a qualsiasi per sona o organizzazione.
Ansvarsfraskrivelse
Imagination Technologies Limit ed afg iver ingen gar antier
eller er klær inger med hensyn til indholdet af dette dokument
og fralægger sig i særdele shed eventuelle stiltiende
garantier for salg barhed eller egnet hed til et bes temt
formål. Endvidere forbeholder Imagination Technologies
Limit ed sig ret til at revidere denne publikation og for etage
ændringer fr a tid til anden, uden at Imagination Technologies
Limit ed er forplig tet t il at underre tte nogen person eller
organisation om sådanne revideringer eller ændringer.
Infor mación acer ca de la garantía
Imagination Technologies Ltd. garant iza al usuario final que est e producto no presenta
defectos ni materiales ni de fabricación durante una utilización normal en un periodo
de dos años a partir de la fecha de compra. Est a garantía cubre averías ocasionadas
por defecto s de fabricación o dis eño; no es aplicable en caso de daños accidentales,
independientemente del hecho que los mot ive, además de desgaste, negligencia, ajuste,
modif icación o reparación no aut orizada por nosotros. Visite el sitio web w ww.pure.com/
register para registrar su produc to. Si tienes cualquier problema con est a unidad, por favor,
póngase en contacto con su distribuidor o póng ase en c ontacto con el Ser vicio de atención
al cliente de PURE en la dirección indic ada en la parte posterior de este manual. Si desea
devolver el producto, utilice el embalaje original e incluya todas las piezas y acces orio s. Nos
rese rvamos el d erecho a re chazar las d evolucione s incomple tas o con un emb alaje incor recto.
Renuncia de responsabilidad
Imagination Technologies Limit ed no asume ninguna
declaración o garantía en r elación con el c ontenido de este
documento y renuncia específicamente a cualquier garant ía
implícita de comerciabilidad o adecuación a un propósito
determinado. Asimismo, Imagination Technologies Limited
se res erva el derecho a ac tuali zar es ta publicación y a hacer
los cambios necesarios de forma periódica sin que ello
obligu e a Imagination Techno logies Limi ted a avisar a n inguna
persona u organización de dichas revisiones o cambios.
Page 80

www.pure.com
PURE
Imagination Technologies Ltd.
Home Park Estate
Kings Langley
Herts, WD4 8LZ
United Kingdom
http://support.pure.com
PURE
Karl-Marx Strasse 6
64589 Stockstadt/Rhein
Alemania
sales_gmbh@pure.com
http://support.pure.com/de
Contour 100Di is a member of the PURE EcoPlus™ product
family. All EcoPlus products are designed and manufactured
to minimise their environmental impact.
EcoPlus
100%
Documentation is printed on 100% recycled paper using
soya-based ink.
The retail carton protecting your product is printed on at
least 70% recycled card fi nished using a water-based
varnish and sized for maximum transport effi ciency.
PURE - Vertrieb über:
TELANOR AG
Unterhaltungselektronik
Bachstrasse 42
4654 Lostorf
Suiza
info@telanor.ch
www.telanor.ch
PURE Australasia Pty Ltd
PO Box 5049
Wonga Park
Victoria 3115
Australia
sales.au@pure.com
http://support.pure.com/au
100%
Printed on 100% recycled paper
For more information please visit www.pure.com/
ecoplus
102 X S
 Loading...